- getting started
Introduction: Cloud
Frequently Asked Questions
Telemetry
Testsigma Terminology
Testsigma Sample Applications
Command Center
- collaboration
Invite Team Members
Assign Projects
Users & Role Management
Review Management [Test Cases]
Review Management [Elements]
Execution Controls
Features & Scenarios
Manage Test Cases
Test Case List Actions
Import Test Project Test Cases
Importing Postman Collections and Environments
Update Test Case Result in a Test Plan
Test Cases (Mobile Web App)
Custom Fields for Test Cases
Label Management
- Test Step Types
Type: Natural Language
Type: REST API
Type: Step Group
Type: For Loop
Type: While Loop
Type: Block
Type: If Condition
Nested Step Groups
Image Injection
Cross-application testing
- Test Data Types
Raw
Parameter
Runtime
Random
Data Generator
Phone Number
Mail Box
Environment
Concat Test Data
Create Test Data Profile
Update Test Data Profile
Updating Value in TDP
Import TDP
Bulk Deletion of a Test Data Profile
Create Test Data [Environment]
- data generators
Default Test Data Generators
Address Function Type
ChangeDataType Function Type
Company Function Type
DateFunctions Function Type
DomainFunctions Function Type
EmailFunctions Function Type
File Function Type
Friends Function Type
IdNumber Function Type
Internet Function Type
MailboxAliasFunctions Function Type
MailboxFunctions Function Type
Name Function Type
NameFunctions Function Type
Number Function Type
NumberFunctions Function Type
Phone Number Function Type
PhoneNumberFunctions Function Type
Random String Function Type
RandomText Function Type
StringFunctions Function Type
TestDataFromProfile Function Type
- Elements (Objects)
- Web Applications
Record Single Element
Record Multiple Elements
Create Elements
Supported Locator Types
Formulating Elements
Shadow DOM Elements
Verifying elements in Chrome DevTools
Handling iframe Elements?
Create Image Based Elements
Dynamic Locators using Parameter
Dynamic Locators using Runtime
Using Environment Test Data for Dynamic Locators
Locating Dynamic Elements in Date Widget
Freeze & Inspect Dynamic Elements (WebPage)
Locating Dynamic Elements in Tables
Import/Export Elements
AI Enabled Auto-Healing
Locator Precedence (Web Apps)
Verify Elements from Test Recorder
- test step recorder
Install Chrome Extension
Install Firefox Extension
Install Edge Extension
Exclude Attributes/Classes
- test plans
Add, Edit, Delete Test Machines
Add, Edit, Delete Test Suites
Schedule Test Plans
Run Test Suites In Parallel
Cross Browser Testing
Distributed Testing
Headless Testing
Test Lab Types
Disabling Test Cases in Test Plans
AfterTest Case
Post Plan Hook
AfterTest Suite
Email Configuration in Test Plan
Execute Partial Test Plans via API
- runs
Ad-hoc Run
Test Plan Executions
Dry Runs on Local Devices
Run Tests on Private Grid
Run Tests on Vendor Platforms
Run Test Plans on Local Devices
Test Locally Hosted Applications
Debug Test Case Failures
Parallel and Allowed queues
- live editor
Introduction: Testsigma Terminal
Installing Testsigma Terminal
Editing a Test Case Using Live Editor
FAQs on Testsigma Terminal
- Testsigma Agent
Pre-requisites
Setup: Windows, Mac, Linux
Setup: Android Local Devices
Setting up iOS Local Devices
Update Agent Manually
Update Drivers Manually
Delete Corrupted Agent
Delete Agents: Soft & Permanent
Triggering Tests on Local Devices
- troubleshooting
Agent - Startup and Registration Errors
Agent Logs
Upgrade Testsigma Agent Automatically
Specify Max Sessions for Agents
Testsigma Agent - FAQs
- continuous integration
Test Plan Details
REST API (Generic)
Jenkins
Azure DevOps
AWS DevOps
AWS Lambda
Circle CI
Bamboo CI
Travis CI
CodeShip CI
Shell Script(Generic)
Bitrise CI
GitHub CI/CD
Bitbucket CI/CD
GitLab CI/CD
Copado CI/CD
Gearset CI/CD
Codemagic CI/CD
- desired capabilities
Most Common Desired Capabilities
Browser Console Debug Logs
Geolocation Emulation
Bypass Unsafe Download Prompt
Geolocation for Chrome & Firefox
Custom User Profile in Chrome
Emulate Mobile Devices (Chrome)
Add Chrome Extension
Network Throttling
Network Logs
Biometric Authentication
Enable App Resigning in iOS
Enable Capturing Screenshots (Android & iOS)
Configure Android WebViews
Incognito/Private mode
Set Google Play Store Credentials
Basic Authentication [Safari]
- addons
What is an Addon?
Addons Community Marketplace
Install and Use Community Addons in Testsigma
Prerequisites for creating add-ons
Create an Addon
Update Addon
Addon Types
Create a Post Plan Hook add-on in Testsigma
Create OCR Text Extraction Addon
- configuration
API Keys
- Security(SSO)
Setting Up Google Single Sign-On(SSO) Login in Testsigma
Setting Up Okta Single Sign-On Integration with SAML Login in Testsigma
Setting up SAML-based SSO login for Testsigma in Azure
iOS Settings
Create WDA File
SMTP Configuration
Manage Access
- uploads
Upload Files
Upload Android and iOS Apps
How to generate mobile builds for Android/iOS applications?
- Testsigma REST APIs
Manage Environments
Elements
Test Plans
Upload Files
Get Project Wide Information
Upload & Update Test Data Profile
Fetch Test Results (All Levels)
Trigger Multiple Test Plans
Trigger Test Plans Remotely & Wait Until Completion
Run the Same Test Plan Multiple Times in Parallel
Schedule, Update & Delete a Test Plan Using API
Update Test Case Results Using API
Create and update values of Test Data Profile using REST API
Rerun Test Cases from Run Results using API
Salesforce Metadata Refresh Using API
- open source dev environment setup
macOS and IntelliJ Community Edition
macOS and IntelliJ Ultimate Edition
Windows and IntelliJ Ultimate Edition
Setup Dev Environment [Addons]
- NLPs
Retrieve Value in Text Element
Capture Dropdown Elements
Unable to Select Radiobutton
Unable to Click Checkbox
Clearing the Session or Cookies
UI Identifier NLP
Drag & Drop NLP
Uploading Files NLP
Use MySQL Addon in NLPs
- setup
Server Docker Deployment Errors
Secured Business Application Support
Troubleshooting Restricted Access to Testsigma
Why mobile device not displayed in Testsigma Mobile Test Recorder?
Unable to Create New Test Session
Agent Startup Failure Due to Used Ports
Tests Permanently Queued in Local Executions
Fix Testsigma Agent Registration Failures
Testsigma Agent Cleanup
Need of Apache Tomcat for Testsigma Agent
- web apps
URL not accessible
Test Queued for a Long Time
Issues with UI Identifiers
Missing Elements in Recorder
Collecting HAR File
Errors with Browser Session
Page Loading Issues
- mobile apps
Failed to Start Mobile Test Recorder
Troubleshooting “Failed to perform action Mobile Test Recorder” error
Why Test Execution State is Queued for a Long Time?
Why Mobile App Keeps Stopping After Successful Launch?
More pre-requisite settings
Why am I not able to start WDA Process on iPhone?
What are the Most Common causes for Click/Tap NLP Failure?
How to Find App Package & Activity in Android?
Cross-environment Compatible ID Locators (Android)
Why Accessibility IDs Over other Locators?
What are Common Android Issues & Proposed Solutions?
How to Find the App Bundle ID for iOS?
Developer Mode (iOS 16 & Above)
How to Handle iOS App Compatibility Issues?
How to Disable Play Protect for SMS Forwarder Installation?
How to Capture Network Logs in an Android Application?
- web apps
Why Install Chrome Extension?
Steps to Test Locally Hosted Apps
How to Turnoff Onboading Tutorial?
Non-Text Keys in Test Cases
Basic Authentication for Web
Why Bypass CAPTCHA?
Test Case Failures Due to Link Text Capture Issues
Why Is a Single Video for All Test Cases in a Test Plan Unavailable in Some Cases?
- accessibility testing
Accessibility Testing for Web Applications
Accessibility Testing for Android & iOS
- salesforce testing
Intro: Testsigma for Salesforce Testing
Creating a Connected App
Creating a Salesforce Project
Test Salesforce Connection Before Authorization
Creating Metadata Connections
Adding User Connections
Build Test Cases: Manual+Live
Salesforce Element Repositories
Intro: Testsigma Special NLPs
SOQL as Test Step
Query Builder for Salesforce Testing
Automating Listview Table NLPs
Error Handling On Metadata Refresh
Introduction: SAP Automation
Selective Element Recorder
Batch Element Recorder
Creating Test Cases for SAP Automation
List of Actions
- desktop automation
Introduction: Desktop Automation
Create Projects and Applications
Selective Element Recorder
Batch Element Recorder
Creating Test Cases for Desktop Automation
Intro: Windows Automation (Lite)
Windows (Lite) Project & Application
Element Learning with Test Recorder
Test Cases for Windows (Lite)
- GenAI Capabilities
Testsigma Copilot
Generate TDP Using Copilot
Generate Tests from User Actions
Generate Tests from Requirements (Jira)
Generate API Test Cases (Swagger)
Generate Tests from Figma Designs
Testsigma Copilot for Mobile Apps
Agentic Test Generation with GitHub
Intro: Windows Desktop Automation
Windows (Adv) Project & Application
Object Learning (Using UFT One)
Converting TSR Files to TSRx
Importing/Updating TSRx Files
Test Cases for Windows Automation
Error Handling Post TSRx File Update
- testsigma tunnel
Intro: Testsigma Tunnel
Components & Requirements
Setup and Installation: Mac
Setup and Installation: Windows
Setup and Installation: Linux
Setup and Installation: Docker
Using Testsigma Tunnel
- open source docs
Intro: Testsigma Community Edition
Testsigma Community Cloud
Testsigma Docker Setup
Reset Password
Debugging Results on Local Devices for Web Applications
Debugging in Testsigma helps identify and resolve errors in test cases through its interactive debugging feature. This feature lets you execute tests step-by-step, pausing at specific points to inspect behaviour. It provides users with detailed resources like step results, metadata, screenshots, source codes, and step settings to pinpoint failures accurately, thus saving time and enhancing the reliability of test executions.
Prerequisites
Before you begin debugging in Testsigma, ensure the following:
- The Testsigma Agent is started and active.
- Debugging can only be done through a Local Device.
- If the test case uses a test data profile, only one test data profile can be selected for debugging.
Executing Test Cases in Debugger Mode
- Navigate to the test case you want to debug.
- On the test case details page, click the Launch Debugger button in the top right corner of the screen.
- On the Run in Debug Overlay, default the Test Lab is set to Local Device and that the Agent is in Active Status for debugging.
- To execute the test steps until a failed step, enable the Run till failed step toggle and set a debug point by selecting the test step from the dropdown. If this toggle is disabled, the test case will execute from start to end.
- Click Debug now to execute the test case.

Adding Debug Points
Debug points are specific locations in your test steps where you want the execution to start or pause. These points help you observe the behaviour of the test case more closely.
- A new window with the webpage's URL provided will open to debug the test steps.
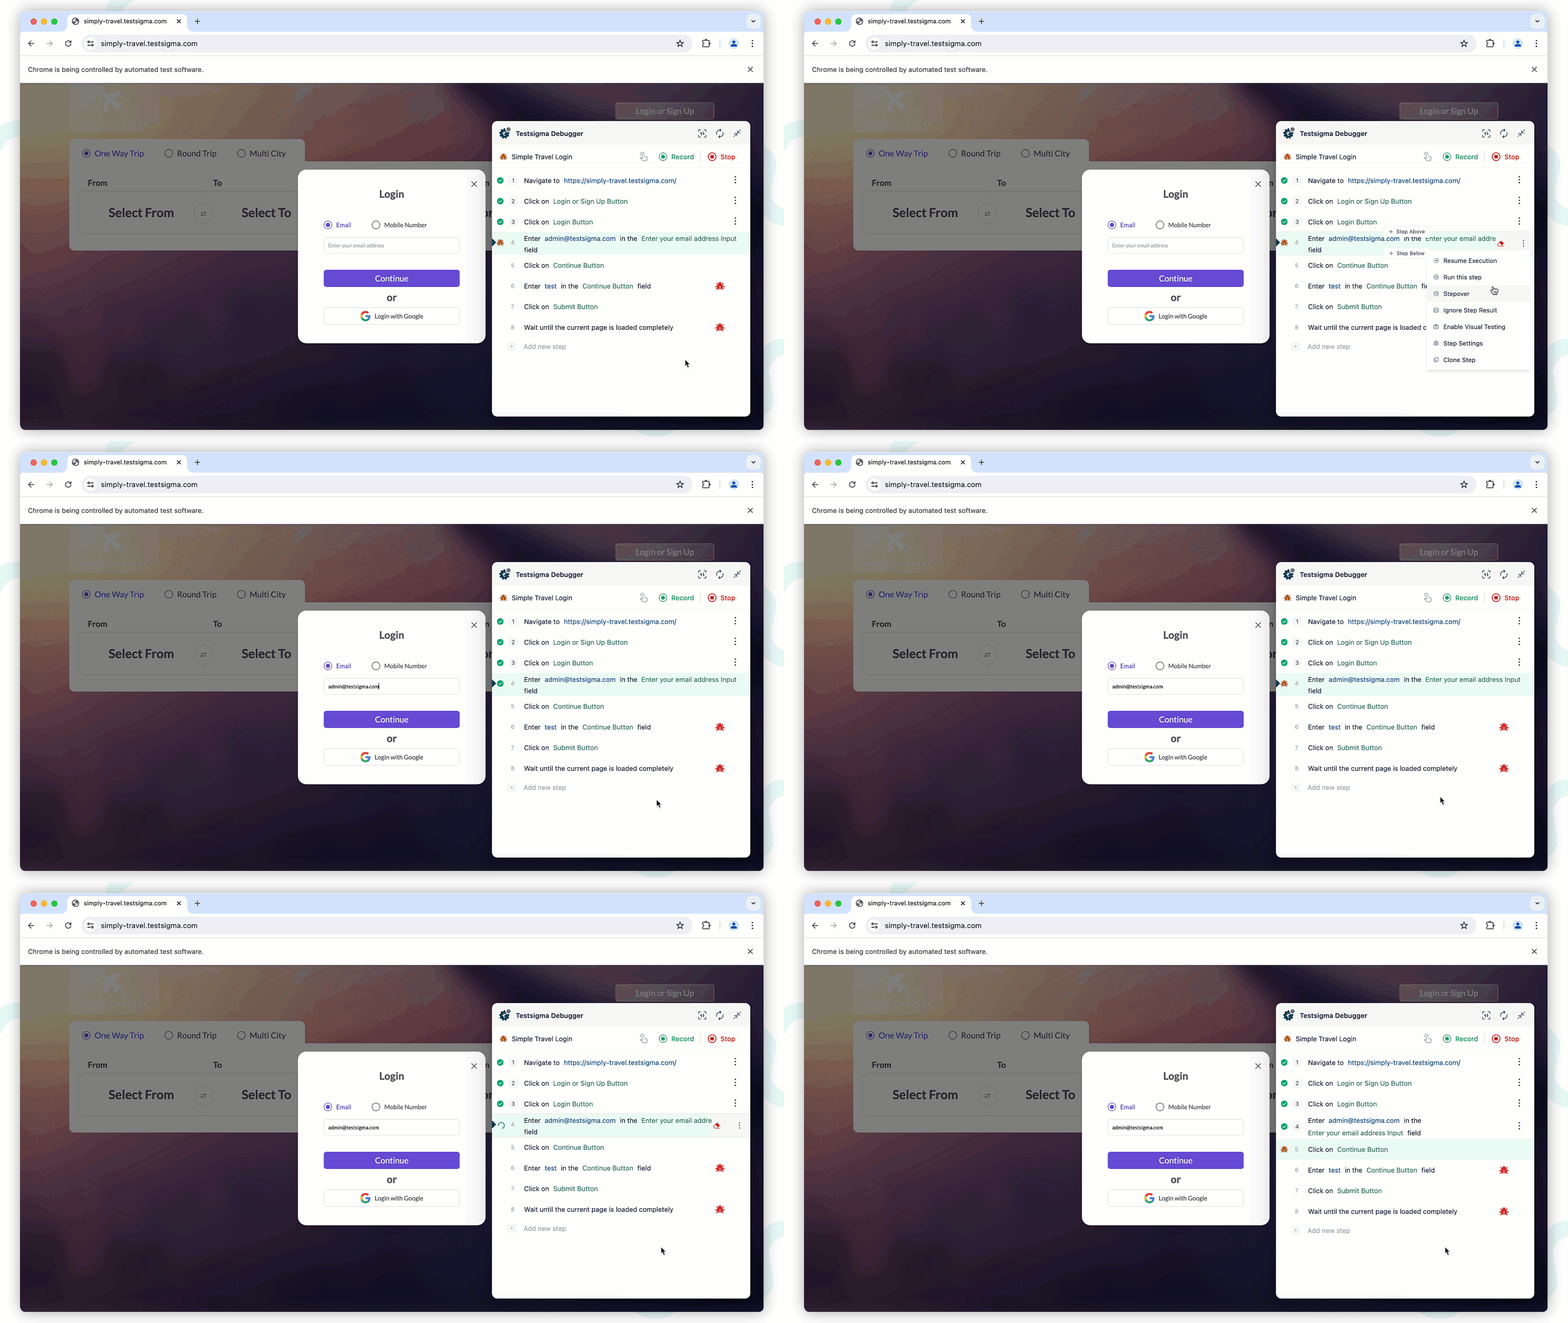
- In the Testsigma Debugger overlay, hover over the yet to execute test step and click the Place Debug Point icon to add a debug point.
- To add multiple debug points, hover over the test step and click on the corresponding debug point that appears to enable it.
- Execution will pause when it reaches an enabled debug point.

Interacting with Debug Points
-
When the test execution pauses at a debug point, you can perform the following actions by clicking Options for the test step that has yet to be executed and selecting the option from the dropdown:
- Resume Execution: Continue the test execution.
- Run this Step: Execute the current step.
- Step Over: Skip the current step.
- Interact with the page to skip the failed test step, click Step Over to skip the current step, and continue the executions.

Identifying and Fixing Errors During Test Case Execution
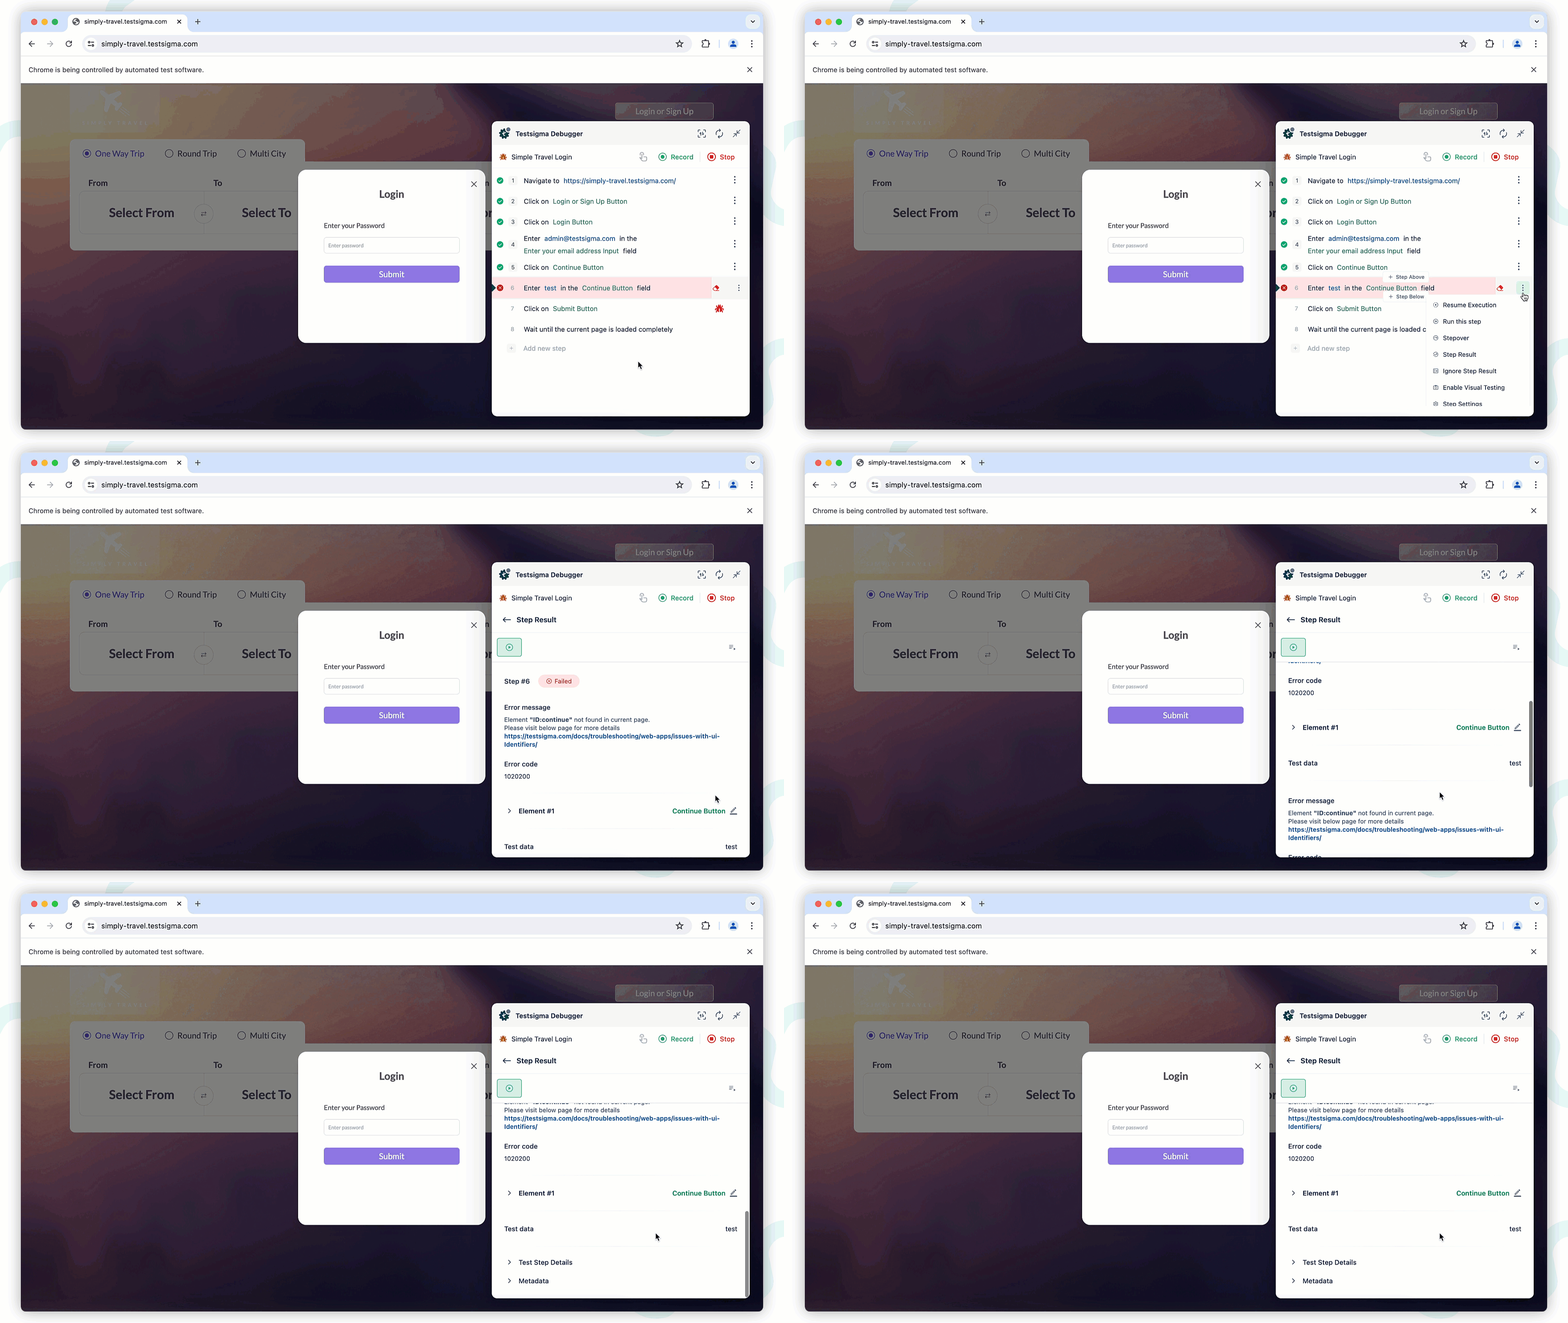
During test case execution, you can visually follow each step. If an error occurs or a debug point is reached, execution pauses, and Testsigma highlights the problematic step. Various resources are provided to help you debug the error, offering a detailed and interactive analysis.
- Hover over the Step Options for Executed Test Step and then click Step Result to view the outcome of each test step.

Troubleshooting Element Not Found Error
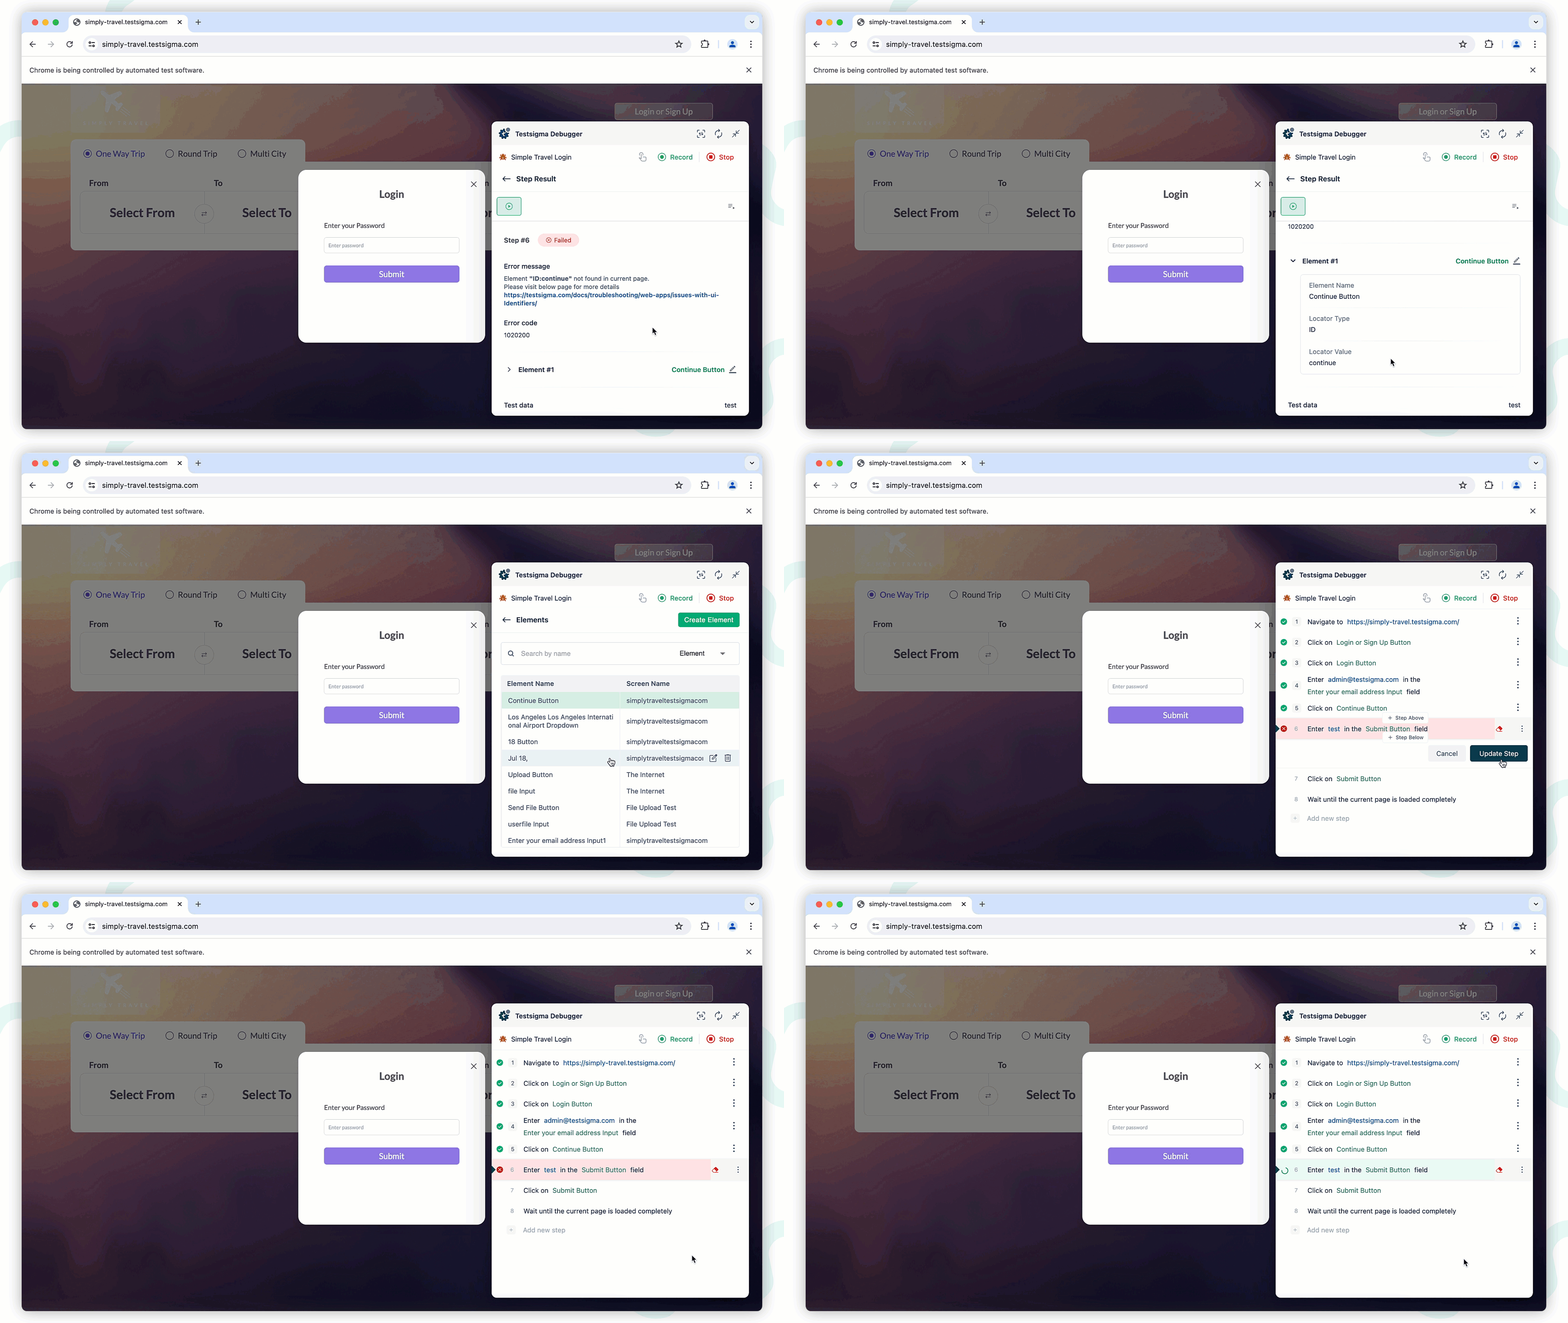
A common issue during test execution is the "Element Not Found" error, where an element visible on the page is still reported as not found. To debug this issue, follow these steps:
- View the message for the test step. If the element is not found, click Element to view its properties, analyse the issue, and update the element.
- After updating the element, click Options and select Resume Execution from the previously paused step.

