- collaboration
- Invite Team Members
- Assign Projects
- Users & Role Management
- Review Management [Test Cases]
- Review Management [Elements]
- Execution Controls
- test cases
- Test Cases
- Test Case List Actions
- Import and Export Test Cases
- Import Test Project Test Cases
- Importing Postman Collections and Environments
- Test cases for Desktop Windows
- Update Test Case result in a Test Plan
- Test cases for Mobile Web Application
- Test Step Types
- Type: Natural Language
- Type: REST API
- Type: Step Group
- Type: For Loop
- Type: While Loop
- Type: Block
- Type: If Condition
- Nested Step Groups
- Create Test Steps
- Create Test Steps Using Simple English
- Test Step Settings
- Test Step Options
- Reuse Elements
- Test Step Reordering
- Bulk Actions
- Add Steps Before & After
- Web Applications
- Test Step Actions
- Test Step Settings
- Test Data in Steps
- Add Steps Manually
- Reuse Elements
- Update Elements
- Create an Element
- Reorder Test Steps
- Bulk Actions
- Add Steps Before & After
- Record steps anywhere in a Test Case
- Image Injection
- Cross-application testing
- Test Data Types
- Raw
- Parameter
- Runtime
- Random
- Data Generator
- Phone Number
- Mail Box
- Environment
- Concat Test Data
- Create Test Data [Parameter]
- Update Test Data Profile
- Updating Value in TDP
- Import TDP
- Bulk Deletion of a Test Data Profile
- Create Test Data [Environment]
- Elements (Objects)
- Web Applications
- Record Multiple Elements
- Record Single Element
- Create Elements
- Supported Locator Types
- Formulating Elements
- Shadow DOM Elements
- Verifying elements in Chrome DevTools
- Handling iframe Elements?
- Dynamic Locators using Parameter
- Dynamic Locators using Runtime
- Using Environment Test Data for Dynamic locators
- Import/Export Elements
- AI Enabled Auto-Healing
- test step recorder
- Install Chrome Extension
- Install Firefox Extension
- Install Edge Extension
- Exclude Attributes/Classes
- test plans
- Add, Edit, Delete Test Machines
- Add, Edit, Delete Test Suites
- Schedule Test Plans
- Run Test Suites In Parallel
- Cross Browser Testing
- Distributed Testing
- Headless Testing
- Test Lab Types
- Disabling Test Cases in Test Plans
- AfterTest Case
- Post Plan Hook
- AfterTest Suite
- Email Configuration in Test Plan
- Execute Partial Test Plans via API
- Ad-hoc Run
- Test Plan Executions
- Dry Runs on Local Devices
- Run Tests on Vendor Platforms
- Run Test Plans on Local Devices
- Test Locally Hosted Applications
- Debug Test Case Failures
- Parallel and Allowed queues
- debugging
- Debug results on local devices (Web applications)
- Debug Results on Local Devices
- Launch Debugger in the Same Window
- Testsigma Agent
- Pre-requisites
- Setup: Windows, Mac, Linux
- Setup: Android Local Devices
- Setting up iOS Local Devices
- Update Agent Manually
- Update Drivers Manually
- Delete Corrupted Agent
- Triggering Tests on Local Devices
- troubleshooting
- Agent - Startup and Registration Errors
- Fetching Agent logs
- Upgrade Testsigma Agent Automatically
- Testsigma Agent - FAQs
- continuous integration
- Test Plan Details
- REST API(Generic)
- Jenkins
- Azure DevOps
- AWS DevOps
- AWS Lambda
- Circle CI
- Bamboo CI
- Travis CI
- CodeShip CI
- Shell Script(Generic)
- Bitrise CI
- GitHub CICD
- Bitbucket CICD
- GitLab CI/CD
- desired capabilities
- Most Common Desired Capabilities
- Browser Console Debug Logs
- Geolocation Emulation
- Bypass Unsafe Download Prompt
- Geolocation for Chrome & Firefox
- Custom User Profile in Chrome
- Emulate Mobile Devices (Chrome)
- Add Chrome Extension
- Network Throttling
- Network Logs
- Biometric Authentication
- Enable App Resigning in iOS
- Enable Capturing Screenshots (Android & iOS)
- Configure Android WebViews
- Incognito/Private mode
- Set Google Play Store Credentials
- addons
- What is an Addon?
- Addons Community Marketplace
- Install Community Addon
- Prerequisites(Create/Update Addon)
- Create an Addon
- Update Addon
- Addon Types
- Create a Post Plan Hook add-on in Testsigma
- Create OCR Text Extraction Addon
- configuration
- API Keys
- Security(SSO)
- Setting Up Google Single Sign-On(SSO) Login in Testsigma
- Setting Up Okta Single Sign-On Integration with SAML Login in Testsigma
- Setting up SAML-based SSO login for Testsigma in Azure
- iOS Settings
- Creating WDA File for iOS App Testing
- uploads
- Upload Files
- Upload Android and iOS Apps
- How to generate mobile builds for Android/iOS applications?
- Testsigma REST APIs
- Environments
- Elements
- Test Plans
- Upload Files
- Get Project wide information
- Upload and update test data profile
- Trigger Multiple Test Plans
- Trigger Test Plan remotely and wait until Completion
- Run the same Test Plan multiple times in Parallel
- Schedule, Update and Delete a test plan using API
- Update Test Case results using API
- Create and update values of Test Data Profile using REST API
- Rerun Test Cases from Run Results using API
- open source dev environment setup
- macOS and IntelliJ Community Edition
- macOS and IntelliJ Ultimate Edition
- Windows and IntelliJ Ultimate Edition
- Setup Dev Environment [Addons]
- NLPs
- Unable to retrieve value stored in text element
- Unable to capture dropdown element
- Unable to Select Radiobutton
- Unable to Click Checkbox
- setup
- Server Docker Deployment Errors
- Secured Business Application Support
- Troubleshooting Restricted Access to Testsigma
- Why mobile device not displayed in Testsigma Mobile Test Recorder?
- Unable to create new test session due to unexpected error
- web apps
- URL not accessible
- Test Queued for a Long Time
- Issues with UI Identifiers
- Missing Elements in the Recorder
- mobile apps
- Failed to Start Mobile Test Recorder
- Troubleshooting “Failed to perform action Mobile Test Recorder” error
- Test Execution State is Queued for a Long Time
- Mobile app keeps stopping after successful launch
- More pre-requisite settings
- Unable to start WDA Process on iPhone
- Most Common causes for Click/Tap NLP failure
- on premise setup
- On-Premise Setup Prerequisites
- On-Premise Setup with Docker-compose File
- Post-Installation Checklist for On-Premise Setup
- Install Docker on an Unix OS in Azure Infrastructure
- SMTP Configuration in Testsigma
- Configure Custom Domains
- salesforce testing
- Intro: Testsigma for Salesforce Testing
- Creating a Connected App
- Creating a Salesforce Project
- Creating Metadata Connections
- Adding User Connections
- Build Test Cases: Manual+Live
- Salesforce Element Repositories
- Intro: Testsigma Special NLPs
Using Custom User Profile in Chrome
Custom user profiles help you emulate settings such as pre-installed extensions, specific location, language, etc. for your web app test automation in Chrome browser.
To do the same, create a new profile, customize it as per your requirements by installing required extensions and changing the settings. After that, you can select the profile using Desired Capabilities in Testsigma while starting a Test Session.
You should already know how to add Desired Capabilities to your Tests. See Desired Capabilities - Overview
Steps for using Custom User Profile in Testsigma
- Finding your current Profile path
- Making changes in the Profile folder
- Using the Desired Capability
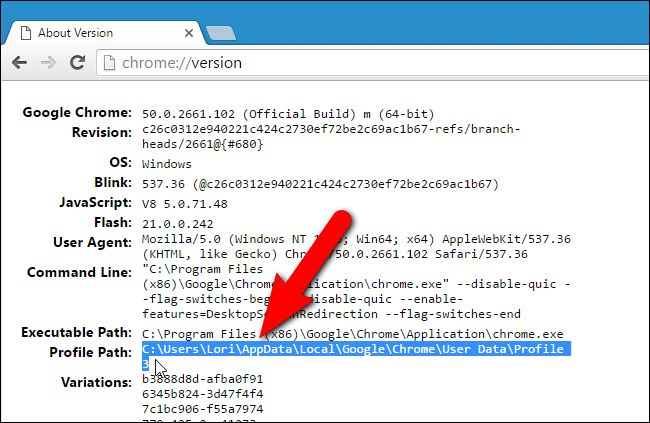
1. Finding your current Profile path
While executing, you can check the current Profile location by going to the following URL:
chrome://version
Location of Chrome Browser Profile(default profile)
OS | Profile Path |
---|---|
Windows 7, 8.1, and 10 | C:\\Users<username>\AppData\Local\Google\Chrome\User Data\Default |
Mac OS X El Capitan | Users/<username>/Library/Application Support/Google/Chrome/Default |
Linux | /home/<username>/.config/google-chrome/default |
Workaround to use user-defined profile for Executing Tests on Testsigma
We could use the --profile-directory argument for specifying the User Profile. However, due to a known bug in Chrome, you might need to do the following workaround and use the --user-data-dir argument.
2. Making changes in Profile folder (workaround)
- Open your default File Explorer (Windows Explorer - Windows, Nautilus - Linux and Files - Mac) and navigate to the location - C:\Users<username>\AppData\Local\Google\Chrome\User Data\Profile 1
- Create a folder named 'Default' there and copy the contents of 'Profile 1' directory deselecting the recently created 'Default' folder.
- Paste the copied contents inside the ‘Default' folder.
3. Using the Desired Capability
After that, you can use Desired Capability in the following format for using a user-defined profile in Testsigma. The following Desired Capability can be used to start Chrome Browser during an automation session using a user-defined profile.
Name | Data Type | Value |
---|---|---|
goog:chromeOptions | String | {"args":["user-data-dir=/path/to/your/custom/profile"]} |