- Testsigma Agent
 Pre-requisites
- Setup: Windows, Mac, Linux
- Setup: Android Local Devices
- Setting Up iOS Local Devices
- Arguments Usage Details
- Agent Upgrade Guide
- Update Agent Manually
- Update Drivers Manually
- Delete Corrupted Agent
- Delete Agents: Soft & Permanent
- Triggering Tests on Local Devices
- Testsigma Agent - FAQs
- troubleshooting
- How to Fix Agent Startup & Registration Errors?
- How to Configure Agent Logs?
- How to Upgrade Testsigma Agent Automatically?
- How to Add Max Sessions for Agents?
- How to Resolve Access Blocked Errors When Downloading the Agent?
- Why is Testsigma Agent Not Detecting My Installed Browser?
- How do I Configure Proxy Settings for the Testsigma Agent?
How to Fix Agent Startup & Registration Errors?
If the Agent is not starting, or is starting and terminating immediately, see the Agent logs for details. For more information refer to the documentation on fetching Agent logs. If you need some help understanding the error from the logs, reach out to support.
The below sections discusses common errors and troubleshooting suggestions:
1. Port not available
By default, Testsigma automatically detects the available ports. If you encounter the error Port not available you can manually check the availability of the ports 8383 and 8484 using the below commands:
Linux
Use the below command in terminal for Linux/Unix
lsof -i :8383
Try the same command with port numbers 8484 as well.
Windows
For Windows, try the below command in Powershell:
Get-Process -Id
(Get-NetTCPConnection -LocalPort 8383).OwningProcess
Try the same command with the port numbers 8484.
If no ports are available,try the below steps to free up the ports
Windows
- Open CMD with Admin privileges (Run as Administrator).
- Find the process that's using the required port. Use the below command to find the processes running on port 8383:
netstat -ano | findstr :8383
You will see the following output: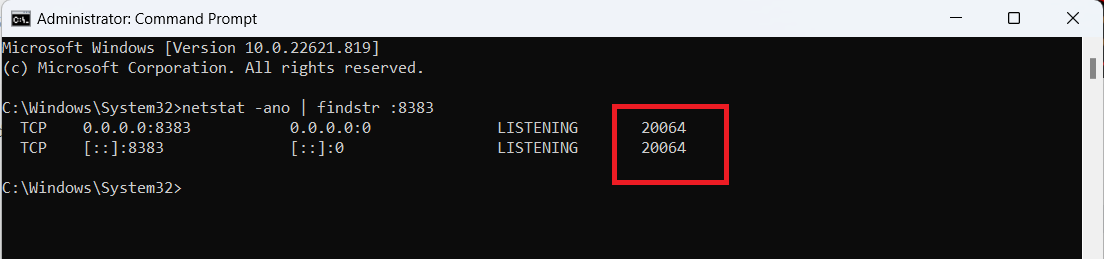
Now that we have got the PID for the process, we can send a kill signal.
taskkill /PID typeyourPIDhere /F
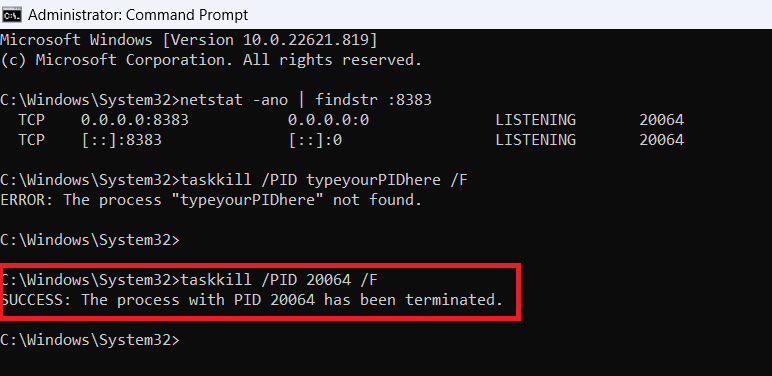 Once the port is free Testsigma automatically detects the available port.
- If the Testsigma agent does not start immediately repeat the same command in Step 2 and confirm the result is empty.
- Try the above steps for port 8484 as well.
Linux and macOS
- Open Terminal.
- Find the process that's running on the required port. Use the below command to find the processes using the port 8080:
netstat -anop | grep :8383
You will see the following output: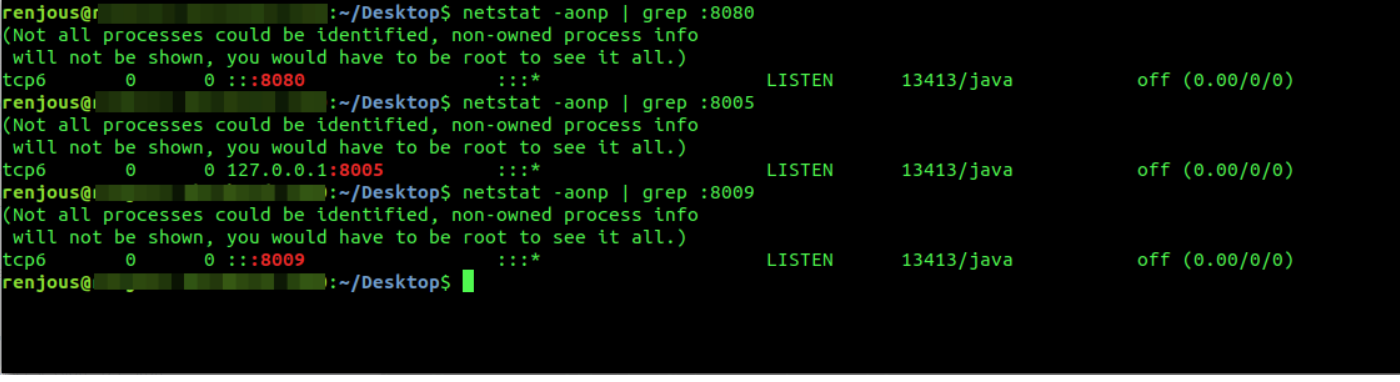
- The second last field with 4/5 digits is the Process ID(PID) and the name after the '/' is the process name.
- Now that we have got the PID for the process, we can send a process termination signal using pkill
pkill typeyourPIDhere - Repeat the same command in Step 2 and confirm the result is empty. If the process is still present, use the below command to force kill using kill
kill -SIGKILL typeyourPIDhere - Repeat the same steps for other ports 8484 as well.
2. Unable to register
Once the Testsigma Agent is started, Testsigma Agent web UI is accessible at
http://localhost:8383/agent(HTTP) ORhttps://local.testsigmaagent.com:8484/agent/(HTTPS).
Try accessing the above localhost URLs after starting the agent.
The reason behind doing so is to understand if the agent is accessible and has all permission from the system administrator. If this is not accessible, it indicates that there is some hindrance in the system like firewall blocks or certain antivirus blocking the access. In such conditions, you may contact your IT Team for help.
If the above pages are accessible, proceed to the next step.
But if https://local.testsigmaagent.com:8484/agent/ is unreachable but http://127.0.0.1:8383/agent/ is reachable, the following entry needs to be added to hosts file:
127.0.0.1 local.testsigmaagent.com
Windows
In Windows, the hosts file is located at C:\Windows\System32\Drivers\etc\hosts.
- Right click on Notepad in the Start menu and select Run as Administrator. This is crucial to ensure you can make the required changes to the file. Now click File > Open and browse to : c:\Windows\System32\Drivers\etc\hosts.
macOS and Linux
On macOS and Linux, the host file is located at /etc/hosts. You may need superuser privileges (sudo) to edit this file.
- Open Terminal.
- Type sudo nano /etc/hosts
- When you’re done adding the entry, use Ctrl + O (followed by Enter) to save the file and then Ctrl + X to exit.
3. Certificate errors
This error on the Agent logs will also help you understand there is a firewall blockage from your network side:
javax.net.ssl.SSLHandshakeException: sun.security.validator.ValidatorException: PKIX path building failed:
sun.security.provider.certpath.SunCertPathBuilderException: unable to find valid certification path to requested target
at java.base/sun.security.ssl.Alerts.getSSLException(Alerts.java:198)
at java.base/sun.security.ssl.SSLSocketImpl.fatal(SSLSocketImpl.java:196)
4. Permission issues
Sometimes while trying to register the Testsigma Agent, we might face errors due to our system's security settings. This usually happens when your system's privacy settings do not Allow apps downloaded from App Store and Identified developers. Follow the below steps to troubleshoot the errors.
Mac
- Navigate to your Privacy settings :
Apple menu > System Preferences > click Security & Privacy > click General. - Under the General tab, change the privacy settings to Allow apps downloaded from App Store and Identified developers after giving the system's credentials.
Windows
- Search for Allowed apps settings in the search box.
- Once you are in the Allowed Apps, change the privacy settings to Allow apps downloaded from App Store and Identified developers after giving the system's credentials.
Try the agent registration process once again after restarting the agent.
5. Agent out of sync
Follow the below steps to fix the issue.
- Refresh the Testsigma app.
- Restart the Agent.
- If the Agent is not updated, update the Agent. For more information, refer to the documentation on updating Agents.
If the above troubleshooting steps does not resolve the issue, contact Testsigma support at support@testsigma.com with the Agent logs files. For more information on how to fetch agent logs refer to the documentation on torubleshooting agent logs.
6. Server connection failed
This occurs because Testsigma Agent cannot reach our servers.It might be due to connection issue or proxy errors. Ensure app.testsigma.com is reachable.
7. Proxy Error
If a proxy is configured for your network, whitelist the domains app.testsigma.com and local.testsigmaagent.com.
If proxy configuration is added in your operating system settings and whitelisting app.testsigma.com and local.testsigmaagent.com in the system proxy settings does not work,
add the following parameter in a configuration file in TestsigmaAgent installation directory.
Windows:
Add wrapper.java.additional.9=-Djava.net.useSystemProxies=true
at the end of Java Additional Parameters section in
<INSTALLATION-FOLDER>/wrapper/conf/wrapper-script-custom.conf
- If Agent is installed using .exe file, <INSTALLATION-FOLDER> is by default at C:\Testsigma\TestsigmaAgent.
- If Agent is extracted from ZIP file, <INSTALLATION-FOLDER> is the folder into which ZIP is extracted.
macOS
Add wrapper.java.additional.9=-Djava.net.useSystemProxies=true at the end of Java Additional Parameters section in <INSTALLATION-FOLDER>/wrapper/conf/wrapper-custom.conf
- If Agent is installed using DMG file, <INSTALLATION-FOLDER> is by default at
/Applications/TestsigmaAgent.app/Contents/Resources/wrapper/conf. - If Agent is extracted from ZIP file, <INSTALLATION-FOLDER> is the folder into which ZIP is extracted.
Linux
Add wrapper.java.additional.15=-Djava.net.useSystemProxies=true at the end of Java Additional Parameters section in <INSTALLATION-FOLDER>/wrapper/conf/wrapper-custom.conf
<INSTALLATION-FOLDER> is the folder into which ZIP or bin is extracted.
Want to contribute or report missing content?