- runs
 Ad-hoc Run
- Test Plan Executions
- Dry Runs on Local Devices
- Run Tests on Private Grid
- Run Tests on Vendor Platforms
- Run Test Plans on Local Devices
- Test Locally Hosted Applications
- Flutter Integration Driver Testing on Testsigma
- Debug Test Case Failures
- Parallel and Allowed queues
Run Tests on Private Grid
Testsigma Private Grid helps run parallel tests across multiple browsers, operating systems, and machines. This can boost the execution time of even the largest test suites and save minutes, hours, or days.
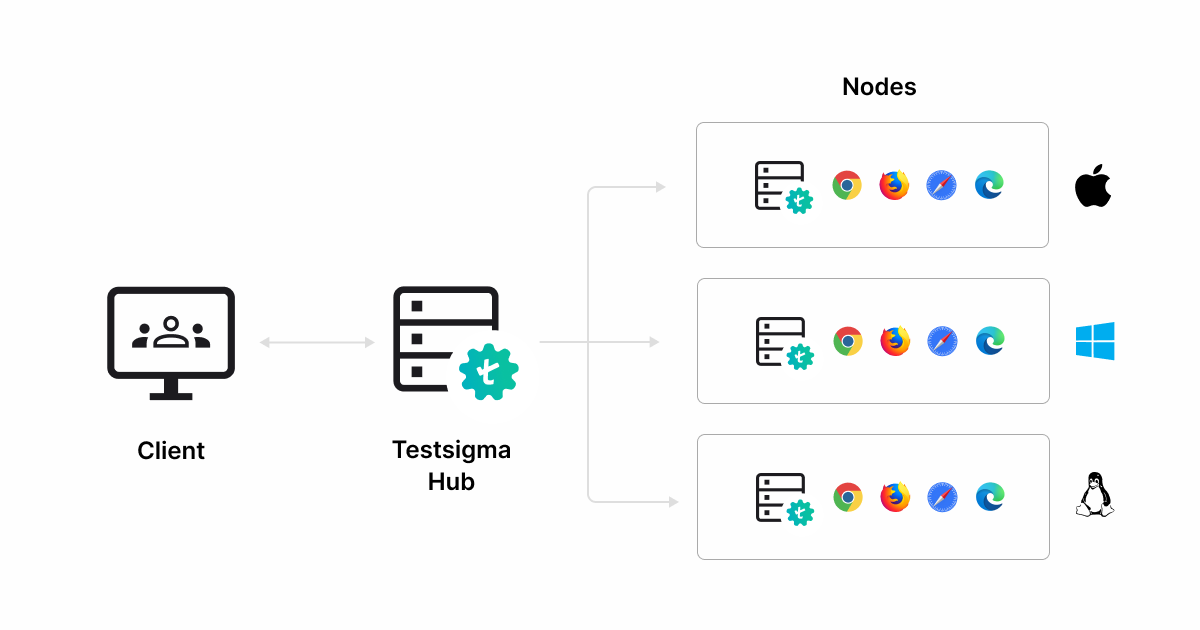
Hub
The Hub is the main controller in Private Grid. Once it receives the test requests, it distributes them to different machines called Nodes. The Hub knows what each Node can do. It evaluates the test requirements against the capabilities of the available Nodes to select the best match and forwards the tests to the selected Nodes.
Nodes
Like Test Machines in Testsigma, Nodes are the machines that run the tests in Private Grid. They can have multiple browsers and operating systems. A session is created when the Node receives a test request from the client. Any commands sent to this Node will then be executed, and the response will be returned to the client. Nodes can handle multiple test sessions simultaneously, depending on their configuration and resource capacity.
This article discusses executing tests in Testsigma Private Grid.
Prerequisites
- Testsigma Agent
- Core Java (OpenJDK 18)
- Testsigma Private Grid Folder
- Ngrok Setup
Create Dynamic Agent Through API
Use the following Endpoint to create Dynamic Agents with Private Grid configuration in Testsigma using REST API.
| Request Type | POST |
|---|---|
| Endpoint | https://app.testsigma.com/api/v1/agents |
| Authorization | Bearer <API_Token> Same as the Testsigma API key mentioned above. |
| Request Body Type (JSON) | Raw |
| Payload | { |
| Response Body Type (JSON) | { |
Here’s a quick demonstration on creating a Dynamic Agent through API with the above mentioned endpoint.
Start Dynamic Agent Using jwtApiKey
Open the terminal in the Testsigma Agent directory and use the following command to start the Dynamic Agent:
For Mac/Linux
<agent_dir>./start.sh --TS_ACTIVATION_KEY=<JWT_KEY>
For Windows
<agent_dir>./start.bat --TS_ACTIVATION_KEY=<JWT_KEY>
Where <JWT_KEY> is jwtApiKey from the above response.
Here’s a quick GIF demonstration on starting Dynamic Agent using jwtApiKey with the above command.
Start the Private Grid Hub & Web Nodes
To start the Private Grid Hub, open the Terminal at Private Grid folder and use the following command:
java -jar selenium-server-4.13.0.jar hubOnce the Private Grid starts, open http://localhost:4444
To start the Web Nodes, open the new tab on the same Terminal and use the following command:
java -jar selenium-server-4.13.0.jar node --config node.json --selenium-manager trueOnce the command runs, the registered Nodes will be added to the Private Grid.
Here’s a quick demonstration on starting the Private Grid Hub and adding Web Nodes.
Execute Tests in Private Grid using REST API
Use the following Endpoint to execute the Testsigma’s test plan in Private Grid using REST API.
| Request Type | POST |
|---|---|
| Endpoint | https://app.testsigma.com/api/v1/execution_results |
| Authorization | Bearer <API_Token> Same as the Testsigma API key mentioned above. |
| Request Body Type (JSON) | Raw |
| Payload | { |
| Sample Response Body (JSON) | { |
Here’s a quick demonstration on executing tests through a Dynamic Agent through API with the above mentioned endpoint.
---
Execute Tests in Private Grid from Application
a. Integrating Testsigma with Private Grid
- From the left navigation bar, go to Settings > Integrations and choose the Test Lab tab.
- Enable the toggle on the Private Grid widget. A popup screen will display the details for the Private Grid lab.
-
On Private Grid details,
- If there is authentication enabled in ngrok platform, select Authentication Enabled and enter Username and Password.
- Enter the Private Hub URL and select applications to use with your Private Grid framework.
- Click on Add Details.
ℹ️Fetching the Private Hub URL:
Follow the steps below to set up ngrok on your device to fetch the Private Hub URL:
- Visit ngork website, create an account, go to Getting Started > Setup & Installation.
- Follow the instructions on the Setup & Installation page to set up ngrok.
- Once the installation is complete, enter the command ngrok http 4444 on the terminal.
- Copy the URL as shown in the image below and use this to integrate Testsigma with Private Grid.

b. Execute Tests in Private Grid
-
For test case execution, select Private Grid as Test Lab on Ad-hoc Run overlay.
Here’s a quick demonstration on executing a test case in Private Grid.
-
For test plan execution, add Private Grid while creating test machine profiles for execution. You need to go to Add Test Suites & Link Machine Profiles > Select test machine profiles > Add Machine and add Private Grid as Test Lab.
Here’s a quick demonstration on executing a test plan in Private Grid.
Want to contribute or report missing content?