

Run tests
A run executes test cases and reports what happened. There are 2 ways to start one: an ad-hoc run executes a single test case straight from the editor, and a test plan execution runs the suites the plan holds, on the machines it names.
An ad-hoc run does not affect the real test outcomes, so use it to confirm a test case is set up correctly before it goes into a plan.
Test lab types
Section titled “Test lab types”A test lab is where a test machine lives. The lab you choose decides whether Testsigma can reach your application, and whether anything has to be installed on your side.
The lab is selected wherever a test machine is: in the Ad-hoc Run overlay, in a test plan’s machine profile, and in the Record test steps and Record Elements overlays.
| Test lab | What it is | Applications it can reach |
|---|---|---|
| Testsigma Labs | Testsigma’s own cloud infrastructure, pre-configured for testing and used for nothing else. The recommended option | Internet-accessible only |
| Local Devices | Your own machines. The preferred option for an application hosted on company premises, which is usually the case during active development | Local and internet |
| BrowserStack | Cloud devices on BrowserStack, after integrating the account | Internet-accessible only |
| Sauce Labs | Cloud devices on Sauce Labs, after integrating the account | Internet-accessible only |
| Kobiton Test Lab | Cloud devices on Kobiton, after integrating the account | Internet-accessible only |
| TestMU | Cloud devices on TestMU, after integrating the account | Internet-accessible only |
| Private Grid | A set of machines you configure for local execution, set up with Testsigma support | Local and internet |
Connect a cloud vendor
Section titled “Connect a cloud vendor”-
Go to Settings > Integrations > Test Lab.
-
Turn on the toggle for the vendor you want.
-
Enter the username and API key from your account with that vendor.
The vendor then appears as a Test Lab option in the run menu and in a test plan’s machine profile.
Ad-hoc run
Section titled “Ad-hoc run”-
Open the test case and click Run.
-
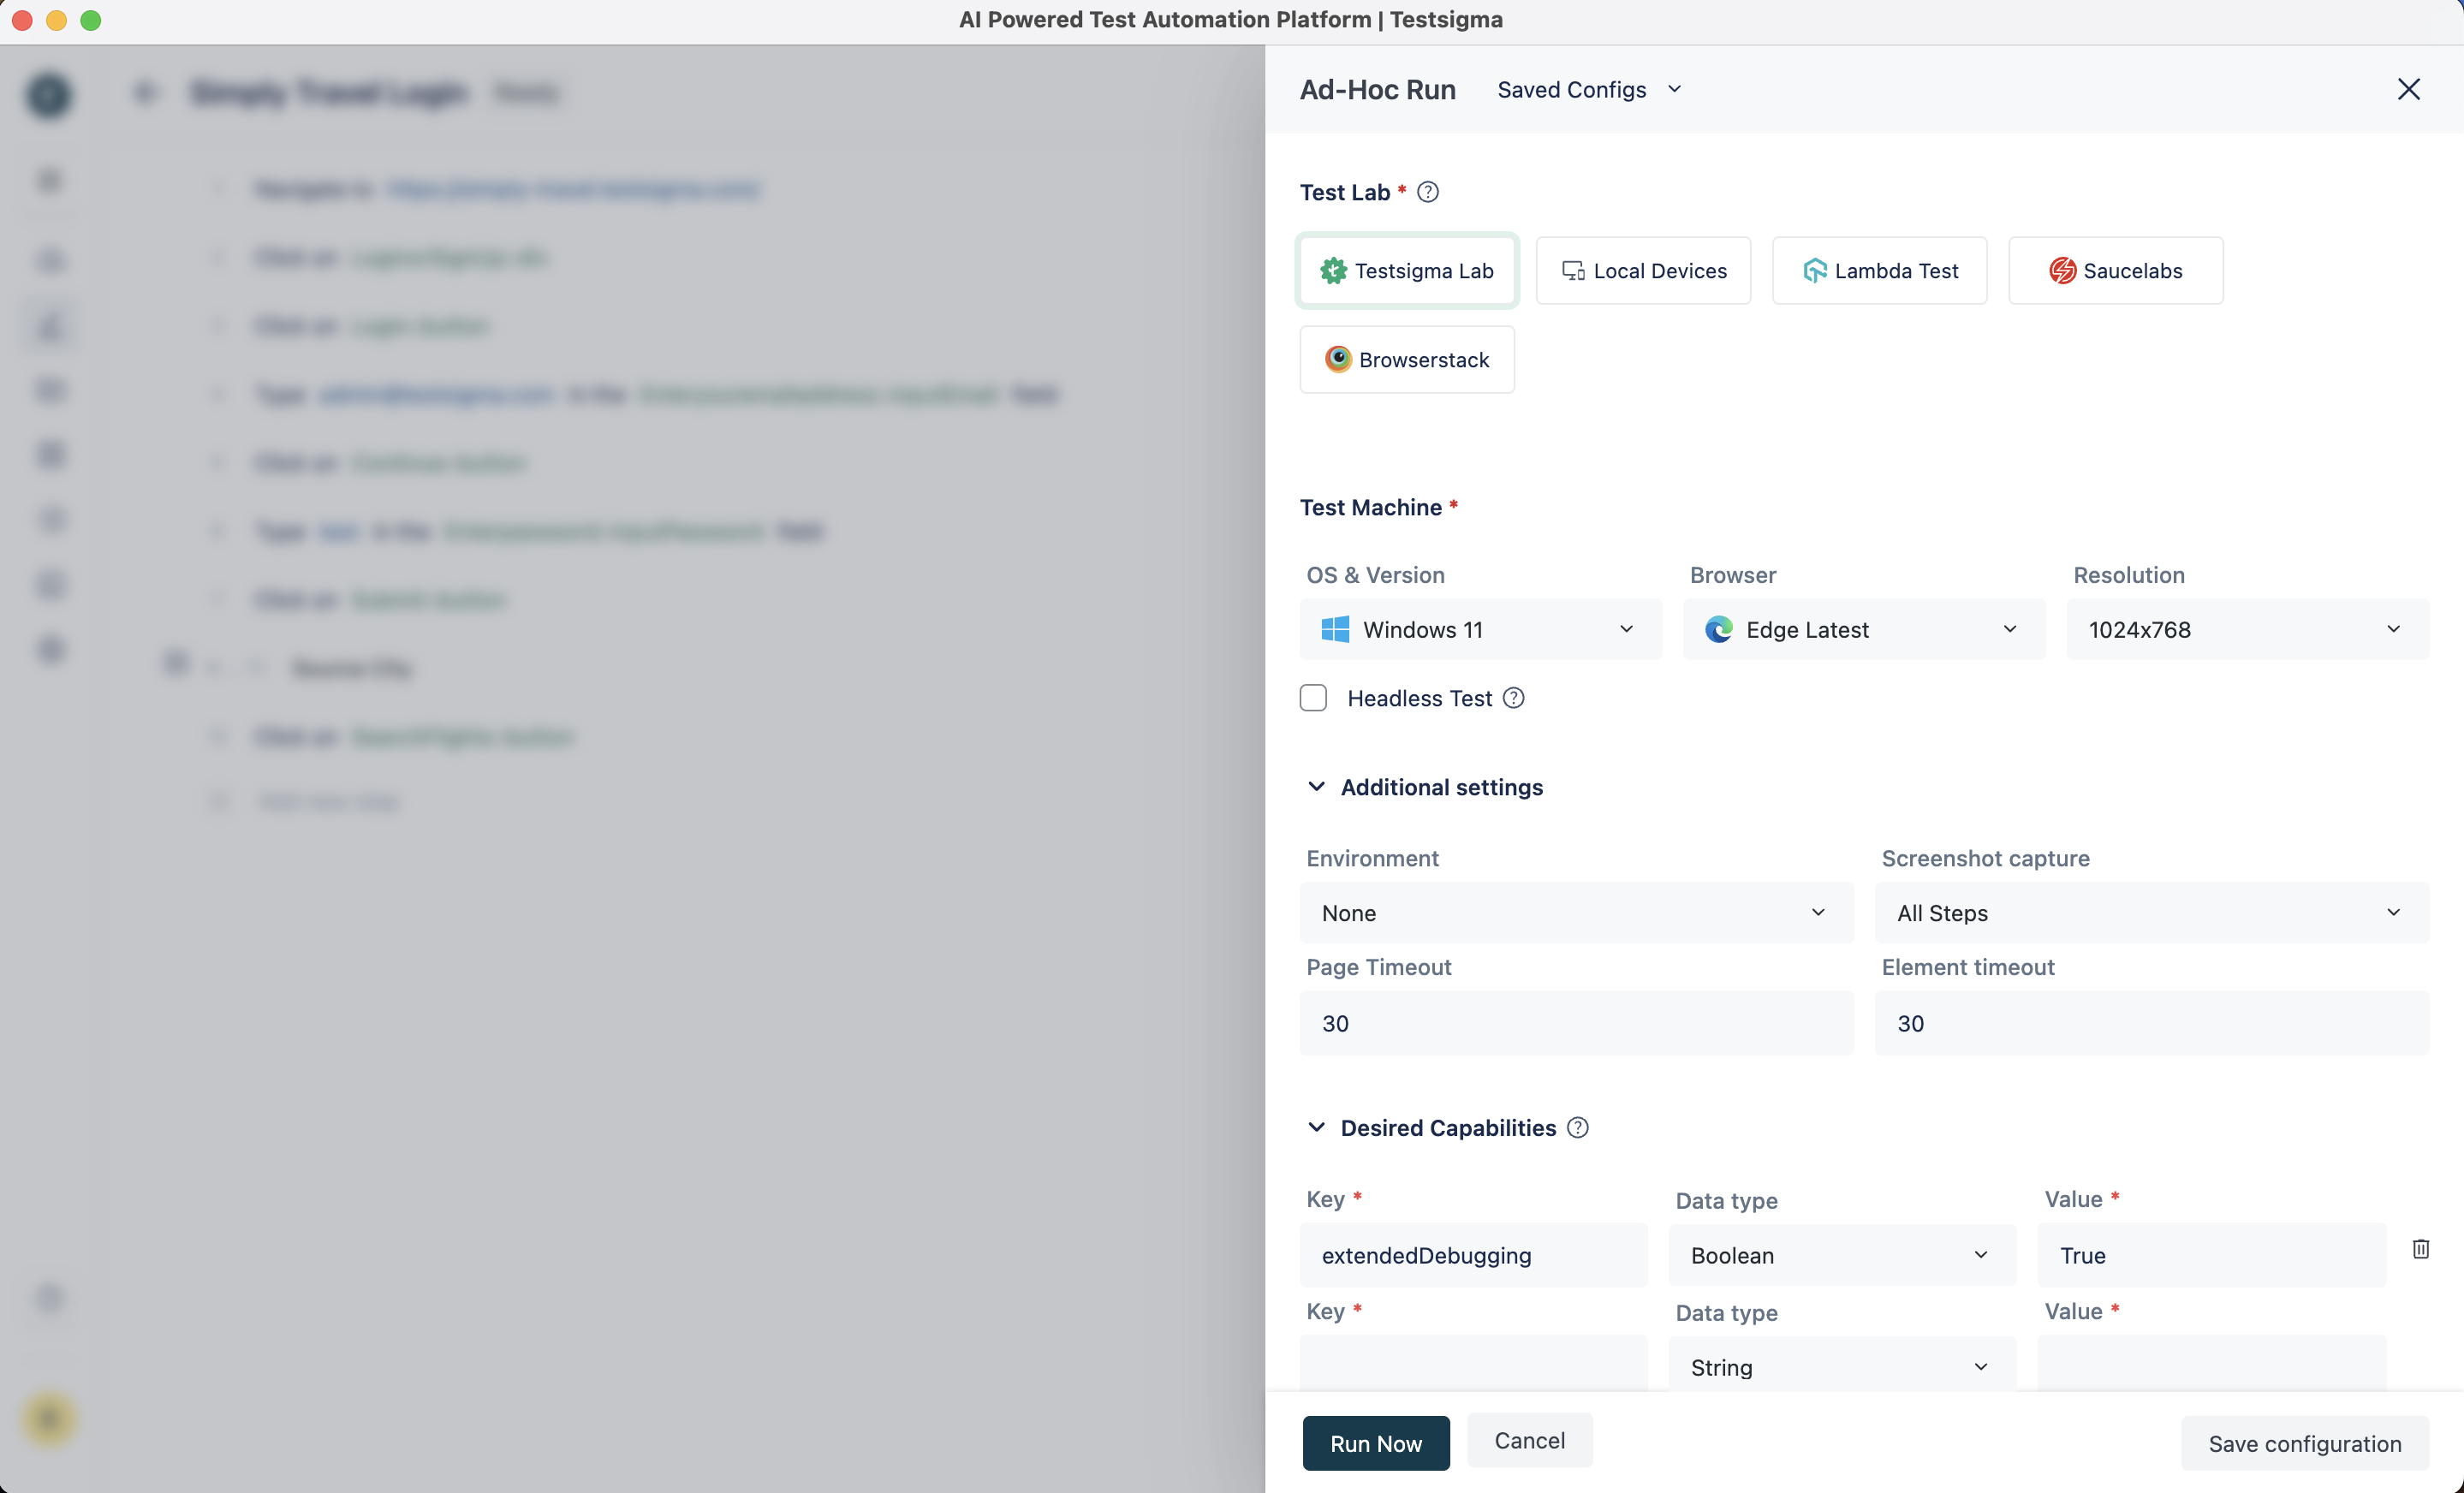
Configure the Ad-hoc Run overlay for your application type, as below.
-
Click Run Now.
What each application type needs differs, including which labs it can run on:
| Setting | Web | Mobile web | Android and iOS | Desktop Windows | Rest API |
|---|---|---|---|---|---|
| Test lab | Any lab | Any lab | Any lab | Local Devices only | Testsigma Cloud Lab or Local Devices |
| Test machine | OS and version, browser and version, resolution | OS and version, device, browser | OS and version, browser and version | The registered active agent | Not applicable |
| App source | Not applicable | Not applicable | External Path for a public URL, or Uploaded Apps | Desktop App Location, the local URL of the application path | Not applicable |
| Headless Test | Yes | No | No | No | No |
| Camera Image Injection | No | Yes | Yes | No | No |
| Network Logs | No | Yes | Yes | No | No |
Desired Capabilities apply to every type, taking a Key, a Data Type, and a Value. See Desired capabilities.
Additional Settings apply to web, mobile web, Android, and iOS. They hold the Environment, Screenshot Capture for All Steps or Failed Steps alone, Page Timeout for how long a test waits for a page, and Element Timeout for how long it waits for an element. Desktop Windows and Rest API take the Environment on its own.
Run a prerequisite first
Section titled “Run a prerequisite first”A test case can run another test case before it. Open the test case, click Test Case Settings, and select the prerequisite from the dropdown. In a dry run the prerequisite executes first, and the order appears as the Execution sequence on the test case results page. See Test case settings for how a prerequisite behaves in a plan.
Save a run configuration
Section titled “Save a run configuration”Click Save Configuration in the overlay, enter a Name, and click Save. To reuse it, click Saved Configs at the top of the overlay and select it from the list. The overlay is then pre-filled for the next run.
To see the history and details of the test case’s past ad-hoc runs, click Ad-Hoc Runs in the right navigation bar of the Test Case Details page.
Test plan execution
Section titled “Test plan execution”-
Create a test case with its steps.
-
Create a test suite and add the test case to it.
-
Create a test plan and add the suite to it.
-
Click Run Now.
To read the outcome, go to Run Results and click the test plan. Results open at test suite level, and Test Suite and Test Machine switch the level.
See Test plans for the plan’s own settings, machines, and schedules.
Partial run
Section titled “Partial run”A partial run executes some of a plan rather than all of it.
-
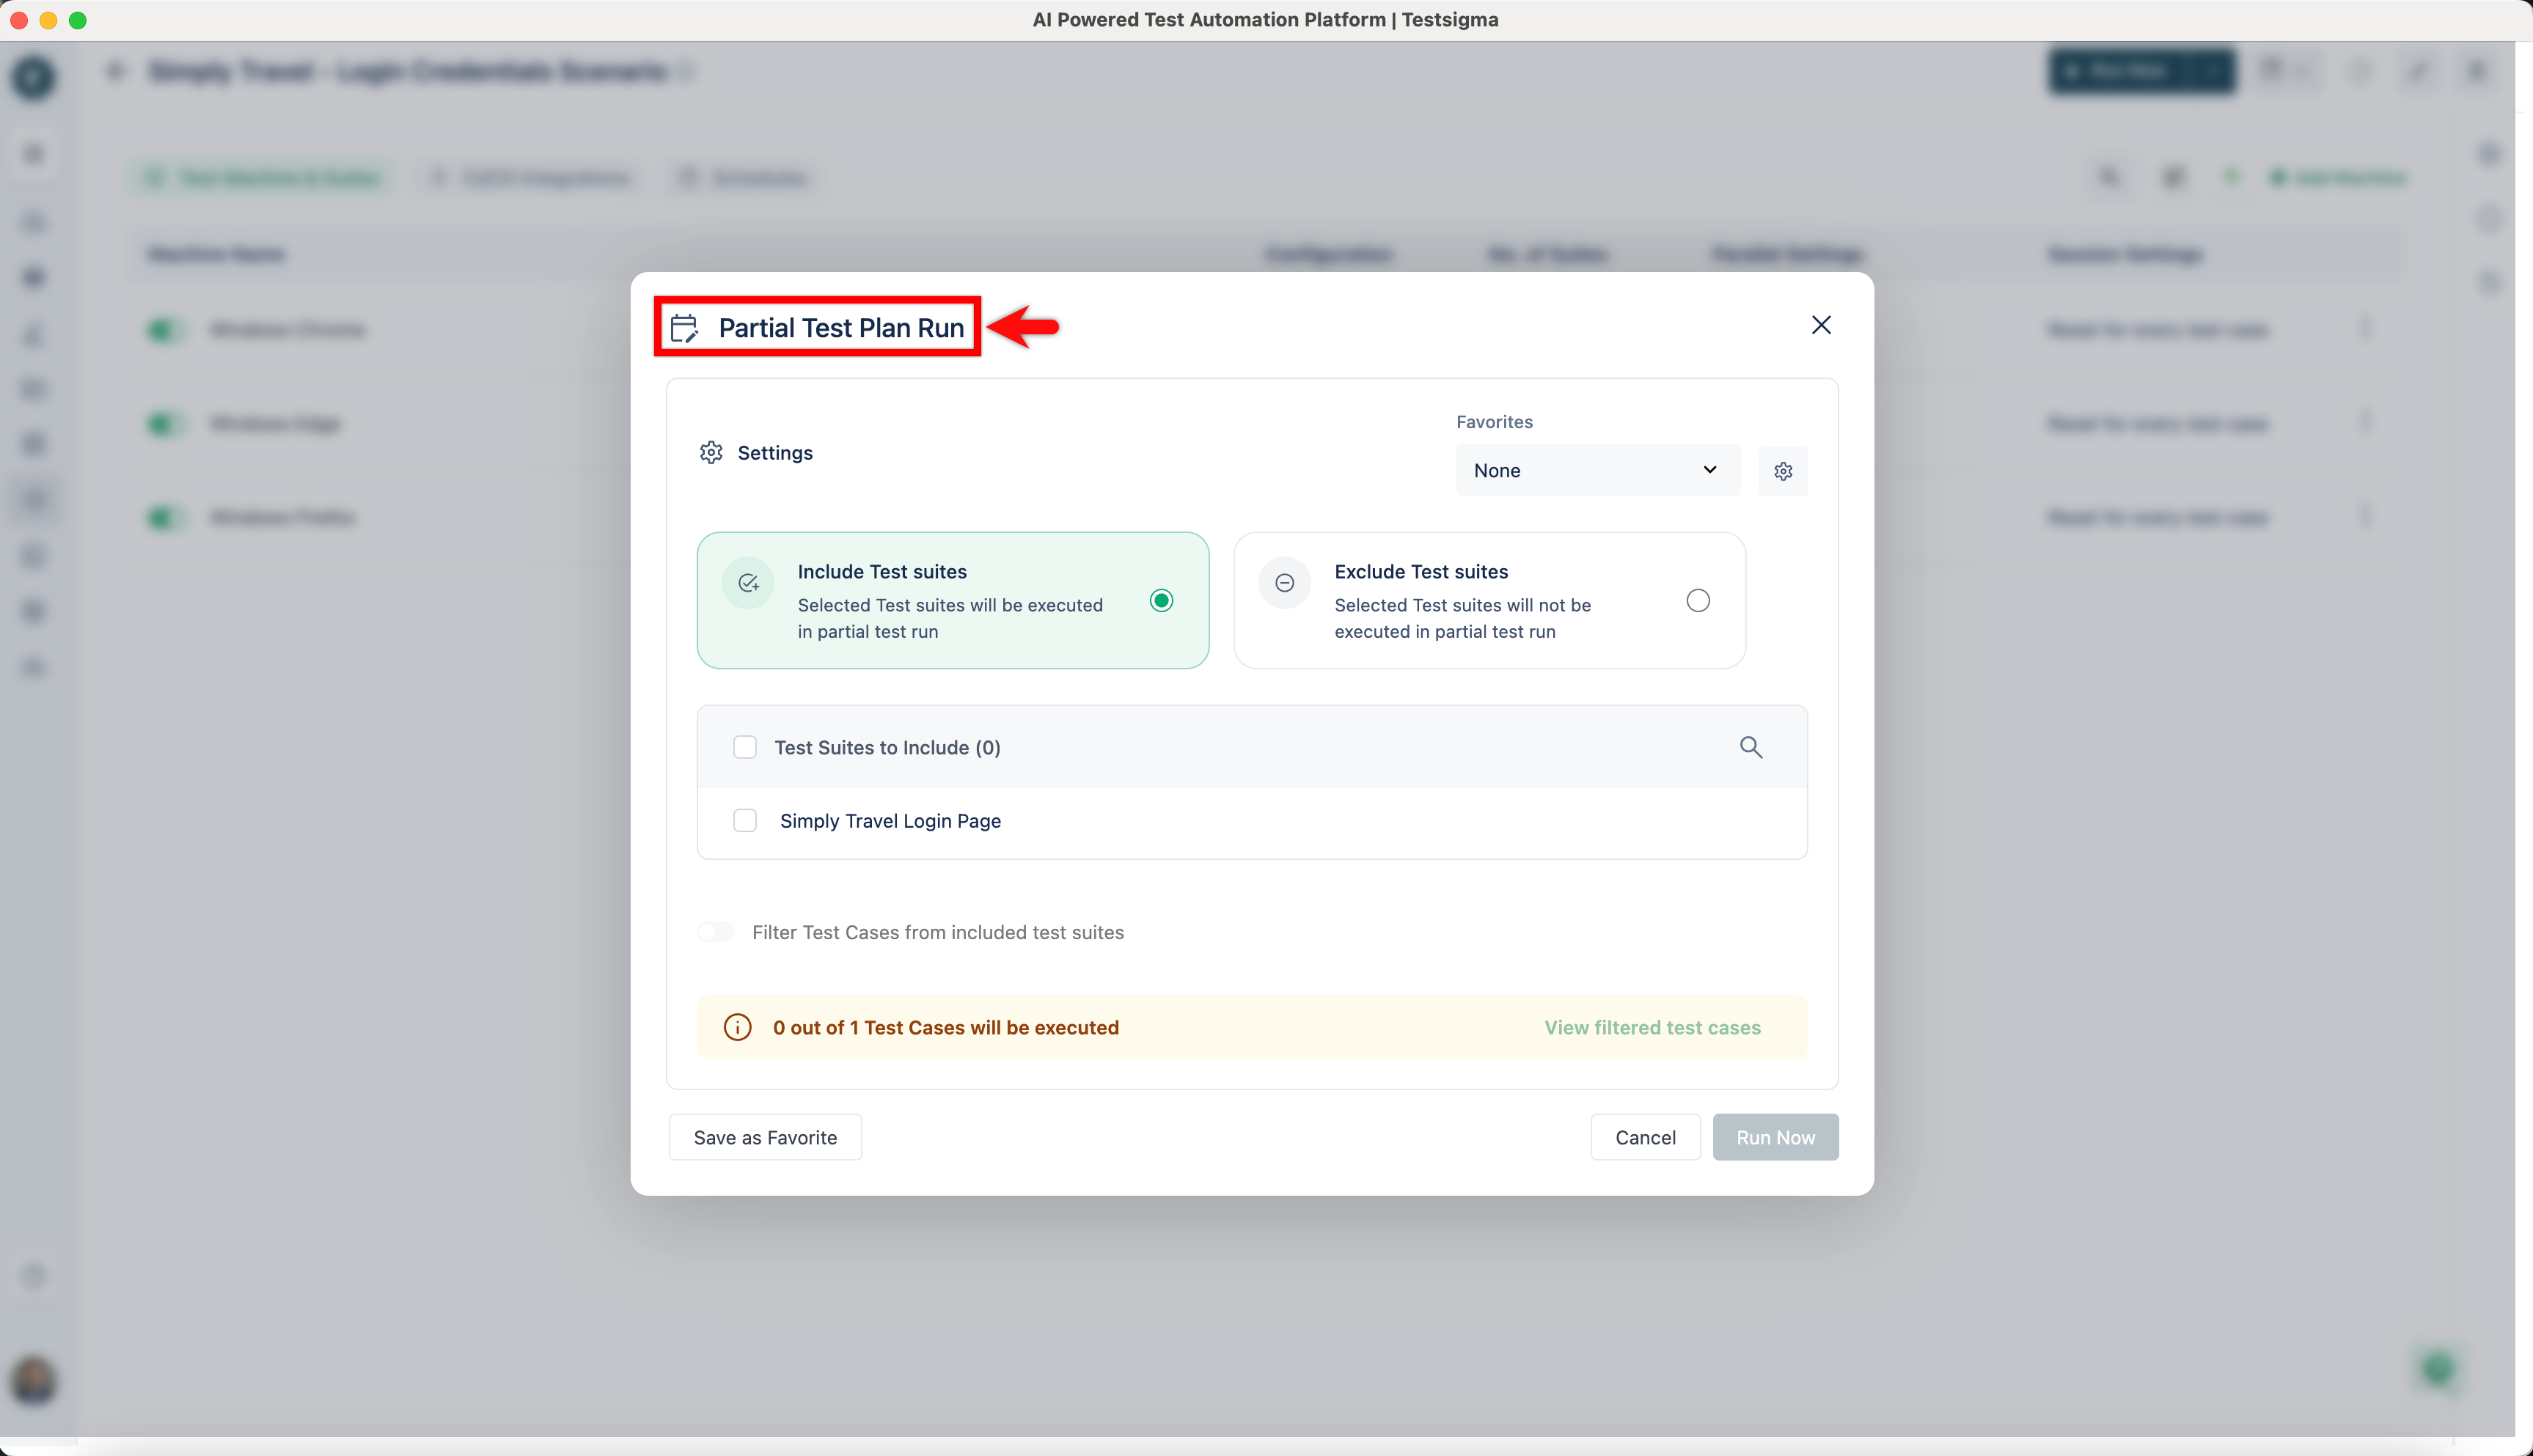
Open the test plan, expand Run Now, and click Partial Run.
-
Select Include or Exclude in the Partial Test Plan Run overlay.
-
Select the suites under Test Suites to Include.
-
Narrow the test cases with the filters: Labels, Type, Requirement, Requirement Type, Priority, Created by, Assignee, and Reviewer.
-
Run the plan.
Run on local devices
Section titled “Run on local devices”Local execution suits an application that is only reachable inside your network. It needs the Testsigma agent set up on the machine.
For a single test case, click Run, select Local Devices as the Test Lab in the Ad-Hoc Run overlay, choose the Connected Machine and the Browser, adjust Additional Settings and Desired Capabilities, then click Run Now.
For a test plan, go to Add Test Suites & Link Machine Profiles and click Machine. In the Select test machine profiles overlay click Add Machine, then in the Add test machine/device profile overlay enter a Name, select Local Devices as the Test Lab, choose the Connected Machine and the Browser, and click Create Profile. Configure Test Plan Settings, click Create, then click Run Now.
Configure Safari for local runs
Section titled “Configure Safari for local runs”Safari’s automation support is off by default, and it has to be on before a local Safari run works. Open Safari > Preferences > Advanced and select Show Develop menu in menu bar, then turn on Develop > Allow Remote Automation.
Below Safari 10.1, install the SafariDriver extension from the SeleniumHQ downloads page, enable it under Preferences > Extensions, then run /usr/bin/safaridriver once from the terminal and complete the authorization prompt. Upgrading to 10.1 or later avoids all of it.
Reach a locally hosted application
Section titled “Reach a locally hosted application”Testsigma’s access to applications on your local machine or network is limited for security reasons, so a locally hosted application may be unreachable. There are 2 ways around it.
Whitelist the Testsigma IP addresses. Go to Settings > Testsigma IP to see the ranges. The Testsigma Server IP covers the server where executions happen on Testsigma’s device cloud, and the Testsigma Lab IPs cover the labs holding your account’s test assets and data. Your network administrator or infosec team adds them to the firewall’s allowed list.
Use the Testsigma agent, which runs the tests from your own machine or device instead. See Run on local devices.
Private Grid
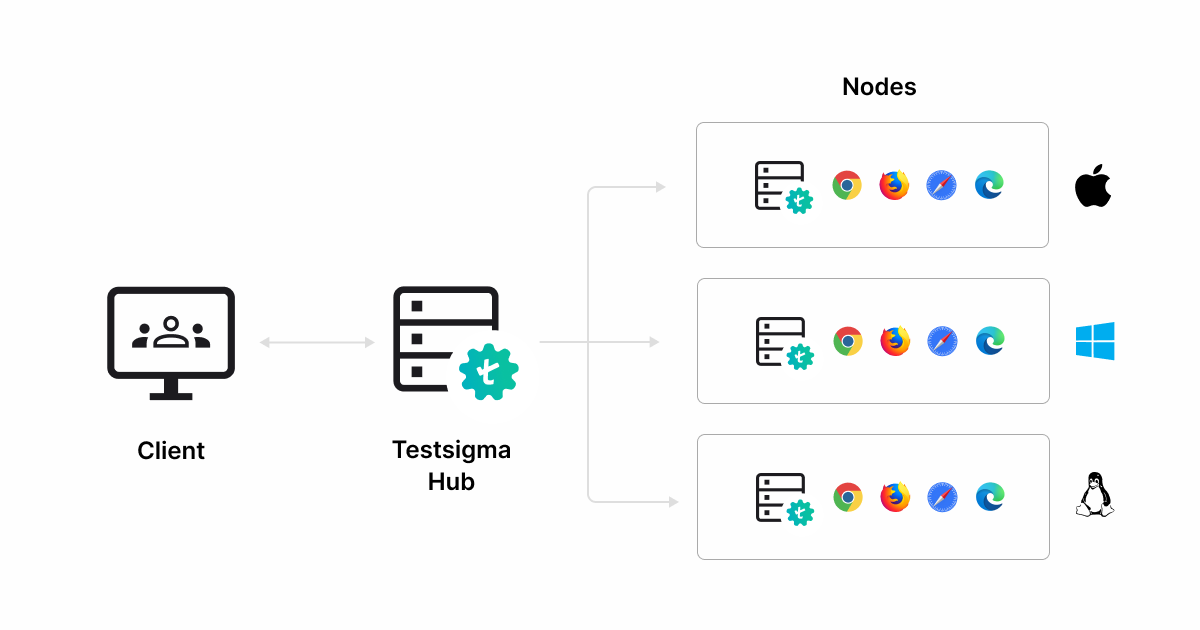
Section titled “Private Grid”Private Grid runs tests in parallel across browsers, operating systems, and machines that you host.
- The Hub is the controller. It takes test requests, compares each one against what the available Nodes can do, and forwards it to the best match.
- Nodes are the machines that run the tests, each able to carry several browsers and operating systems. A Node opens a session per request and can hold several sessions at once, depending on its configuration and capacity.
Setting one up needs the Testsigma agent, Core Java with OpenJDK 18, the Testsigma Private Grid folder, and an ngrok setup. The full setup covers creating a dynamic agent through POST https://app.testsigma.com/api/v1/agents, starting that agent with a jwtApiKey, starting the hub and its web nodes, and then executing tests either through the REST API or from the application.
Parallel runs and queues
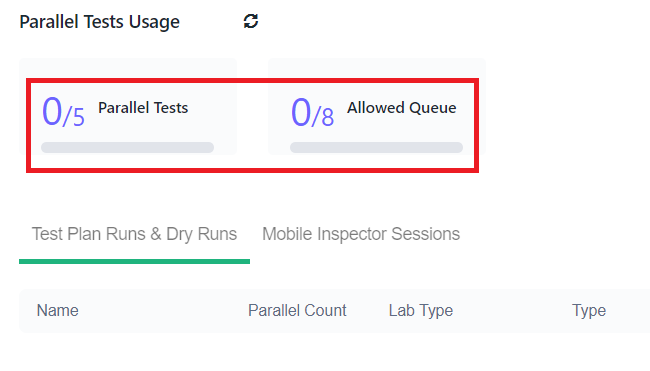
Section titled “Parallel runs and queues”Your subscription sets 2 limits: the parallel executions allowed at once, and the queue allowed behind them.
With a license for 5 parallel executions and 8 queued, 5 test suites run simultaneously, whatever the number of test cases inside each, and up to 8 more suites wait their turn.
The same limits apply to test cases when suites run their cases in parallel. Trigger 10 test cases against a license for 8 parallel and 8 queued, and 8 run while 2 queue.
Related run features
Section titled “Related run features”- Mock servers return simulated API responses during a run. See Mock servers.
- Camera image injection feeds an image to the device camera during a mobile run, through the toggle in the Ad-hoc Run overlay.
- Debugging pauses a run at a step so you can inspect and fix it. See Copilot.
Frequently asked questions
Section titled “Frequently asked questions”Why has my execution been queued for a long time?
Section titled “Why has my execution been queued for a long time?”Every parallel run allowed by your license is already in use. Click Usage details on the Dashboard and check Parallel Tests. A reading of 2/2 means both allowed parallel runs are busy, and queued tests wait until one finishes.
Can I run tests on an emulator or a simulator?
Section titled “Can I run tests on an emulator or a simulator?”Yes. Start the emulator first, then the Testsigma agent, then select Local Devices in the Ad-Hoc Run overlay and confirm the emulator appears under Test Machine. Starting several emulators gives you cross-device testing without physical devices.
Why can’t a cloud device reach my application?
Section titled “Why can’t a cloud device reach my application?”Cloud labs run outside your network, so an application on a local development server is unreachable through a proxy, a VPN, or a firewall. To check, open the application URL on a workstation outside your company network without a VPN. If it loads there, cloud devices can run against it. If it does not, run on local devices instead, or whitelist the Testsigma IP addresses.
Why do local runs on a real Android device fail with a permission error?
Section titled “Why do local runs on a real Android device fail with a permission error?”Device-level settings are off by default, and which ones differ by brand.
- Realme and Oppo: turn on Developer Options, USB Debugging, and Disable Permission Monitoring.
- OnePlus: the same 3, plus configure or disable Battery Optimization for the app under test.
- Xiaomi: turn on Developer Options, USB Debugging, and USB Debugging (Security Settings), and turn off MIUI Optimization.
Was this page helpful?
Thanks for the feedback.