

Testsigma Tunnel
Testsigma Tunnel runs tests against a private server URL or a locally hosted application, using the operating systems, browsers, and screen resolutions available in Testsigma’s cloud. It opens a secure connection from your machine to Testsigma over WebSocket, HTTPS, and SSH, so a corporate firewall or proxy does not have to be opened up, and no public internet access is needed.
How the tunnel works
Section titled “How the tunnel works”Five parts make up the connection.
| Component | What it does |
|---|---|
| Testsigma Tunnel Client | The binary you install on a machine that can reach your application. It authenticates with the key you supply when it starts |
| Authentication Server | Processes the client’s authentication request and assigns it a tunnel connect server |
| Testsigma Tunnel Server | A virtual machine or container in a Testsigma data center. It carries an HTTP and TCP proxy that forwards requests from test executors, and the TCP server the client connects to |
| REST API client or browser | The automation environment, which uses the tunnel server as its proxy |
| Remote address | The server URL you are testing, whether localhost, a privately hosted site, or a public one |
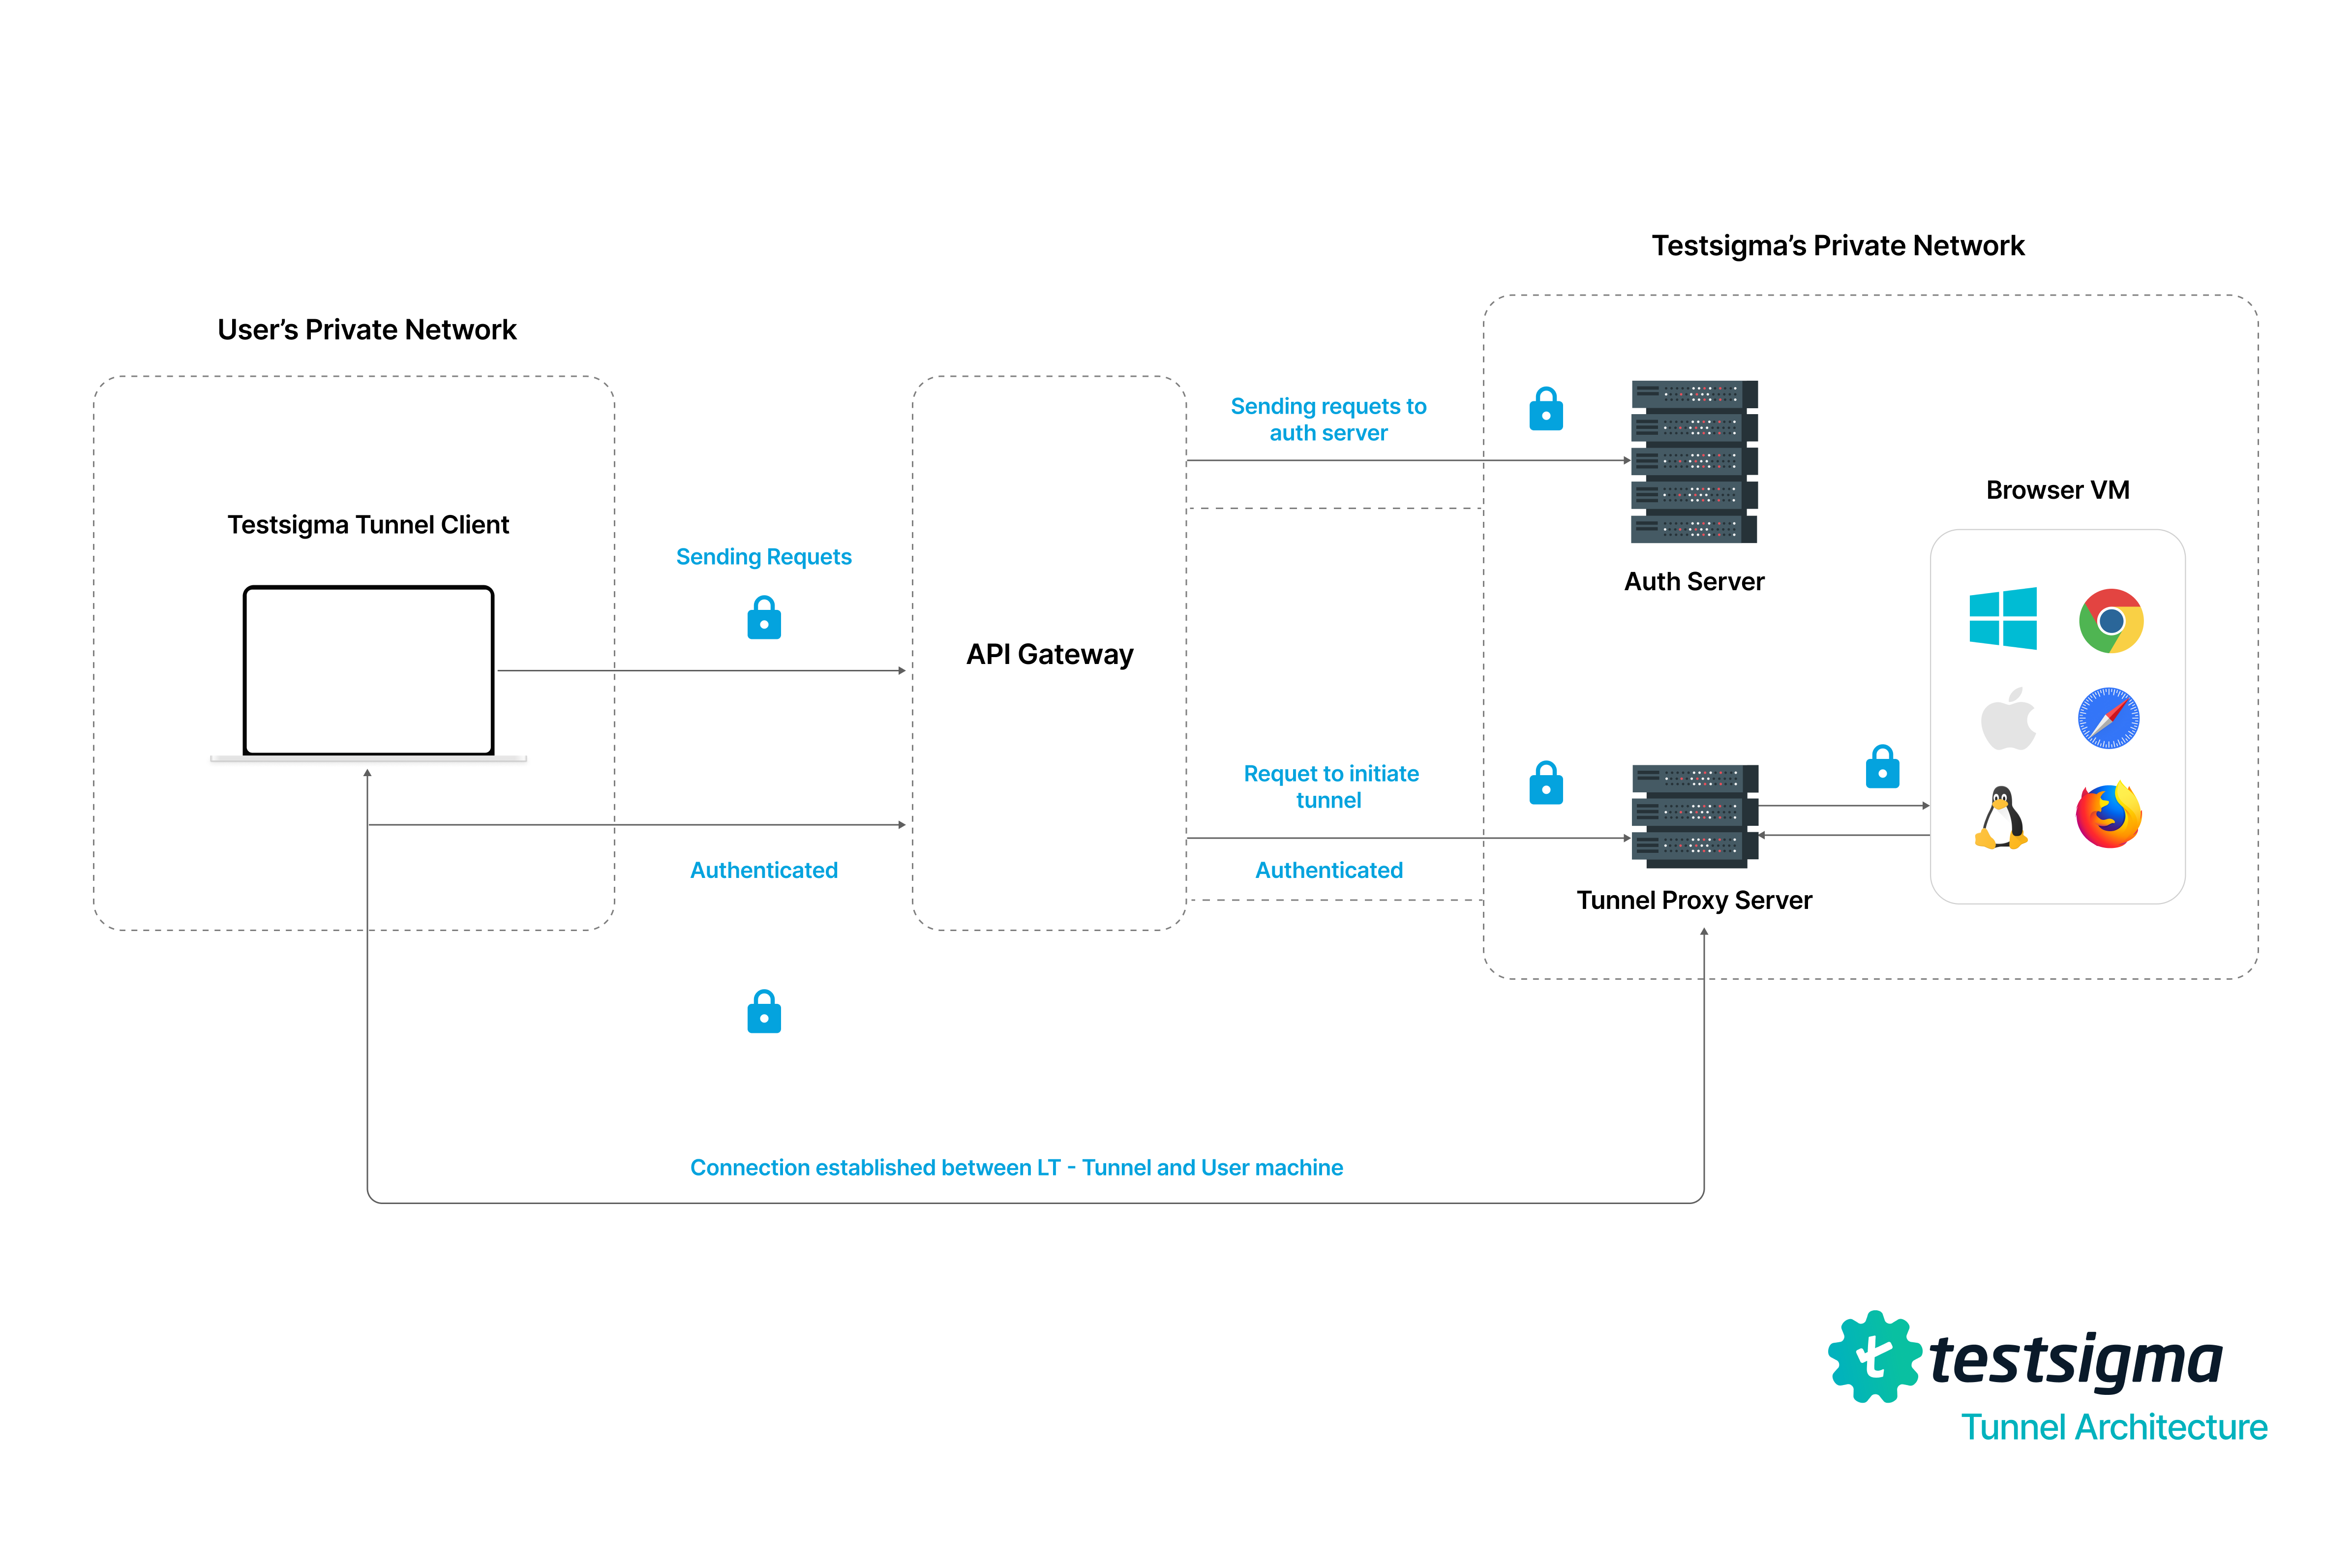
The client holds a bidirectional tunnel open between Testsigma and the remote address.
System requirements
Section titled “System requirements”| Requirement | Specification |
|---|---|
| Operating system | Windows XP or later, macOS 10.10 or later, or Ubuntu 12.04 or later |
| CPU | x64, or ARM in 32-bit and 64-bit |
| Memory | 2 GB or more |
| Disk space | 100 MB free to install, 500 MB recommended |
| Network | A stable internet connection |
| Firewall | Nothing restricting the client’s outbound traffic. The tunnel accepts no inbound connections, so no ingress rule is needed |
Install the tunnel
Section titled “Install the tunnel”Go to Settings > Testsigma Tunnel, which walks through 3 steps: install the tunnel, run it in a terminal, and verify the connection.
Click the Download icon beside Documentation Link and select your platform and architecture. Mac, Windows, Linux, Debian, and RPM each offer amd64 and arm64; Docker links to its own instructions. Or take the direct download for your machine:
| Platform | amd64 | arm64 |
|---|---|---|
| macOS | ||
| Windows | ||
| Linux | ||
| Debian | ||
| RPM |
The authentication key comes from Settings > API Keys.
-
Extract the ZIP to a directory of your choice.
-
Go to that directory and start the client, passing the key on the command line:
Terminal window ./TestsigmaTunnel --key="<API_KEY>" --tunnel-name "<TUNNEL_NAME>"
Or set the key and the other parameters in the args.yaml file beside the binary, then start it with ./TestsigmaTunnel:
key: "<your-authentication-key>"tunnel-name: ""connections: 10inactive-timeout: 300verbose: falseThe client prints a success message and the tunnel name when it starts. Use that name when you set up a live or automated test. Press Ctrl+C to stop it.
-
Extract the ZIP to a directory of your choice.
-
Go to that directory and start the client, passing the key on the command line:
Terminal window TestsigmaTunnel.exe --key="<API_KEY>" --tunnel-name "<TUNNEL_NAME>"
Or set the key and the other parameters in the args.yaml file beside the binary, then start it with TestsigmaTunnel.exe. See Client settings for the fields.
The client prints the tunnel name when it starts. Press Ctrl+C to stop it.
Run the binary directly, or install it as a service so it starts on boot.
To run it directly, extract the ZIP, go to that directory, and start the client:
./TestsigmaTunnel --key="<API_KEY>" --tunnel-name "<TUNNEL_NAME>"The args.yaml file beside the binary holds the same settings. See Client settings.
As a service, on Debian:
- Download the DEB file for your architecture.
- Install it with
sudo apt install ./testsigma-connect-<version>.deb. - Set the key and parameters in
/etc/testsigma-connect/args.yaml. - Enable it on boot with
sudo systemctl enable testsigma-connect. - Start it with
sudo systemctl start testsigma-connect.
To remove it, disable the service, stop it, run sudo apt remove testsigma-connect, delete /etc/systemd/system/testsigma-connect.service if it remains, and run sudo systemctl daemon-reload.
As a service, on RPM:
- Download the RPM file for your architecture.
- Install it with
sudo rpm -ivh testsigma-connect-<version>.rpm. - Set the key and parameters in
/etc/testsigma-connect/args.yaml. - Enable it on boot with
sudo systemctl enable testsigma-connect.service. - Start it with
sudo systemctl start testsigma-connect.service.
To remove it, disable the service, stop it, run sudo rpm -e testsigma-connect, delete /etc/systemd/system/testsigma-connect.service if it remains, and run sudo systemctl daemon-reload.
Create a docker-compose.yml in your project directory. The image name carries the region, and the tag carries the architecture:
services: testsigma-tunnel: image: testsigmainc/testsigma-tunnel:<arm64/amd64>-latest container_name: testsigma-tunnel environment: - KEY=<API_KEY> - TUNNEL_NAME=<NAME_OF_TUNNEL> - CONNECTIONS=<NUMBER> - INACTIVE_TIMEOUT=<NUMBER in seconds> - VERBOSE=true/false| Region | Image |
|---|---|
| US | testsigmainc/testsigma-tunnel |
| EU | testsigmainc/testsigma-tunnel-eu |
| IN | testsigmainc/testsigma-tunnel-in |
Then run docker compose up -d. The logs confirm the tunnel is active and give the tunnel name to use in your tests. Stop it with docker compose down.
The chart runs the tunnel client as a StatefulSet, a Secret holding the authentication key, and a headless Service that gives the pods stable identities and routes no traffic.
All replicas share one tunnel name. The first pod registers the tunnel and the rest join that registration, which is why they start in sequence. The client keeps nothing that has to survive a restart, since its mTLS certificates are fetched again at each registration, so there is no volume to manage.
The pod runs as a non-root user from a distroless image and needs no elevated privileges.
Check the cluster prerequisites
Section titled “Check the cluster prerequisites”- A Kubernetes cluster running 1.21 or later.
- Helm 3.8 or later, for OCI chart support.
kubectlconfigured with access to the cluster.- An authentication key from Settings > Tunnels.
- Outbound access from the cluster to your Testsigma address and to the registry serving the chart and image. The tunnel accepts no inbound connections, so no ingress or firewall change is needed.
The same chart sits in 2 public registries, and neither needs credentials.
| Registry | Chart location | Container image |
|---|---|---|
| Azure Container Registry | oci://testsigmaregistry.azurecr.io/charts/testsigma-tunnel | Mirrored into the same registry |
| GitHub Container Registry | oci://ghcr.io/testsigmainc/charts/testsigma-tunnel | Pulled from Docker Hub |
Choose based on what your cluster is allowed to reach. Azure Container Registry with global.imageRegistry suits restricted egress, because the chart and the image come from one host. GitHub Container Registry suits a cluster that already reaches Docker Hub, and global.imageRegistry does not apply there.
Install the chart
Section titled “Install the chart”-
Copy the authentication key from Settings > Tunnels.
-
Create a namespace and store the key in a secret, writing it to a temporary file so it stays out of your shell history and the process list.
Terminal window kubectl create namespace testsigmaumask 077 && cat > tunnel-key.txt # paste the key, then press Ctrl+Dkubectl -n testsigma create secret generic testsigma-tunnel-auth \--from-file=KEY=./tunnel-key.txtrm tunnel-key.txt -
Install the chart.
Terminal window helm install ts-tunnel oci://testsigmaregistry.azurecr.io/charts/testsigma-tunnel \--version 0.1.0 -n testsigma \--set global.imageRegistry=testsigmaregistry.azurecr.io \--set tunnel.auth.existingSecret=testsigma-tunnel-auth \--set tunnel.tunnelName=my-tunnel -
Wait for the pod with
kubectl -n testsigma rollout status statefulset/ts-tunnel-testsigma-tunnel. -
The tunnel appears under Settings > Tunnels once it registers.
For GitHub Container Registry, use the same command against oci://ghcr.io/testsigmainc/charts/testsigma-tunnel without the global.imageRegistry flag.
Select your Testsigma region
Section titled “Select your Testsigma region”The image is built against a fixed Testsigma address, so the 3 regional builds are different images rather than copies. Set tunnel.region to match the address you sign in to.
| Sign-in address | tunnel.region |
|---|---|
app.testsigma.com | us, the default |
app-eu.testsigma.com | eu |
app-in.testsigma.com | in |
Add --set tunnel.region=eu to the install command, or apply it to an existing release with helm upgrade --reuse-values.
Verify the Kubernetes installation
Section titled “Verify the Kubernetes installation”Confirm the cluster can reach Testsigma, which is the one thing the tunnel cannot work without:
helm test ts-tunnel -n testsigmaThen check the client registered with kubectl -n testsigma logs ts-tunnel-testsigma-tunnel-0 -f, and confirm the tunnel is listed under Settings > Tunnels.
Helm configuration reference
Section titled “Helm configuration reference”Pass these with --set, or collect them in a values file and use -f values.yaml. helm show values on the chart lists every available setting.
| Setting | Default | What it does |
|---|---|---|
tunnel.region | us | Testsigma region: us, eu, or in |
tunnel.auth.existingSecret | Secret holding the authentication key | |
tunnel.auth.key | "" | The key inline, for a quick trial instead of a secret |
tunnel.tunnelName | "" | Name shown in Testsigma. Empty means randomly generated |
tunnel.replicaCount | 1 | Replicas sharing one tunnel. 0 stops it without uninstalling |
tunnel.verbose | false | Debug logging |
tunnel.delegateSslValidation | false | Accept certificates from an SSL inspection appliance |
tunnel.image.tag | latest | Pin to a release such as 2.1.0 for a fixed baseline |
tunnel.resources | 500m and 256Mi to 2 CPU and 1Gi | Pod requests and limits |
tunnel.extraArgs | [] | Extra command-line flags, which outrank the settings above |
global.imageRegistry | "" | Pull the chart’s images from one registry |
proxy.enabled | false | Set with proxy.url |
networkPolicy.enabled | false | Restricts egress to DNS and 443. Add rules for your own applications first |
imagePullSecrets | [] | For registries that require authentication |
For a proxy, set proxy.enabled=true and proxy.url=http://proxy.internal.example.com:8080. Where your network re-signs TLS with its own certificate authority, set tunnel.delegateSslValidation=true.
Scale the tunnel on Kubernetes
Section titled “Scale the tunnel on Kubernetes”Raise tunnel.replicaCount for more concurrent test traffic. Pods start one at a time, the first registers the tunnel, and the rest join it. Scaling to zero stops the tunnel without uninstalling it.
kubectl -n testsigma scale statefulset/ts-tunnel-testsigma-tunnel --replicas=3Upgrade and uninstall the chart
Section titled “Upgrade and uninstall the chart”With one replica, run helm upgrade ts-tunnel oci://testsigmaregistry.azurecr.io/charts/testsigma-tunnel --version <version> -n testsigma --reuse-values. Remove the release with helm uninstall ts-tunnel -n testsigma.
Rotate an authentication key
Section titled “Rotate an authentication key”-
Get a new key from Settings > Tunnels.
-
Update the secret.
Terminal window kubectl -n testsigma create secret generic testsigma-tunnel-auth \--from-file=KEY=./tunnel-key.txt --dry-run=client -o yaml | kubectl apply -f - -
Restart the tunnel with
kubectl -n testsigma rollout restart statefulset/ts-tunnel-testsigma-tunnel.
Install the chart using Argo CD
Section titled “Install the chart using Argo CD”Argo CD does not detect OCI registries automatically, so register the repository first.
-
Go to Settings > Repositories > CONNECT REPO > VIA HTTPS and enter the details below.
Field Value Type helmName testsigma-chartsRepository URL testsigmaregistry.azurecr.io/charts, orghcr.io/testsigmainc/chartsEnable OCI Selected Username and Password Leave empty -
Create the key secret in the destination namespace, as in Install the chart.
-
Create the application.
apiVersion: argoproj.io/v1alpha1kind: Applicationmetadata:name: testsigma-tunnelnamespace: argocdspec:project: defaultsource:repoURL: testsigmaregistry.azurecr.io/chartschart: testsigma-tunneltargetRevision: 0.1.0helm:releaseName: ts-tunnelvalues: |tests:enabled: falseglobal:imageRegistry: testsigmaregistry.azurecr.iotunnel:region: ustunnelName: my-tunnelauth:existingSecret: testsigma-tunnel-authdestination:server: https://kubernetes.default.svcnamespace: testsigmasyncPolicy:syncOptions:- CreateNamespace=true -
Sync the application, with SYNC in the UI or
argocd app sync testsigma-tunnelfrom the CLI.
Four things catch people out:
CreateNamespace=truechanges how a sync behaves rather than starting one, so a new application stays OutOfSync until you trigger it.repoURLholds the registry path only. The chart name belongs inchart, and there is nooci://prefix.targetRevisionis the chart version, not the tunnel client version.- Argo CD does not run Helm test hooks, so set
tests.enabledtofalseand verify manually.
Troubleshoot the Kubernetes install
Section titled “Troubleshoot the Kubernetes install”| Symptom | Cause and resolution |
|---|---|
Pod stays Pending | No node has enough free CPU or memory. Run kubectl -n testsigma describe pod |
ImagePullBackOff | Confirm tunnel.region, and remove global.imageRegistry to pull from Docker Hub. A per-architecture tag such as amd64-latest fails on nodes of any other architecture, so use latest or a version |
CreateContainerConfigError | The secret named in tunnel.auth.existingSecret does not exist in that namespace |
| The pod restarts repeatedly | Usually an invalid or expired key. Check the logs and get a fresh key from Settings > Tunnels |
| The pod runs but no tunnel appears | Usually the wrong tunnel.region, or a key issued for a different region. Check the logs |
helm test fails | The cluster cannot reach your Testsigma address. Check egress rules, and set proxy.enabled with proxy.url if a proxy is required |
| Connection timeouts during a test | The tunnel reached Testsigma but cannot reach your application. With networkPolicy.enabled on, add egress rules through networkPolicy.extraEgress |
| SSL errors during a test | The application’s certificate is not trusted, or an inspection appliance re-signs traffic. Set tunnel.delegateSslValidation=true |
Client settings
Section titled “Client settings”The binary takes the same 5 settings on macOS, Windows, and Linux, as command-line flags or in args.yaml. Docker passes them as environment variables, and Kubernetes as Helm values.
| Setting | Default | What it does |
|---|---|---|
key | Your authentication key, from Settings > API Keys | |
tunnel-name | Generated | The name you reference when running tests |
connections | 10 | Connections the client establishes |
inactive-timeout | 300 | Seconds of inactivity before the tunnel closes |
verbose | false | Debug logging |
Run a test through the tunnel
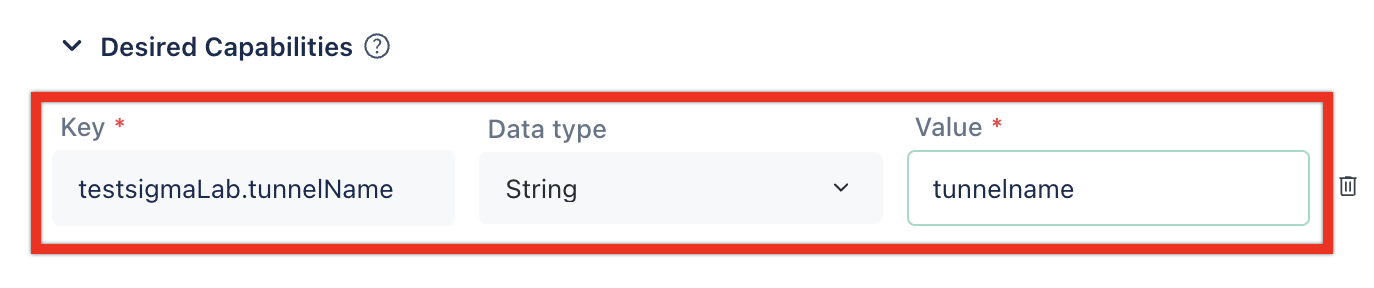
Section titled “Run a test through the tunnel”For an automated test, open the test case, click Run, select the Test Lab and Test Machine in the Ad-Hoc Run overlay, click Desired Capabilities, and add the tunnel name:
| Key | Data type | Value |
|---|---|---|
testsigmaLab.tunnelName | String | <tunnel_name> |
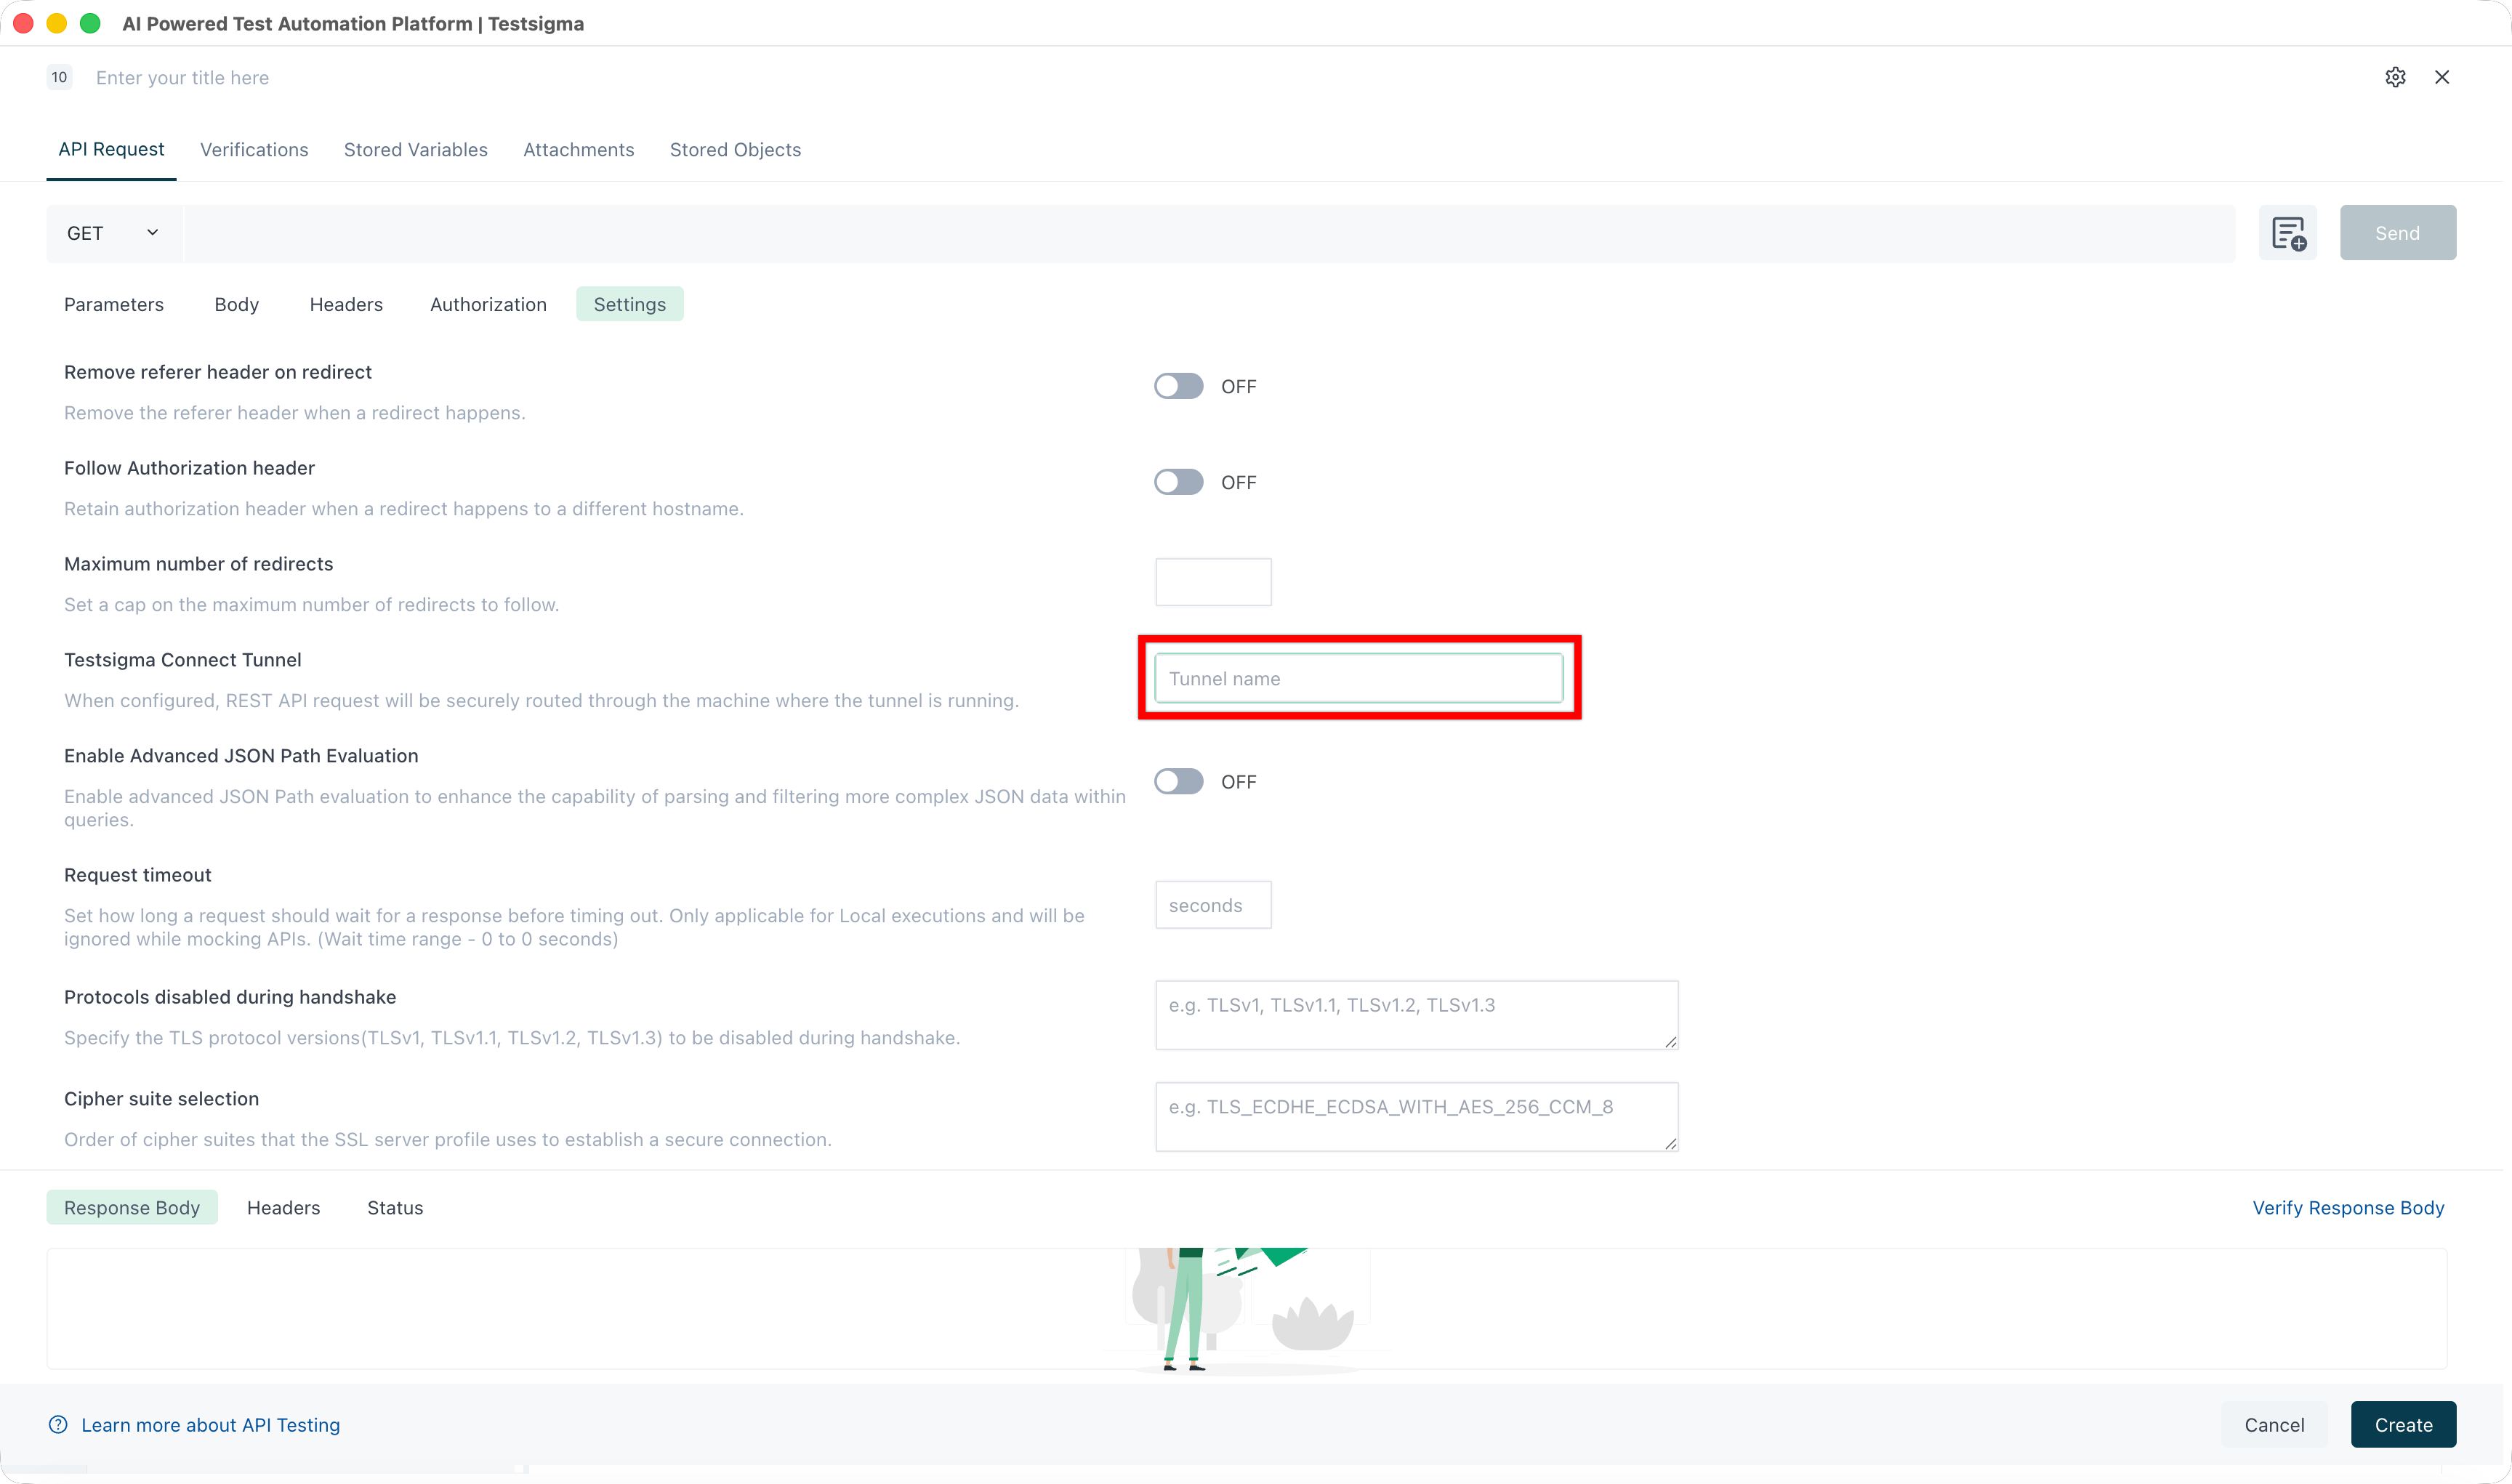
For live REST API testing, open the REST API step, go to Settings, and enter the tunnel name in Tunnel Name.
Frequently asked questions
Section titled “Frequently asked questions”Why can’t a cloud device reach my application?
Section titled “Why can’t a cloud device reach my application?”Cloud labs run outside your network, so an application on a local development server is unreachable through a proxy, a VPN, or a firewall. To check, open the application URL on a workstation outside your company network, without a VPN. If it loads there, cloud devices can run against it. If it does not, use the tunnel, or run on local devices instead.
Do I need to whitelist Testsigma’s IP addresses?
Section titled “Do I need to whitelist Testsigma’s IP addresses?”Not for the tunnel. It opens an outbound connection and accepts none inbound, so no ingress rule is needed. Whitelisting is a separate route that works for an internet-reachable application but cannot reach a locally hosted one.
Why does my test go to the cloud when the tunnel is running?
Section titled “Why does my test go to the cloud when the tunnel is running?”The tunnel name is missing from the run. Add testsigmaLab.tunnelName under Desired Capabilities, or enter the name in the REST API step’s Settings.
Why does the tunnel name keep changing?
Section titled “Why does the tunnel name keep changing?”tunnel-name was left empty, so the client generates one at startup. Set it in args.yaml, on the command line, or through tunnel.tunnelName on Kubernetes.
Was this page helpful?
Thanks for the feedback.