

Create test cases
A test case is a list of steps that tests one flow in your application. Write the steps as NLPs, record them with the Recorder extension or Copilot, or generate them with Atto.
By application type
Section titled “By application type”How you create a test case depends on the application type you test. This page covers what is common to all of them. Each application type has its own page for creating a test case:
| Application type | Where to start |
|---|---|
| Web and mobile web | Create a web or mobile web test case |
| Android | Create an Android test case |
| iOS | Create an iOS test case |
| Unified mobile (Android and iOS) | Create a Unified mobile test case |
| Windows desktop | Create a Windows test case |
| Salesforce | Create a Salesforce test case |
| REST and SOAP APIs | Create an API test case |
Folders and subfolders
Section titled “Folders and subfolders”Test cases live in folders and subfolders. A folder groups related subfolders, and each subfolder holds its test cases. In a shopping application, User Authentication is a folder, Login is a subfolder, and Login with invalid credentials is a test case.
This structure keeps a large library searchable, prevents duplicate test cases, and feeds the filters you use when you build test suites.
To create a folder, click +, select New Folder, name it, and click Add. To create a subfolder, click +, select New Subfolder, select the parent folder in Select Folder, click Next, name the subfolder, and click Create.
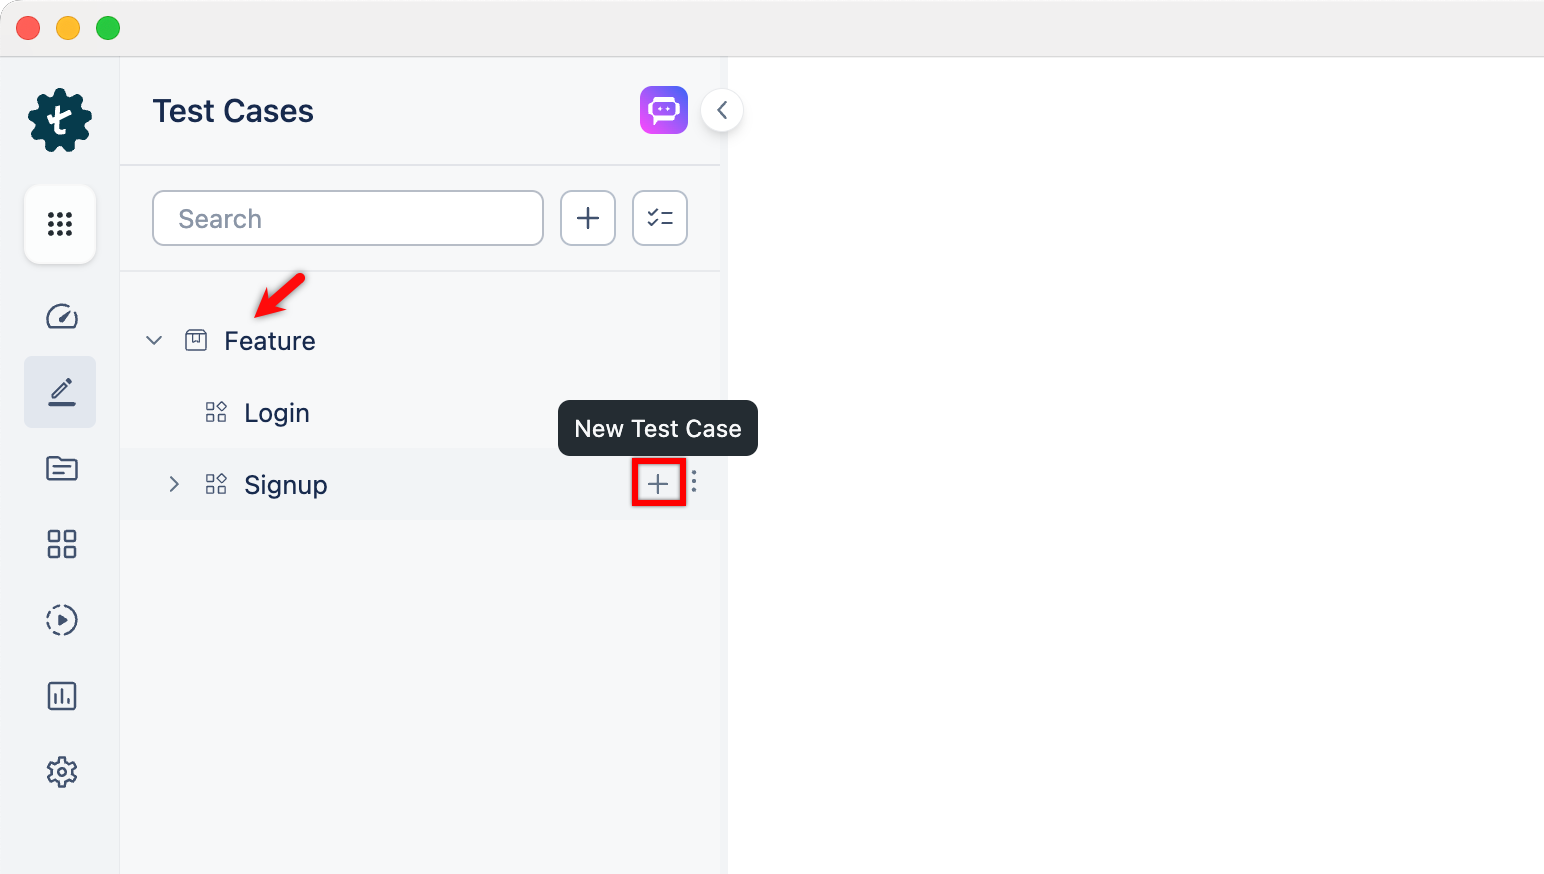
For quick actions, click the ellipsis icon ⋮ on a folder or subfolder row:
| Action | What it does |
|---|---|
| Rename | Changes the name |
| Clone | Creates a copy |
| Move | Places it under a different folder |
| Delete | Removes it from the project |
Create test steps
Section titled “Create test steps”-
Click + Add new step.
-
Enter the action in plain English. Suggestions appear as you type an action word.
-
Click Create Step.
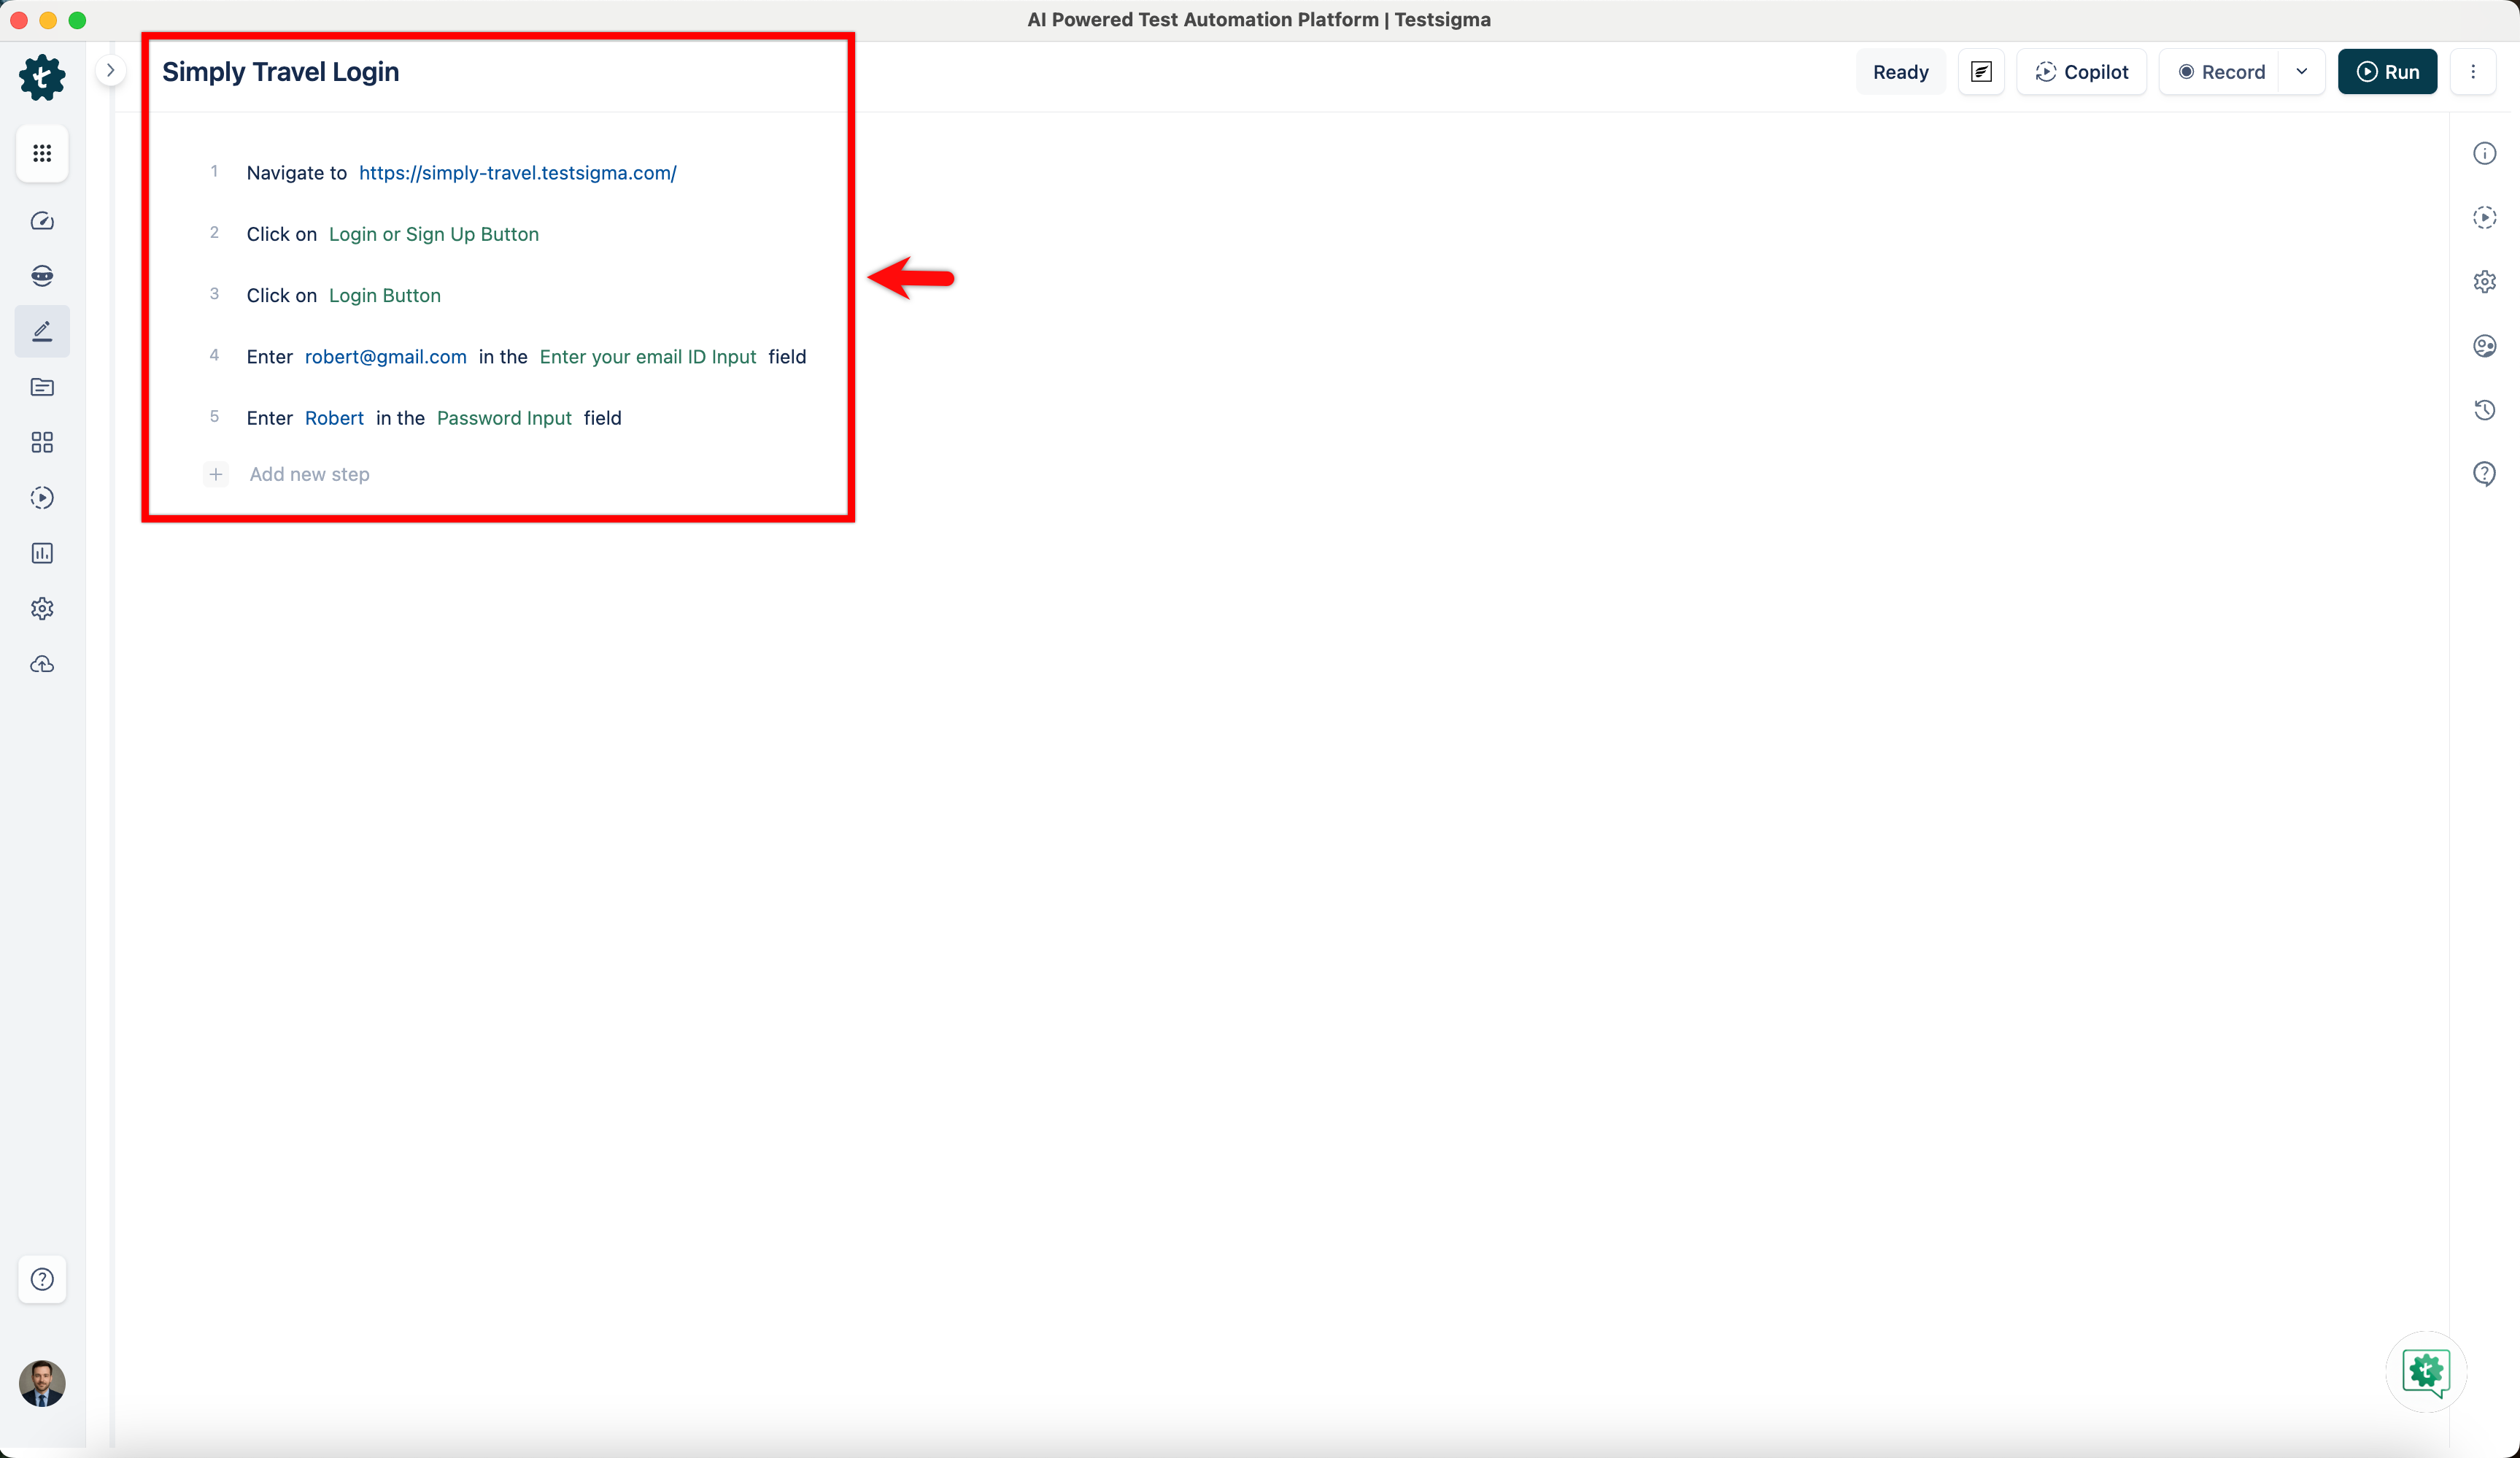
These action words have suggestions: Click, Tap, Verify, Scroll, Check, Clear, Close, Uncheck, Store, Double Click, Drag, Enter, Swipe, Switch, Execute, Select, Wait, and Mouseover.
Recording needs the Recorder extension installed in your browser.
Web and mobile web
-
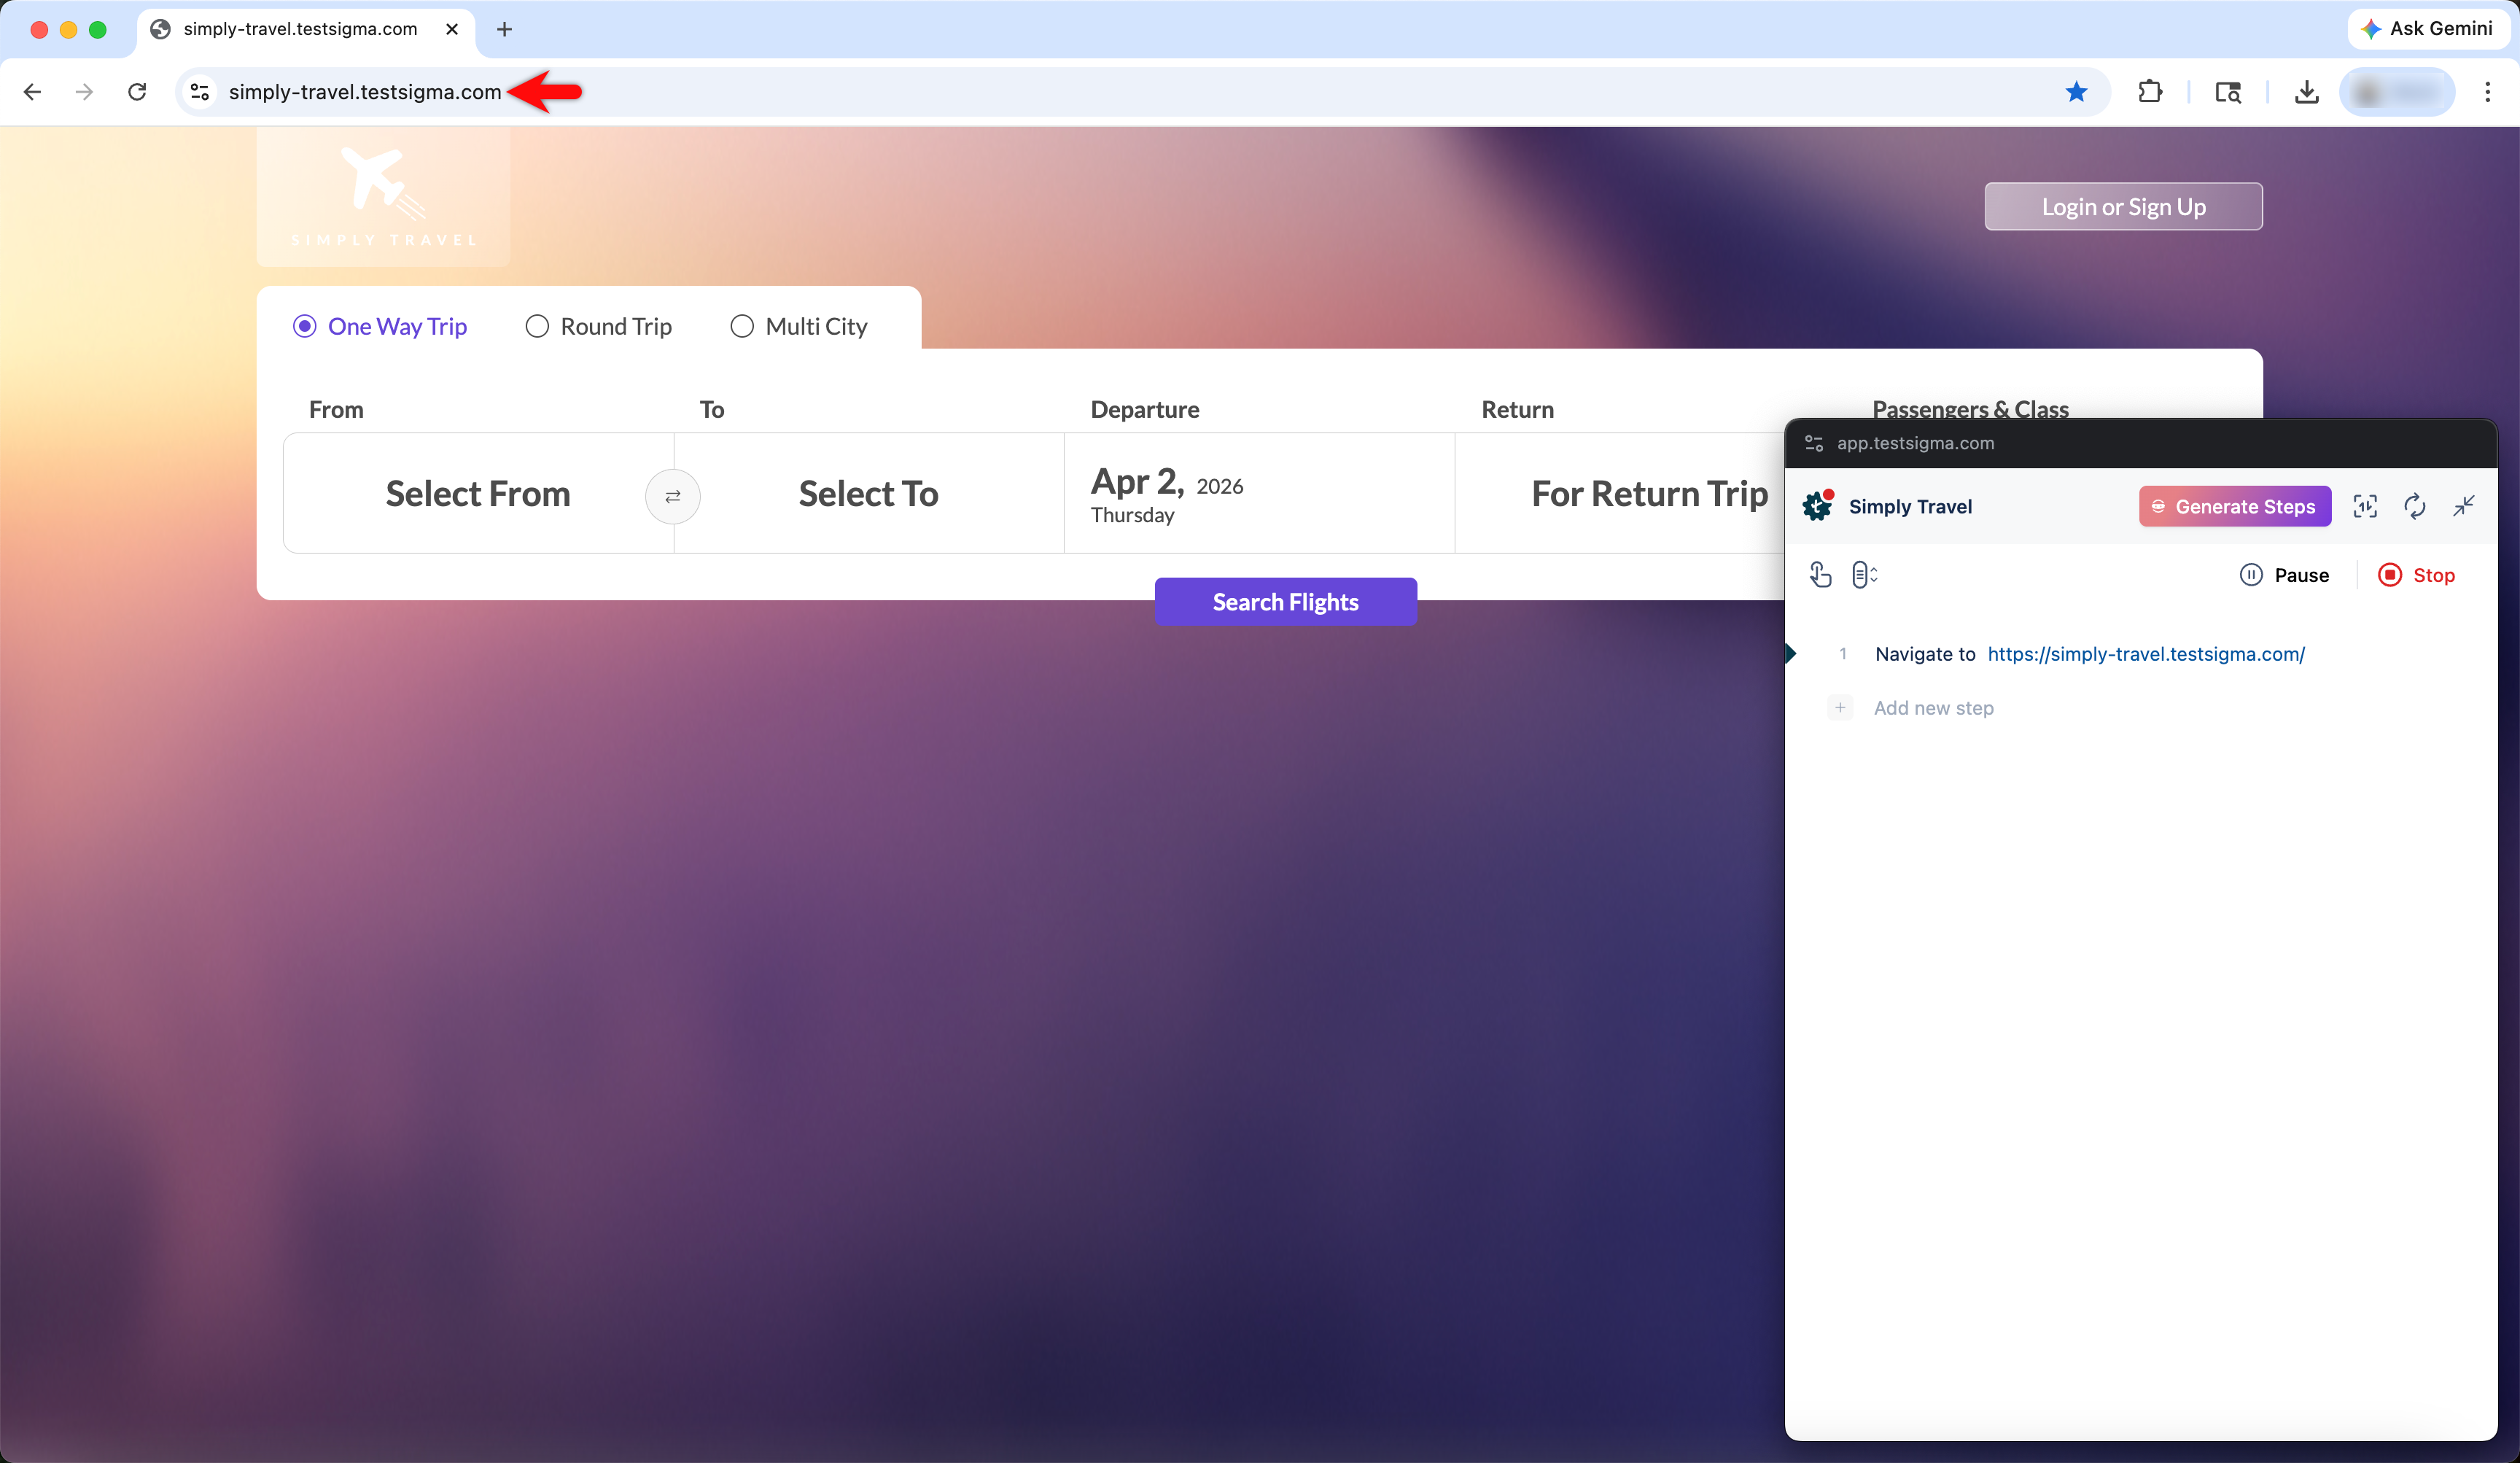
Create a first step carrying the URL to automate.
-
Click Create Step.
-
Click Record. A new window opens the URL.
-
Wait for the page to load fully, so the extension can collect the page information.
-
Perform the flow. Each action lands as a step in the recorder.
-
Click Stop. The test case page reopens with the recorded steps.
Android and iOS
-
Click Create Step.
-
Click Record.
-
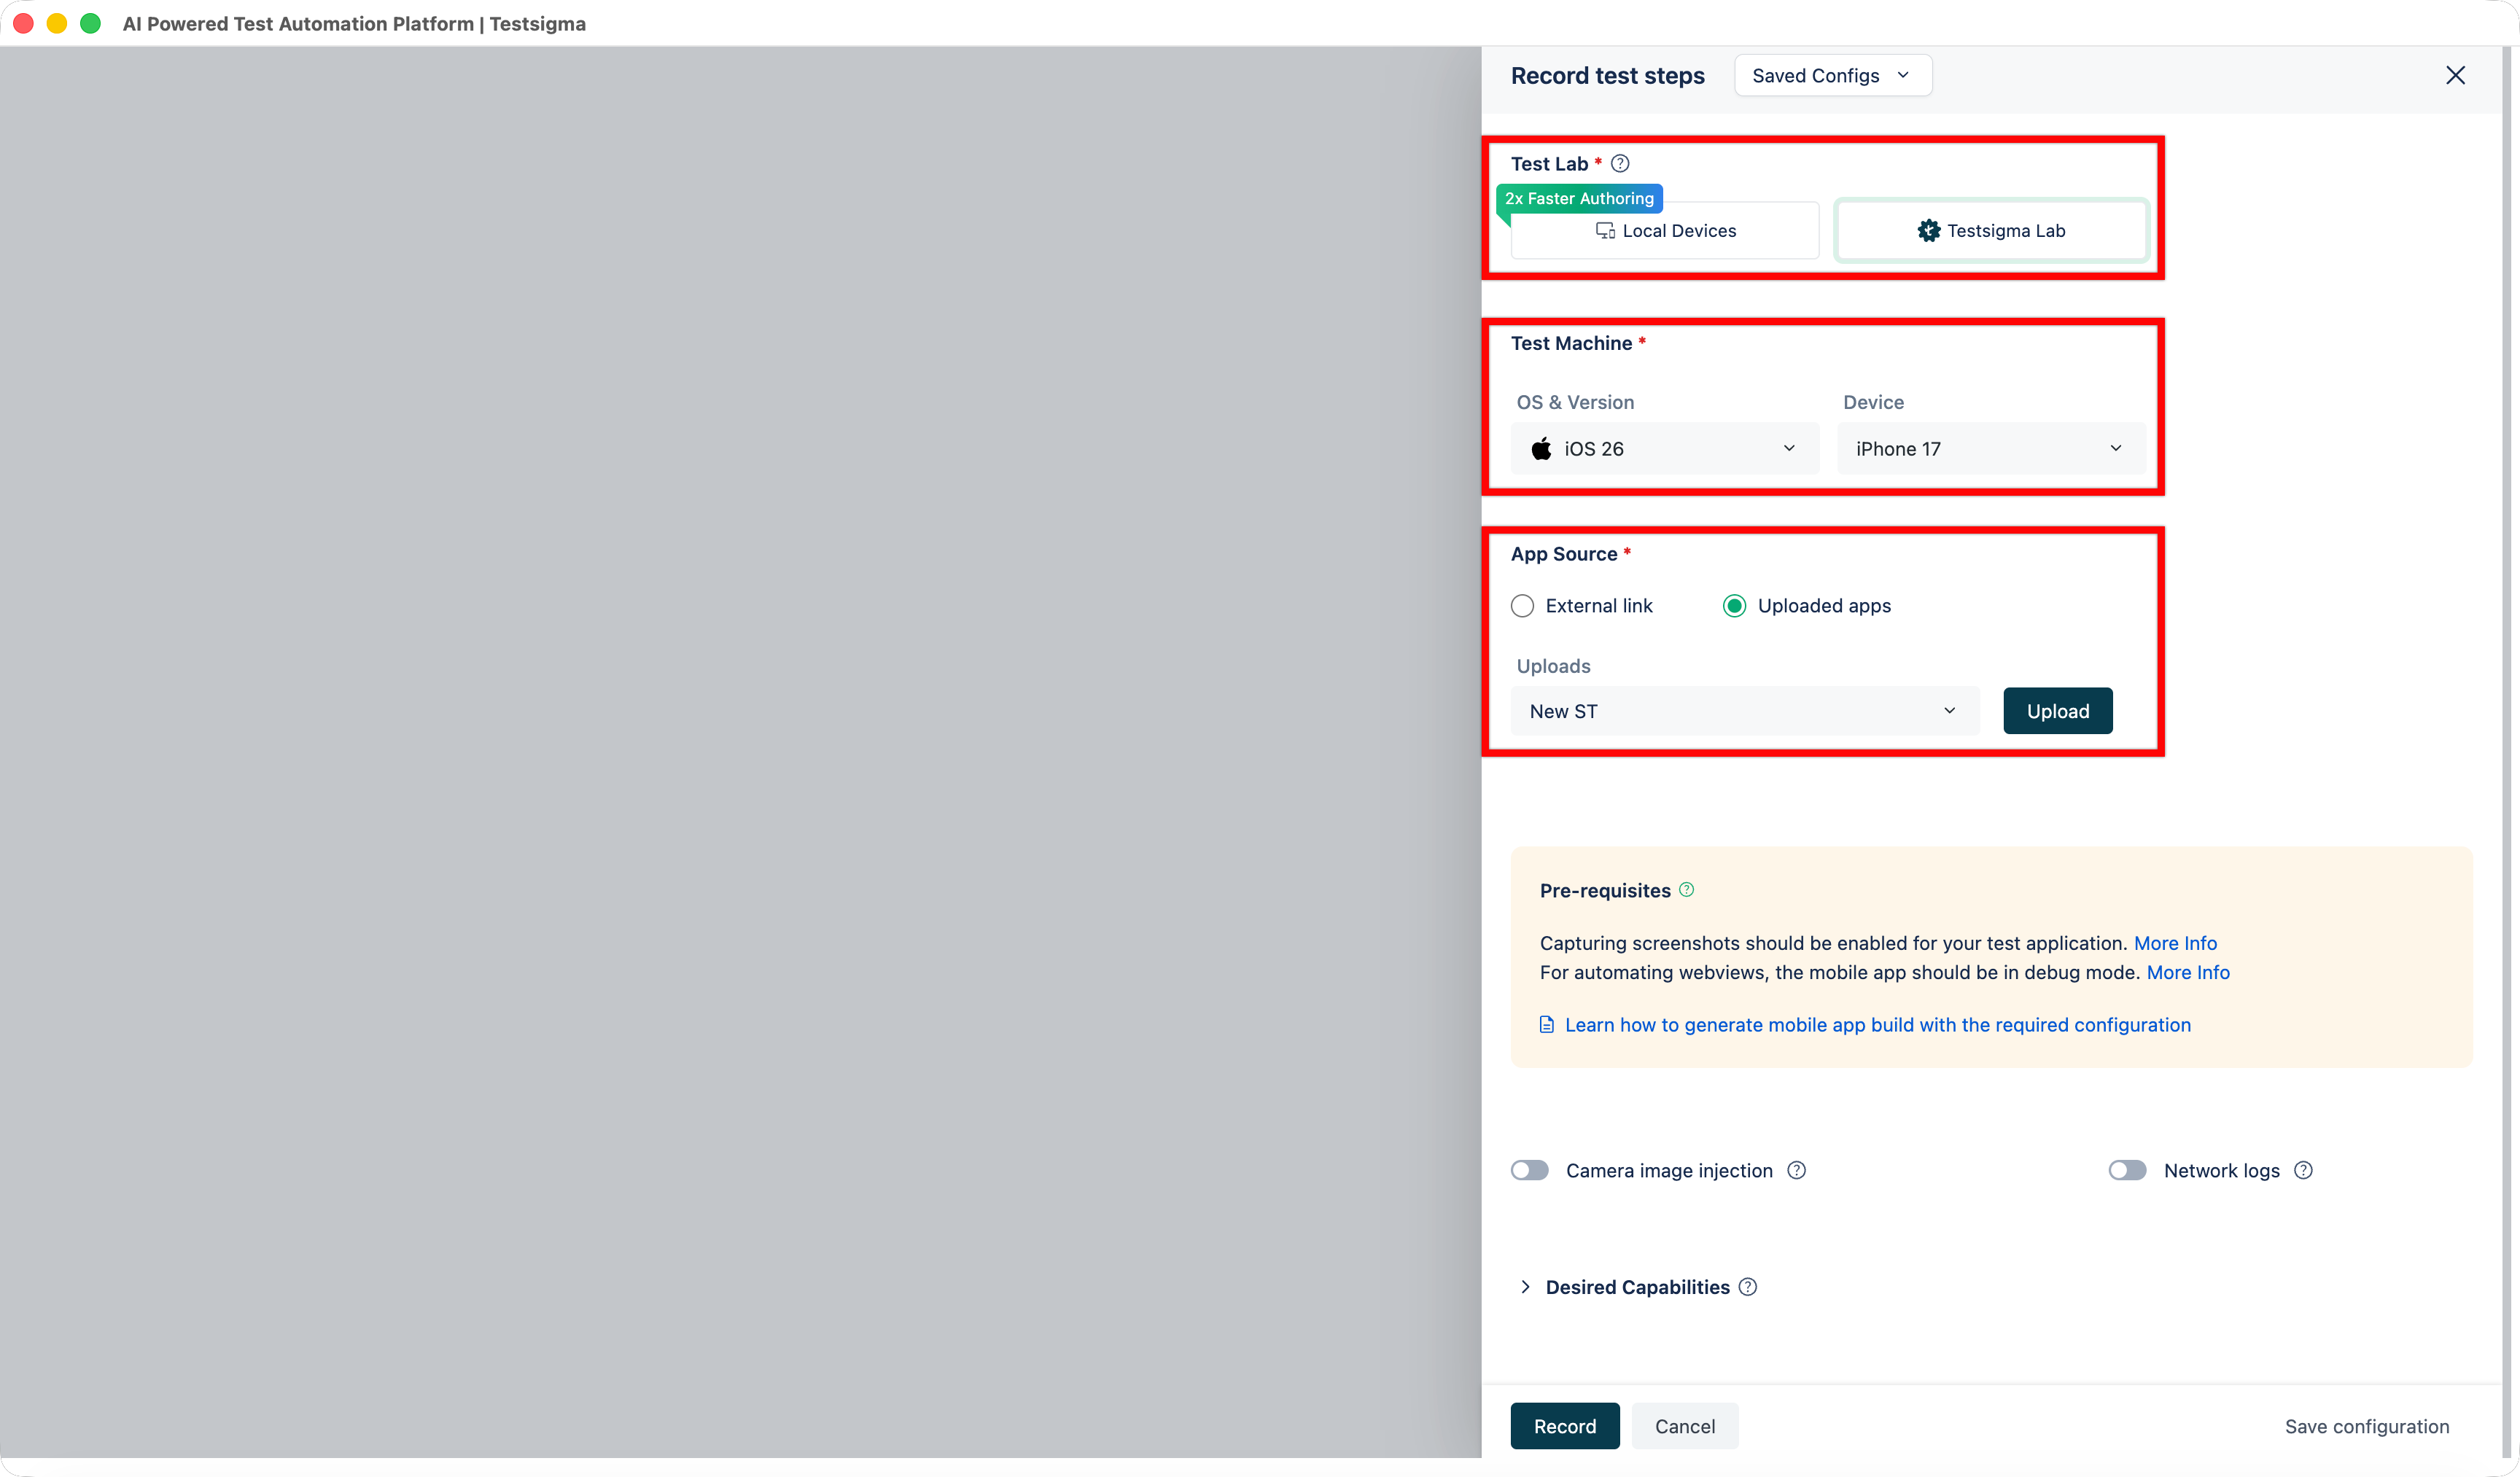
In the Record test steps overlay, select the Test Lab and the Test Machine.
-
Click Upload and supply the application build.
-
Click Record.
-
Perform the flow on the streamed device.
-
Stop the recording.
The device panel and the element actions are the same on Android and iOS.
- Device controls: Install App, Mirroring mode, Inspect Mode (view element attributes without recording a step), Swipe By Coordinates, Tap By Coordinates, Search Element, Go back, Home, Hide Keyboard, Rotate Screen
- Element actions: Tap, Enter Data, View Code, Clear, Element Details
Inside a WebView
A blank screen with no selectable elements usually means a hybrid application rendering a WebView. Switch context to reach the elements inside it.
-
Click H in the recorder panel.
-
Select the WebView.
-
Perform the flow inside the WebView.
-
Switch back to the native context when you leave the WebView.
Each switch is recorded as a step:
- Switch to Webview context when you enter the WebView
- Switch to Native App Context when you return to the native application
- Switch to context with name WEBVIEW_6890.1 when you pick a named view
Copilot needs Testsigma Terminal running on your desktop. If it isn’t running, the editor shows a prompt with Launch Terminal.
-
Enter the URL to automate, and click Create Step.
-
Click Copilot.
-
Click Launch in the Copilot overlay. Copilot opens a browser window and runs the URL.
-
Click Rec.
-
Perform the flow. Each action lands as a step in the background.
-
Click Stop recording.
-
Click Exit Copilot.
-
Click Stop Copilot in the Stop & Exit Copilot dialog.
Atto’s Generator agent turns requirements or an API schema into complete test cases, not single steps. Generated test cases are saved under the AI Generated folder and subfolder.
-
Go to Atto’s Home and click Generate with AI.
-
Add your requirements as sources.
-
Describe what to cover in the prompt box.
-
Click Generate with AI.
-
Expand a category and open a generated test case.
-
On the Manual Steps tab, click Edit to change the steps directly, or enter a prompt and click Refine manual steps.
-
Click Generate Automated Steps to convert the manual steps to NLP steps.
-
(Optional) To check the test case before you save it, hover over Run with Copilot and select an environment.
-
Click Save to Library.
-
Select the folder and subfolder.
From an API schema
Turn on Generate test cases from Swagger schema under Settings > Preferences > Generative AI features.
Atto groups REST endpoints into test cases by their Swagger tags. Tag every endpoint before you import.
-
In Test Case Explorer, click Atto.
-
Select Generate Test Cases from API Schema.
-
Import the schema. REST schemas use
.json. SOAP schemas use.wsdlor.xml. -
Clear the test cases you want to skip. All generated test cases are selected.
-
Review the steps in Test Steps, and the endpoint, body, and status verifications in Verification Details.
-
Click Save Test Cases.
Steps default to natural language. For loops, conditions, blocks, step groups, and API calls, see Step types.
Manage test cases
Section titled “Manage test cases”Find test cases with filters and labels, delete and restore them, and import test cases from another project or from Postman.
Find and organize test cases
Section titled “Find and organize test cases”Click List View to search, sort, and filter the whole library. Search by name from the search bar. Sort by Title, Created Date, or Updated Date. To filter, click Show Filters > Add Filter. Filters stack, and you can filter by Status, Priority, Last run result, Added to Test Suite, Assignee, Created By, Created Date, Updated Date, Reviewer, Test Case Type, Labels, Requirement, Requirement Type, and any custom field.
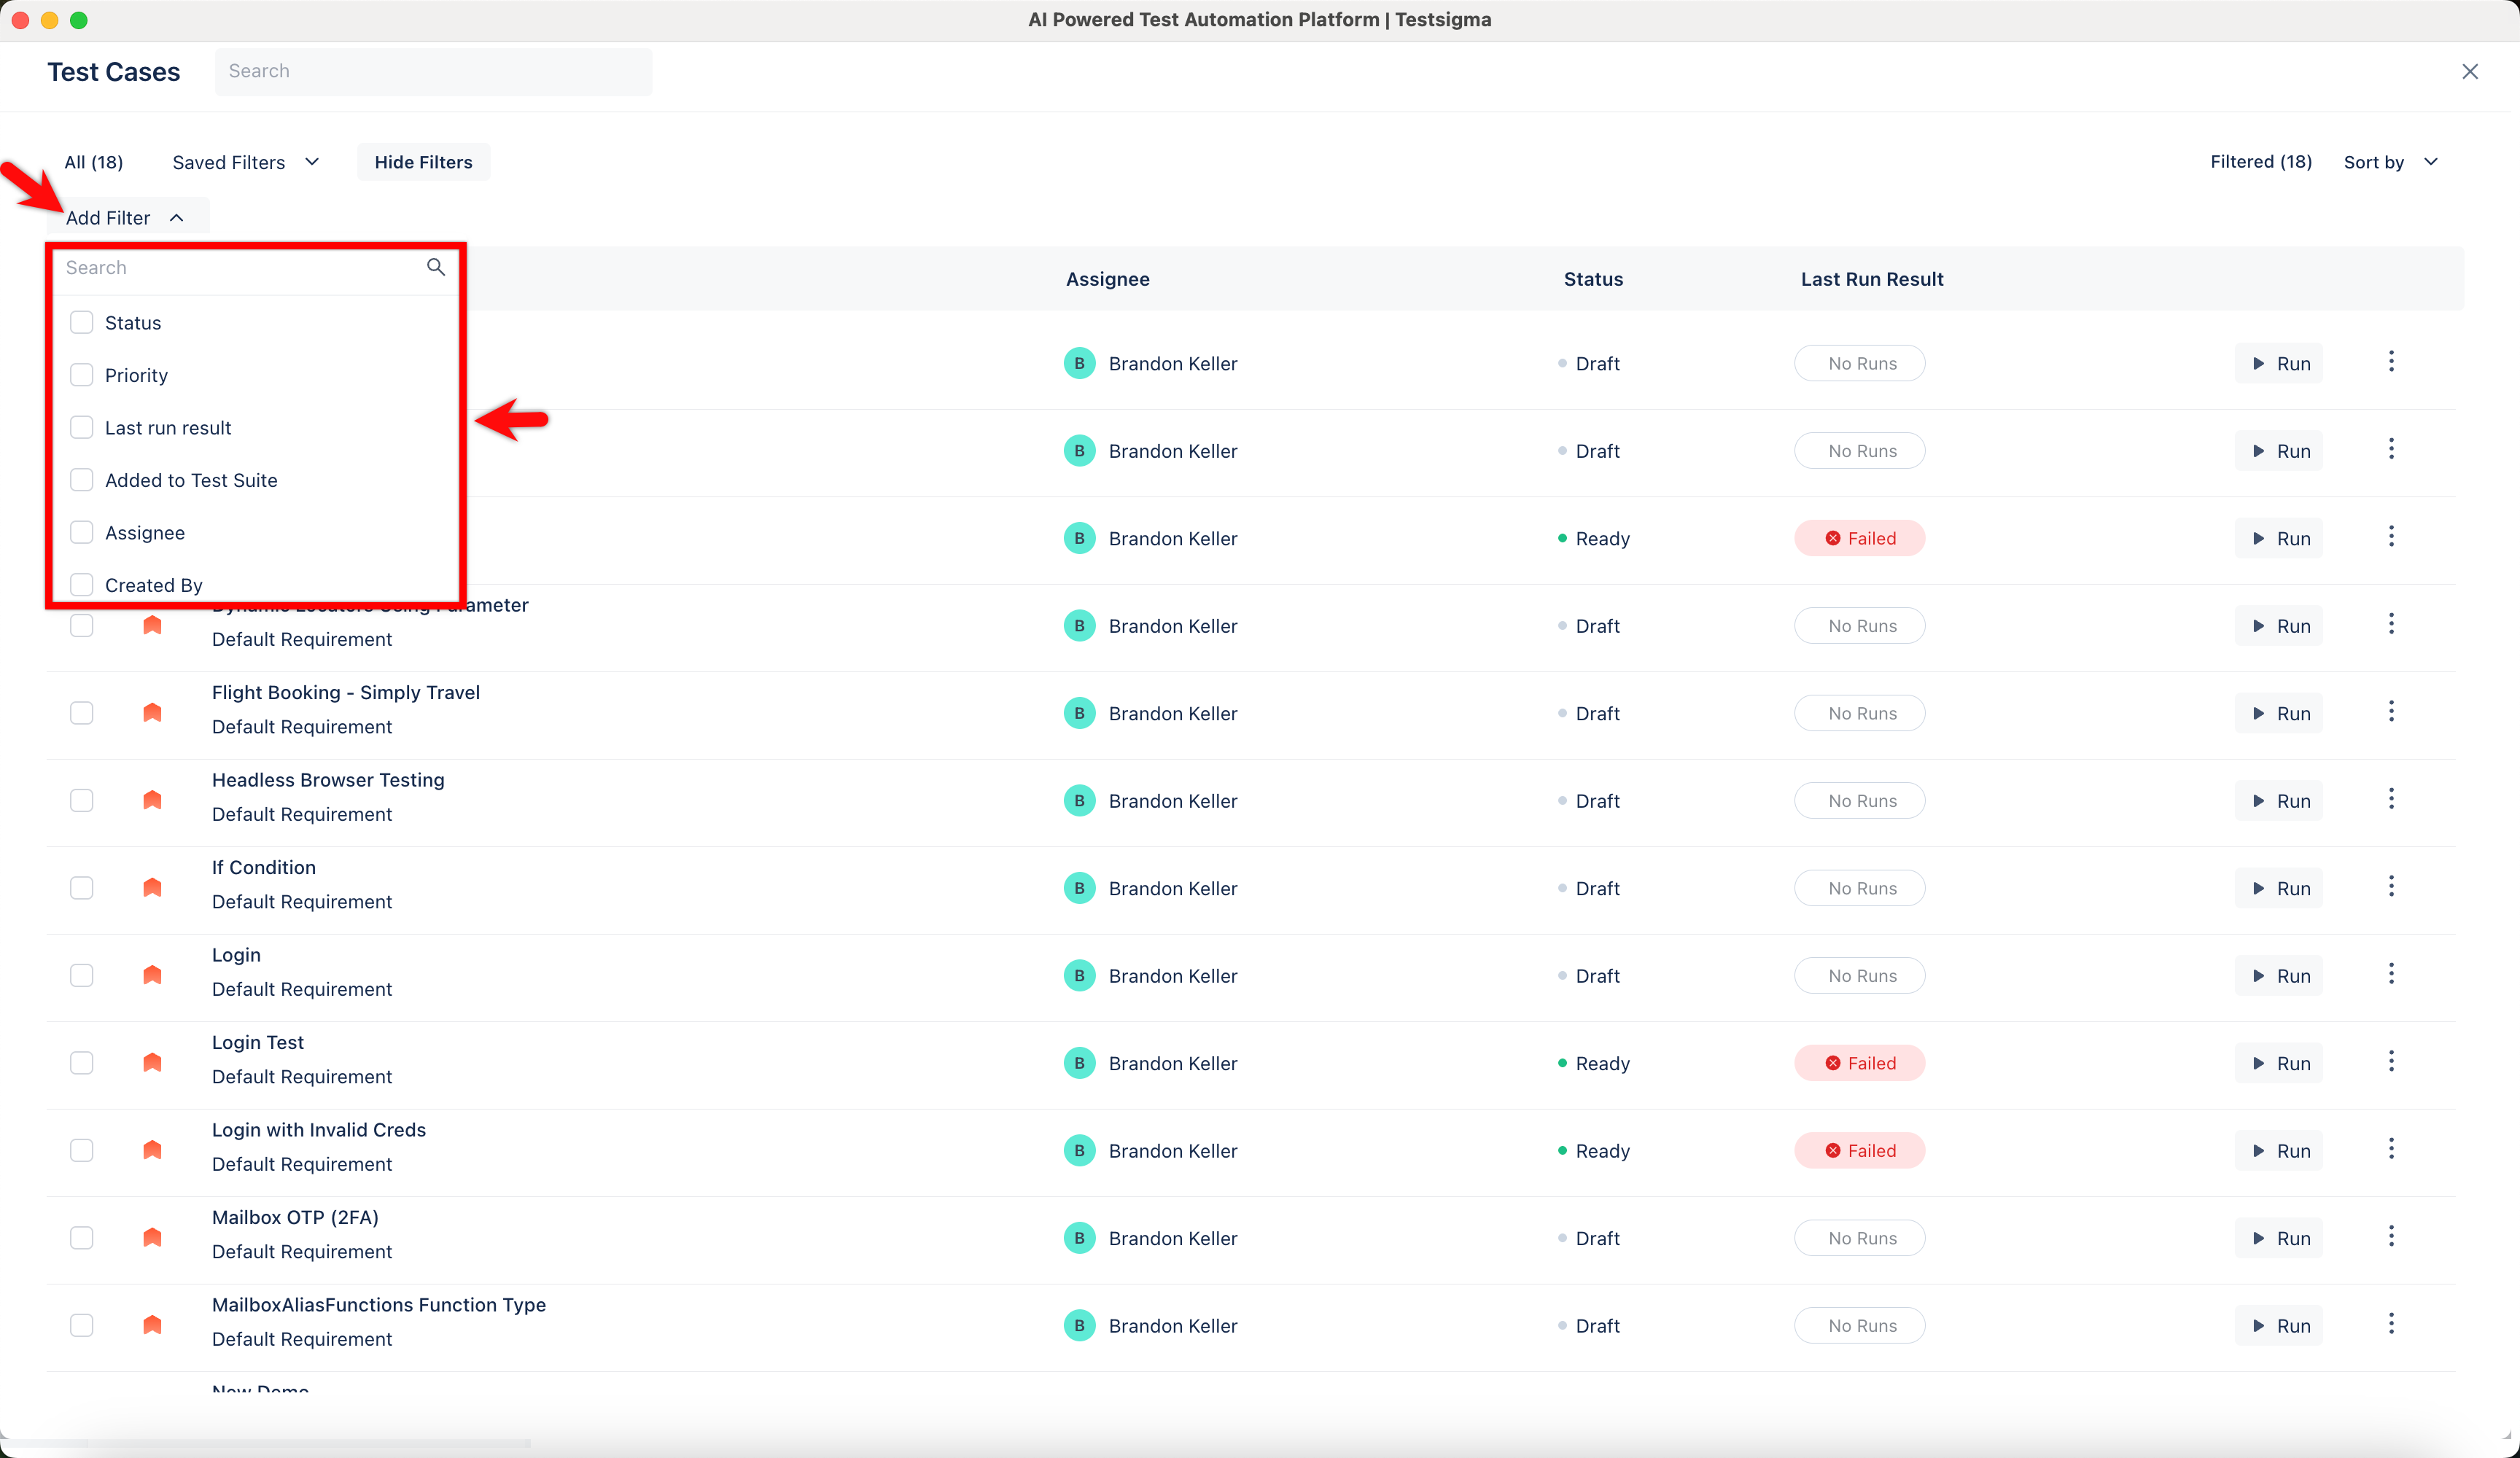
To keep a filter, click Save Filter > As New, name it, and select Mark as Public to share it. Replace Existing updates a filter you already saved. Saved filters live under Saved Filters, split into Custom and Predefined, and you can edit or delete each one. Click Reset or All to clear the active filter.
Label test cases
Section titled “Label test cases”One label can be attached to test cases, step groups, elements, test suites, and test plans. To create a label, go to Settings > Labels and click Add New Label. To attach it to a test case, open the test case and use Manage Test Case > Labels. Step groups, elements, test suites, and test plans attach labels from their own panels.
To detach a label, go to Settings > Labels, click the label’s count, select the assets in Linked Entities, and click Remove Link.
Delete and restore test cases
Section titled “Delete and restore test cases”Delete a test case 3 ways:
- Open the test case, click the More options
⋮menu, and click Delete. - Click the ellipsis icon
⋮next to the test case in its subfolder, and click Delete. - Select one or more test cases in List View, and click the Delete icon in the menu bar.
In Delete Confirmation, click Delete to remove the test case from the project.
A deleted test case goes to the trash. To restore it, click Saved Filters in List View, select Trash (Deleted Test Cases), find the test case, click Restore next to it, then click Restore in the dialog.
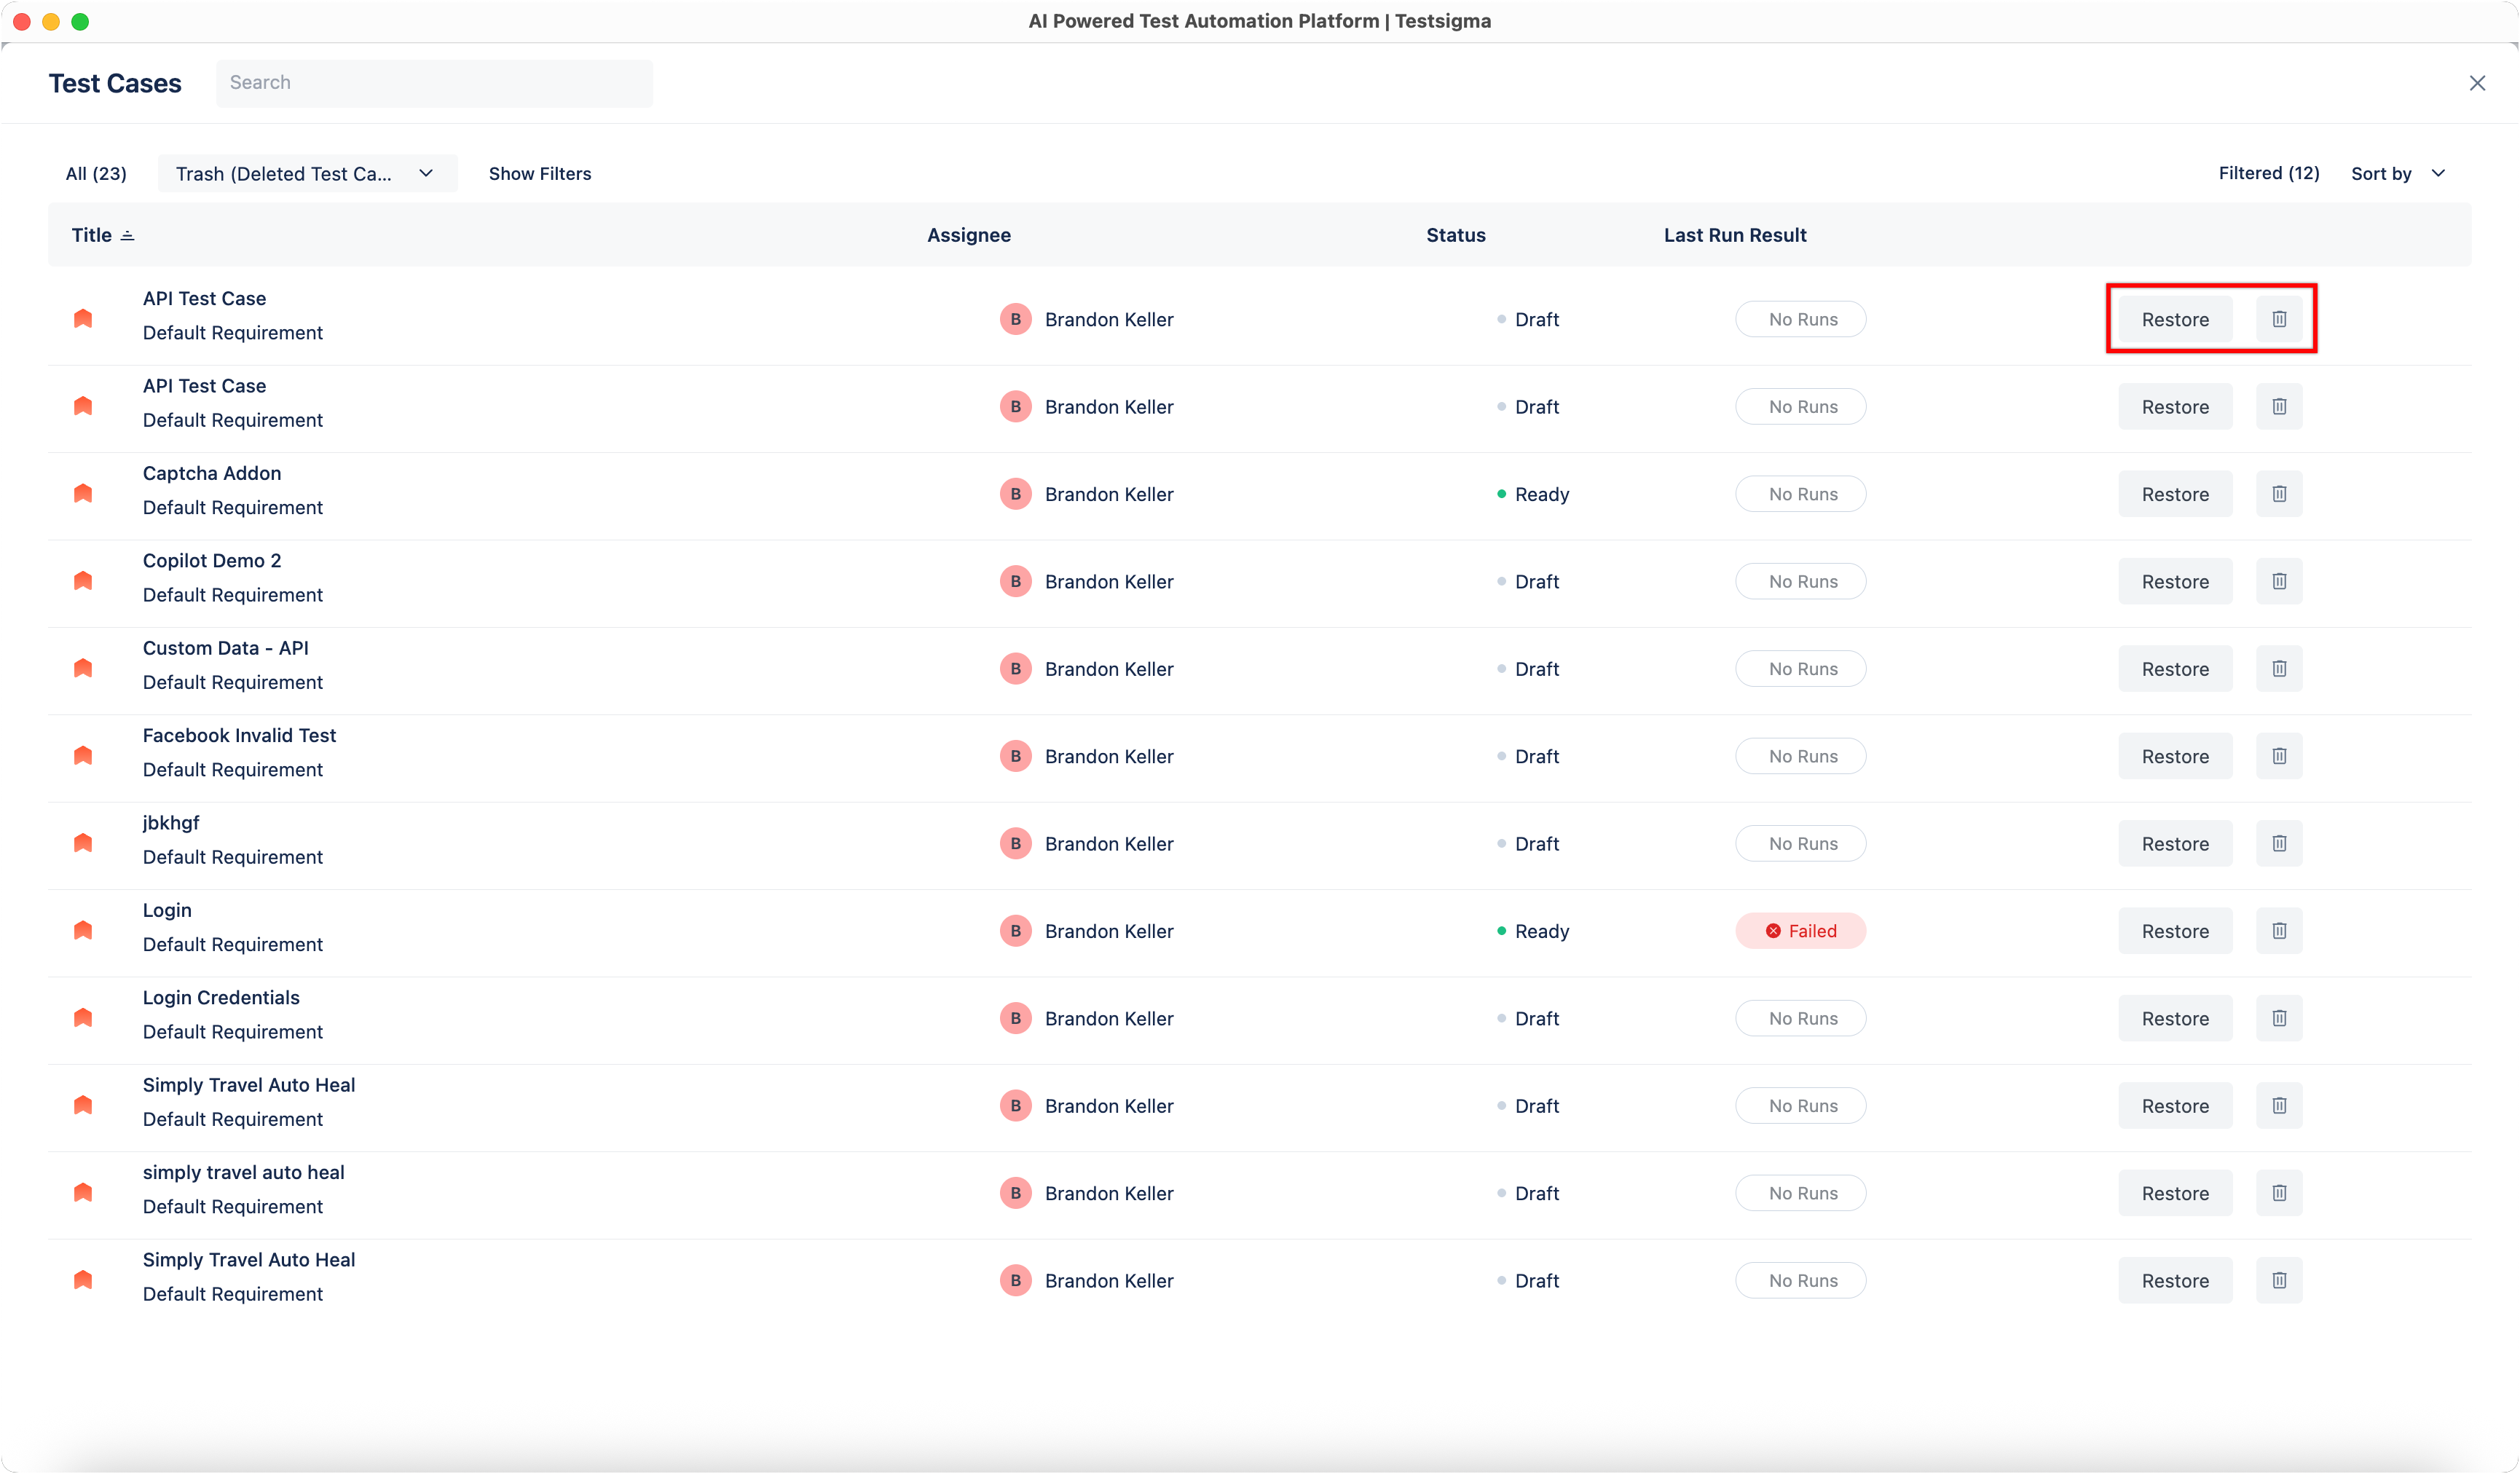
To delete a test case permanently, click Delete next to it in the trash, enter DELETE, and click I Understand, delete this (test-case-name).
Import test cases from another project
Section titled “Import test cases from another project”Test cases import into the same application type only. Test cases from a web application import into a web application in the target project, and cannot move to a different application type.
-
Go to Create Tests > Test Cases.
-
In Test Case Explorer, click the ellipsis icon
⋮and click Import. -
On the Select Source tab of Import Artefacts, select the source Project, Application Name, and Version.
-
Click Next.
-
On the Select Artefacts tab, select the test cases, step groups, elements, test data profiles, environment variables, and uploads to import.
-
Click Proceed to Import.
-
On the Start Import tab, review the artefacts and click Confirm.
-
In Create a Save Point?, enter a name and click Start Importing.
-
Click Done.
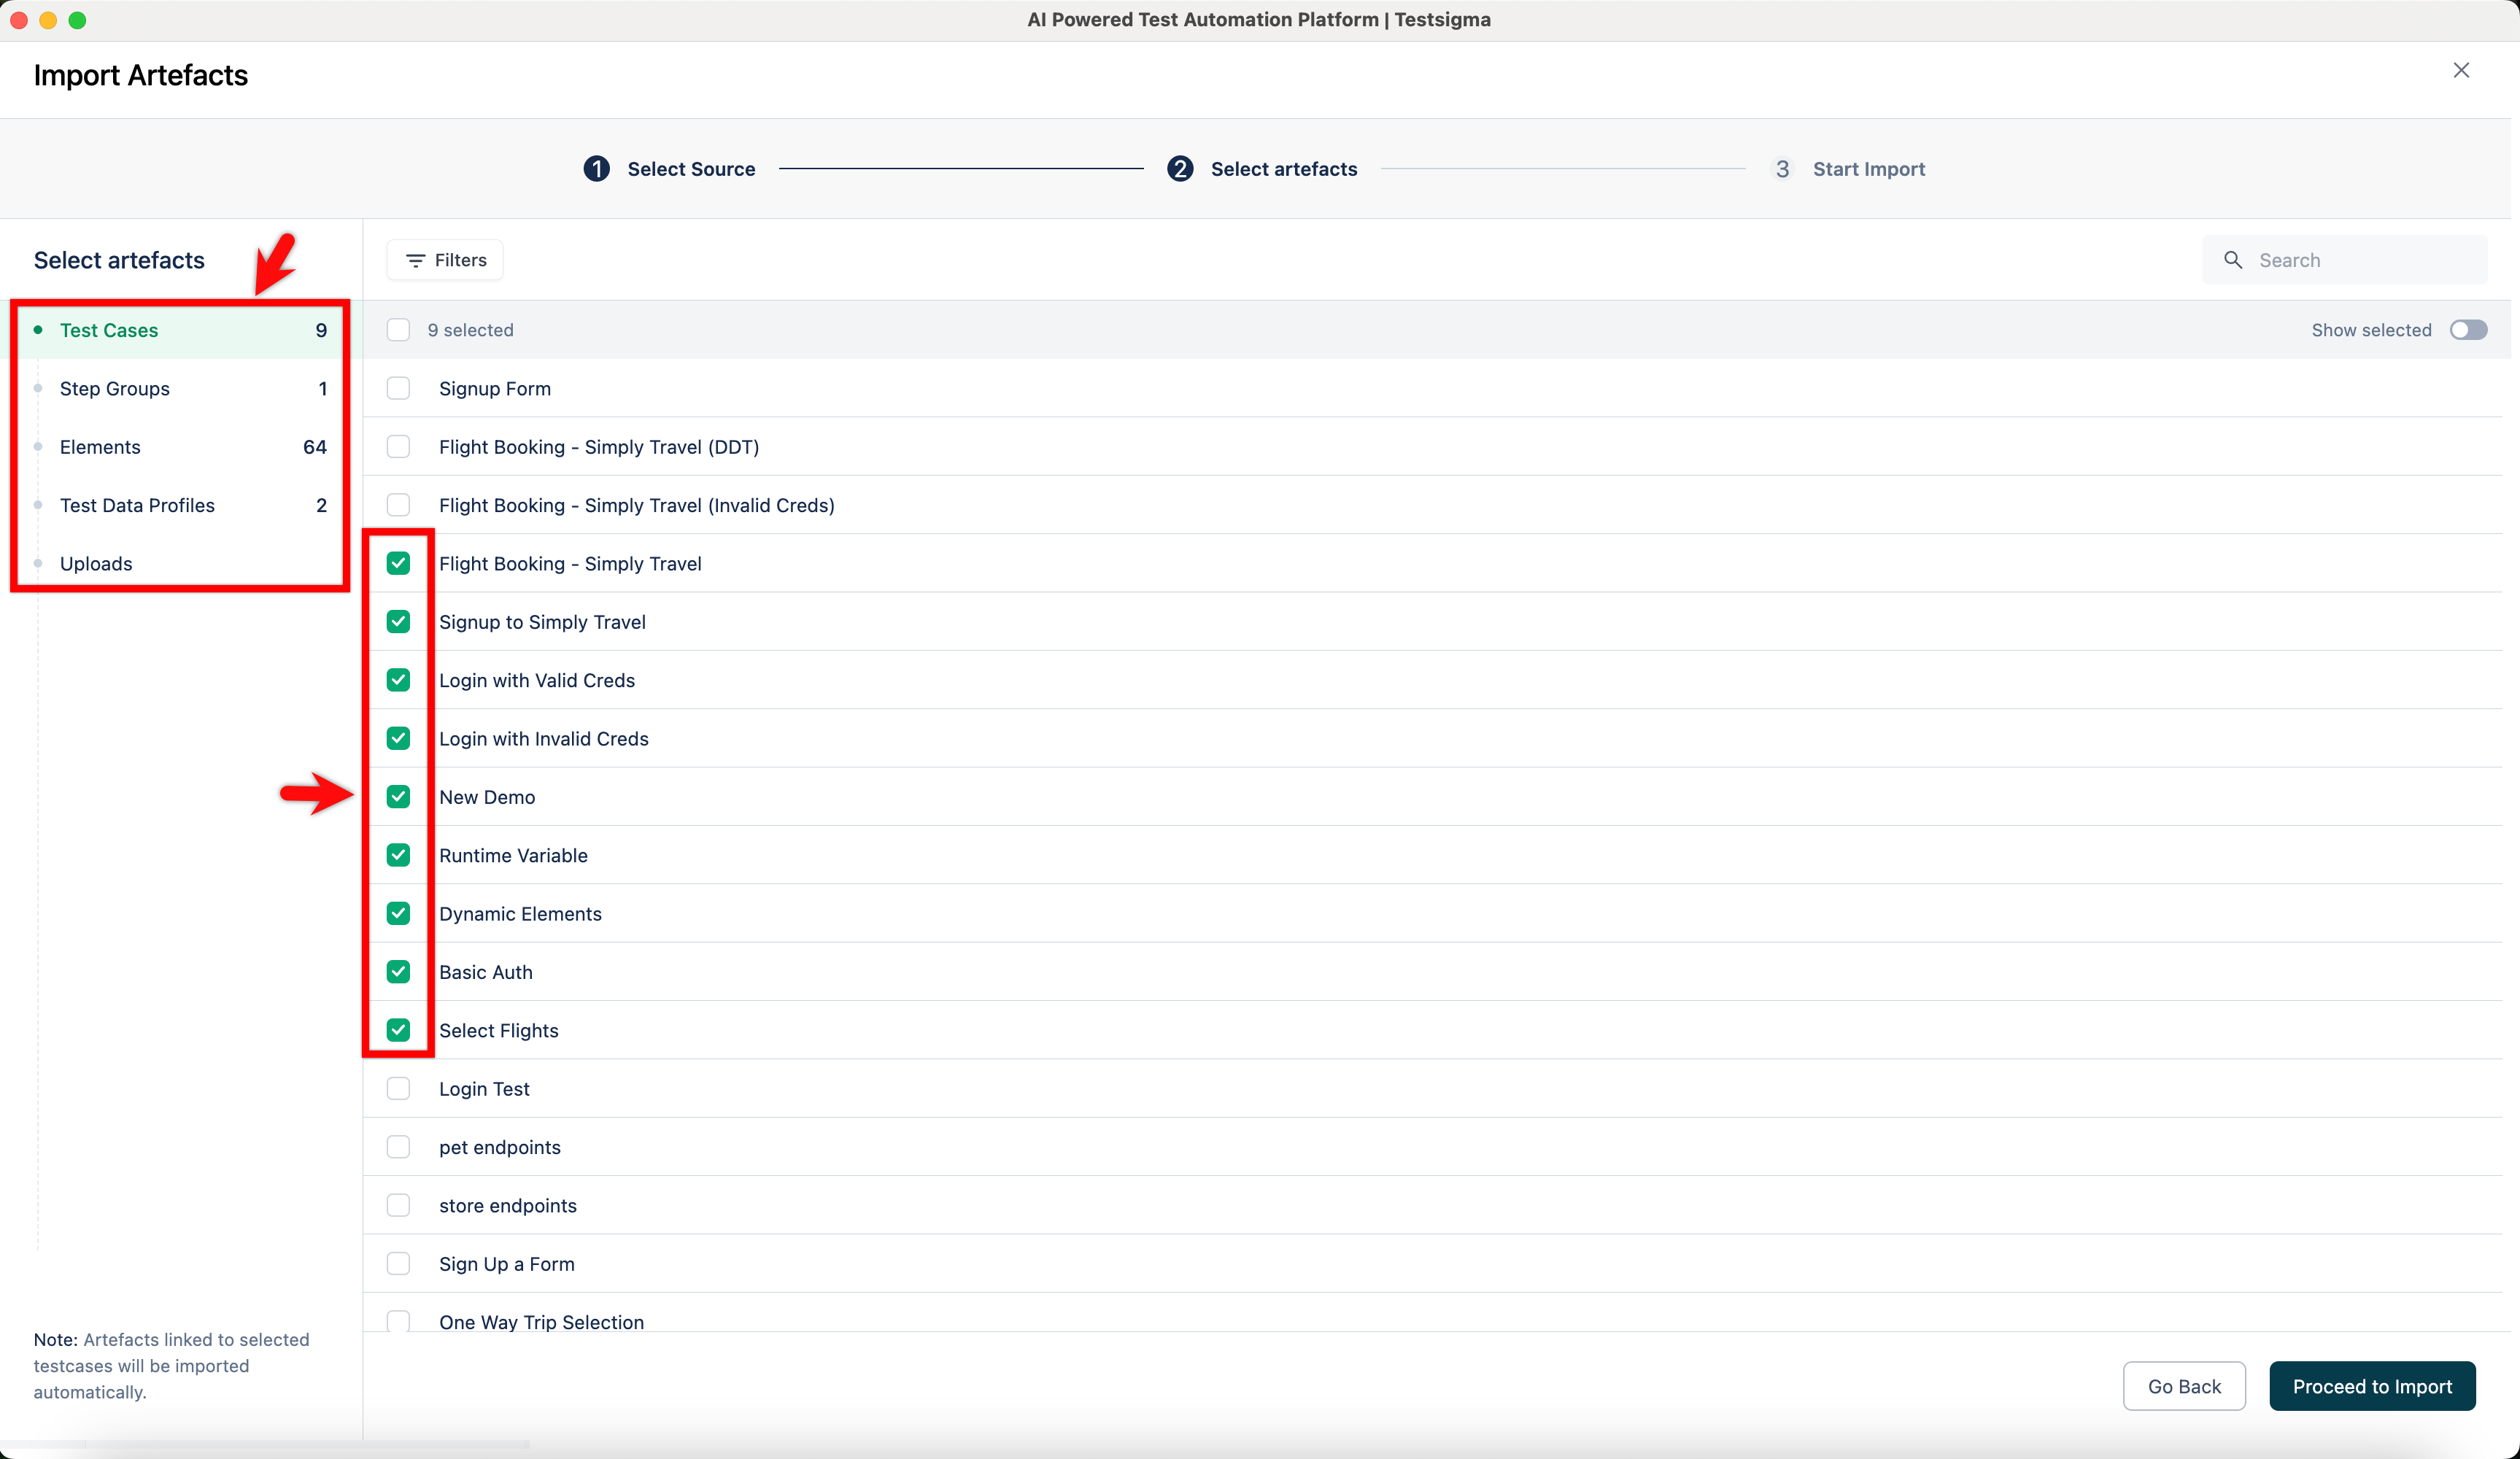
On the Start Import tab, each test case carries a status: New if it does not exist in the target project, No Change if it exists and matches, or Override if it exists and has been modified.
Testsigma creates a save point before the import, so you can revert the project to its state before the import. See Save points.
To check an import afterwards, go to Settings > Imports, click the import’s status, and review the details in Import Summary.
Import a Postman collection
Section titled “Import a Postman collection”-
Go to Settings > Imports > Import.
-
Select the exported JSON or ZIP file.
-
Select the project, application, and version.
-
Review the mapping preview.
-
Click Start Importing.
Testsigma emails you when the import finishes. You can download the imported files to check them.
| Postman | Testsigma |
|---|---|
| Collection | Test suite |
| Subfolder | Test case |
| API inside a subfolder | Test steps |
| Folder inside a subfolder | A block inside the test case |
| Collection variables | Test data profiles |
| Global and environment variables | Environments |
| Parent folder | Test case label |
Step types
Section titled “Step types”A step is a natural language action by default. Change its type to reuse a sequence, repeat steps over test data, branch on a condition, group steps under a label, or call an API.
Click the option on the left side of a step to open the step type panel. Six types are available.
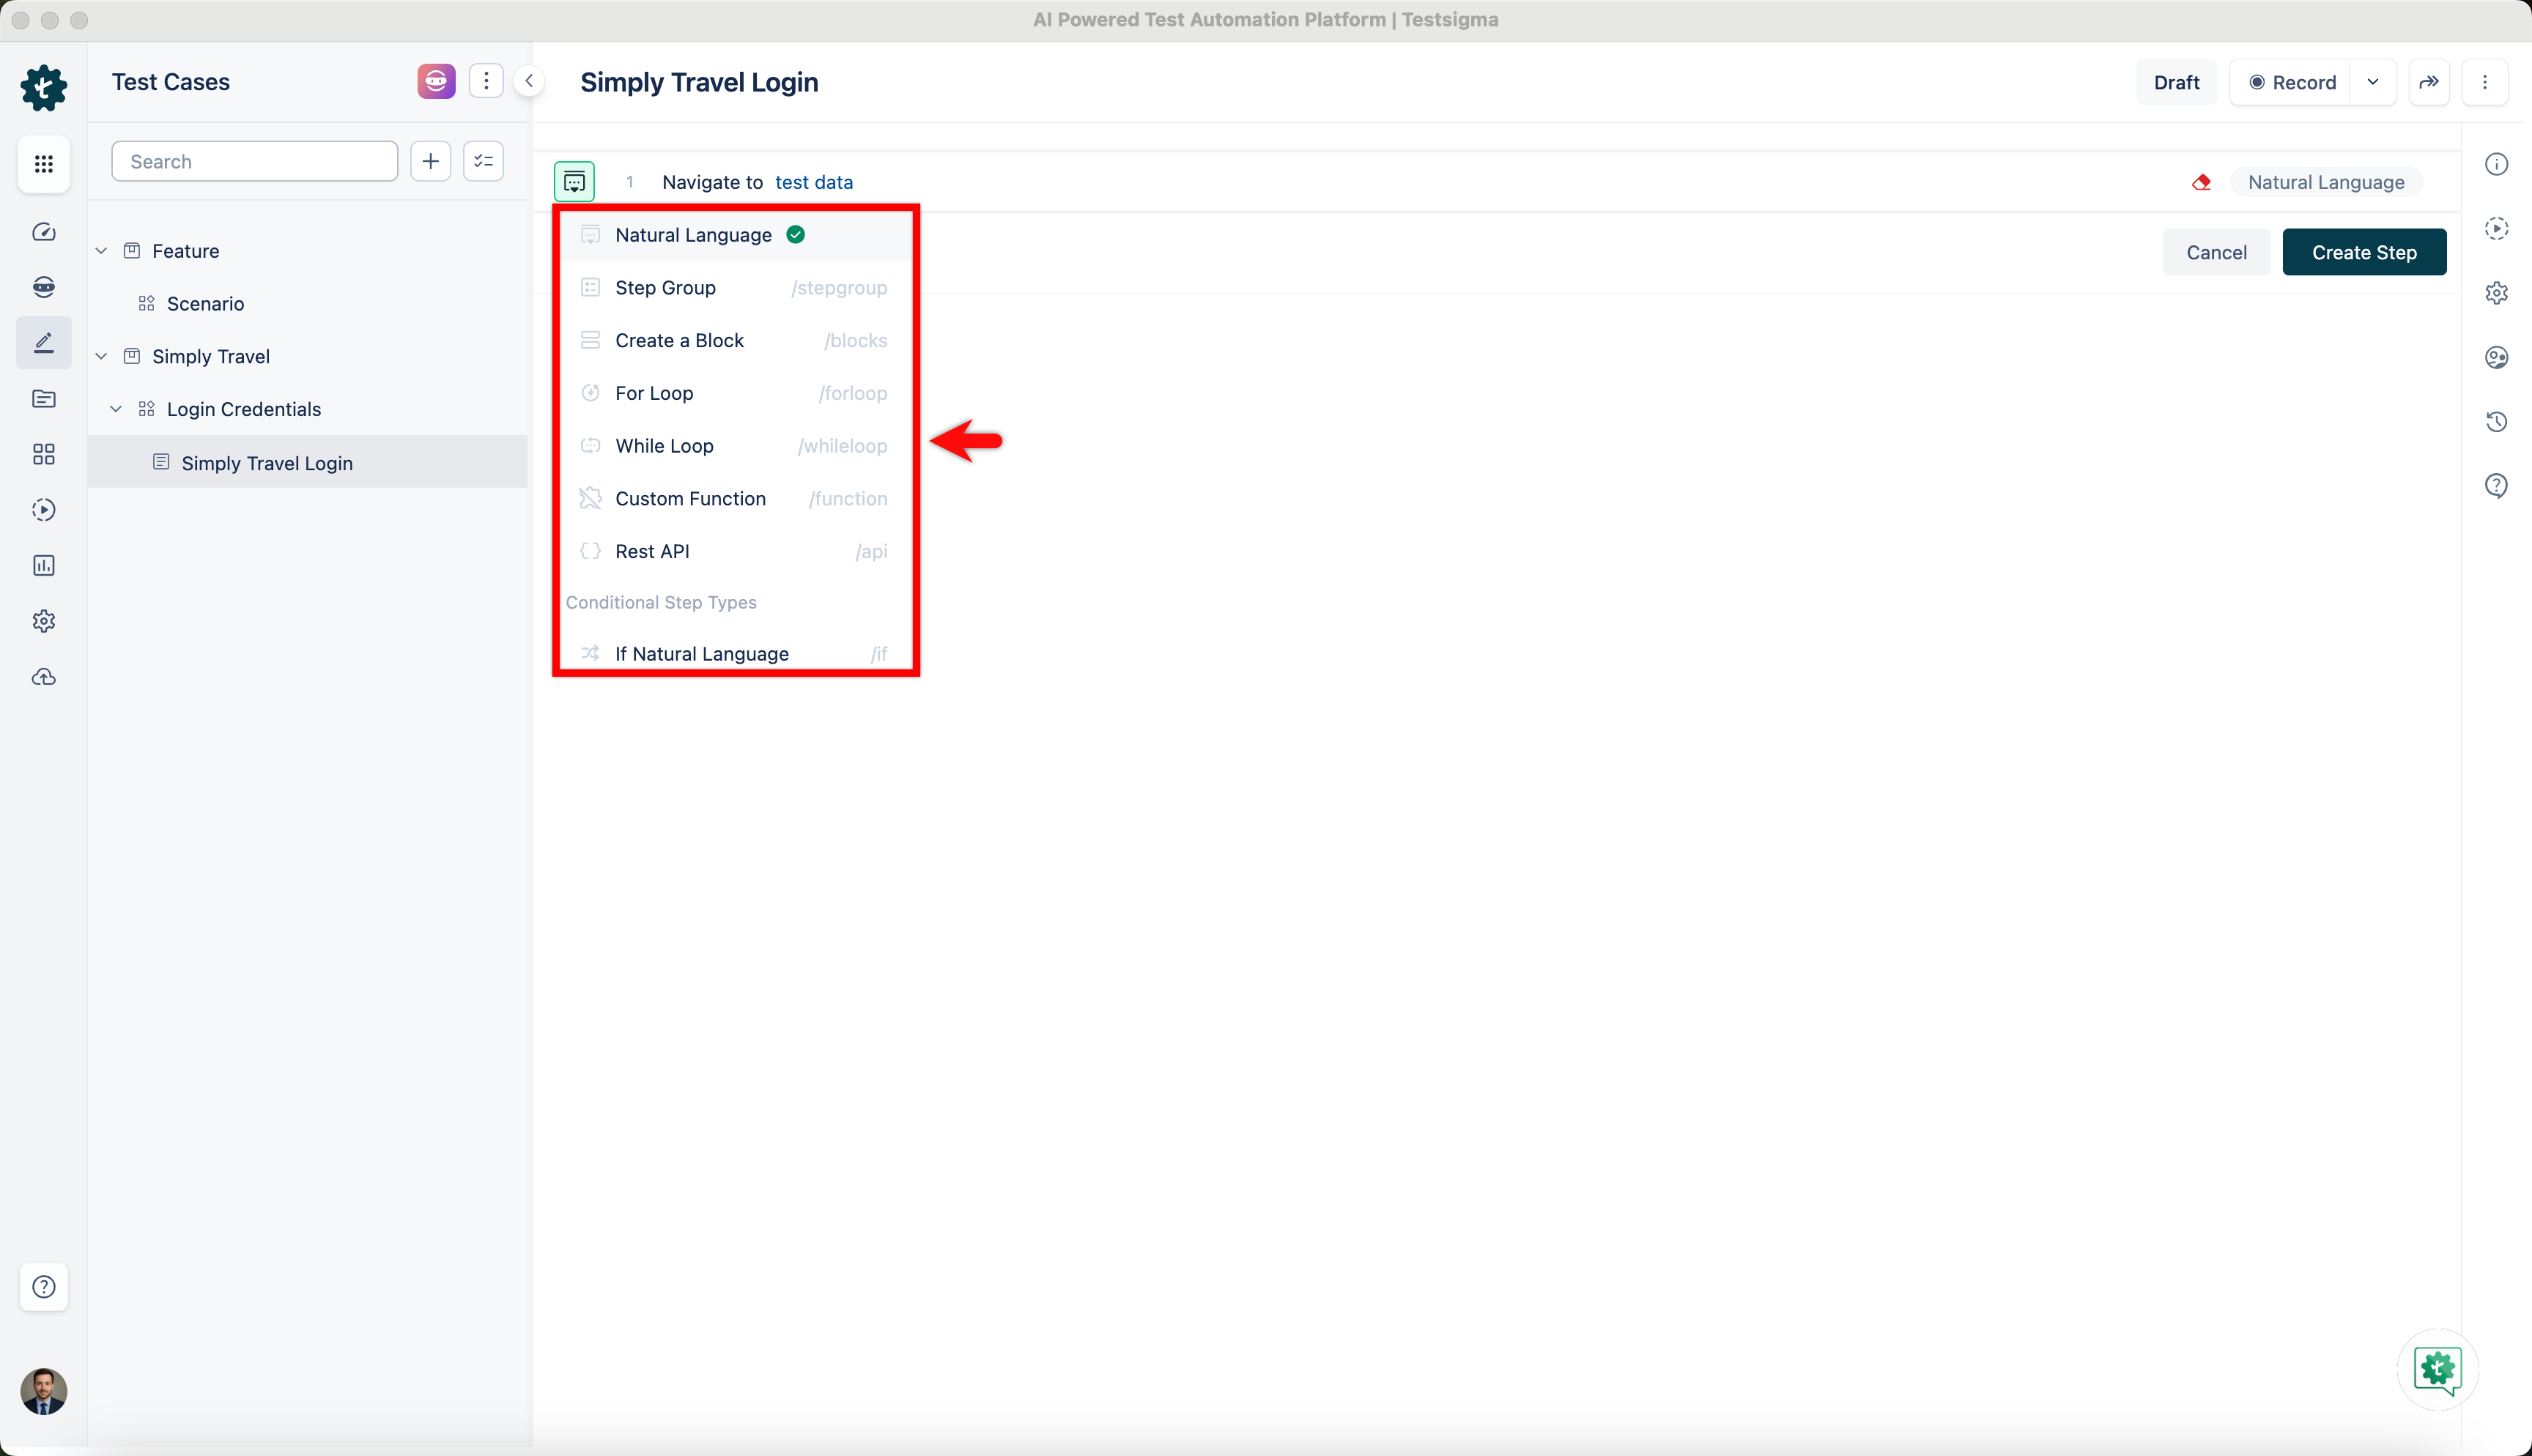
Loops, conditions, and blocks hold child steps, added with the Step Inside control. Child steps are numbered under their parent, such as 2.1 and 2.2.
| Step type | What it does | How to add it | Limits and behavior |
|---|---|---|---|
| Natural language | Runs one action or assertion, written in plain English | Enter the action in the step | The default type |
| Step group | Calls a reusable sequence of steps from the test case | Select Step Group, select the group, then click Create Step. To build a group from steps you already have, select the steps and click Create Step Group | Groups nest up to 3 levels. Create copies the selected steps into a new group. Create and Replace also swaps them for the group call, and is offered only for consecutive steps. Reuse Step Group pulls a group from another project, application, or version; check its element locators against the target application first. Inside a test case you can edit a group step’s test data and elements, but not its NLP. Click Update Step to save. These edits stay local to that test case |
| For loop | Repeats its child steps once per data set of a test data profile | Select the NLP variant for the data sets you want: the whole profile from start to end, an index range, sets filtered by name (contains, starts with, ends with, or IN), or sets filtered by a parameter value | Ends at the last data set, or at a break |
| While loop | Repeats its child steps while a condition holds, then moves on | Select the type, then add child steps with Step Inside Loop | Works in the recorder on web, mobile web, Android, and iOS |
| If condition | Runs its child steps only when the condition is true | Select Conditional Step Types > If Natural Language, then add child steps with Step Inside IF. Hover over the IF step to add Else If and Else | Also works while recording |
| Block | Labels consecutive steps as a named group, without making them reusable | Select Create a Block, or select consecutive steps and click Create Block. Click > to expand it, then add steps with Step Inside Block or Step After Block | A block can be reordered or moved within the test case. Deleting a block keeps its steps. Blocks cannot nest, cannot contain another block step at creation, and cannot be converted back to a plain step |
Inside a for loop, a while loop, or a step group, the Store NLP saves the current iteration count into a variable. The String Compare addon compares iterated values inside an if condition.
The panel also offers the REST API step type. See REST API steps.
Run database queries from a step
Section titled “Run database queries from a step”The mysql_queries addon runs MySQL from NLP steps over a JDBC URL. Install it from the addons page.
The connection string takes this form:
jdbc:mysql://<hostname>:<port>/<database>?user=<user>&password=<password>Its NLPs cover:
- Executing a query, a create-procedure statement, a stored procedure call, an update, or a
.sqlscript file - Storing a select result into a variable
- Verifying a select result, or the affected-row count of a query
- Comparing two queries on one connection, or the same query across two connections
REST API steps
Section titled “REST API steps”A REST API step calls an API inside any test case. Configure the request, verify the response, and store values for the steps that follow. For API-only testing, create the project with the Rest API application type.
Configure the request
Section titled “Configure the request”-
Select Rest API from the step type panel.
-
Enter a Title for the step.
-
Enter the endpoint URL.
-
Select the method: GET to retrieve, POST to add, PUT to replace, PATCH to update fields, or DELETE to remove. The default is GET.
-
Fill in what the API needs:
- Parameters: the URL field and the Parameters tab stay in sync. Enter
?name=Joel&type=newin the URL, or enter key-value pairs in the tab. Path parameters use placeholders such as/customer/:id. - Headers: key-value pairs, such as
Accept: application/json. - Authorization: No Auth by default. Select a type and fill in its fields.
- Body: see the body types below.
- Settings: request-specific options.
- Parameters: the URL field and the Parameters tab stay in sync. Enter
-
(Optional) Click Send to try the request live.
-
Click Create.
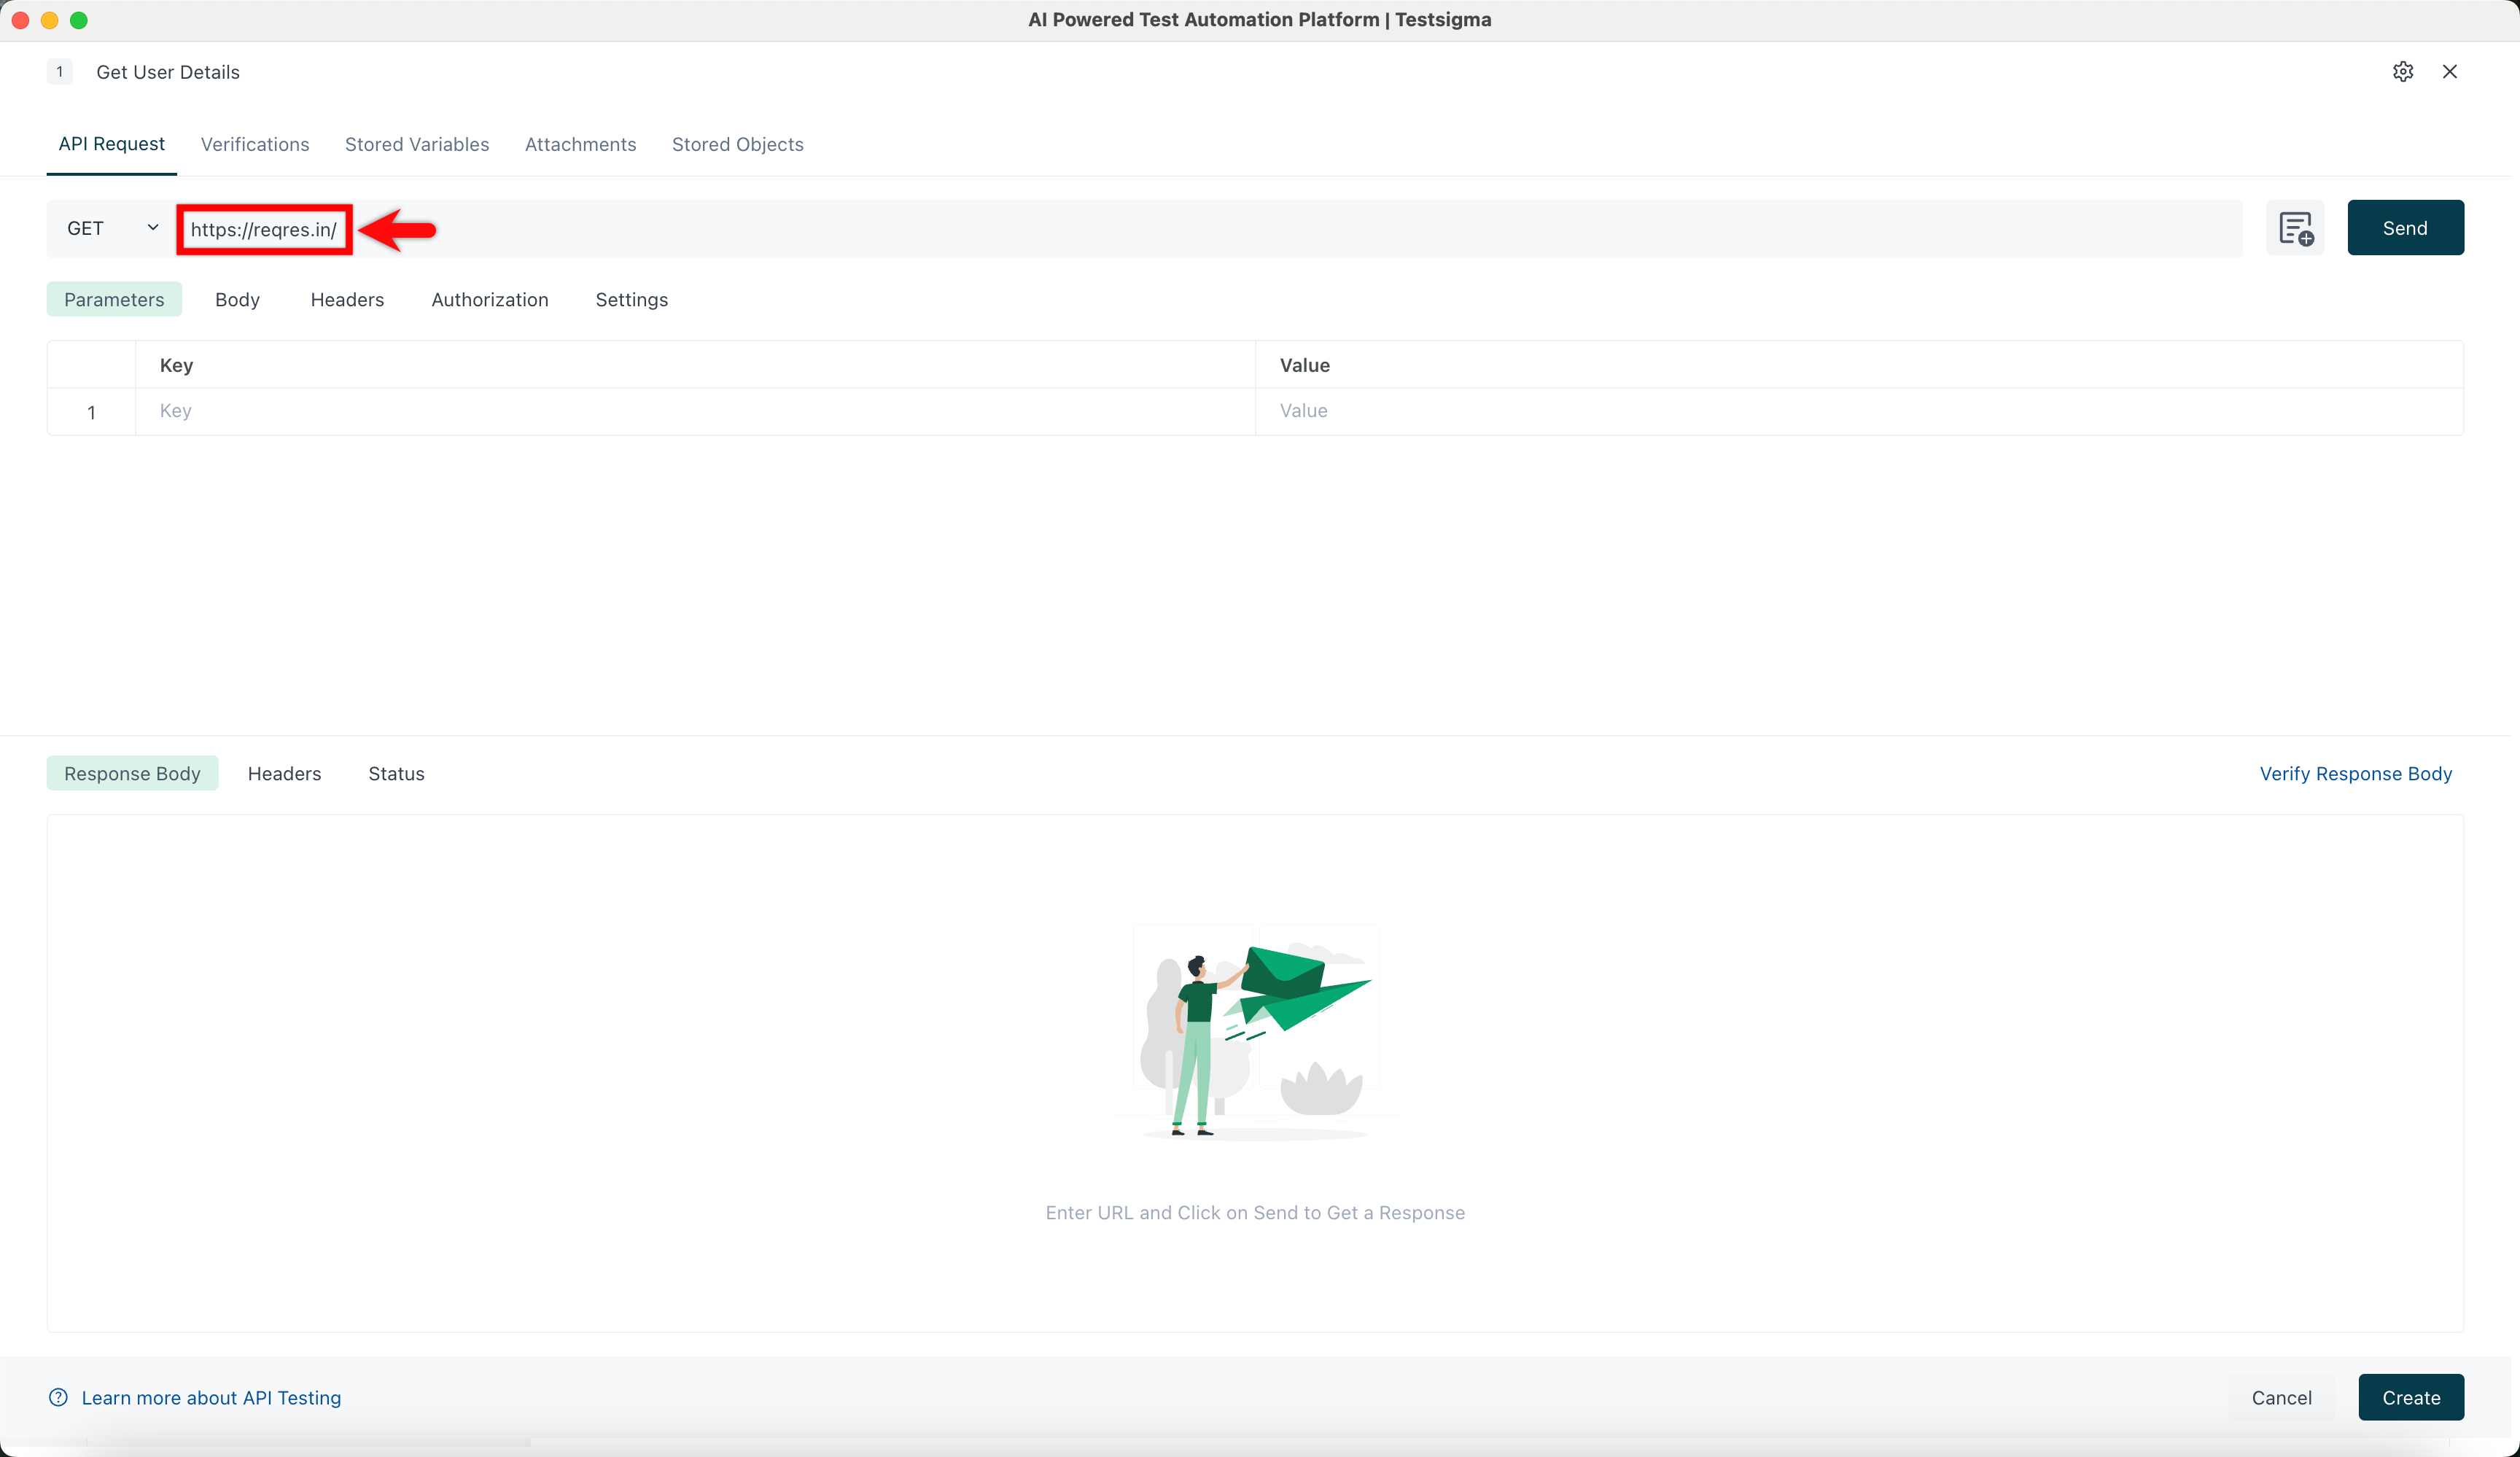
Global Objects links stored objects and other predefined project objects into the request for reuse.
SOAP APIs use the same step. Send the XML envelope as the raw body with a content-type: text/xml; charset=utf-8 header, using the POST method.
Body types
Section titled “Body types”- None: requests without a body. This is the default
- form-data: key-value pairs with a content type. A key holds text or a file
- x-www-form-url-encoded: key-value pairs encoded like URL parameters
- Raw: JSON, text, or XML, with syntax highlighting and automatic headers
- Binary: a single non-text file, such as an image or a video
- GraphQL: a query and optional variables, in JSON or table form
Form-data file paths persist across repeated calls. Uploading multiple files that each carry their own content type is not supported.
Files sent as form-data or Binary also appear on the Attachments tab after you click Create.
Verify the response
Section titled “Verify the response”Verifications live on the response Body, Headers, and Status. Add them any of 4 ways:
- Send the request, click Outline on the response, and select Add verification
- Hover over an HTML response line and capture an attribute
- Add fields on the Verification tab, with a JSON or XPath path, an expected value, and a verification type. The Status tab takes a key name instead of a path
- Click Copy Response, paste the copied path into the path field, then set the type and the expected value
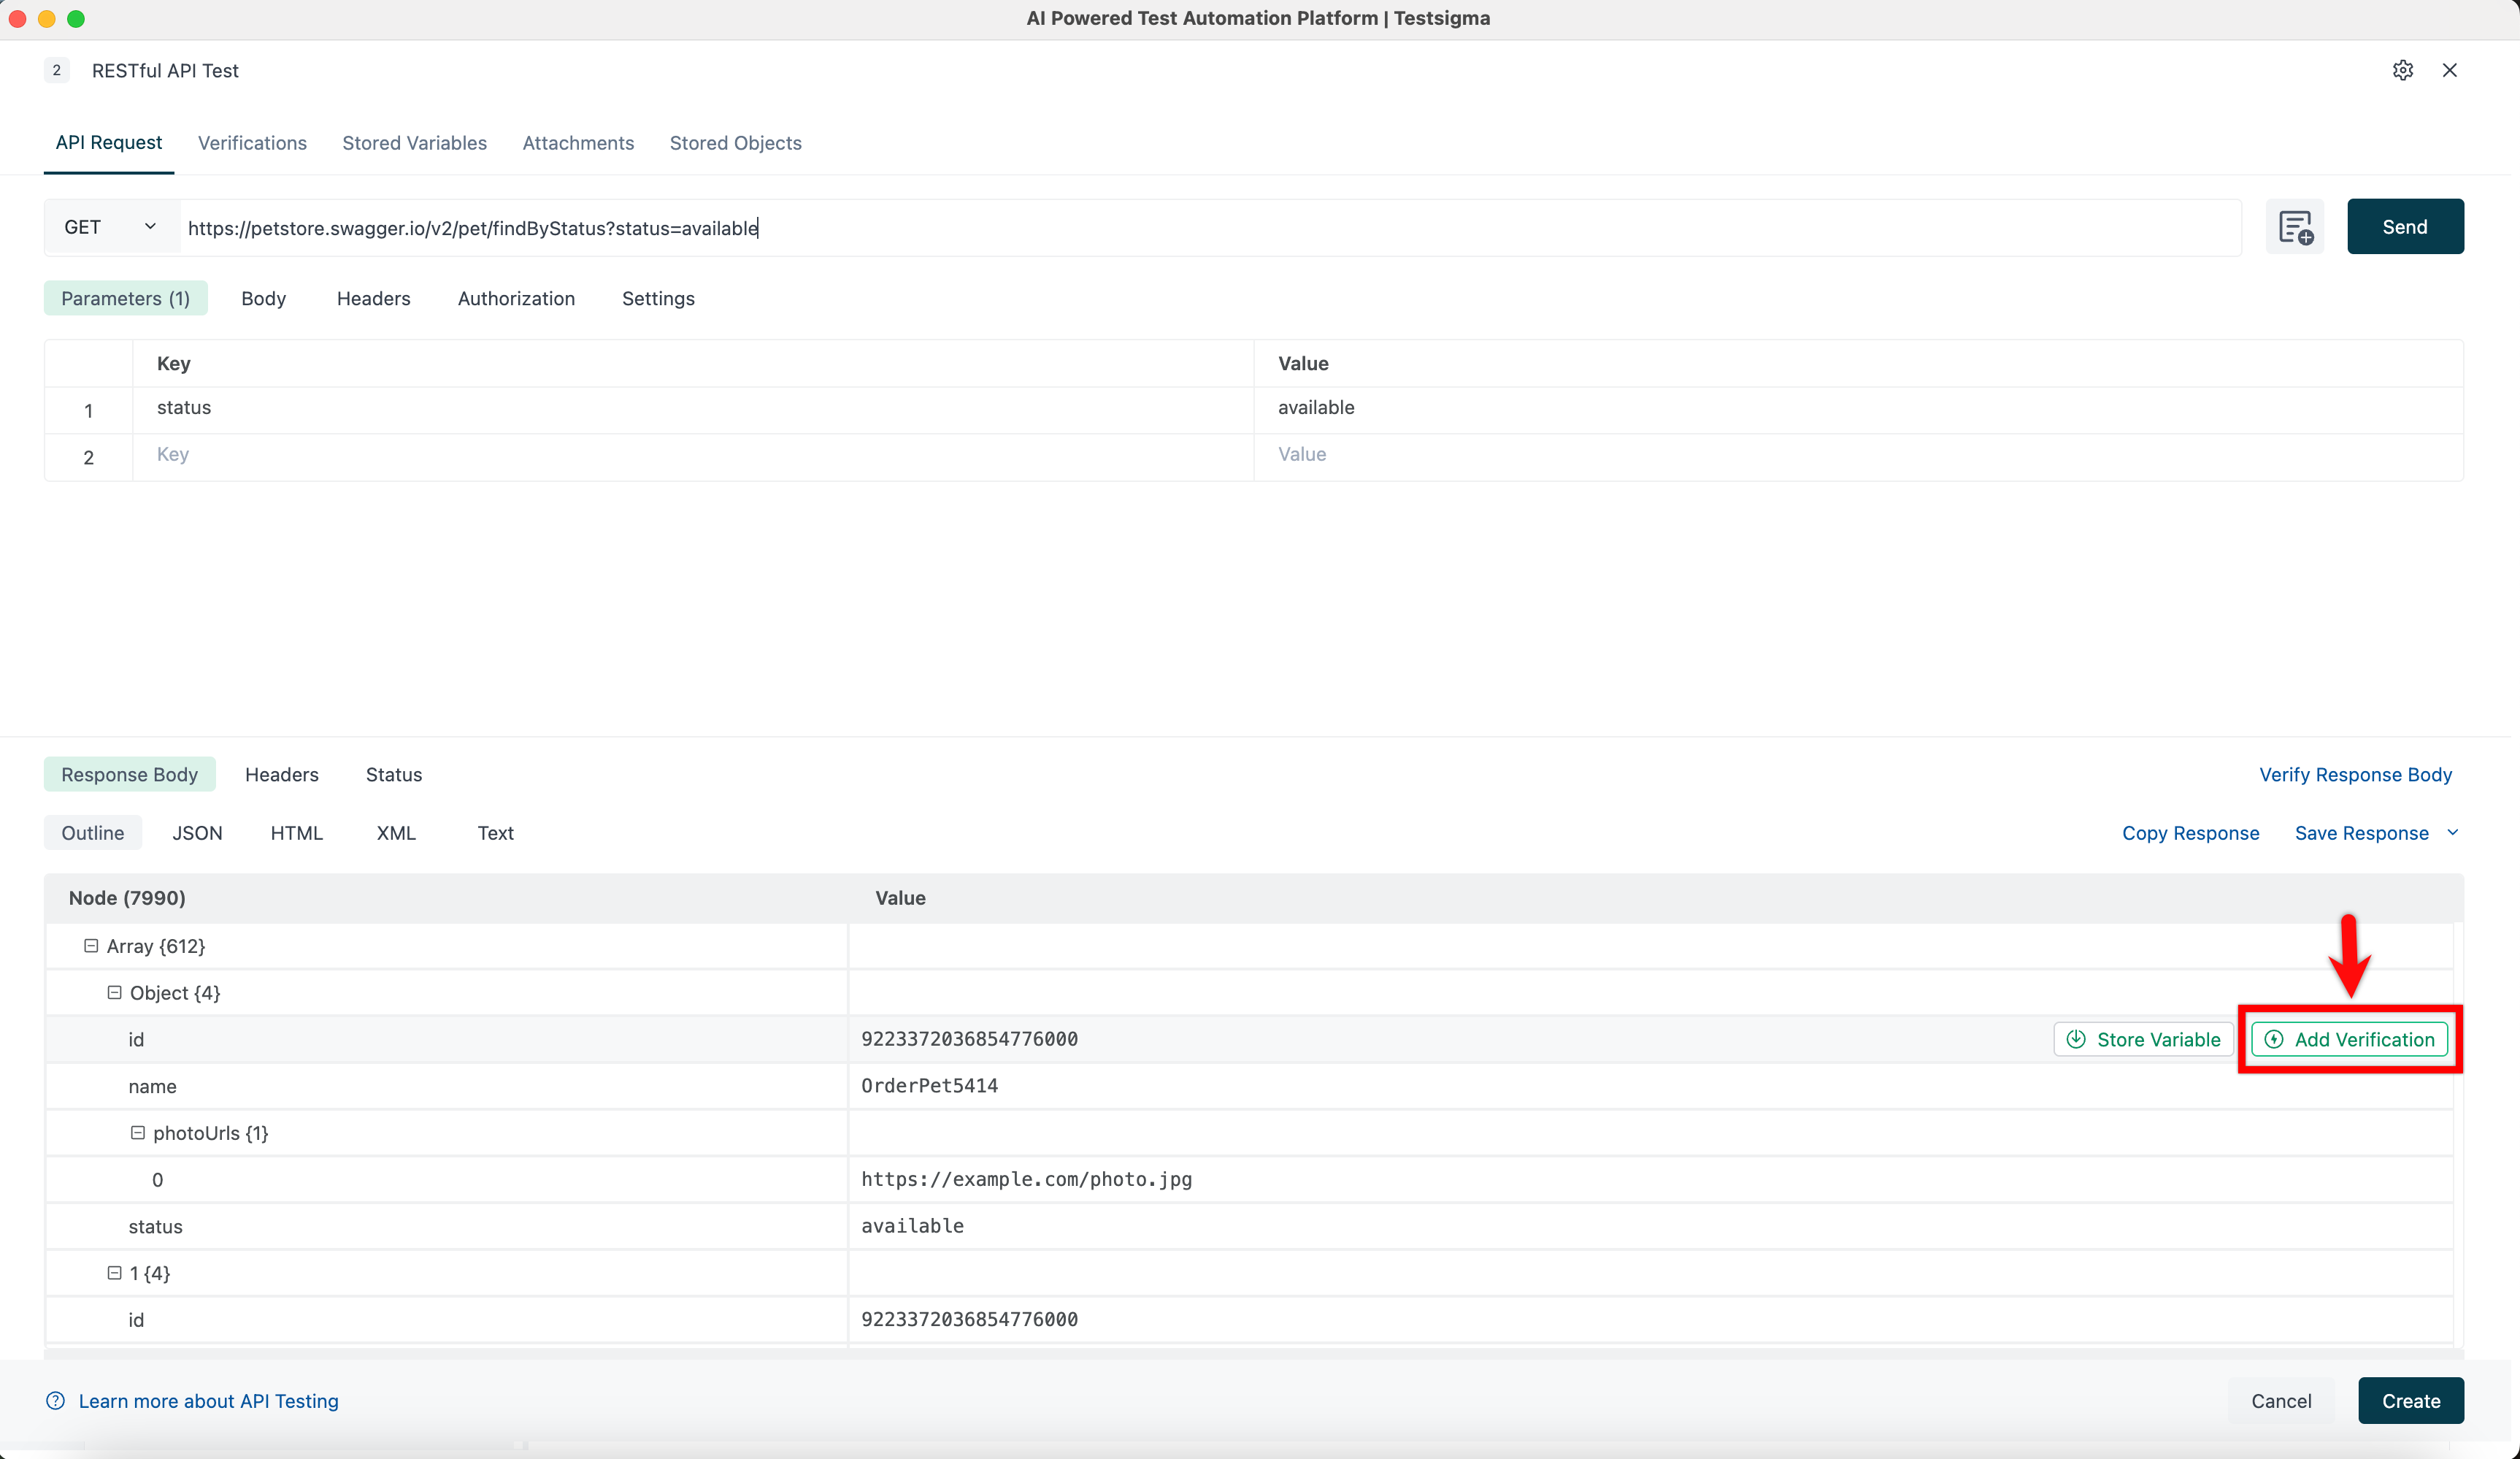
Verify Response Body compares the whole body instead. Set Comparison Type and Verification Type. Before the API is invoked, it also asks for Response Body Type and an expected value.
Each verification type passes under a different condition:
- Strict: every condition matches exactly as specified
- Strict Order: the conditions match in the specified order
- Lenient: the essential conditions match, and the rest may be relaxed
- Non-extensible: only the pre-defined rules apply, with no extension
- Schema: the response satisfies a structural schema
Store values for later steps
Section titled “Store values for later steps”Stored variables capture parts of the response for use later in the test case or the session.
- Body fields: click Outline > Store Variable, or add them on the Stored Variables tab
- HTML attributes: hover over the response line and select the attribute
- Headers: click Store Variable on the Headers tab, or hover over a response header
Save Response > As an Object stores the whole response as a stored object instead. Stored objects have global scope, work across test cases, and can be downloaded.
Use test data in a request
Section titled “Use test data in a request”Any request field takes test data instead of a literal value.
-
Select the value to parameterize.
-
Click Insert Test Data.
-
Select a Parameter, Runtime, Environment, Random, Data Generator, Phone Number, or Mail Box value.
-
(Optional) Enter trial values under Add Request Values, click Apply, then click Send.
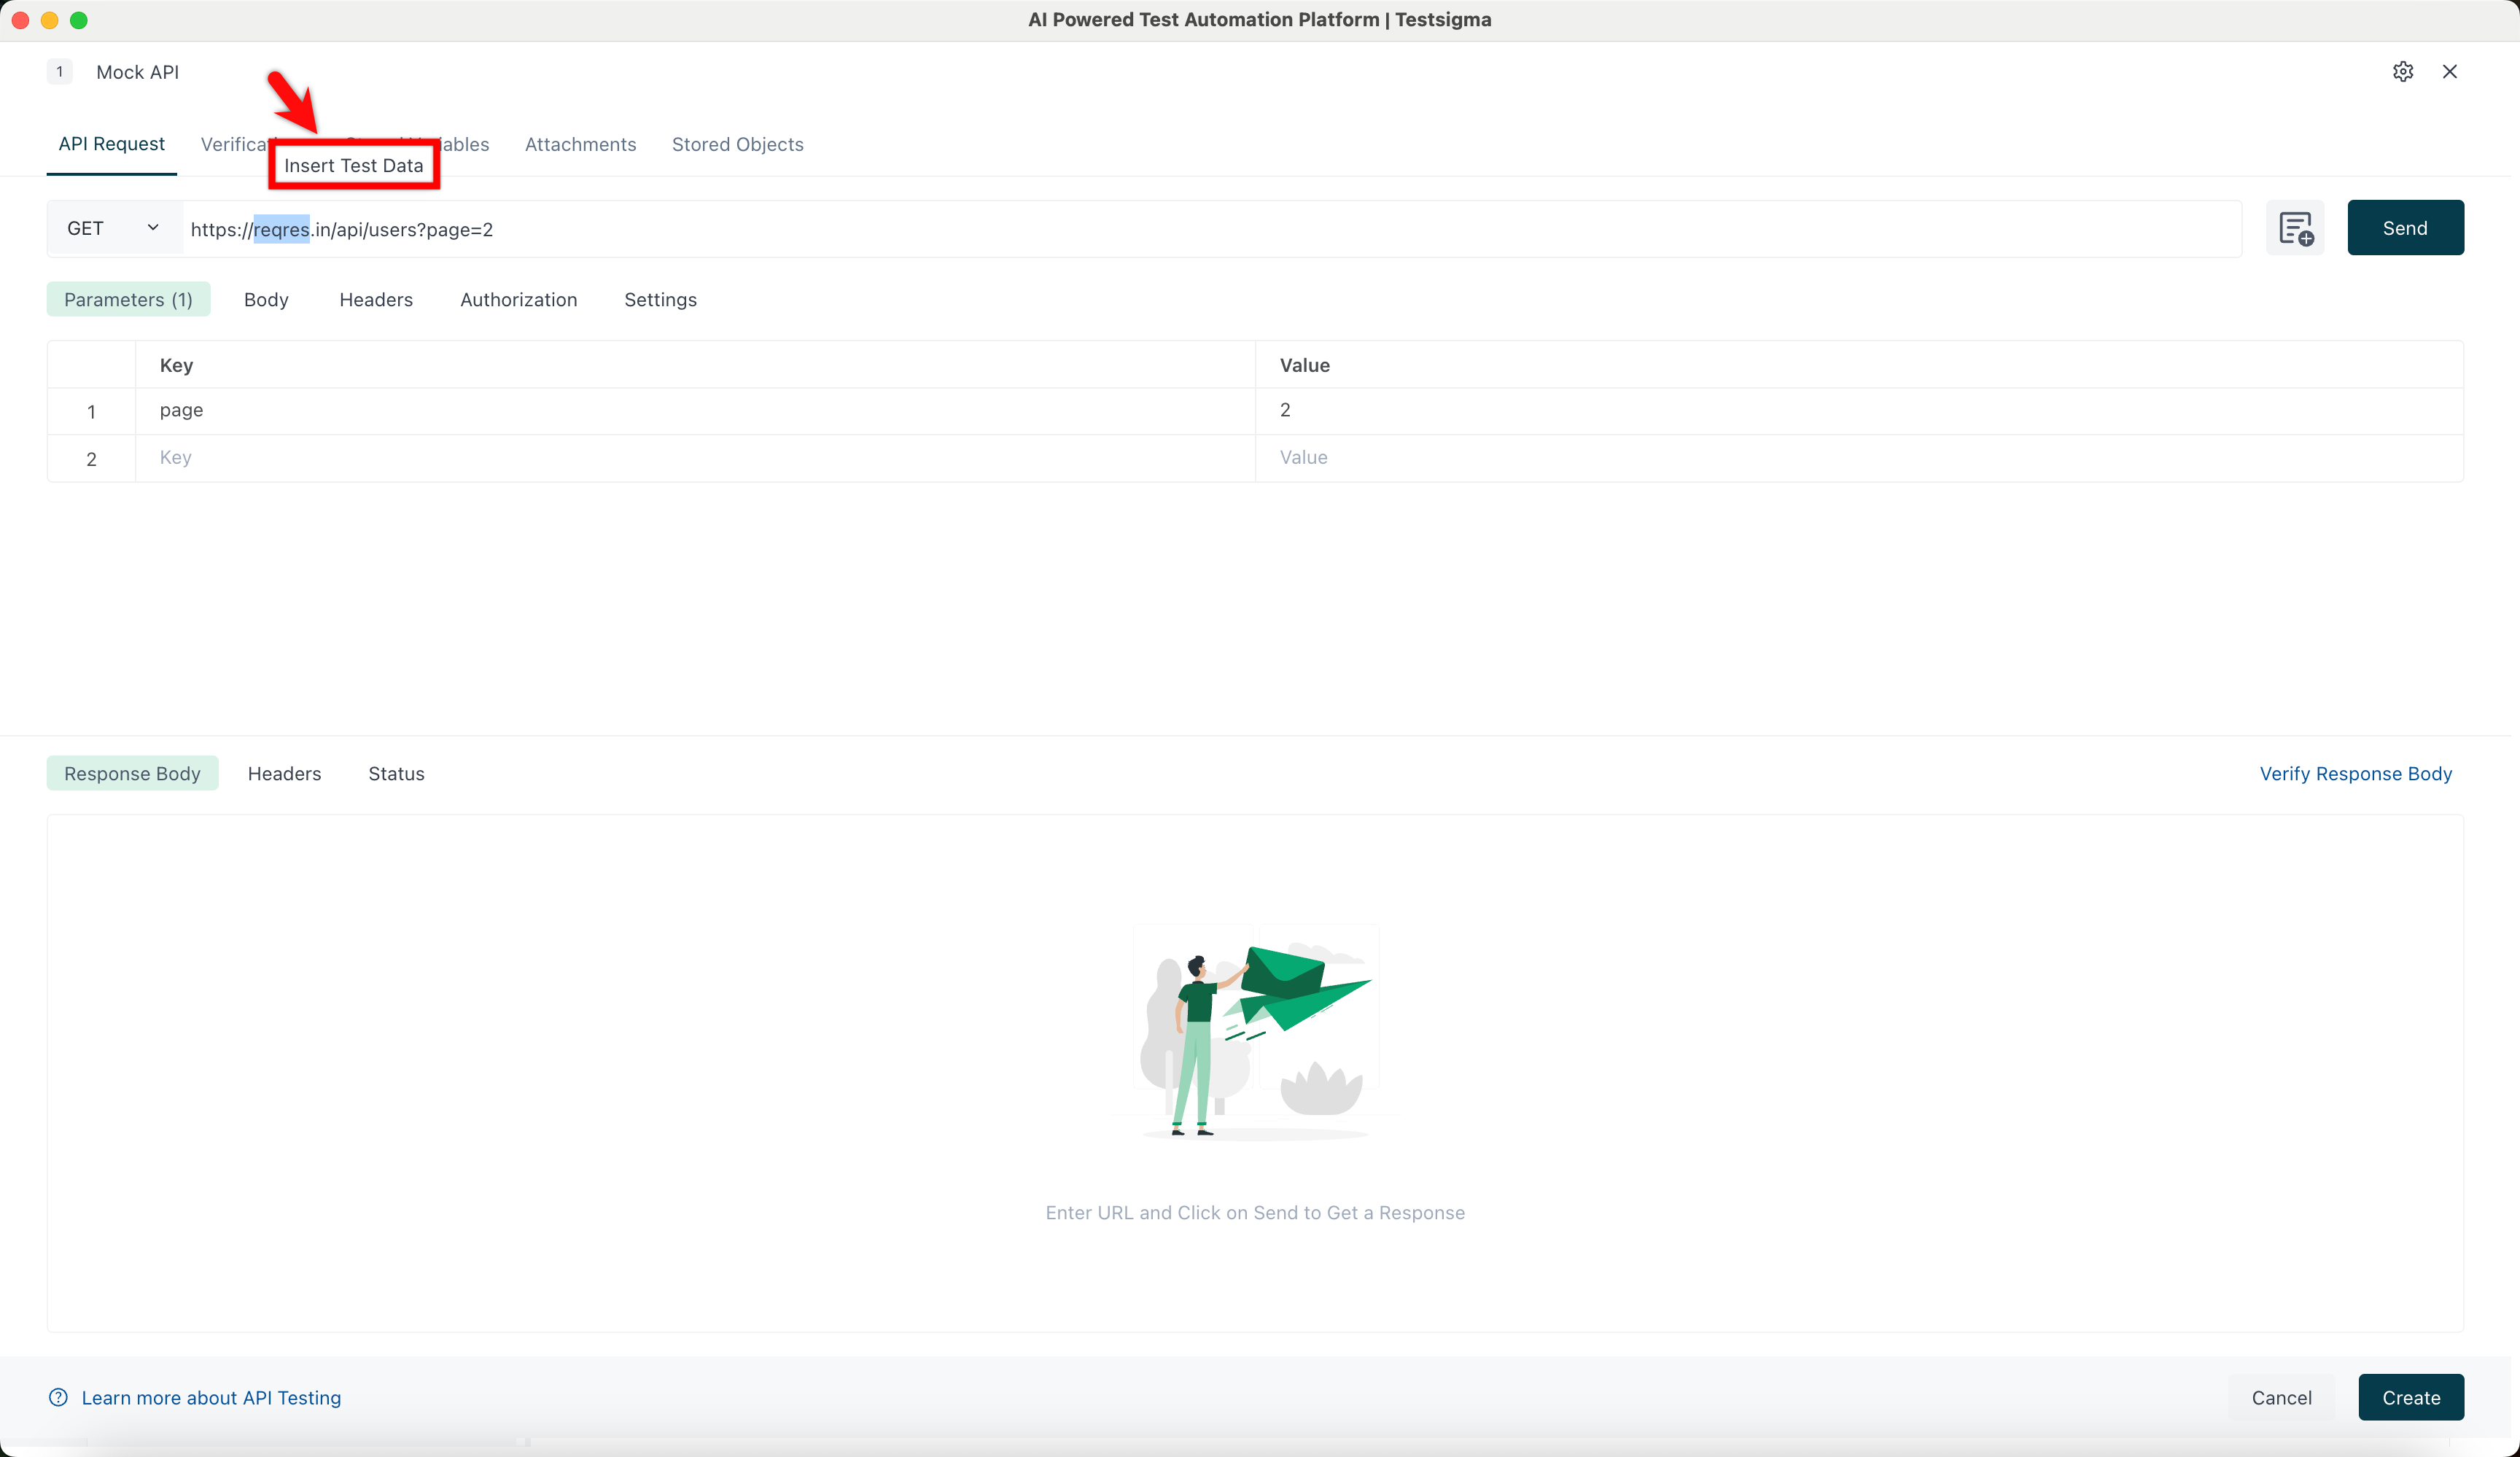
Inside a raw body, reference a profile parameter as @|ParameterName| and a data generator as !|Number.digits(int:3)|. Unicode values work in every field. Paste them in.
Step and test case settings
Section titled “Step and test case settings”Every setting that changes how a test case runs, at the step level and at the test case level: timeouts, retries, screenshots, prerequisites, data-driven runs, and the workflow fields.
Step options
Section titled “Step options”Click a step to reach its inline controls, or the ellipsis icon ⋮ for the rest. The options behave the same across application types.
- Clear Step: empties the step’s action and data. The eraser icon does the same
- Clone Step: duplicates the step
- Delete Step: removes the step
- Step Above and Step Below: insert a neighbor. + Add new step appends at the end
- Disable Step: skips the step at run time without deleting it
- Ignore Step Result: keeps the step’s outcome out of the test case result
- Enable Visual Testing: adds a visual comparison on the step
To reorder steps, drag the ⋮⋮ handle, then click Save New Order. In the recorder the button reads Save Order.
In the recorder, clicking an element in a step offers Edit, Change, and Create Element. Pause and Stop control the session.
Step settings
Section titled “Step settings”Click the ellipsis icon ⋮ and select Step Settings for the full per-step configuration.
- Max. wait time: fails the step past the limit. The maximum is 120 seconds
- Retries on step failure: re-attempts a failing step, up to 10 times
- Screenshot capture: Always, Only on step failure, No screenshot required, or Use step level settings. This applies to execution only
- Pre-Requisite: a step in the same test case that must pass first
- Stop Test Case execution on Test Step: stops the test case when this step fails. On by default
- Ignore this step result in Test Case Result: excludes the step from the test case result
- Disable Step: skips the step. Off by default
- Enable Visual Testing for the Step: captures and compares the UI on this step
- Enable Accessibility Testing for the step: validates the step against accessibility standards
- Highlight element in screenshot: marks the acted-on element in captures
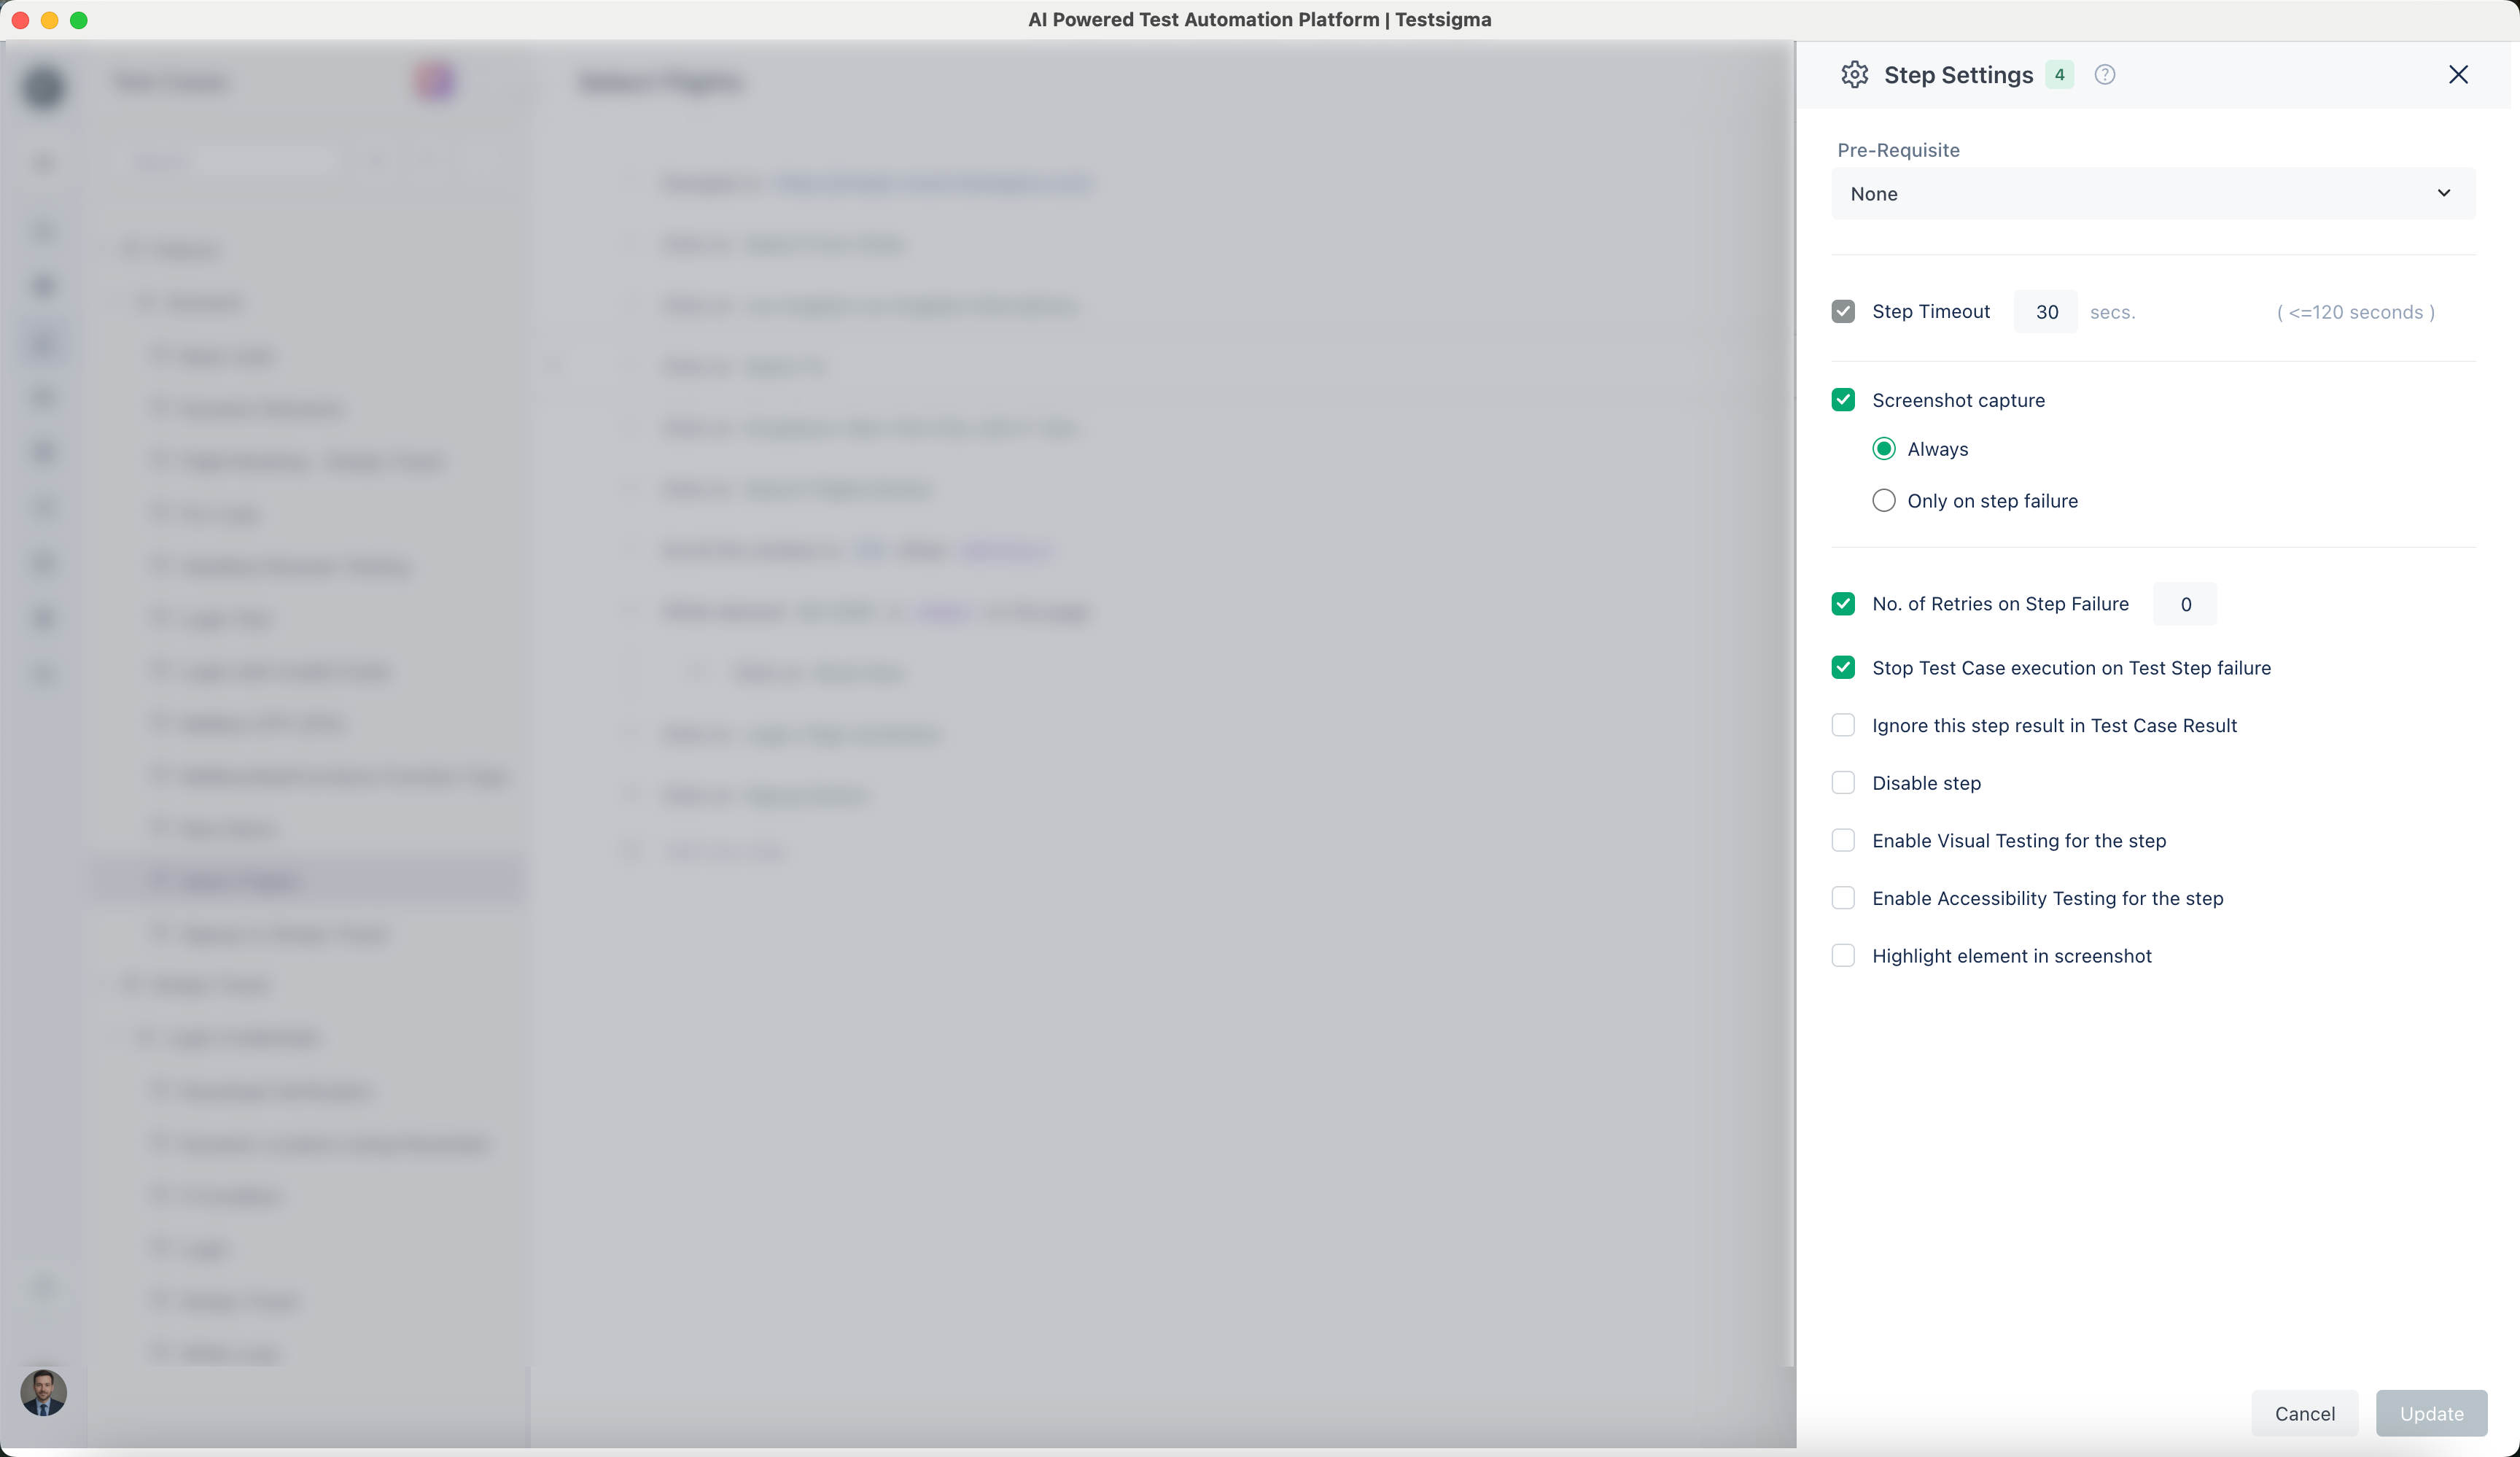
Global Step Timeout, under Additional settings in the Ad-hoc Run overlay, can override these values. With the toggle off, the global value applies only to steps without a custom timeout. With it on, the global value overrides every step.
Change several steps at once
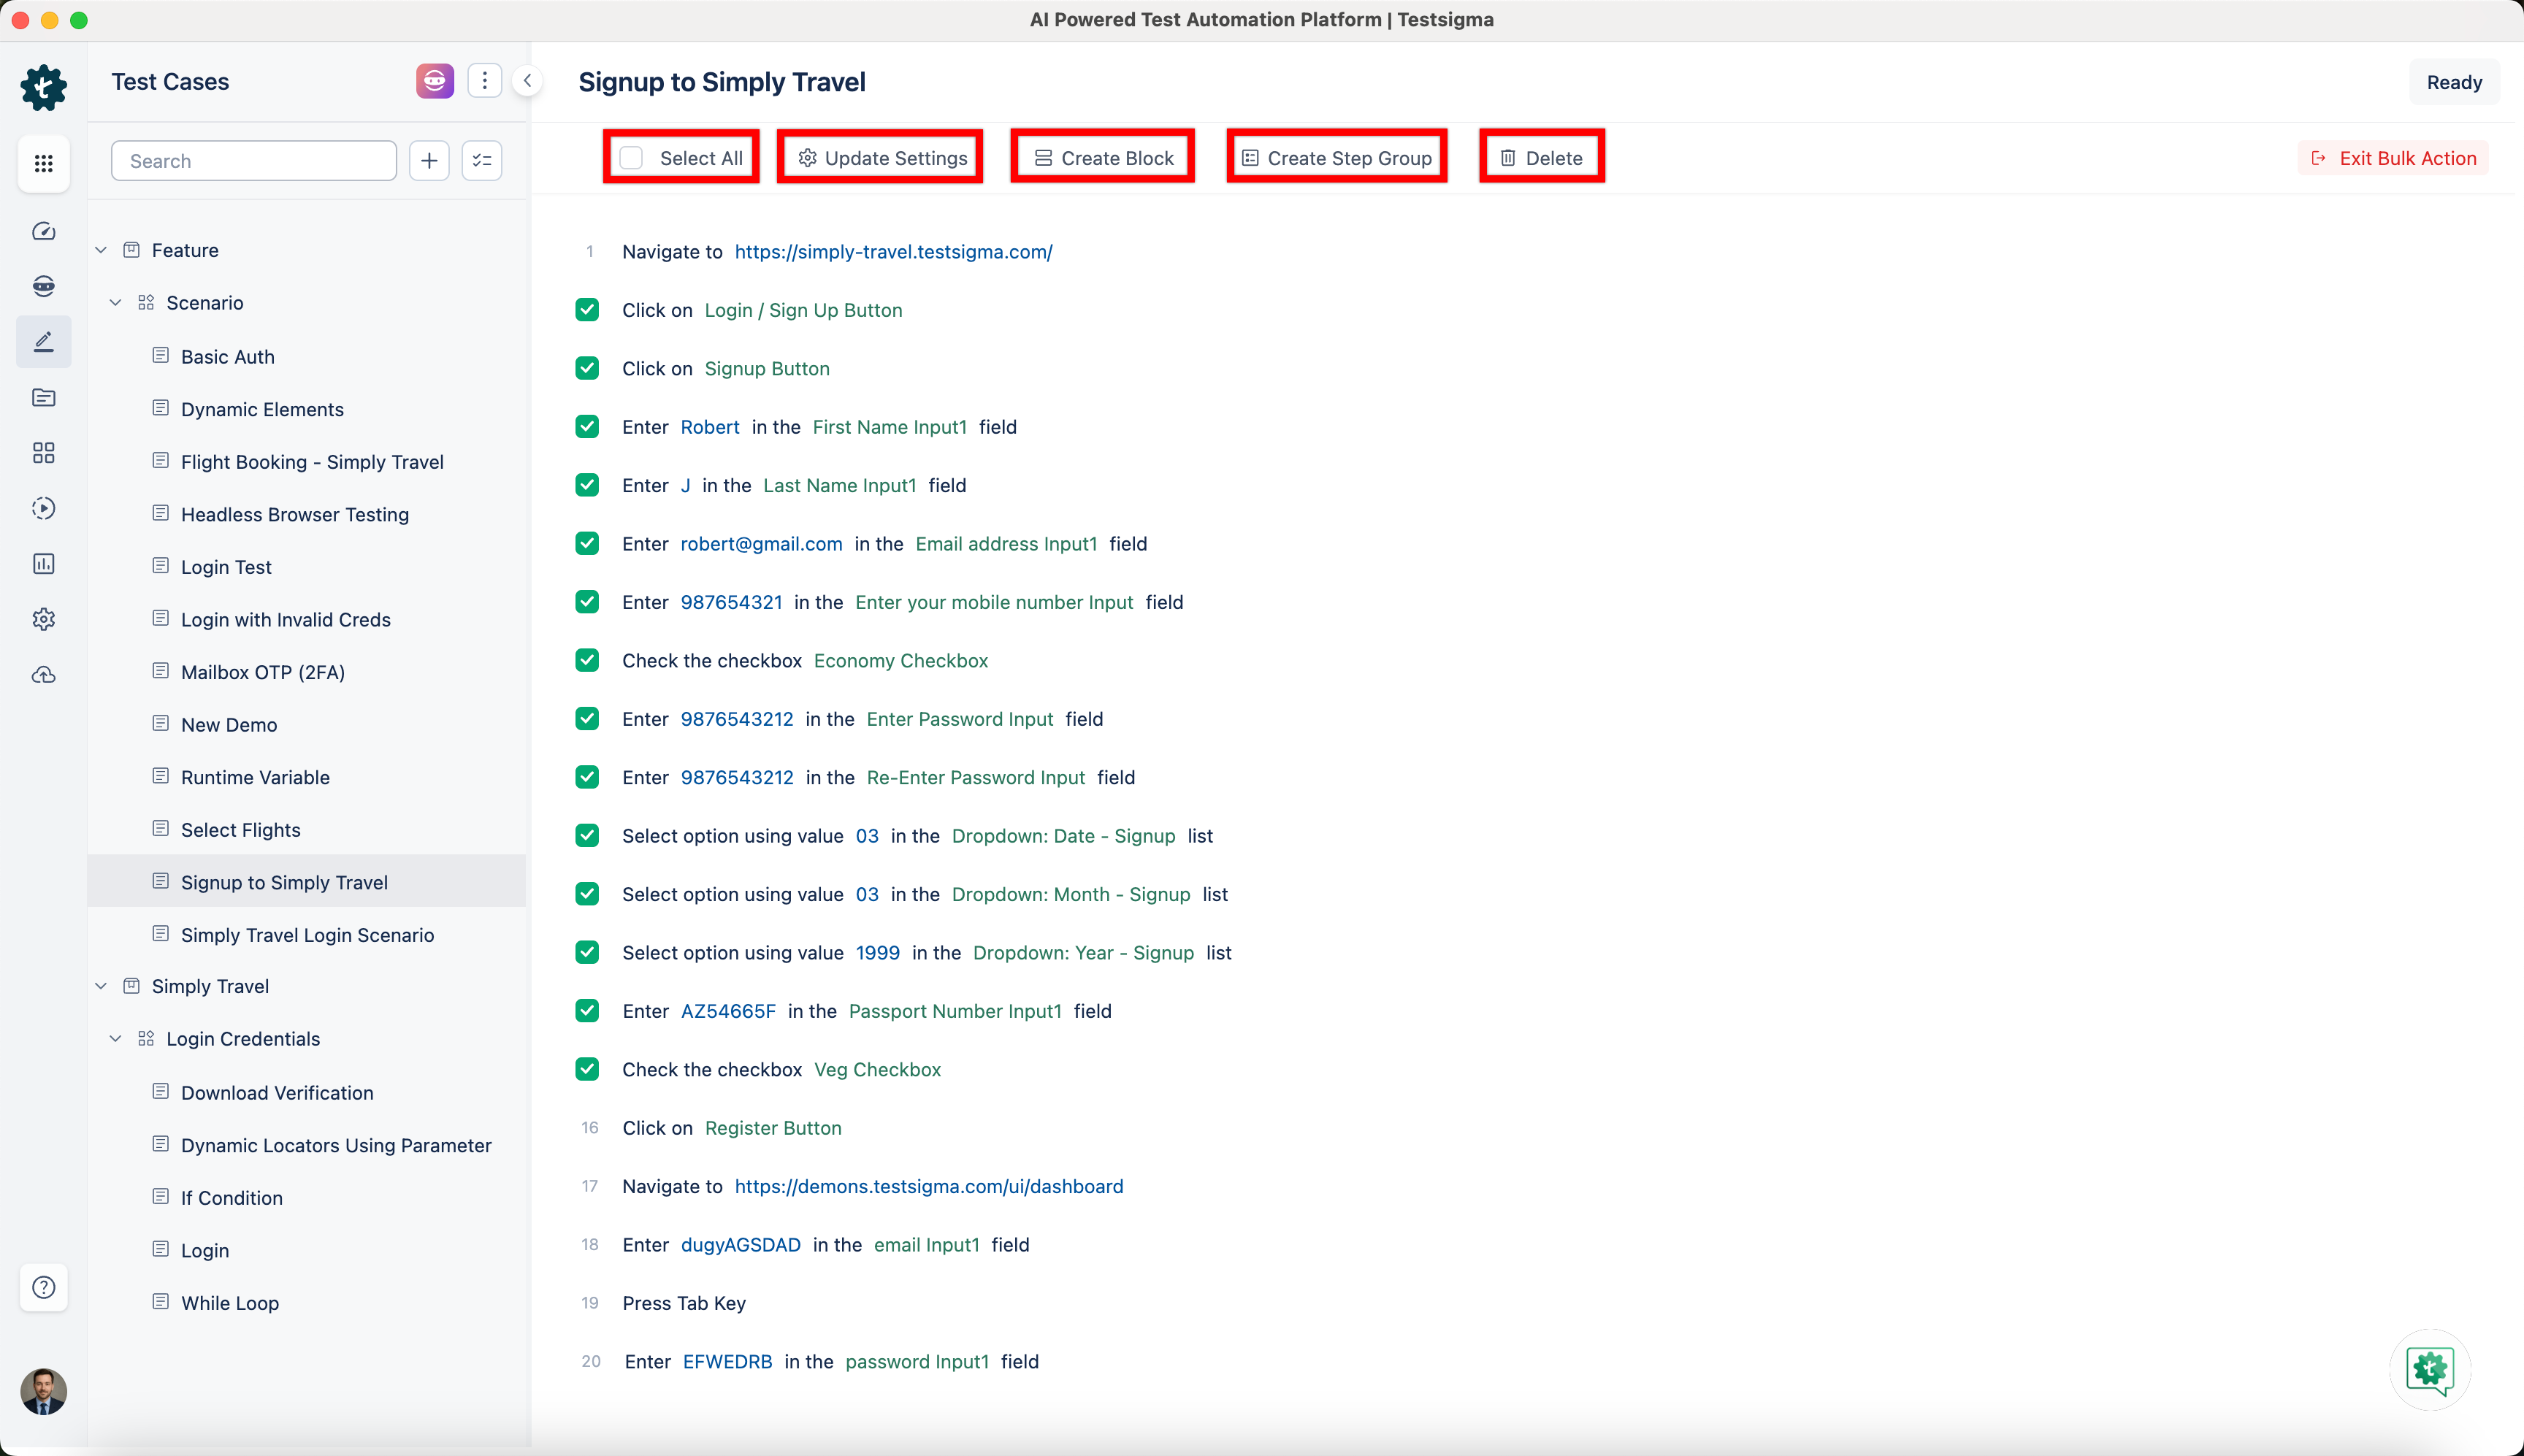
Section titled “Change several steps at once”-
Hover over a step number to turn it into a checkbox, then select the steps. Select All selects every step.
-
Select Update Settings, Create Block, Create Step Group, or Delete from the menu bar.
-
Click Exit Bulk Action to leave the mode.
Test case settings
Section titled “Test case settings”The right-side utility panel holds everything that belongs to the test case rather than to a step.
- Test Case Info: rename the test case, edit the description, and read the created and updated timestamps
- Ad-Hoc Runs: the test case’s ad-hoc run history
- Activity: history and comments
- Help: examples, the action list, and get-started guides
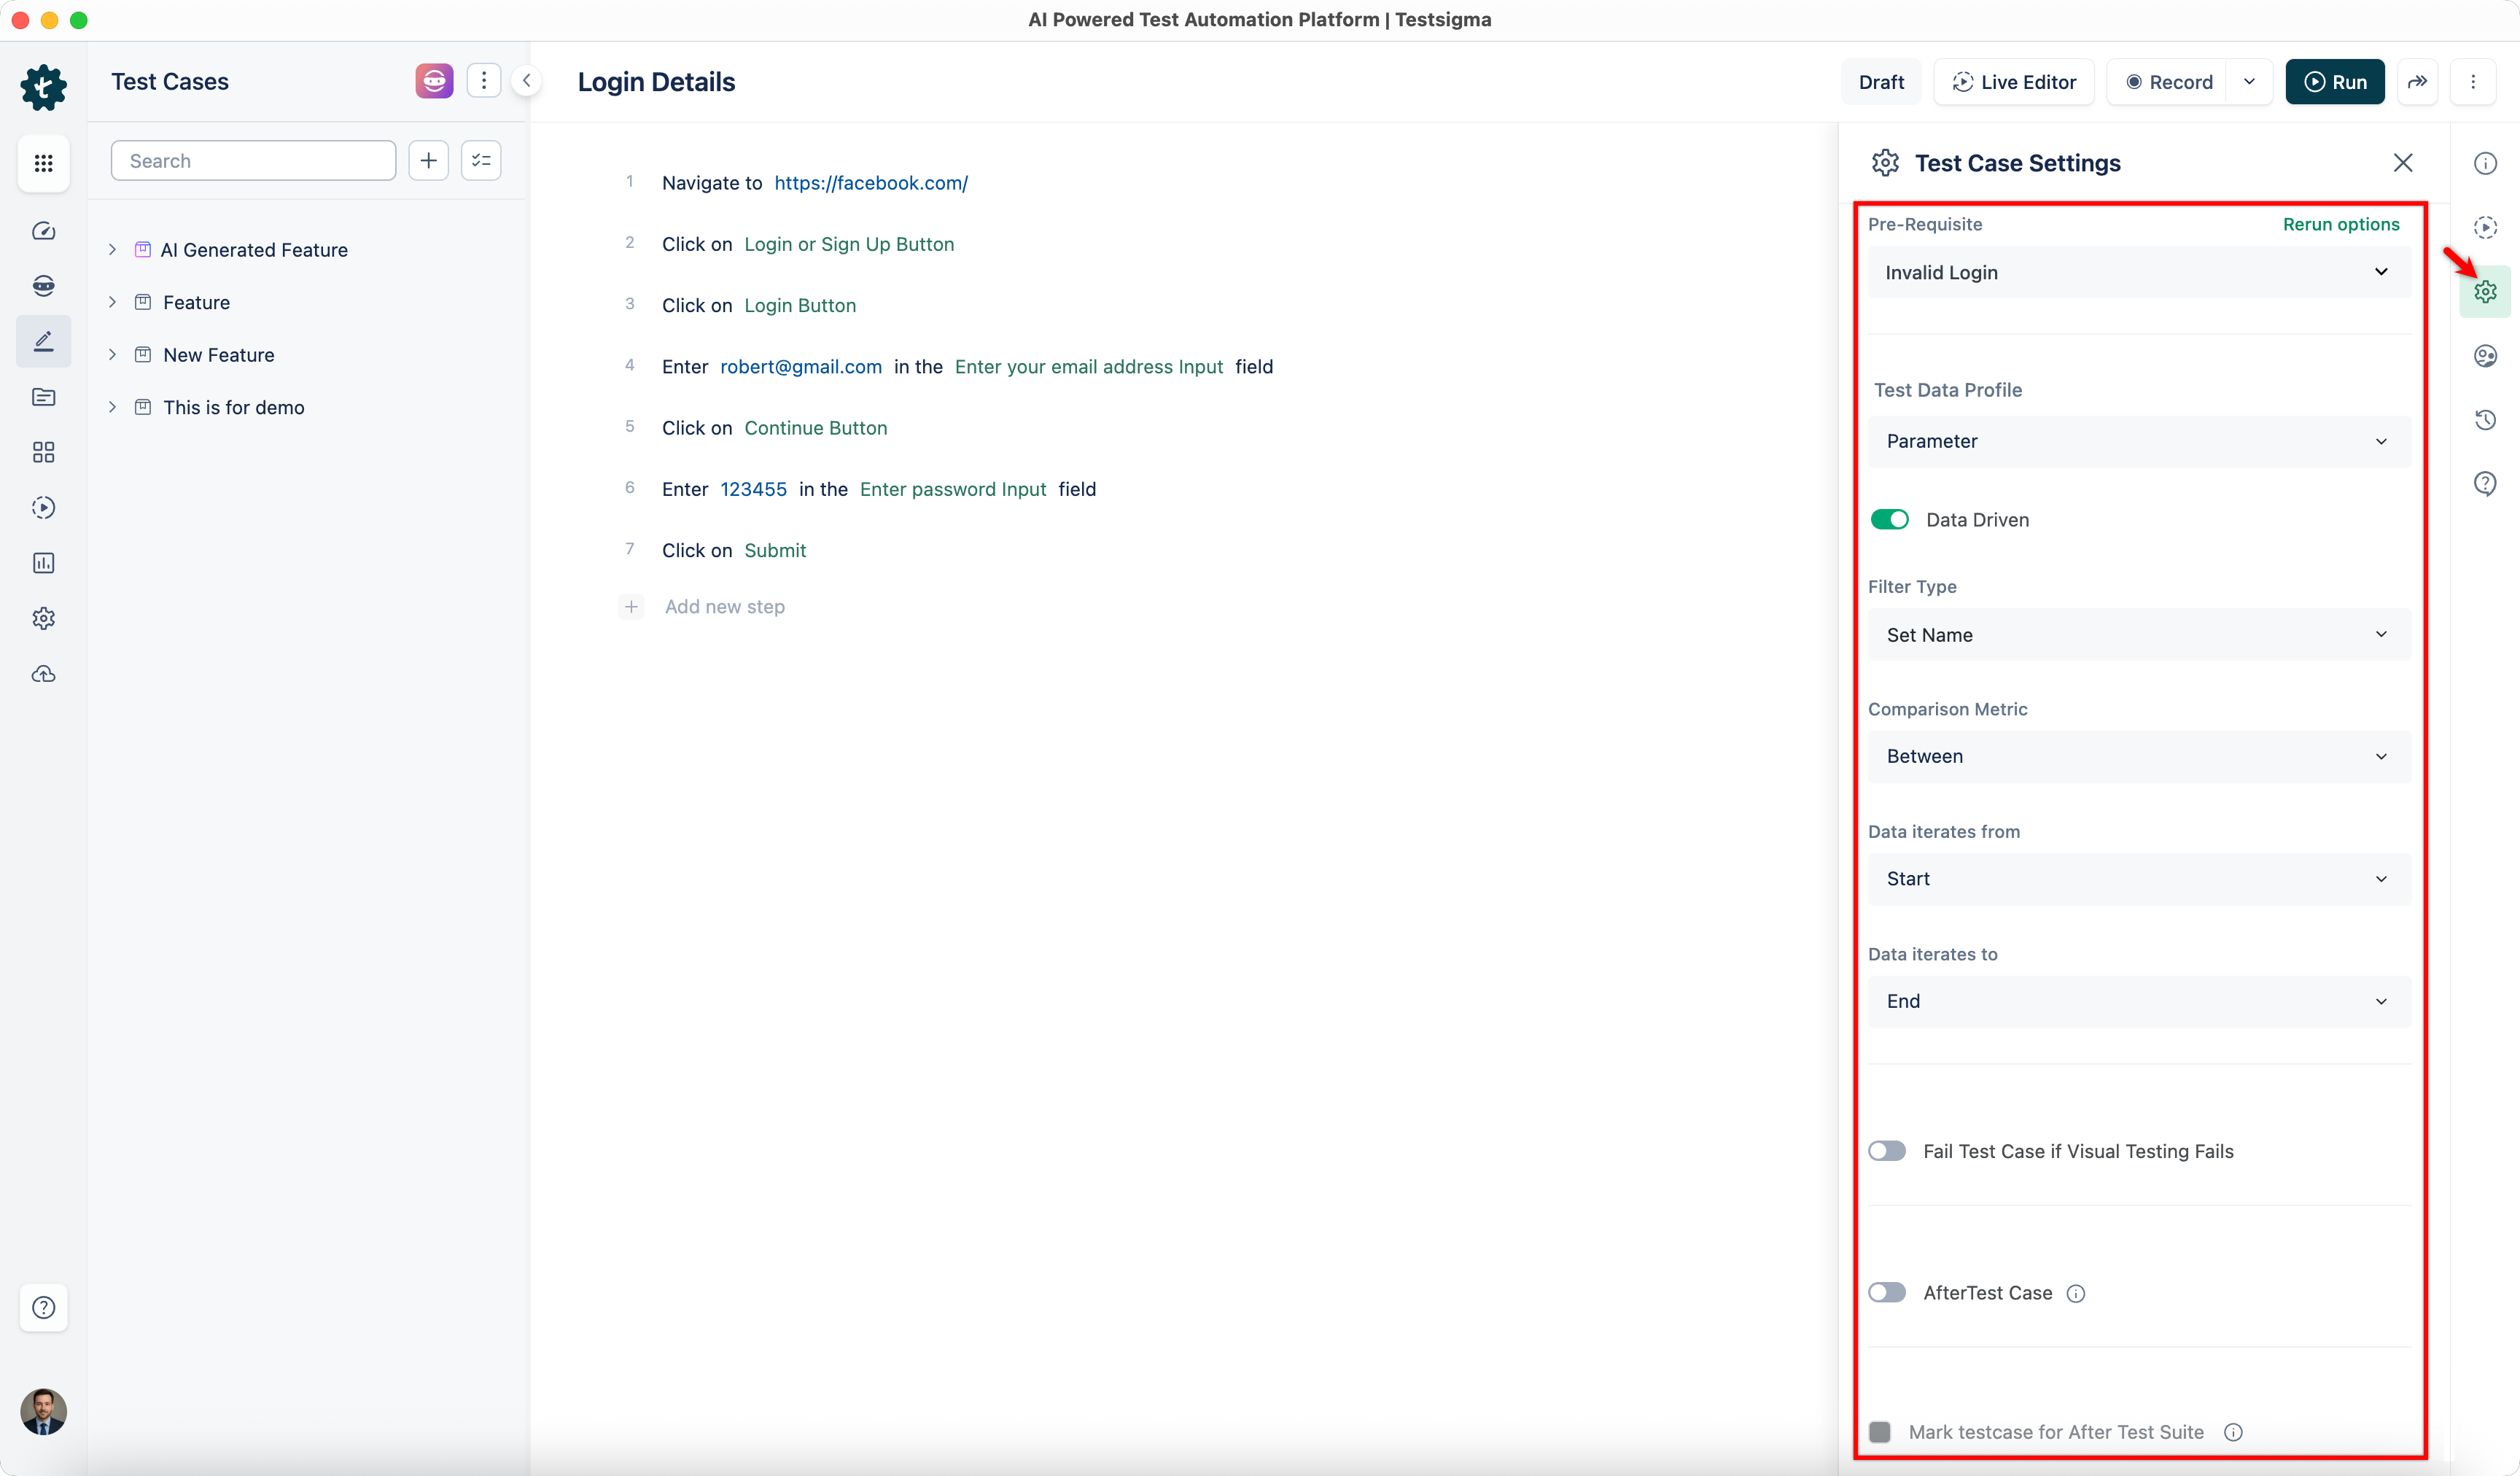
Test Case Settings configures how the test case runs.
- Pre-Requisites: another test case that must run first. Always run Pre-requisite executes it on every run. Only execute failed Pre-requisite iteration(s) reruns only the failed iterations of a data-driven prerequisite
- Test Data Profile and Test Data Set: bind the test case to a profile and select the set
- Data-Driven: runs the test case once per data set, filtered by Iteration (greater than, less than, between), Set Name (equals, contains, starts with, ends with, between), or Parameter
- Fail Test Case if Visual Testing Fails: a visual mismatch fails the test case
- After Test Case: cleanup steps that run after the test case, with Fail the Test Case or Show Test Case Result when they fail. Mark this for AfterTest Suite runs the test case in a suite’s cleanup phase
Manage Test Case carries the workflow fields.
- Status: Draft, Review, Ready, Obsolete, or Rework
- Priority: Critical, Major, Medium, or Minor
- Assignee: notified when the test case fails during a review
- Reviewer: the reviewer for the test case
- Test Type: Unit Test, Integration, Functional, Non-functional, or User Experience
- Requirement: the linked requirement, for traceability
- Labels: the labels attached to the test case
Custom workflow fields are defined under Custom fields.
Was this page helpful?
Thanks for the feedback.