

Test data types
Test data is the value a step works with: the username a login takes, the source and destination a booking takes, the account numbers a transfer takes. A step that carries a test data placeholder accepts any of the types below.
Add test data to a step
Section titled “Add test data to a step”-
Write a step with an NLP that carries a test data placeholder, such as
Enter test data in the element field. -
Click the placeholder to open the Test Data Types dropdown.
-
Select a type and supply its value.
| Type | Written as | Use for |
|---|---|---|
| Plain Text | the value itself | A fixed value that never changes |
| Parameter | @ Parameter | A column from a test data profile, for data-driven runs |
| Runtime | $ Runtime | A value captured earlier in the run |
| Environment | * Environment | A value that differs by environment, such as a URL or an endpoint |
| Random | ~ Random | A throwaway alphanumeric string |
| Data Generator | ! Data Generator | Generated realistic data, such as names, dates, or emails |
| Phone Number | % Phone Number | A real number Testsigma provides, for SMS and 2FA |
| Mail Box | & Mail Box | A real inbox Testsigma provides, for OTPs and activation links |
Plain text
Section titled “Plain text”Plain text hardcodes a value into the step. Use it when the input is fixed and belongs to this test case alone, such as a URL to navigate to or a number of seconds to wait.
Erase the test data placeholder and enter the value.
Parameter
Section titled “Parameter”A parameter takes its value from a column in a test data profile, so the step runs once per data set.
Click the placeholder, select @ Parameter, and pick the parameter from the right panel. Written into the step, @ Email refers to the Email parameter in the profile.
Runtime
Section titled “Runtime”A runtime variable holds a value captured while the test runs, such as a bill ID generated at payment time, and reuses it in a later step.
Store the value first: write a step using the Store keyword, remove the test data placeholder, enter the variable name, and click Create Step.
To use it, click the placeholder in a later step, select $ Runtime, and pick the variable from the Runtime Variables overlay. The overlay lists every runtime variable in the project, and you can search it. Click Switch Project in the overlay to select another Project, Application, and Version, and use a variable from there.
Two worked examples:
- Bill payment:
Store the value displayed in the text box Bill_ID field into a variable billid_no, thenEnter $ billid_no in the Enteryour::BillNumber field - Router SSID:
Store text from the element SSID into a variable ssid_no, thenEnter $ ssid_no in the Enteryour::SSIDNumber field
Environment
Section titled “Environment”Environment data holds the values that change between development, testing, staging, and production: URLs, API endpoints, database credentials. Its scope is the project.
In a step, click the placeholder, select Environment, and pick the environment parameter from the Environments overlay.
An environment is also selected for a whole run. On the Ad-hoc Run page, click the arrow before Additional Settings and select the Environment. In a test plan, open the Test Plan Settings tab on the Create or Edit Test Plan page and select the Environment under Additional Settings.
Environment variables
Section titled “Environment variables”A master list holds every environment variable in one place, so you pick from a known set while authoring instead of retyping keys per environment. Adding a key there creates it across all environments, with no manual copying.
To add one, go to Test Data > Environments, open the Variables tab, click Add Variable, enter the Variable name and Value, click Create, then click Update.
Random
Section titled “Random”Random data produces an alphanumeric string of the length you ask for, from 1 to 256 characters, generated fresh on every execution. A passport number field that needs a plausible 9-character value takes one.
Select ~ Random and enter the length. Written as ~|25|, the step receives a 25-character string.
Writing a test that copes with any generated value is the harder problem. A random integer is one thing; a randomly chosen user whose properties differ from the next user’s is another. Hardcoding the expected result only works when the inputs are decided in advance, and calculating the expected result from random inputs means rebuilding the application’s logic inside the test.
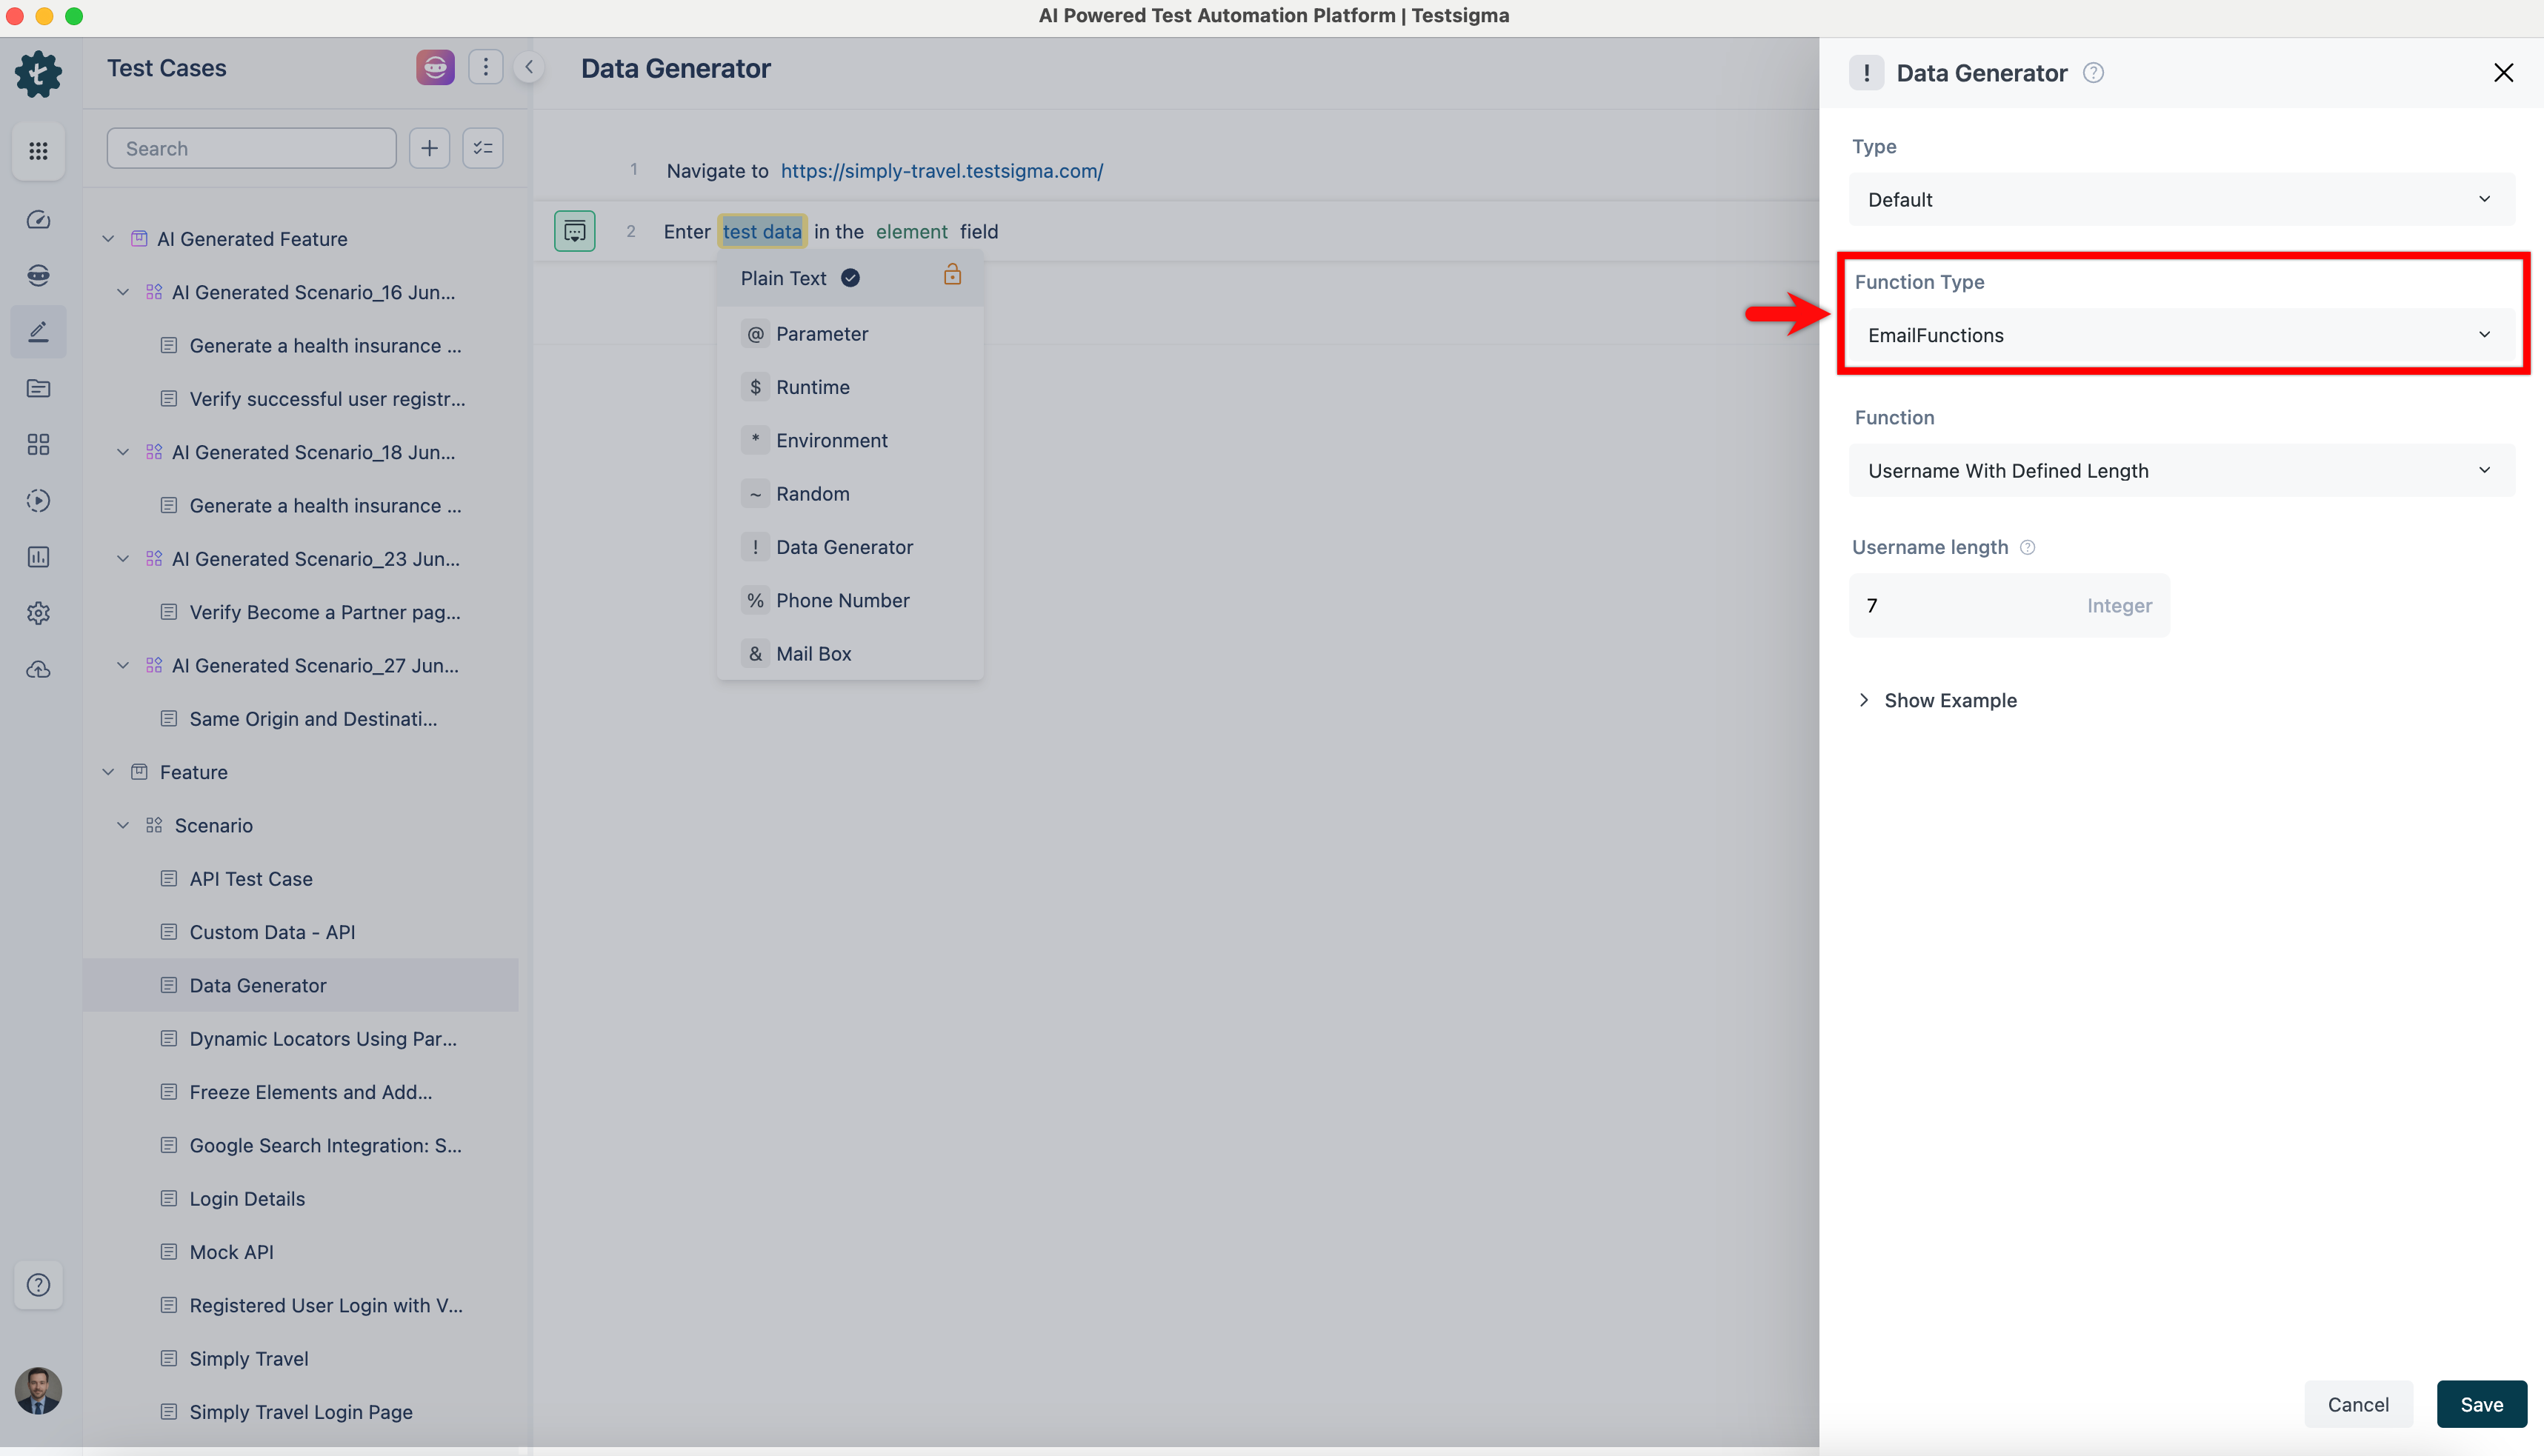
Data generator
Section titled “Data generator”A data generator produces structured, realistic values at execution time: names, addresses, emails, dates, numbers.
-
Click the test data placeholder and select ! Data Generator.
-
Select Default as the Type in the Data Generators overlay.
-
Select a Function Type.
-
Select a Function. The list shows the functions belonging to that function type.
-
Click the arrow before Show Examples to read the function’s description and its sample inputs and outputs.
-
Enter the inputs and click Save.
Testsigma ships 115 built-in functions across 15 function types. For the full list with the inputs each one takes, see Data generator functions.
Concatenate two values
Section titled “Concatenate two values”Concatenation is a generator function rather than a type of its own.
Select ! Data Generator, select StringFunctions as the Function Type and Concat as the Function, enter the first value in Testdata 1, click + Input Testdata and enter the second, then click Save.
Phone number
Section titled “Phone number”Testsigma allocates a real mobile number to your account, so a test can complete two-factor authentication or a number-based login.
Entering the number and reading the OTP are two separate steps in the test case.
-
Write a step such as
Enter test data in the element field, click the test data placeholder, and select % Phone Number. The overlay lists the numbers allocated to your account. -
Select a number. The OTP is sent there.
-
Write a second step for the OTP field, click its placeholder, and select ! Data Generator.
-
Select PhoneNumberFunctions as the Function Type, enter the details, and click Save.
Message forwarding
Section titled “Message forwarding”Some countries restrict the phone numbers available for OTP and login. The Testsigma SMS Forwarder app works around this by sending SMS messages to a mailbox you then read the OTP from.
Install the app on a device, click the icon in the top-left corner to open settings, and sign in. Select the Gmail API if you use a Google account.
Then set up a filter:
-
Tap Filters and click the plus icon.
-
Click the plus icon on Set up recipients.
-
Tap Enter Phone Number on the Add overlay and enter the number to forward messages to.
-
Swipe left to Forwarding conditions and set the rule, by sender number or by message text.
-
Swipe left to Change the content to add the original sender’s number and any words you want included.
-
Swipe left to More Settings to rename the filter and turn on notifications and results.
-
Click Save.
A forwarded-OTP test case then runs: navigate to the URL, click Login or Sign Up, enter the phone number, wait 30 seconds, fetch the OTP with a data generator, and submit it.
Mail box
Section titled “Mail box”Testsigma provides a digital inbox for verifying OTPs, activation links, and email content.
To put the address into a step, click the test data placeholder, select & Mail Box, and pick the email from the right panel.
To read an OTP out of it:
-
Write a step with a test data placeholder and the element for the OTP field.
-
Click the placeholder and select ! Data Generator.
-
Select default as the type, MailBoxFunctions as the Function type, and Get Email OTP as the function.
-
Fill in the function’s arguments:
- Regex: the pattern to match, such as
\d{4}for four consecutive digits - MailBox: the mailbox holding the incoming messages
- Timeout: how long to wait for the email, in seconds
- Regex: the pattern to match, such as
-
Click Save.
To store email data in a runtime variable, write a step with two test data placeholders. Set the first to ! Data Generator, with MailBoxFunctions as the function type and Content Verification as the function, then fill in Regex, MailBox, Compare String, and Timeout. Substitute the second placeholder with the text that names the variable.
The same toggle that exposes phone numbers outside executions applies to mailboxes.
Was this page helpful?
Thanks for the feedback.