

Create a Salesforce test case
Salesforce applications are hard to automate through the UI alone, because the workflows are long, the DOM is complex, and the org changes often. Three things work around that. Metadata learns your org’s components, so elements exist before you write a step. Smart NLPs collapse long UI flows into single steps. Copilot records against the live org.
Before you start, you need a Salesforce project with a metadata connection, and the Testsigma Recorder extension installed. See Set up Salesforce testing.
Create the test case
Section titled “Create the test case”Go to Create Tests > Test Cases, create a test case, and build its steps with smart NLPs, with Copilot, or with both. Then click Run.
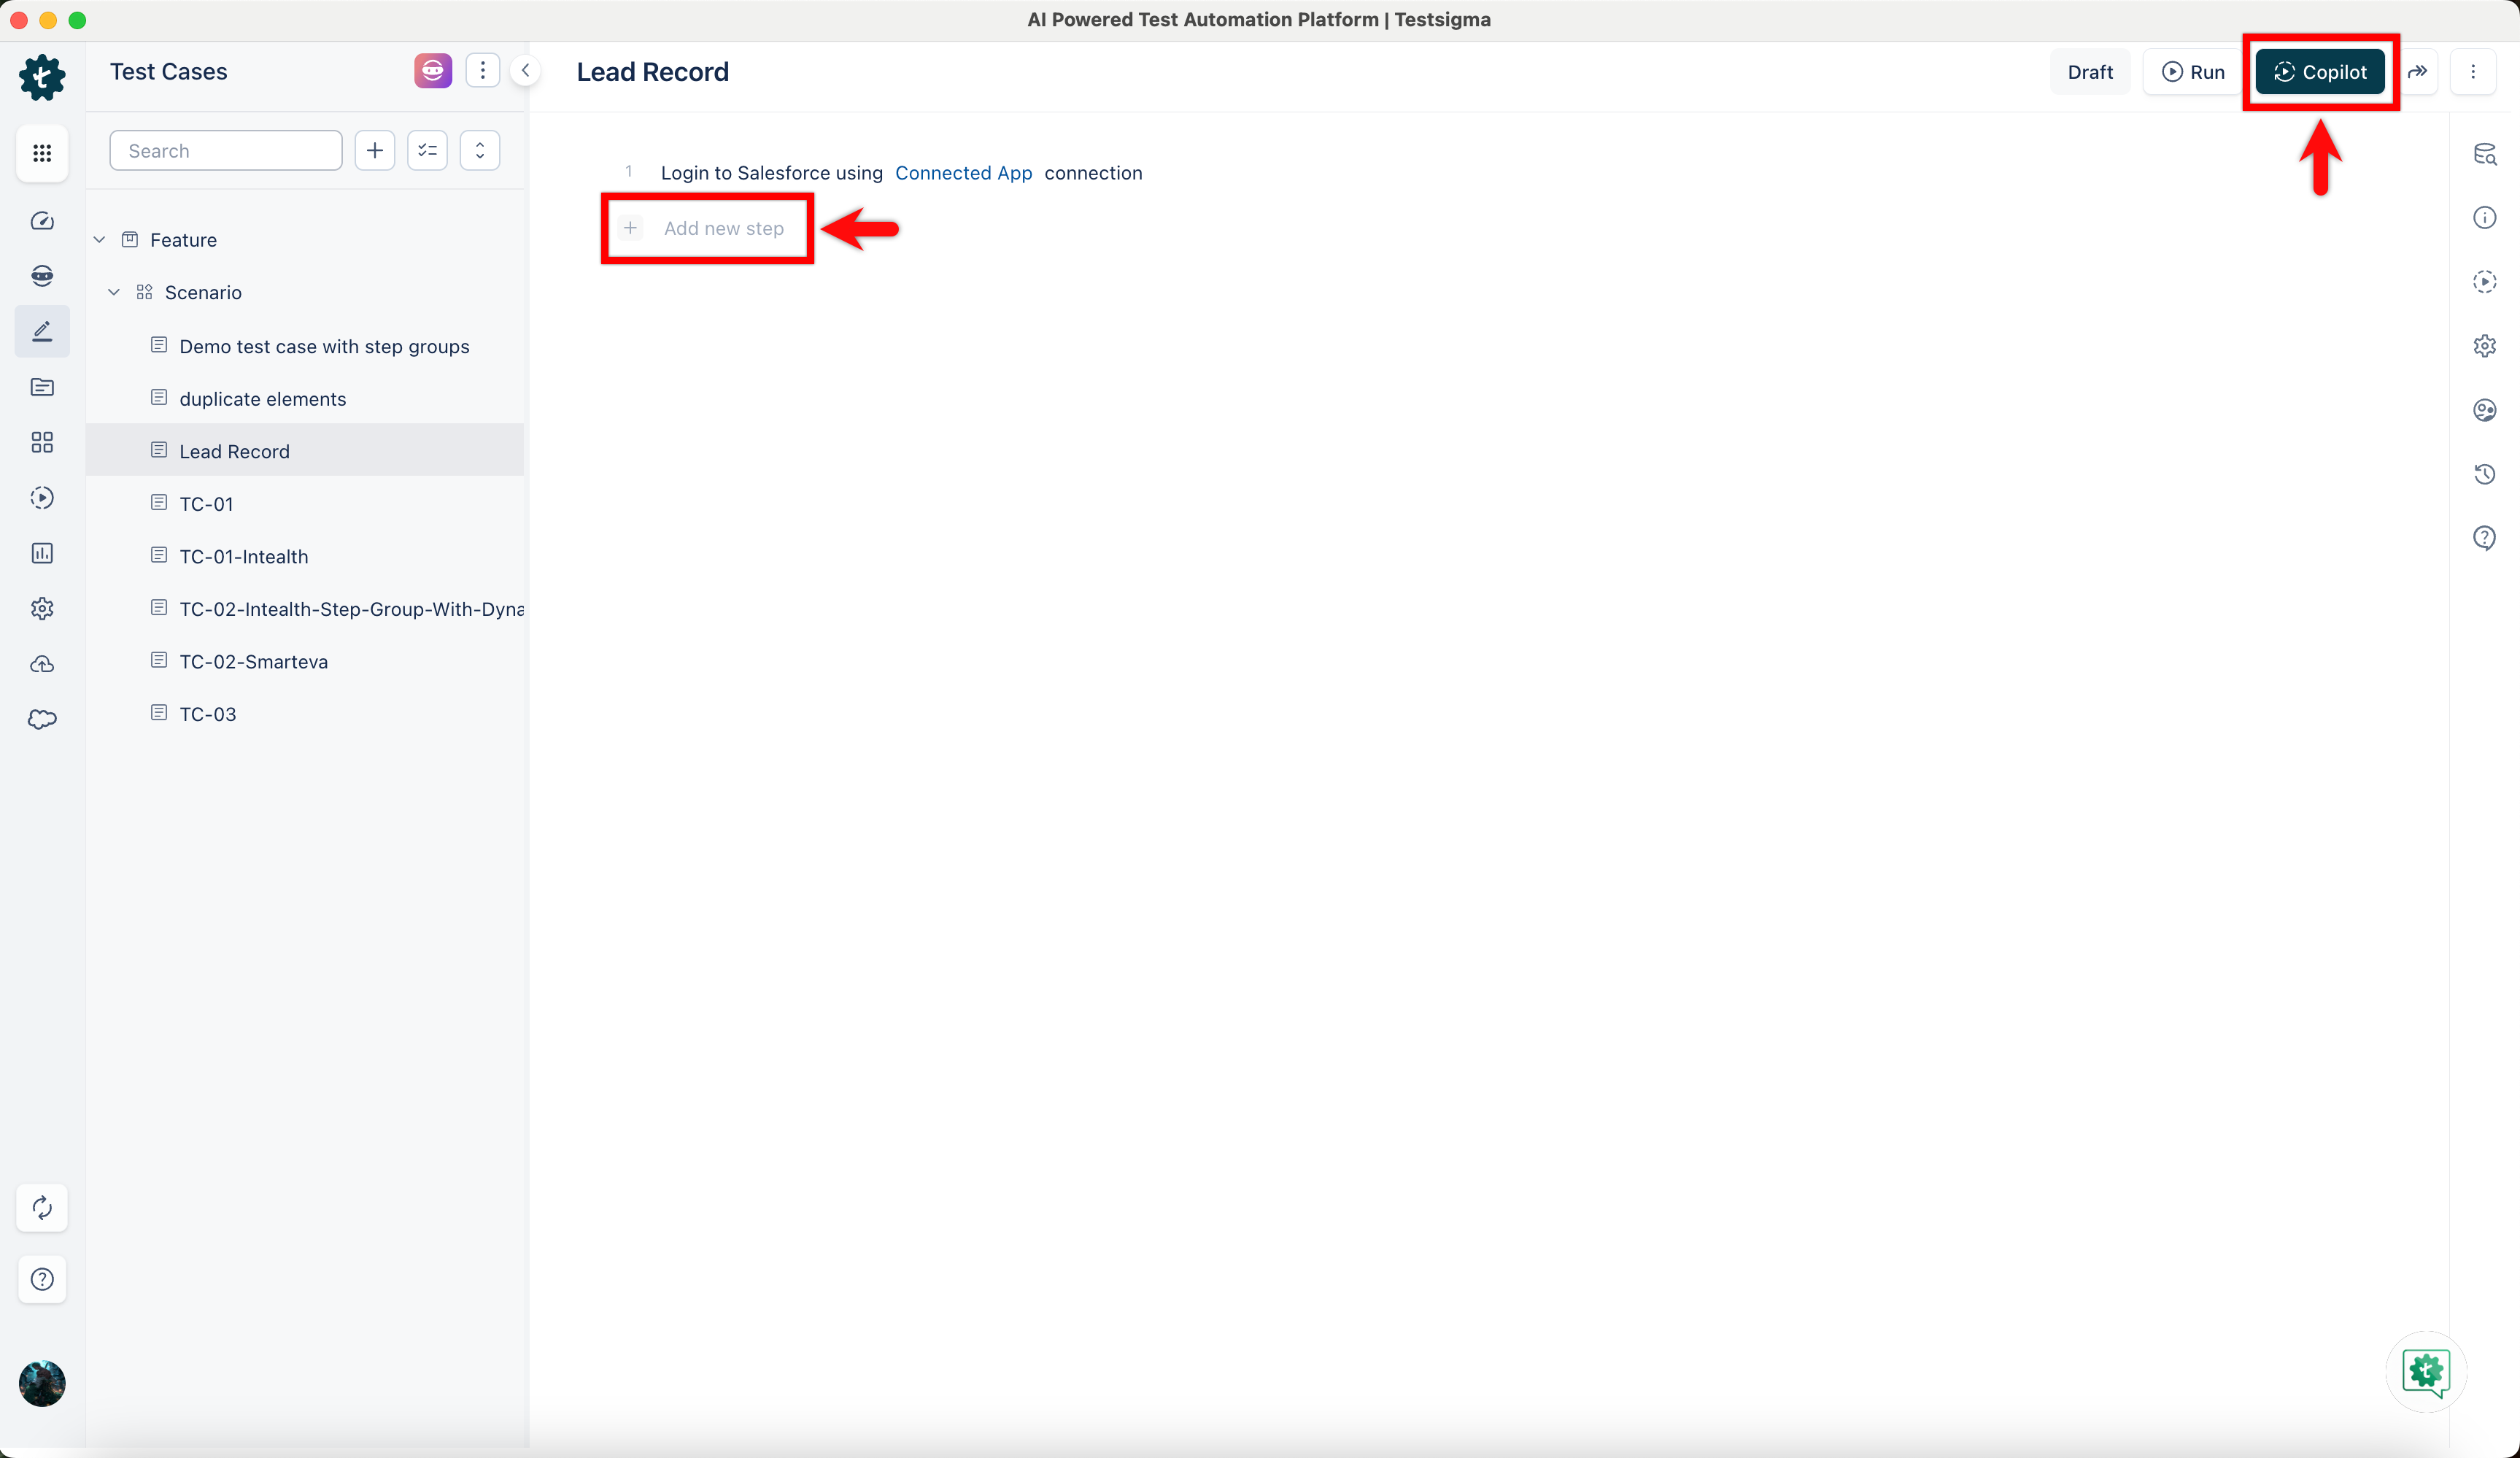
Write steps with smart NLPs
Section titled “Write steps with smart NLPs”A smart NLP does through the API what would otherwise take a page of UI interactions. Creating a lead and editing it takes 4 steps rather than dozens.
-
Login to Salesforce application using Salesforce Connection connection. Select a connection, or click Add Connection to create one. -
Switch to Application, replacing the application from the dropdown. -
Create record in Salesforce Object Form using Salesforce Connection and store the record id in variable test data. This is an API step:- Click Salesforce Object Form to open Create record using API, and select or search for the object.
- Fill in the form that appears for that object and click Save. Only the fields you filled are sent in the request.
- Click Salesforce Connection and select the connection.
- Store the record ID in a variable, such as
Lead Records. That variable is available to later steps and to other test cases.
-
Open the edit Salesforce Object form where record is Record ID, using the $ Runtime test data type to pass the variable from step 3.
Parameterize the login connection
Section titled “Parameterize the login connection”Rather than hardcoding a connection, click Salesforce Connections on the login step, type /, and select a test data type such as Environment. The connection then comes from the environment the test runs in.
Record steps with Copilot
Section titled “Record steps with Copilot”-
Click Copilot on the Test Case Details page.
-
Confirm Copilot is ready in the Debug & Record overlay, and click Launch.
-
Click Rec and perform the actions you want as test steps.
-
Click Stop Recording, then Exit Copilot.
-
Click Stop Session in the Stop & Exit Session dialog.
-
Refresh the Test Case Details page to see the recorded steps.
Elements
Section titled “Elements”Salesforce elements are learned automatically once metadata synchronizes, so you do not create them by hand.
Their names follow a convention. A field name is ObjectName_FieldName, so Account_CreatedDate is the CreatedDate field on the Account object. A screen name is the object name as it appears on screen, such as Account.
To browse them, open a test case, add a step, hover over the element, and click Select Element. The Elements overlay lists everything learned.
To confirm an element was pre-learned, click it, select View/Edit Element in the Testsigma Debugger and Recorder, and the overlay tells you it is a standard Salesforce element.
Create an element during recording
Section titled “Create an element during recording”An element the metadata did not cover can be captured live.
-
Click Copilot on the test case.
-
Confirm Copilot is live in the Debug & Record overlay, select a connection under Salesforce Metadata connection, and click Launch.
-
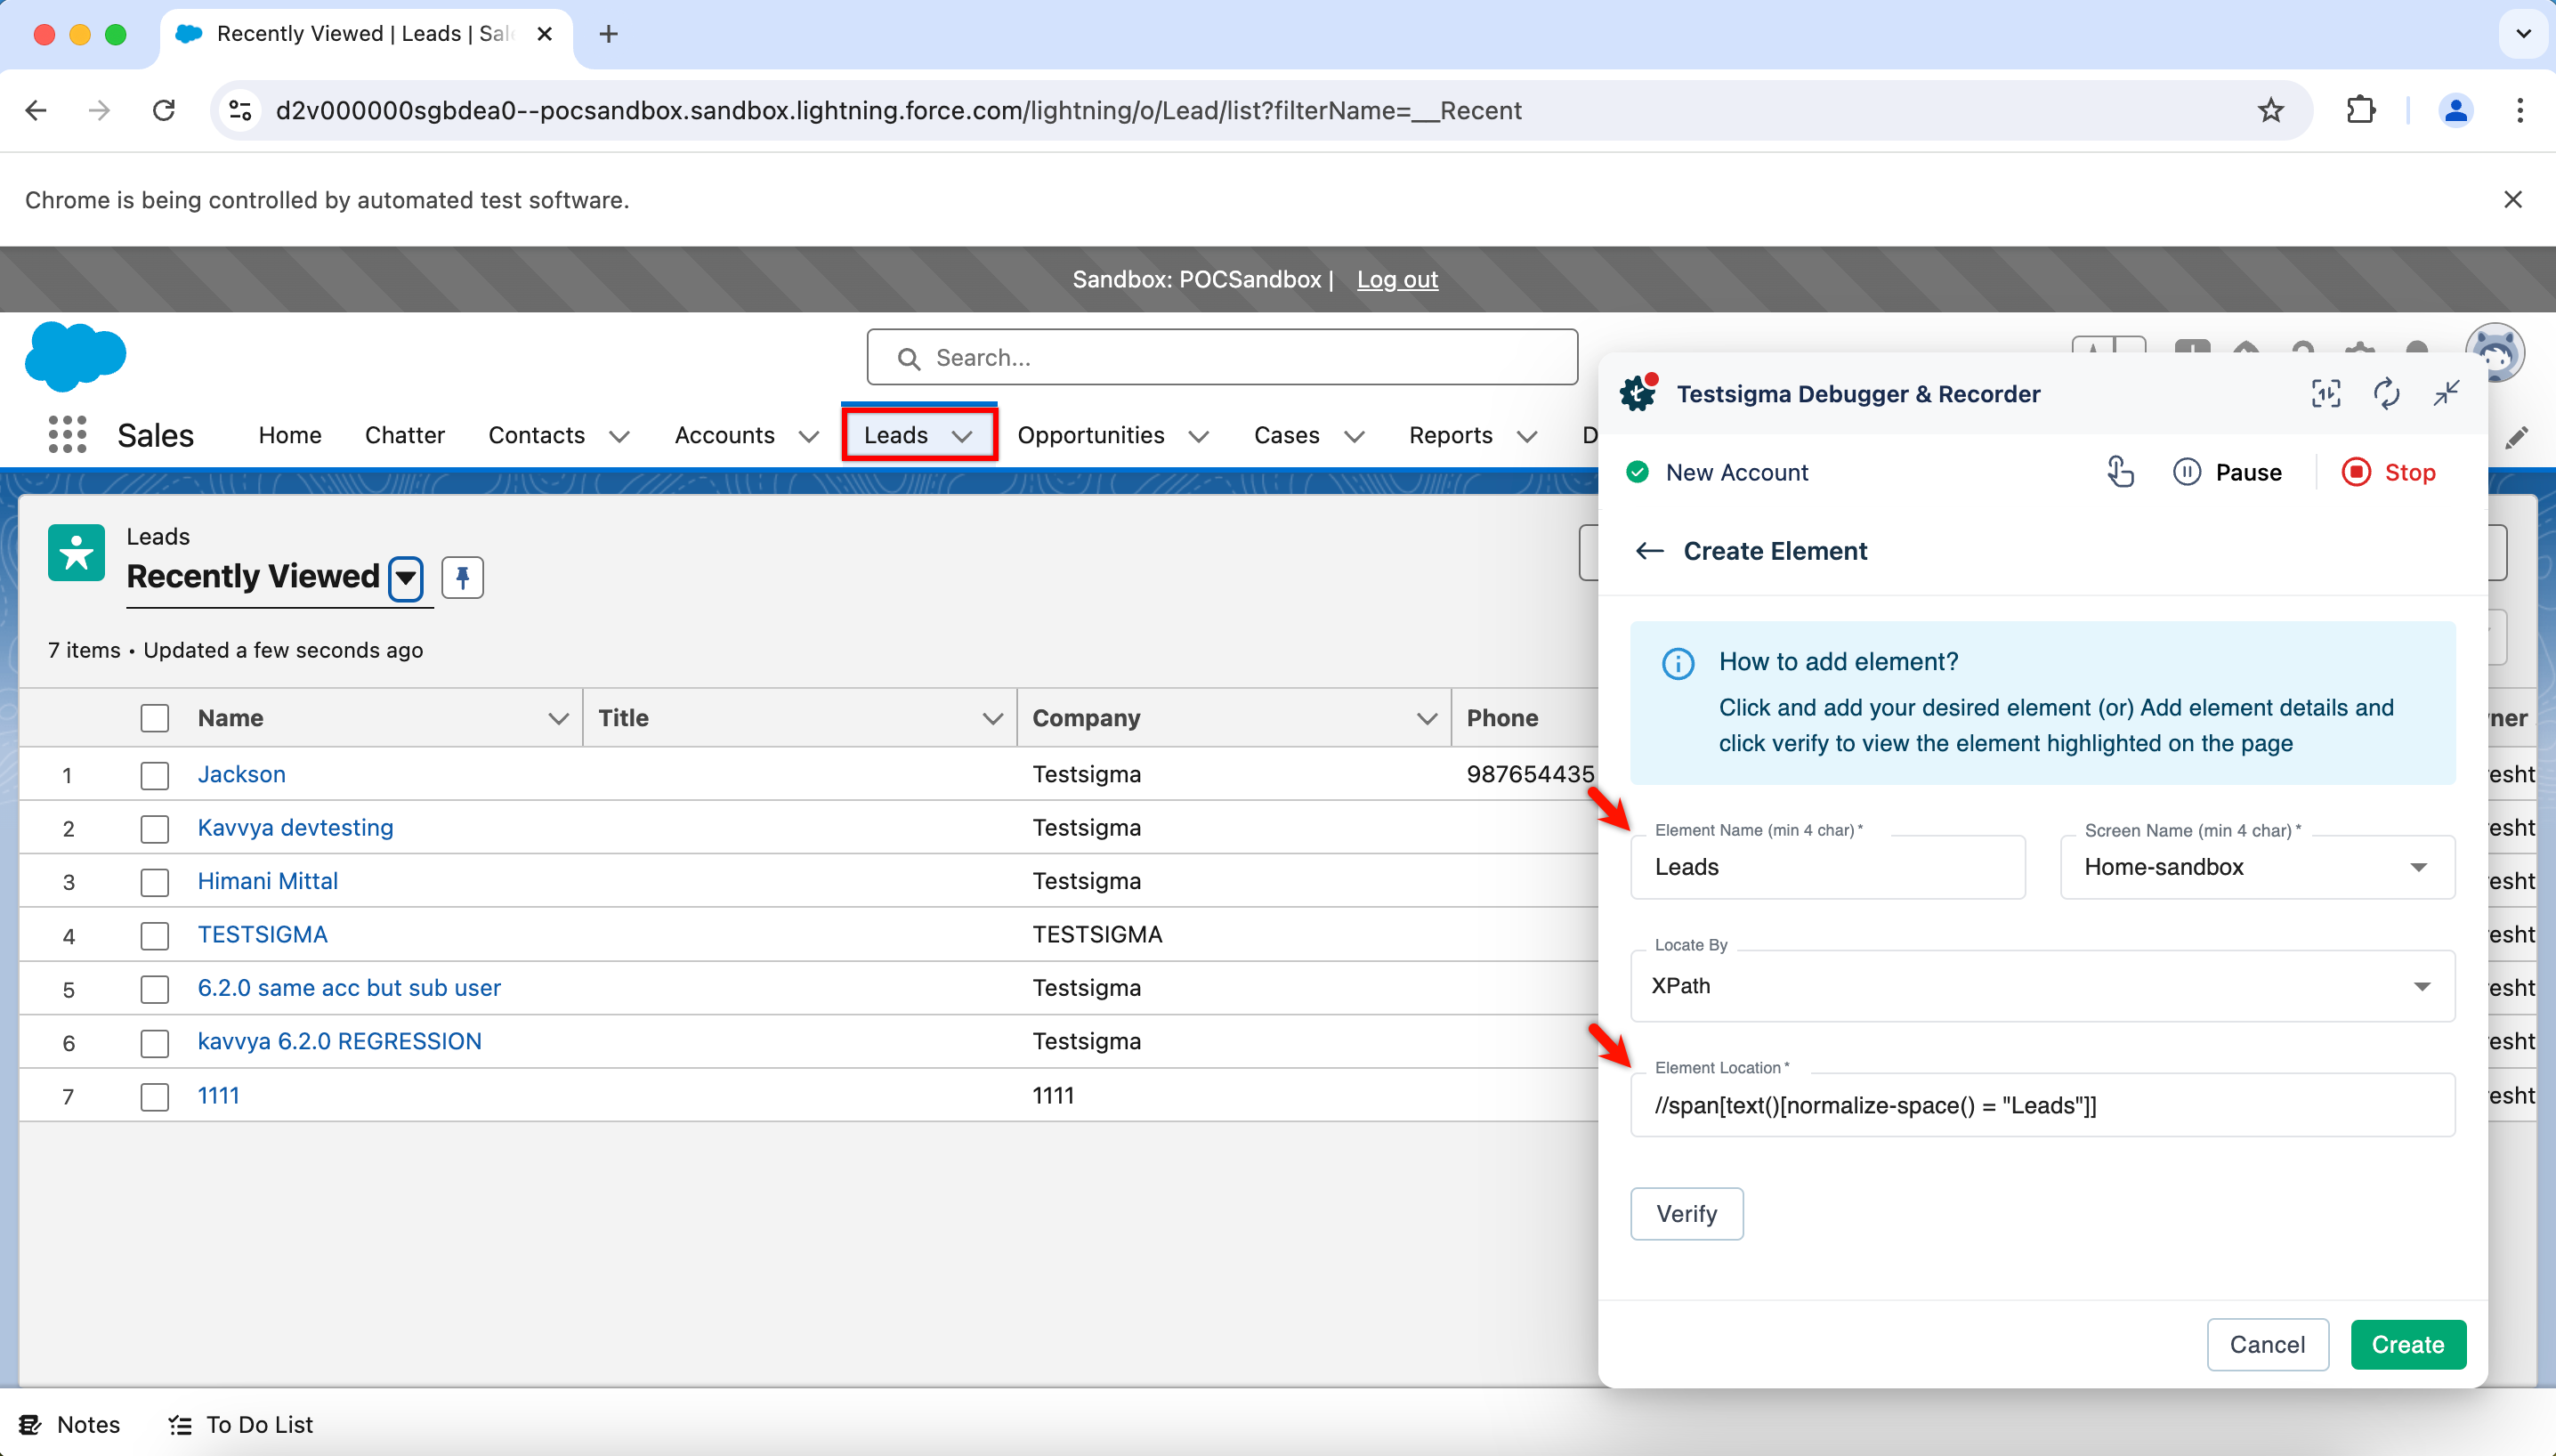
Click the element in the NLP and select Create Element.
-
Click the UI element you want. The recorder captures its details.
-
Check the details and click Create.
When the org changes
Section titled “When the org changes”A metadata refresh downloads your org’s current structure and identifies fields that no longer exist, so a removed or renamed field surfaces as a warning rather than as a failed run later.
Find the affected test cases
Section titled “Find the affected test cases”Impacted test cases are flagged with a warning on the Test Cases page. Click View All to filter to the deprecated ones, or use the highlighted filter to show only test cases containing errors.
Fix them
Section titled “Fix them”-
Open the deprecated test case.
-
Hover over the highlighted step to read the error.
-
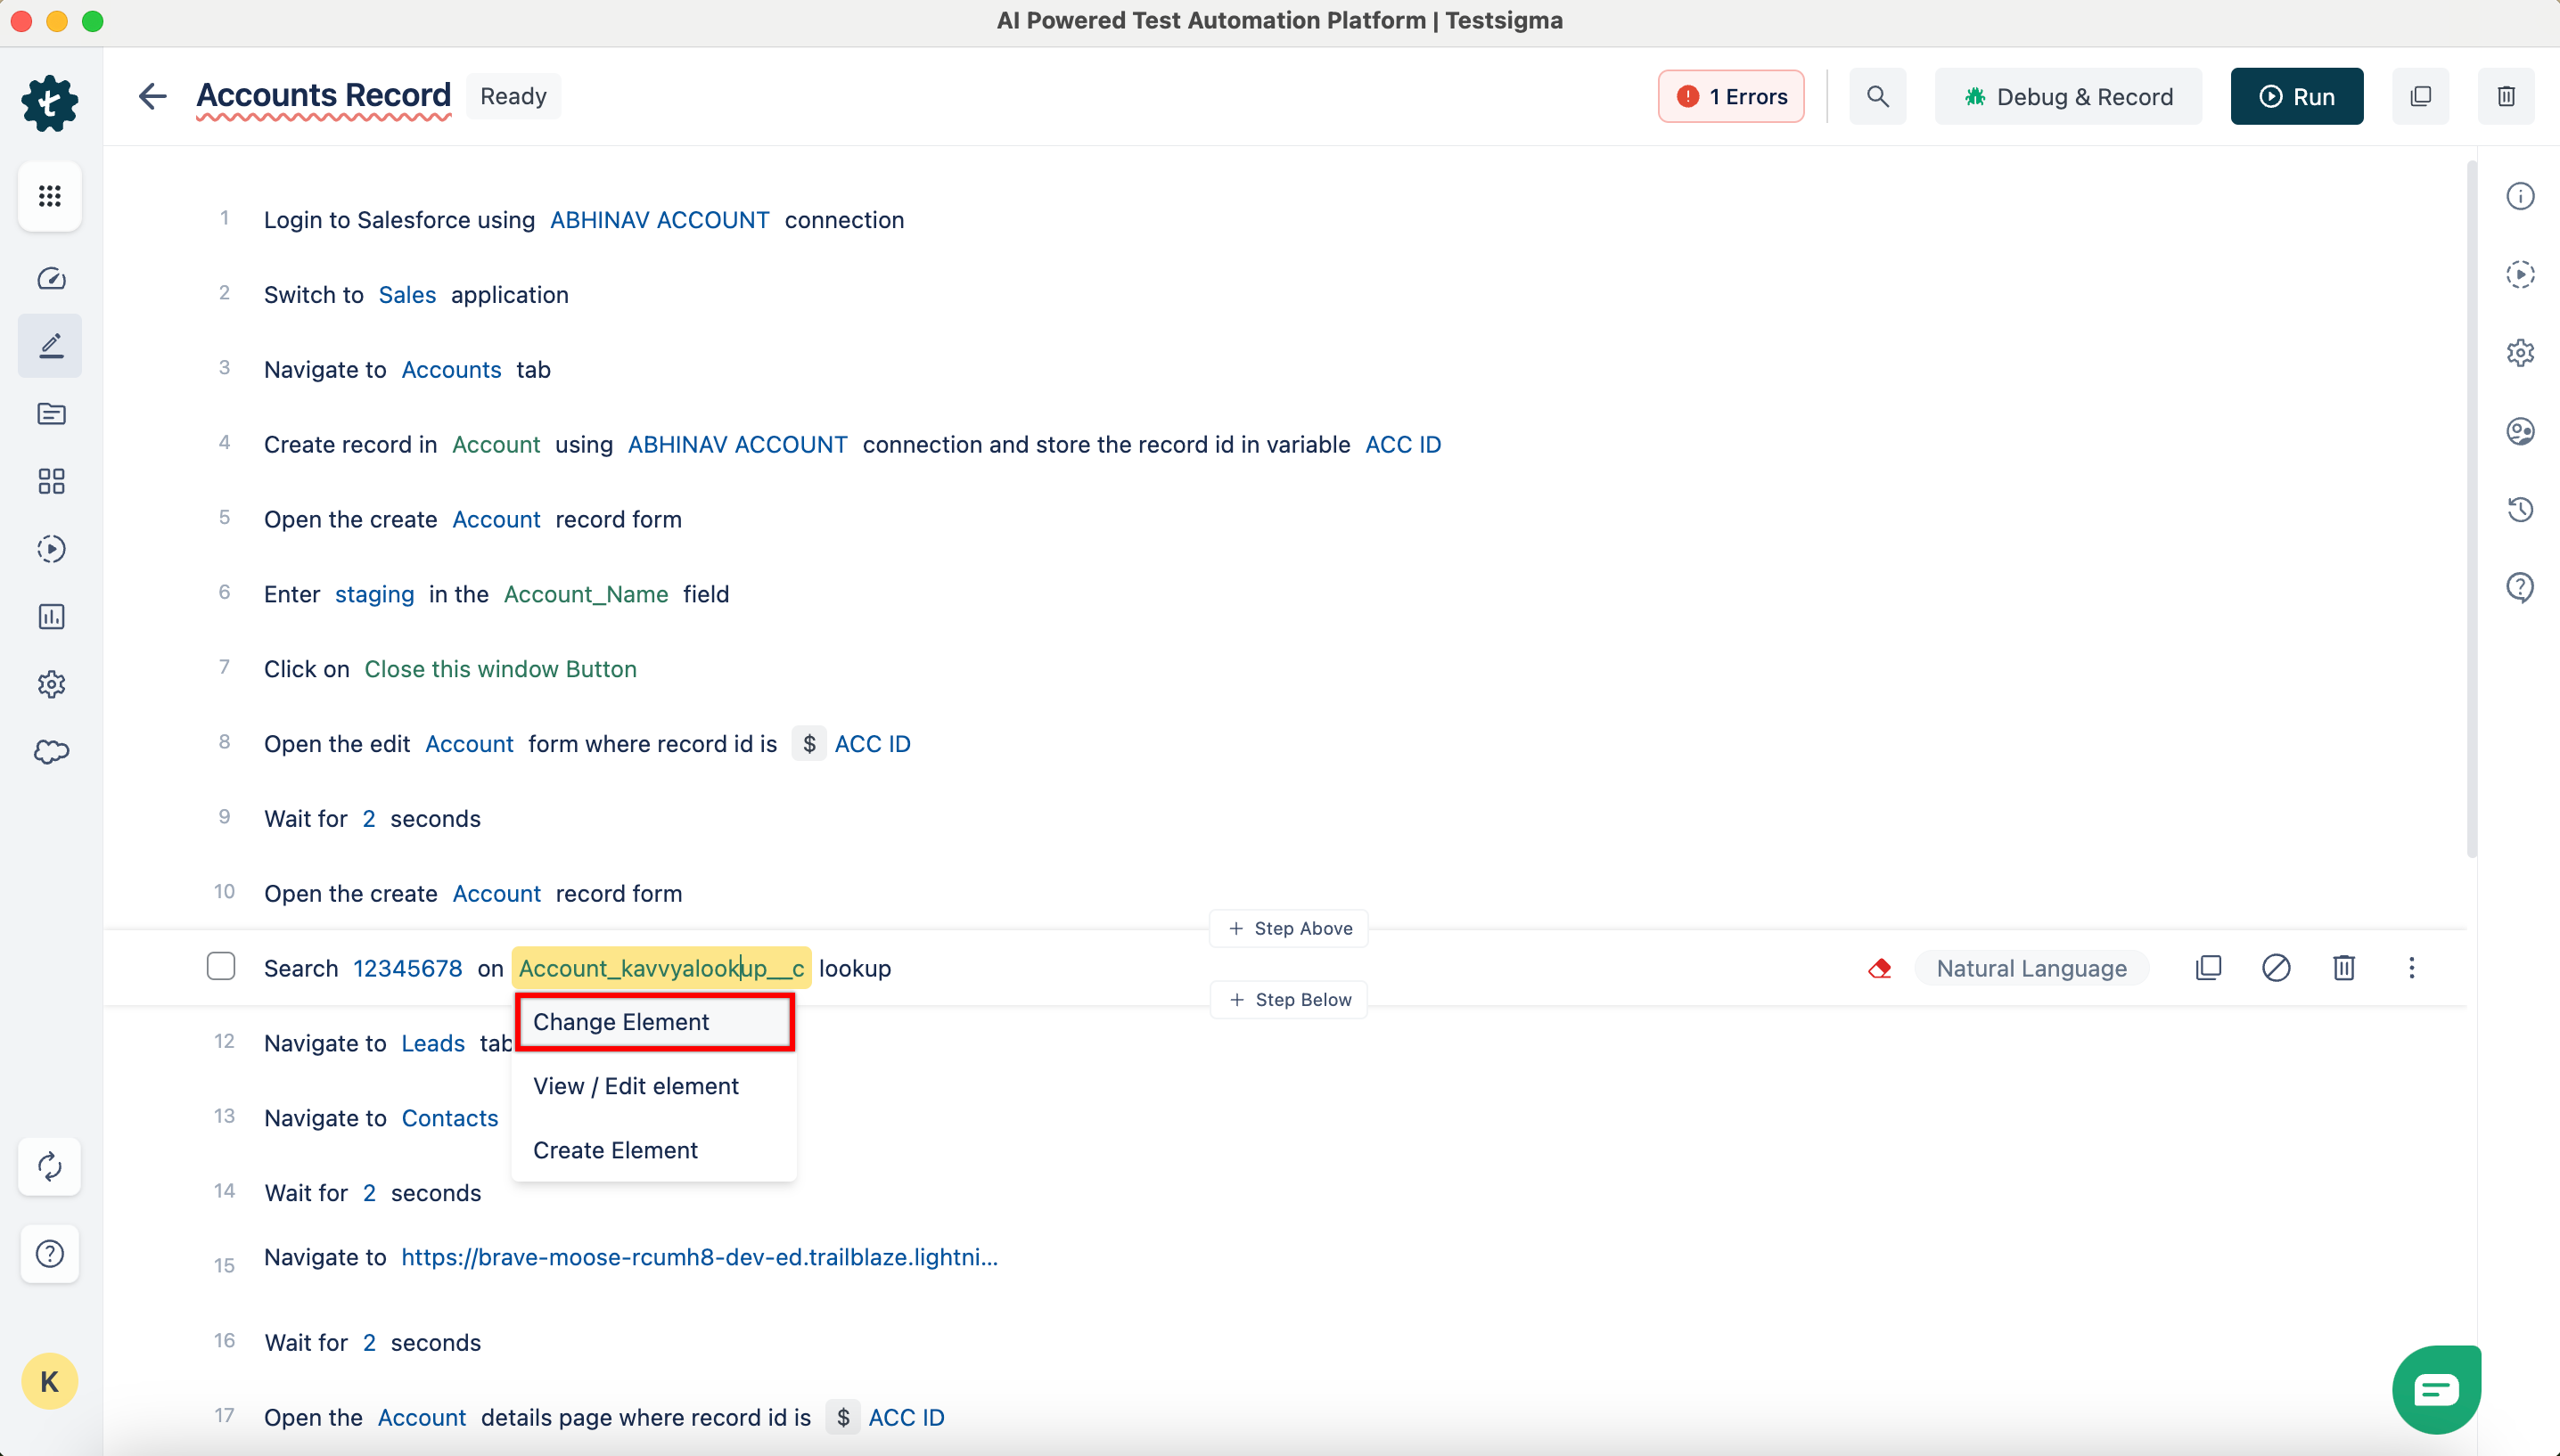
Hover over the element and click View/Edit element to open Element details, which names the deprecated element.
-
Replace it with a new element, or disable or remove the step.
For a deprecated element specifically, disable the step that uses it, create a new element in the same context, and swap it in with Change Element.
Frequently asked questions
Section titled “Frequently asked questions”Why does authorization fail?
Section titled “Why does authorization fail?”The client ID, the secret, the environment, or the callback URL is wrong. Check the client ID and secret for typos and regenerate them if needed, confirm the environment matches the org you are connecting to, and check the callback URL against the one in Salesforce. Also confirm the app’s permissions and scopes are set, and that no firewall blocks the authorization endpoint.
Why does the login step fail when metadata syncs fine?
Section titled “Why does the login step fail when metadata syncs fine?”The access and refresh tokens have expired, the same app is being used by several users at once, or the app’s configuration changed in the org. Re-authenticate the connection to get fresh tokens, then check the app’s settings in Salesforce.
Why does an MFA challenge appear during metadata sync?
Section titled “Why does an MFA challenge appear during metadata sync?”The org enforces MFA on direct UI logins. Turn off Require multi-factor authentication (MFA) for all direct UI logins to your Salesforce org, and check user-level MFA under Account > Settings > Advanced User Settings > User Details > Profile.
Why does an MFA dialog appear during execution?
Section titled “Why does an MFA dialog appear during execution?”Salesforce treats a session from a lab or an agent as untrusted and challenges it. Go to Setup > Quick Finder > Session Settings > Session Security Levels, remove the MFA requirement, and confirm passwordless login and username and password login are both enabled.
Why does execution fail on labs but pass locally?
Section titled “Why does execution fail on labs but pass locally?”The session was generated on one machine and executed on another, so Salesforce treats it as invalid.
- Confirm the executing user has the same privileges as the System Administrator, under Setup > Quick Finder > Users.
- Run the test on a local agent. If it passes, the problem is lab session handling.
- Go to Setup > Quick Finder > Session Settings and disable Lock sessions to the IP address from which they originated, then enable Lock sessions to the domain in which they were first used and Force relogin after Login-As-User.
Was this page helpful?
Thanks for the feedback.