

Test plans
A test plan decides what runs, where it runs, and when. It holds the test suites to execute, the test machines to execute them on, and the settings that apply across the run: environment, timeouts, notifications, recovery actions, and post-run hooks.
A test plan needs at least one test suite and at least one test machine.
Test plan types
Section titled “Test plan types”| Question | Cross Browser Testing | Custom Test Plan |
|---|---|---|
| How do suites and machines pair up? | Every selected suite runs on every selected machine, in parallel or sequentially depending on your settings | You attach machines to each suite yourself |
| How do you select them? | Suites and machines are selected separately | Machines are selected per suite |
| What is it for? | Running the same suites across several browsers | Distributed testing, end-to-end testing, and any run where suites need different machines |
Test lab types
Section titled “Test lab types”Each test machine belongs to a test lab, which decides where the machine lives and whether it can reach your application. Testsigma supports 7 labs, including its own cloud, your local devices, and third-party clouds such as BrowserStack. See test runs for what each lab needs and how to pick one.
Create a test plan
Section titled “Create a test plan”-
Go to Test Plans and click Create Test Plan.
-
Enter a Name in the Basic Details tab.
-
(Optional) Turn on the Description toggle and describe the plan’s purpose and scope.
-
(Optional) Add Labels, which make plans easier to sort and group.
-
Select the Test Plan Type, either Cross Browser Testing or Custom Test Plan, and click Continue.
-
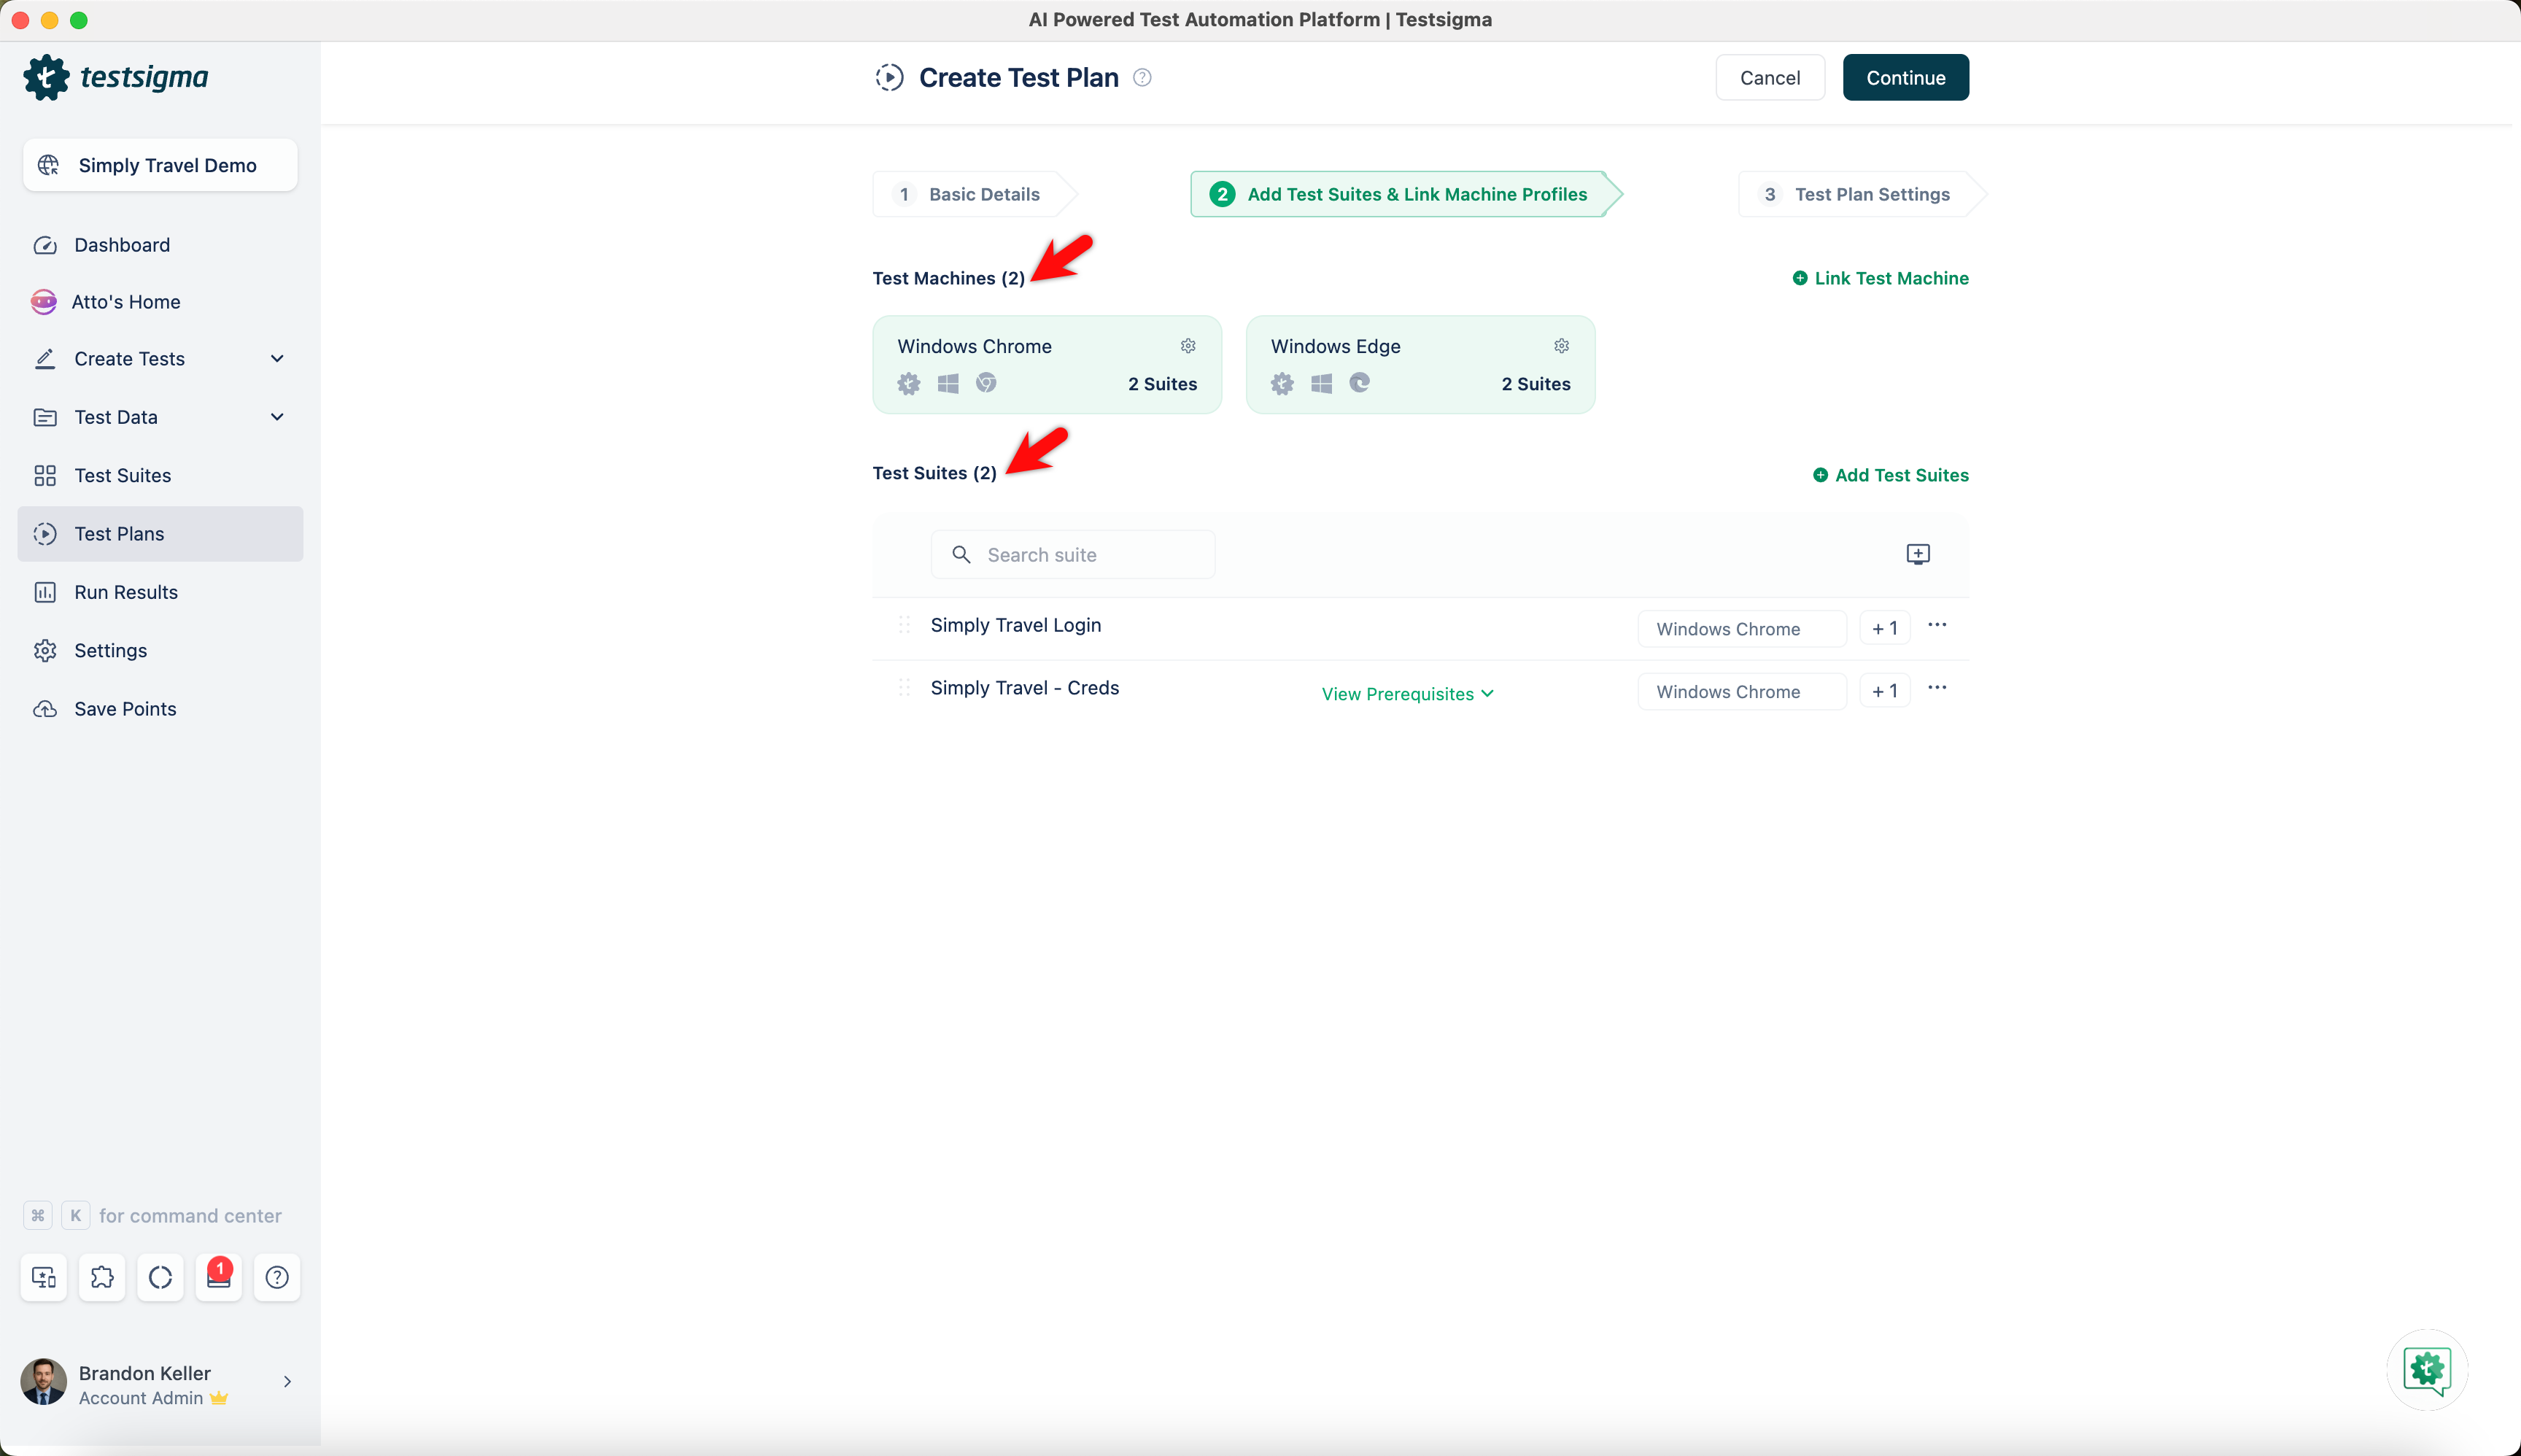
Click Add Test Suites in the Add Test Suites & Link Machine Profiles tab and select the suites.
-
Click the Test Machine icon, select a pre-defined machine or create a new one, and click Save Selection.
-
Click Continue.
-
Configure the Test Plan Settings tab and click Create.
Test plan settings
Section titled “Test plan settings”Notifications
Section titled “Notifications”Turn on Send Notifications, then select which outcomes to be notified about: Passed, Failed, Not Executed, Queued, Stopped, or Running.
Enter the addresses in Send Notification to, or select Add my email to use your Testsigma-registered address. To notify a chat channel as well, expand Also Send messages to and select Google Chat, Slack, or Microsoft Teams.
Additional settings
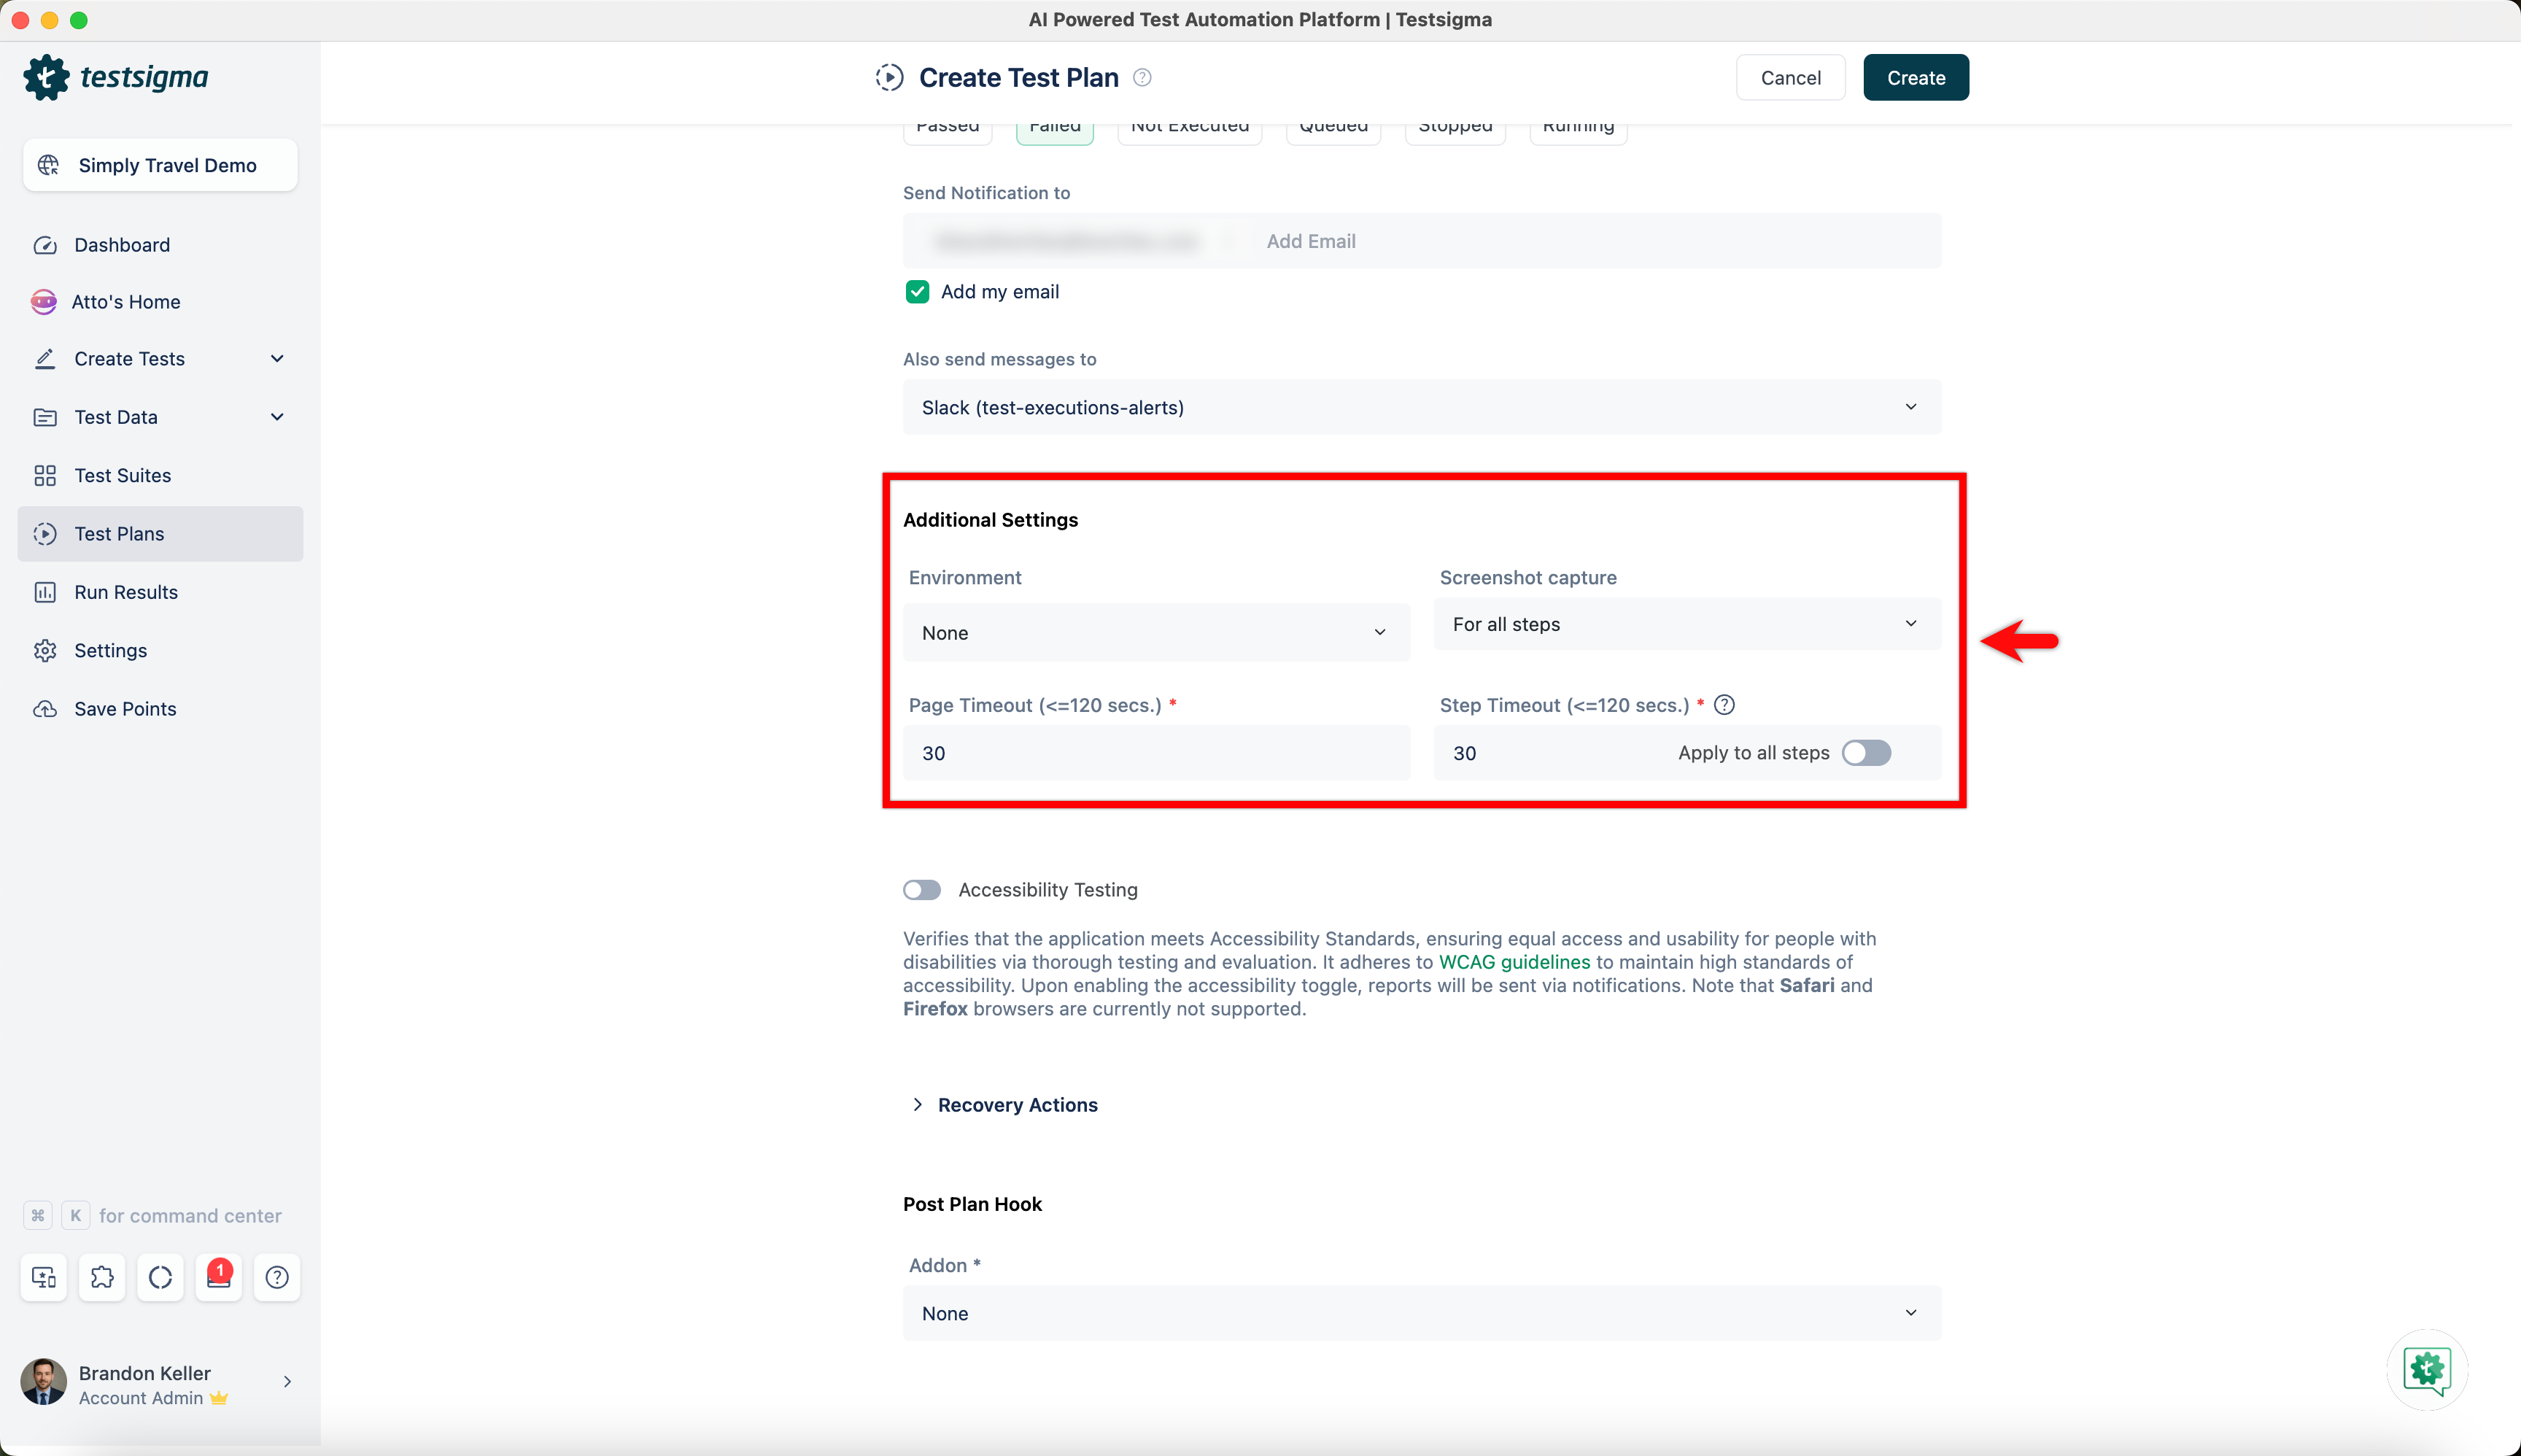
Section titled “Additional settings”- Environment: the test environment the run uses
- Screenshot Capture: None, All Steps, or Failed Steps alone
- Page Timeout: how long a test waits for a page to load
- Element Timeout: how long a test waits for an element to load
Accessibility testing
Section titled “Accessibility testing”Turn this on to validate the application against WCAG guidelines, and select the WCAG Version & Conformance Level you need. Checks run on the steps you enabled them for, and the reports are shared through the plan’s notifications. See Accessibility testing.
Recovery actions
Section titled “Recovery actions”Click Recovery Actions to set what Testsigma does when a step, test case, or suite fails during the run.
Post plan hook
Section titled “Post plan hook”A post plan hook runs an add-on after the plan finishes executing, whether the plan passed or failed.
Select the add-on from the Post Plan Hook dropdown, fill in its fields, click Create or Update, then run the plan. To see the outcome, click View Reports on the Test Plan details page and read the Post Plan Hook status under Run Result Overview.
Run suites and test cases in parallel
Section titled “Run suites and test cases in parallel”-
Open the plan and go to the Add Test Suites & Link Machine Profiles tab.
-
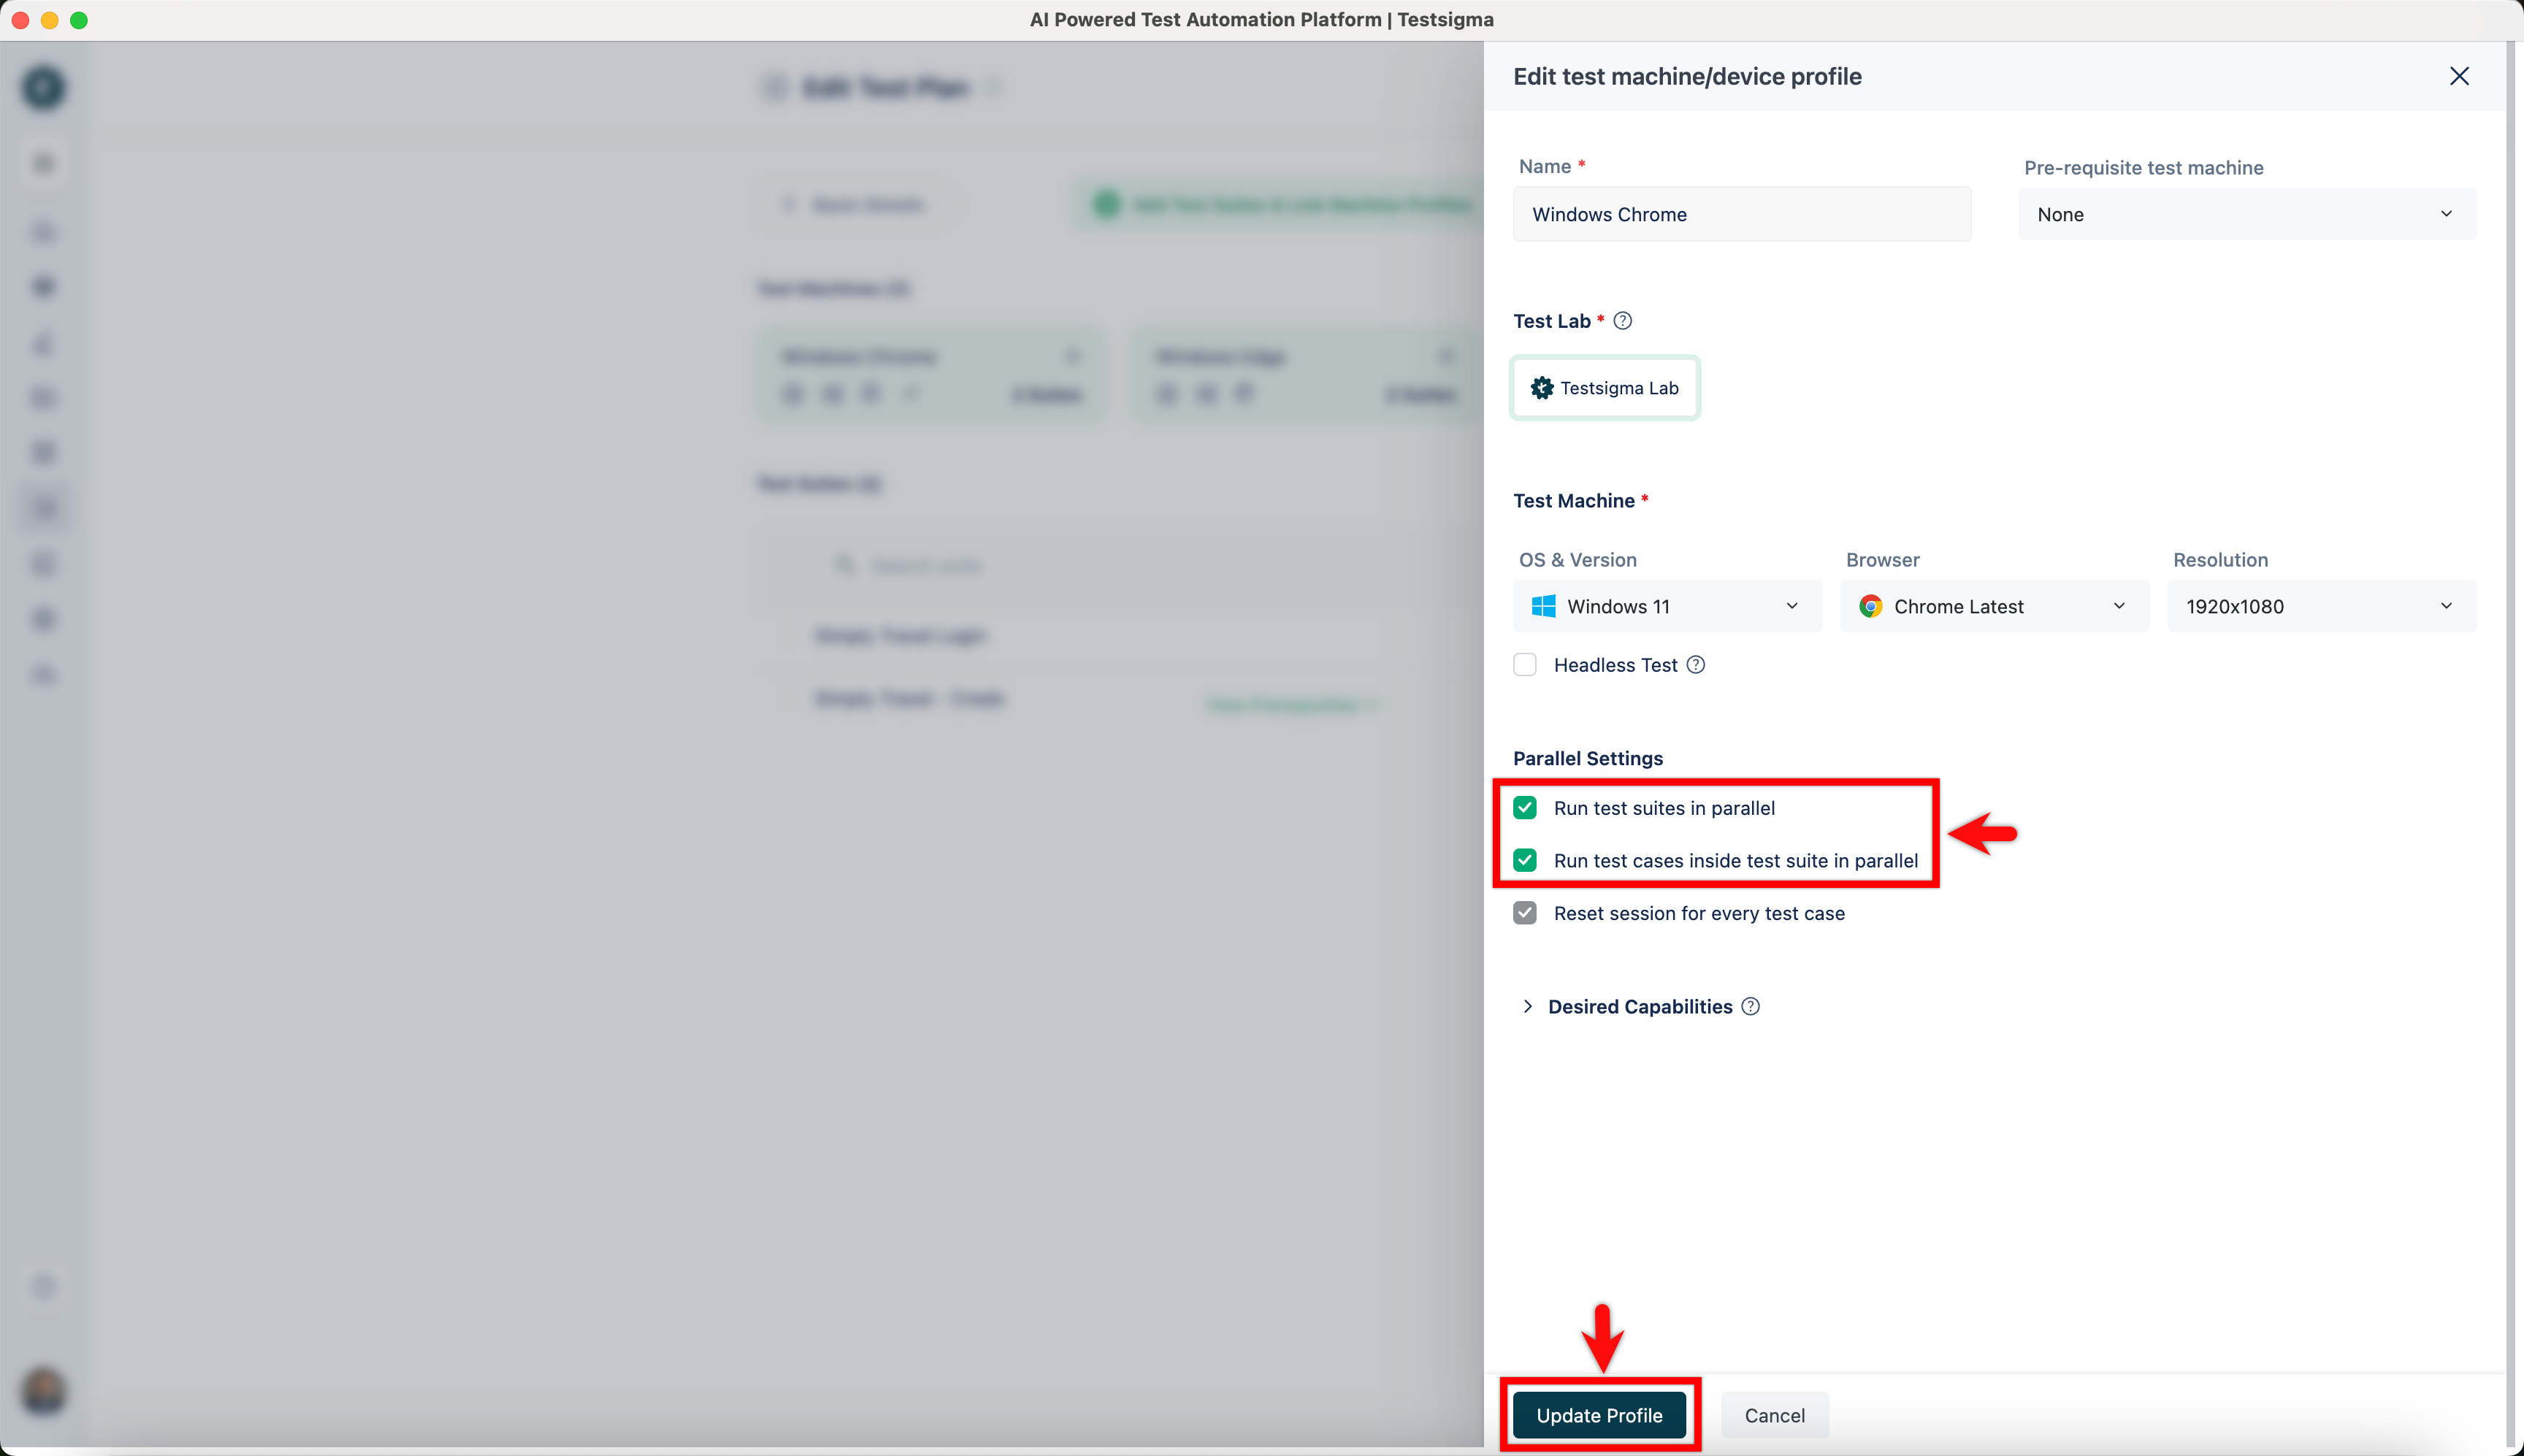
Click the Settings icon under the Test Machine tab for a machine already set up, or click Link to Test Machine to add one.
-
In the Edit Test Machine or Device Profile overlay, select Run Test Suites in Parallel, Run Test Cases inside the Test Suite in Parallel, or both.
-
Click Create or Update Profile.
Add backup devices
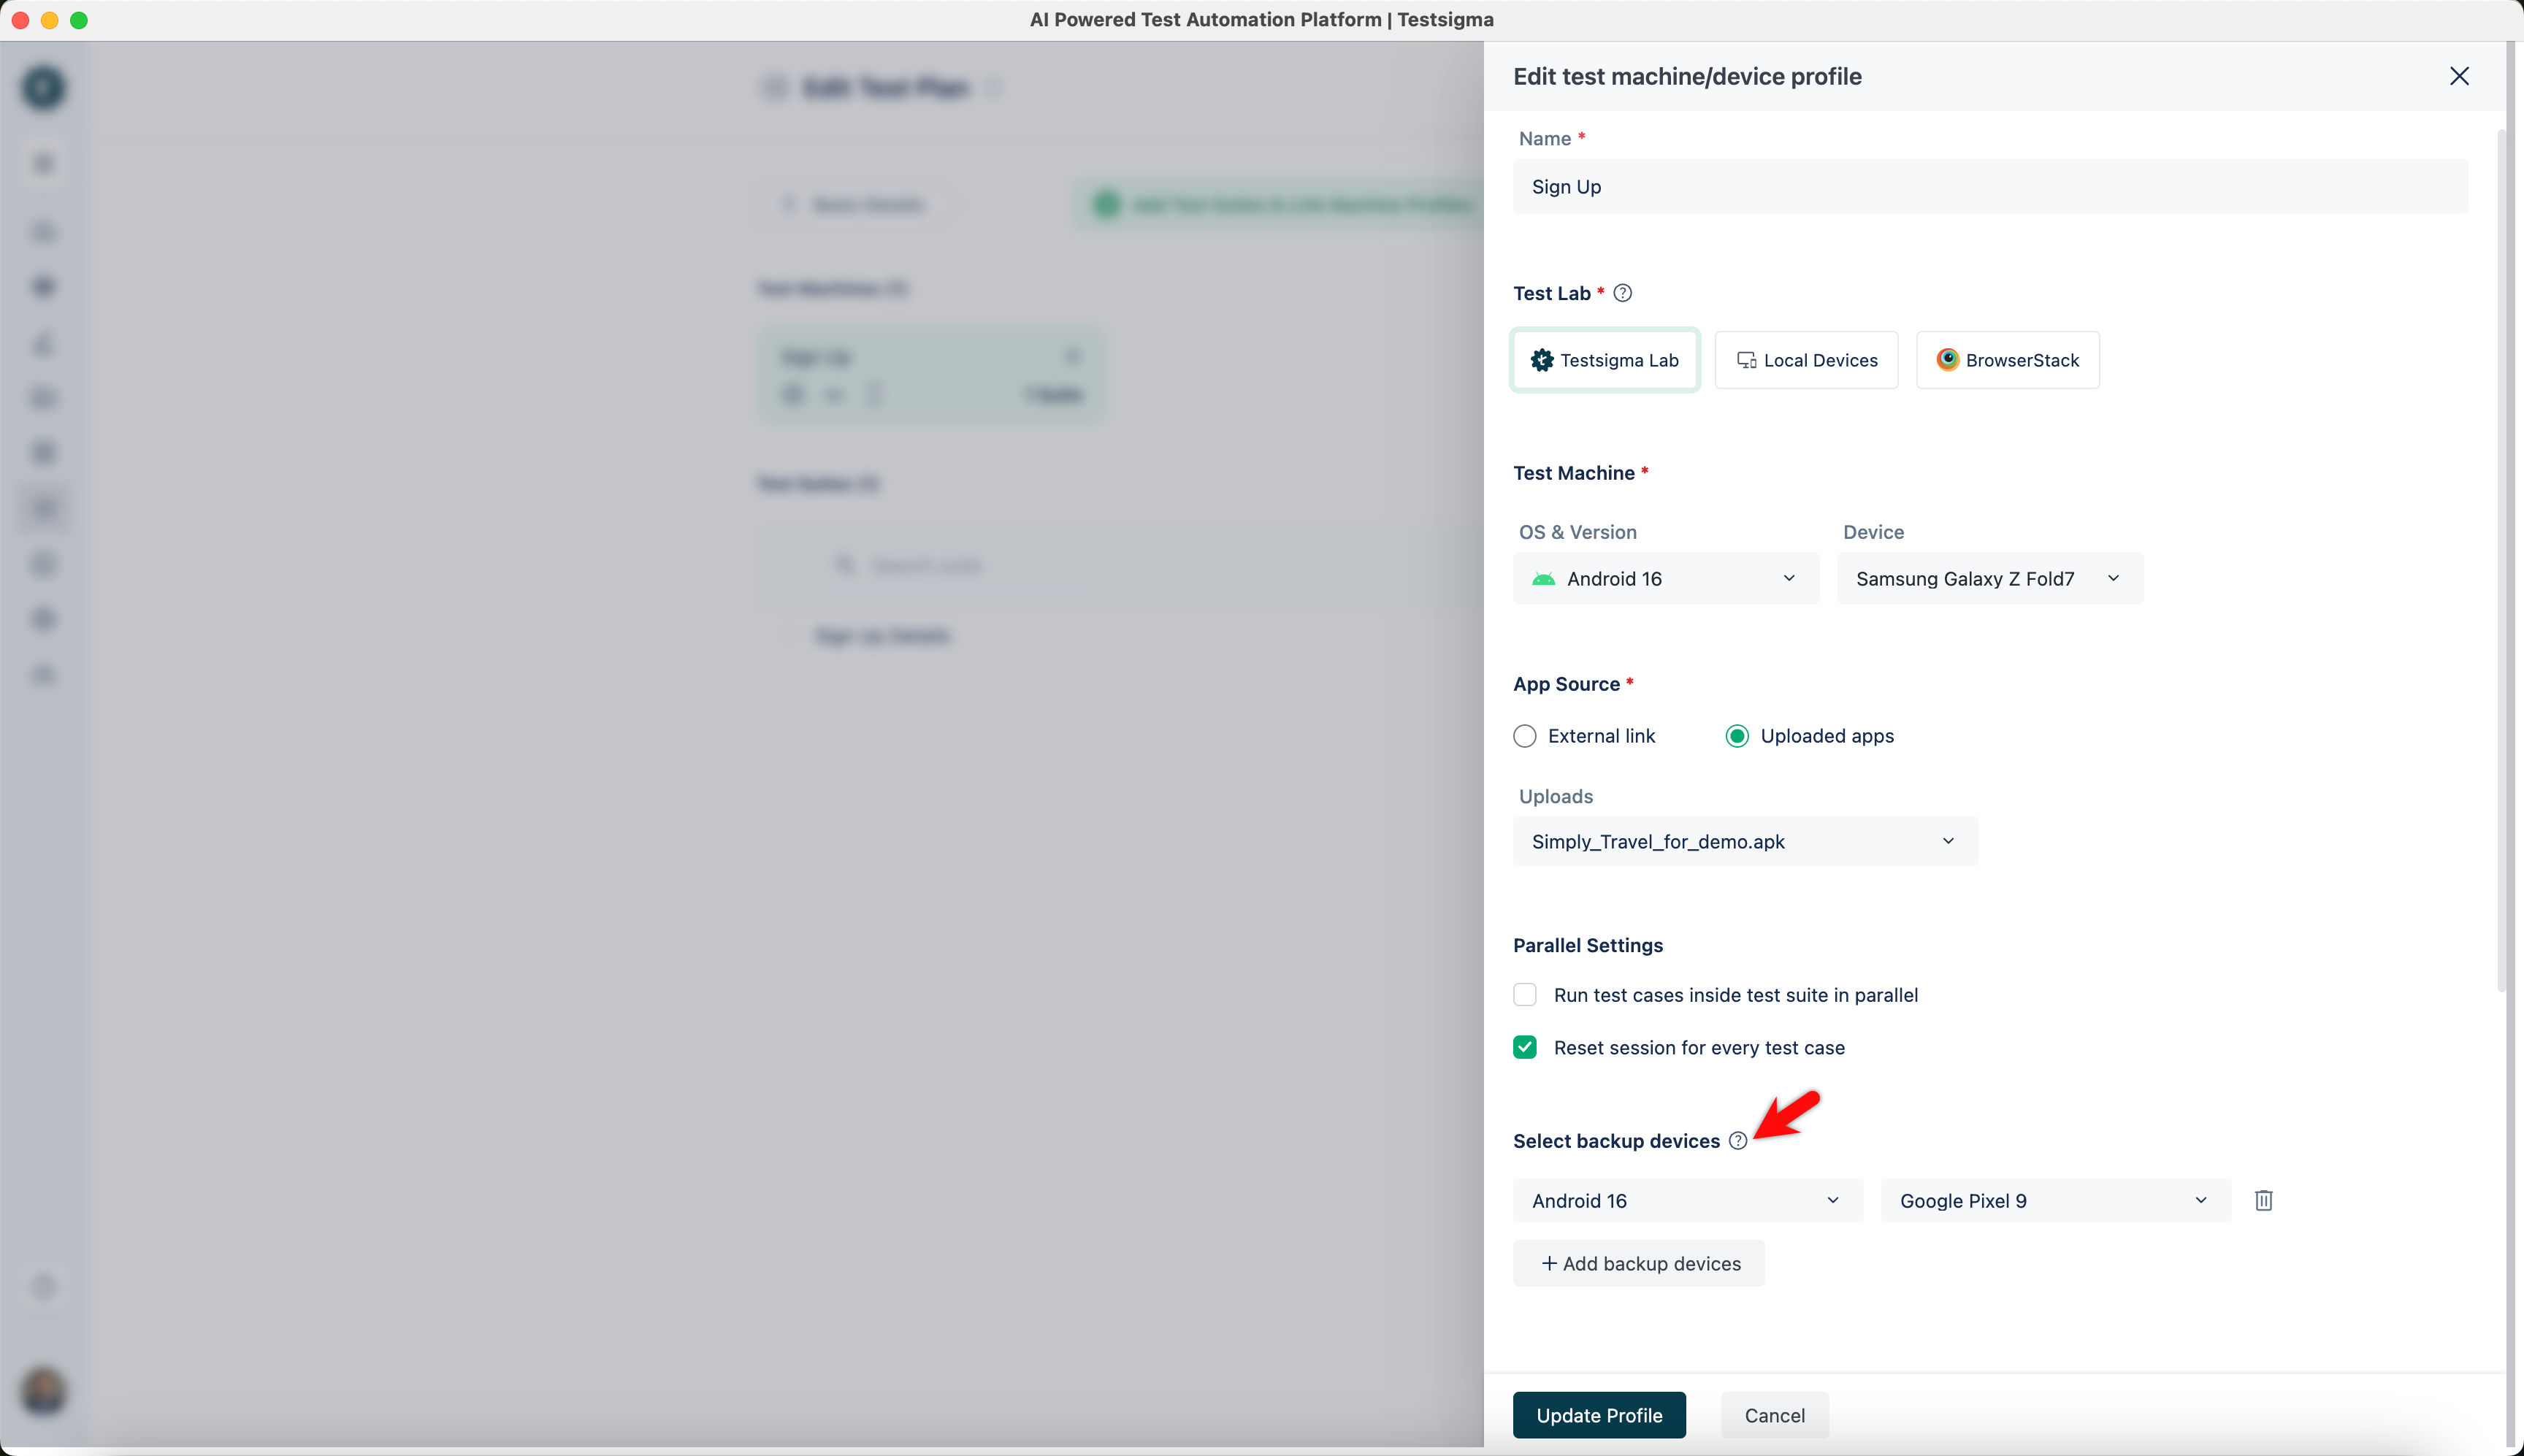
Section titled “Add backup devices”A backup device takes over when the primary device is unavailable, so an Android or iOS run does not stop on a device failure.
-
Go to the Add Test Suites & Link Machine Profiles tab on the Create or Edit Test Plan page.
-
Click the Settings icon under the Test Machine tab for a machine already set up, or click Link to Test Machine to add one.
-
Click Add Backup Devices under Select Backup Devices in the Edit Test Machine or Device Profile overlay.
-
Select the OS, the Version, and then the Device.
-
Repeat for as many backup devices as you want, then click Create or Update Profile.
Headless testing
Section titled “Headless testing”Headless testing runs the browser without rendering its interface, so tests execute faster and consume fewer system resources. That also makes parallel runs cheaper to scale. It applies to web applications only.
For a test plan, open the Add Test Suites & Link Machine Profiles tab, click Test Machine Settings for the machine, turn on the Headless Test toggle, and click Update Profile. For a single test case, turn on Headless Test on the Ad-hoc Run page and click Run Now.
Distributed testing
Section titled “Distributed testing”Distributed testing splits a run across machines, with each machine executing a different part of the application. Use it when components run on different machines and interact, such as a client-server system.
Select Custom test plan as the Test Plan Type, then attach a different test suite to each test machine in the Add Test Suites & Link Machine Profiles tab.
End-to-end testing
Section titled “End-to-end testing”End-to-end testing puts test suites from more than one project and application into a single plan.
-
Create a test plan and select Custom Test Plan as the Test Plan Type.
-
Click Add Test Suites in the Add Test Suites & Link Machine Profiles tab.
-
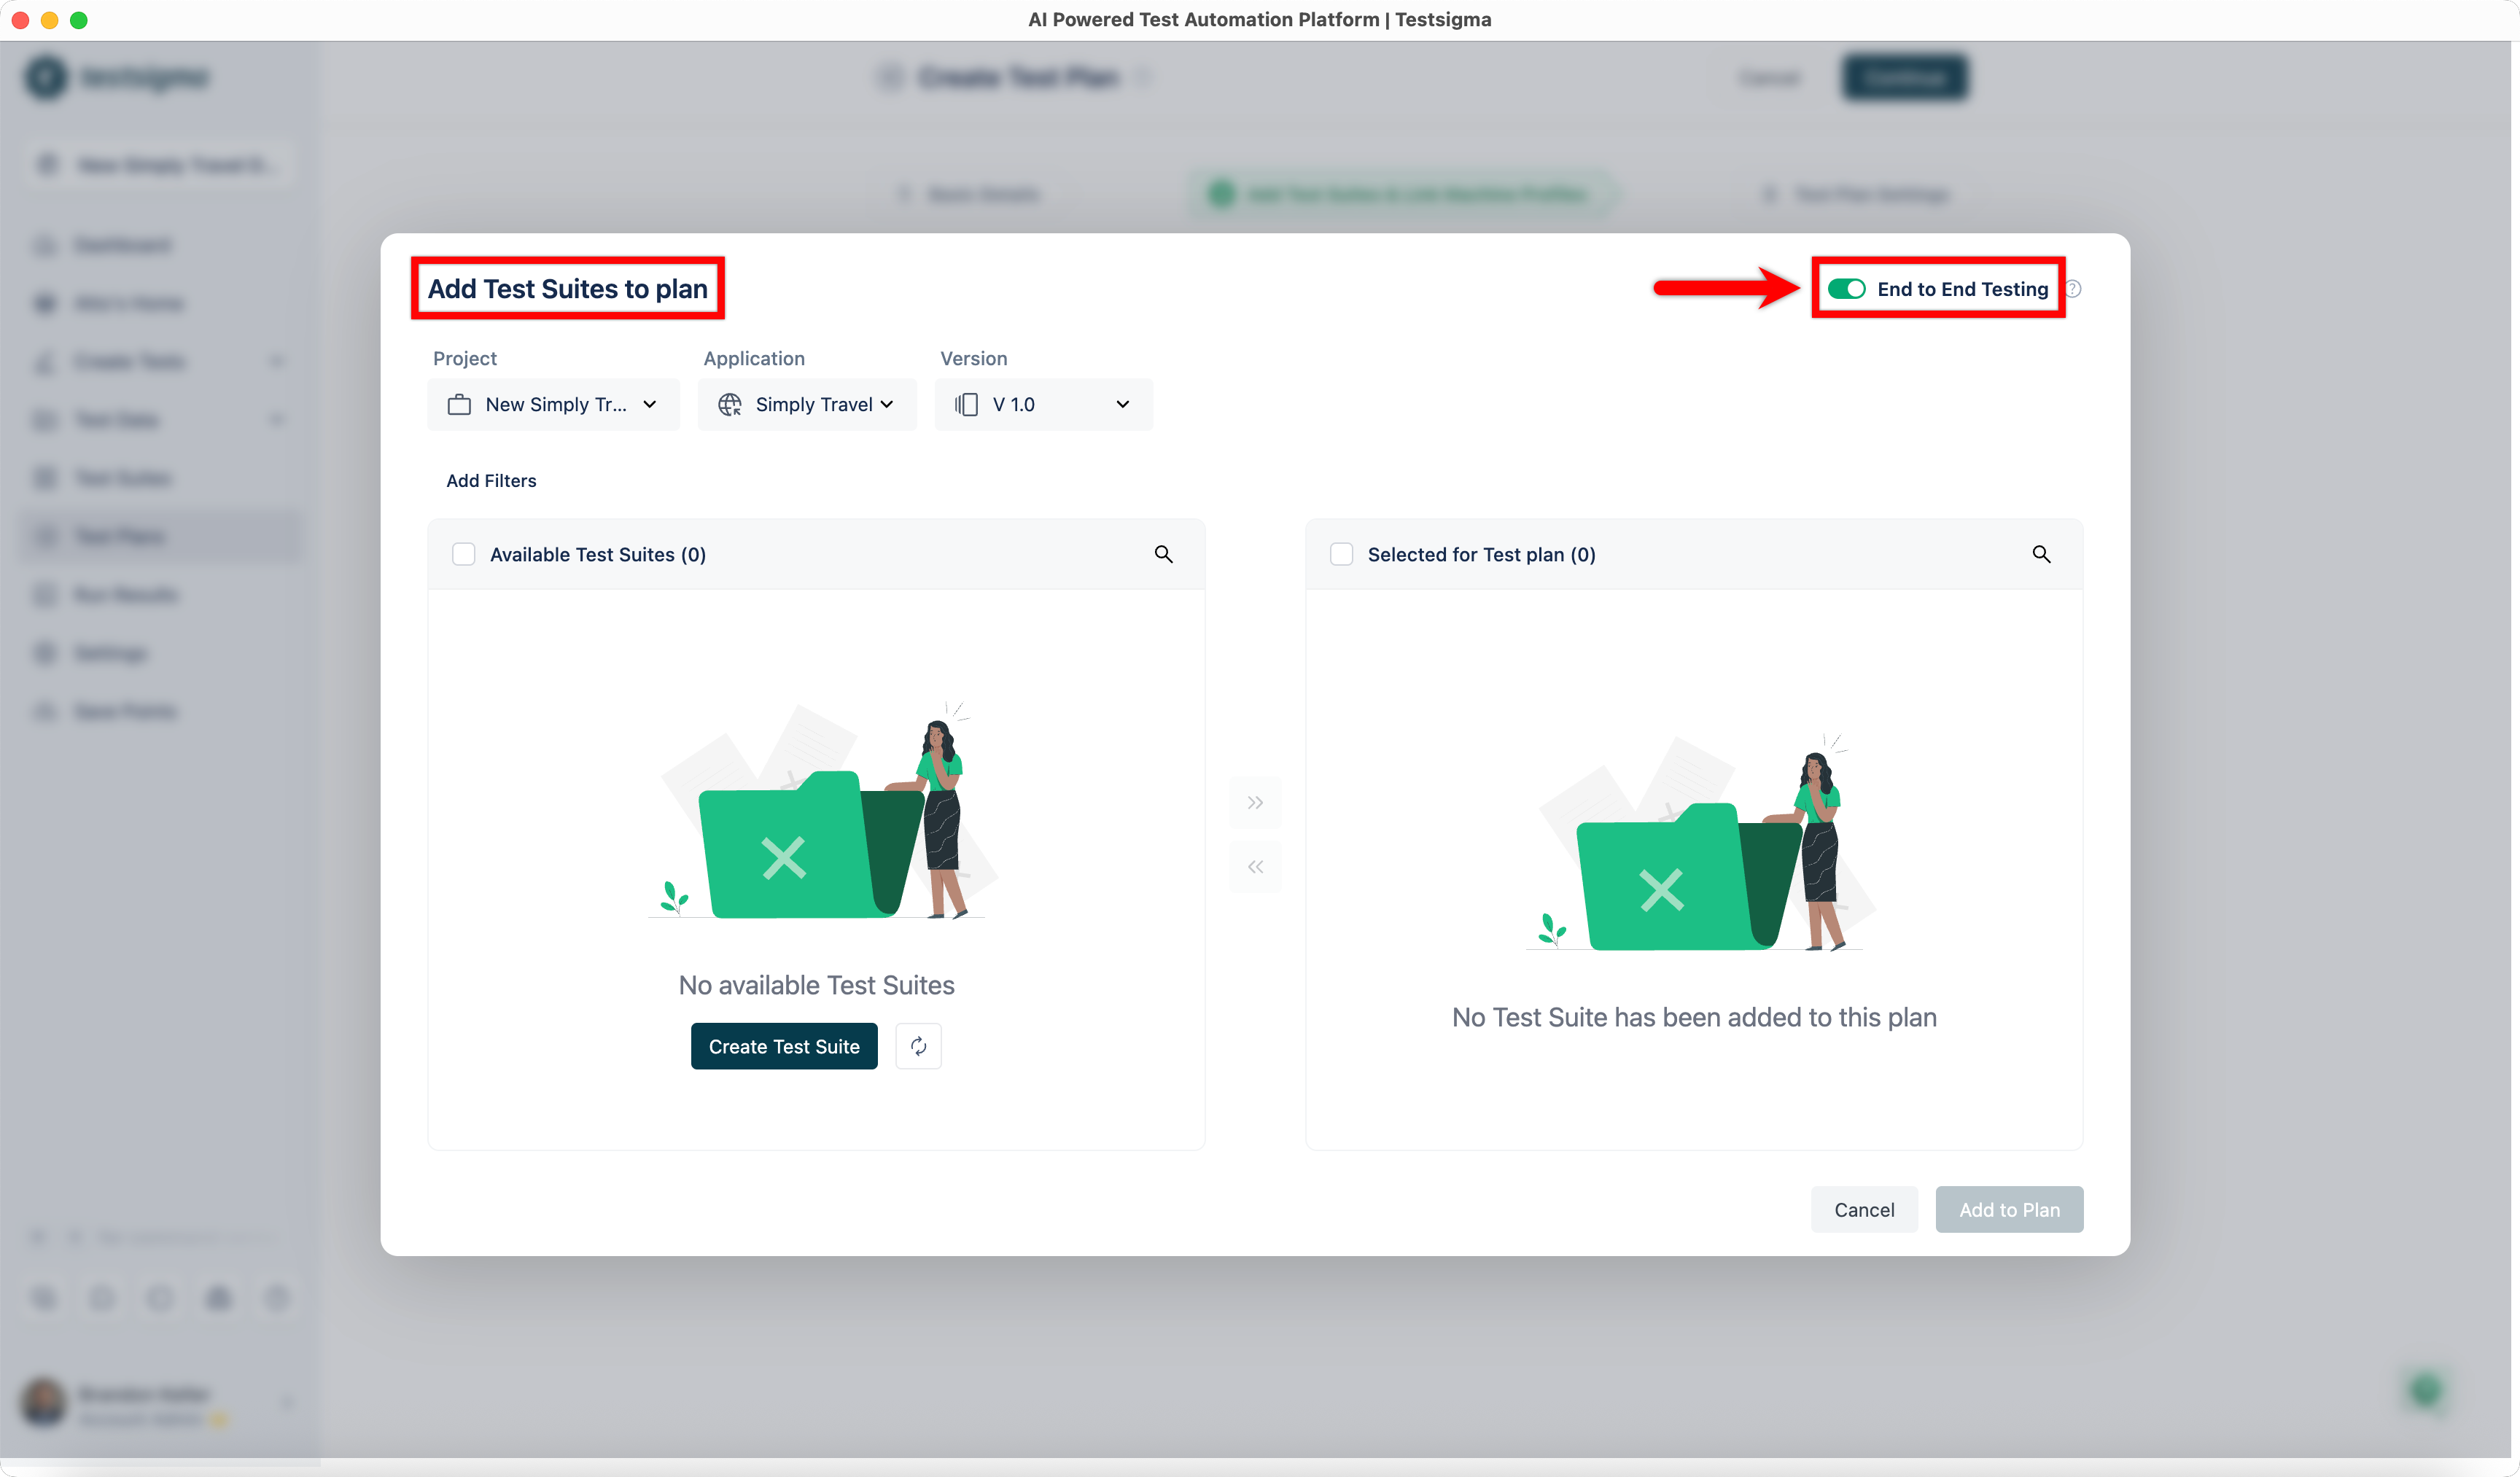
Turn on the End-to-End Testing toggle in the Add Test Suites to Plan dialog.
-
Select the Project, Application, and Version, then add suites from Available Test Suites. They appear under Selected for Test Plan.
-
Switch the Project, Application, or Version to add suites from another source, repeat until every suite is in, then click Add to Plan.
-
Click Test Machine for each suite, select the machines that fit its application type, and click Save Selections.
Manage test suites
Section titled “Manage test suites”A plan’s suites can be changed while editing the plan or directly from its details page.
While editing, the Add Test Suites & Link Machine Profiles tab adds and removes both suites and machines.
From the details page, hover over a test machine, click the ellipsis icon (⋮), and click Edit. In the Edit test machine/device profile overlay, click Add/Remove Test Suites, then in the Add test suites to plan overlay click + on a suite under Available Test Suites to add it, or - under Selected for Test Plan to remove it. Click Update Machine to save.
Disable test cases in a plan
Section titled “Disable test cases in a plan”Disabling a test case skips it during the plan’s runs without removing it from its suite.
-
Go to the Add Test Suites & Link Machine Profiles tab on the Create or Edit Test Plan page.
-
Click the ellipsis icon (⋮) in the Test Suites section and select Manage Test Case.
-
Clear the checkboxes of the test cases to disable in the dialog.
-
Click Update test suites.
Manage test machines
Section titled “Manage test machines”A machine can be added from the plan details page or from the edit page.
From the details page, click Add Machine, enter a Name in the Add test machine/device profile overlay, click Add/Remove Test Suites, select the suites, click Add to Plan, then click Create Machine.
From the edit page, click Edit, go to Add Test Suites & Link Machine Profiles, click Test Machine, select the machines in the Select test machine profiles overlay, click Save selections, then go to Test Plan Settings and click Update.
The Test Machine & Suites tab shows each machine’s Machine Name, Configuration, No of Suites, Parallel Settings, and Session Settings. From there you can turn a machine on or off for the plan, search for one, or use the ellipsis icon (⋮) to edit or delete it.
To delete a machine, click the ellipsis icon (⋮) and click Delete, then enter DELETE in the Delete Test Machine? prompt and click I understand, delete this Test Machine.
Schedule a test plan
Section titled “Schedule a test plan”-
Go to Test Plans.
-
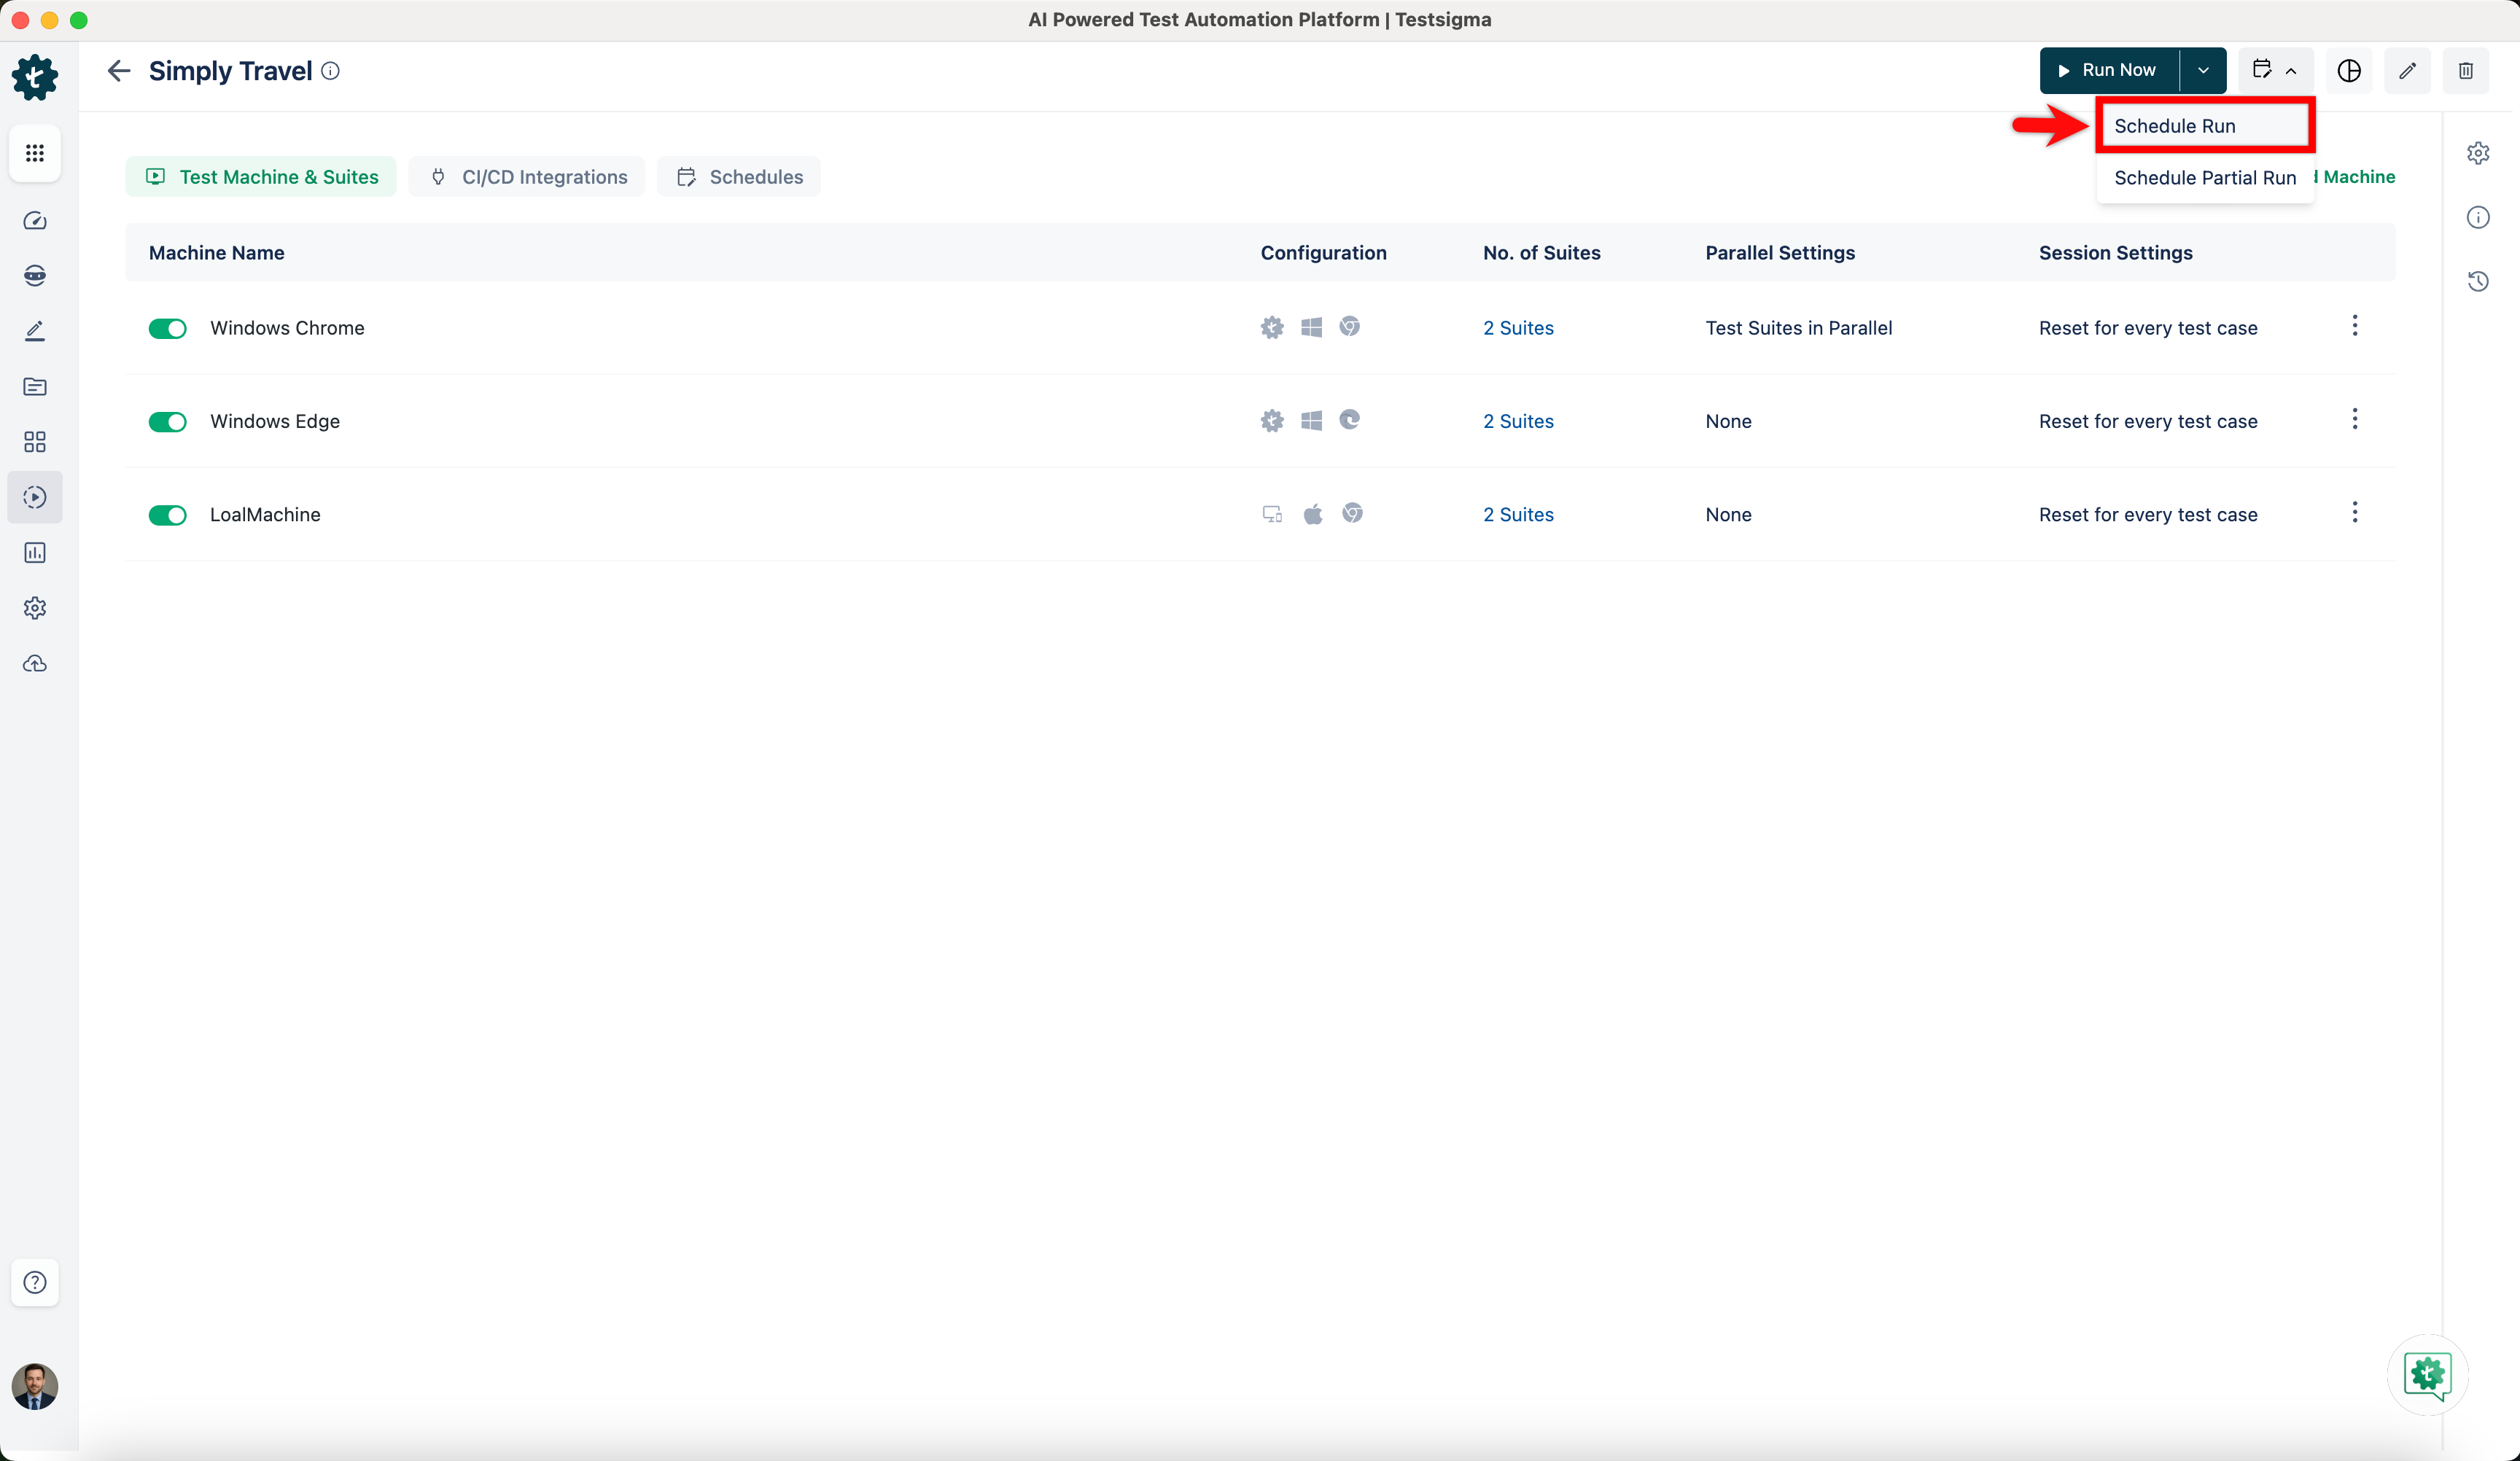
Expand the Schedule button and select Schedule Run. The button is on the Test Plans list page and on the Test Plan details page.
-
Enter a Name in the Schedule Test Plan overlay, and turn on the Description toggle to describe the schedule.
-
Click the calendar icon and select the Date. It defaults to today.
-
Click the clock icon and select the Time. It defaults to now.
-
Click Repeat and select the frequency: Don’t Repeat, Hourly, Daily, Weekly on the scheduled weekday, or Monthly on the scheduled day.
-
Click Schedule.
Schedule a partial run
Section titled “Schedule a partial run”To schedule a subset of the plan, select Schedule Partial Run instead, then in the same overlay:
- Select Include or Exclude and pick the test suites the choice applies to.
- (Optional) Turn on Filter Test Cases from included test suites and filter by Labels, Type, Requirement Type, Priority, Created by, Assignee, or Reviewer. Reset clears the filters, and View filtered test cases shows what will run.
- (Optional) Click Save as Favourite to reuse the configuration later.
- Click Schedule.
Manage schedules
Section titled “Manage schedules”Schedules are listed on the Schedules tab, on both the Test Plans list page and the plan’s own page, showing each one’s Schedule Name, Test Plan, Frequency, and Next Run At. Click the ellipsis icon (⋮) on a schedule and select Edit to change it, or Delete, then enter DELETE and click I understand, delete this Schedule to remove it.
Run part of a plan from the API
Section titled “Run part of a plan from the API”-
Open the Test Plan details page, expand Run Now, and select Partial Run.
-
Select the test suites to include or exclude in the Partial Test Plan Run overlay, and apply any filters.
-
Click Save As Favorite.
-
Enter a name and click Save.
Then call POST https://app.testsigma.com/api/v1/execution_results with your Testsigma API key as a Bearer token and a raw JSON body carrying the plan’s execution ID and the favorite’s name or ID. See trigger a test plan for the payload. A partial run can also be scheduled from the API; see schedule a test plan.
Edit a test plan
Section titled “Edit a test plan”Click the Edit icon on the Test Plan details page to reopen the three tabs from creation. The details page also edits parts of the plan directly, through the right navigation bar:
- Test Plan Info: the Name, the Description, and the created and updated details
- Test Plan Settings: the Test Plan Type, Send Notification, Additional Settings, Recovery Actions, and Post Plan Hook. The type cannot be switched once test machines are set up
- Activity: the history and the comments
The CI/CD Integrations tab holds the default integration tools and the REST API for integrating others.
Delete a test plan
Section titled “Delete a test plan”Click Delete on the Test Plan details page, enter DELETE in the Delete Confirmation pop-up, and click I understand, delete this Test Plan.
Find a test plan
Section titled “Find a test plan”The Test Plans list shows each plan’s title, type, actions, test labs, and test machines, and can be sorted, filtered, or searched. The Schedules tab lists the schedules. Refresh reloads the list.
Frequently asked questions
Section titled “Frequently asked questions”Why does my test plan take so long to execute?
Section titled “Why does my test plan take so long to execute?”Reset session for every test case is selected in the machine’s settings, so Testsigma assigns a new machine for each test case and repeats that for every queued case until the plan finishes. To turn it off, click Edit on the plan, go to Add Test Suites & Link Machine Profiles, click the settings icon for the machine, clear Reset session for every test case, click Update Profile, then Continue, then Update.
Why is there no video of the whole test plan run?
Section titled “Why is there no video of the whole test plan run?”The same setting causes it. With Reset session for every test case on, each test case runs on a fresh machine, so no single recording covers the plan. Clear the checkbox in Parallel Settings, and the complete video for each suite appears under Run Results > Test Suite > Watch Video.
Was this page helpful?
Thanks for the feedback.