

Testsigma Agent
The Testsigma Agent is a Java utility that runs on a test machine and orchestrates local test execution: queueing tests, running them, and returning results. Install it wherever you want to run tests on your own machines and devices rather than on Testsigma Cloud.
The agent bundles everything a local run needs: a Java JRE, so you install no Java yourself, the browser drivers from each browser vendor, Appium for mobile tests, and the mobile test recorder with its Android and iOS libraries.
What the agent makes possible
Section titled “What the agent makes possible”Local applications. A corporate firewall blocks outside communication into a private network, so Testsigma’s cloud servers cannot reach an application deployed inside it. The agent sits on a machine inside that network and relays between the cloud and the local machine over HTTPS, without opening the network up.
The local mobile recorder. Automating a mobile app needs the app’s element attributes. With the device connected to the agent machine, the agent collects them and sends them to your browser, where you save them to Testsigma. The cloud recorder needs no local setup but runs with more delay.
System requirements
Section titled “System requirements”| Component | Requirement |
|---|---|
| Memory | 8 GB, dedicated to the tests |
| Disk space | Around 20 GB, including reserved space for screenshots and downloaded files |
| Processor | Dual-core or better |
Install the agent
Section titled “Install the agent”Go to Agents and click Download Agent, or take the direct download for your machine:
| Operating system | Executable | ZIP |
|---|---|---|
| Windows | ||
| macOS (Apple silicon) | ||
| macOS (Intel) | ||
| Linux |
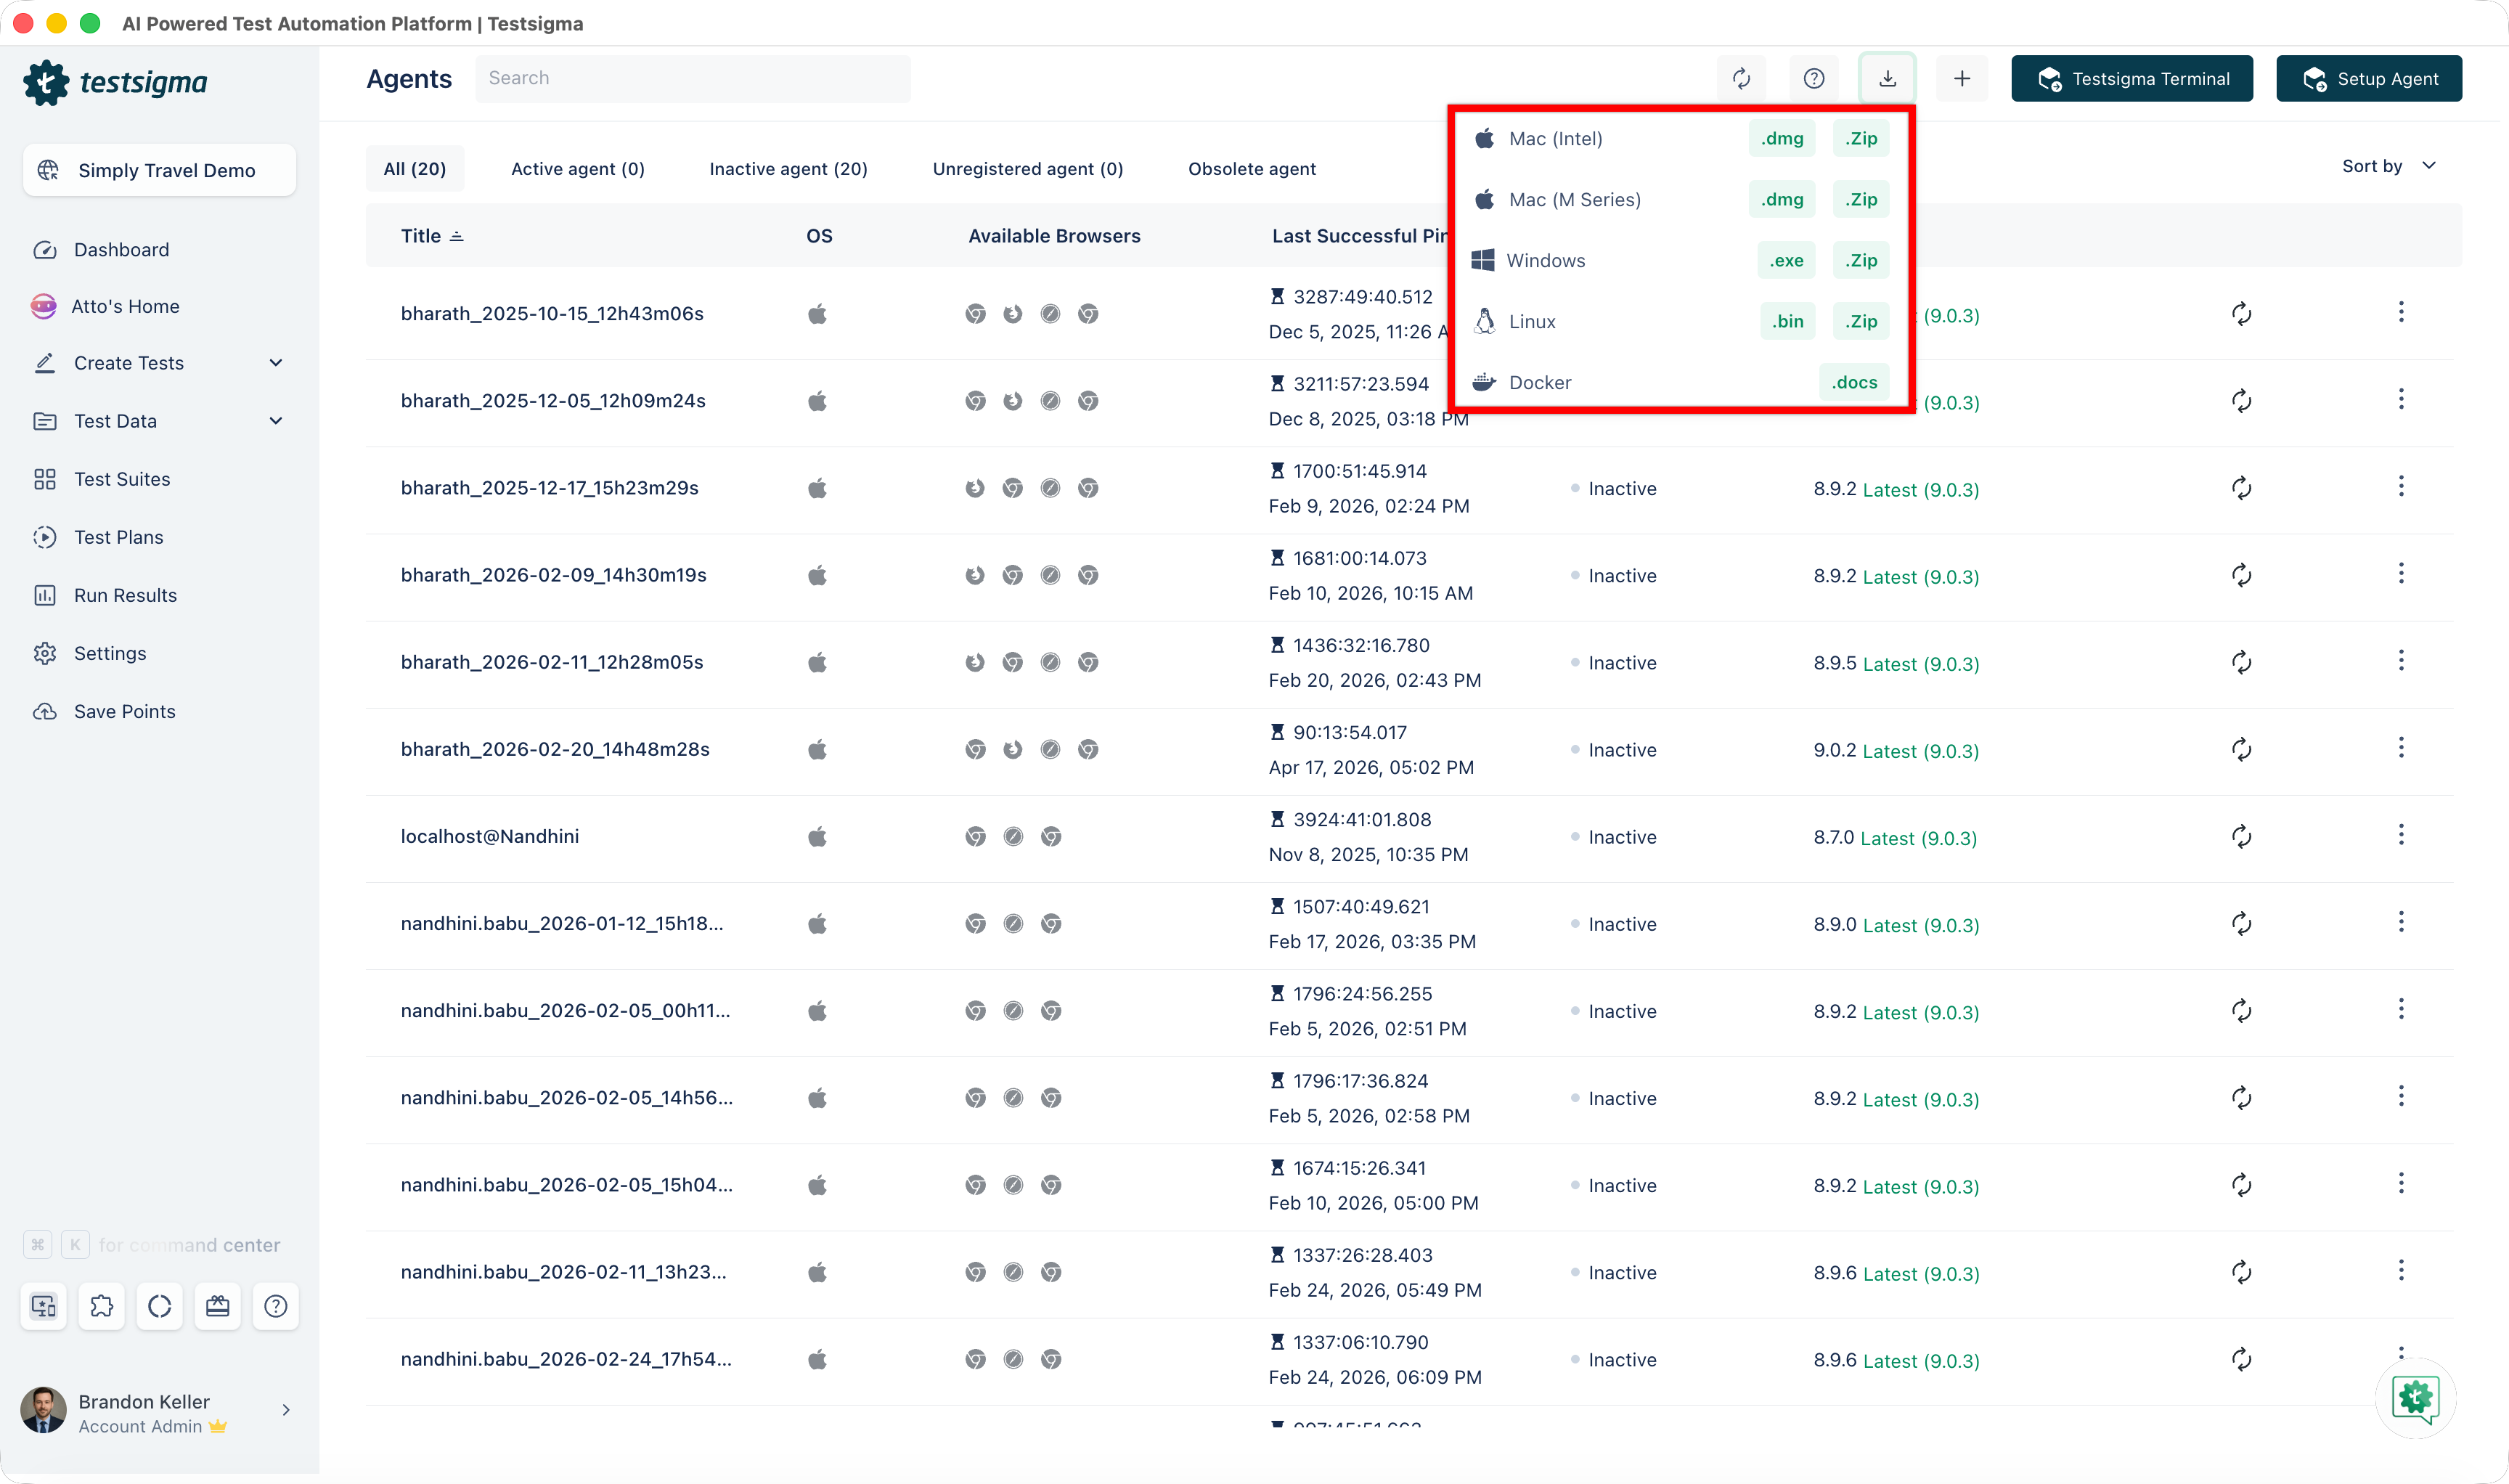
The agent comes in 4 forms: a ZIP file, an executable, a DMG, or a Docker image. A ZIP or an executable installs on the machine and is then started and registered separately. A Docker image does all three at once. It also runs on Kubernetes as a Helm release. Deploying to managed devices at scale goes through PatchMyPC rather than any of these.
- Select the ZIP for your machine from the dropdown.
- Extract it to a location of your choice.
Put the folder in your home directory, which avoids file permission and ownership problems, and avoids corruption from iCloud or Google Drive syncing:
| OS | Location |
|---|---|
| Windows | C:\Users\<your_username>\ |
| macOS | /Users/<your_username>/ |
| Linux | /Users/<your_username>/ |
- Select the file for your machine:
exefor Windows,dmgfor macOS, orbinfor Linux. - Double-click the download.
- Choose an installation path.
- Let the installer finish.
A Docker agent starts and registers itself when the container boots, so the next 2 sections do not apply to it.
It registers 2 ways: with an activation key from an agent you created in Testsigma, or by creating and registering a new agent as the container boots.
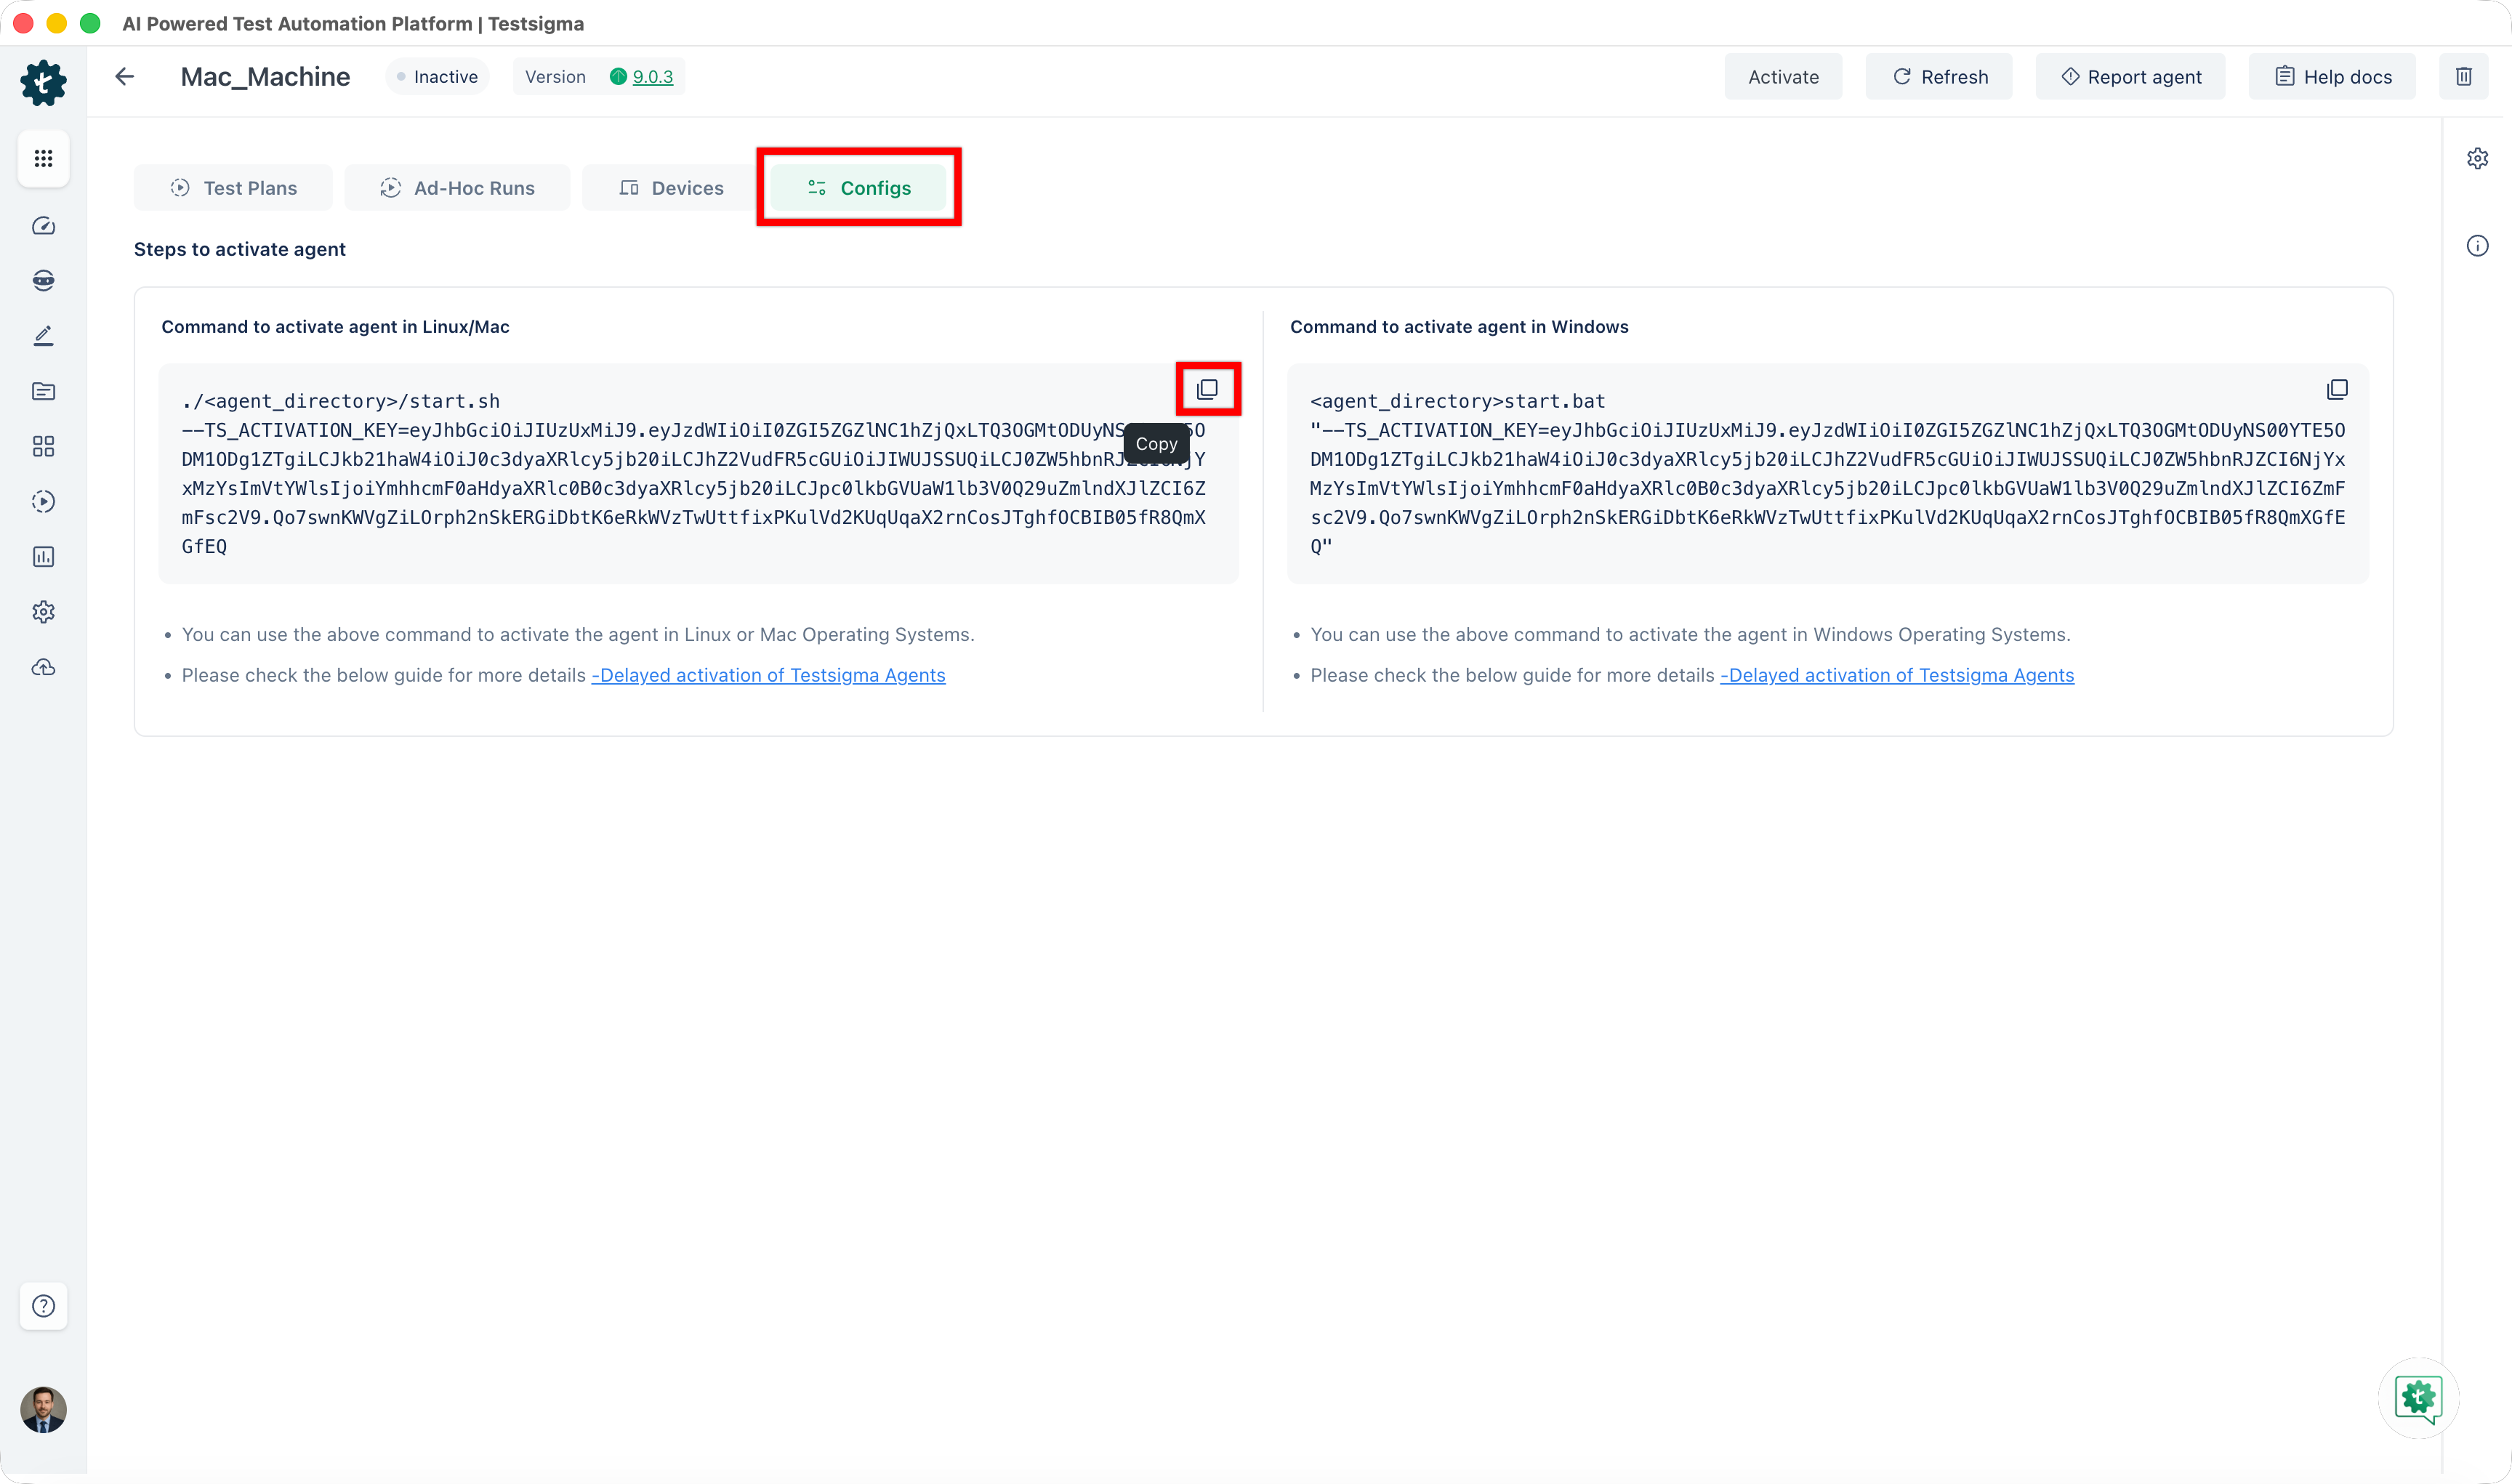
With an activation key. Register the agent with Activate later, go to Agents, select the agent, open Config, and copy the Activation Key. Then create a docker-compose.yml with TS_ACTIVATION_KEY set to it.
Registering as the container boots. Set 4 variables instead of the activation key, and the container creates and registers its own agent:
| Variable | What it holds |
|---|---|
TS_AUTO_REGISTRATION_KEY | Your Testsigma API key |
TS_AUTO_REGISTRATION_TITLE | The name the agent appears under |
TS_AUTO_REGISTRATION_HTTP_PORT | HTTP port for agent-to-Testsigma communication |
TS_AUTO_REGISTRATION_HTTPS_PORT | HTTPS port for agent-to-Testsigma communication |
Everything else in the compose file below stays the same, with those 4 lines replacing TS_ACTIVATION_KEY.
This compose file uses the activation key, and starts the agent alongside headless Chrome, Firefox, and Edge:
version: "3.9"services: testsigma-agent: image: testsigmainc/testsigma-agent:latest container_name: testsigma-agent depends_on: - chrome - firefox - edge volumes: - ./data/agent_data:/var/ts/agent - ./data/agent_temp:/tmp/agent_temp - ./:/root/.testsigma/agent/logs environment: TS_ACTIVATION_KEY: "REPLACE_WITH_YOUR_ACTIVATION_KEY" CHROME: "http://chrome:4444" FIREFOX: "http://firefox:4444" EDGE: "http://edge:4444" chrome: image: selenium/standalone-chrome:latest shm_size: 1gb ports: - "4444:4444" volumes: - ./data/agent_temp:/tmp/agent_temp firefox: image: selenium/standalone-firefox:latest shm_size: 1gb ports: - "4445:4444" volumes: - ./data/agent_temp:/tmp/agent_temp edge: image: selenium/standalone-edge:latest shm_size: 1gb ports: - "4446:4444" volumes: - ./data/agent_temp:/tmp/agent_tempDeploy the agent as a Helm release instead of installing it on a machine. The chart runs the agent together with the Selenium browsers it drives, so one install gives a working local execution environment. Like Docker, this route starts and registers the agent itself, so the next 2 sections do not apply.
The chart deploys a single pod holding the Testsigma Agent and one or more Selenium browsers as sidecars, plus a PersistentVolumeClaim that keeps the agent registered across restarts.
The same chart sits in 2 public registries, and neither needs credentials.
| Registry | Chart location | Container images |
|---|---|---|
| Azure Container Registry | oci://testsigmaregistry.azurecr.io/charts/testsigma-agent | Mirrored into the same registry |
| GitHub Container Registry | oci://ghcr.io/testsigmainc/charts/testsigma-agent | Pulled from Docker Hub |
Choose based on what your cluster is allowed to reach. Azure Container Registry with global.imageRegistry suits restricted egress, because the chart and every image come from one host. GitHub Container Registry suits a cluster that already reaches Docker Hub, and global.imageRegistry does not apply there.
The examples below use Azure Container Registry. For GitHub Container Registry, swap the chart address and drop the global.imageRegistry flag.
Check the cluster prerequisites
Section titled “Check the cluster prerequisites”- A Kubernetes cluster running 1.23 or later. 1.29 or later is recommended, so the browsers start as native sidecars.
- Helm 3.8 or later, for OCI chart support.
- A default StorageClass, or the name of one you want to use. Check with
kubectl get storageclass. - A node with enough free capacity for the whole pod. Chrome alone requests 1 CPU and 3Gi; with Firefox and Edge it requests 2 CPU and 5Gi. The pod is scheduled as a unit, so it has to fit on one node.
- Outbound access from the cluster to your Testsigma instance and to the registry serving the chart and images.
Install the chart with an activation key
Section titled “Install the chart with an activation key”-
Go to Agents in Testsigma and create an agent with Activate Later. Select it, open the Config tab, and copy the Activation Key.
-
Create a namespace and store the key in a secret. Write the key to a temporary file rather than passing it on the command line, so it stays out of your shell history and the process list.
Terminal window kubectl create namespace testsigmaumask 077 && cat > activation-key.txt # paste the key, then press Ctrl+Dkubectl -n testsigma create secret generic testsigma-agent-auth \--from-file=TS_ACTIVATION_KEY=./activation-key.txtrm activation-key.txt -
Install the chart.
Terminal window helm install ts-agent oci://testsigmaregistry.azurecr.io/charts/testsigma-agent \--version 0.2.0 -n testsigma \--set global.imageRegistry=testsigmaregistry.azurecr.io \--set agent.auth.existingSecret=testsigma-agent-auth -
Wait for the pod with
kubectl -n testsigma rollout status statefulset/ts-agent-testsigma-agent. -
The agent appears under Agents once it registers.
The first start takes a few minutes. Each browser image is over 1 GB, and the browsers pass their readiness checks before the agent container starts.
For GitHub Container Registry, replace step 3 with the same command against oci://ghcr.io/testsigmainc/charts/testsigma-agent, without the global.imageRegistry flag. Every other flag applies to both registries.
Install the chart with auto registration
Section titled “Install the chart with auto registration”The agent can register itself on startup instead, which suits environments where agents are created and destroyed often.
-
Get an API key from Testsigma.
-
Create the namespace and store the key in a secret, keeping it off the command line as above.
Terminal window kubectl create namespace testsigmaumask 077 && cat > api-key.txt # paste the key, then press Ctrl+Dkubectl -n testsigma create secret generic testsigma-agent-auth \--from-file=TS_AUTO_REGISTRATION_KEY=./api-key.txtrm api-key.txt -
Install with auto registration enabled.
Terminal window helm install ts-agent oci://testsigmaregistry.azurecr.io/charts/testsigma-agent \--version 0.2.0 -n testsigma \--set global.imageRegistry=testsigmaregistry.azurecr.io \--set agent.auth.mode=autoRegistration \--set agent.auth.existingSecret=testsigma-agent-auth
Each agent registers under its own pod name, so --set agent.replicaCount=3 runs three at once. agent.auth.autoRegistration.title sets the name shown in the application.
Select your Testsigma region
Section titled “Select your Testsigma region”The agent image is built against a specific Testsigma region, and the 3 builds are not interchangeable. Set agent.region to match the address you sign in to.
| Sign-in address | agent.region |
|---|---|
app.testsigma.com | us, the default |
app-eu.testsigma.com | eu |
app-in.testsigma.com | in |
Add it to the install command with --set agent.region=eu.
Enable more browsers on Kubernetes
Section titled “Enable more browsers on Kubernetes”Chrome is enabled by default. Firefox and Edge are available and disabled.
To enable them at install, add --set browsers.firefox.enabled=true and --set browsers.edge.enabled=true to the install command. To add them to an existing release:
helm upgrade ts-agent oci://testsigmaregistry.azurecr.io/charts/testsigma-agent \ --version 0.2.0 -n testsigma --reuse-values \ --set browsers.firefox.enabled=true \ --set browsers.edge.enabled=trueThe pod is recreated, so the agent goes offline briefly and returns with the extra browsers registered.
Each browser you enable is reported to Testsigma as available on that agent, and adds 0.5 CPU and 1Gi to the pod’s requests. Enable only the browsers you plan to use.
Install the chart using Argo CD
Section titled “Install the chart using Argo CD”Argo CD does not detect OCI registries automatically, so register the repository first.
-
Go to Settings > Repositories > CONNECT REPO > VIA HTTPS and enter the details below.
Field Value Type helmName testsigma-chartsRepository URL testsigmaregistry.azurecr.io/charts, orghcr.io/testsigmainc/chartsEnable OCI Selected Username and Password Leave empty -
Create the credential secret in the destination namespace, as in the activation key steps above.
-
Create the application.
apiVersion: argoproj.io/v1alpha1kind: Applicationmetadata:name: testsigma-agentnamespace: argocdspec:project: defaultsource:repoURL: testsigmaregistry.azurecr.io/chartschart: testsigma-agenttargetRevision: 0.2.0helm:releaseName: ts-agentvalues: |tests:enabled: falseglobal:imageRegistry: testsigmaregistry.azurecr.ioagent:region: usauth:mode: activationKeyexistingSecret: testsigma-agent-authdestination:server: https://kubernetes.default.svcnamespace: testsigmasyncPolicy:syncOptions:- CreateNamespace=true -
Sync the application, from the UI with SYNC or from the CLI with
argocd app sync testsigma-agent.
Three things catch people out:
repoURLholds the registry path only. The chart name belongs inchart, and there is nooci://prefix.targetRevisionis the chart version, not the agent version.- Argo CD does not run Helm test hooks, so set
tests.enabledtofalse.
Verify the Kubernetes installation
Section titled “Verify the Kubernetes installation”After a Helm install, run the bundled checks, which confirm the agent and every enabled browser are responding:
helm test ts-agent -n testsigmaAfter an Argo CD install, check the application state with argocd app get testsigma-agent instead. Synced and Healthy means the chart is applied and the pod is ready.
To inspect the agent directly, on either kind of install:
kubectl -n testsigma logs ts-agent-testsigma-agent-0 -c agentkubectl -n testsigma exec ts-agent-testsigma-agent-0 -c agent -- \ curl -sf http://127.0.0.1:8383/agent/healthThen confirm the agent is listed under Agents in Testsigma, and run a test against it.
Helm configuration reference
Section titled “Helm configuration reference”Pass these with --set, or collect them in a values file and use -f values.yaml. helm show values on the chart lists every available setting.
| Setting | Default | What it does |
|---|---|---|
agent.region | us | Testsigma region: us, eu, or in |
agent.auth.mode | activationKey | activationKey or autoRegistration |
agent.auth.existingSecret | Secret holding the activation or API key | |
agent.replicaCount | 1 | Above 1 requires autoRegistration |
agent.resources | 2Gi and 500m CPU | Agent requests. The JVM heap derives from the memory limit |
agent.persistence.enabled | true | Keeps the agent registered across restarts |
agent.persistence.size | 10Gi | Volume size |
agent.persistence.storageClass | Leave empty to use the cluster default | |
browsers.chrome.enabled | true | |
browsers.firefox.enabled | false | |
browsers.edge.enabled | false | |
global.imageRegistry | Pull every image from one registry | |
proxy.enabled | false | Set with proxy.httpProxy and proxy.noProxy |
caBundle.existingConfigMap | Mounts a corporate CA certificate | |
imagePullSecrets | [] | For registries that require authentication |
Manage the release with whichever tool installed it. Helm commands do not apply to an application deployed by Argo CD, and editing an Argo CD application by hand is reverted on the next sync.
Installed with Helm. Upgrade with helm upgrade ts-agent oci://testsigmaregistry.azurecr.io/charts/testsigma-agent --version <version> -n testsigma --reuse-values, and remove it with helm uninstall ts-agent -n testsigma.
Installed with Argo CD. Change targetRevision to the new chart version and sync, or remove it with argocd app delete testsigma-agent.
The volume is kept, so the agent can be reinstalled with the same registration. To delete it, run kubectl -n testsigma delete pvc data-ts-agent-testsigma-agent-0.
Troubleshoot the Kubernetes install
Section titled “Troubleshoot the Kubernetes install”| Symptom | Cause and resolution |
|---|---|
Pod stays Pending | No node has enough free CPU or memory, or the volume cannot be provisioned. Run kubectl -n testsigma describe pod and kubectl -n testsigma get pvc |
ImagePullBackOff | The image is not available at the configured registry. Confirm agent.region, and remove global.imageRegistry to pull from Docker Hub |
CreateContainerConfigError | The secret named in agent.auth.existingSecret does not exist in that namespace |
| The pod runs but no agent appears in Testsigma | Usually the wrong agent.region, or an activation key from a different region. Check the agent logs |
| The pod is rejected on creation | The namespace enforces the restricted Pod Security Standard. The agent image requires baseline |
| A browser crashes mid test | The browser needs more shared memory. Raise browsers.chrome.shmSize and its memory limit together |
For agent startup and registration errors themselves, see the frequently asked questions at the end of this page.
Start the agent
Section titled “Start the agent”As a process
Section titled “As a process”On Windows, go to the installation folder and double-click start.bat, or run it from the command line. On macOS and Linux, drag start.sh into a new terminal window and press Return.
Startup takes a few minutes, and the agent registration page opens when it finishes.
As a service
Section titled “As a service”-
Open a command line on Windows, or a terminal on macOS and Linux.
-
Go to the installation folder, then into Wrapper > Bin.
-
On macOS and Linux, run
TestsigmaAgent start. On Windows, runTestsigmaAgent install. -
To stop it, run
TestsigmaAgent stopfrom the same location.
TestsigmaAgent accepts these commands from Wrapper > Bin:
console Launch in the current consolestart Start in the background as a daemon processstop Stop if running as a daemon or in another consolerestart Stop if running and then startcondrestart Restart only if already runningstatus Query the current statusinstall Install to start automatically when system bootsinstallstart Install and start running as a daemon processremove Uninstalldump Request a Java thread dump if runningRegister the agent
Section titled “Register the agent”-
Click Register on the Agent Registration page, which opens once the agent is running.
-
Enter a Name for the machine.
-
Enter a value in Max sessions for this machine, which limits parallel executions so the machine does not slow down. It cannot exceed the parallels available to your account, and the field needs enabling by Testsigma support.
-
Select Public or Private for the agent’s visibility.
-
Select Activate now or Activate later.
-
Click Register & Activate.
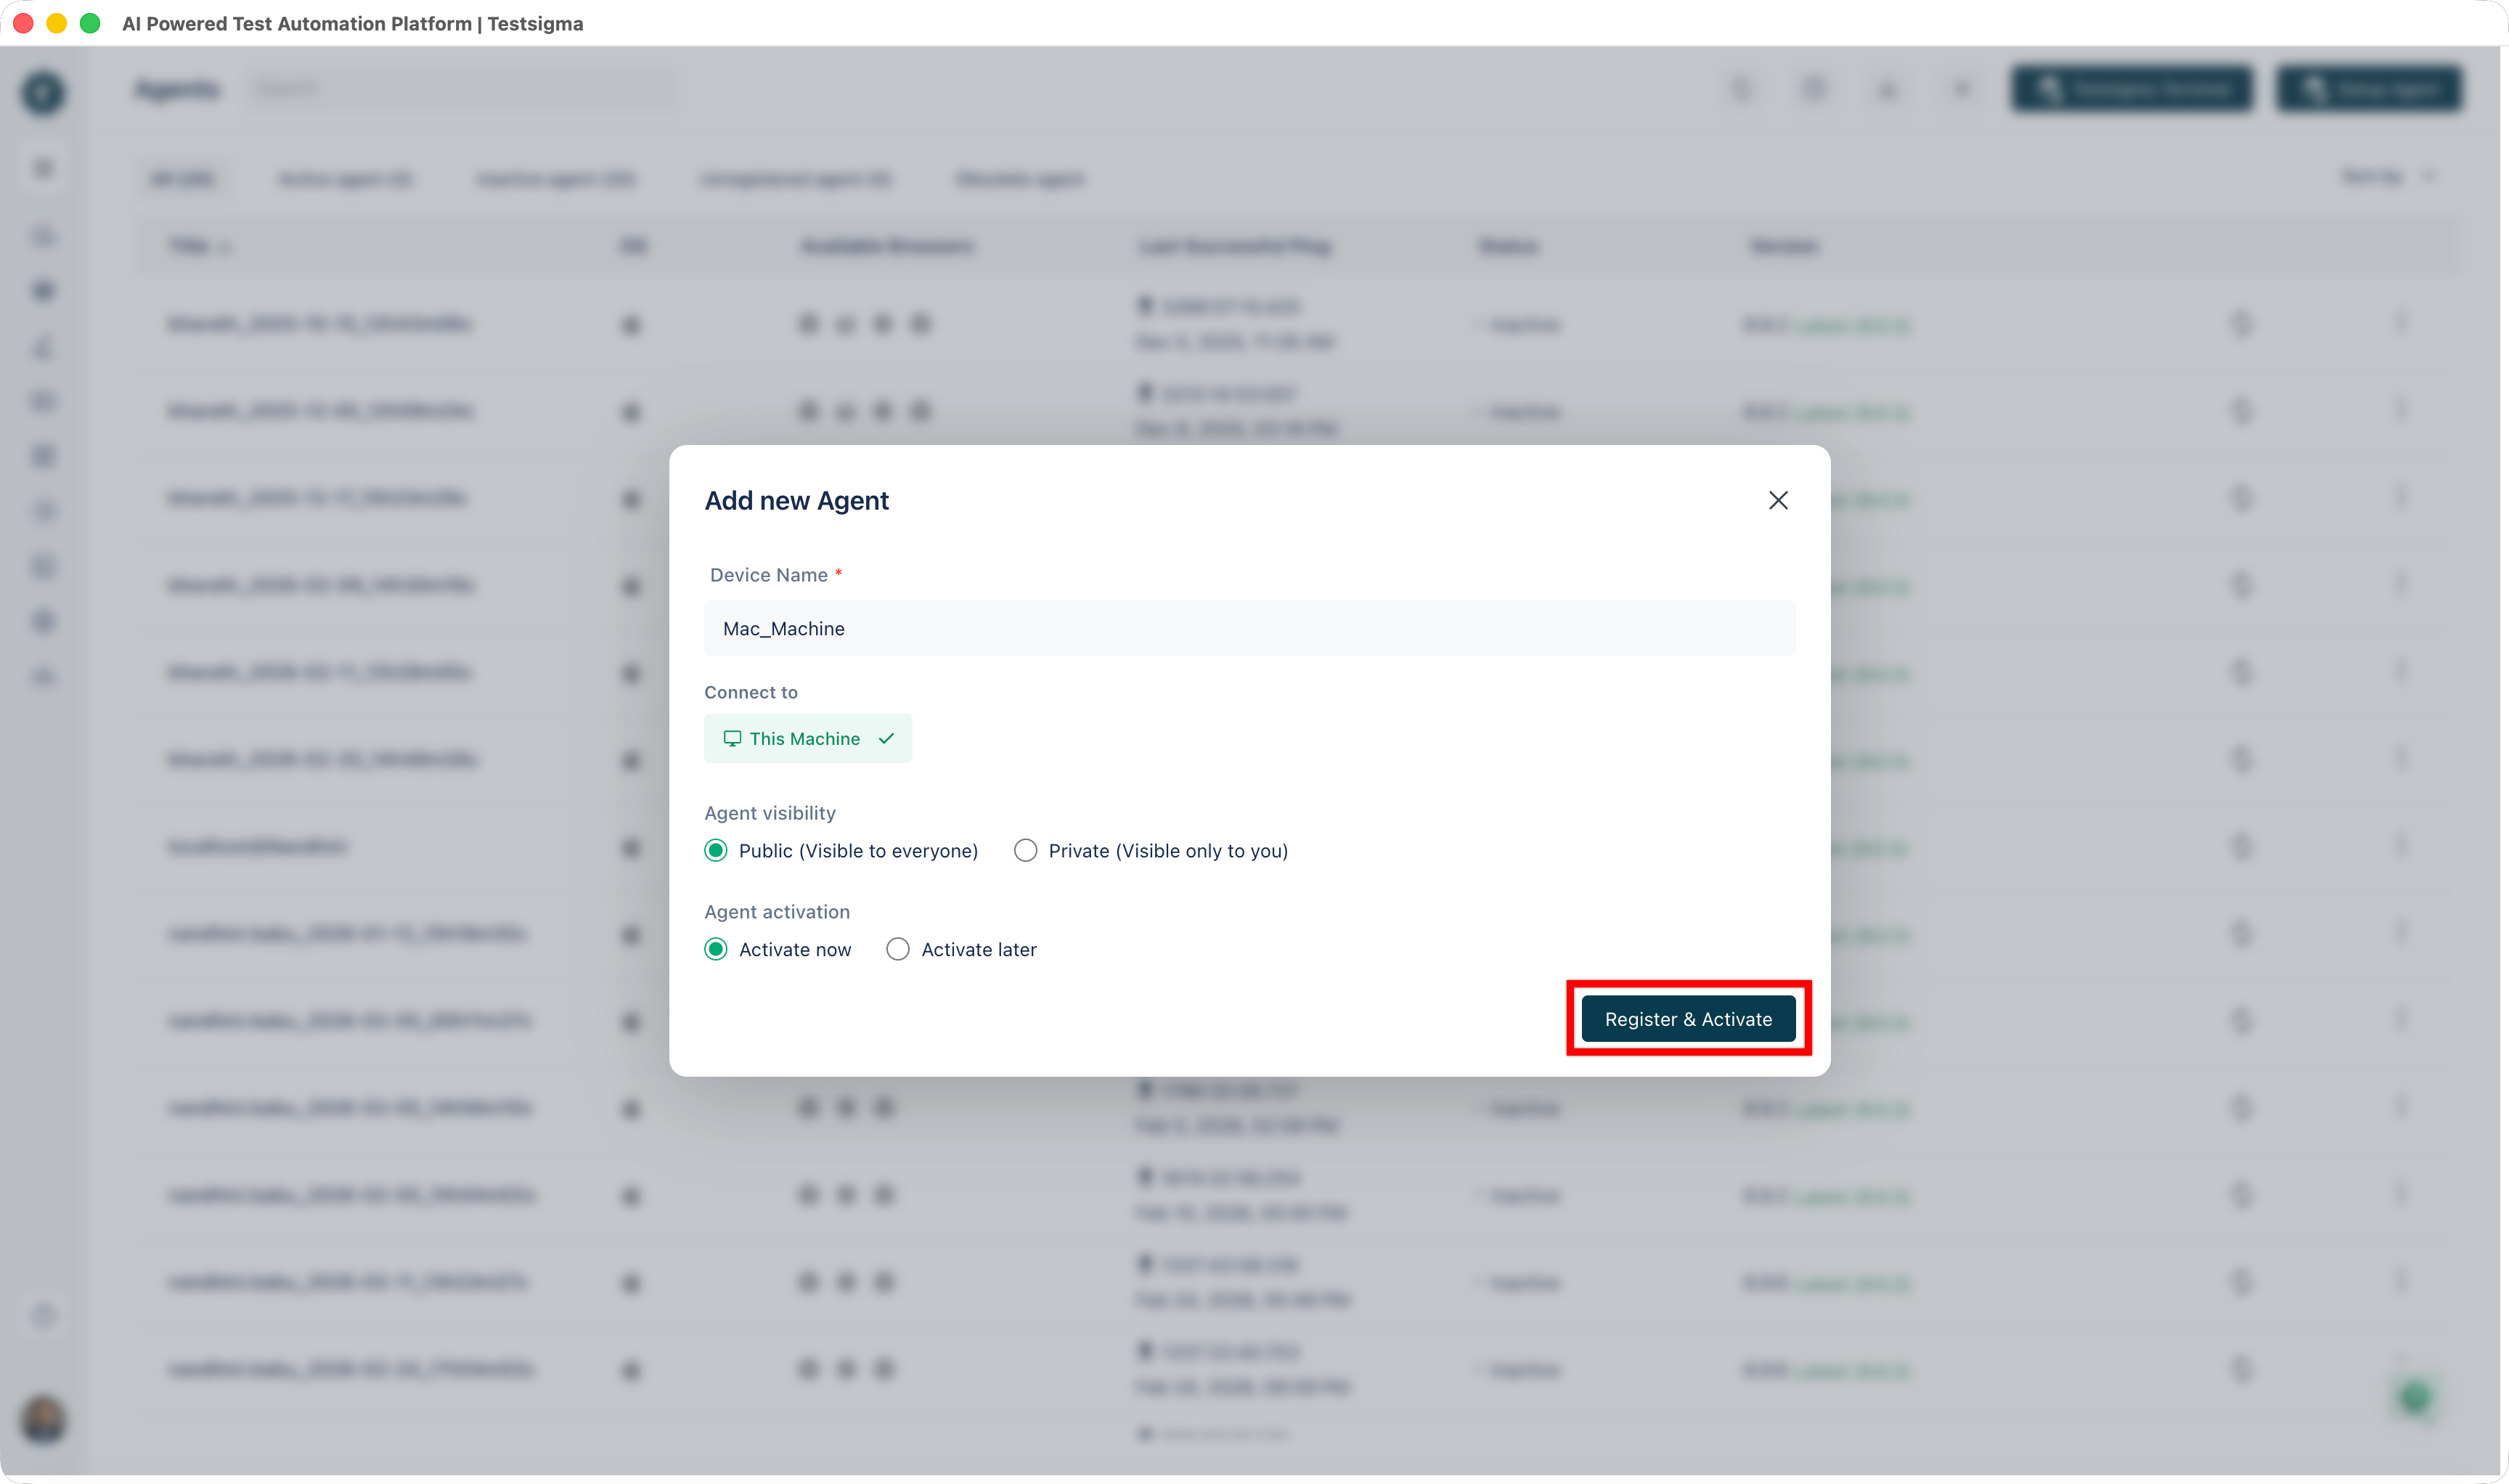
The agent then appears on the Agents page with the browsers available on that machine. The operating system version and browser names take a couple of minutes to appear. If they have not appeared after 10 minutes, the agent has a setup problem.
Connect a local device
Section titled “Connect a local device”A local Android or iOS device connects to the machine running the agent, and then appears under Devices on that agent’s page in Testsigma.
Developer options have to be enabled on the device first.
-
Open Settings and tap About Phone.
-
Go to Software information and tap Build number 7 times.
-
Open Developer Options from Settings.
-
Turn on USB Debugging.
-
Connect the device to the machine running the agent, and accept the Allow USB Debugging alert. Select Always allow from this computer if it appears.
-
Go to Agents in Testsigma and click the registered agent.
-
The device appears under Devices.
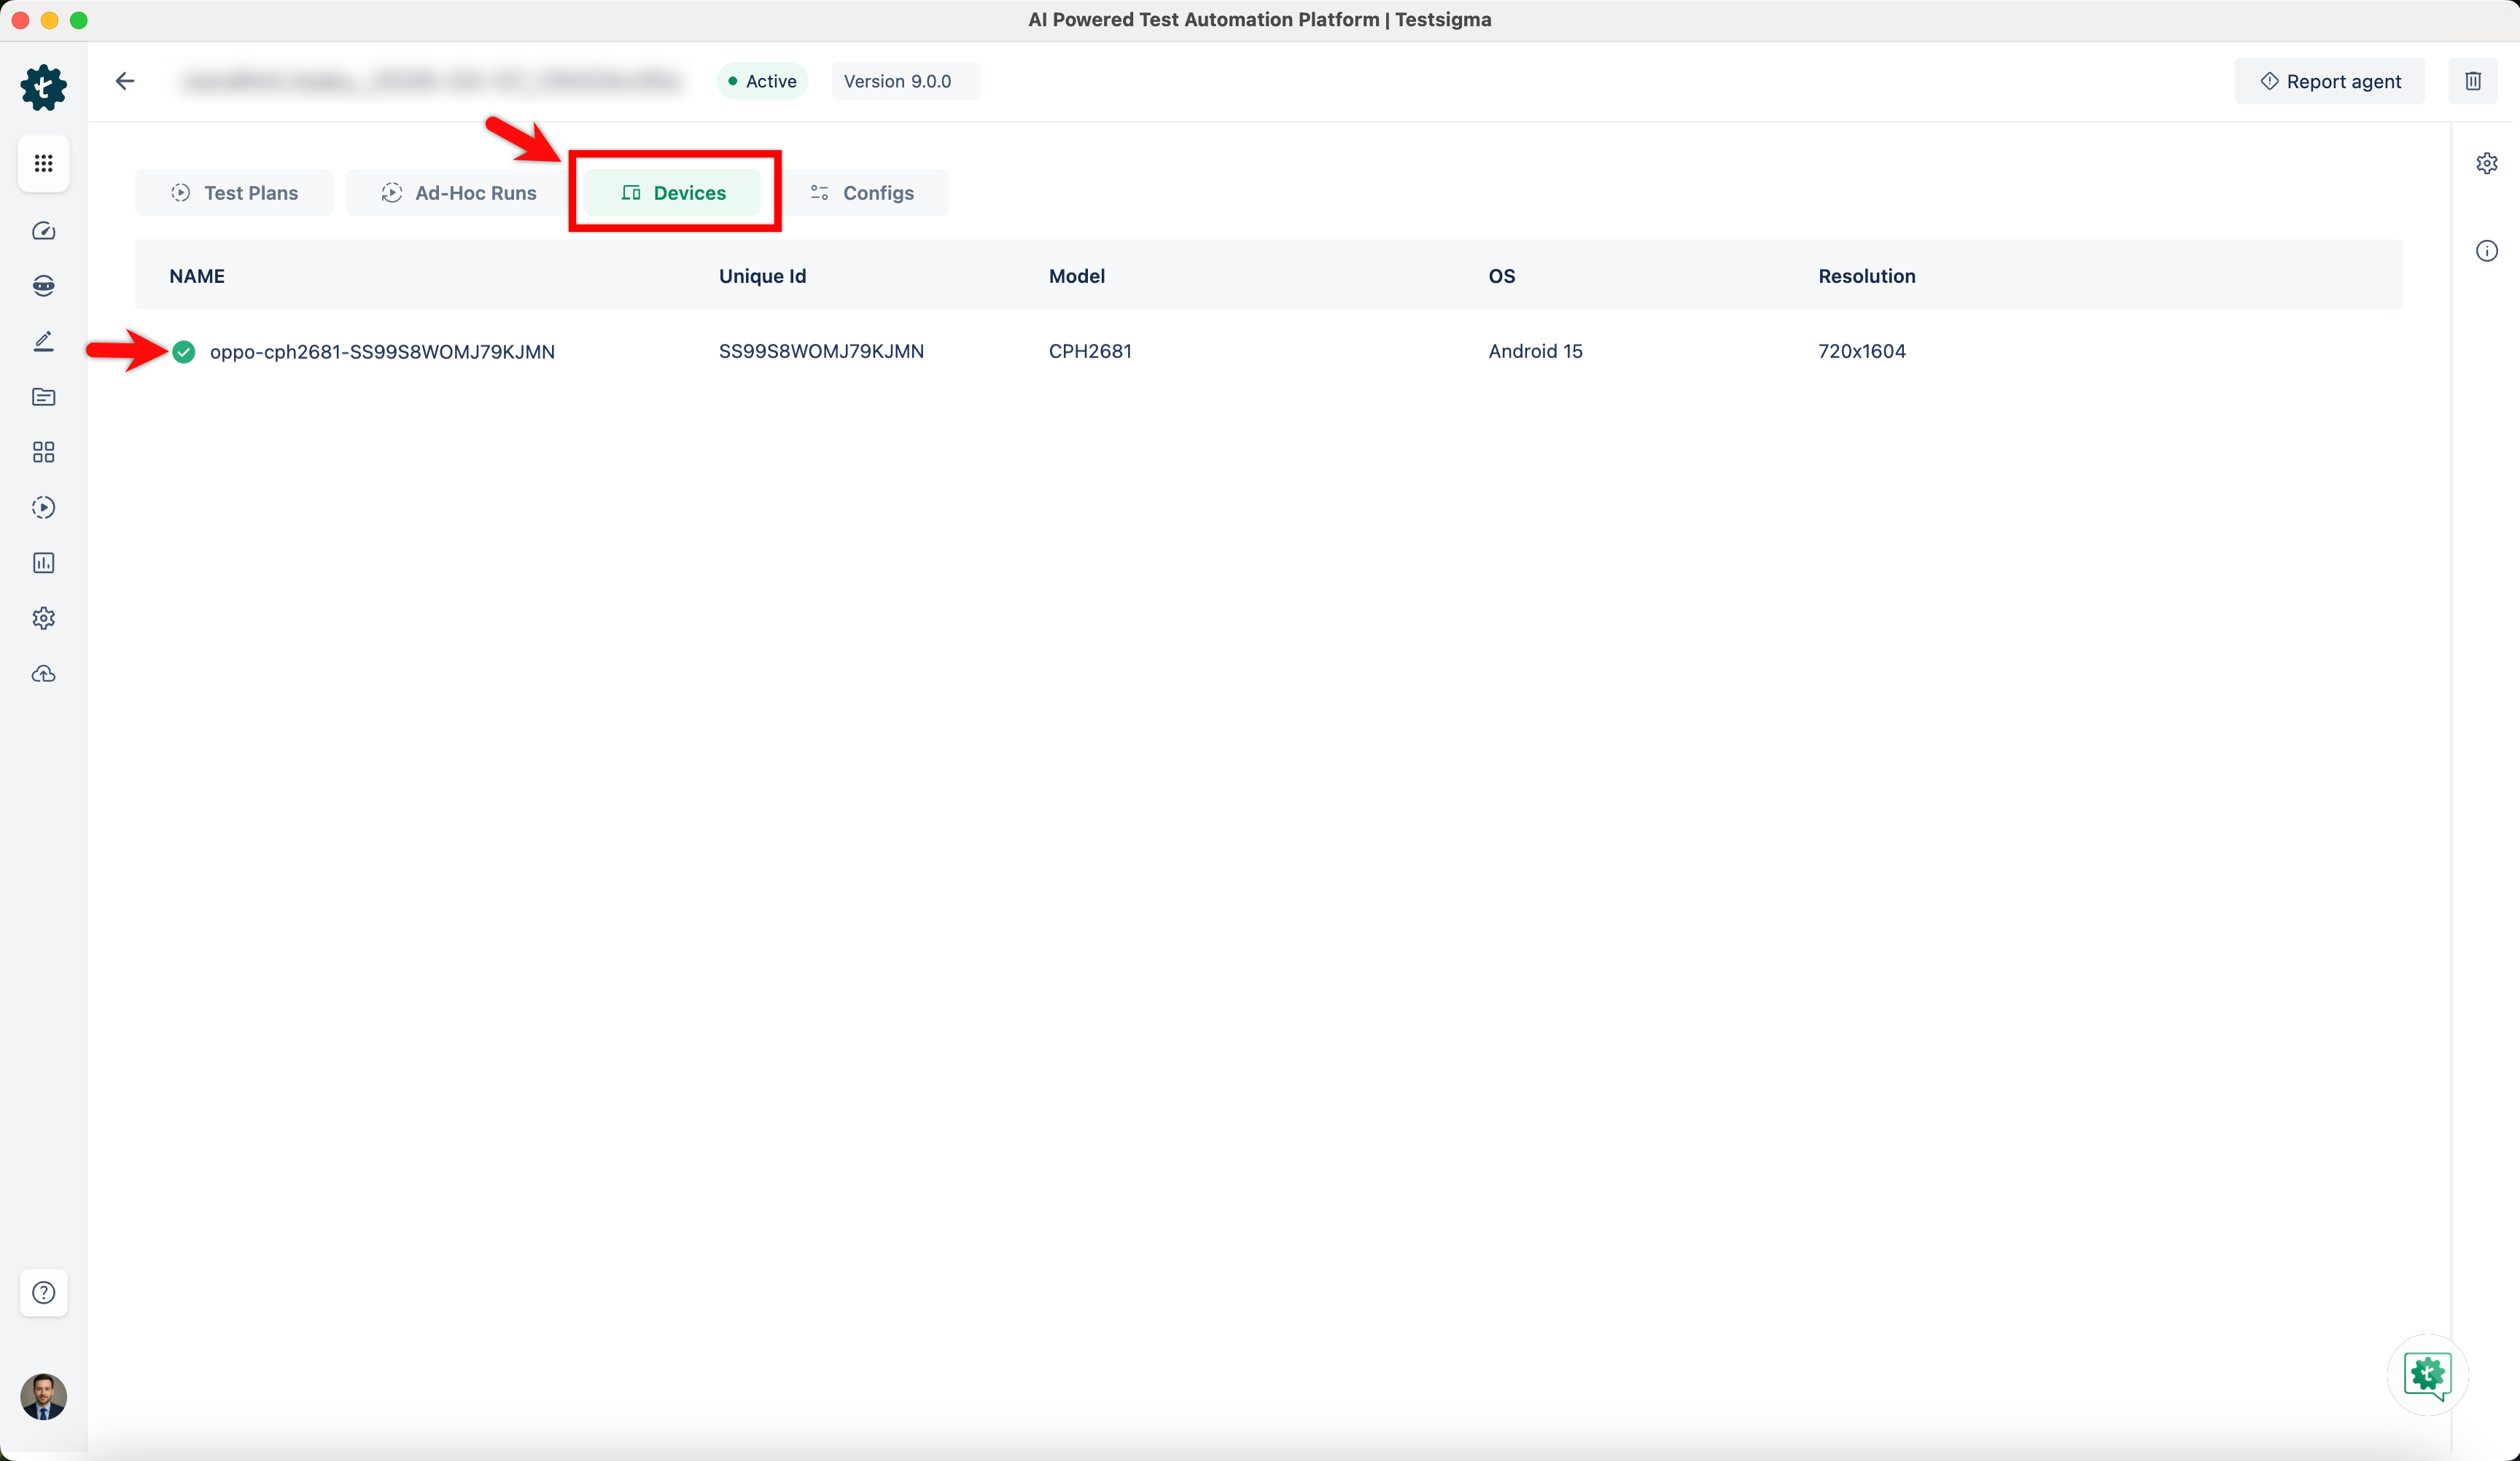
To run a test on it, select the Connected Machine and the Device.
An iOS device needs a provisioning profile configured in Testsigma before it will run tests. On Windows, it also needs iTunes installed to connect the device.
Creating a provisioning profile moves between Testsigma and the Apple Developer portal:
- Go to Settings > iOS Settings, open the Provisional Profile tab, and click + Create new profile.
- Enter a Profile Name.
- Click Generate Request to create a Certificate Signing Request, then Download Request to save the CSR file.
- In the Apple Developer portal, go to Certificates, Identifiers & Profiles and click + next to Certificates.
- Select iOS App Development under Software and click Continue.
- Upload the CSR file and click Continue.
- Click Download to save the certificate.
- Back in Testsigma, click Upload Signed file under Upload Certificate and select it.
- In the Apple Developer portal, go to Profiles and click +.
- Select iOS App Development under Development and click Continue.
- Select an App ID and click Continue.
- Select the certificates to include and click Continue.
- Select the Devices to include and click Continue.
- Name the provisioning profile and click Generate.
- Click Download to save it.
- In Testsigma, click Upload Certificate next to Provisioning Profile, select the file, and click Create.
Then go to Agents, select the agent, and find the device under Devices. To run a test on it, select Local Devices as the Test Lab, then the machine and device under Test Machine.
These are the errors the setup produces:
| Error | What it means |
|---|---|
| “Invalid certificate uploaded, please upload a valid certificate.” | The certificate is wrong or corrupted. Generate it from the CSR created in the iOS Settings profile in Testsigma |
| “Certificate uploaded is not included in this provisioning profile.” | The provisioning profile was built with a different certificate. Use the one uploaded in iOS Settings |
| “Upload is not resigned” | Re-signing is still in progress. Track it in the Provisioning Profile Details dialog, and select the upload once it finishes |
| “Device initializing” | The agent is still setting the device up. Setup errors appear on the Devices tab of the agent details page |
Command-line arguments
Section titled “Command-line arguments”Arguments passed at startup configure registration, logging, memory, browsers, and proxies:
./start.sh --TS_AUTO_DETECT_PROXY=true| Argument | What it does |
|---|---|
--TS_AUTO_DETECT_PROXY | Detects and uses a network proxy, including proxies configured through PAC files |
--TS_USE_SYSTEM_PROXY | Uses the system’s own proxy configuration |
--TS_NON_PROXY_HOSTS | Hosts that bypass the proxy |
--TS_DELEGATE_SSL_VALIDATION | Hands SSL validation to your SSL inspection tools instead of Java, bypassing certificate validation errors |
--TS_TRUST_STORE_TYPE | The trust store type to use |
--TS_ACTIVATION_KEY | Registers the agent with an activation key |
--TS_ADDITIONAL_JVM_ARGS | Extra JVM arguments |
--TS_AGENT_JAR_PATH | Path to the agent JAR |
--TS_JAVA_HOME | Path to a Java installation, instead of the bundled JRE |
--TS_DATA_DIR | The agent’s data directory |
--TS_ROOT_DIR | The agent’s root directory |
--TS_LOGGING_LEVEL | Log verbosity |
--TS_ENABLE_GC_LOG | Writes garbage collection logs |
--TS_ENABLE_HEAP_DUMP | Writes a heap dump |
--TS_IS_HEADLESS | Runs browsers headless |
--TS_IS_MOBILE_DISABLED | Disables mobile support |
--TS_CHROME_PATH | The Chrome executable path, for when the agent cannot find the browser itself |
Bypass the proxy for specific hosts
Section titled “Bypass the proxy for specific hosts”Where the agent must use a proxy for most traffic but connect directly to internal or trusted domains, set the non-proxy hosts in the agent’s configuration.
-
Open the TestsigmaAgent installation directory.
-
Go to agent_data and open
args.yml. -
Add or update these properties, separating domains with a pipe:
http.nonProxyHosts: "localhost|127.0.0.1|*.testsigma.com|*.amazonaws.com"https.nonProxyHosts: "localhost|127.0.0.1|*.testsigma.com|*.amazonaws.com"
Configure logs
Section titled “Configure logs”The log level controls what the agent writes to the command line and to its local log files. The default is INFO.
Open an agent from the Agents list page, click the Agent Settings icon in the right navigation bar, and select the level for the CLI and for local files.
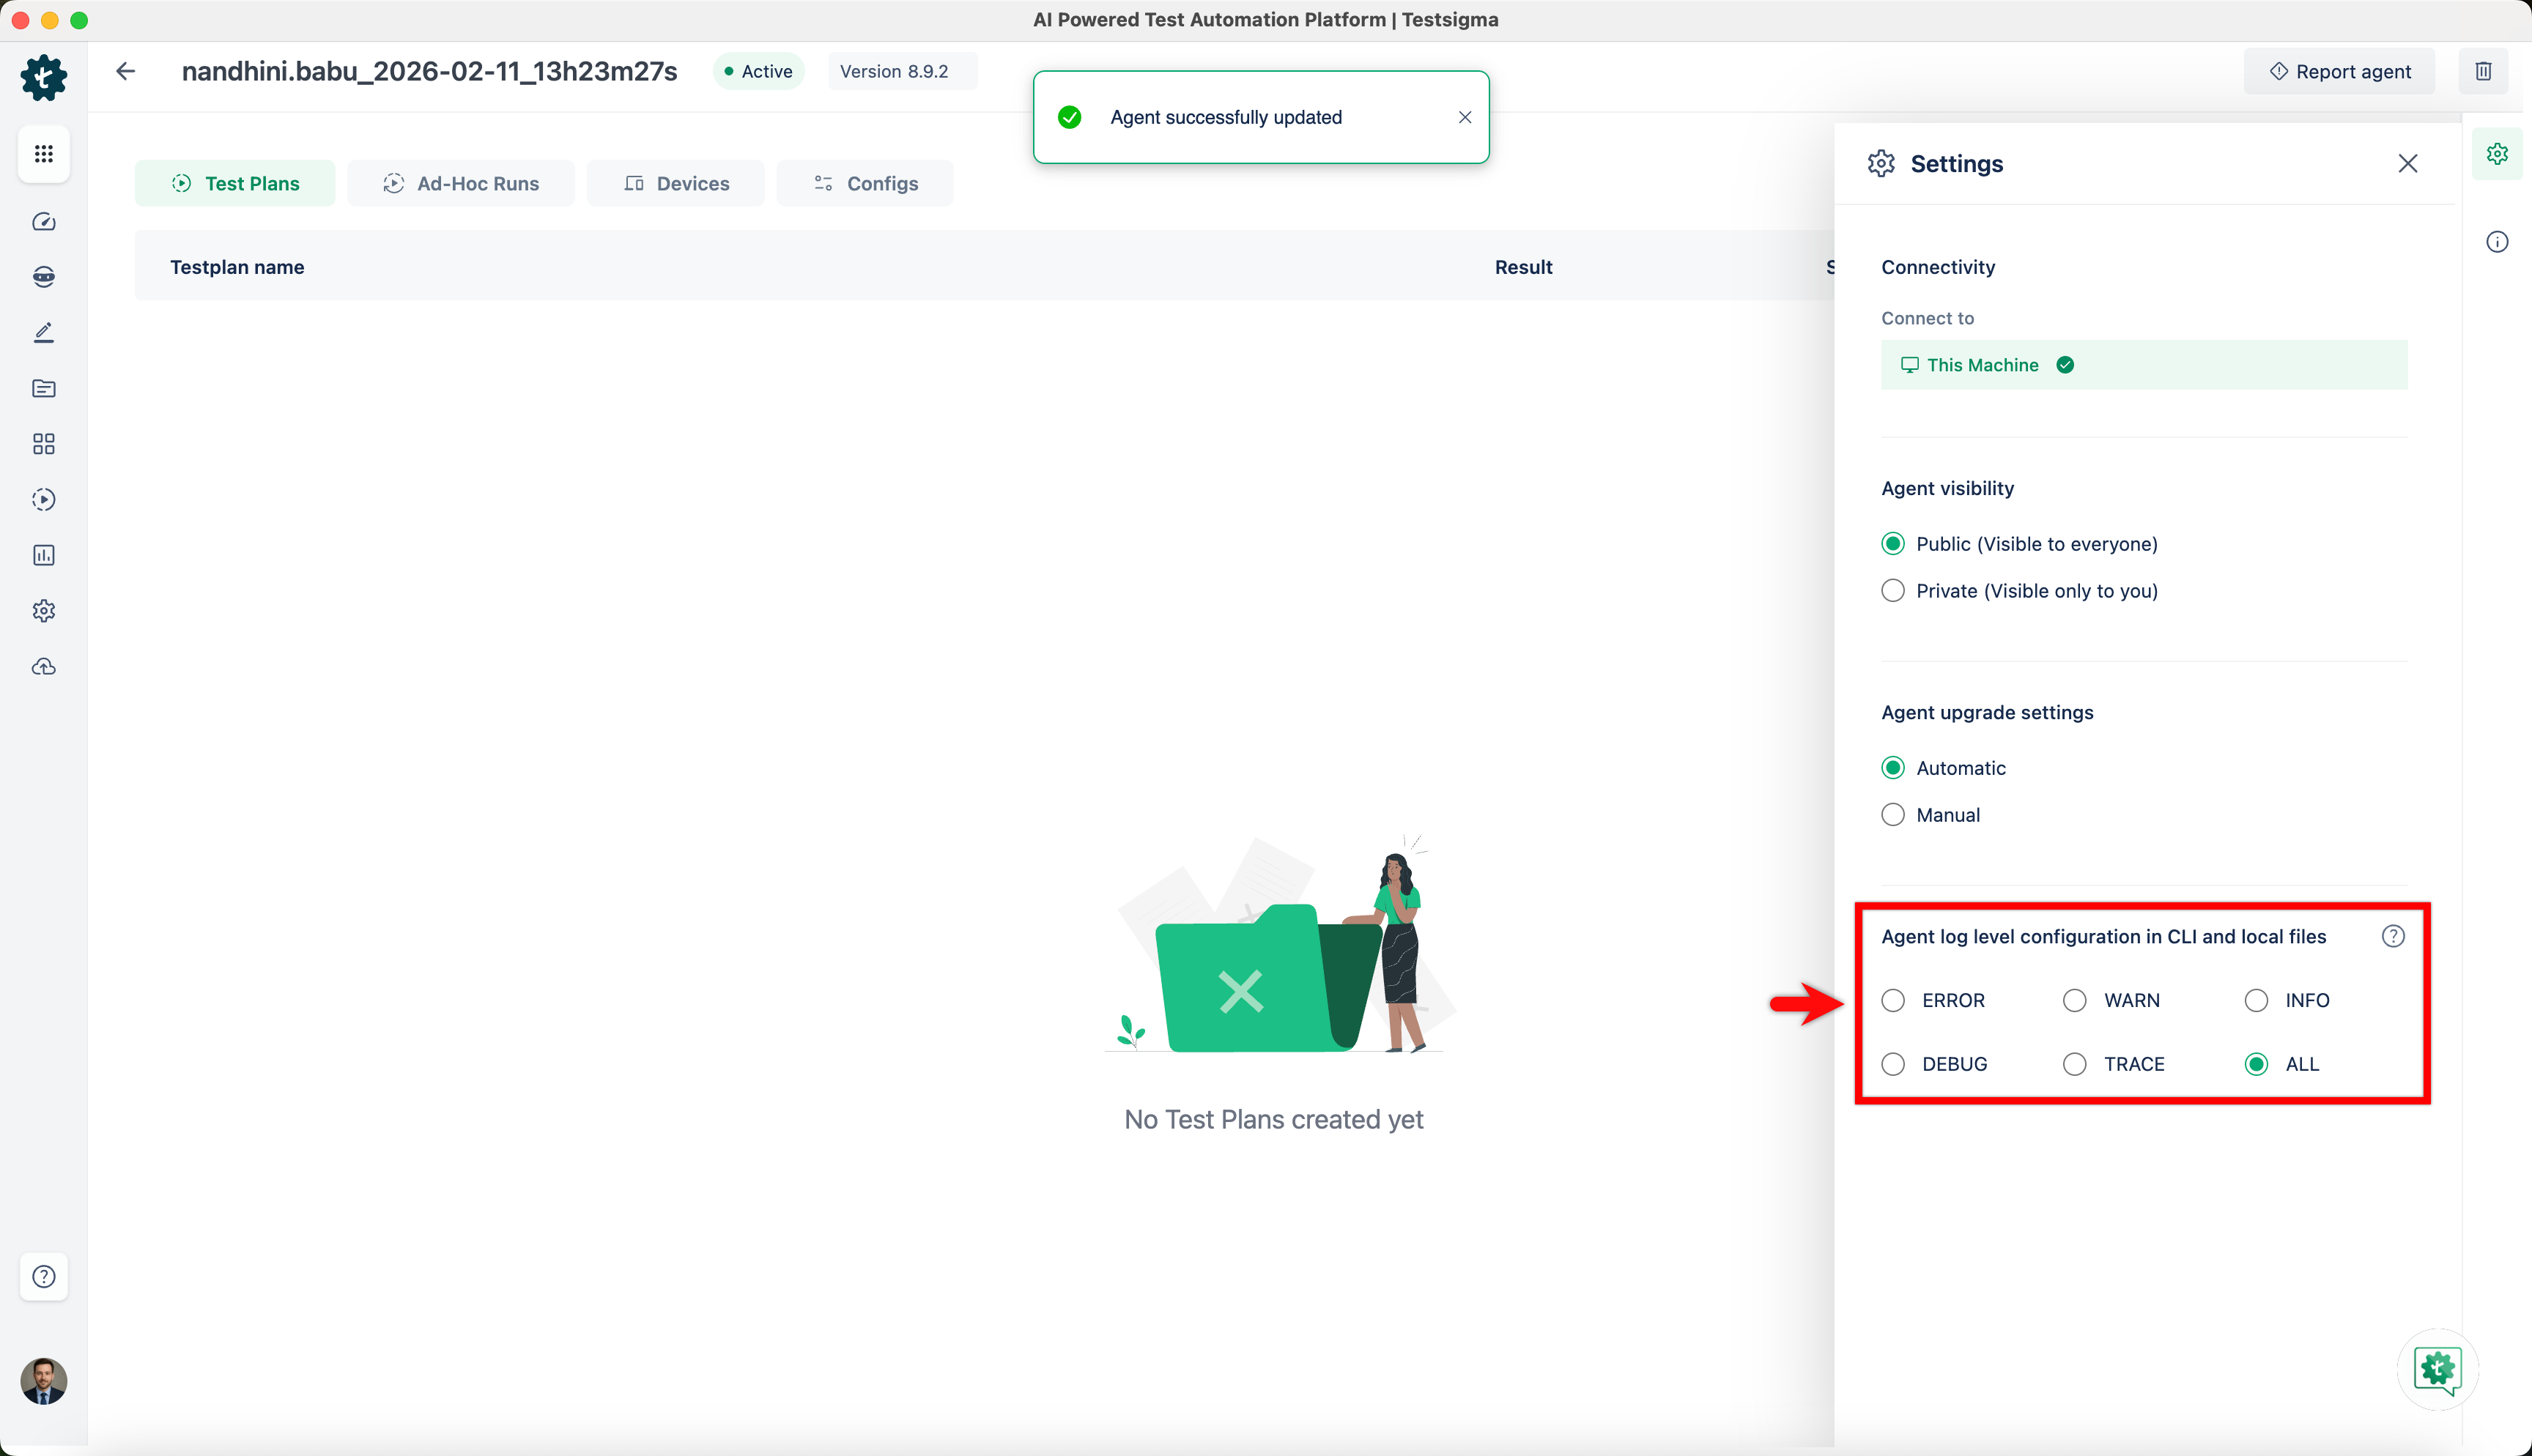
| Level | What it logs |
|---|---|
| ERROR | Critical issues that cause the agent to fail |
| WARN | Warnings and errors, to catch problems early |
| INFO | General information, warnings, and errors. The default |
| DEBUG | Detailed information for debugging, plus everything above |
| TRACE | Traces of the execution flow for deep debugging, plus everything above |
| ALL | Every message the agent produces |
To send logs to Testsigma, go to Agents, hover over the agent, and click Report Agent. Describe the problem in the dialog and click Report.
Keep the agent up to date
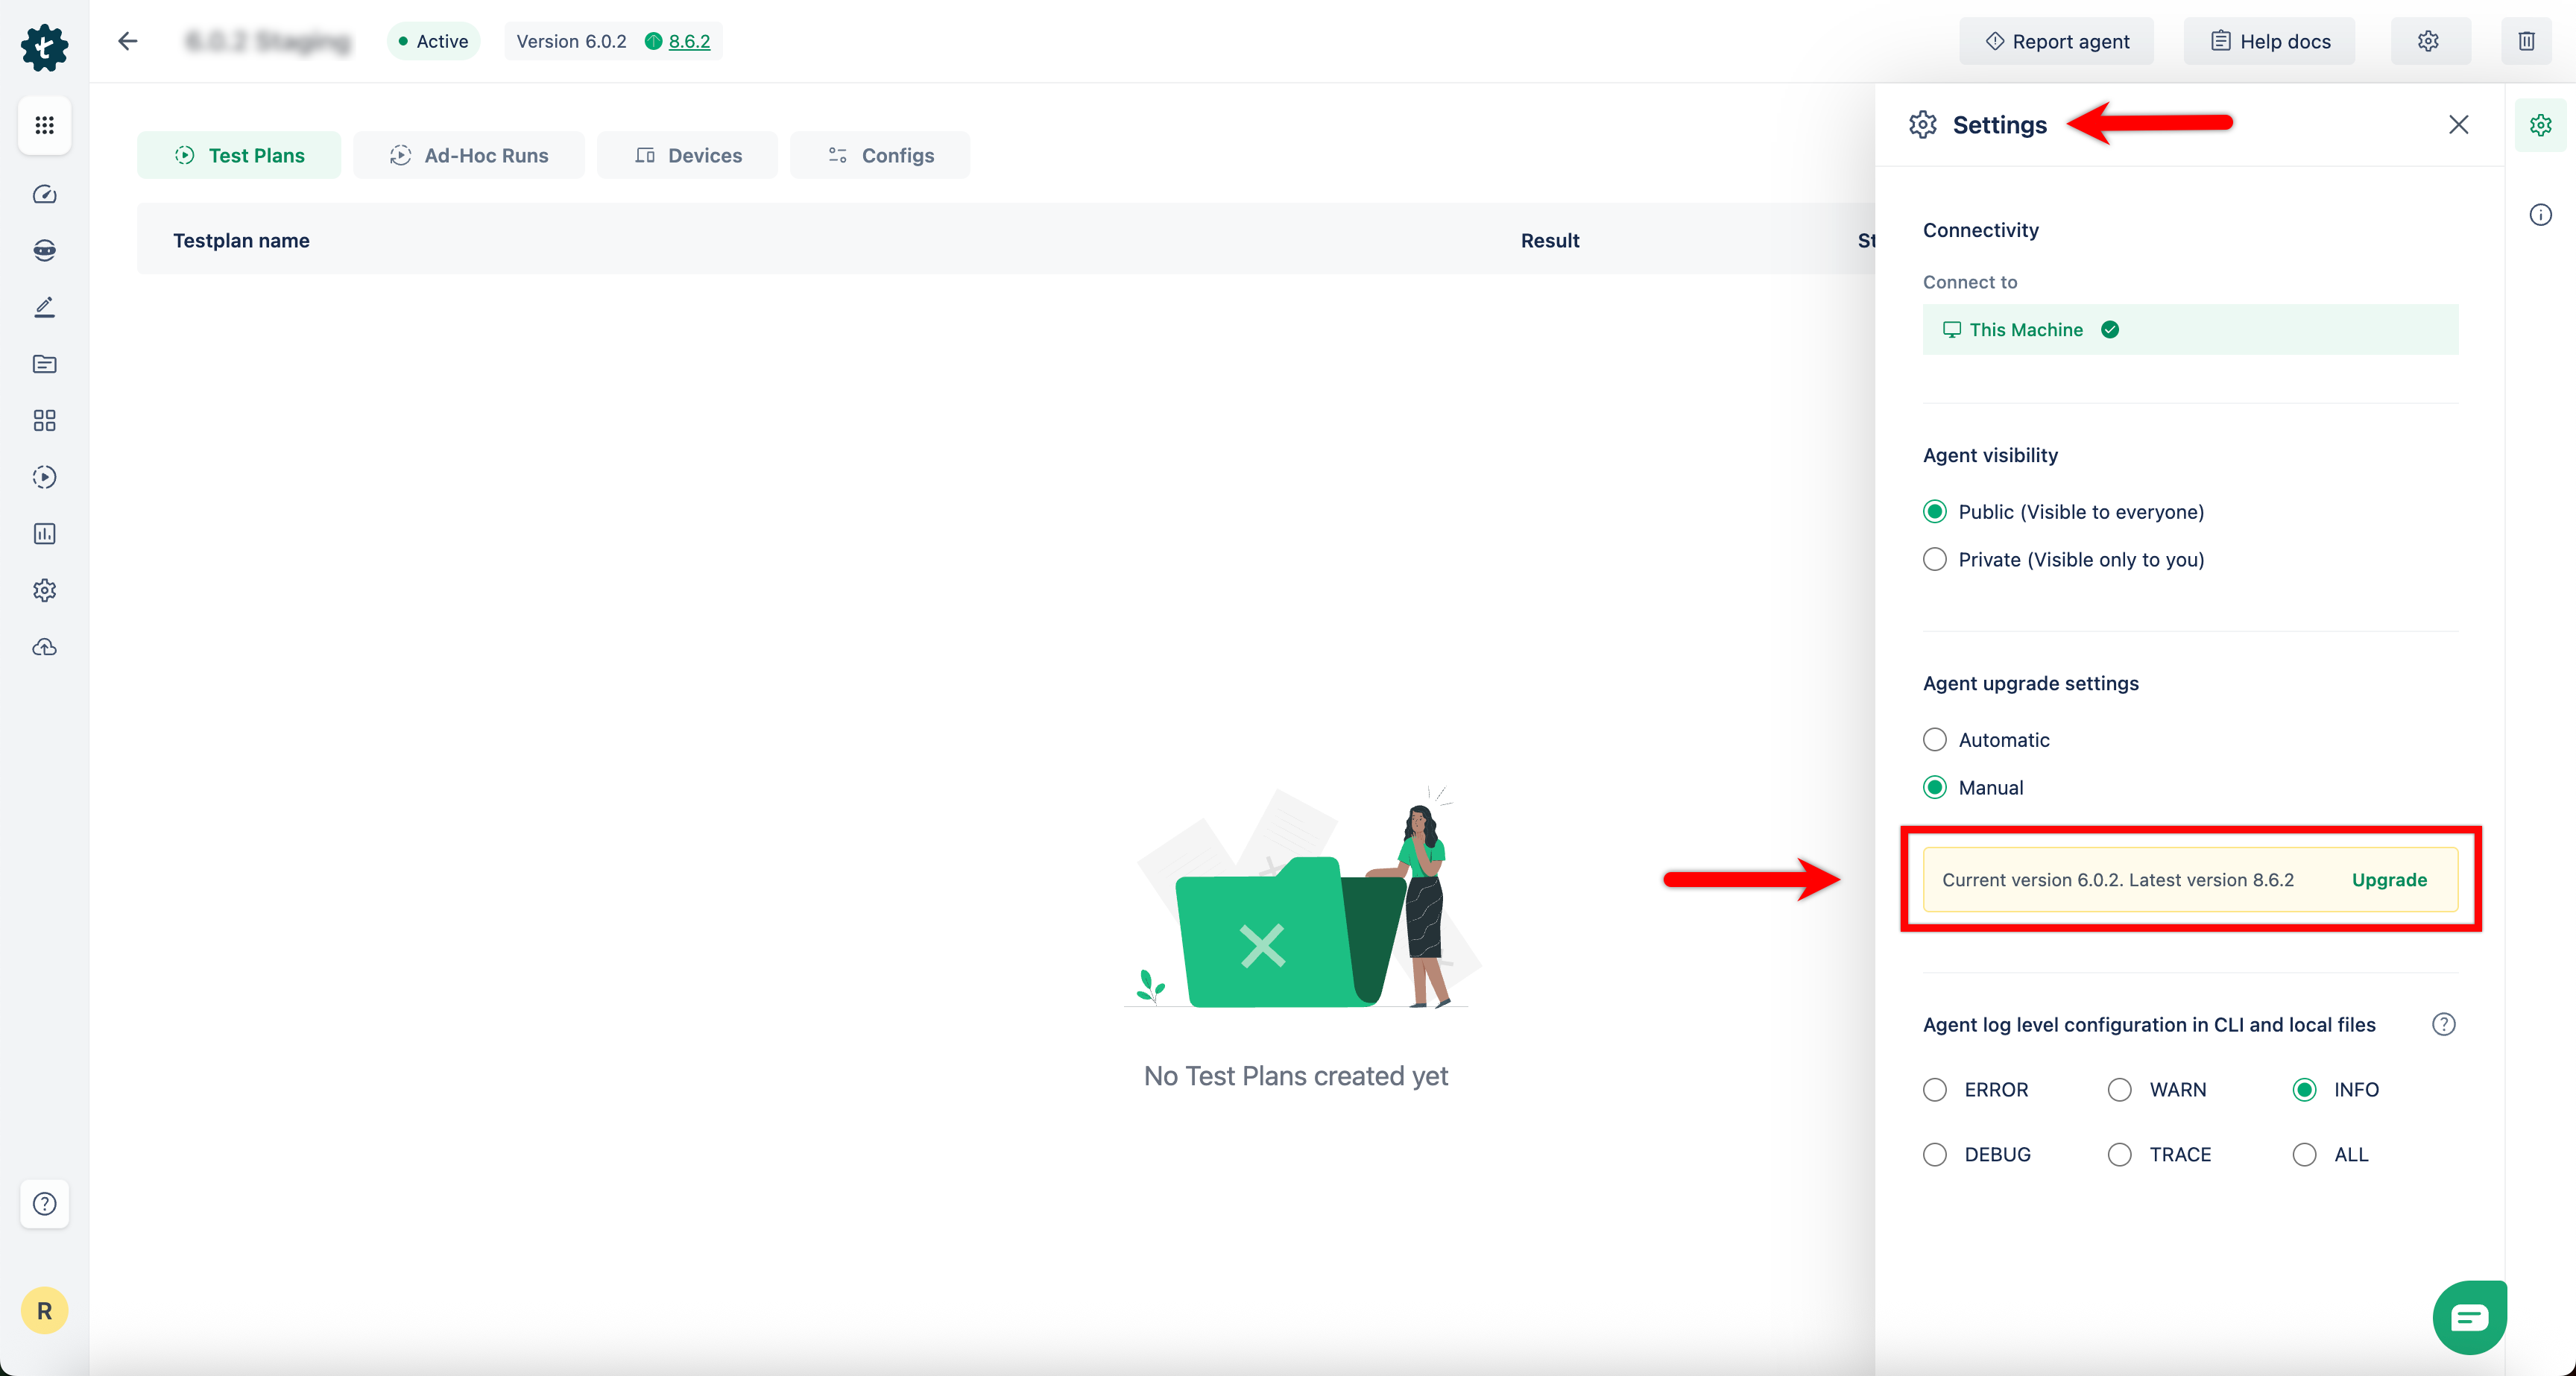
Section titled “Keep the agent up to date”Automatic upgrades are on by default. Start the agent, and it downloads a higher version if one exists, then restarts itself and reports Upgrade Success. Nothing is required from you.
To control when upgrades happen, go to Agents > Agent > Settings > Agent upgrade settings and select Manual. The interface then shows the current and latest versions when an upgrade is available, and Upgrade installs it.
Update the agent manually
Section titled “Update the agent manually”Use this when an automatic upgrade fails, usually from network conditions or a misconfiguration.
-
Check whether the agent is running. Its icon sits in the system tray on Windows, and in the status bar on macOS and Linux. If it is not running, skip to step 3.
-
Stop it from the agent directory. On Windows, open a command prompt there and run
./stop.bat. On macOS and Linux, open a terminal there and run./stop.sh. -
Delete the contents of the
TestsigmaAgentfolder. -
Click Download Agent on the Agents page to get the latest ZIP.
-
Extract the
TestsigmaAgentfolder from the ZIP into the same location on your machine. -
Start the agent from that directory. On Windows, run
./start.bat. On macOS and Linux, run./start.sh.
Update browser drivers manually
Section titled “Update browser drivers manually”The agent talks to each browser through a driver file, and driver updates ship with the agent’s automatic updates. A failed update, from network conditions or a firewall, leaves you to replace the file yourself.
Download the driver for your browser version and operating system from the SeleniumHQ downloads page, then place it in the matching directory inside the agent folder:
| Browser | Directory |
|---|---|
| Google Chrome | /drivers/googlechrome |
| Microsoft Edge | /drivers/edge |
| Mozilla Firefox | /drivers/mozilla |
| Internet Explorer | /drivers/internetexplorer |
Trigger tests on a local agent from another machine
Section titled “Trigger tests on a local agent from another machine”Tests can run on one machine’s agent while you work from another, on the same Testsigma account.
-
Install and register the agent on the target machine.
-
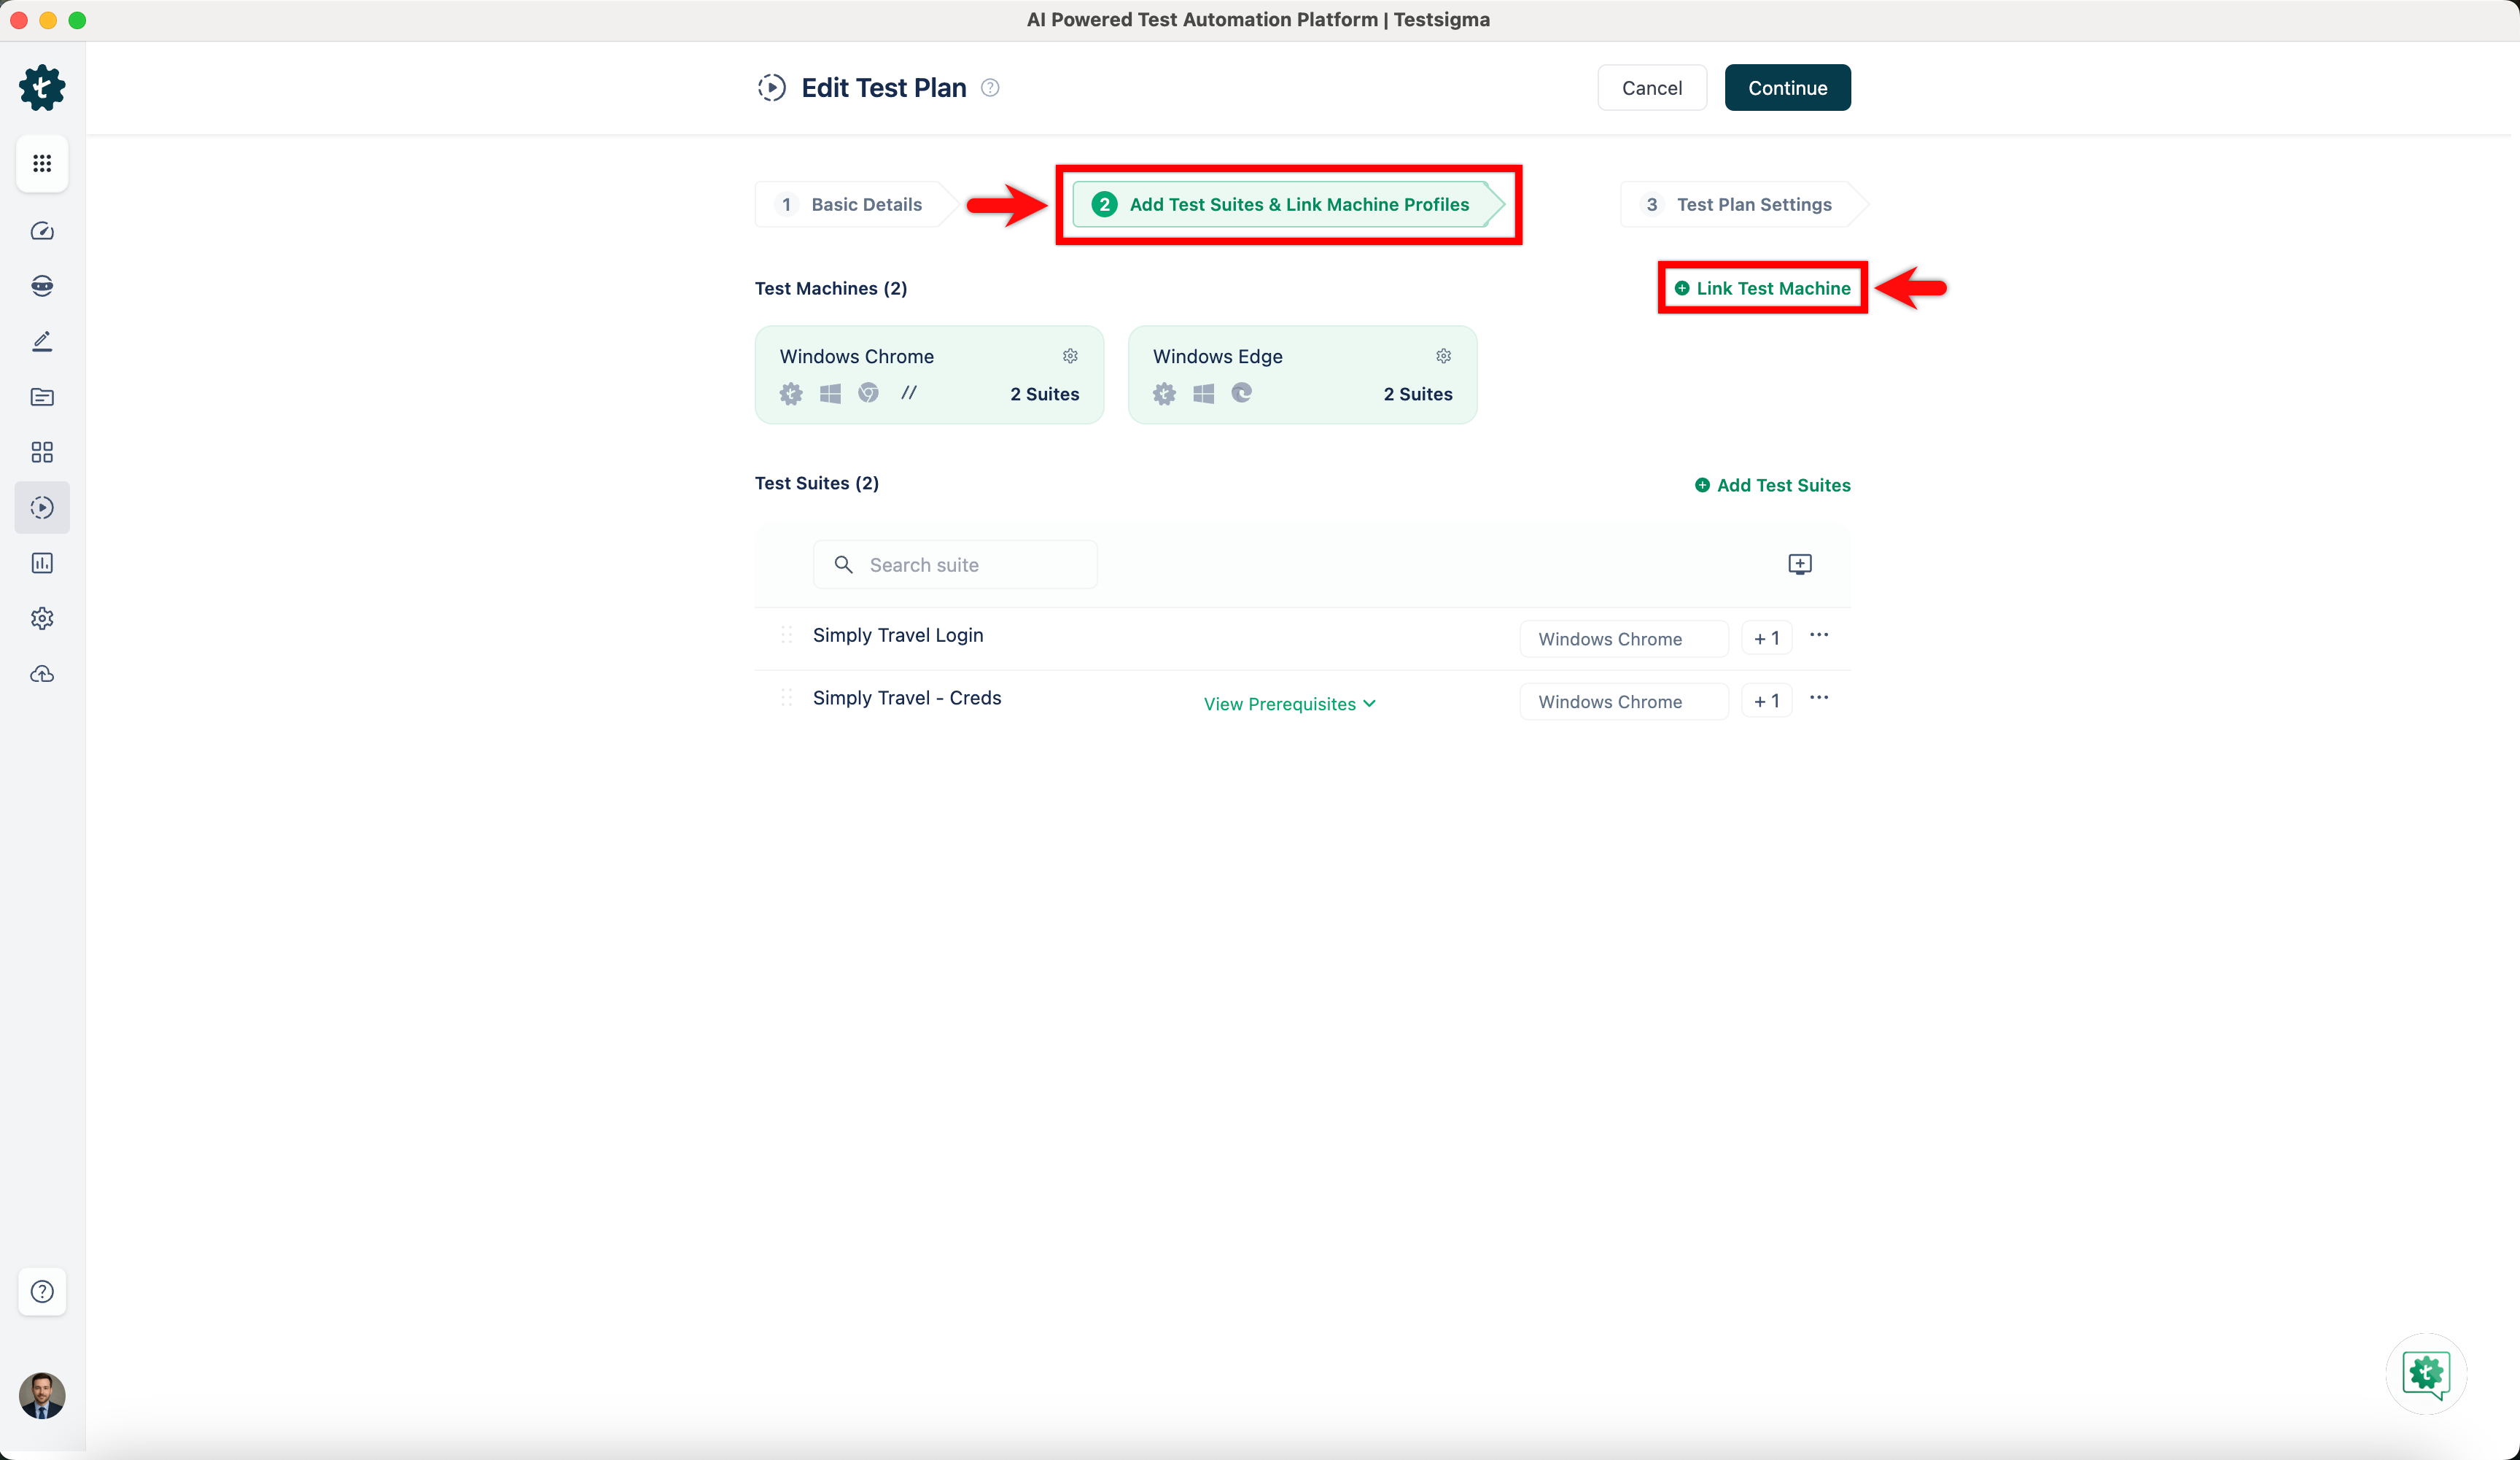
Go to Test Plans, open the plan, and click Edit.
-
On Add Test Suites & Link Machine Profiles, click Link Test Machine and select the target machine.
Delete an agent
Section titled “Delete an agent”A long agent list makes picking the right machine harder, so an agent can be pushed to an obsolete state instead of deleted.
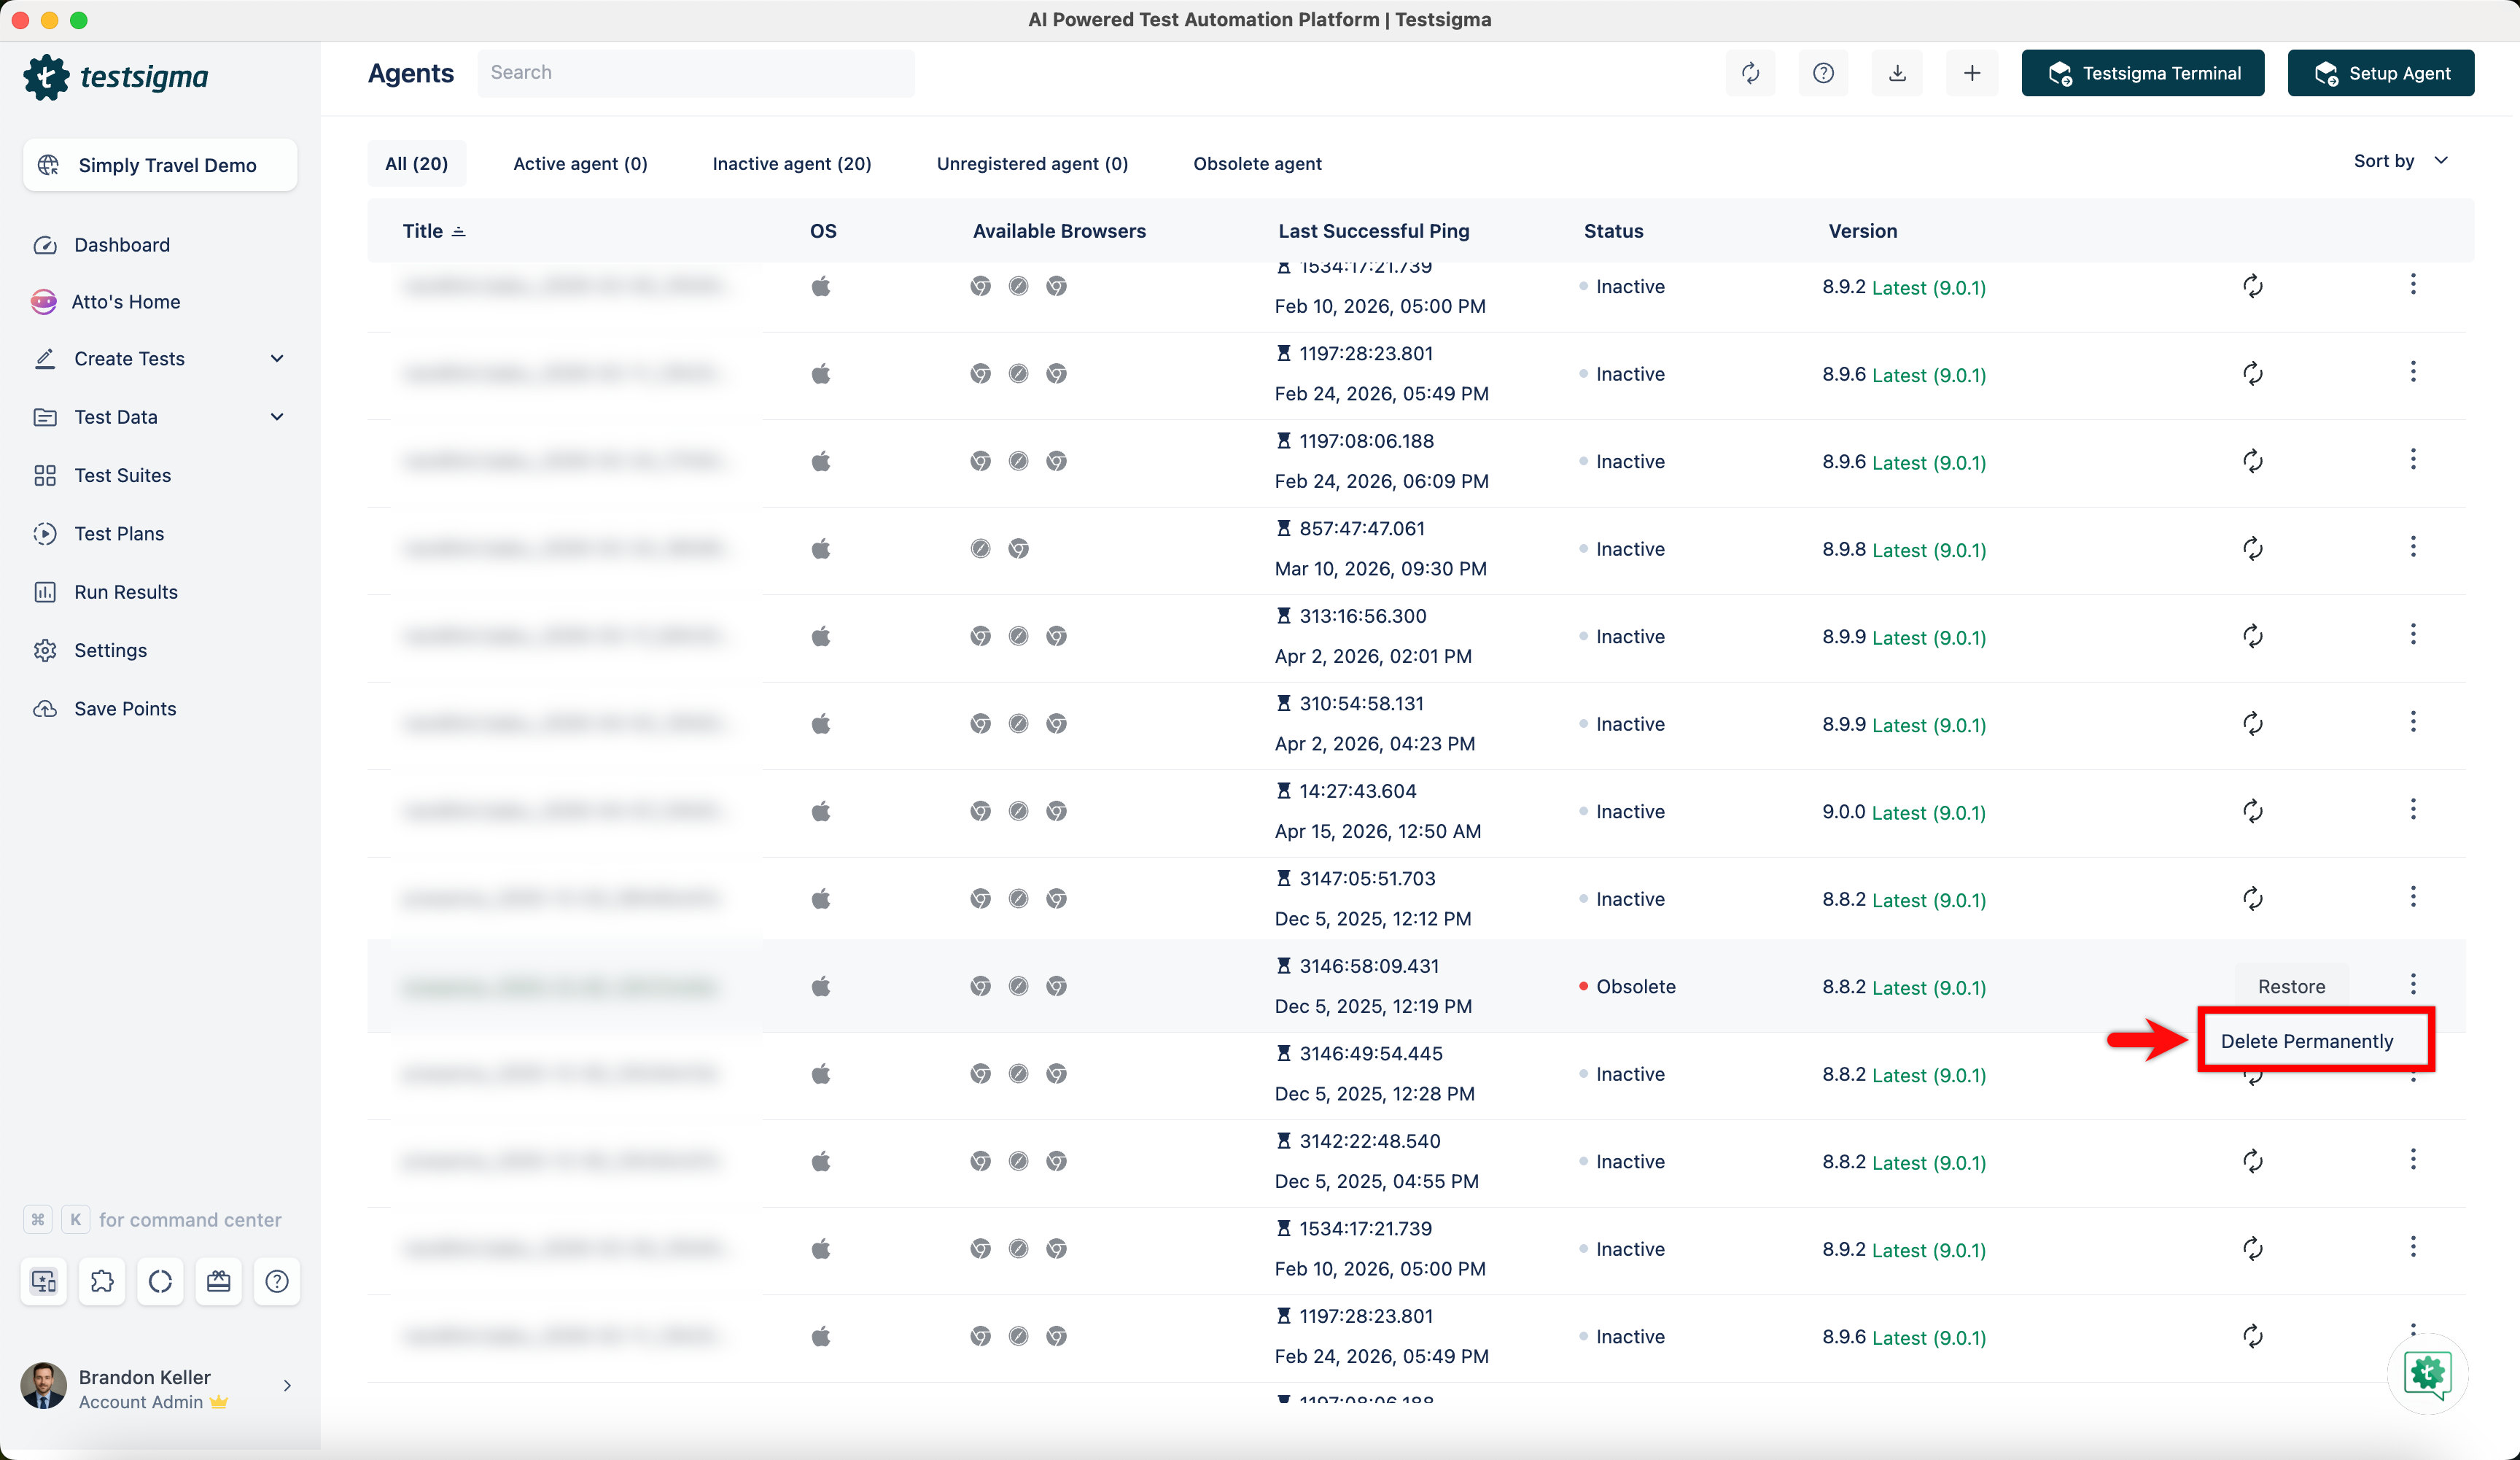
To obsolete one, go to Agents, click the ellipsis icon (⋮) beside the agent, click Obsolete, then click Obsolete Agent in the dialog. Restore brings it back.
To delete one for good, click the ellipsis icon (⋮), click Delete Permanently, then confirm in the Delete Agent Permanently? dialog.
Force delete
Section titled “Force delete”Where an agent will not come off cleanly, remove it in 4 places:
-
Click the Testsigma Agent icon in the status bar on macOS and Linux, or the system tray on Windows, and click Quit.
-
Delete the folder the agent was started from.
-
Delete the agent’s entry in the Testsigma agents list.
-
Delete the
agent.propertiesfile.
agent.properties lives in the agent’s config directory:
| OS | Location |
|---|---|
| Windows | %userprofile%\AppData\Roaming\Testsigma\Agent\config\ |
| Linux | $HOME/.testsigma/agent/config/ |
| macOS | $HOME/Library/Application Support/Testsigma/Agent/config/ |
Frequently asked questions
Section titled “Frequently asked questions”How does Testsigma communicate with the agent?
Section titled “How does Testsigma communicate with the agent?”The agent queries Testsigma’s servers and receives responses. Testsigma never initiates a connection to it, so no inbound firewall rule and no IP whitelisting is needed. Outgoing connections to *.testsigma.com on port 443 have to be allowed.
What are the resource requirements?
Section titled “What are the resource requirements?”8 GB of memory dedicated to the tests, around 20 GB of disk including space for screenshots and downloads, and a dual-core processor or better. See System requirements.
Do I need a Windows machine to run the agent?
Section titled “Do I need a Windows machine to run the agent?”No. The agent runs on Linux, Windows, or macOS.
Can I run the agent without installing it on a machine?
Section titled “Can I run the agent without installing it on a machine?”Yes. A Docker image and a Helm chart both run it as a container, and both register the agent themselves. See the Docker and Kubernetes tabs under Install the agent.
How do I run more tests at once on one machine?
Section titled “How do I run more tests at once on one machine?”Raise Max sessions for this machine, set when you register the agent. See Register the agent for its limits.
How do I make the agent bypass our proxy for internal domains?
Section titled “How do I make the agent bypass our proxy for internal domains?”Add the domains to http.nonProxyHosts and https.nonProxyHosts in args.yml, in the agent’s agent_data directory. See Bypass the proxy for specific hosts.
How do I make the agent log more detail?
Section titled “How do I make the agent log more detail?”Change the log level from Agent Settings on the agent’s page, and restart the agent. DEBUG and TRACE add progressively more detail. See Configure logs.
How do I stop the agent upgrading itself?
Section titled “How do I stop the agent upgrading itself?”Set Agent upgrade settings to Manual, under Agents > Agent > Settings. See Keep the agent up to date.
Why won’t the agent start?
Section titled “Why won’t the agent start?”An agent that fails to start, or starts and terminates immediately, records the cause in its logs, so read those first. A common one is a port conflict: the agent detects available ports automatically, and an error reading “Port not available” means 8383 or 8484 is taken.
Check them with lsof -i :8383 on Linux and macOS, or on Windows with:
Get-Process -Id (Get-NetTCPConnection -LocalPort 8383).OwningProcessRepeat for 8484, and free whichever port is held. If the logs are unclear, send them to support@testsigma.com.
Why doesn’t the agent detect my installed browsers?
Section titled “Why doesn’t the agent detect my installed browsers?”The agent could not find the web driver during startup, so its browser scan failed. Give it the browser path directly.
Open chrome://version in Chrome, copy the executable path, then start the agent with it:
sudo sh start.sh --TS_CHROME_PATH=<chrome_executable_path>On Windows, use start.bat --TS_CHROME_PATH=<chrome_executable_path>. The agent scans that path, writes it into args.yml, and detects the browser on later runs without reconfiguration.
Why is the agent download blocked?
Section titled “Why is the agent download blocked?”Your network is blocking the domains and IPs the agent needs. Whitelist these:
| Purpose | Domain | IPs |
|---|---|---|
| Local agent and cloud services | app.testsigma.com | 166.117.52.243, 166.117.190.246 |
| Testsigma Tunnels | connect.testsigma.com | 166.117.49.200, 166.117.156.234 |
| Mobile Recorder | mobilerecorder.testsigma.com | 166.117.86.235, 166.117.227.251 |
| Asset Proxy | asset-proxy.testsigma.com | 166.117.67.252, 166.117.170.206 |
| Test lab incoming connections | 35.174.92.188, 34.204.63.14, 74.50.105.97 |
The agent also downloads browser drivers, so whitelist their sources: googlechromelabs.github.io, chromedriver.storage.googleapis.com, storage.googleapis.com, registry.npmmirror.com, and raw.githubusercontent.com for Chrome and Firefox, and msedgewebdriverstorage.blob.core.windows.net for Edge and Internet Explorer. Two more Testsigma services need allowing as well: static-id.testsigma.com and id.testsigma.com.
Was this page helpful?
Thanks for the feedback.