

Elements
An element is a UI component a test step acts on, such as a field, a button, or a link. Testsigma stores elements in a repository, so a step refers to an element by name and every step using it picks up a change at once.
Create elements by recording them from the running application, or by entering the locator yourself.
Locator types
Section titled “Locator types”A locator tells Testsigma how to find the element on screen. Web applications support 7 types.
| Locator | What it matches | Example |
|---|---|---|
| XPath | A path through the page’s structure, using elements and attributes. Any element can be written several ways, and most other locators can be expressed as an XPath | //input[@id="email"] |
| CSS Selector | A pattern combining tag, id, class, and attributes. The only locator that reaches inside a Shadow DOM | input#email or input.inputtext |
| Link Text and Partial Link Text | The visible text of a link, in full or in part | Forgot password?, or Forgot for partial |
| ID | The id attribute, which the W3C standard expects to be unique | email |
| Name | The name attribute, which is not strictly unique | userName |
| Class Name | The class attribute | inputtext |
| Tag Name | The tag itself, useful for pulling the content inside it | input |
ID is the first choice when an element has a unique one. Link text has to be unique on the page: when several links share it, such as repeated header and footer menus, the step acts on the first match.
Android and iOS applications support 5 types, in this order of preference:
- Accessibility ID: the first choice. The same value carries across Android and iOS, which makes a test easier to port, and it is the least likely to change when the source is restructured
- ID: the second choice. Every element is supposed to have a unique one
- XPATH: parses the source to reach the referred element
- Class Name: the value of the element’s Class Name attribute
- Name: the value of the element’s Name attribute
If you cannot find IDs for your elements, ask your developer to add them.
A unified mobile element stores an Android locator and an iOS locator under one name, and the types can differ per platform: XPath on Android with Accessibility ID on iOS works, as long as each value uniquely identifies the element on its platform.
Create an element manually
Section titled “Create an element manually”Manual creation suits dynamic applications, where an element’s attributes change between sessions and a recorded locator stops matching.
Go to Create Tests > Elements, click Create Element, fill in the fields, and click Create element. The element is saved to the elements list.
- Name: what you call the element in test steps
- Screen Name: the screen or page the element sits on, used to group elements
- Element Type: XPATH, ID, Name, Class Name, or Accessibility ID. These are the 5 types the dropdown offers
- Enter Value: the locator value for the type you selected
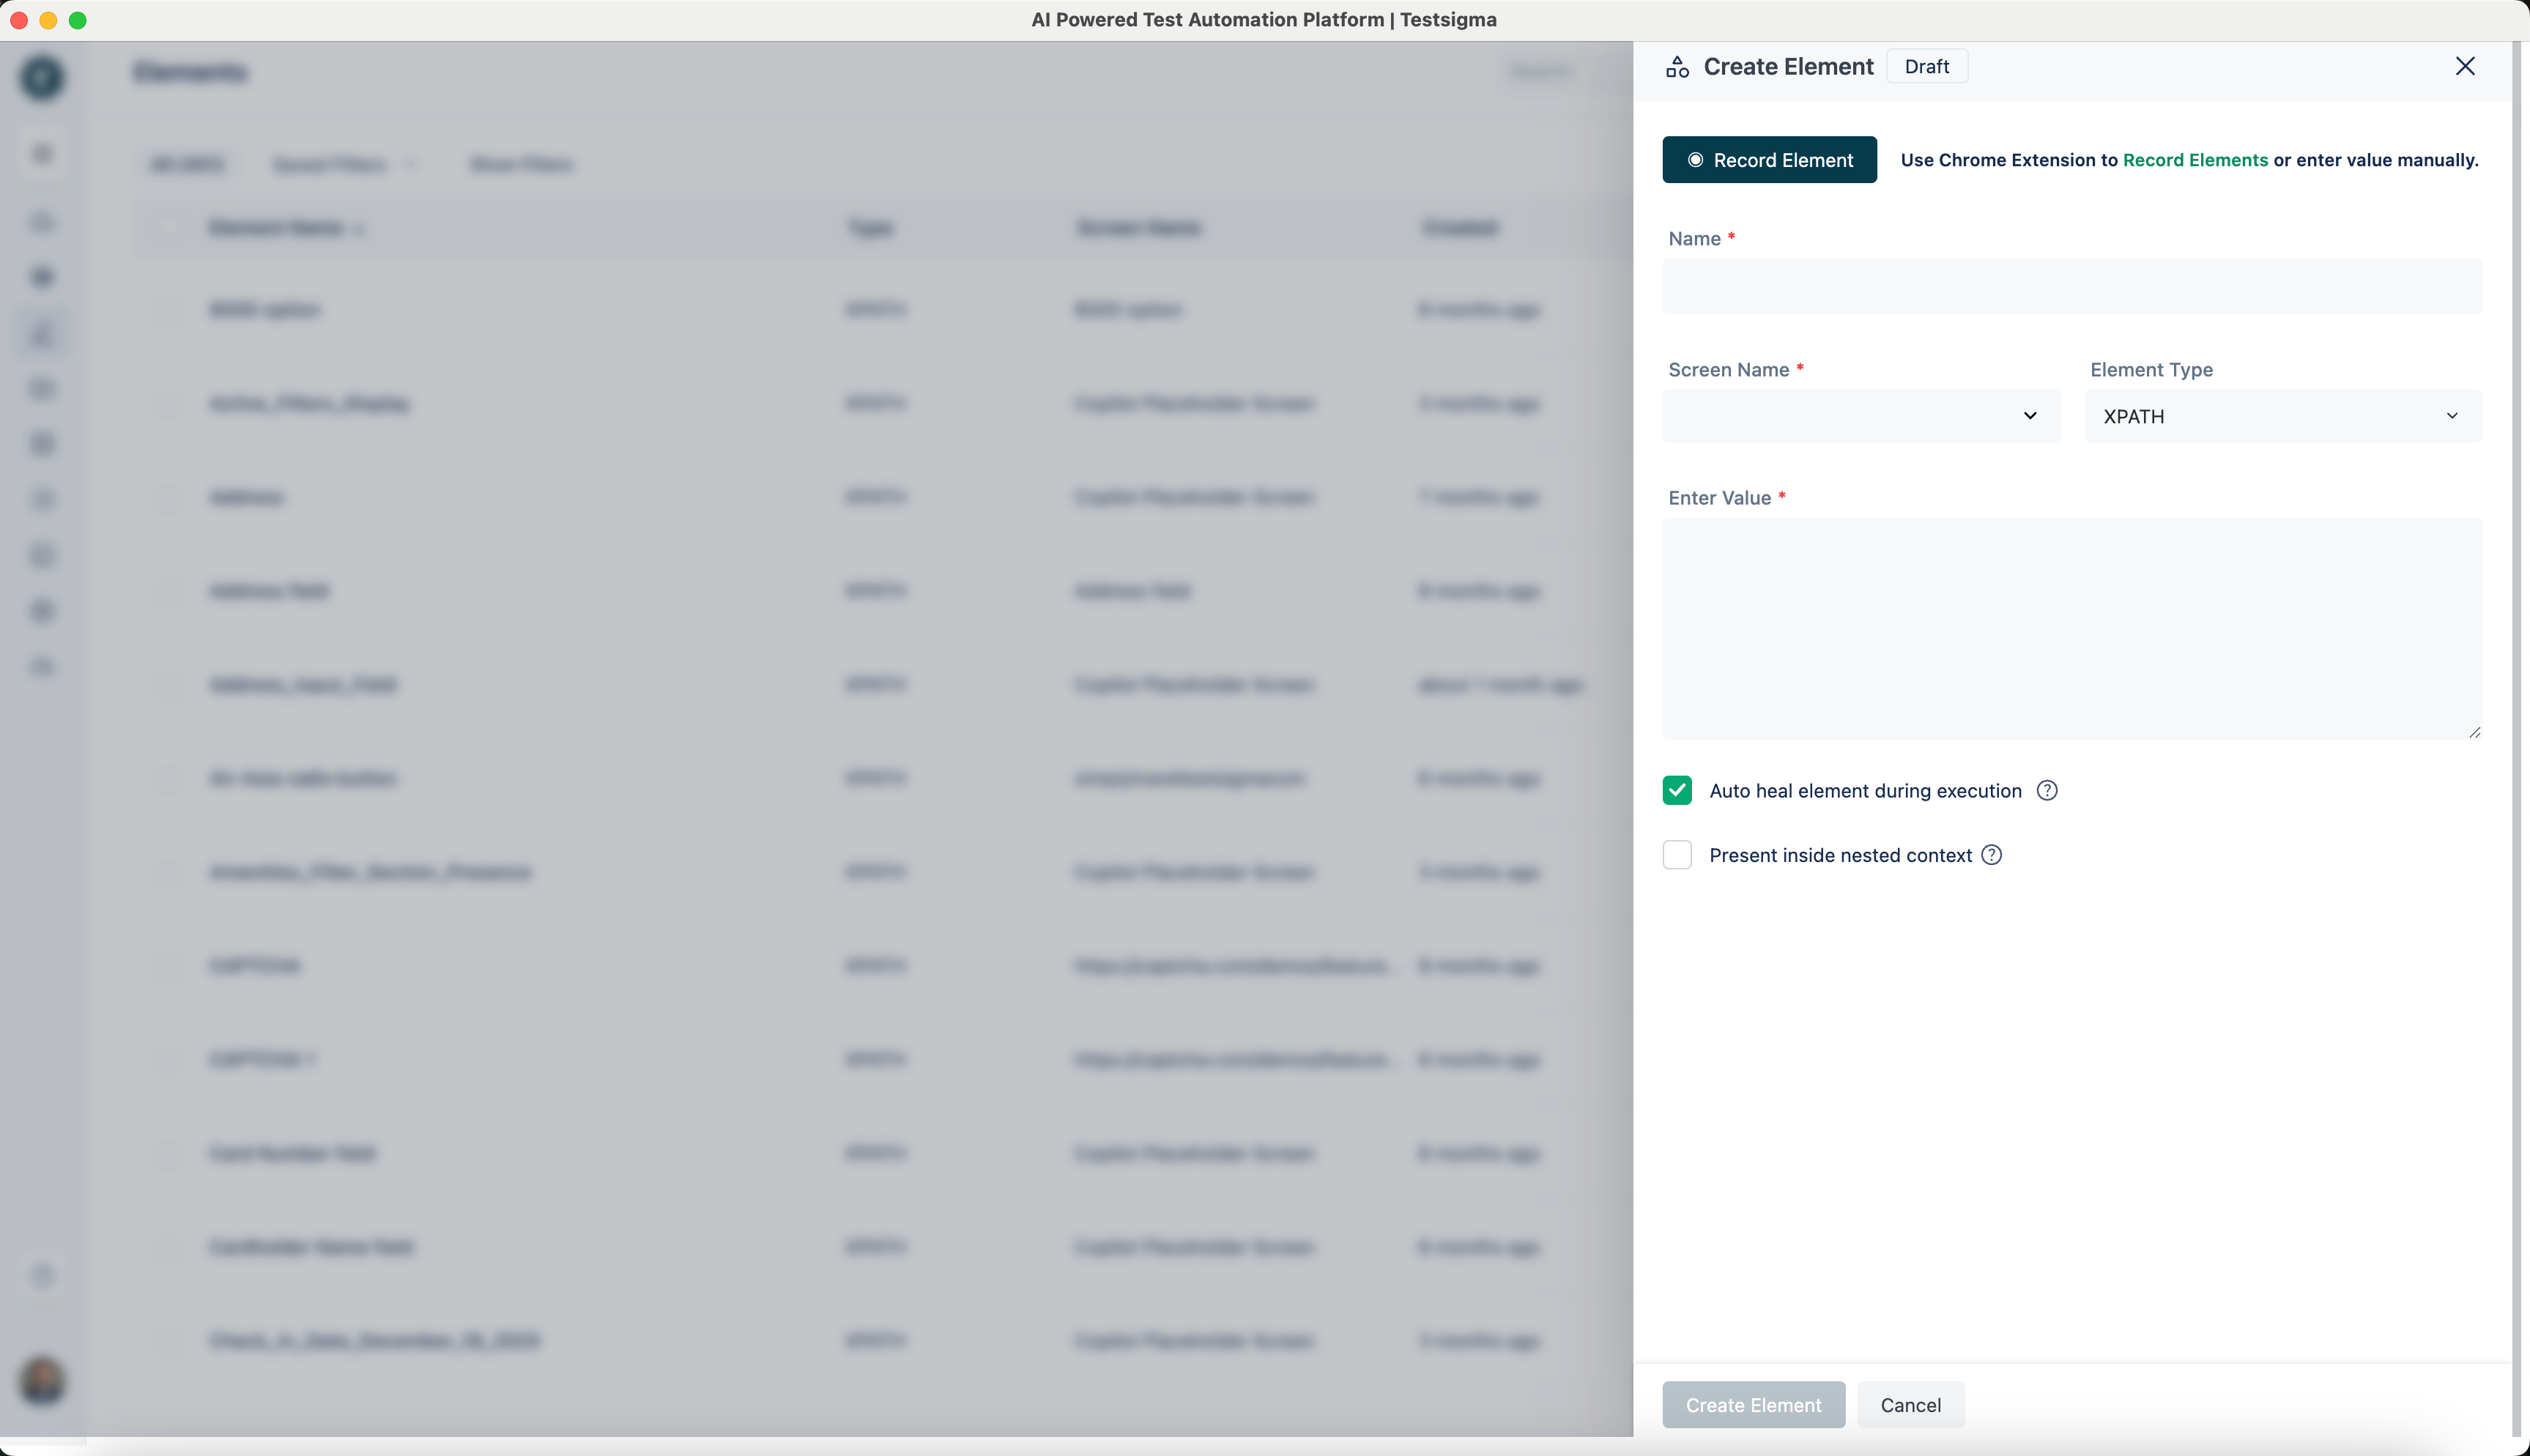
You can also create an element while writing a step. Open a test case, add a step that takes an element, hover over the element placeholder, and select Create Element from the dropdown.
Writing a locator by hand needs a working knowledge of XPath and CSS selectors.
Unified mobile elements
Section titled “Unified mobile elements”For a Unified Mobile application, the Create Element overlay carries an Android tab and an iOS tab. Select the Element Type and enter the value on each tab, for one platform or both: an element with a locator for only one platform is usable when a test case runs on that platform.
Leave Auto heal element during execution checked to let Testsigma recover this element’s locator if it changes, or clear it to opt out.
Each platform’s locator updates independently in the Update Element overlay: changing one never touches the other.
Read a locator off the page
Section titled “Read a locator off the page”Right-click the element in Chrome and select Inspect. The Elements panel opens with your element highlighted in blue, showing its HTML.
HTML elements follow this shape, where the tag name, the attribute names, and the values in quotes are all candidates for a locator:
<input type="submit" name="Submit" class="button" id="btnLogin" value="LOGIN">Here the tag name is input, and the attributes are type, name, class, id, and value. Build the element from a single attribute whose value is unique, from a link’s visible text, or from an XPath or CSS selector you write against that HTML. ID is the preferred single attribute.
Record elements
Section titled “Record elements”The recorder flow depends on the application type.
Recording needs the Testsigma Chrome extension and an application you can reach.
-
Go to Create Tests > Elements and click Record.
-
Enter the URL to capture from in the new tab. The recorder opens and waits.
-
Hover over an element until it highlights in green.
-
Click it and wait for it to appear in the recorder.
-
Repeat for every element you want.
-
Click Stop.
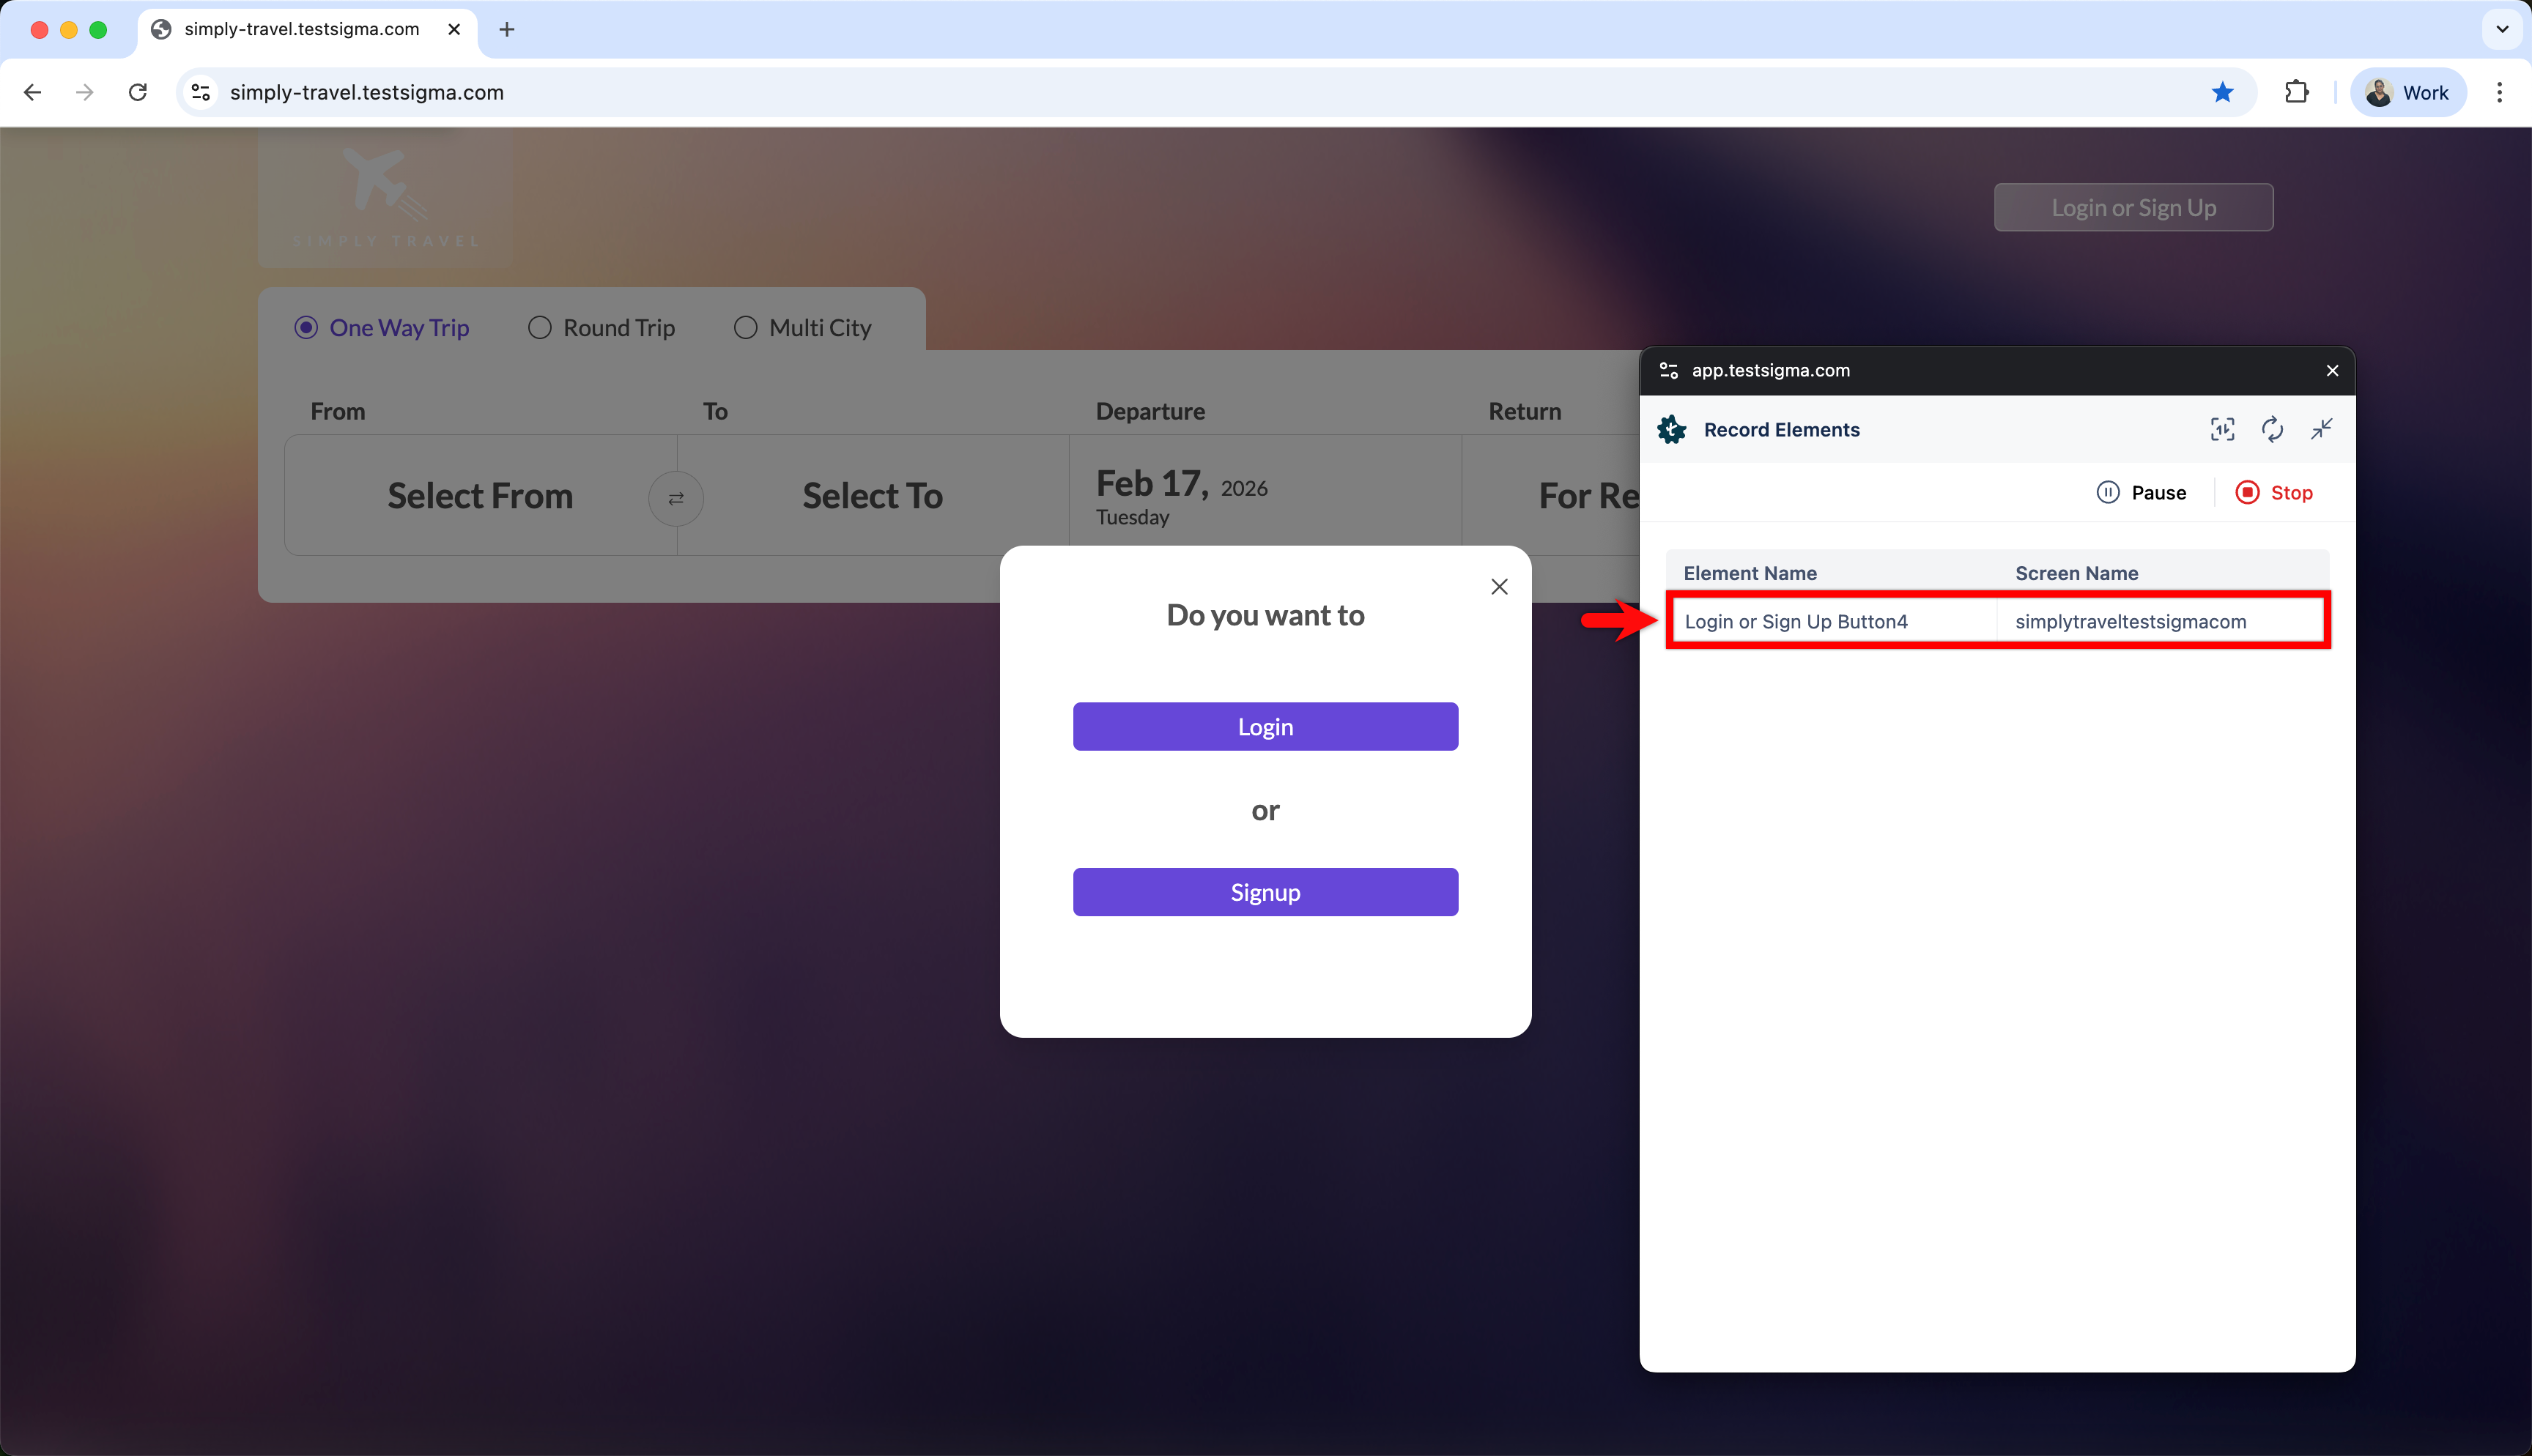
The recorder returns you to the Elements page with everything you captured.
-
Go to Create Tests > Elements and click Record.
-
In the Record Elements overlay, select the Test Lab and Test Machine, supply the app under Upload App Source, and click Record.
-
Wait for the app to load fully.
-
Click the element you want to capture.
-
Check the Name, Screen Name, Element Type, and Value in the Create Element section.
-
Click Create.
To change a captured element, hover over it and click the edit icon, change the details, and click Update.
Mobile web recording pairs the recorder with Chrome DevTools.
-
Go to Create Tests > Elements and click Record.
-
Enter the URL in the new window.
-
Select Companion Mode in the action bar.
-
Press F12 to open Chrome DevTools, and dock it to the right of the window.
-
Click >> and select Testsigma Recorder. The recorder opens inside DevTools.
-
Select the device dimension to record at.
-
Click the elements to capture them, and click Stop when you are done.
Recording captures one platform at a time. Recording the same element on the second platform adds that platform’s locator to the existing element instead of creating a duplicate.
-
Go to Create Tests > Elements and click Record.
-
In the Record Elements overlay, select the Test Machine (Android or iOS) to record on, along with the Test Lab and Upload App Source, and click Record. Upload an IPA when the test machine’s OS is iOS, or an APK when it is Android; the overlay does not show the app source uploaded for the other OS, even from earlier in the same session.
-
Wait for the app to load fully.
-
Click the element you want to capture.
-
In the Create Element panel, confirm the Name, Screen Name, Element Type, and Value for the platform you are recording on, and click Create.
-
Repeat for every element you want to capture, then click Stop Recording. You return to the Elements page with everything you captured.
To add the other platform’s locator to an element you already captured, open it from the elements list, click Edit, select the tab for the platform you have not captured yet, click Record, and record it the same way.
The desktop Element Recorder captures elements into a hierarchical tree with their properties. It needs a Desktop project and application, Testsigma Terminal installed on the Windows system, the WinTest Automation folder present in the Testsigma Agent directory, and the application open on your device.
-
Go to Create Tests > Elements and click Record.
-
In the Select application window, select the desktop application to record against. Only applications running on your device are listed; filter with the search field, or click the refresh icon after opening a new application.
-
Click Start recording. The Element Recorder opens on the Selective tab, with the application name in the recorder header.
-
Capture in either mode:
- Selective: hover over an element until it highlights in green, then click it. To capture elements that disappear on hover, such as menus and dropdowns, click Freeze (Ctrl+Shift+F) to hold the current UI state first.
- Batch: click the Batch tab to capture every element in the currently open window at once. Switching windows within the same application captures the new window and clears the previous one.
-
Select a captured element in the tree to check it in the Element properties panel (Name, Type, Class, AutomationId, FrameworkId), and click Locate to highlight it in the application window.
-
Click Save. The elements are listed under Create Tests > Elements.
Pause keeps the application open and retains what you recorded; Stop ends the session; Expand all, Collapse all, and the search field manage the tree, and the footer shows a running count such as 78 elements recorded. Keyboard shortcuts: Alt+R records, Alt+S stops, Ctrl+Shift+F freezes.
Salesforce elements are learned automatically when the metadata connection syncs (see Setup), so there is nothing to record or create for standard objects. Auto-learned elements cannot be edited.
Learned elements follow two naming conventions, and names must stay unique:
- Field names: ObjectName_FieldName, so Account_CreatedDate is the CreatedDate field on the Account object.
- Screen names: the object name as displayed on the UI screen, so a screen of account details is Account.
To browse the repository, open a test case, add a step, hover over the element and click Select Element; the Elements overlay lists everything learned. Clicking an element that follows the naming convention and selecting View/Edit Element in the Testsigma Debugger & Recorder shows an overlay confirming it is a standard, pre-learned Salesforce element.
For an element the sync did not learn, capture it live from a step:
-
Open the test case and click Copilot.
-
In the Debug & Record overlay, verify that Copilot is live, select a connection under Salesforce Metadata connection, and click Launch.
-
In the Testsigma Debugger & Recorder, click the element in the NLP step and select Create Element from the dropdown.
-
Click the UI element to capture. The recorder captures the element details.
-
Verify the element and click Create.
Set locator precedence
Section titled “Set locator precedence”Locator precedence tells the recorder which locator type to reach for first, across Link Text, Name, ID, CSS Selector, and XPath. The recorder works down your order and takes the first locator that is static and unique.
-
Go to Create Tests > Elements and click Record.
-
Click Locator precedence in the recorder.
-
Drag the handles into the order you want.
-
Click Save.

Verify an element while recording
Section titled “Verify an element while recording”Verify an element during recording rather than waiting for a run to fail on it.
-
Open a test case and click Record.
-
Hover over the element in a step, click it, and select Edit Element.
-
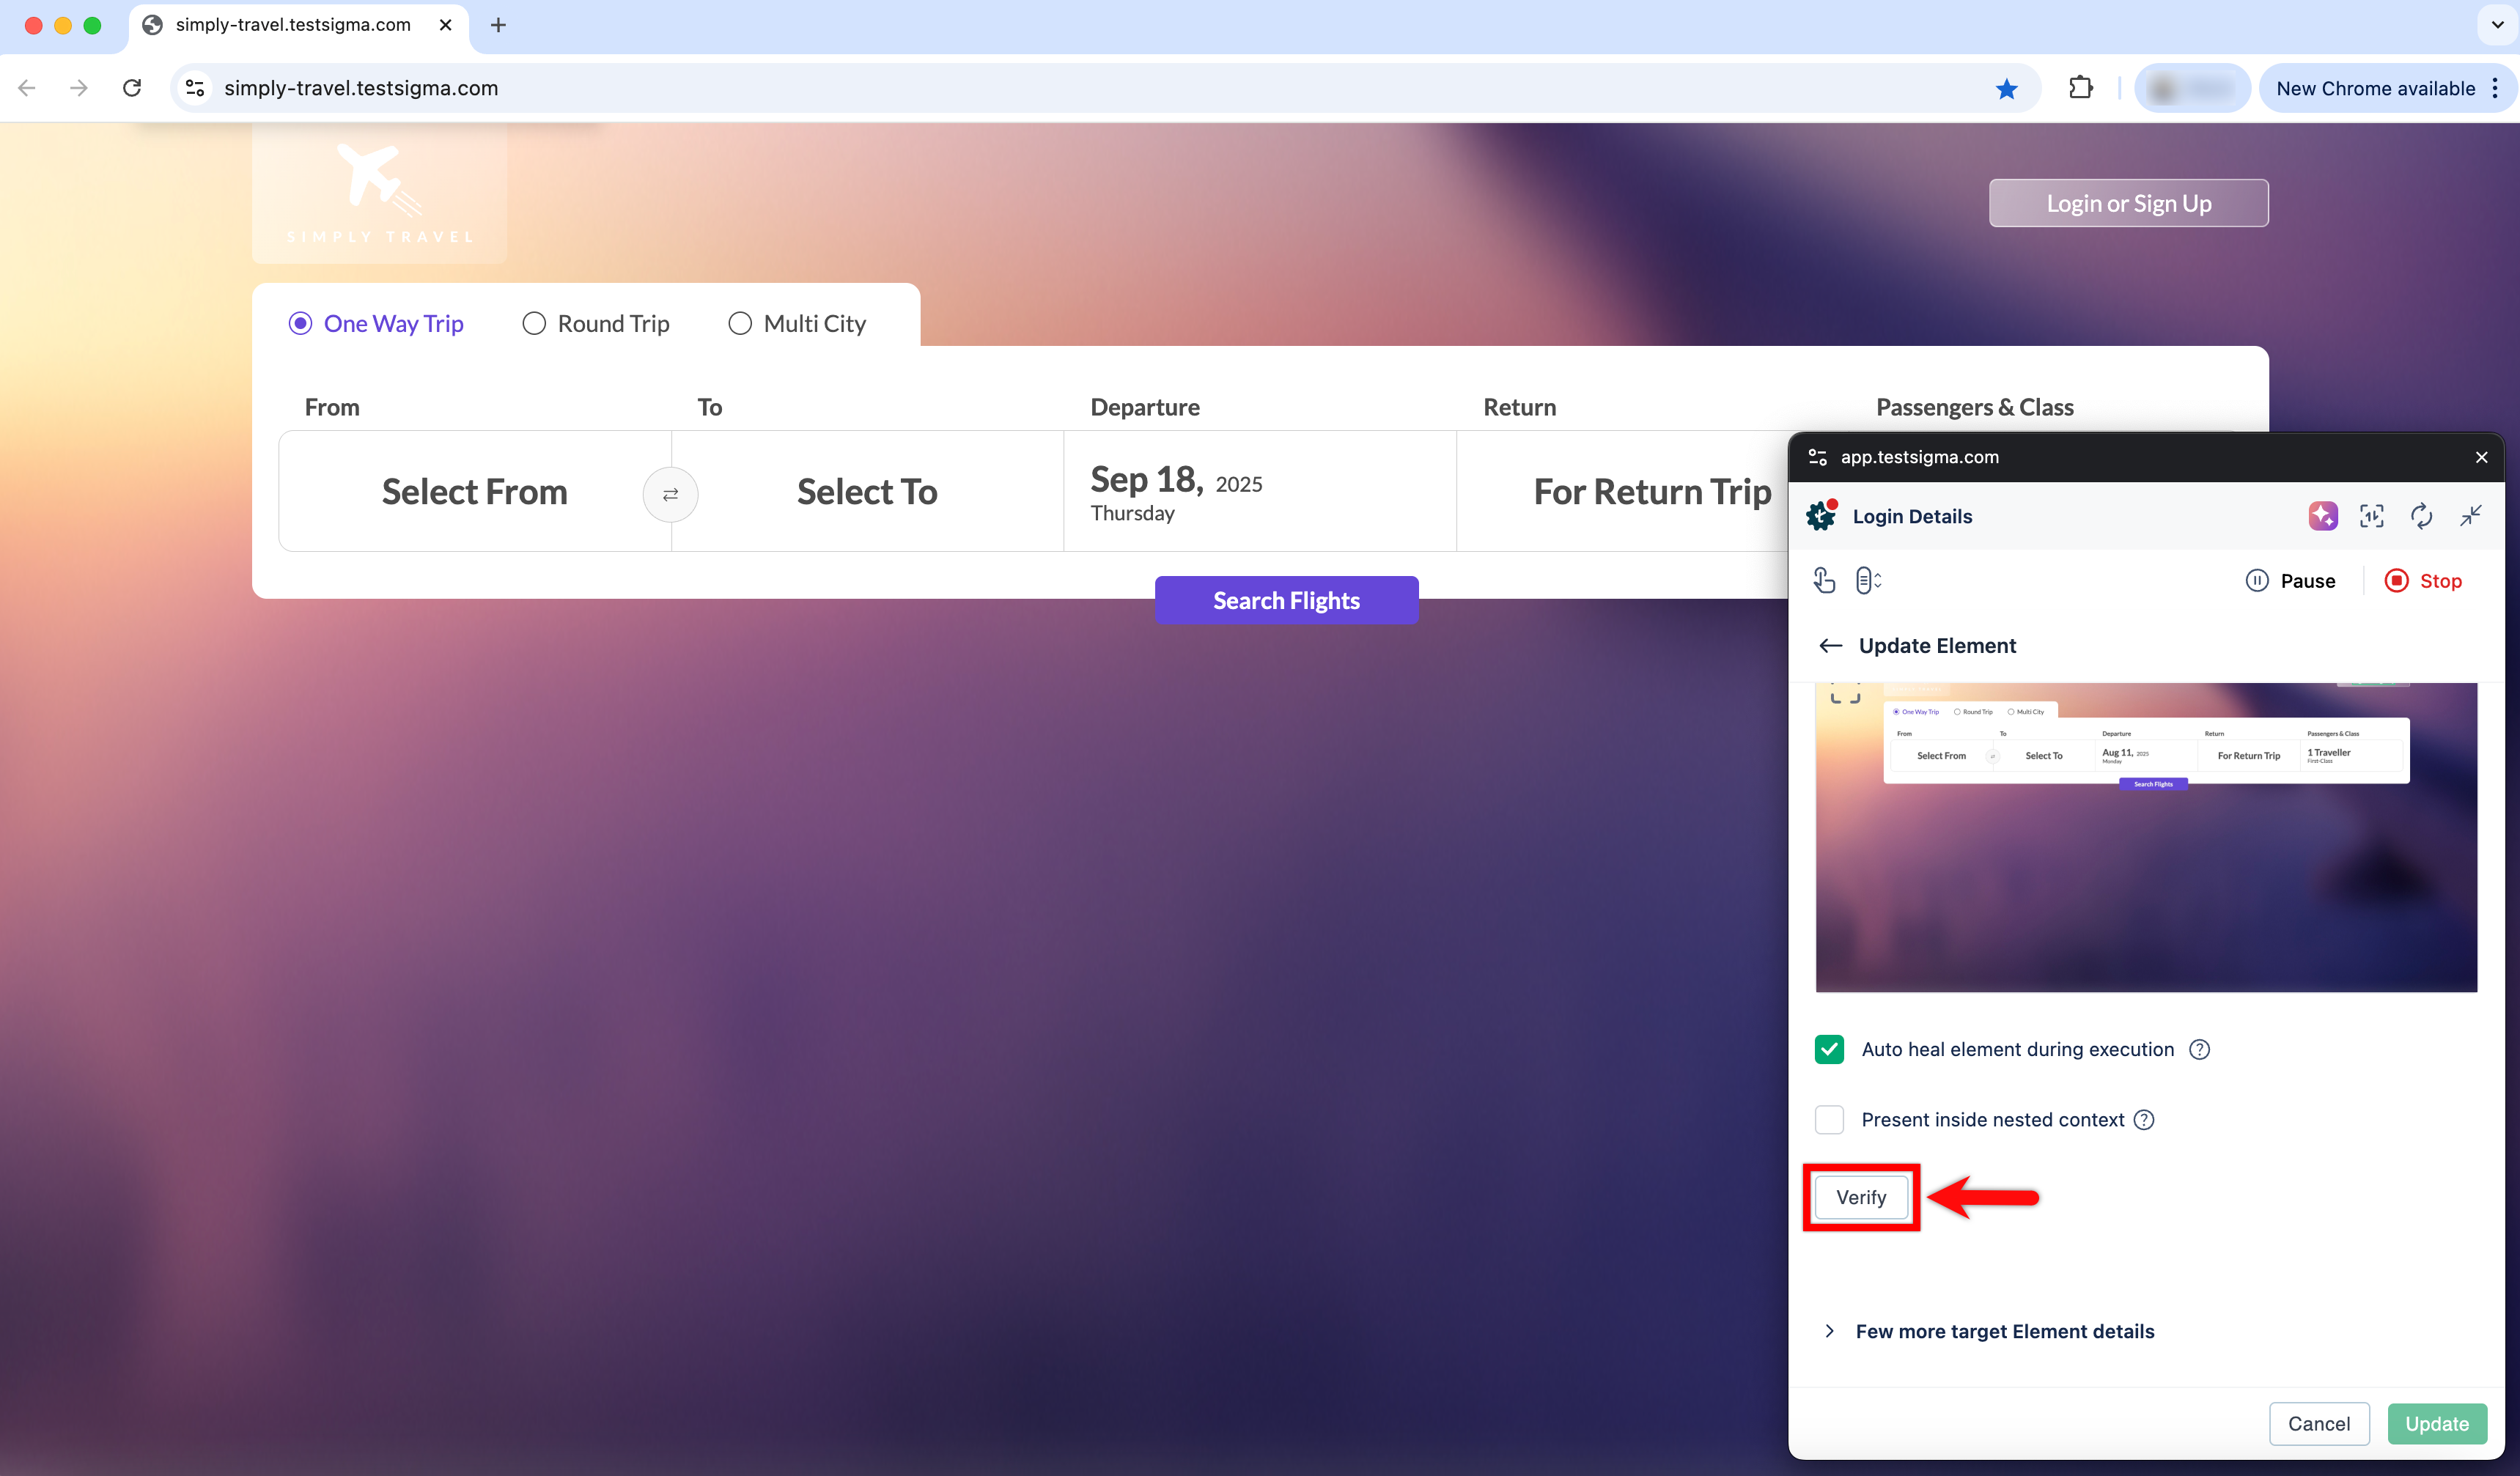
Click Verify in the Update Element screen. The element highlights on the page.
-
If the element does not exist, a message says so. Correct the locator and verify again until it highlights.
Update an element
Section titled “Update an element”Go to Create Tests > Elements, click the ellipsis icon (⋮) next to the element, and click Edit. Change the Name, Screen Name, Element Type, or Element Value in the Update Element overlay, and click Update. Clicking the element opens Element Details, where Edit opens the same overlay.
To update many elements at once, export them, change the fields you need, and import the file back. See Import and export elements.
Image-based elements
Section titled “Image-based elements”An image element identifies a control by pixel recognition instead of the DOM, which helps when dynamic behavior keeps breaking an XPath.
-
Go to Create Tests > Elements and click Create Element.
-
Click Record Element to open the recorder.
-
Enter the Name and Screen Name, and select Image as the Element Type.
-
Click Capture to take the element from the screen, or Upload to supply a screenshot.
-
Select the part of the screen that holds the element, and click Capture.
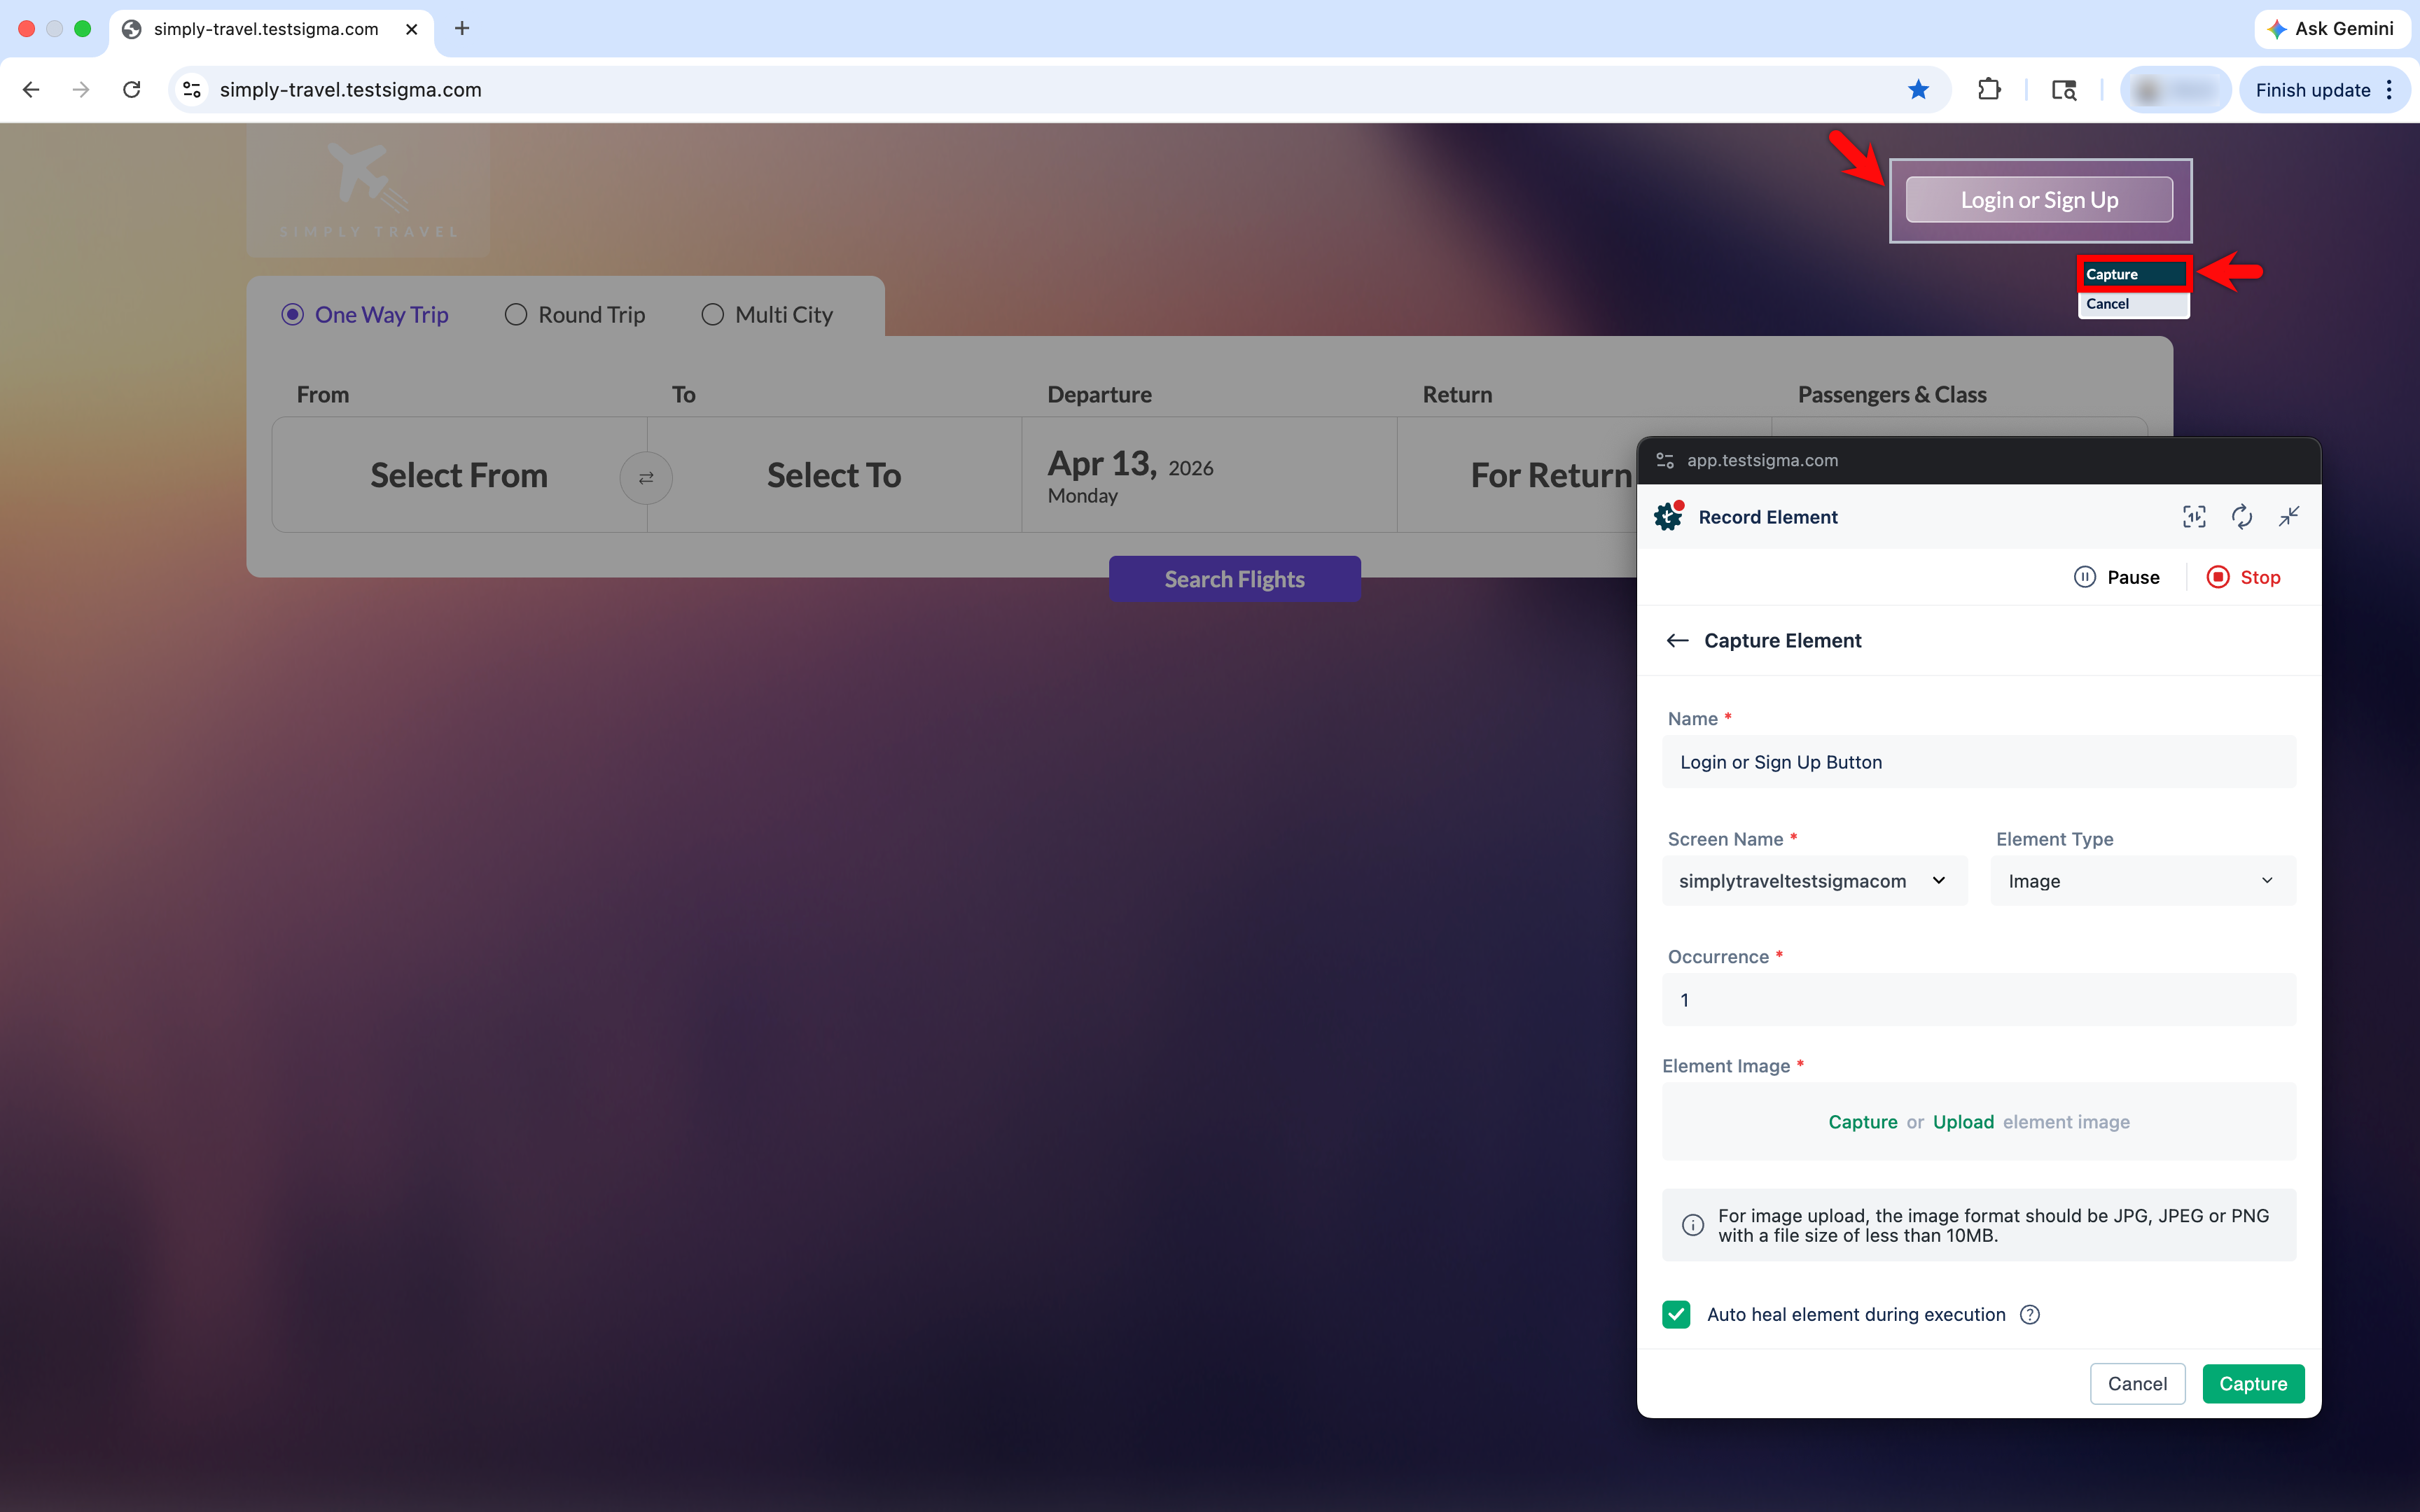
Crop the capture tight to the control, with even padding on all sides. A capture that includes surrounding background, or cuts the control off, matches less reliably.
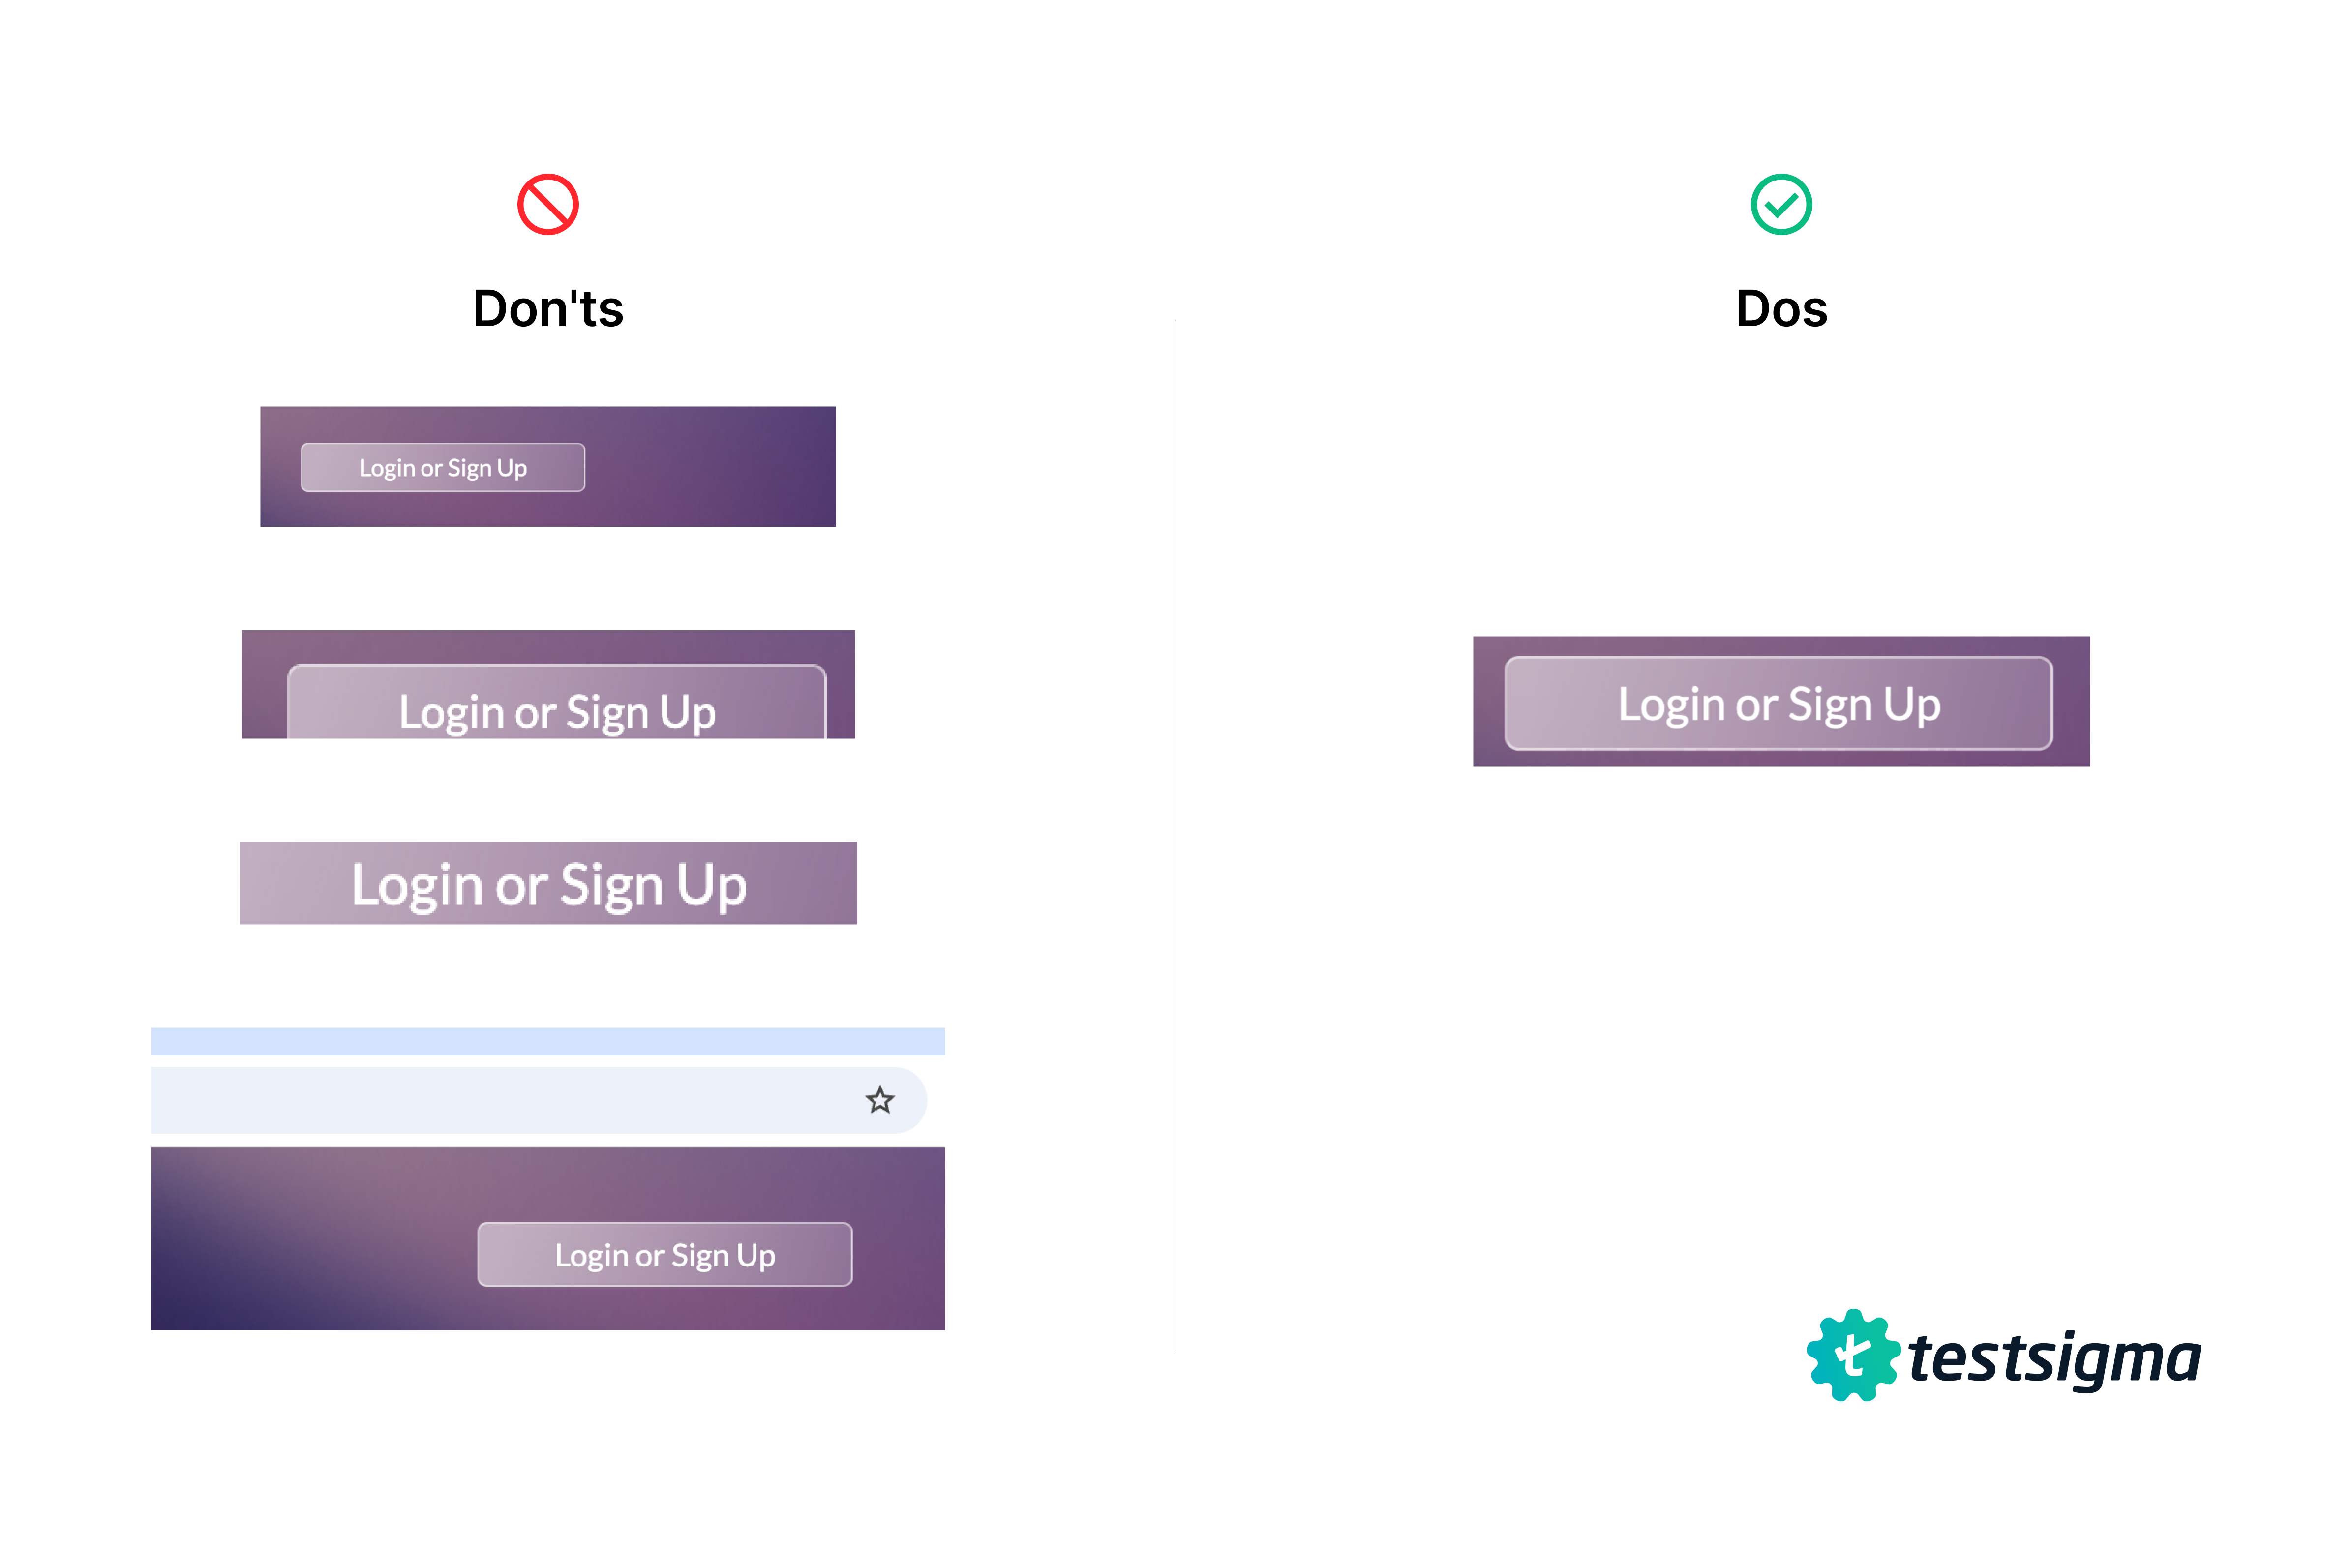
The element is saved to the elements list. You can also do this from a test case: click Record, create a step that takes an element, click the element, and select Create Element.
Shadow DOM elements
Section titled “Shadow DOM elements”A Shadow DOM attaches a hidden DOM tree to an element, keeping its styles and markup separate from the main page. Those elements do not exist in the main DOM, so ordinary locators cannot reach them. Only a CSS selector can.
To check whether a page uses one, right-click the page, select Inspect, expand the <body> tag on the Elements tab, and look for #shadow-root.
| Term | What it is |
|---|---|
| Shadow host | The HTML element the shadow DOM is attached to |
| Shadow tree | The hidden tree of DOM elements inside the shadow DOM |
| Shadow boundary | The line separating the shadow DOM from the main DOM |
| Shadow root | The root node of the hidden tree |
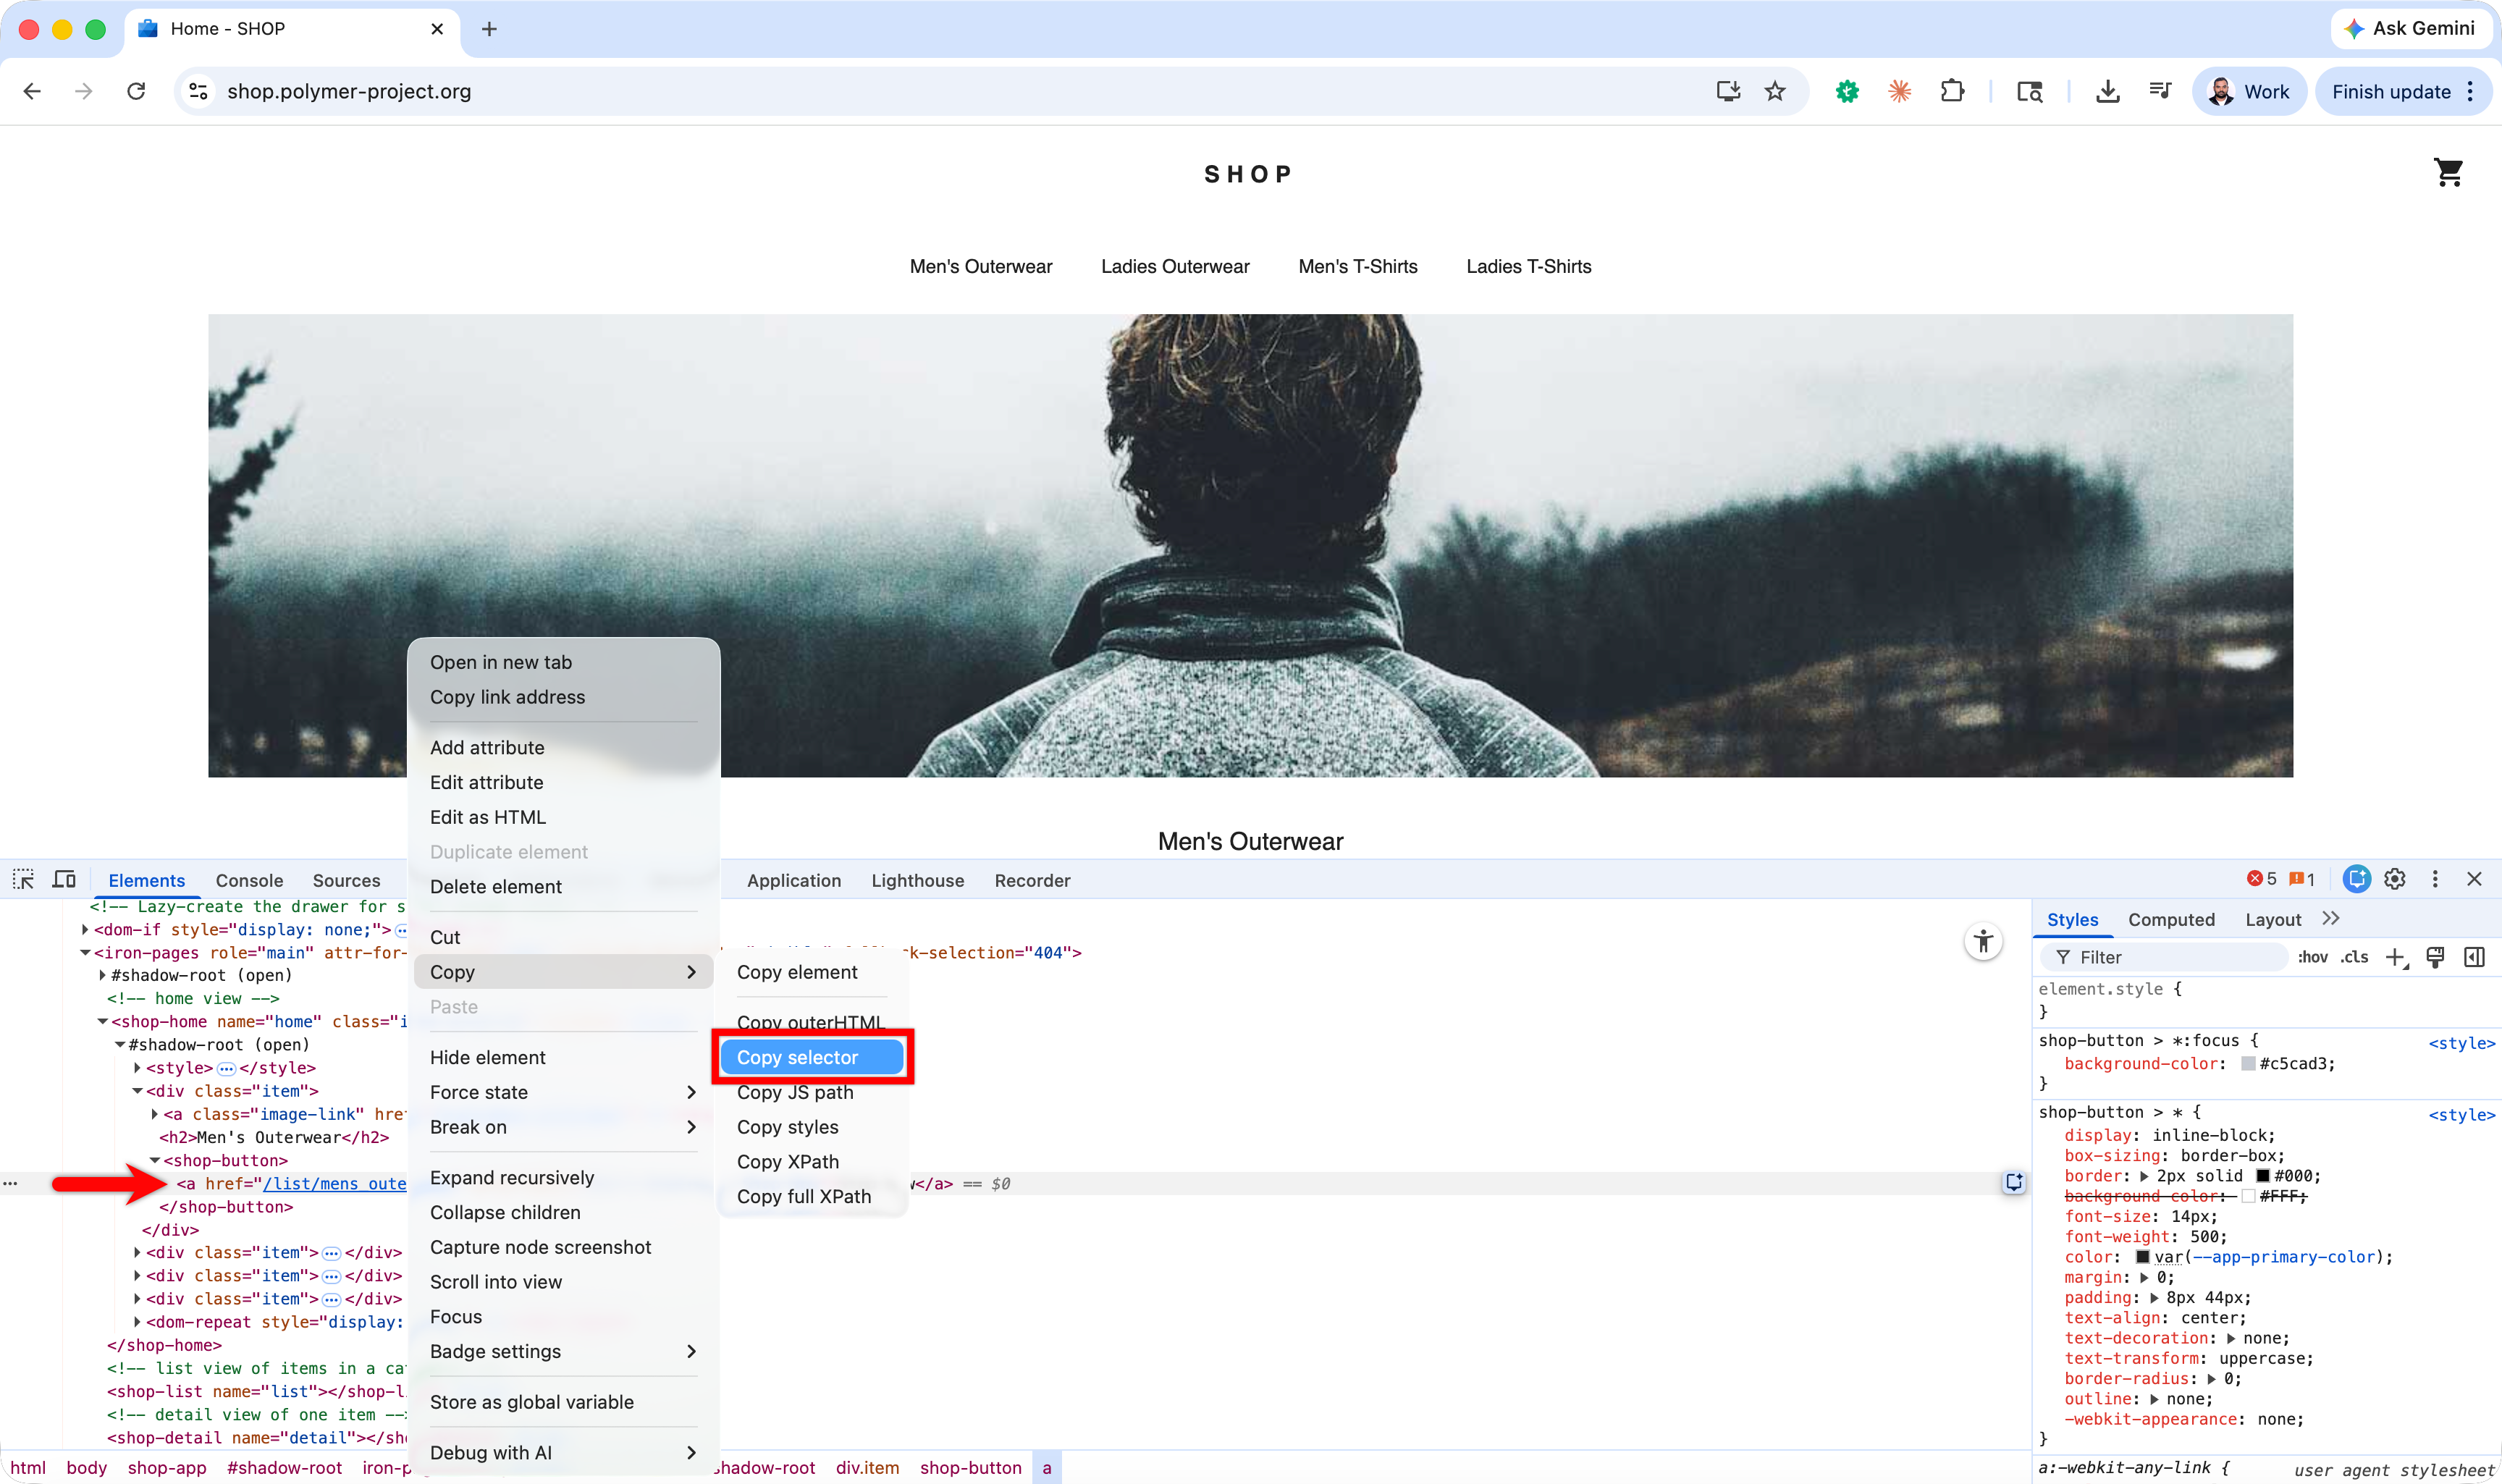
Capture one from Create Tests > Elements: click Create Element, click Record Element in the overlay, open the page in a new tab, click the element, and click Capture.
iframe elements
Section titled “iframe elements”The recorder captures the iframe details with the element, so a test case works without the switch to the frame NLP.
If you do use switch to the frame, edit every iframe element in that test case and clear present inside nested content.
Dynamic locators
Section titled “Dynamic locators”When part of a locator changes between runs, put the changing part in test data and reference it from the locator. Testsigma accepts parameterized XPath and CSS selectors, taking the variable from a test data profile parameter, from environment data, or from a runtime variable. This is what makes a data-driven test work against elements whose attributes shift.
Reference an environment parameter in the locator with *|parameter_name|. If the username on screen is dev-admin on Dev and qa-admin on QA, store it as an environment parameter and write the locator as //button[text()='*|username|']. Testsigma substitutes the environment’s value at runtime.
For a value that only exists mid-run, store it into a runtime variable with an NLP first, then reference that variable in the locator. Recording a dynamic element is unreliable, so create these elements manually.
For an element in a table, copy a working XPath first: right-click the element, select Inspect, then right-click the highlighted HTML and select Copy > Copy XPath. Generalize the row or column position from there.
A date widget marks today’s date with its own class, and the class differs by date library but follows a pattern. In a JQuery UI date picker, today carries ui-state-highlight, so today, tomorrow, and any later day are:
//td/a[@class='ui-state-default ui-state-highlight']//td/a[@class='ui-state-default ui-state-highlight']/following::td[1]//td/a[@class='ui-state-default ui-state-highlight']/following::td[7]An overlay that closes the moment you inspect it can be frozen. Open DevTools, go to the Sources tab, bring the application to the state you need, and click Pause script execution. When clicking the page closes the overlay first, trigger the click from the console on a delay instead:
element1 = document.querySelector("#gbwa");setTimeout(function() { element1.click();}, 3000);Disabling JavaScript temporarily also works, but not reliably.
Flutter applications
Section titled “Flutter applications”Mobile automation on Flutter reads the app’s semantics tree, not its widget tree. An element is identifiable only when its widget carries a semantic label.
Most built-in Flutter widgets set semantic properties already. Custom widgets often do not, and semantics for several widgets can be merged into one, which hides the individual elements. When an element cannot be identified, the app developer has to set the semantic label on that widget.
Find and organize elements
Section titled “Find and organize elements”Search by name from the search bar on the Elements List page.
Sort by Title, Created Date, or Updated Date.
To filter, click Show Filters > Add Filter and pick from Element Value, Name, Linked to Test Case, Labels, Screen Name, Element Type, Created By, Created Date, and Updated Date, along with any custom field. Filters stack. Click Reset or All to clear them.
To keep a filter, click Save Filter > As New, name it in Config Name, and select Public to share it with everyone who can access the project. Saved filters sit under Saved Filters, split into Custom and Predefined, where you can edit or delete each one.
Click View in an element’s affected list to see the test cases, step groups, test suites, and test plans a change to it would reach.
Larger teams can turn on review management for elements, so an element is reviewed before it joins a regression suite, the same way a test case is.
Import and export elements
Section titled “Import and export elements”Import and export move elements between application versions, in the same project or a different one. They also handle bulk edits: export the elements, change them in the file, and import the file back.
To import, go to Create Tests > Elements, click Import, click Browse File and select your file, choose Overwrite or Ignore for duplicates, then click Import.
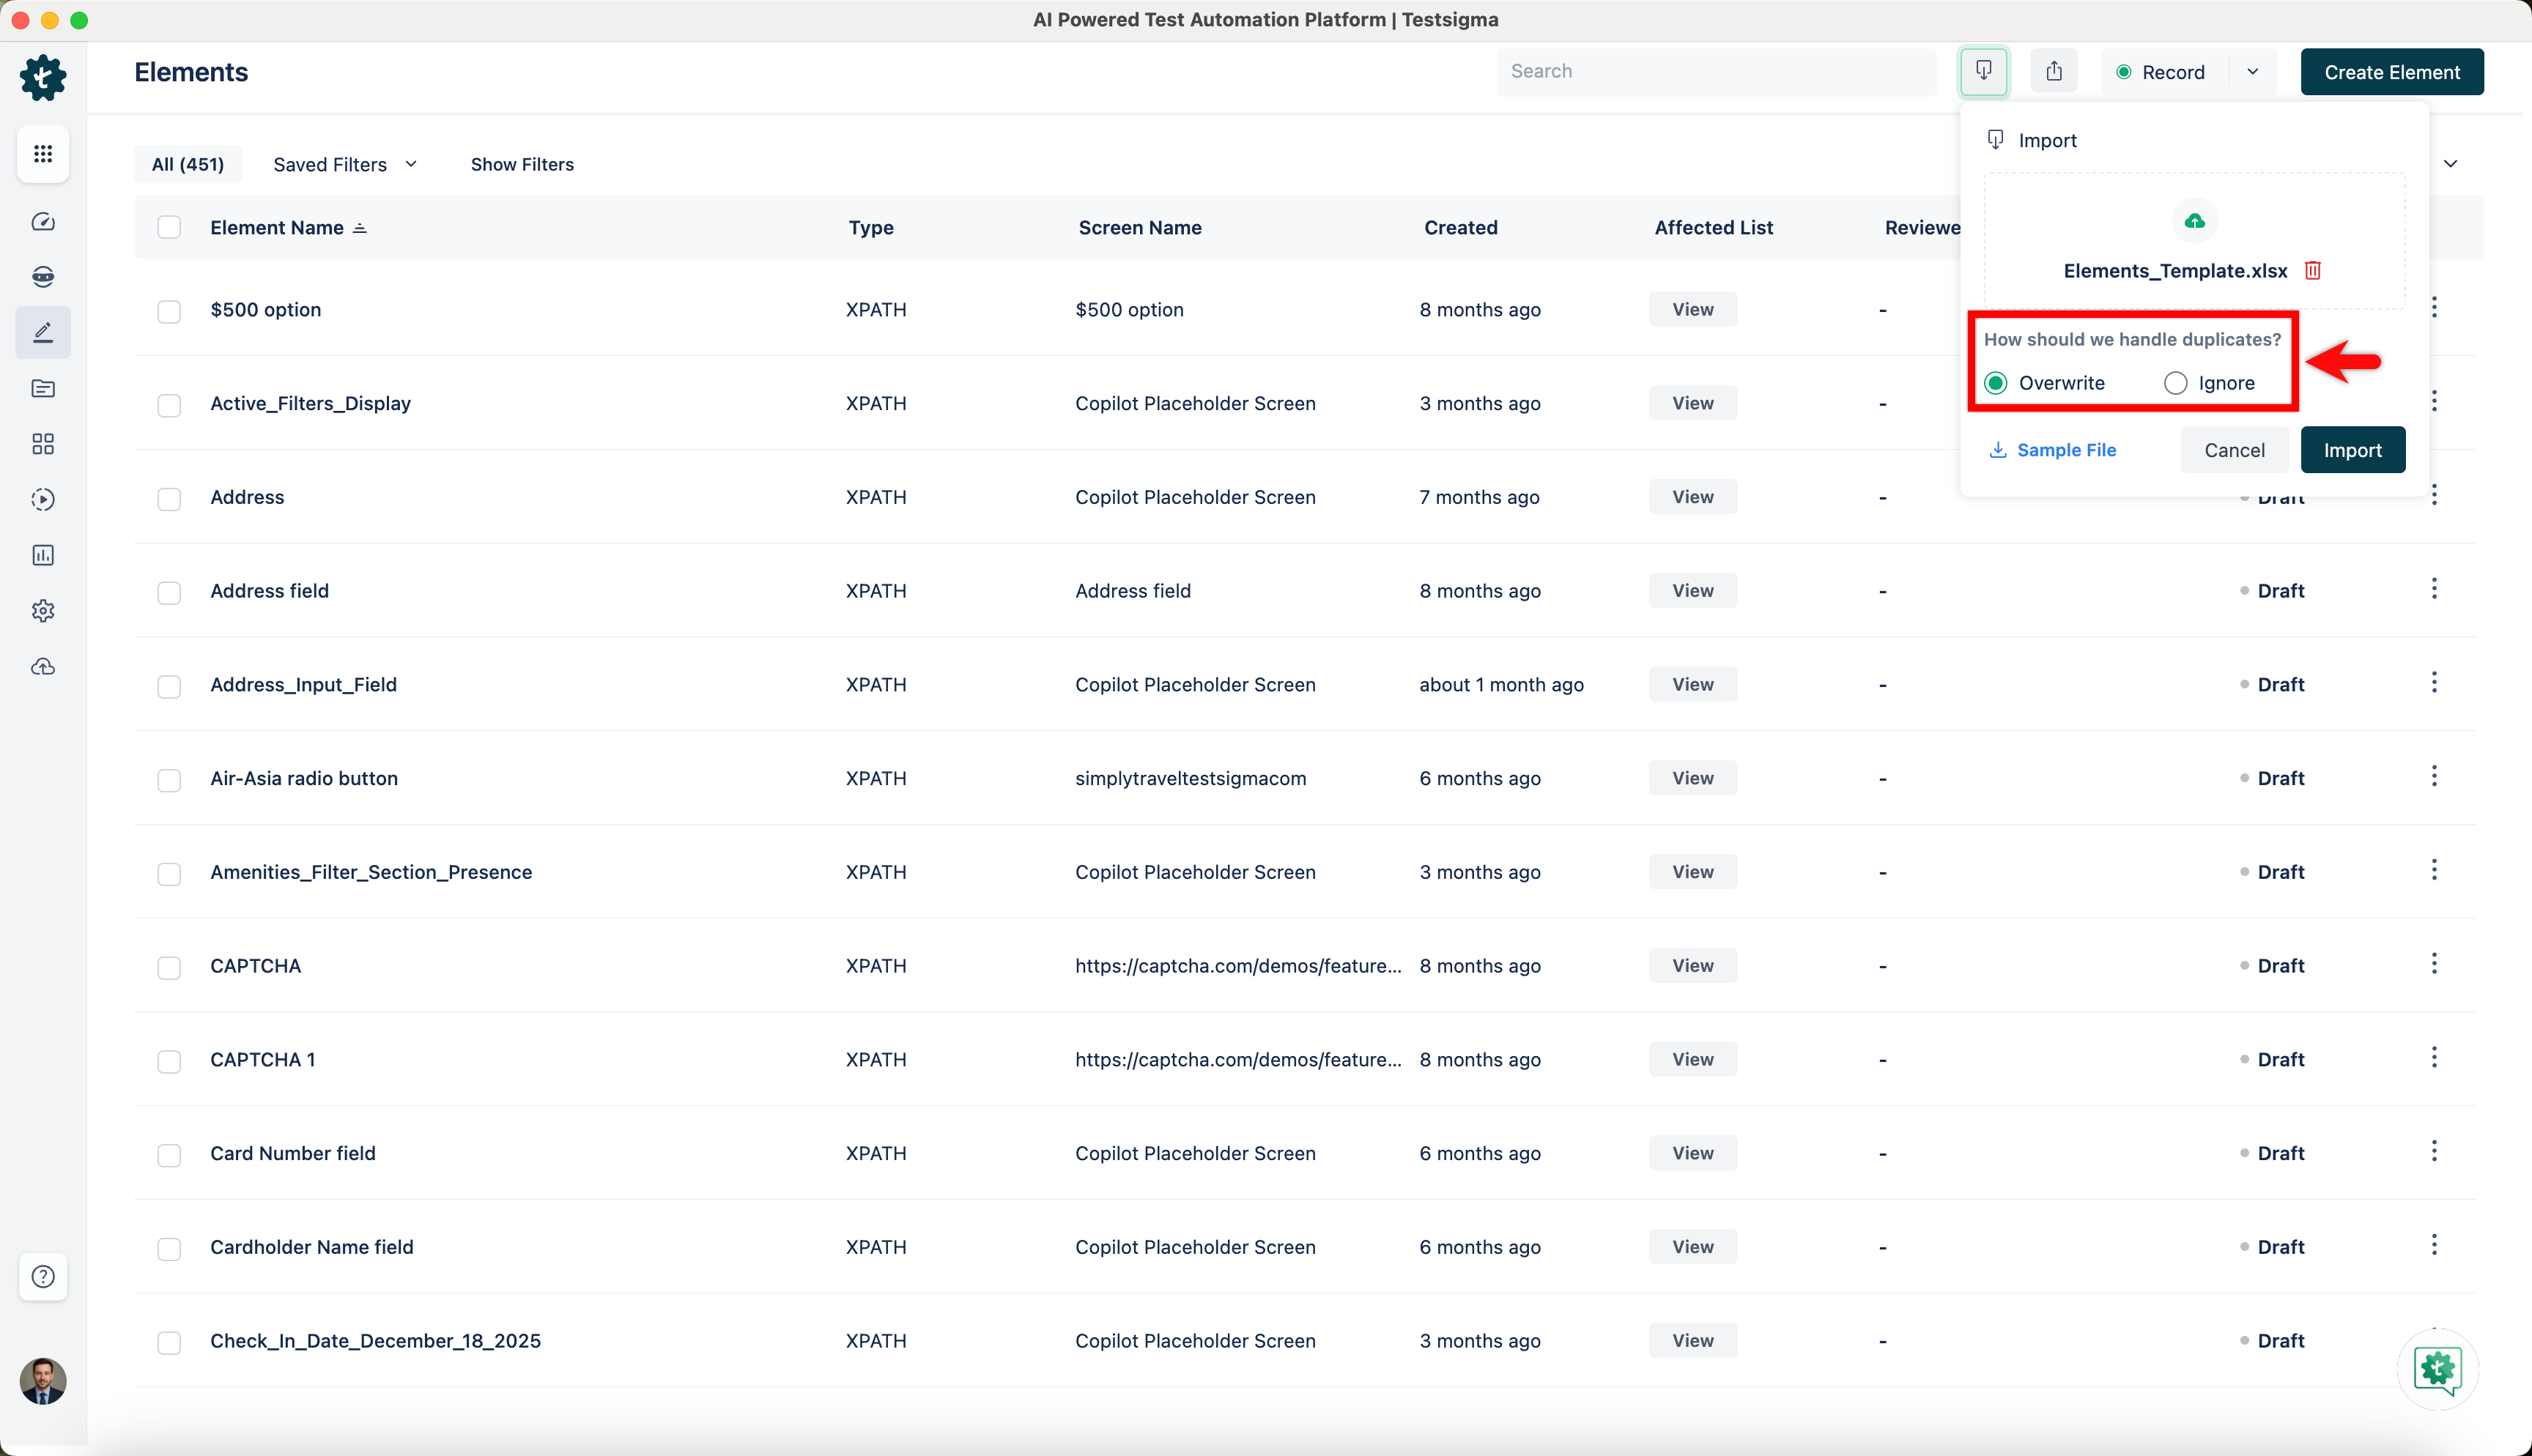
To export, go to Create Tests > Elements and click Export.
Both run in the background, and Testsigma emails you when they finish.
| Column | What it holds |
|---|---|
| UUID | The element’s unique identifier, present only on exported elements |
| Name / fieldName | The element’s name |
| Screen Name / screenName | The screen the element sits on, used for grouping |
| Locator Type / locatorType | The type of locator |
| Value / fieldDefintion | The locator value for that type |
| Created Using / createType | How the element was created |
A development team can use the same route to hand over locators for UAT, adding custom attributes to the application to make it more testable and supplying them as a spreadsheet.
Was this page helpful?
Thanks for the feedback.