

Create a Windows test case
Testsigma tests Windows desktop applications through 2 project types. Windows (Lite) captures elements with the Test Recorder and suits applications built on the modern Windows frameworks. Windows (Advanced) uses the Element Recorder or a UFT One object repository, and reaches Oracle, Java, SAP, Insight, terminal emulators, and legacy software that Lite cannot.
The project type is set when you create the application and cannot be changed afterwards, so choose before you start.
Technologies supported
Section titled “Technologies supported”| Project type | Covers |
|---|---|
| Windows (Lite) | Universal Windows Platform, Windows Forms, Windows Presentation Foundation, Classic Win32 |
| Windows (Advanced) | Oracle, Java, SAP GUI, SAP UI5, Insight, Terminal Emulator, UIA-based applications, legacy Windows software |
Before you start
Section titled “Before you start”Windows (Lite) needs the Testsigma Agent set up and Developer Mode enabled on the Windows machine.
Windows (Advanced) needs Testsigma Terminal installed, the WinTest Automation folder in the Testsigma Agent directory, and Developer Mode enabled.
Capture elements and create test cases
Section titled “Capture elements and create test cases”The flow is the same throughout: capture the elements, then build steps against them. What changes is how the elements arrive. Running the test case is the same for every route, and is covered below.
Capture the elements
Section titled “Capture the elements”A Lite test case is built from elements captured beforehand, so this comes first. The Test Recorder takes them one at a time from the running application.
- Go to Create Tests > Elements and click Record.
- In the Record Elements overlay, select Local Test Machine, enter the App path, and click Record.
- Wait for the application to load fully.
- Click the element you want to capture.
- Check the Name, Screen Name, Element Type, and Value in the Create Element section.
- Click Create.
- Repeat for every element you need, then stop the recorder to close the session.
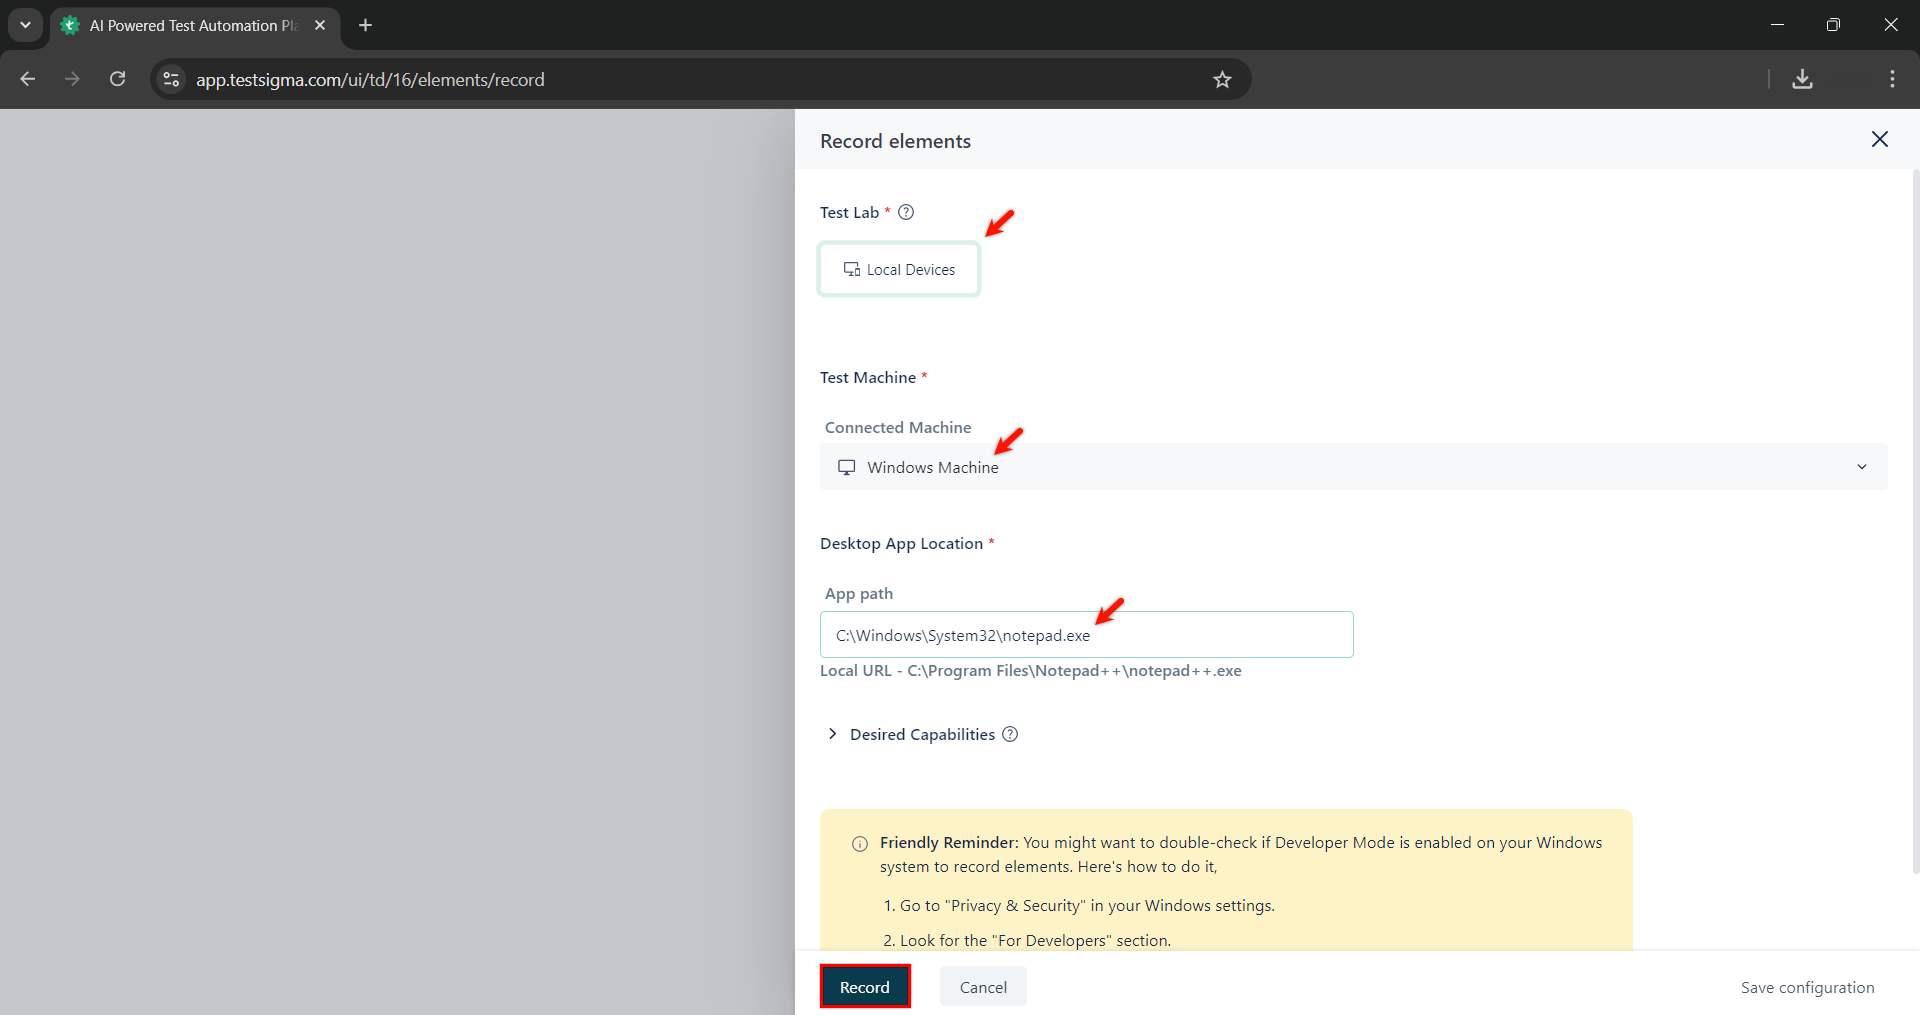
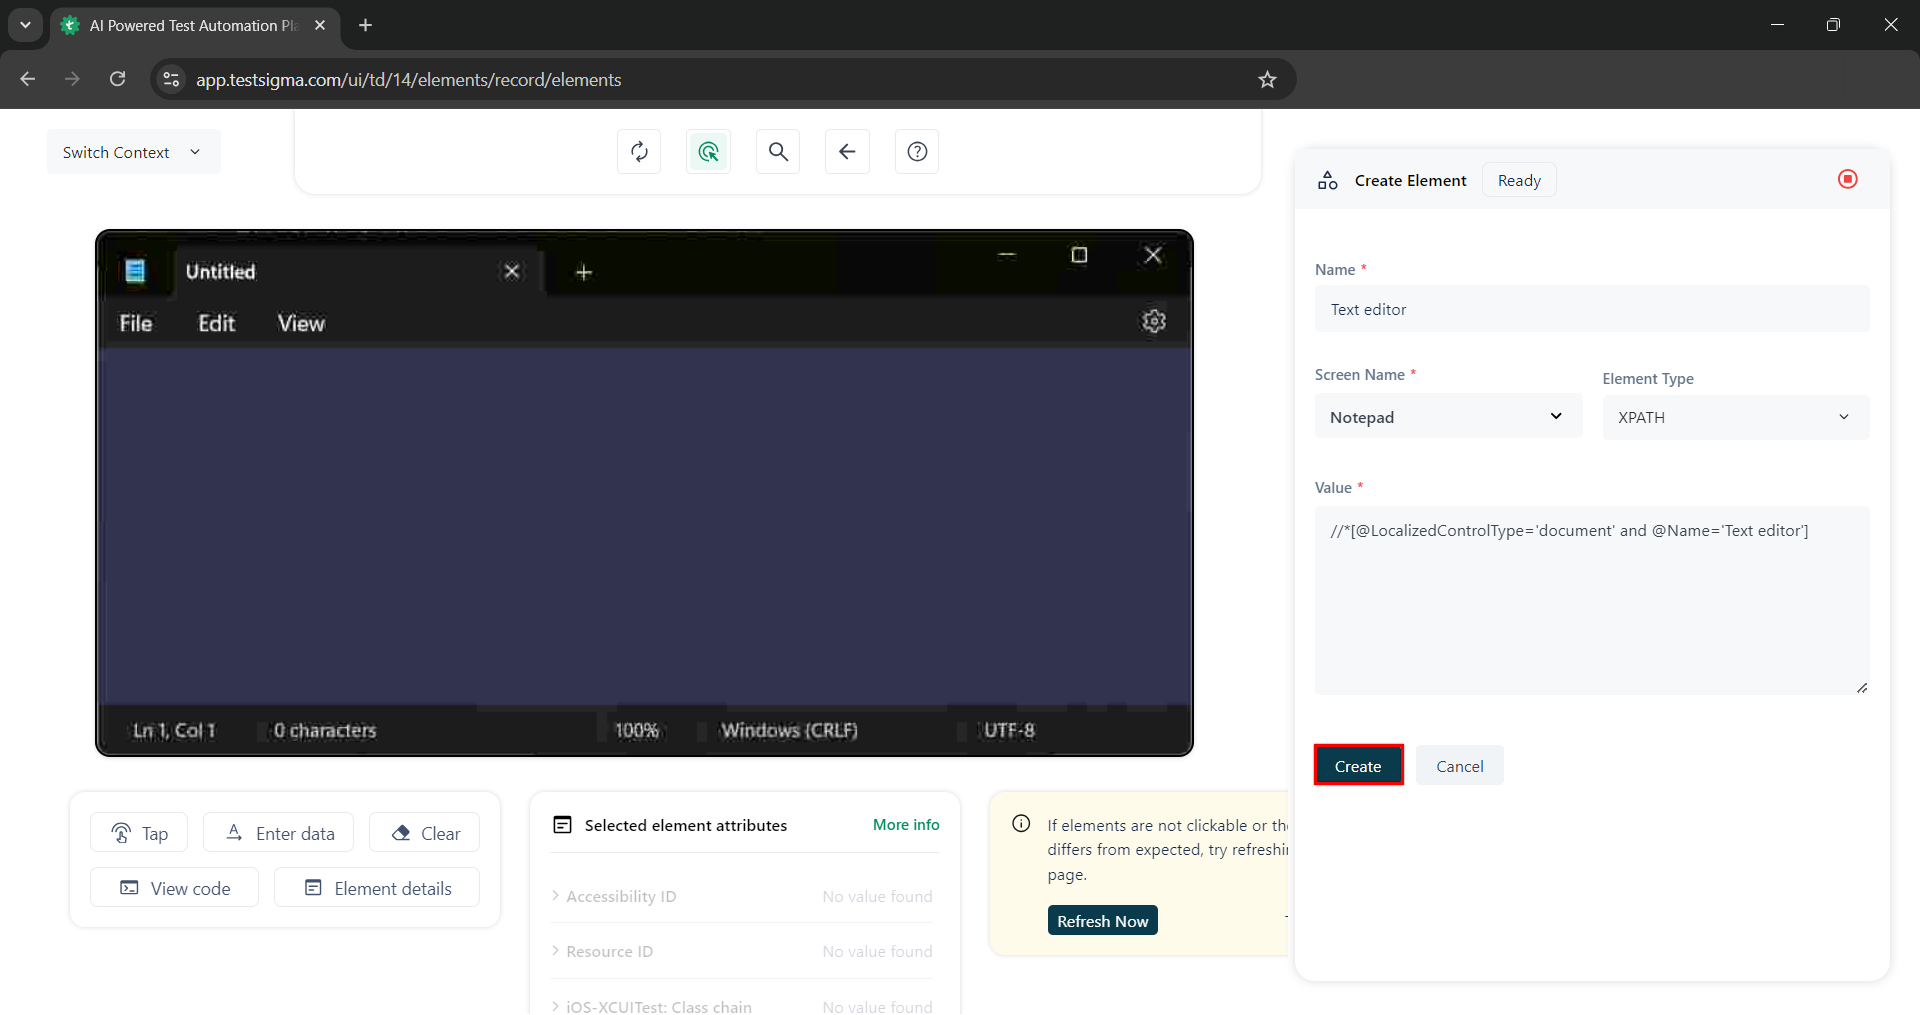
The captured elements appear under Create Tests > Elements and can be reused across test cases.
Create the test case
Section titled “Create the test case”- Go to Create Tests > Test Cases and click Create Test Case.
- Build the steps on the Test Case Details page from the built-in NLPs and the elements you captured.
Capture the elements
Section titled “Capture the elements”The Element Recorder has 2 modes. Selective captures elements one at a time. Batch captures every element in the current window at once. You switch between them inside the recorder without relaunching it.
The application you are recording has to be open on the device.
- Go to Create Tests > Elements and click Record.
- Select the application in the Select application window.
- Click Start recording.
Selective mode
The recorder opens on the Selective tab with the application name in its header.
- Hover over an element in the application until it highlights in green, then click it to capture it.
- Select a captured element in the tree to see its details in Element properties.
- Click Locate to highlight the selected element in the application window.
- Click Save.
Batch mode
- Click the Batch tab. The recorder captures every element in the application’s current window and lists them in a hierarchical tree.
- Select an element in the tree to see its details in Element properties.
- Click Locate to highlight the selected element in the application window.
- Click Save.
Batch records the window’s full control tree, including containers such as the title bar and tab groups, so narrow the tree with the search field before saving.
The saved elements appear under Create Tests > Elements.
Recorder controls
Section titled “Recorder controls”| Control | What it does |
|---|---|
| Selective and Batch | Switches capture mode without relaunching the recorder |
| Pause | Pauses capture. The application stays open and captured elements are kept |
| Stop | Ends the session |
| Freeze | Holds the current UI state, so a transient element such as a menu can be captured |
| Expand all and Collapse all | Expands or collapses the element hierarchy |
| Search | Filters the tree by name |
| Element properties | Shows the selected element’s Name, Type, Class, AutomationId, and FrameworkId |
| Locate | Highlights the selected element in the application |
| Save | Saves the captured elements to the Elements list |
The footer keeps a running count, such as 78 elements recorded.
| Shortcut | Action |
|---|---|
| Alt+R | Record |
| Alt+S | Stop |
| Ctrl+Shift+F | Freeze |
Create the test case
Section titled “Create the test case”Recording captures each interaction as a test step and creates the elements it touches along the way, so you do not have to capture them first.
- Go to Create Tests > Test Cases and open the test case to record into.
- Click Record in the action panel.
- Select the application in the Select application window, and click Start recording.
The Testsigma Recorder opens, the application comes to the foreground, and Open application is added as the first step with the application path.
- Perform the actions you want as test steps. Each interaction becomes a step, and its elements are created automatically.
- Click Pause to hold recording without ending the session, or Stop to end it.
Elements created this way are saved under Create Tests > Elements and can be reused in other test cases.
Steps can also be added by hand: click Actions from the dropdown on the Test Case Details page, select the action, and select a captured element. Testsigma suggests actions based on the element’s type, and the other step types are available too.
Capture the elements
Section titled “Capture the elements”SAP uses the same Element Recorder, opened through a dialog of its own. Go to Create Tests > Elements, click Record, select Selective Element Recorder or Batch Element Recorder in the Desktop Element Recorder dialog, and click Launch. Then choose the SAP application and click Start Recording. Capture and save as in the Element Recorder tab.
It adds requirements of its own. SAP Logon has to be installed with a working connection to your SAP system, and the SAP desktop application has to be open on the screen you want to record.
System and network requirements
Section titled “System and network requirements”| Component | Requirement |
|---|---|
| Memory | 8 GB, dedicated to the tests |
| Disk space | 20 GB, including space for screenshots and downloaded files |
| Processor | Dual-core or higher |
Your SAP connection needs a Description, the System ID (SID), the Instance Number, and the Application Server as an IP address or hostname.
SAP systems commonly use ports 3200 and 5000, though this varies by configuration. Communication between the Testsigma Agent and the SAP system may need more ports opened, depending on your network.
Create the test case
Section titled “Create the test case”Recording captures each interaction as a test step and creates the elements it touches along the way, so you do not have to capture them first.
- Go to Create Tests > Test Cases and open the test case to record into.
- Click Record in the action panel.
- Select the application in the Select application window, and click Start recording.
The Testsigma Recorder opens, the application comes to the foreground, and Open application is added as the first step with the application path.
- Perform the actions you want as test steps. Each interaction becomes a step, and its elements are created automatically.
- Click Pause to hold recording without ending the session, or Stop to end it.
Elements created this way are saved under Create Tests > Elements and can be reused in other test cases.
Testsigma suggests the actions available for the element’s type. See SAP actions by element type.
Import the elements
Section titled “Import the elements”Testsigma reads elements from a developer application model file, so this route starts in UFT One.
- Create an object repository, a
.tsrfile, in UFT One and learn the objects your tests need. UFT One’s object model and object spy capture them. - Convert it to
.tsrx, which is the only format Testsigma imports.
Convert TSR to TSRx
Section titled “Convert TSR to TSRx”- Open a command prompt in the folder holding the
.tsrfiles. - Enter the full path to UFT One’s
OR2AppModelConverter.exeutility. - Enter the name of the
.tsrfile, confirm it, appendx, and press Enter.
The .tsrx file is saved in the same folder.
Import the file
Section titled “Import the file”- Go to Create Tests > Elements and click Import.
- Click Browse file and select the
.tsrxfile. - Under How should we handle duplicates?, select Overwrite to replace existing elements or Ignore to skip them.
- Click Import.
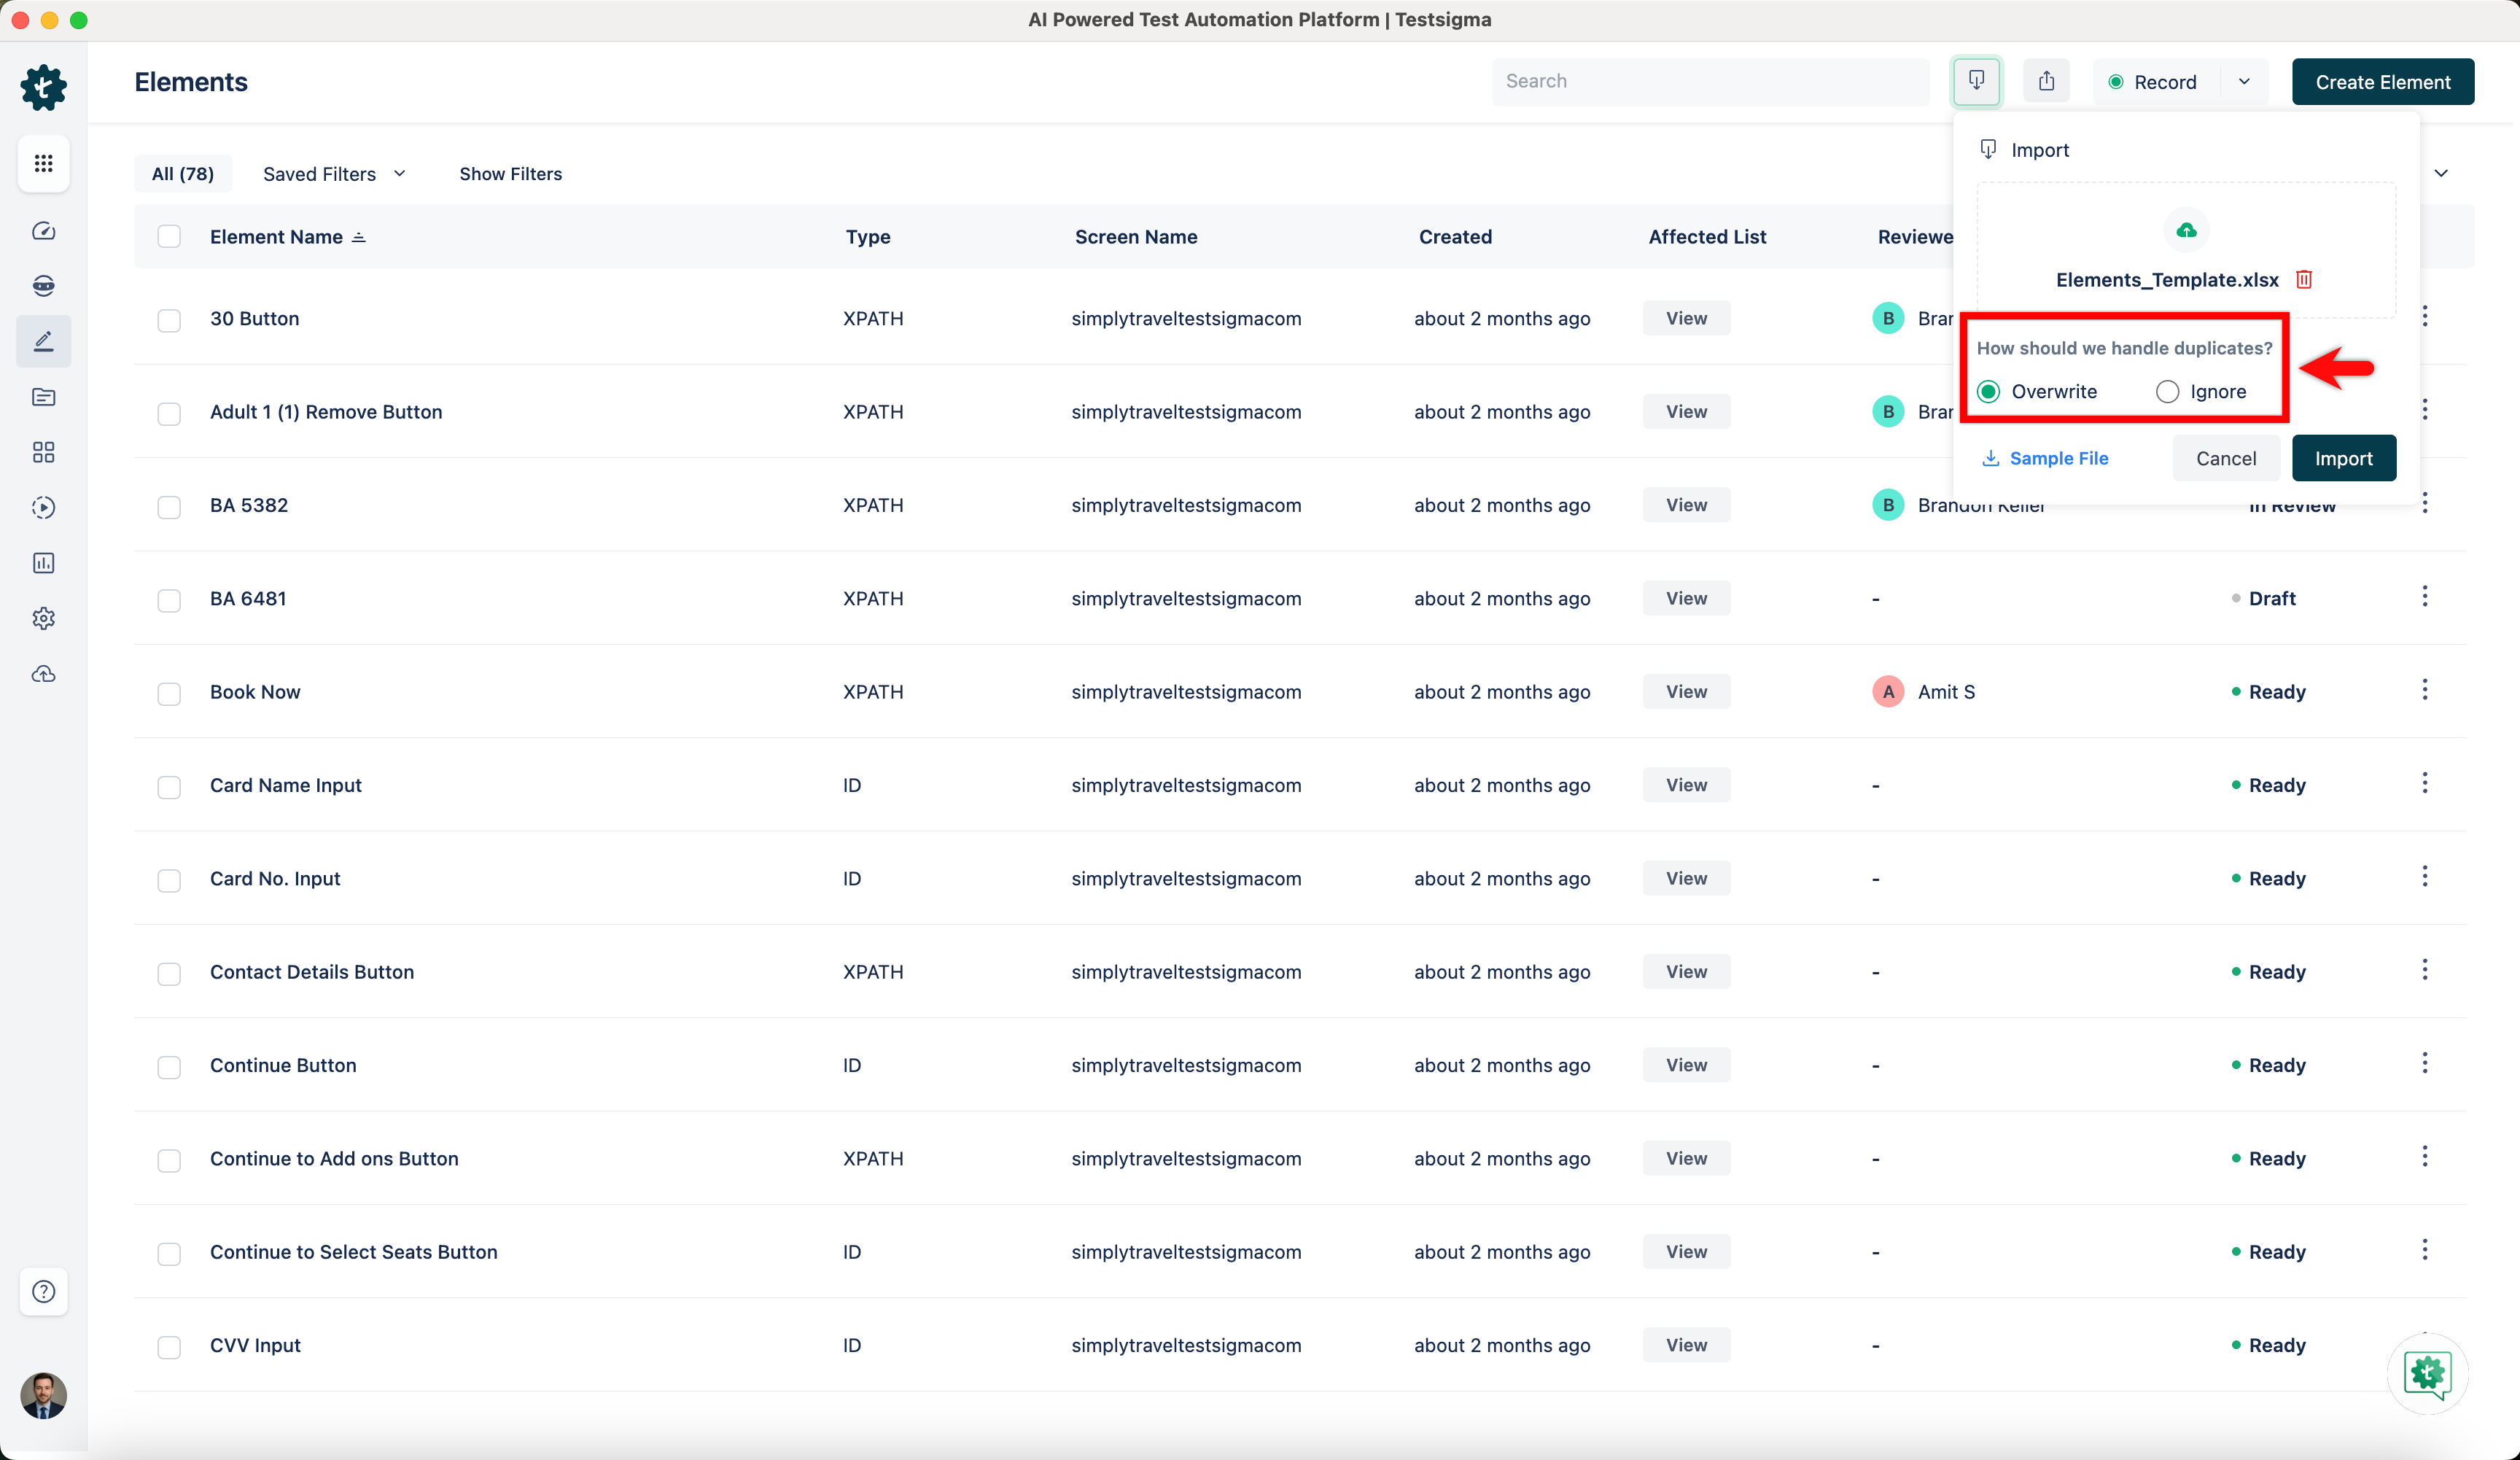
Create the test case
Section titled “Create the test case”Steps are written against the imported elements rather than recorded, since the elements come from a file.
Click Actions from the dropdown on the Test Case Details page, select the action you want in the Actions overlay, and select a captured element for the step.
Testsigma suggests actions based on the element’s type, and the other step types are available as well.
Run the test case
Section titled “Run the test case”-
Click Run on the Test Case Details page.
-
In the Ad-Hoc Run overlay, select the Local Test Machine, set any Additional settings, and click Run Now.
Debug with Copilot
Section titled “Debug with Copilot”Copilot works on any Advanced technology. It runs the test case on the Windows machine and pauses where you tell it to, so you can inspect the application and record more steps without leaving the session.
-
Click Copilot in the action panel on the Test Case Details page.
-
Set Set Initial Debug Point and Execute from Step in the Copilot overlay, and configure the additional settings if needed.
-
Click Launch. Execution starts on the Windows test machine, and the Copilot panel opens beside the step results.
-
When execution pauses at a debug point or on a failure, inspect the application and use the execution controls.
-
Click Rec to record more steps by performing actions in the application.
-
Click Resume to continue the run.
Resume continues from the next step rather than restarting, and Rec records additional steps into the test case during the session. Pause, Step Over, Skip Over, and Restart Execution are also available. See Copilot.
SAP actions by element type
Section titled “SAP actions by element type”Every SAP element supports these 7 actions: SetFocus, GetId, GetText, SetText, GetToolTip, GetName, and IsEnable.
Each element type adds its own on top.
| Element type | Additional actions |
|---|---|
| Button | Click |
| Calendar | GetDate, SetDateRange, setDate |
| CheckBox | Set, IsChecked |
| ComboBox | Select, SelectKey |
| EditField | setCursorPosition, GetDisplayedText, GetMaxLength, IsRequired, IsNumerical |
| Editor | DoubleClick, Select, SetUnprotectedTextPart |
| Label | GetMaxLength, IsNumerical, setCursorPosition |
| Menubar | Select |
| OKCode | None beyond the 7 common actions |
| StatusBar | GetMessageNumber, GetMessageId, IsMessageAsPopup |
| TabControl | GetSelectedTab, Select |
| Table | SelectCell, SelectRow, SelectRowRange, SelectColumn, SelectAllColumns, DeselectRow, DeselectRowRange, DeselectColumn, ActivateCell, IsValidRow, GetLength, GetTitle, Click, PressSettingsButton, OpenPossibleEntries |
| Toolbar | PressButton, PressContextButton, SelectMenuItem, SelectMenuItemById |
| TreeView | ActivateNode, GetSelectedItem, GetSelectedNodePath, OpenContextMenu, OpenHeaderContextMenu |
| Window | Close, Maximize, Resize, Restore, SendVKey, TabBackward, TabForward |
When the application changes
Section titled “When the application changes”Importing an updated TSRx file can leave elements, test cases, and step groups pointing at something that no longer matches. Testsigma flags them rather than letting the next run fail.
Errors surface in 2 places, each with a View All filter that narrows the list to the impacted items:
- On Create Tests > Elements, an impacted element carries a warning
- On Create Tests > Test Cases, an impacted test case shows a red underline on the element that no longer matches
To fix one:
-
Open the impacted test case.
-
Hover over the highlighted step to read the error.
-
Hover over the element and click View/Edit element to open Element details, which names the impacted elements.
-
Replace them with new elements, or disable or remove the step.
Frequently asked questions
Section titled “Frequently asked questions”Why does the recorder fail to start?
Section titled “Why does the recorder fail to start?”Developer Mode is off on the Windows machine. Turn it on under Settings > Privacy & security > For developers, and click Yes.
If Developer Mode is already on, check the executable path. A wrong .exe path stops the recorder the same way.
Was this page helpful?
Thanks for the feedback.