

Create an API test case
A REST API step calls an API from inside a test case. Use it on its own, in a project created with the Rest API application type, or alongside UI steps in a web or mobile test case.
Add the step
Section titled “Add the step”-
Go to Create Tests > Test Cases and create a test case.
-
Click the option next to a test step on the Test Case Details page and select Rest API.
-
Click the step to open the Rest API window.
Build the request
Section titled “Build the request”A request needs a Title, a URL, and a Method. Parameters, headers, authorization, and a body are added as the API requires them.
URL and method
Section titled “URL and method”The URL is the base location plus the endpoint path. With a base of https://jsonplaceholder.typicode.com/, a free API service for testing against, adding /posts makes the endpoint path.
To parameterize it, double-click the URL field and select a test data type. In https://jsonplaceholder.typicode.com/posts?userId=@userId, @userId is a test data type inserted into the URL, and the host itself can be replaced the same way.
The method defaults to GET:
| Method | Use it to |
|---|---|
| GET | Retrieve data |
| POST | Add new data |
| PUT | Replace existing data |
| PATCH | Update some existing fields |
| DELETE | Delete existing data |
Parameters
Section titled “Parameters”A query parameter is appended to the URL after ? as key-value pairs separated by &, as in ?id=1&type=new. A path parameter is part of the URL itself, referenced with a placeholder, as in /customer/:id.
The URL field and the Parameters tab stay in sync, so a change in one appears in the other.
- In the URL: type the full parameterized URL, such as
https://jsonplaceholder.typicode.com/?name=Joel&type=new. The Parameters tab populates with the matching pairs - In the Parameters tab: enter the keys and values, and the URL updates to match
Headers and authorization
Section titled “Headers and authorization”Headers are key-value pairs on the Headers tab, such as Accept: application/json.
Authorization defaults to No Auth. Select the type your API needs from the dropdown and fill in its fields.
Six body types are available, on the Body tab.
| Type | Use it for |
|---|---|
| None | A request with no body. The default |
| form-data | Key-value pairs with a content type, sent as multipart/form-data. A key holds text or a file |
| x-www-form-url-encoded | Key-value pairs encoded the way URL parameters are |
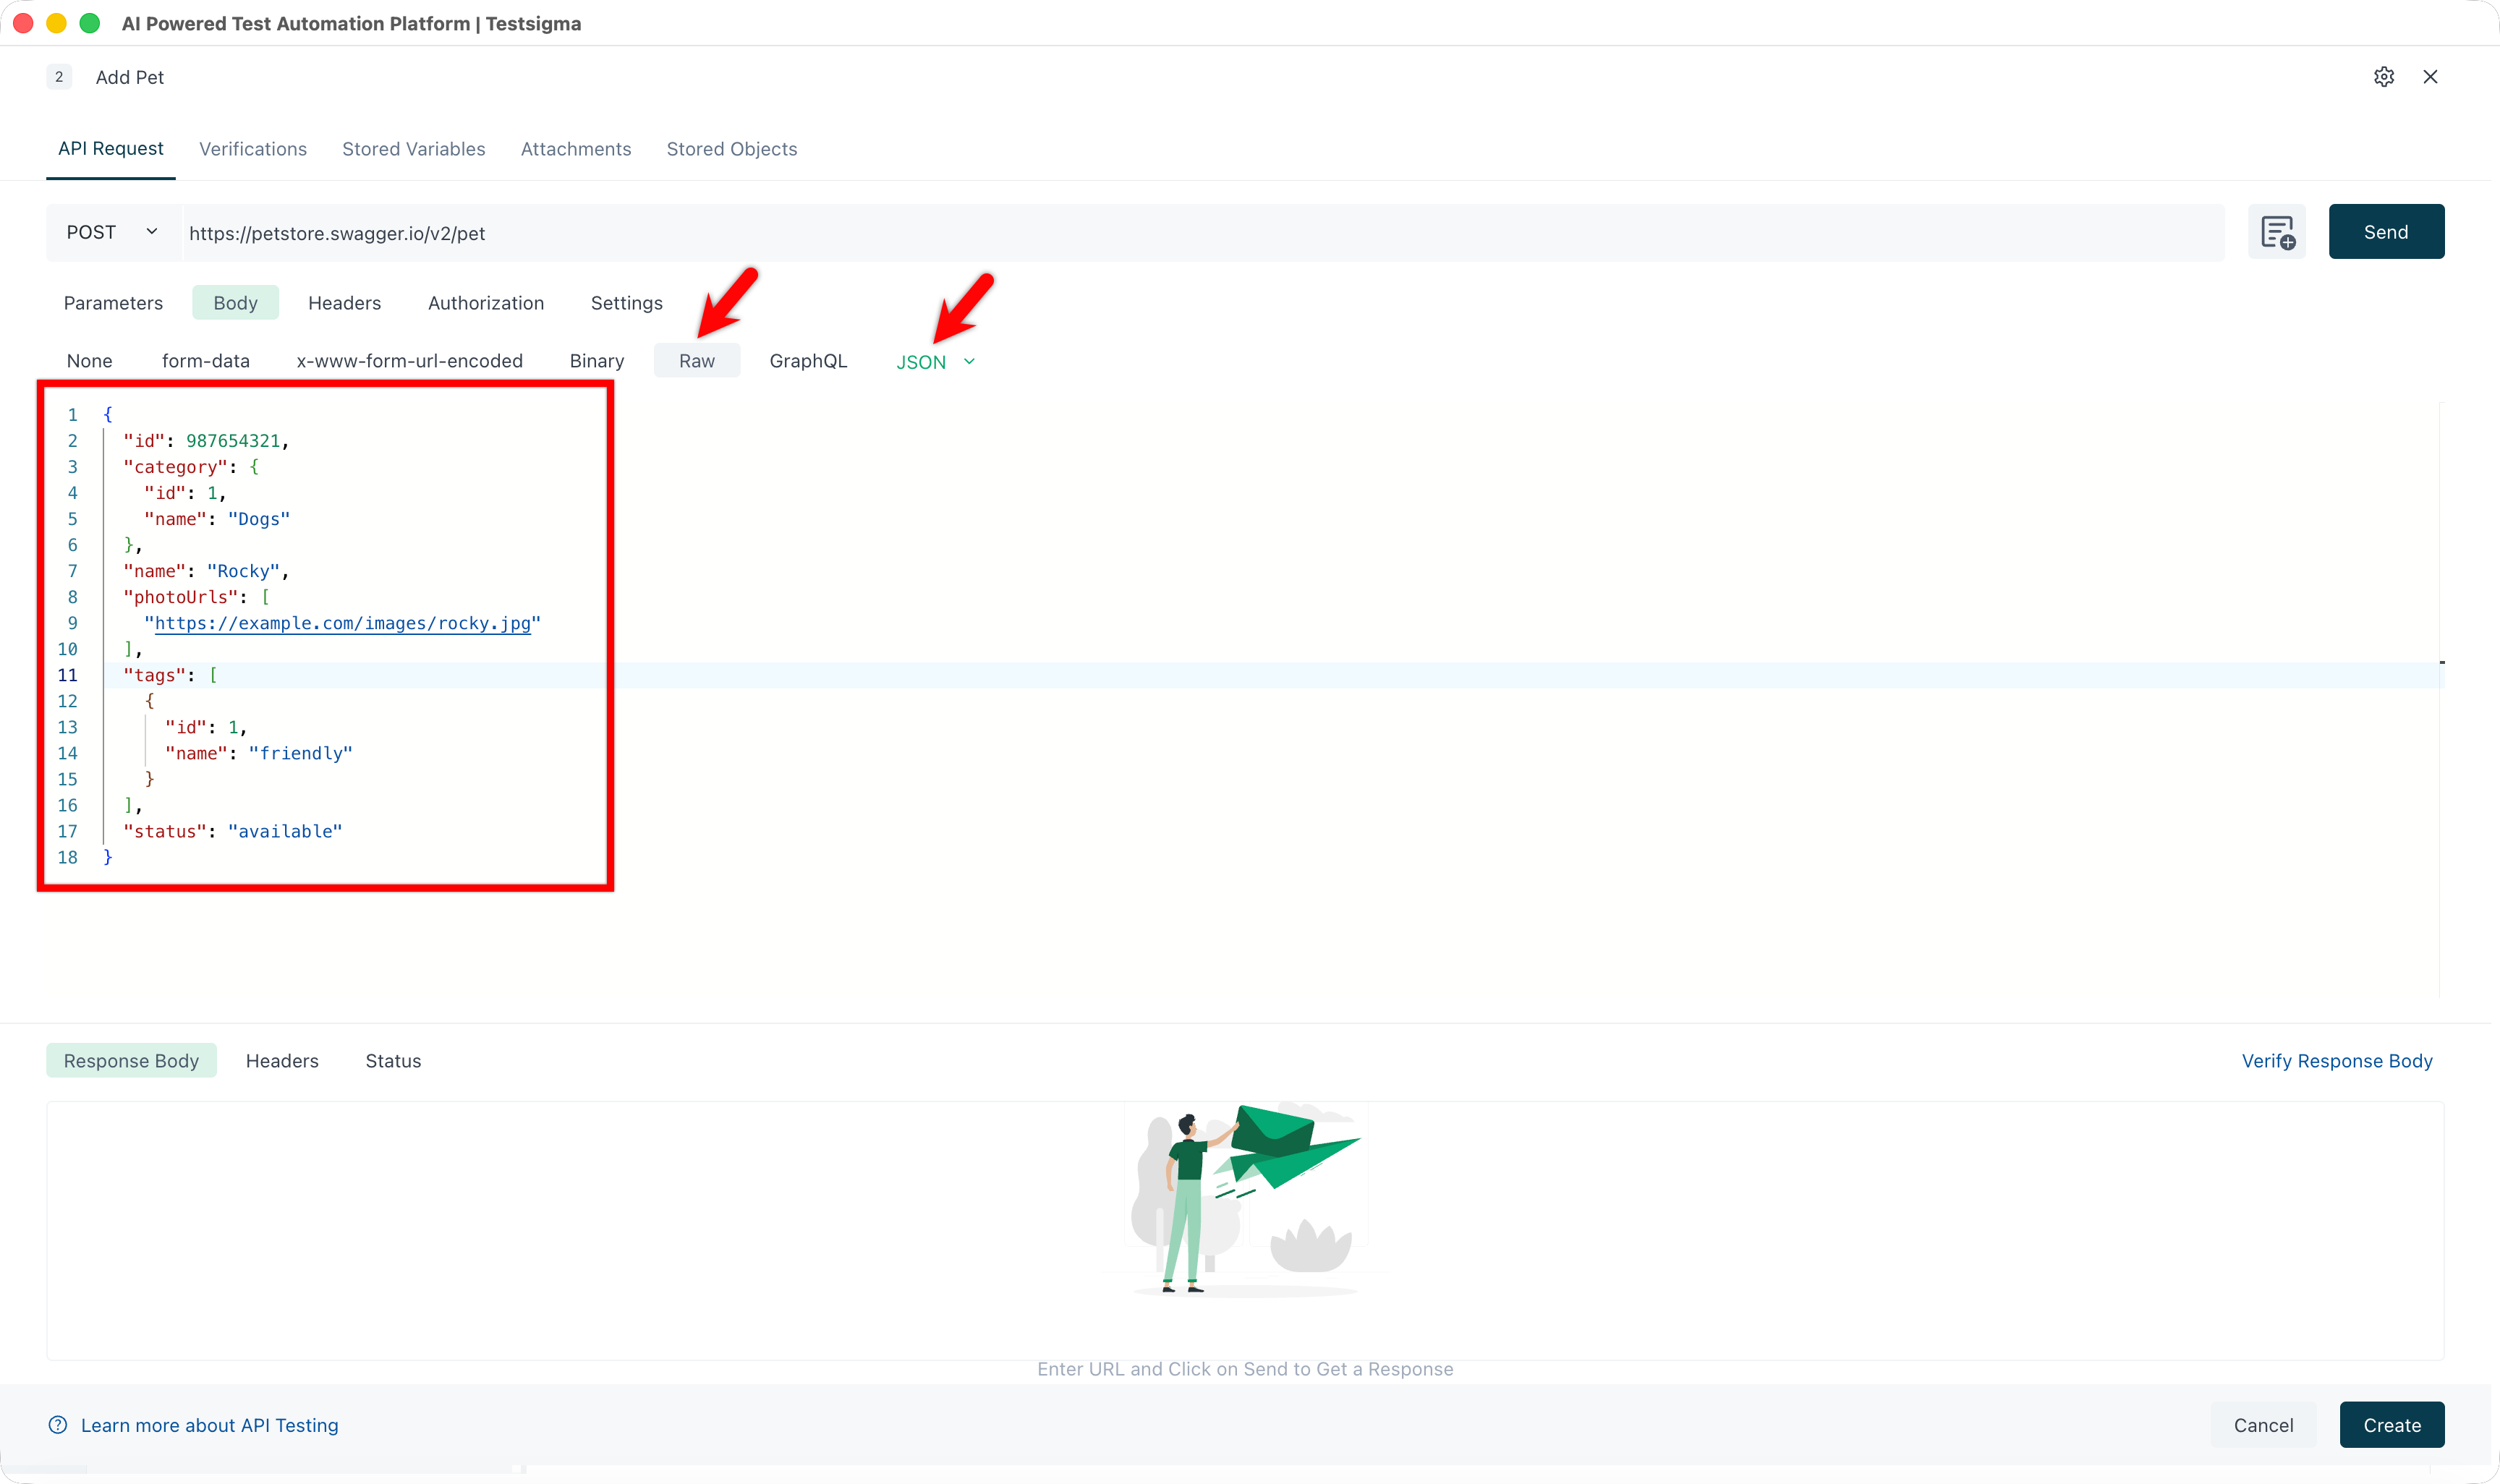
| Raw | JSON, text, or XML, with syntax highlighting and automatic headers |
| Binary | A single non-text file, such as an image, audio, or video |
| GraphQL | A query and optional variables, in JSON or table form |
Three of them need more than a key and a value:
- form-data: takes a file path such as
@"/Users/Downloads/Sample Attachment File.pdf", and hovering the Key field switches it between text and file. Testsigma keeps file paths across repeated calls, which is what lets a collection with file uploads run more than once - Raw: takes a type from the dropdown, either JSON, text, or XML. Testsigma then enables syntax highlighting and appends the matching headers to the request
- GraphQL: splits into a Query field and a Variables section. Variables are optional, and go in as JSON, such as
{ "code": "US" }, or through the Table option, where you pick the keys and enter their values alongside
Selecting GraphQL sets the method to POST. A body on a GET request has no defined semantics, and some servers reject it.
Test data in a raw body
Section titled “Test data in a raw body”A raw body takes test data references anywhere a value would go, so a POST sends generated and parameterized values rather than fixed ones. Reference a test data profile parameter as "@|ParameterName|" and a data generator as "!|FunctionName(arguments)|".
{ "id": "!|Number.digits(int:3)|", "name": "@|DogName|", "status": "available"}Here id is a random 3-digit number generated at run time, name comes from the DogName parameter of the bound test data profile, and status is static. Any static field can be parameterized the same way.
Send the request and save the step
Section titled “Send the request and save the step”Click Send to run the request live and see the response. Click Create to save the step.
Verify the response
Section titled “Verify the response”Verifications live on the response Body, Headers, and Status, and 5 types are available for JSON and XML.
| Type | Passes when |
|---|---|
| Strict | Every condition matches exactly as specified |
| Strict Order | The conditions match in the specified order |
| Lenient | The essential conditions match, and the rest may be relaxed |
| Non-extensible | Only the pre-defined rules apply, with no extension |
| Schema | The response satisfies a structural schema |
From the response body
Section titled “From the response body”Send the request, then take one of 3 routes:
- Click Outline on the response and select Add verification, which adds it to the Verification tab
- Hover over a line in an HTML response and select the attribute to capture
- Click Copy Response, paste the copied path into the path field on the Verification tab, then set the type and expected value
To add one by hand, go to Verification > Response Body and click Add Verification.
Verify Response Body compares the whole body instead of a field. Set the Comparison Type and the Verification Type. Before the API is invoked, it also asks for the Response Body Type and an expected value.
From headers and status
Section titled “From headers and status”There are 2 routes, as with the body.
To capture from the response, click the Headers or Status tab on the response, hover over the value you want, and click Add Verification. It appears in the matching sub-tab under Verification.
To add one by hand, click Add Verification on the Verification > Headers or Verification > Status tab, then:
-
Enter the JSON path on the Headers tab, or select the key name from the dropdown on the Status tab.
-
Enter the expected value, or replace it with a test data type.
-
Select the verification type from the dropdown.
-
Click Create.
Store values for later steps
Section titled “Store values for later steps”A stored variable holds part of a response for use in a later step or elsewhere in the session.
- From the response body: click Outline > Store Variable, or add the field by hand on the Stored Variables > Response Body tab
- From an HTML response: hover over a line and select the attribute
- From headers: click Store Variable on the Headers tab, enter a variable name and a header name, and click Create
Stored objects
Section titled “Stored objects”Save Response > As an Object stores the whole response instead of a field. Stored objects have global scope, so they work across test cases, and they can be downloaded from Save Response or the Stored Objects tab.
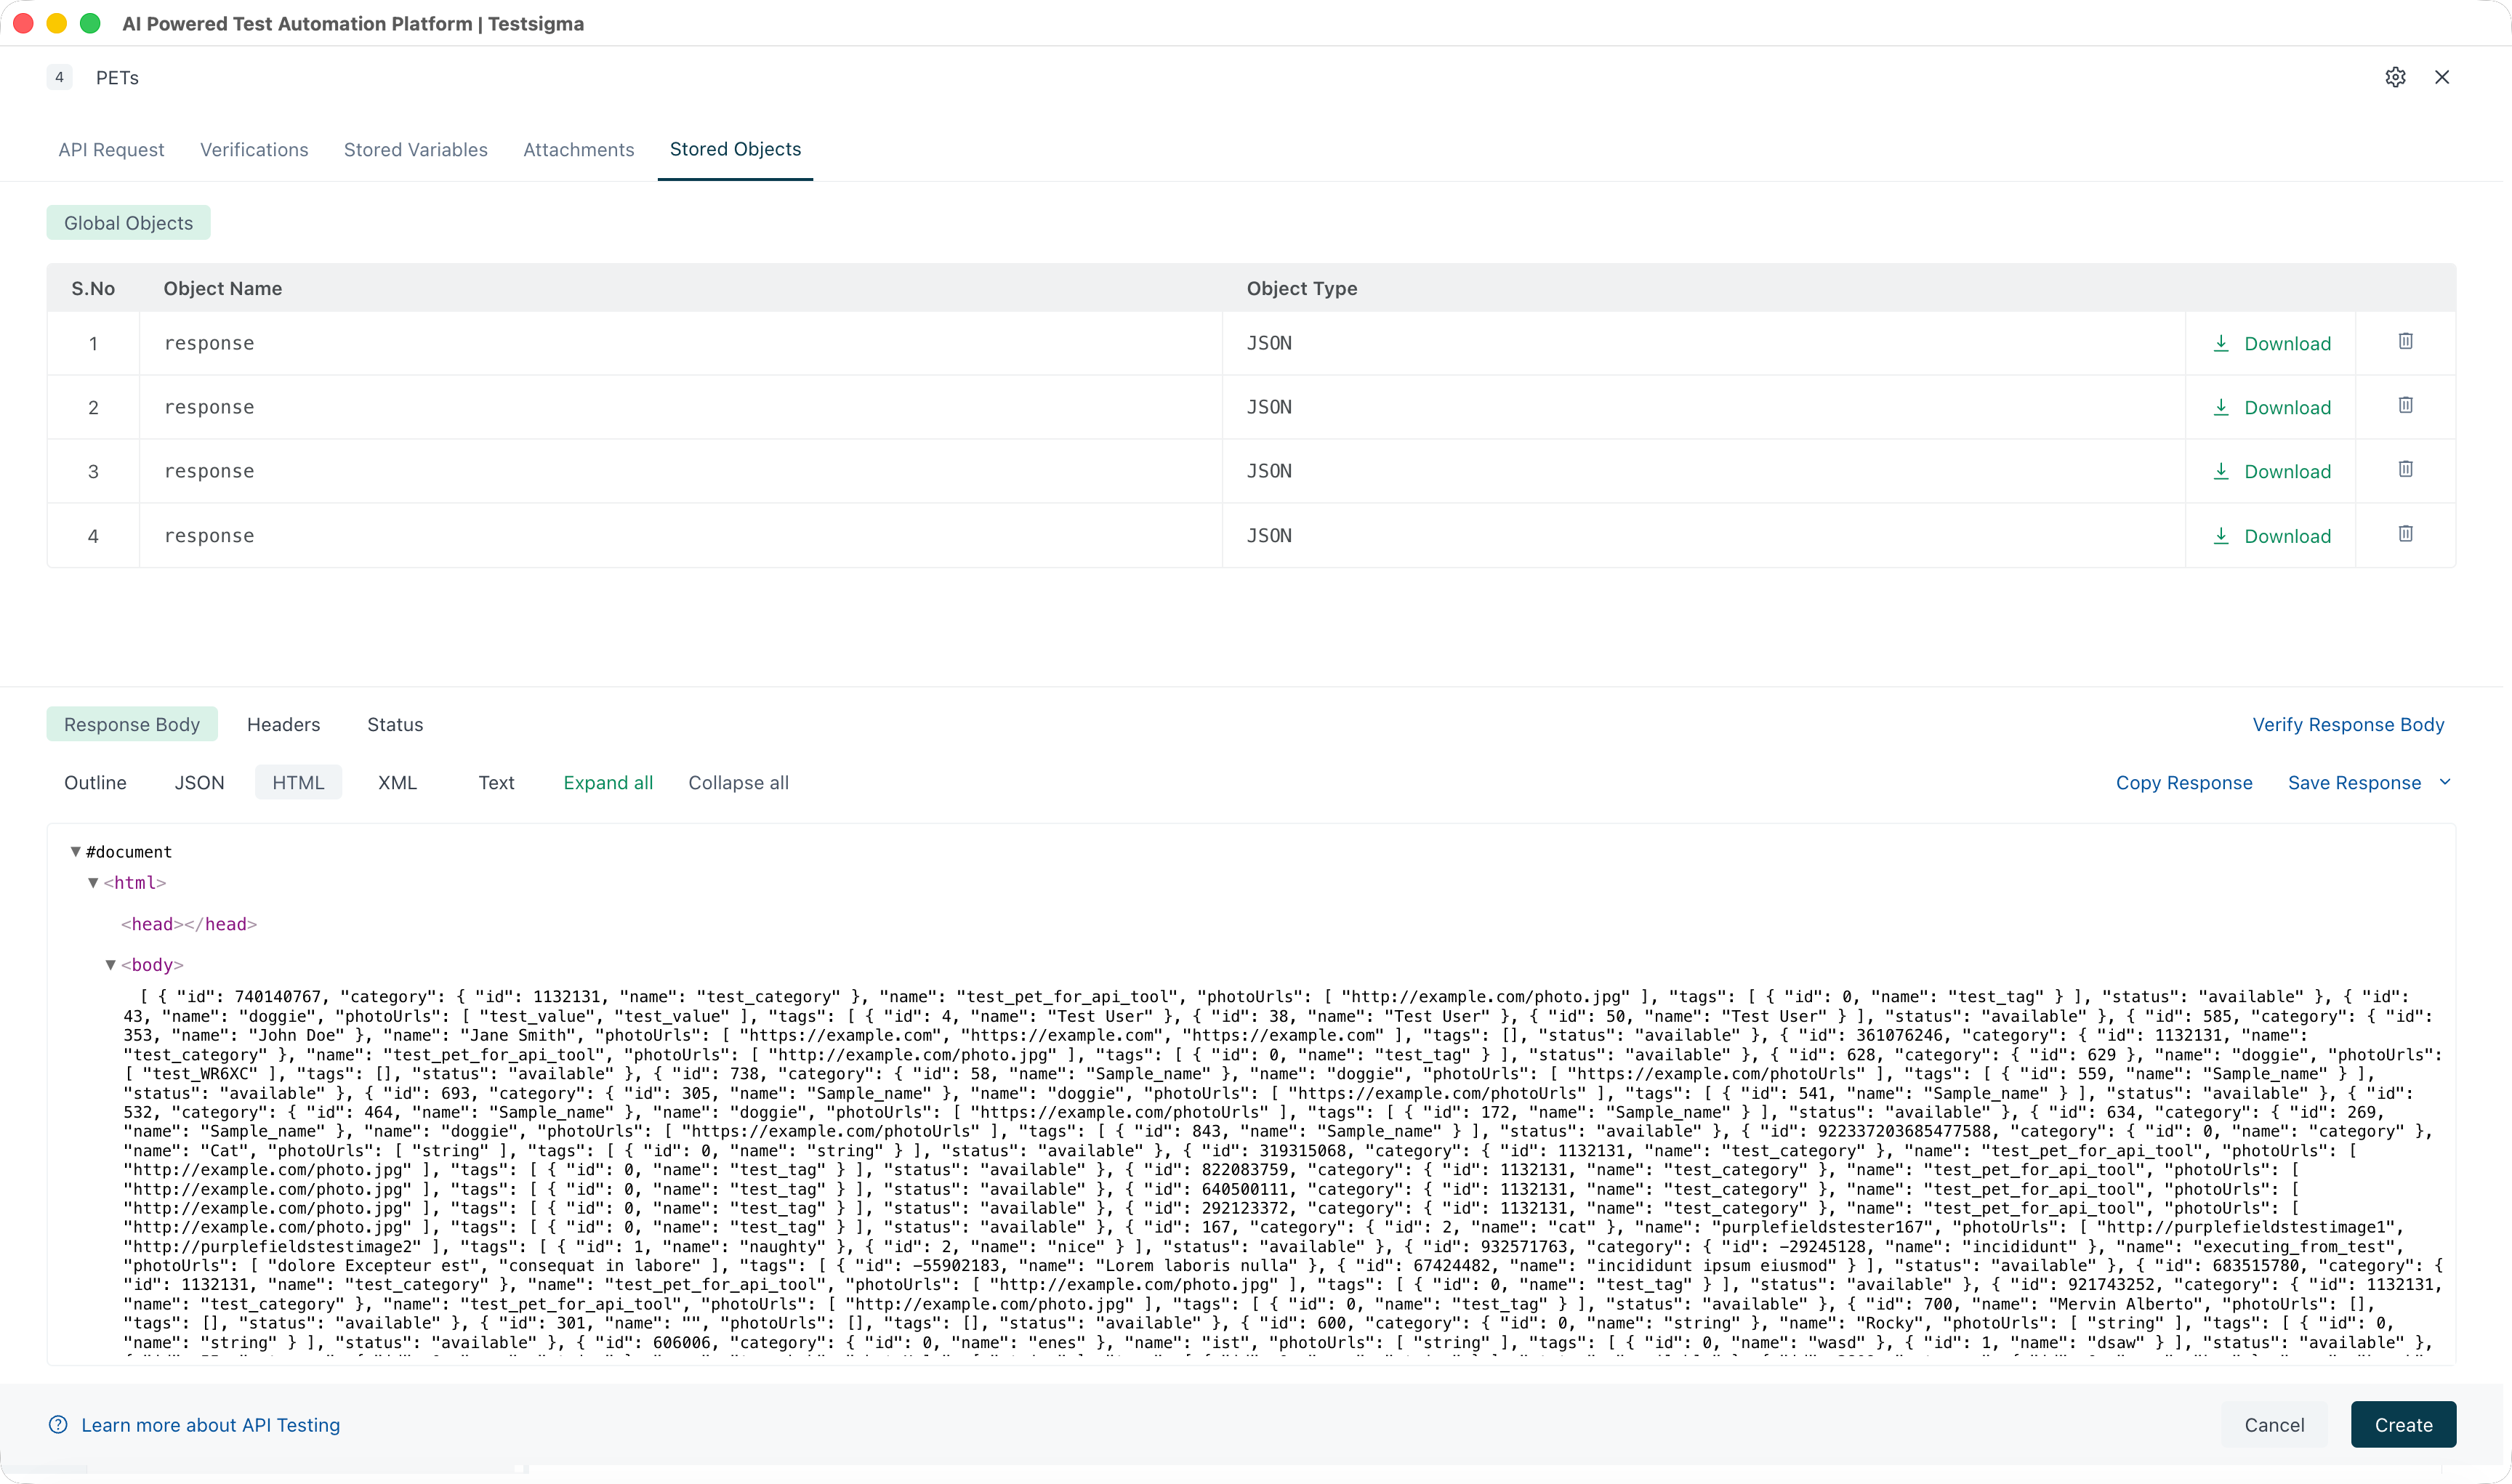
To use one in a request, the Global Objects section links stored objects and other predefined project objects into it, so they are reused rather than re-entered.
Attachments
Section titled “Attachments”A file sent with a request appears on the Attachments tab, and there are 2 ways to send one.
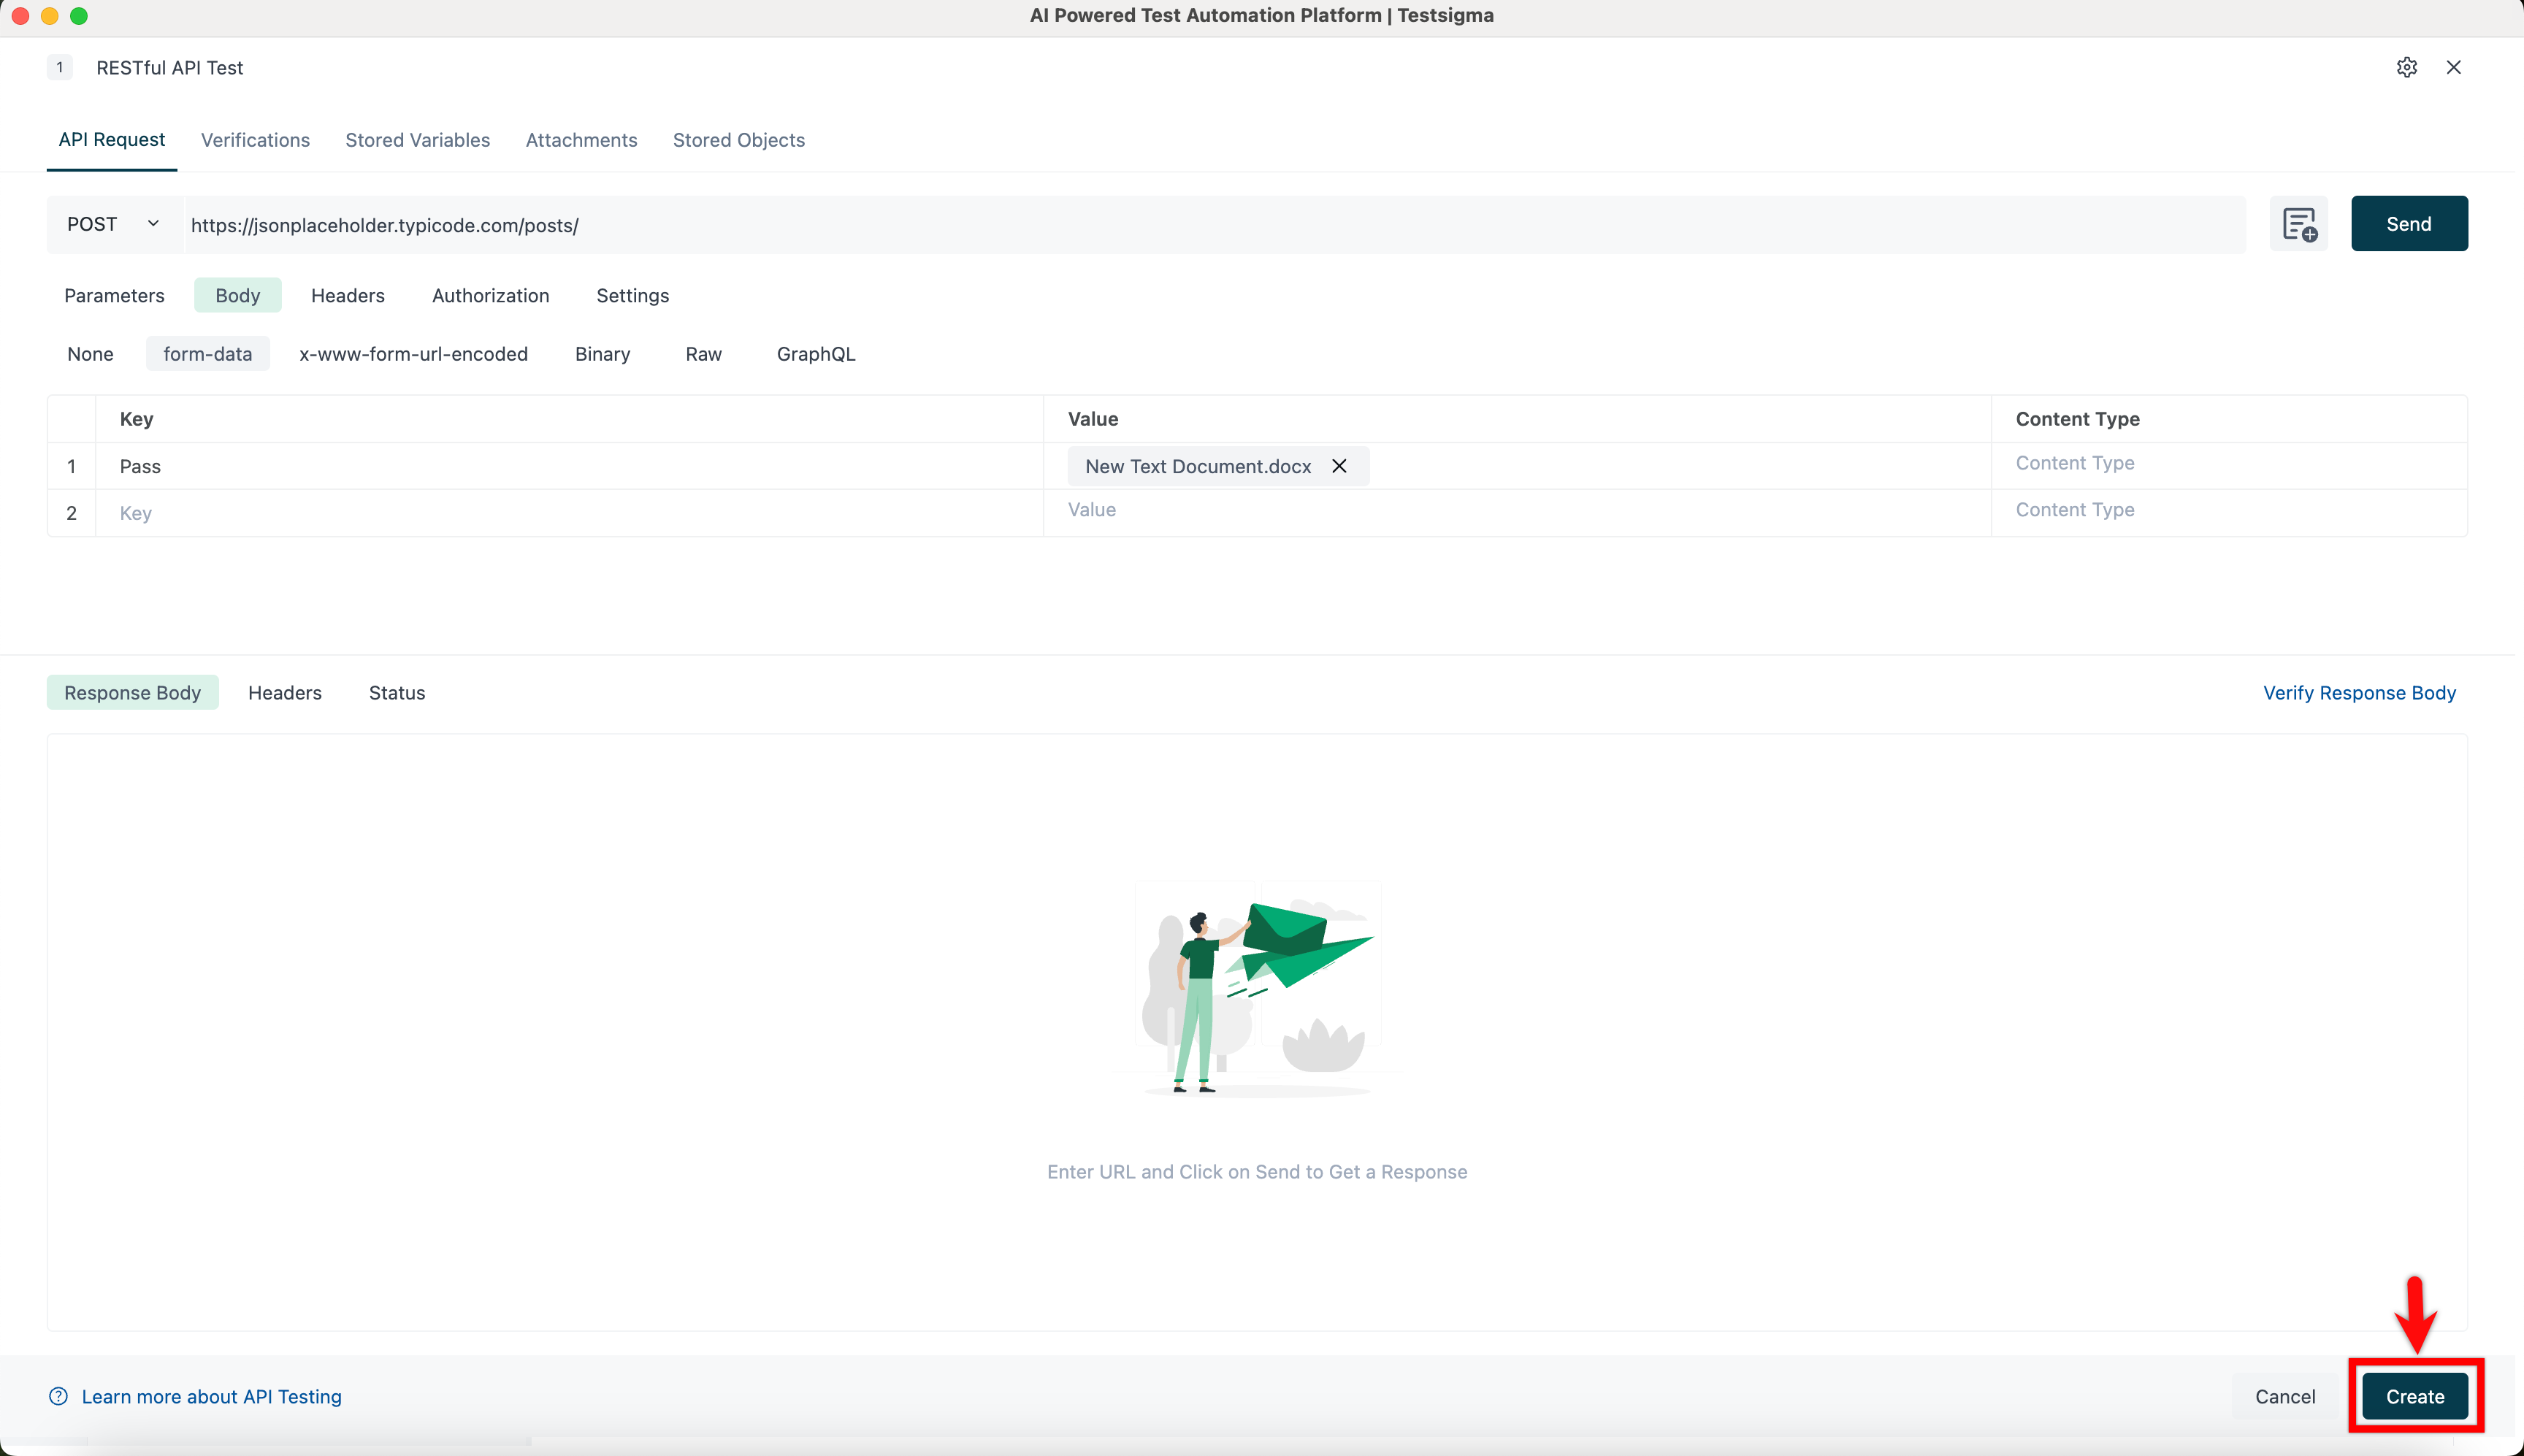
- From form-data: go to Body > form-data, hover the Key field and select File, upload the file in the Value field, and click Create
- From Binary: go to Body > Binary, upload the file, and click Create
Frequently asked questions
Section titled “Frequently asked questions”Why does my API step fail?
Section titled “Why does my API step fail?”- The request never sends: connectivity. Load any page in a browser, retry, then contact your network administrator
- “Invalid request URL”: a path that does not start with
/, unmatched or empty{}placeholders, unencoded spaces (use%20), or reserved characters such as; ? # $ * @ { } = - “Invalid HTTP method”: a body parameter on a GET request. Change the method, or move the parameter
- “JSON Path not found”: a syntax error in the JSON path. Review its syntax
- 403 Forbidden: the request is authenticated but not authorized. The user lacks the role or the permission
- 501 Not implemented: the server does not support the method. Try another one
Was this page helpful?
Thanks for the feedback.