

AI agents
Testsigma’s AI agents take on parts of the testing workflow that would otherwise be manual: writing test cases, building test data, working out why a step failed, and filing the bug.
| Agent | What it does | Where you use it |
|---|---|---|
| Generator | Turns requirements, files, and prompts into test cases, then automates them against the live application | Atto’s Home |
| Test Data Generator | Builds a test data profile for a data-driven test case | Test Case Settings |
| Analyzer | Explains why a step failed and suggests fixes | Run Results |
| Bug Reporter | Files the failure as a bug, with the analysis attached | The Analyzer overlay |
| Healer | Repairs an element locator mid-run, and records what it changed | Run Results |
Set up Atto
Section titled “Set up Atto”Atto reads requirements from the tools your team already uses, and runs on a large language model. Both are configured before you generate anything: the integrations under Settings > Integrations, and the model under Settings > Gen AI Keys.
Integrations
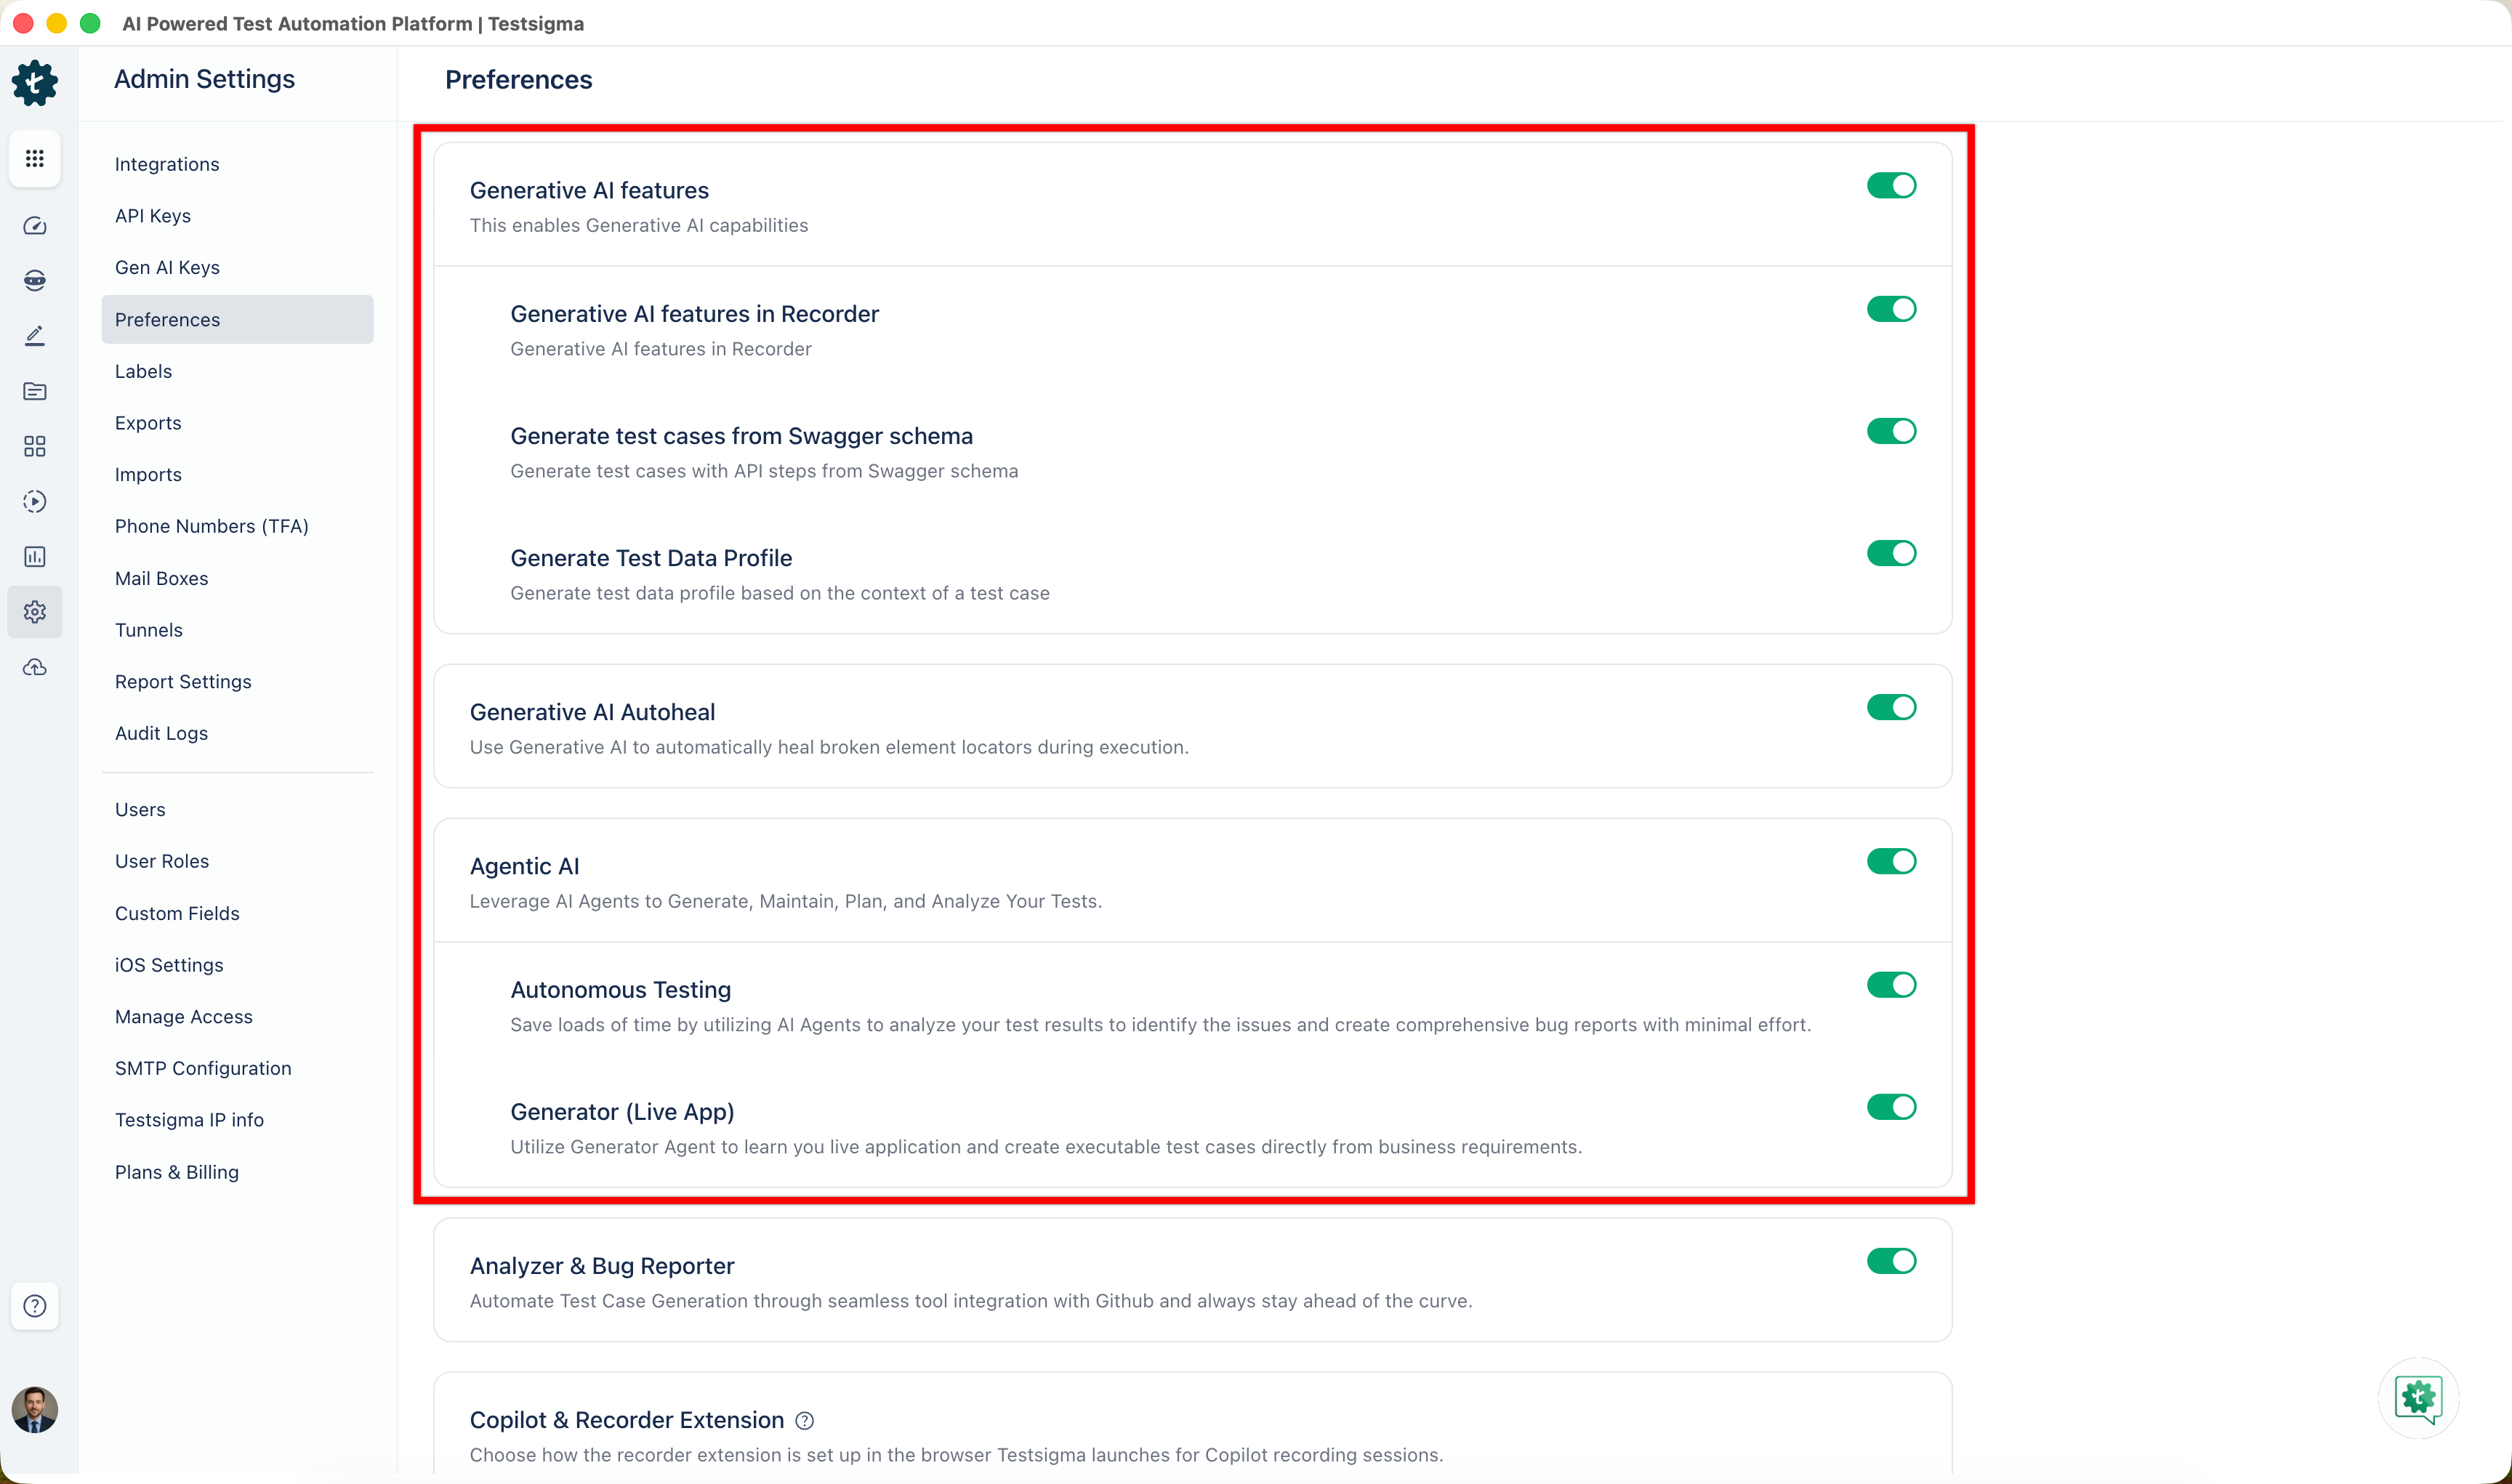
Section titled “Integrations”Every integration follows the same shape. Go to Settings > Integrations, turn on the widget’s toggle, enter the credentials in the dialog, and click Save & Enable. What differs is which credentials each one needs, and where you get them.
| Integration | Credentials | What it gives Atto |
|---|---|---|
| Jira | Account URL, user name, API key | User stories, epics, and issues as input, plus bug reporting back to Jira |
| Jira Server or Data Center | Server URL, and admin access to the instance | The same, for a self-hosted Jira |
| Figma | Team ID, API key | Design frames as input |
| Xray | Jira account URL, client ID, client secret | Xray tests, epics, and stories as input |
| qTest | Host URL, bearer token | qTest modules and test cases as input |
| GitHub | Personal access token, resource owner, and a webhook in your repository | Test case generation when a pull request is raised |
Get the Figma credentials
Section titled “Get the Figma credentials”Team ID. Open Figma in a browser, select the team from the dropdown in the left navigation bar, and read the URL. In https://www.figma.com/files/team/{TEAM_ID}/your-team-name, the {TEAM_ID} segment is what you need.
Personal access token. Click your profile icon, select Settings, go to Security > Personal access tokens, and click Generate new token. Name it, choose an expiration period, click Generate token, and click Copy this token.
Set up GitHub
Section titled “Set up GitHub”GitHub takes more than a toggle, because Testsigma has to receive pull request events from your repository.
-
Go to Settings > Integrations in Testsigma and turn on the Github toggle. The dialog shows a Webhook URL and a Webhook Secret. Keep it open.
-
In GitHub, open your organization, go to Settings, and click Webhooks under Code, planning, and automation.
-
Click Add webhook, and fill it in:
- Payload URL: the Webhook URL from Testsigma
- Content type:
application/json - Secret: the Webhook Secret from Testsigma
- Select Let me select individual events, then select Pull requests
-
Click Add webhook.
-
Back in GitHub, click your profile picture, go to Settings > Developer settings > Personal access tokens > Fine-grained tokens, and click Generate new token.
-
Name the token, select your organization as the Resource owner, choose an expiration, select Public repositories or All repositories under repository access, and set the repository and organization permissions.
-
Click Generate token, confirm, and copy it.
-
Enter the Personal Access Token and the Resource Owner in the Testsigma dialog, and click Save & Enable.
Bring your own LLM keys
Section titled “Bring your own LLM keys”By default Atto runs on Testsigma’s models. BYOK points it at your own LLM account instead, which keeps prompts and data within your provider and puts the model choice and its cost under your control.
Four providers are supported: Azure OpenAI, Open AI, Gemini AI, and Vertex AI.
To add a key:
-
Go to Settings > Gen AI Keys and click Create New Key.
-
Enter a Key Name and an optional Description.
-
Select an AI Provider and enter the details it asks for.
-
Click Validate API Key.
-
Click Create.
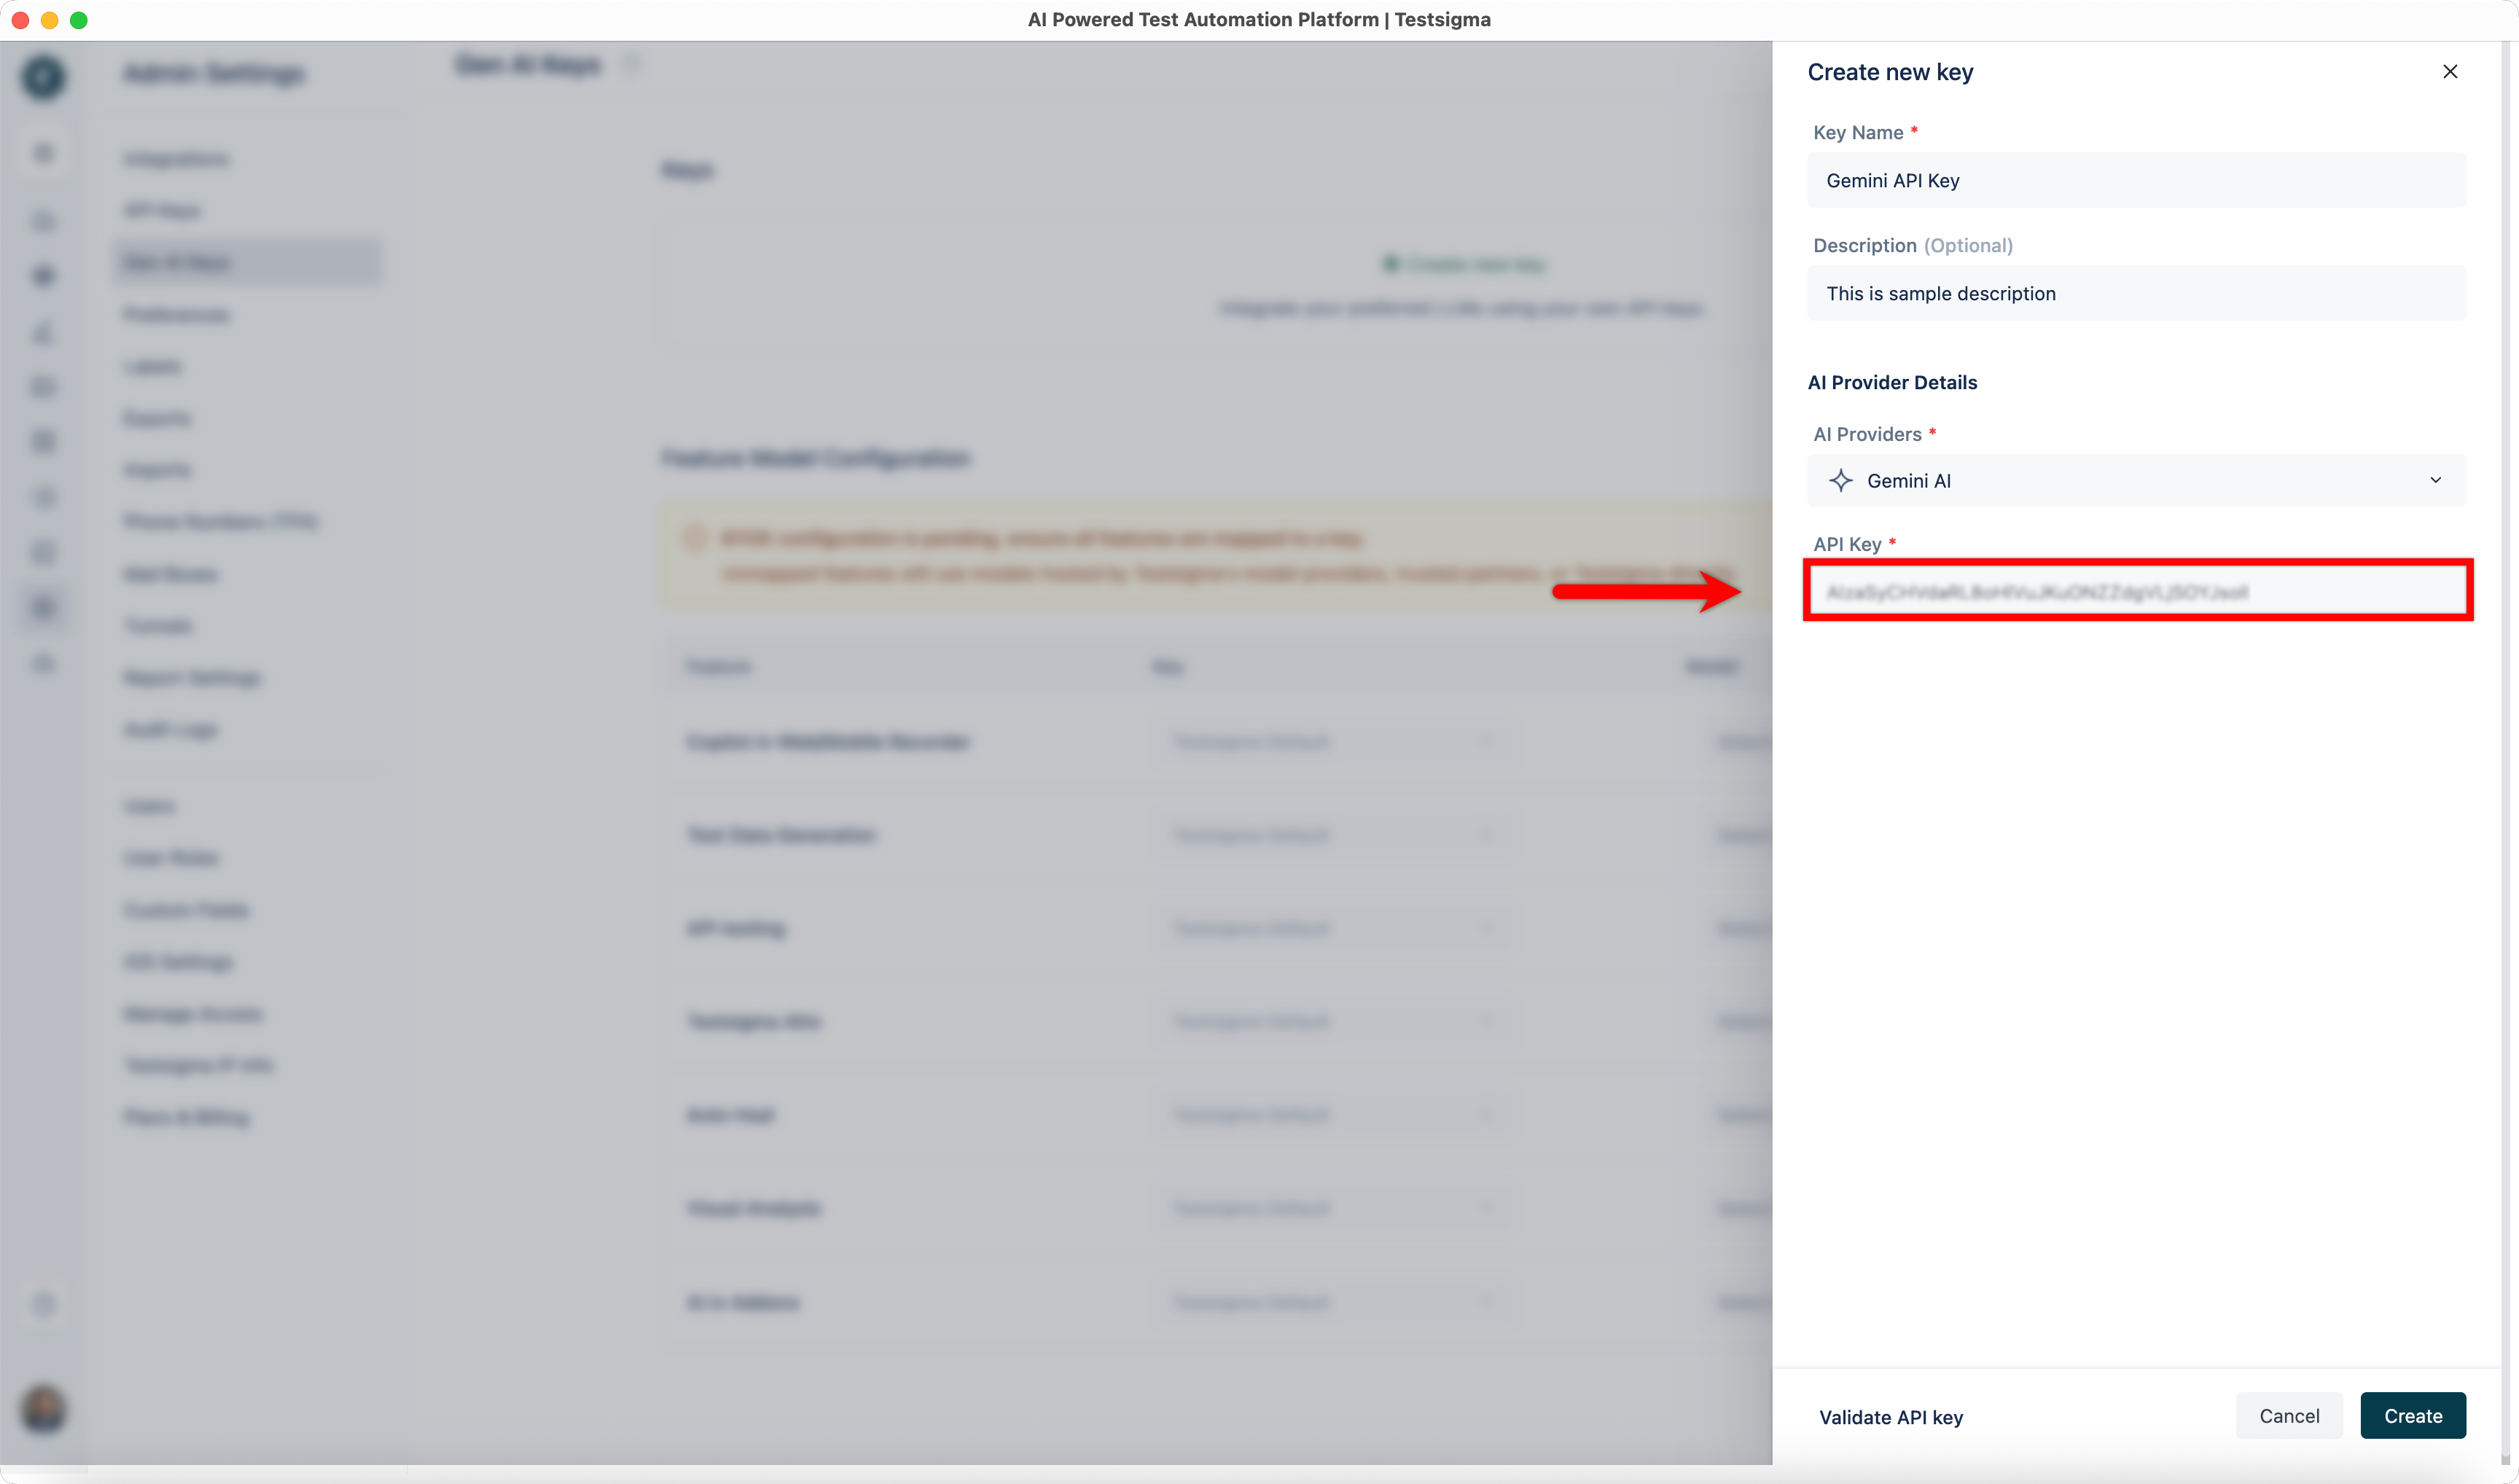
The key appears in the Keys section.
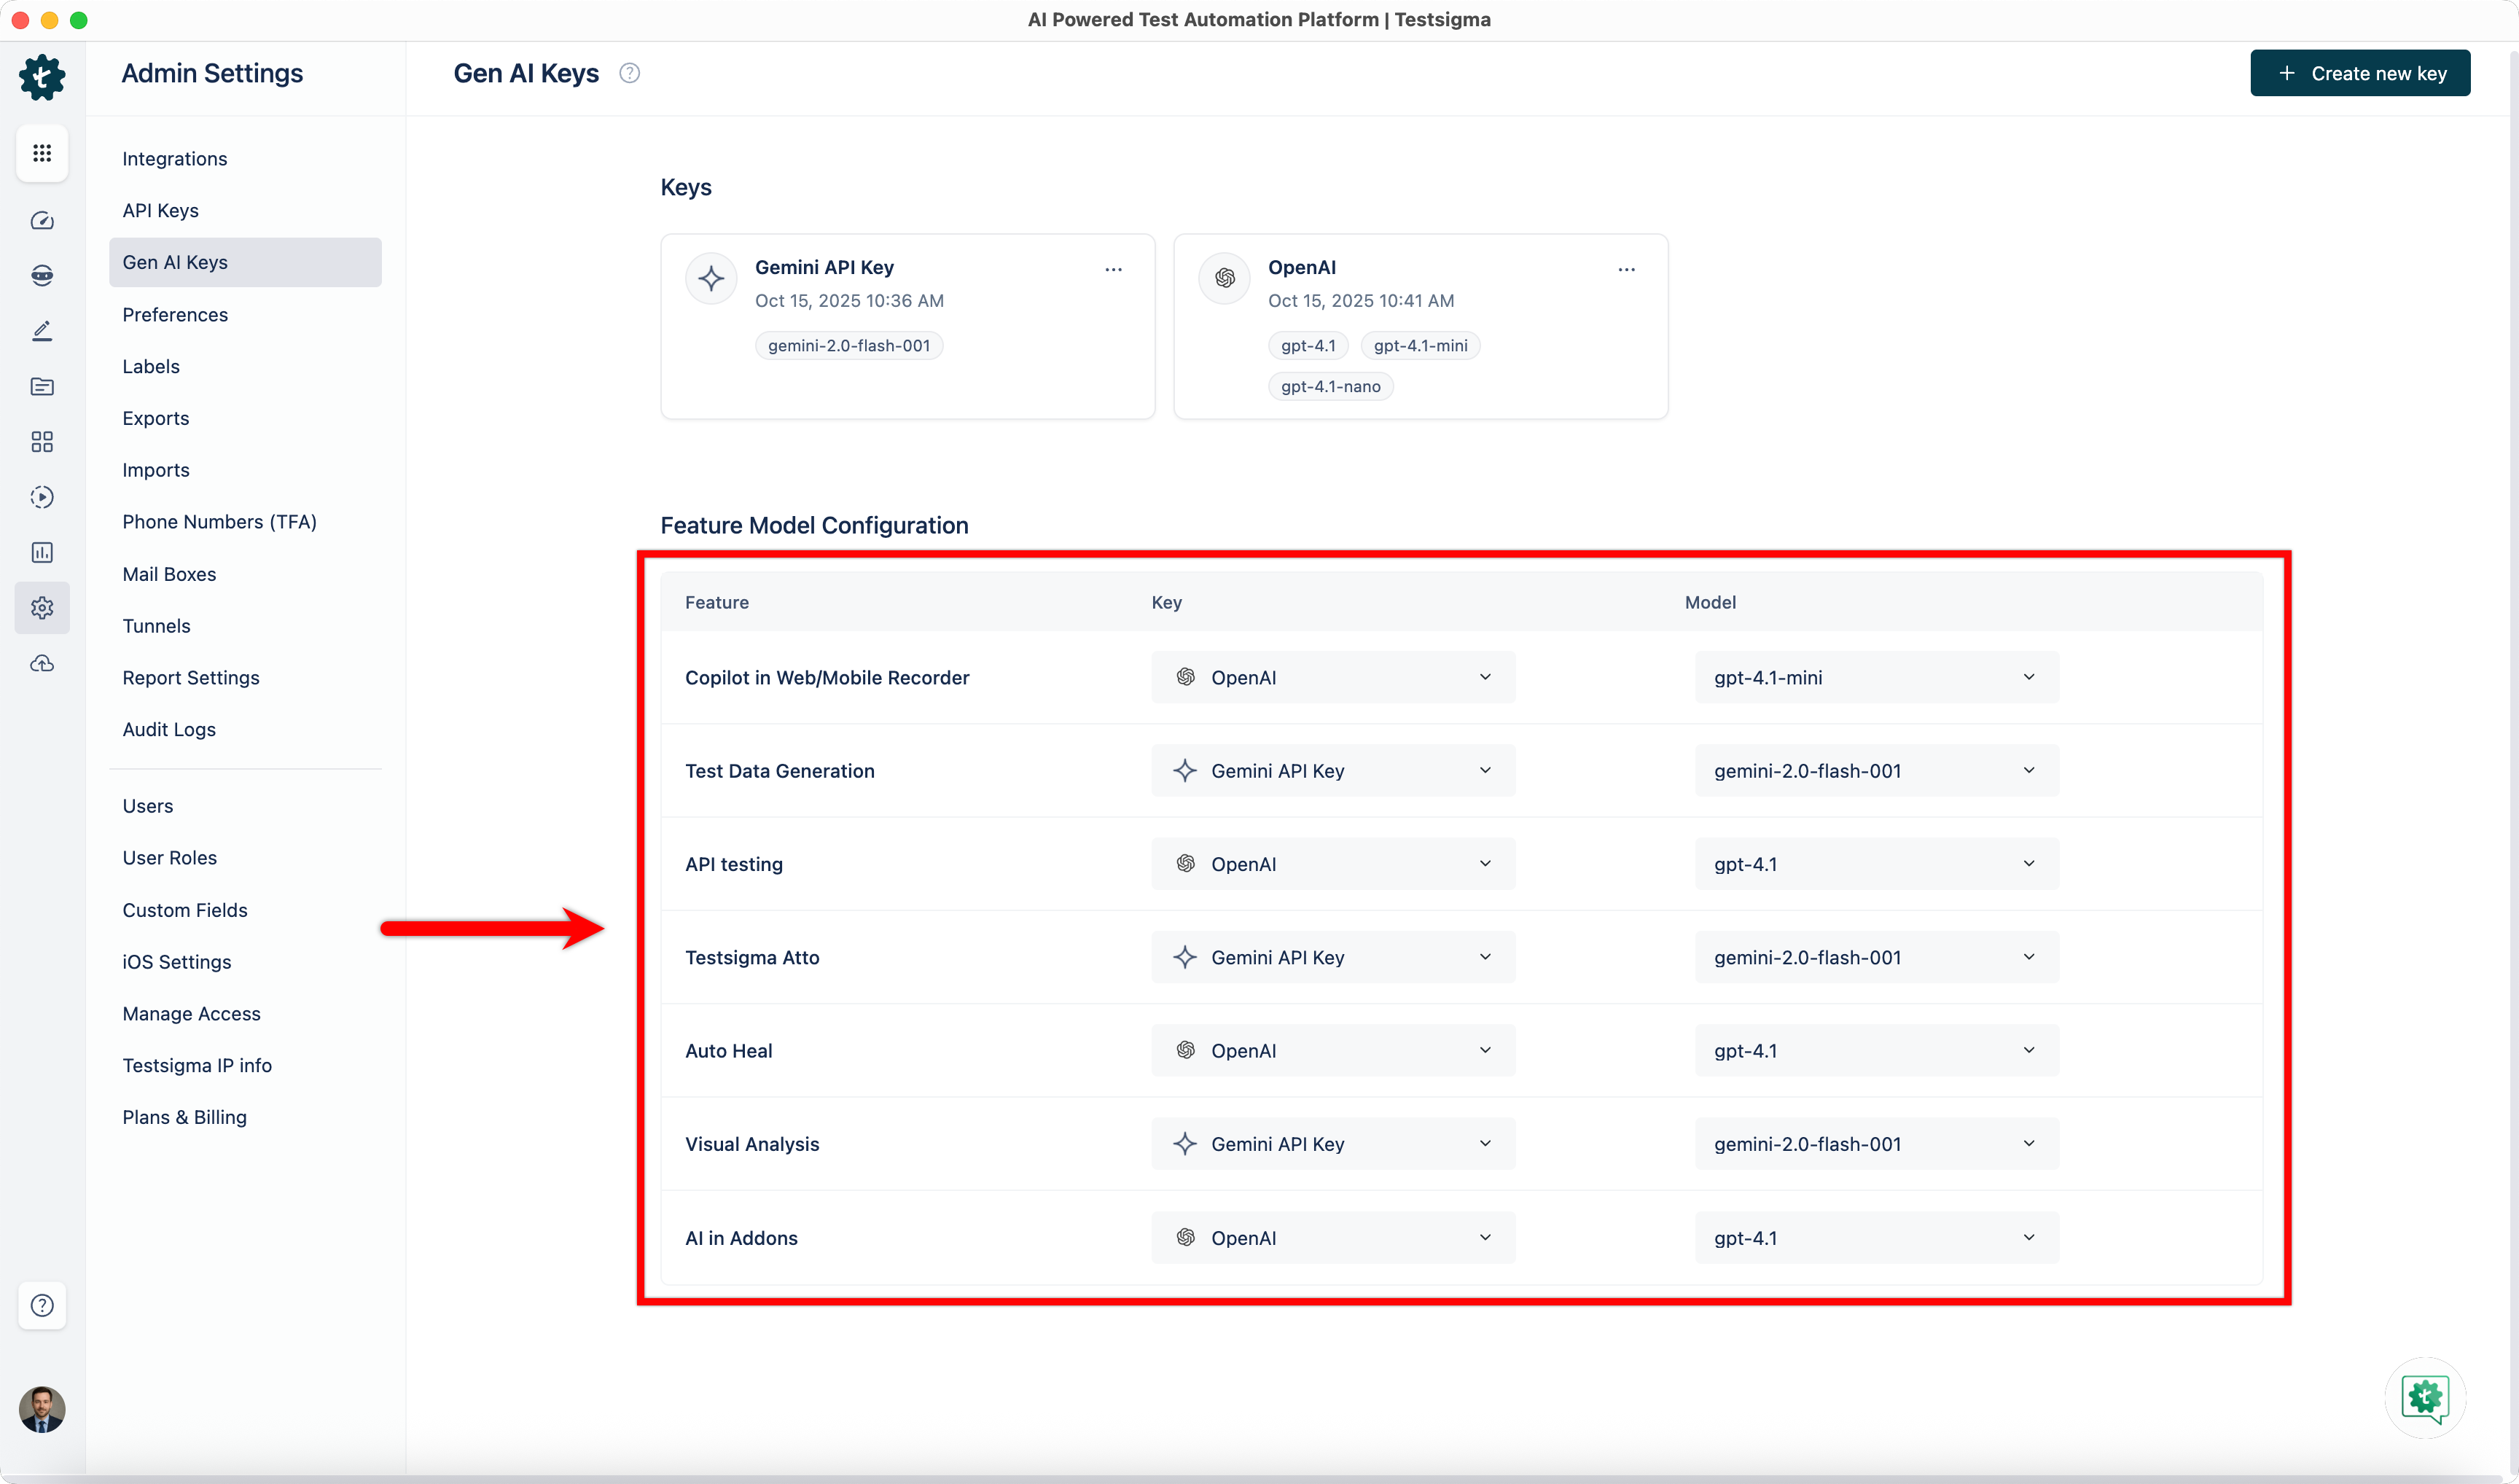
Adding a key changes nothing on its own. Each Testsigma feature is pointed at a key and a model separately, so different features can run on different models.
In Feature Model Configuration, select the Key and the Model for each Feature. Those features then use the mapped model.
Generator
Section titled “Generator”The Generator agent writes test cases from your requirements, then automates them against your application.
Add an input source
Section titled “Add an input source”Go to Atto’s Home, click Generate with AI, and select a source in the Generate Test Cases section. Add as many as you need before prompting.
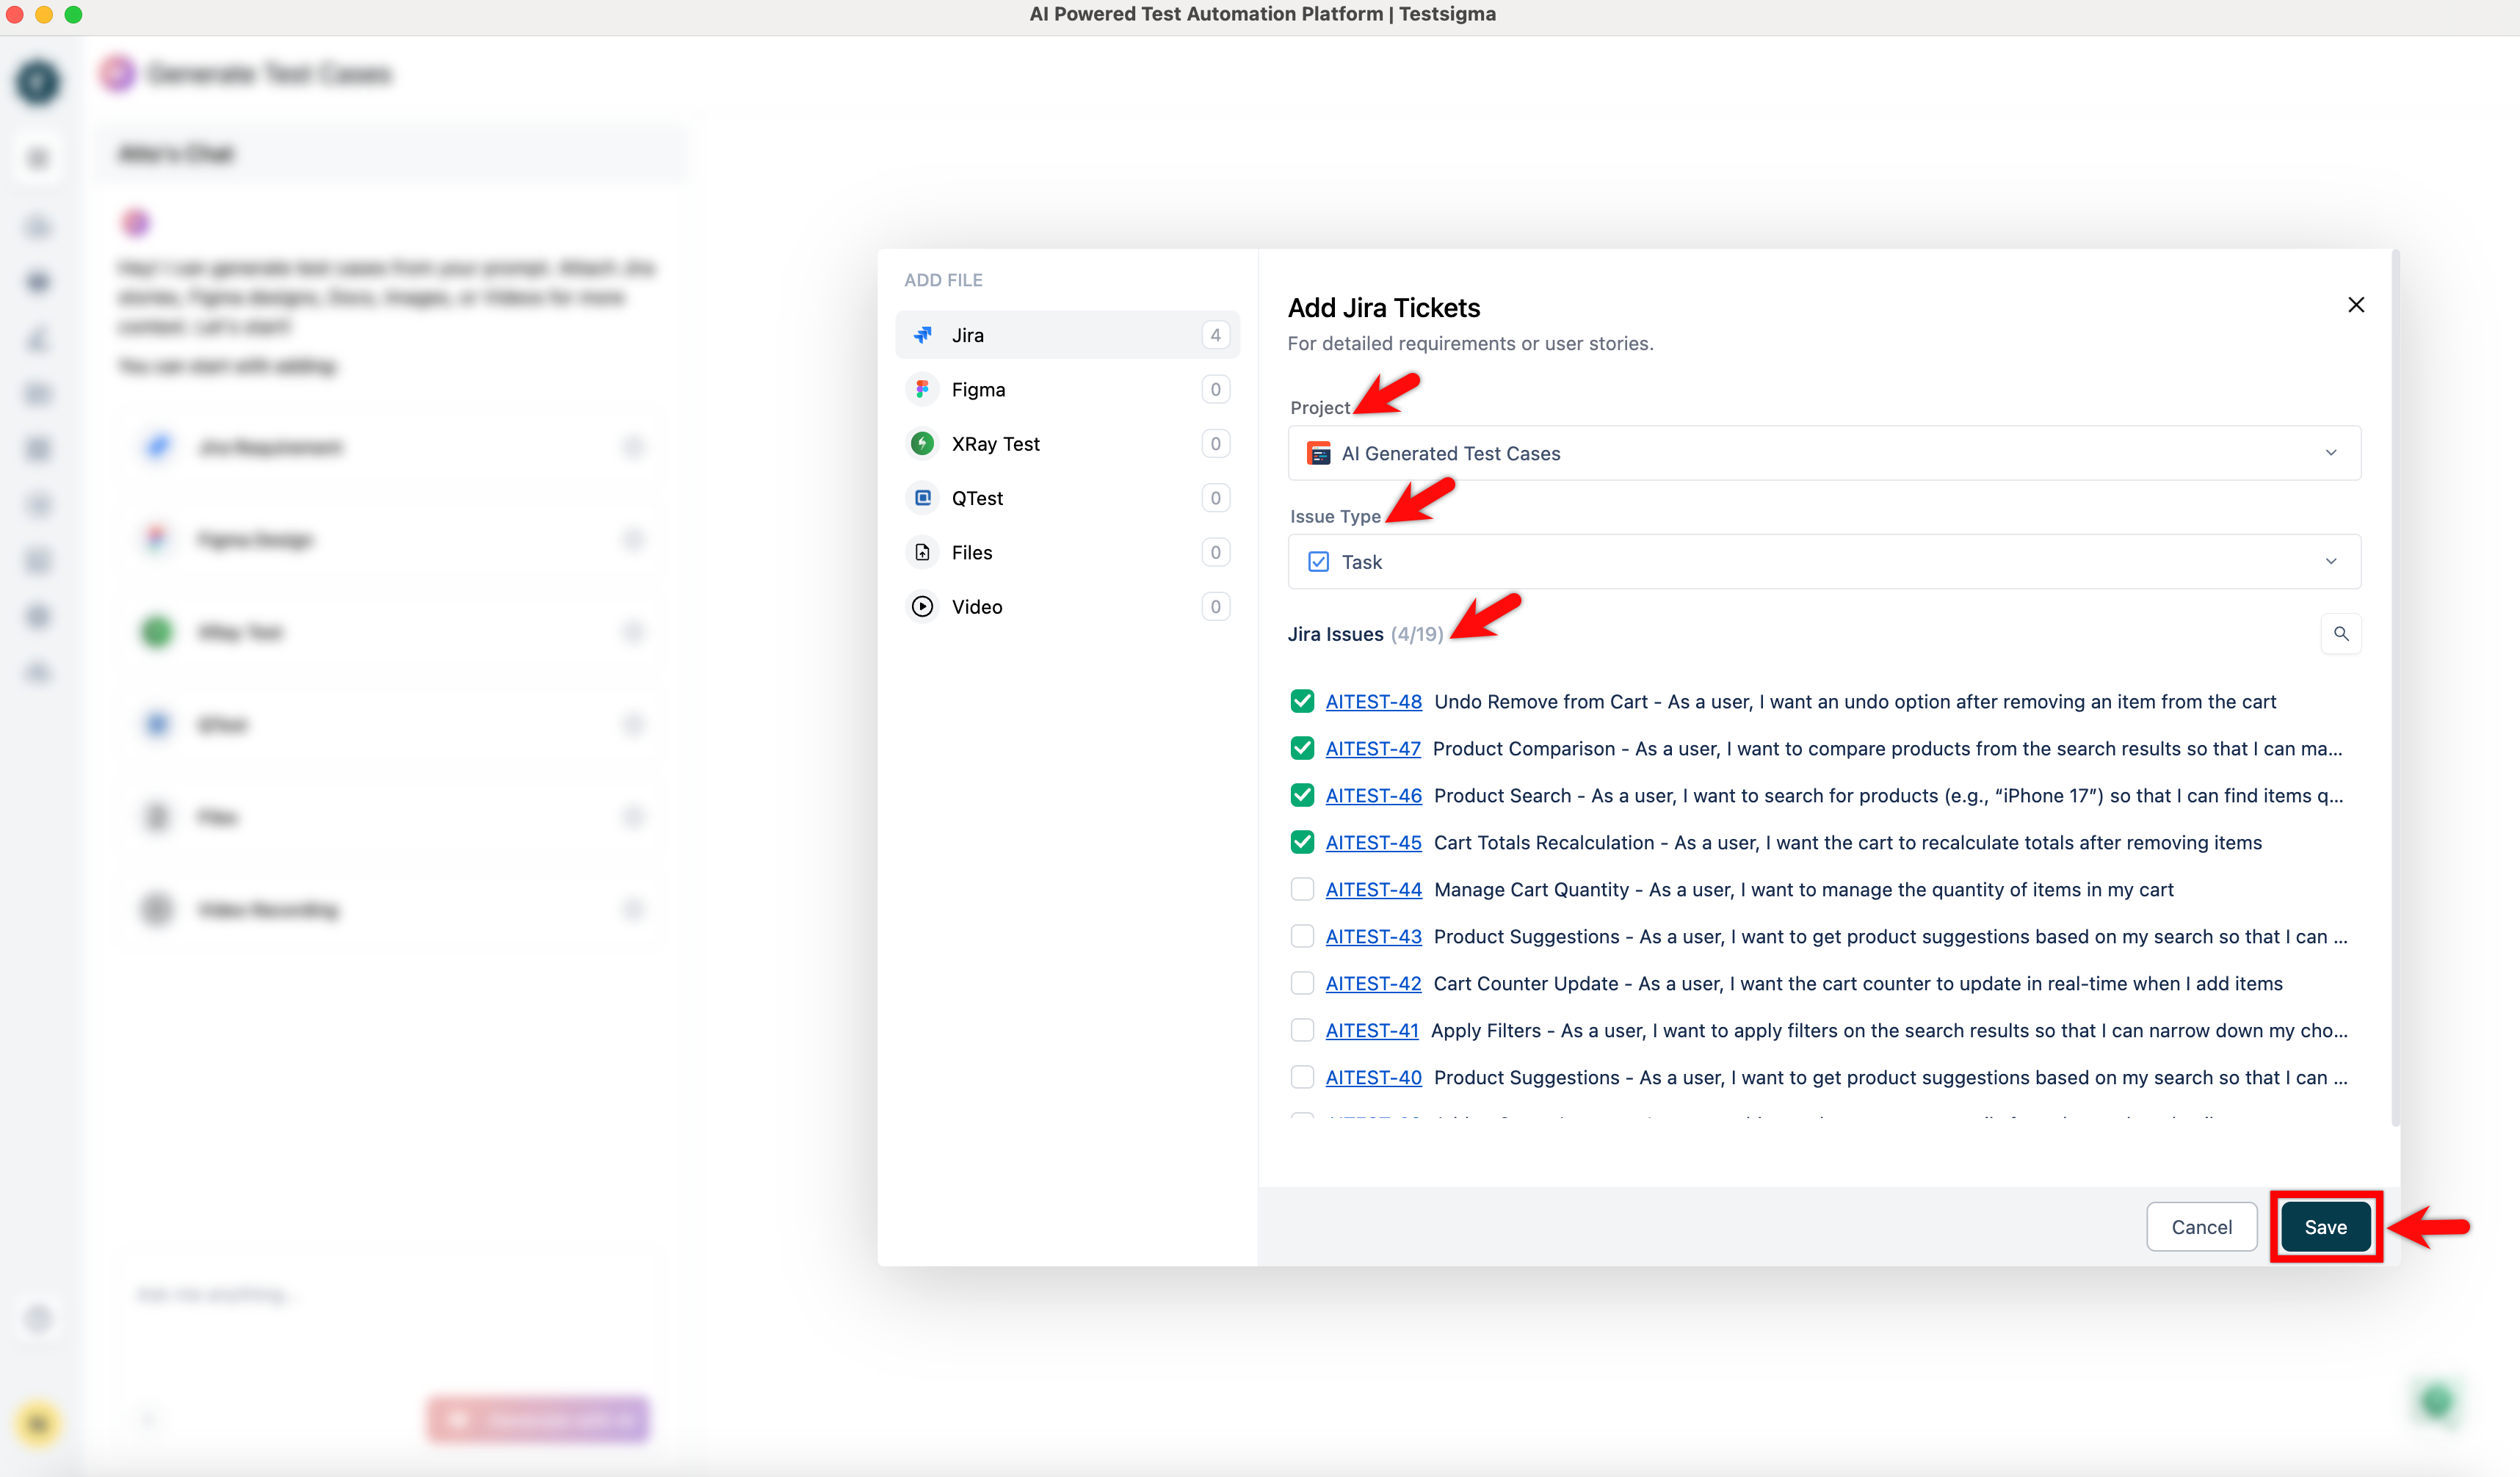
- Click Jira Requirements.
- Select a project from the Jira Project dropdown in Add Jira Tickets.
- Select Epic or Story under Issue Type. Selecting Epic lets you choose the stories under it; selecting Story lets you choose stories directly.
- Click Save.
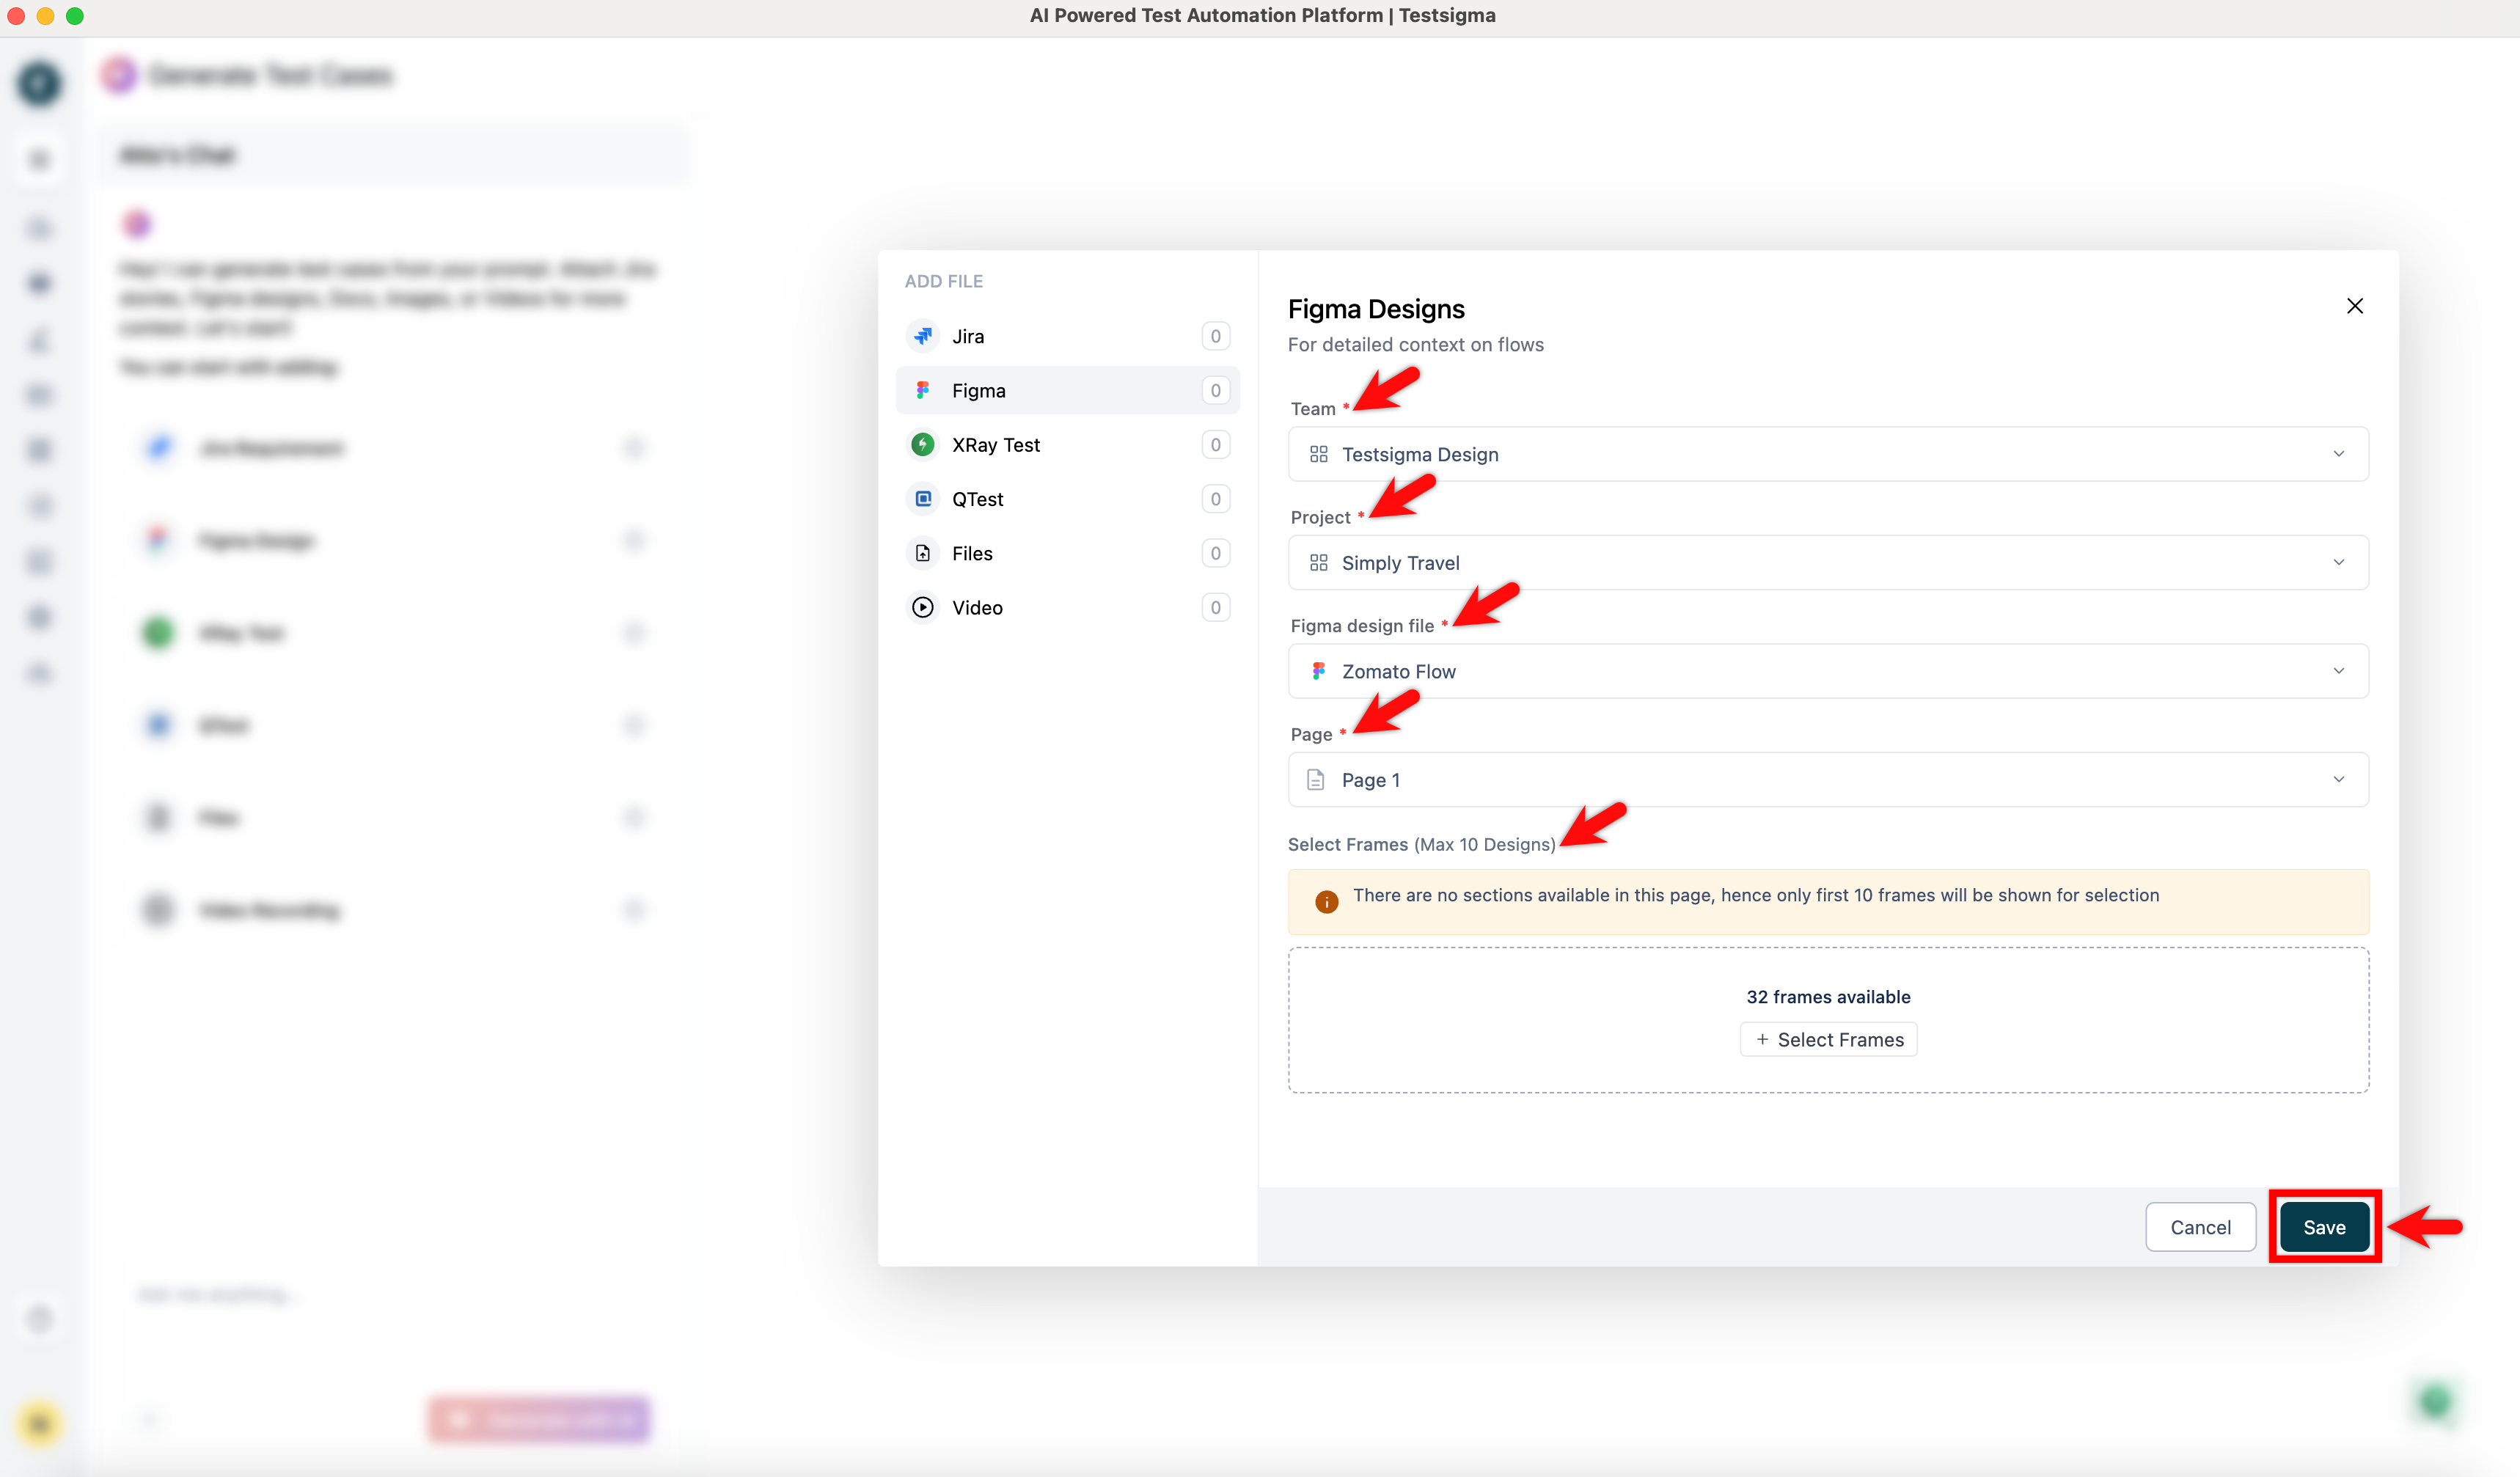
- Click Figma Designs.
- Select a Team, Project, Figma design file, Section, and Page in the Figma Designs dialog.
- Click + Select Frames, select the frames you want, and click Save.
- Click QTest.
- Select a Project and a Module in the Qtest dialog.
- Select the test cases to use as input.
- Click Save.
- Click Confluence.
- Select the Confluence Space holding your requirements.
- Select the Pages to use as input.
- Click Save.
- Click Video Recording.
- Click Add Files in the Video Recording dialog.
- Click Browse, select the video, and wait for the upload.
- Click Save, then Save again.
- Click Files.
- Click Add Files in the Files Upload dialog.
- Click Browse and select the files holding the test information. Images and PDFs are supported.
- Click Add Files, then Save.
For a Salesforce application, the Flows and Workflows in your connected Salesforce instance are available as input alongside the sources above.
The Live Recorder captures your own walkthrough of the application as context.
- Click Live Recorder.
- Click Start Recording in the Live Recorder dialog. A Chrome session opens.
- Enter the URL to test and click Start Recording.
- Select Entire screen or Window when asked what to share.
- Perform the actions you want Atto to learn from.
- Click Stop, review the recording, and click Continue.
- Review it once more and click Continue. Testsigma reopens with the recording in the Live Recorder dialog.
- Click Save.
Generate the test cases
Section titled “Generate the test cases”-
Enter a prompt describing the test cases you want.
-
Leave Read existing test case library selected so Atto builds around test cases you already have, or clear it to ignore them.
-
Click Generate with AI.
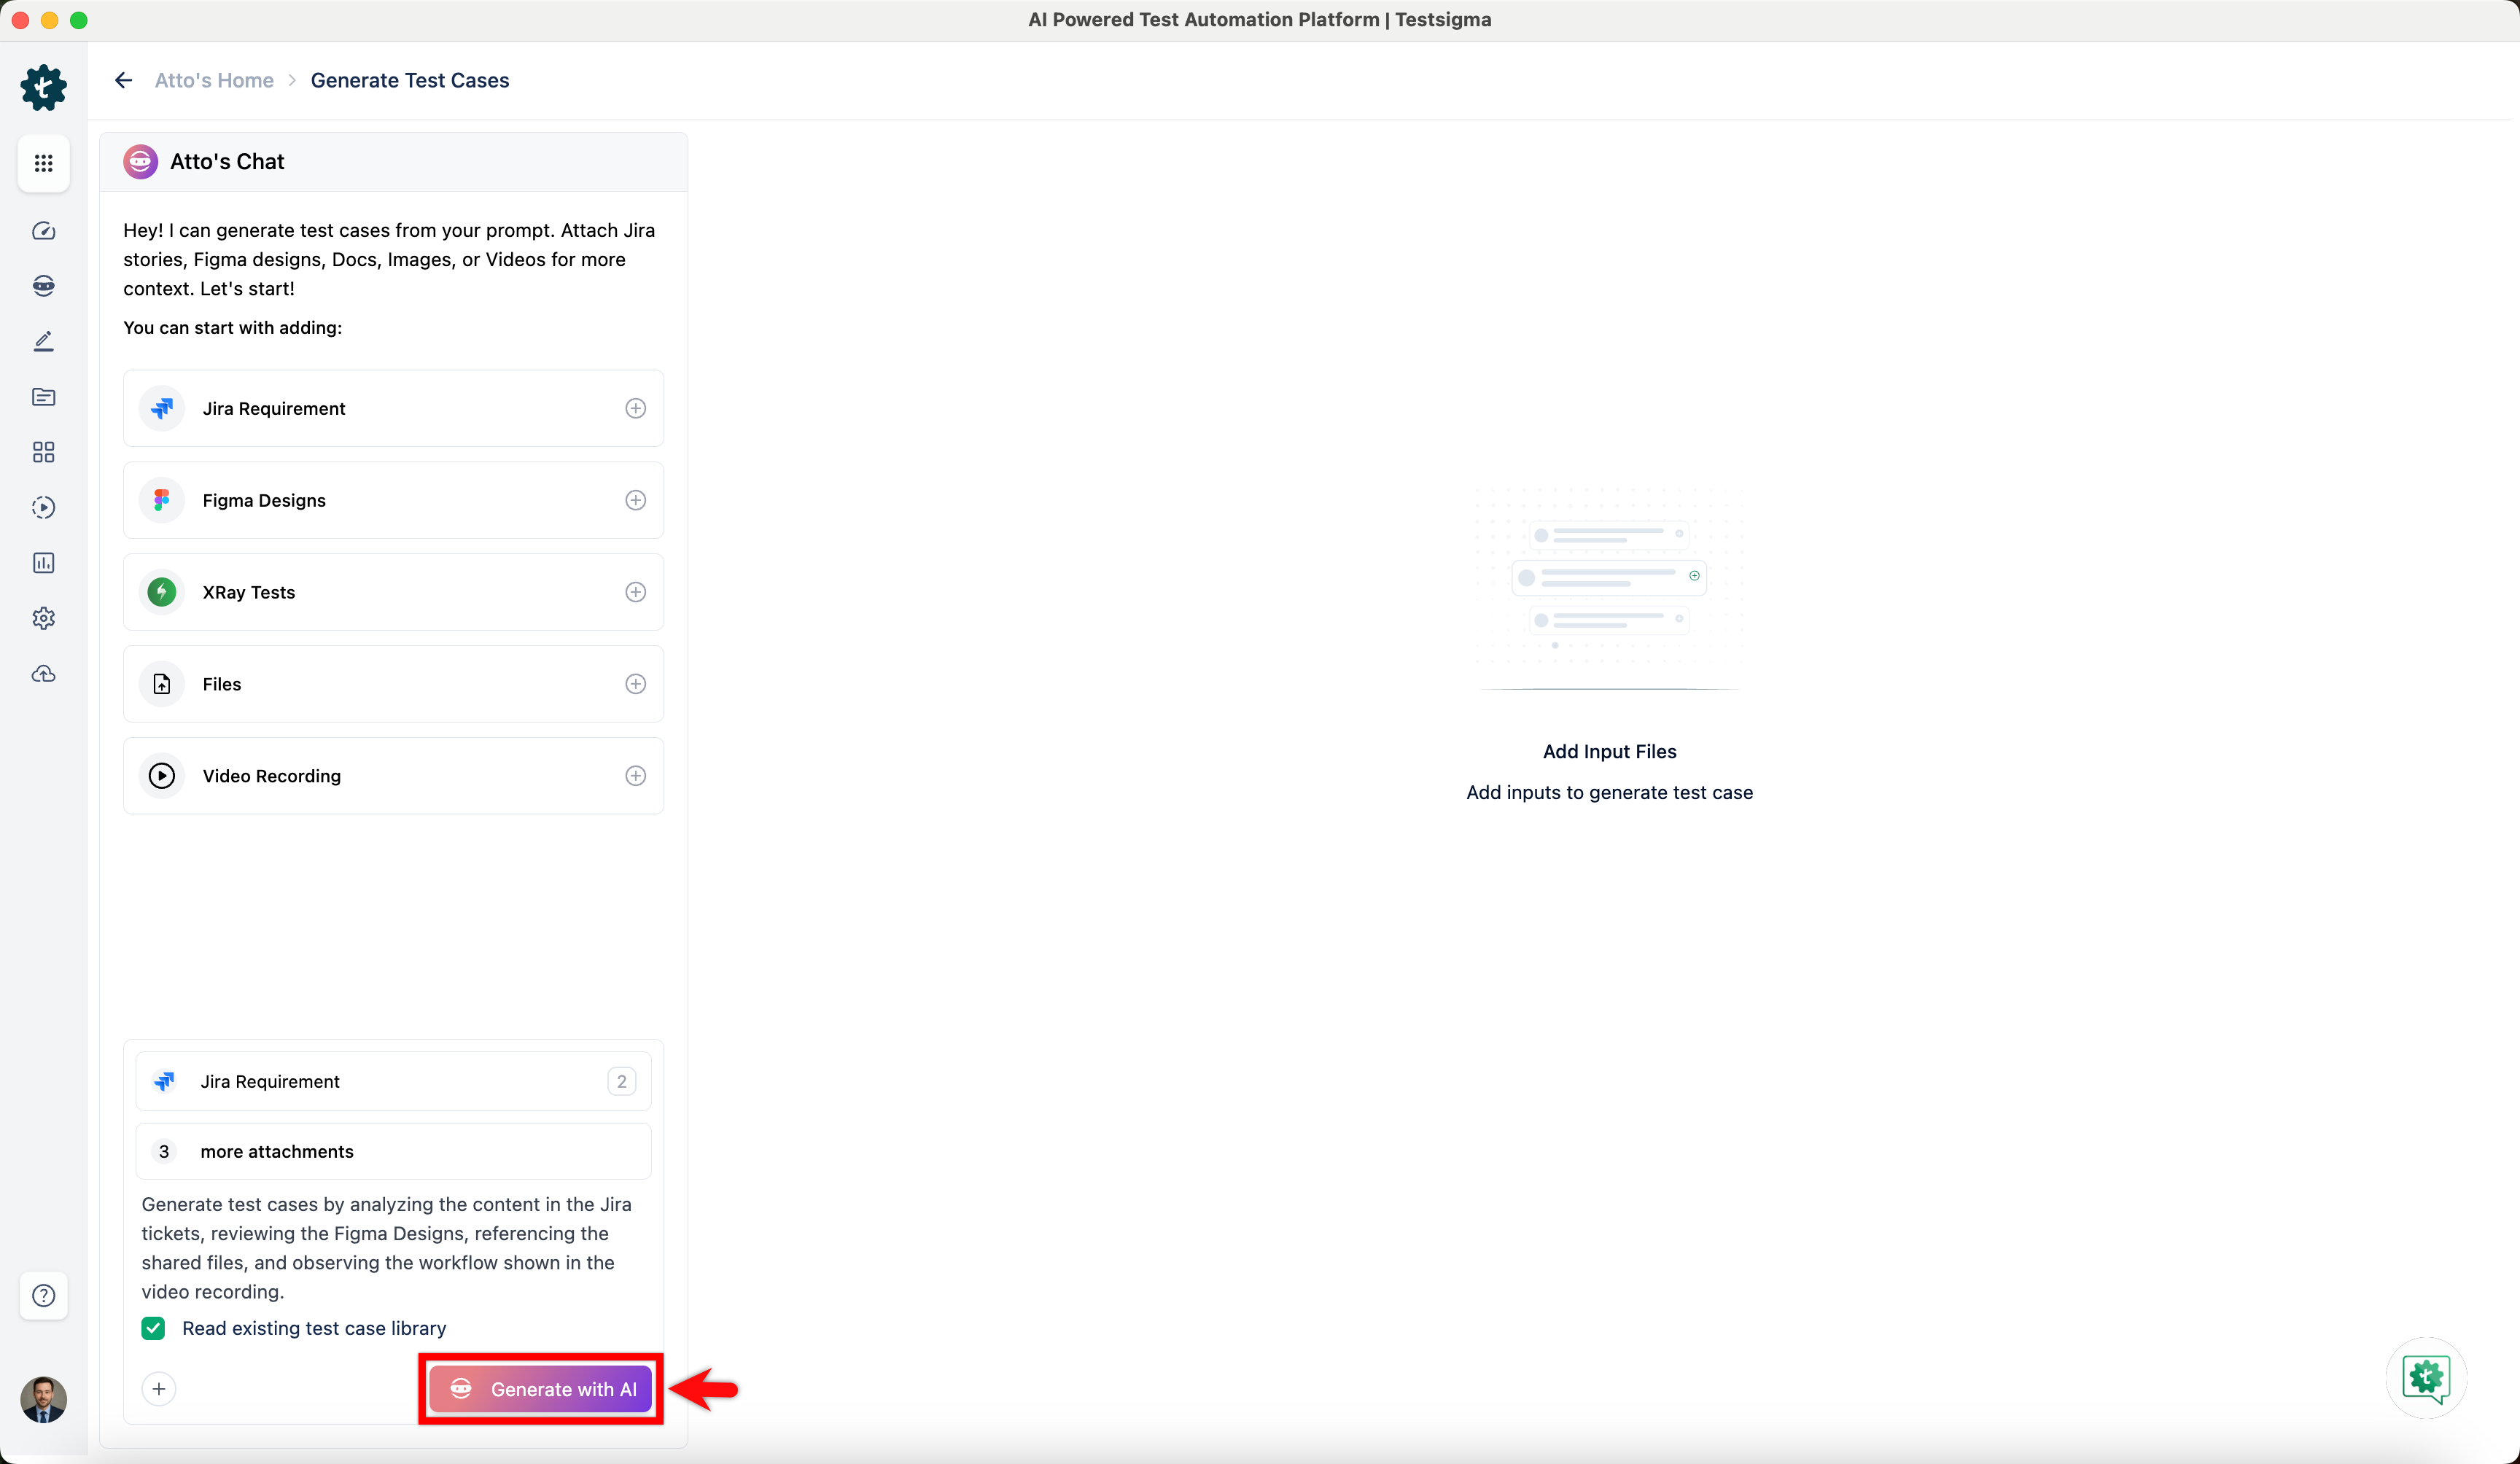
The generated test cases carry manual steps. Run with Copilot turns them into automated ones, below. Agentic Learning does the same by exploring the application, and is covered in Agentic execution.
What each application type needs
Section titled “What each application type needs”Every application type takes the same input sources: Jira, Figma, qTest, Confluence, video recordings, files, and the Live Recorder. Two have something extra:
- Salesforce adds the Flows and Workflows of a connected Salesforce instance as an input source. Its steps default to API rather than UI
- REST and SOAP APIs take a schema file instead of a requirement, through the separate flow below
Whichever you use, the integration for that input source has to be configured first, along with a project and an application of that type. See Set up Atto above.
Generate API test cases from a schema
Section titled “Generate API test cases from a schema”API generation does not run from Atto’s Home. It reads a schema file instead of a requirement.
Turn on Generate test cases from Swagger schema under Settings > Preferences > Generative AI features first. REST schemas are .json; SOAP schemas are .wsdl or .xml.
-
Go to Create Tests > Test Cases.
-
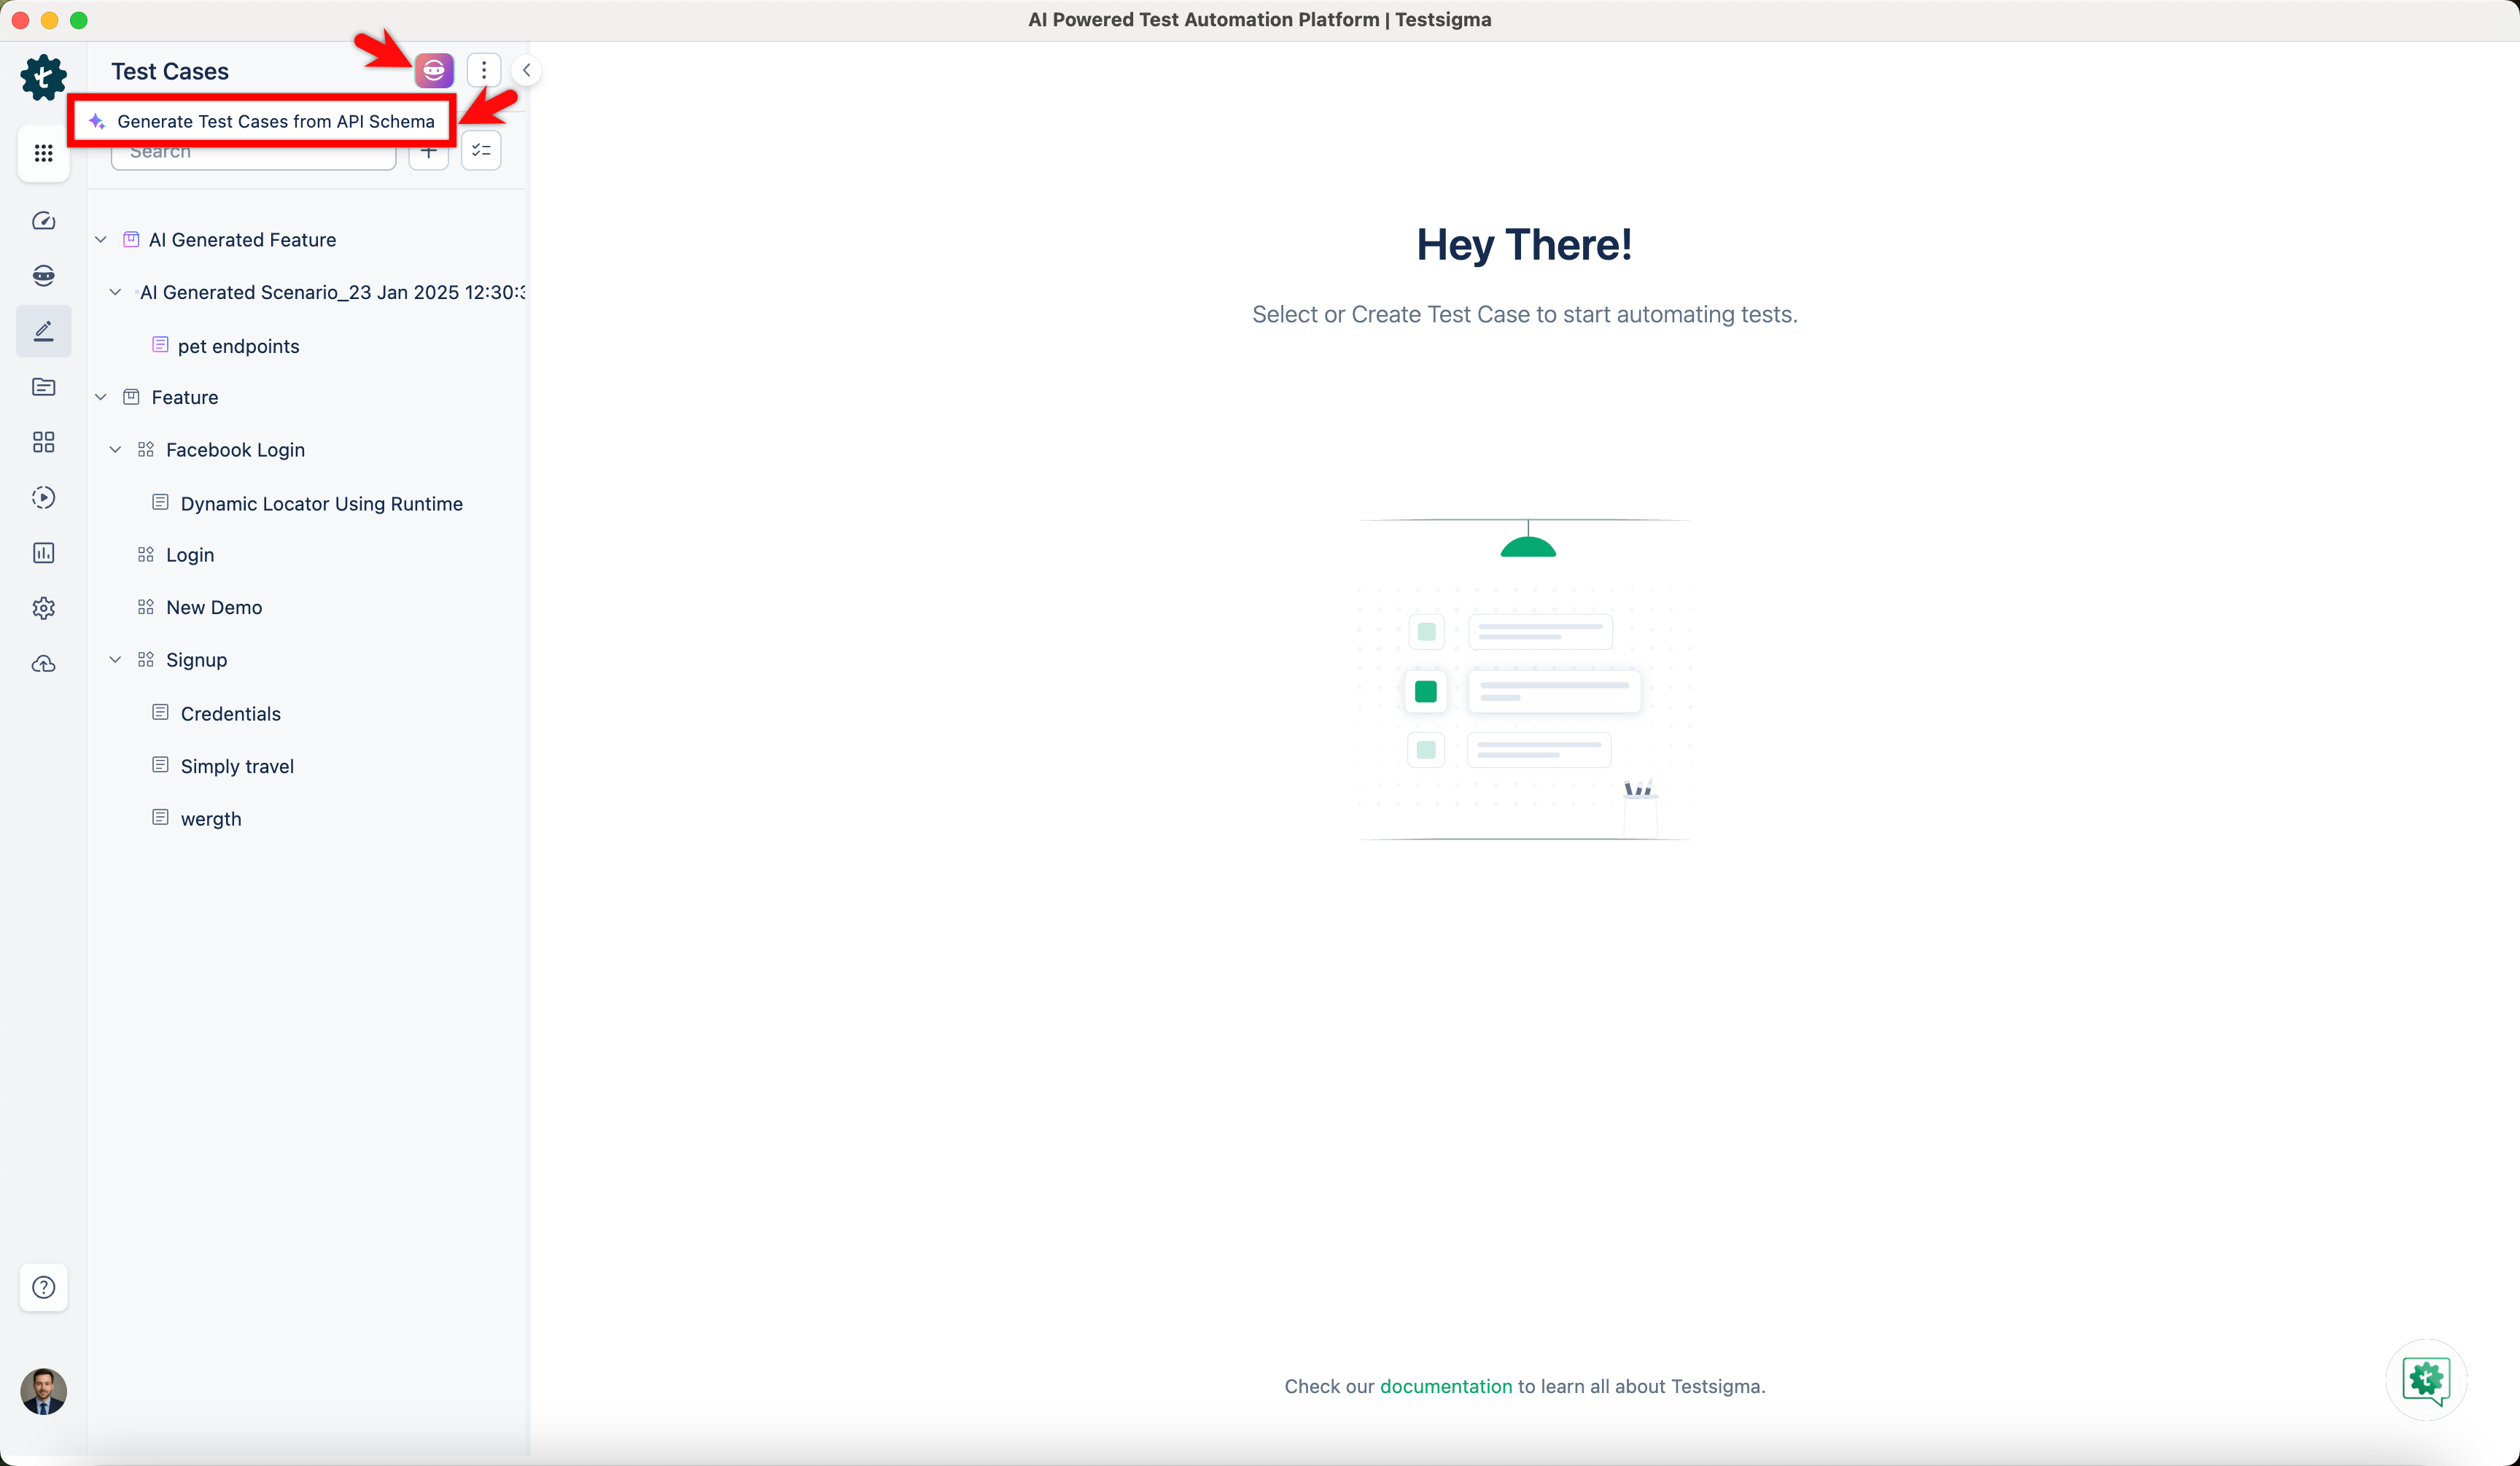
Click Atto in Test Case Explorer and select Generate Test Cases from API Schema.
-
Click Select file to import in Add API Schema and choose your schema file.
-
Clear any test cases you do not want. All are selected by default.
-
Review the steps in Test Steps, and the endpoint, body, and status verifications in Verification Details.
-
Click Save Test Cases.
Run with Copilot
Section titled “Run with Copilot”The generated test cases carry manual steps, and 2 features turn them into automated ones. Run with Copilot executes the steps you already have. Agentic Learning explores the application to find the steps you are missing, and is covered in Agentic execution.
Running before saving checks element detection, assertions, and test data against the live application rather than assuming the generated steps were right, and lets you debug them before the test case reaches the library.
-
Generate the test cases and open one from the list.
-
Review the steps on the Manual Steps tab. Click Edit to change them by hand, or enter a prompt and click Refine manual steps to have Atto adjust them.
-
Click Generate Automated Steps to convert the manual steps into NLP steps.
-
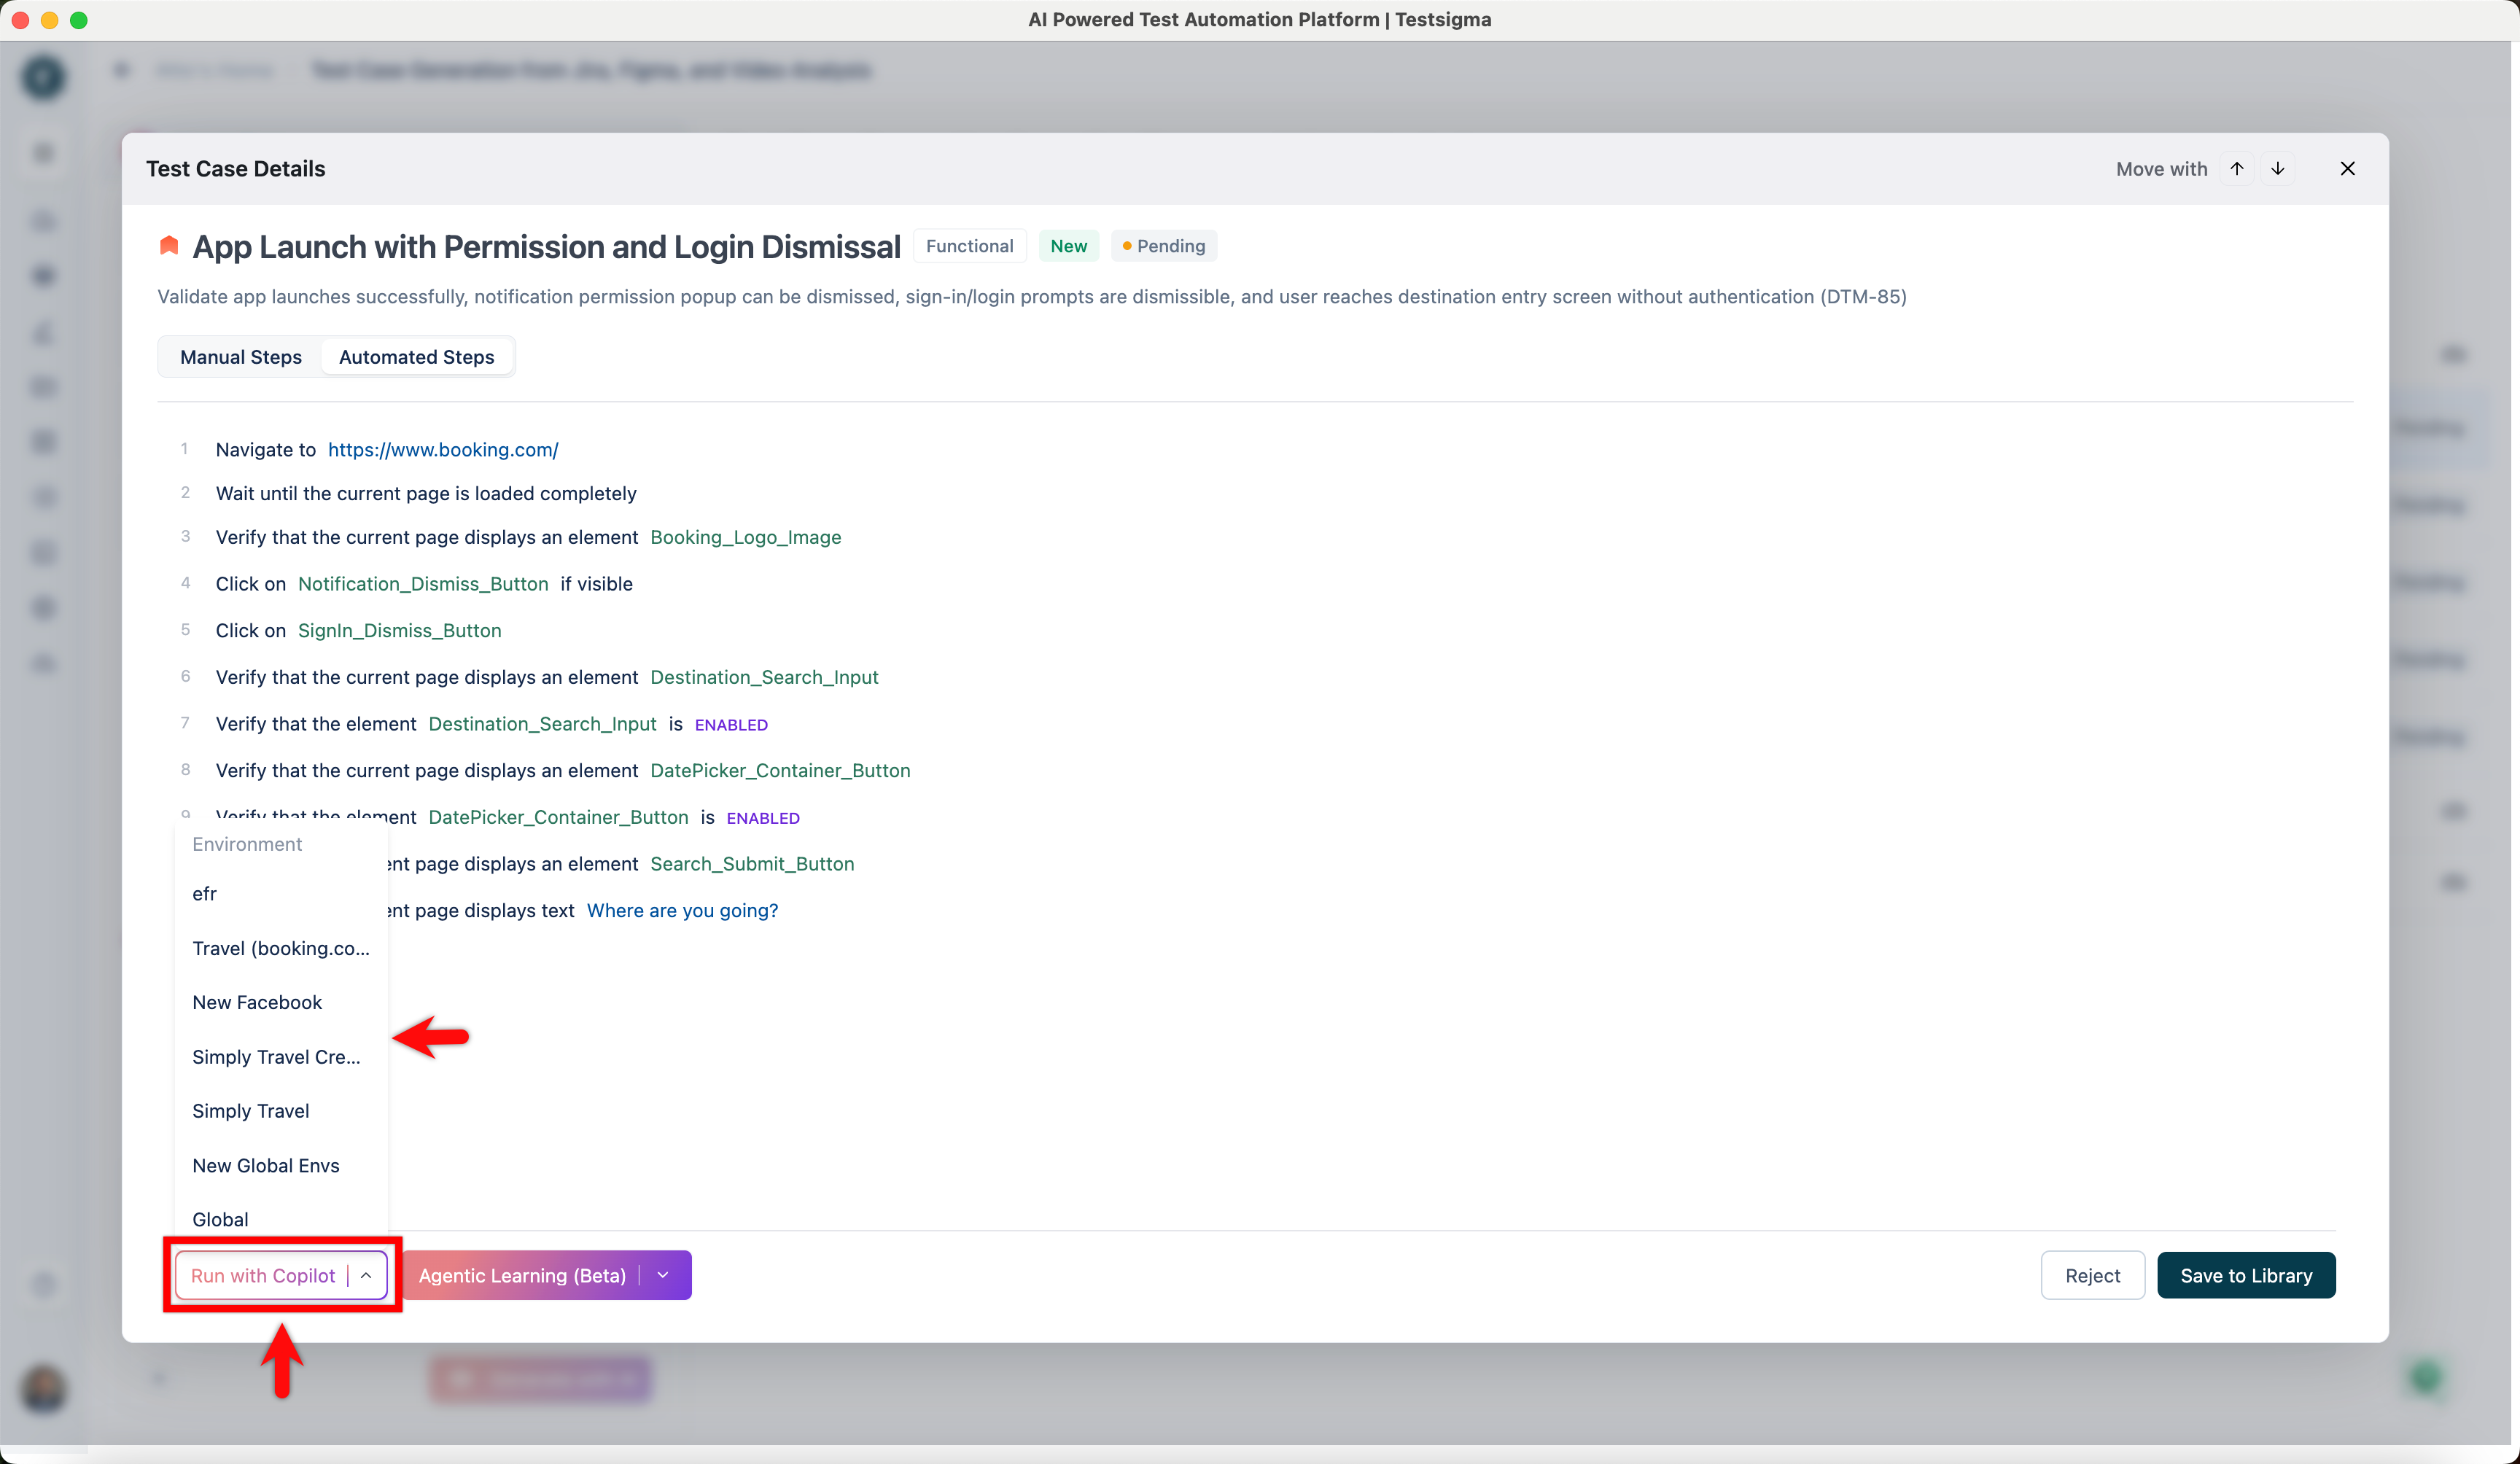
Hover over Run with Copilot and select the environment to run in. Copilot executes the steps.
-
Review the results, then click Save to Library.
-
Select the folder and subfolder in Select Location.
With auto-healing enabled, a Copilot run validates element locators against the live application as it executes. Where a locator no longer matches, because the UI changed, Testsigma identifies the updated locator and finds the element rather than failing the step.
After the run, Auto-Healing Insights shows what was healed and lets you update the element locator so the change is permanent.
Save over an existing test case
Section titled “Save over an existing test case”Atto checks the library while it generates. Where a test case already exists, Atto updates it rather than creating a second copy, and marks it with an Update tag.
-
Expand a subfolder and select the updated test case.
-
Click See What’s New to compare the previous steps against the newly generated ones, and Hide Difference to close the comparison.
-
Click Generate Automated Steps.
-
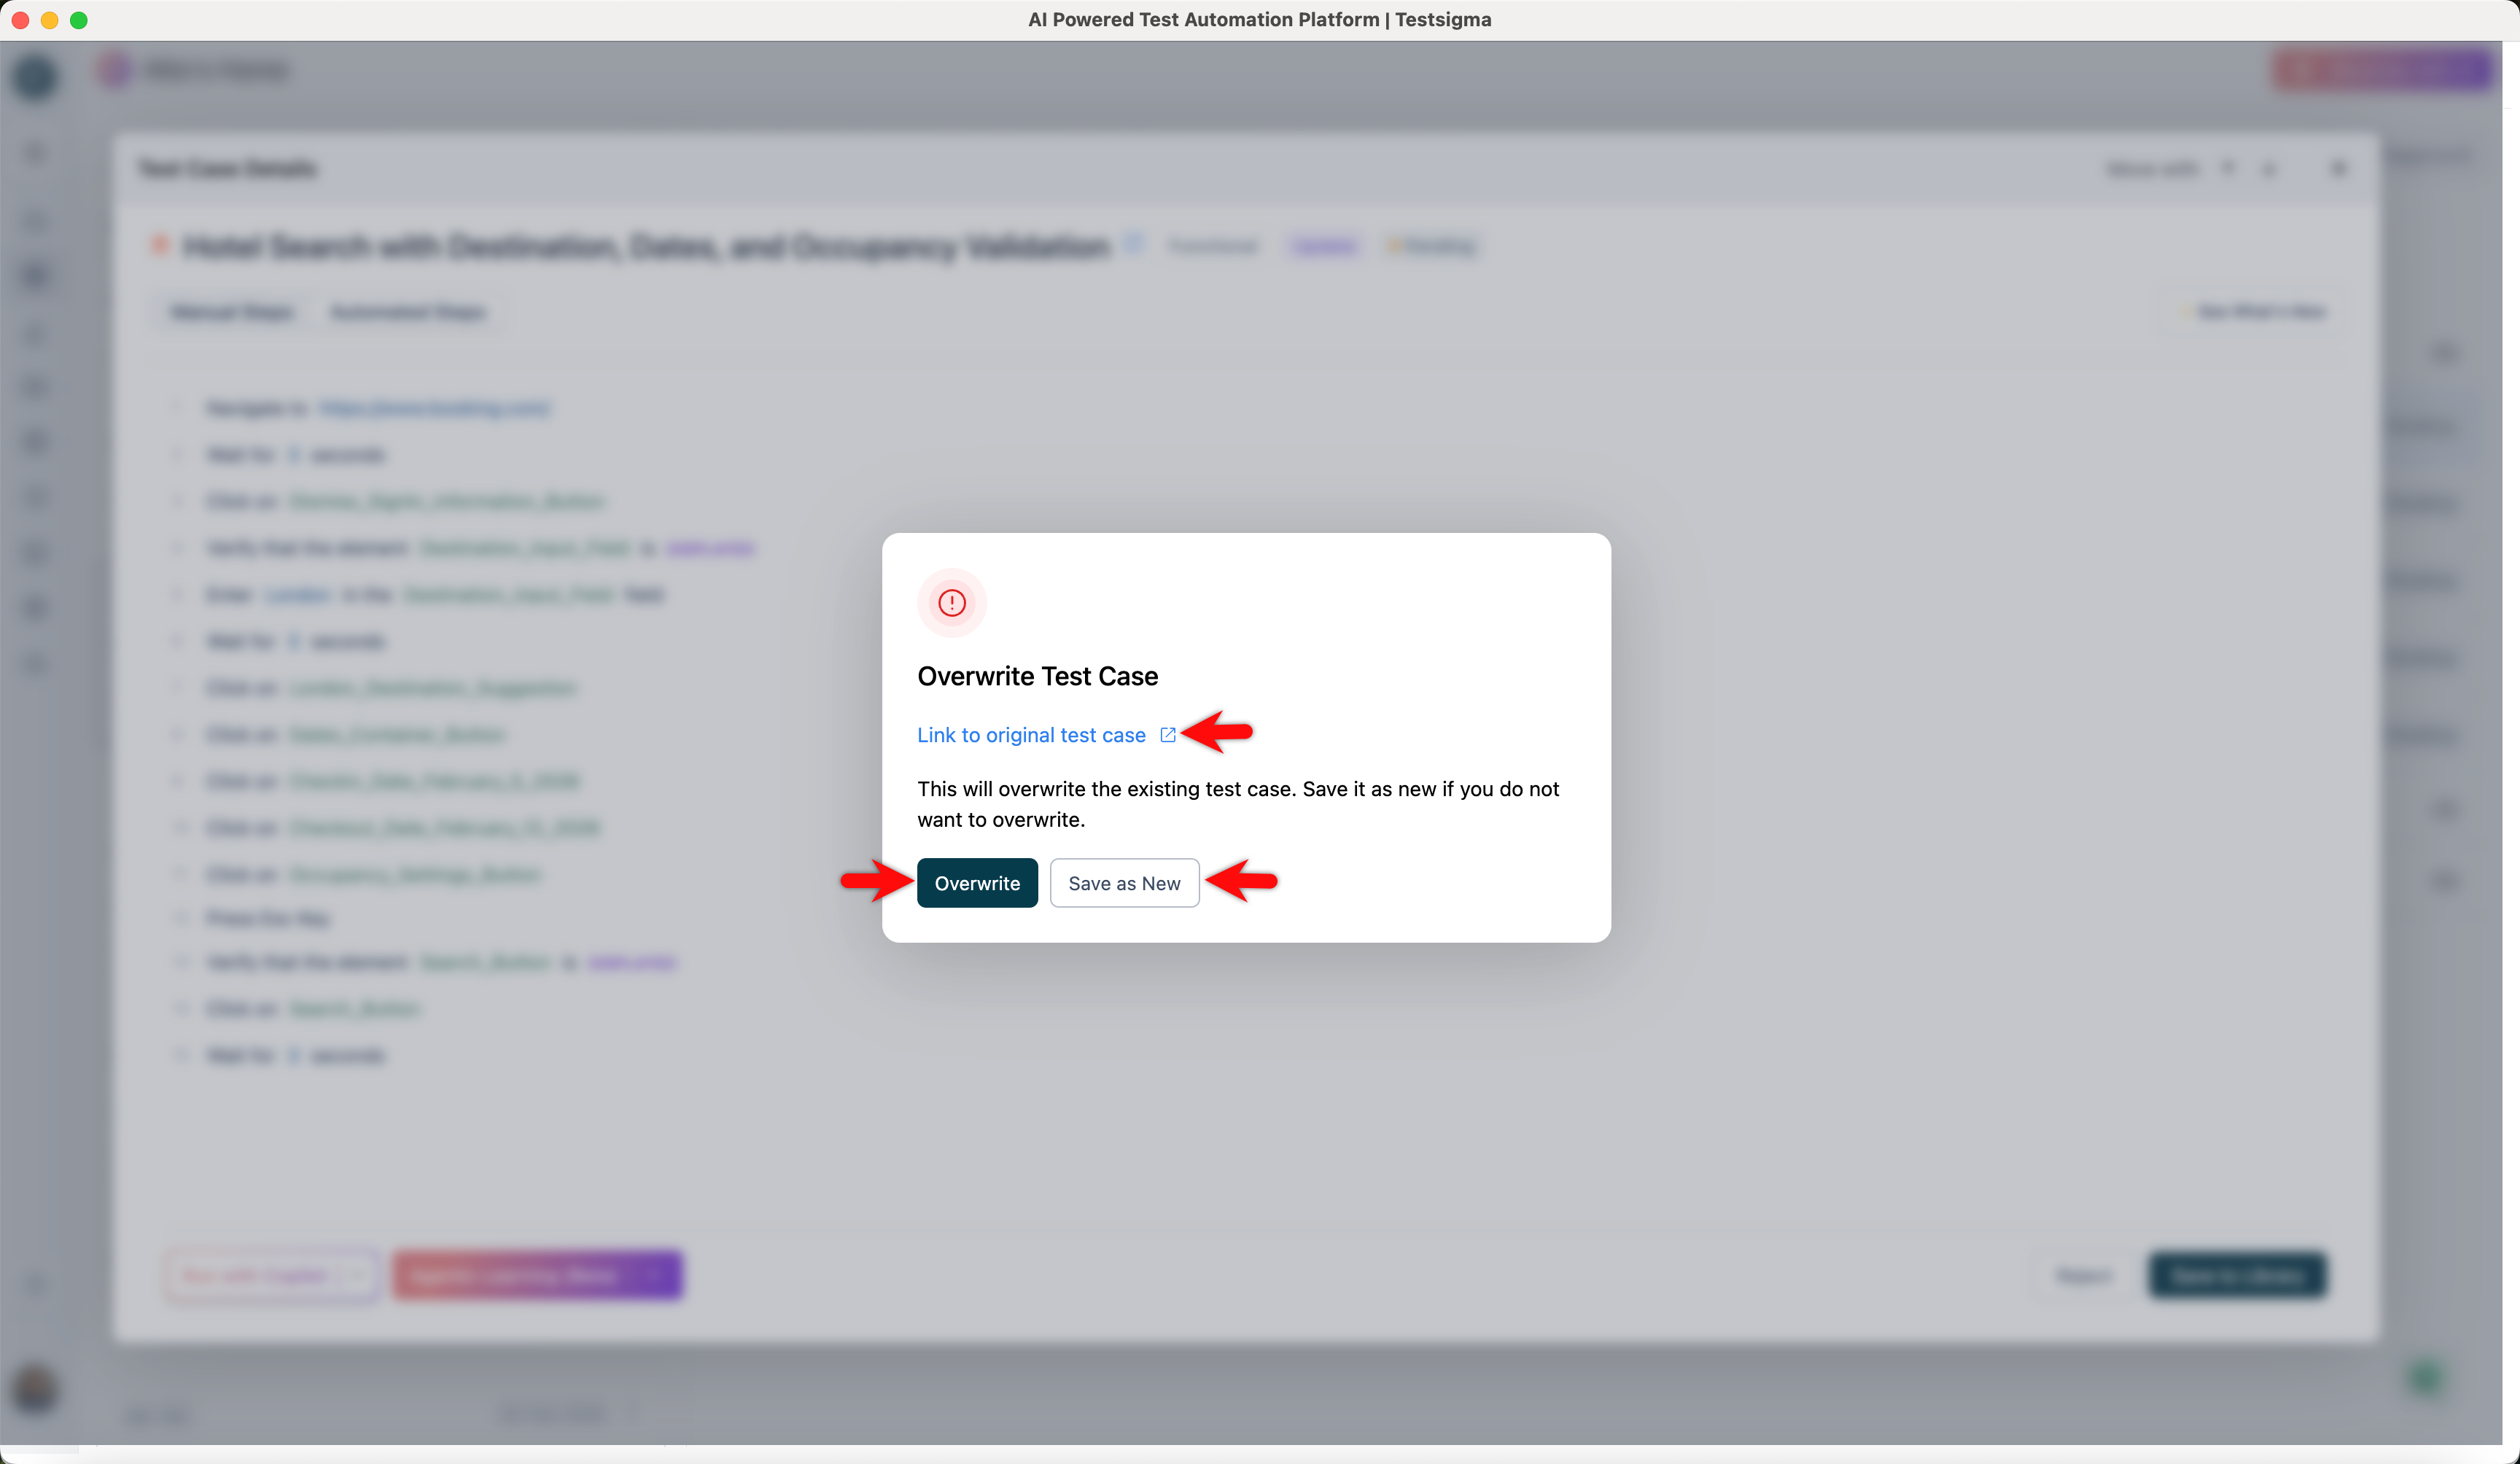
Click Save to Library. The Overwrite Test Case dialog opens.
-
Choose what happens to the existing test case:
- Overwrite: replaces it with the new version.
- Save as New: keeps both, saving the new version as a copy.
- Link to original test case: lets you review the existing test case before saving.
Test Data Generator
Section titled “Test Data Generator”The Test Data Generator builds a test data profile for a data-driven test case, instead of you entering the data set by set.
-
Go to Create Tests > Test Cases, open the test case, and go to Test Case Settings in the utility panel.
-
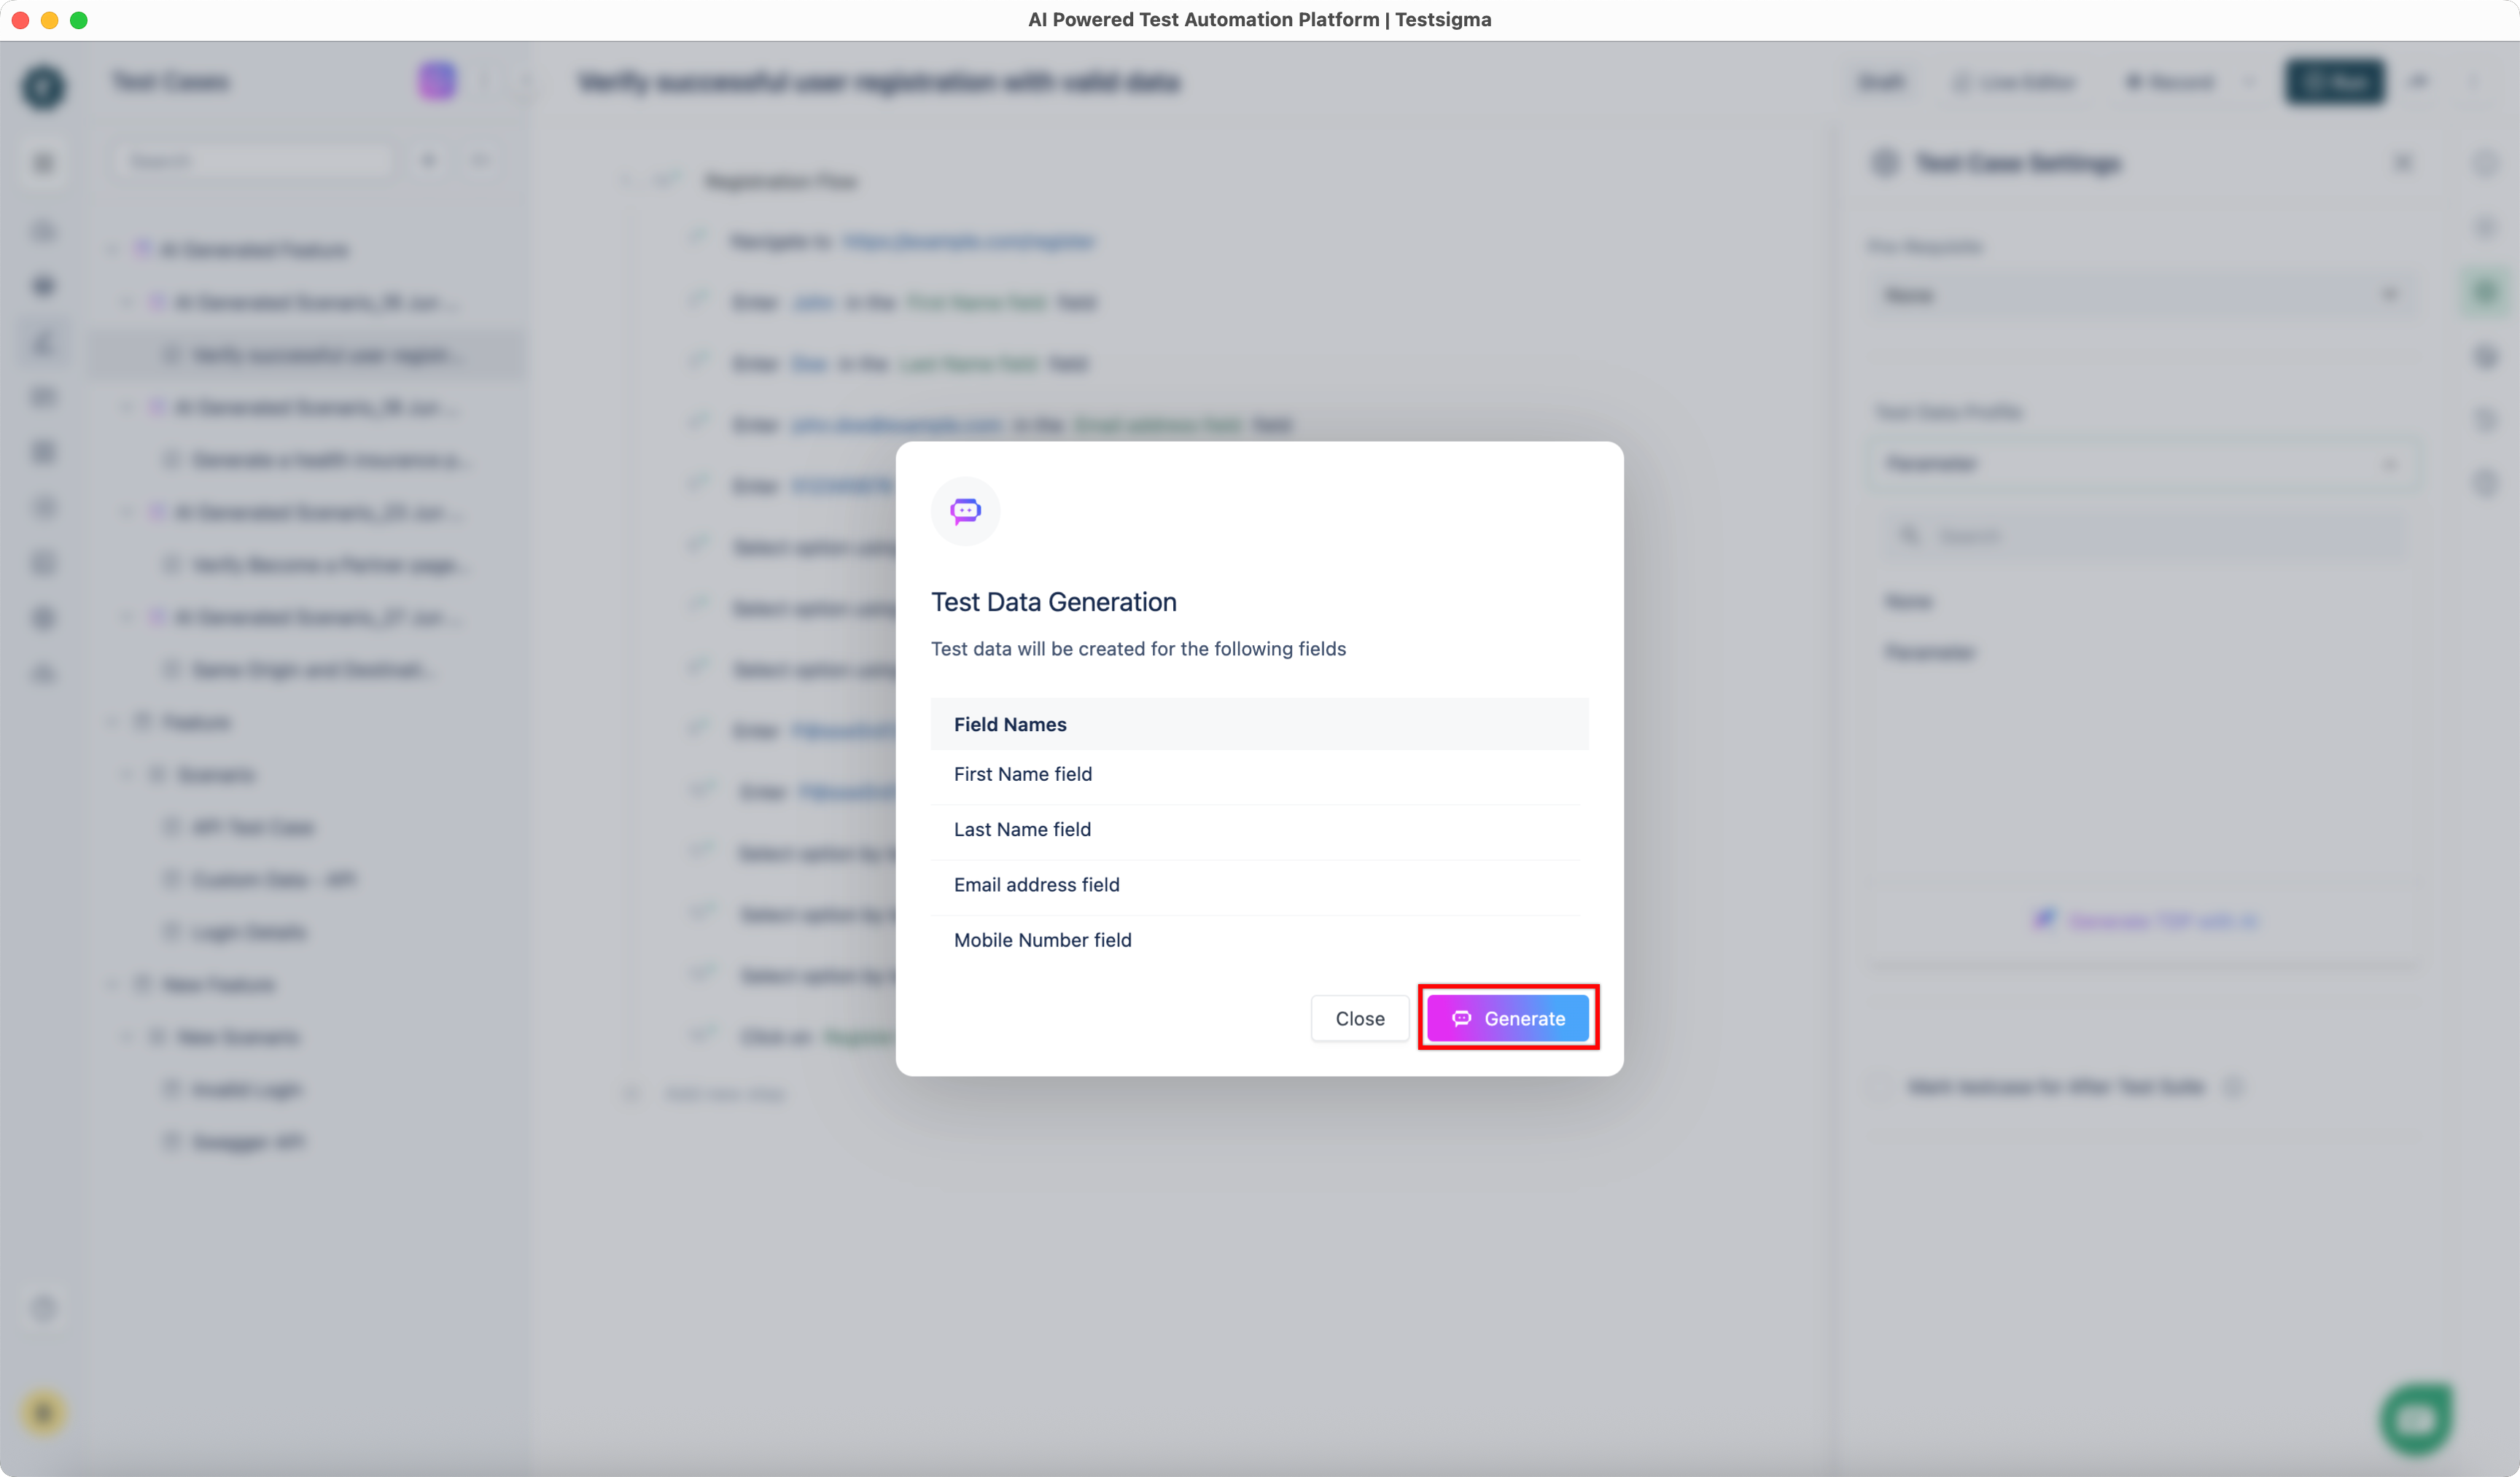
Click Test Data Profile, then Generate TDP with AI.
-
Check the fields in the Test Data Generation dialog and click Generate.
-
Click Add more rows for more data, or enter a prompt to change what is generated. A prompt asking for an Indian context, for instance, reshapes the whole data set.
-
Click Create and Replace when the data looks right.
Analyzer
Section titled “Analyzer”The Analyzer explains a failed step: the error type, the root cause, the visual evidence captured during execution, and a set of suggestions. It needs a run containing a failed step, from a test plan or a dry run.
-
Go to Run Results and select the run with the failure.
-
Open the test case and select the failed step. The header shows the error message, with Read more for the full text, and the Analysis tab shows the error code and Visual Evidence.
-
Click Analyze with Agent in the action bar.
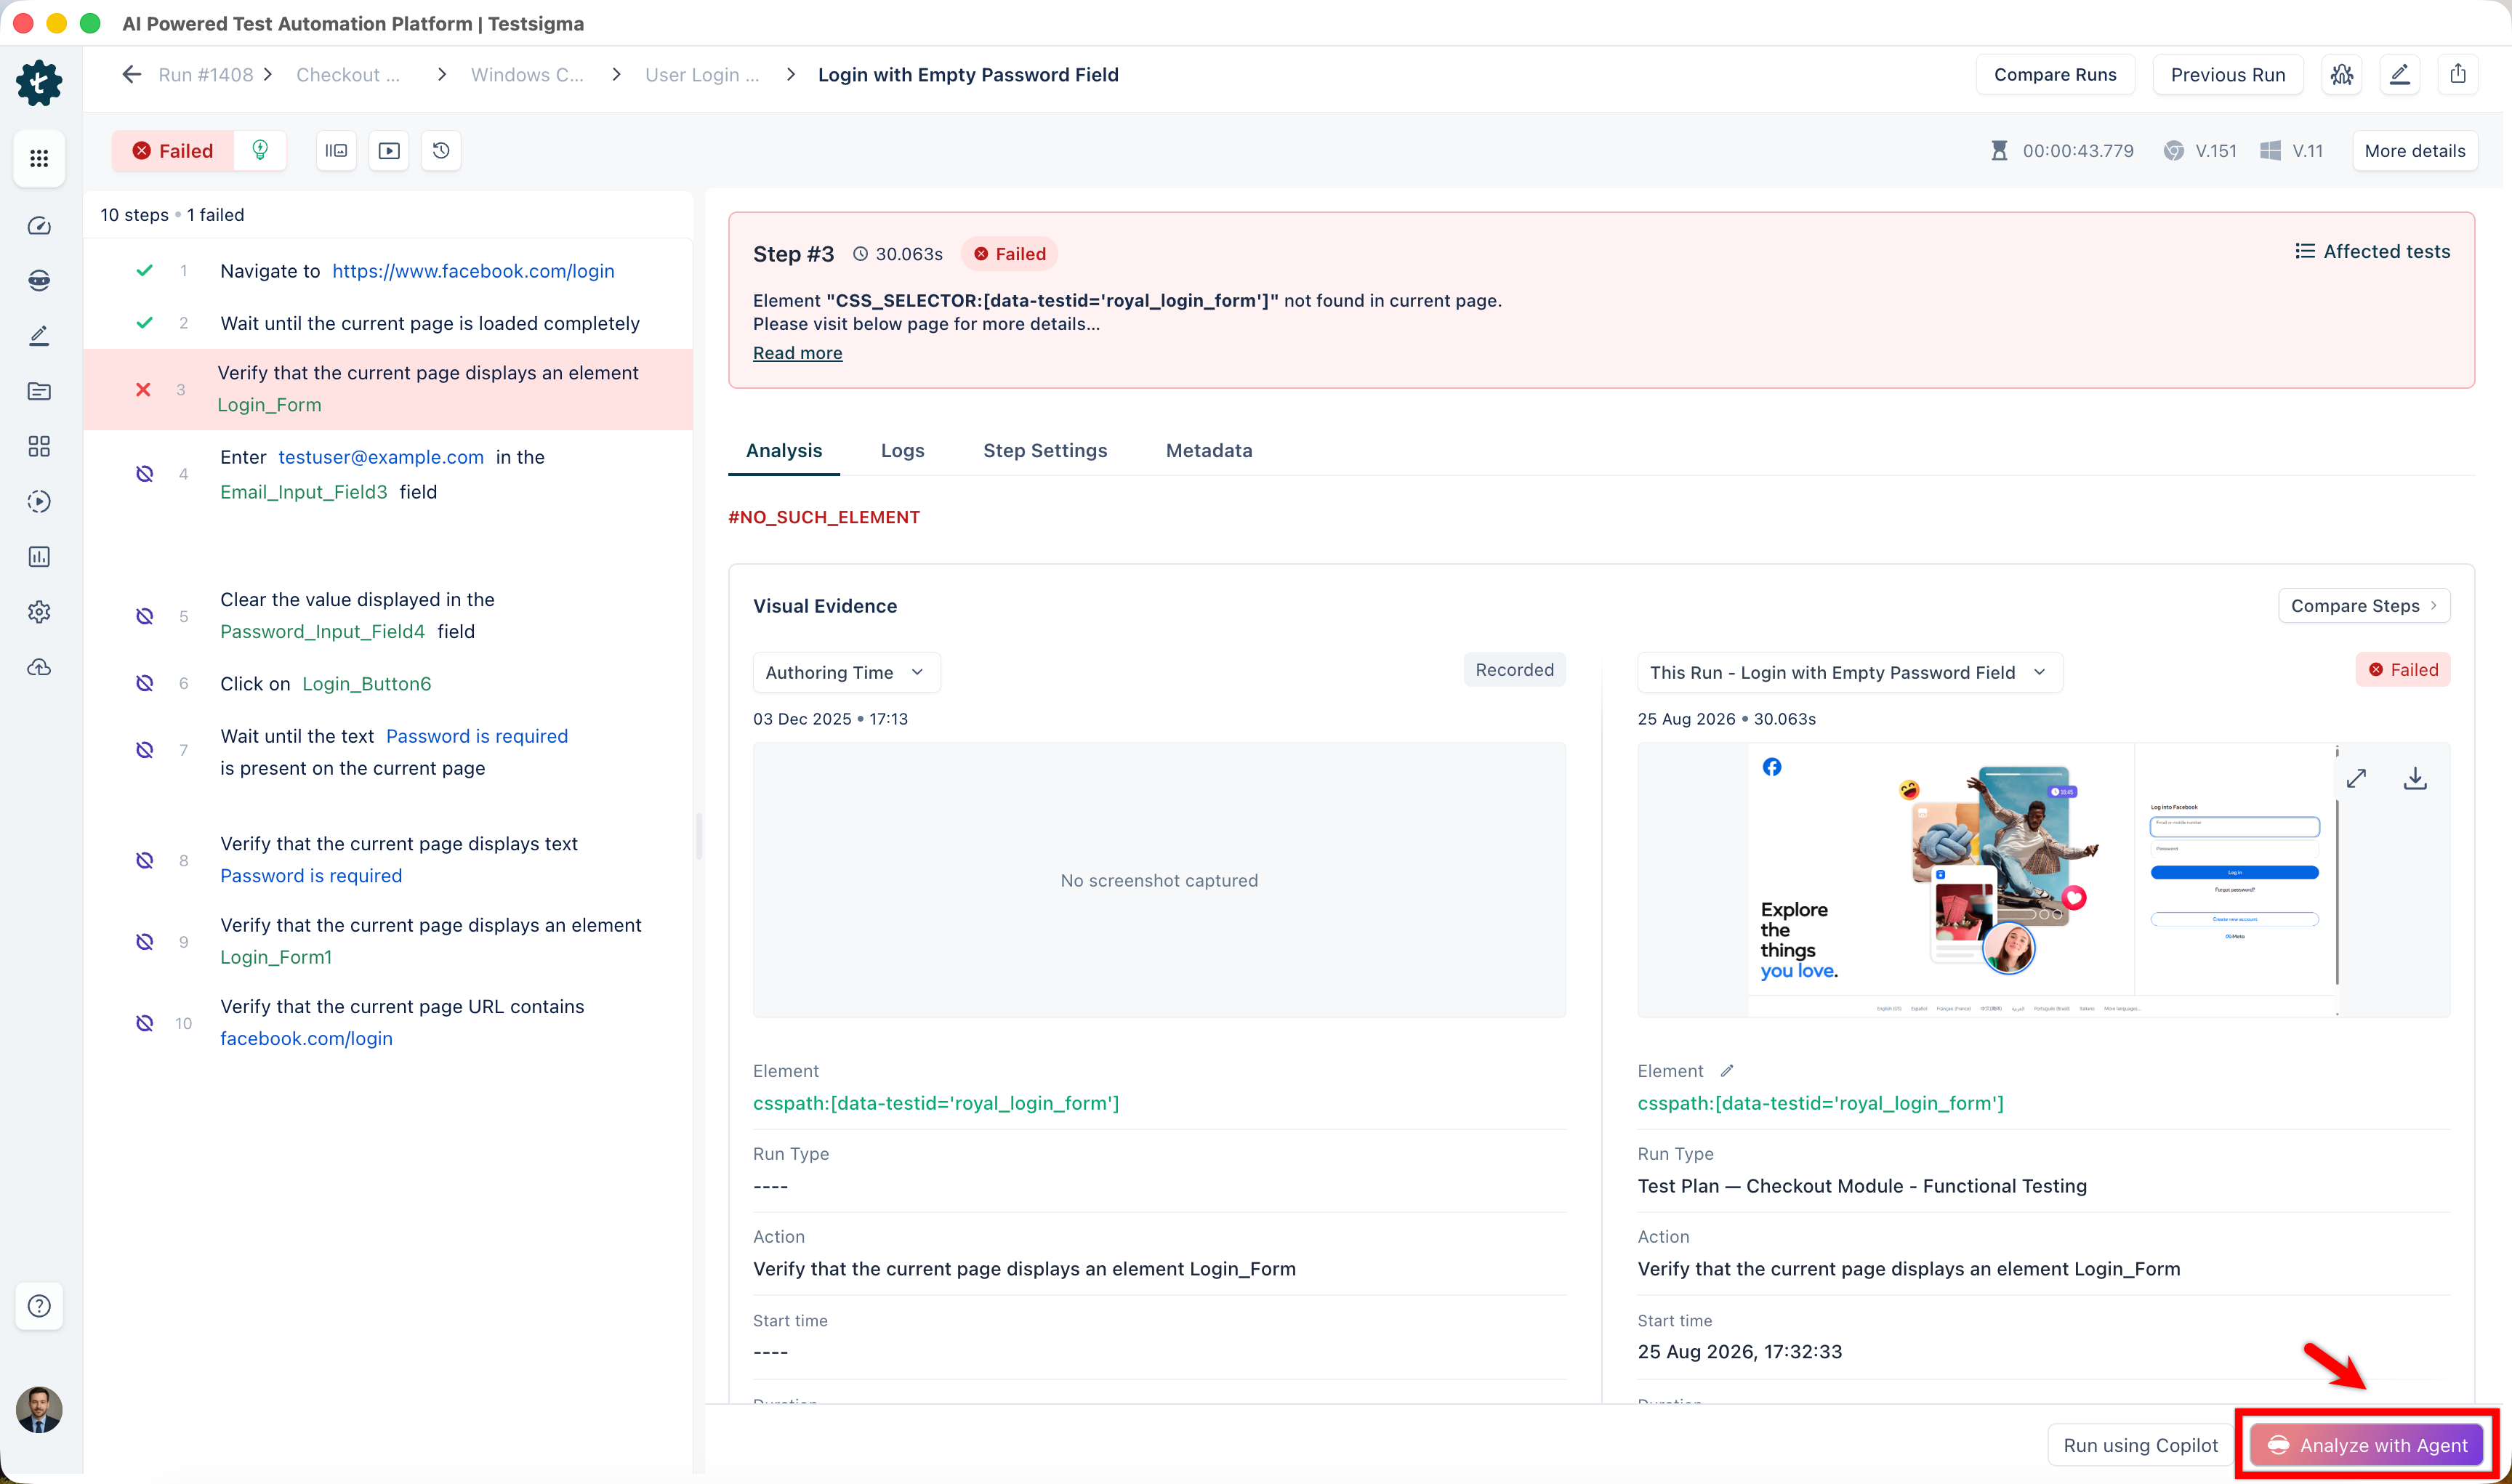
The analysis returns 4 things:
- Error Type: the category of failure, such as
ELEMENT_NOT_FOUND - Root Cause: why the step failed, based on the error message and the captured evidence
- Visual Evidence: the screenshot taken at execution. Expand Images shows it full size, and the download icon saves it
- Suggestions: a numbered list of ways to resolve the failure
Apply a fix
Section titled “Apply a fix”-
Select a suggestion in the Suggestions list. Only one at a time.
-
Click Apply Fix. Atto returns an Update Test Step card explaining what it found, with the current version of the step and the proposed version.
-
Compare the two versions.
-
Click Update Step to apply the change.
-
Rerun the test to validate the fix.
Bug Reporter
Section titled “Bug Reporter”The Bug Reporter files a failure as a bug from the Analyzer panel, carrying the error type, root cause, suggested fixes, and screenshots into the ticket. That removes the step where someone reproduces the failure by hand to describe it.
This needs a bug tracking tool integrated with Testsigma, and a step the Analyzer has already reviewed.
-
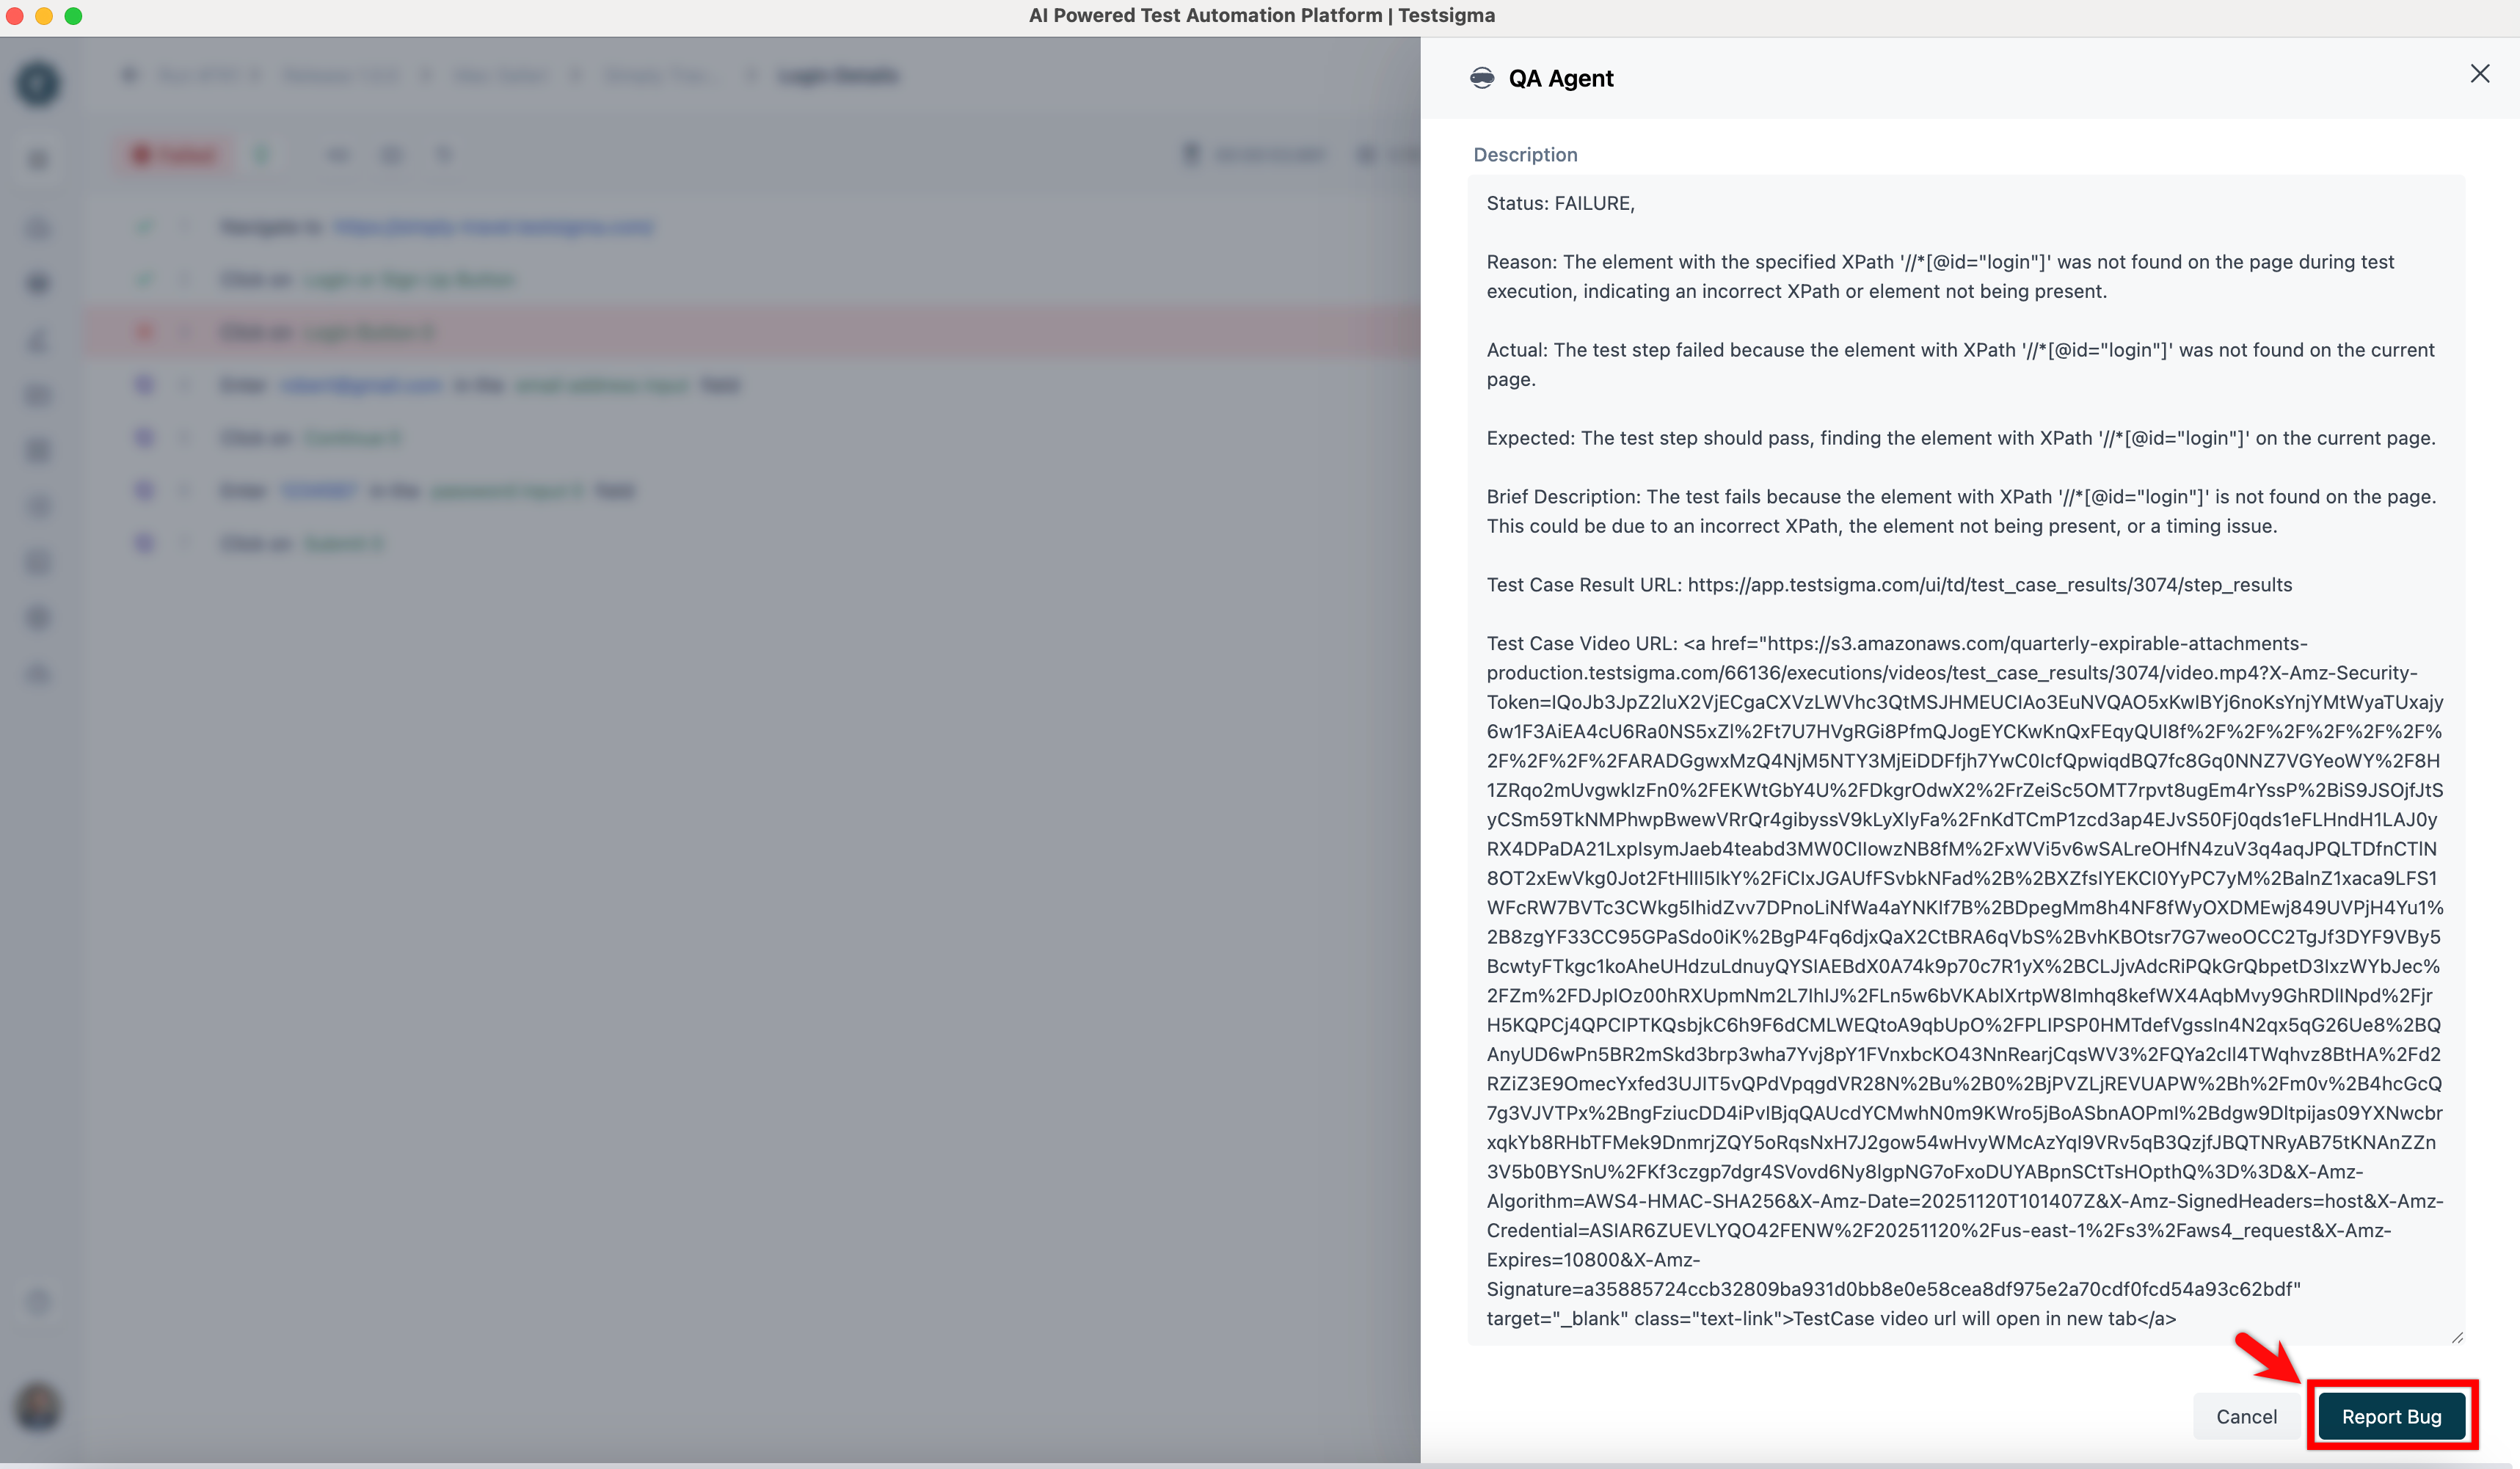
Click Report Bug in the Analyzer with Atto panel. The QA Agent panel opens.
-
Select your bug tracking tool from the dropdown.
-
Take either route:
- Create New: review the prefilled details and click Report Bug
- Link To Issue: search for the existing issue and click Link To Ticket
If the tool returns no projects, check that its configured credentials have access to the projects you expect. For Jira the panel reads For given JIRA Credentials, the projects list is empty. Please make sure it has the right access to required projects on JIRA.
Healer
Section titled “Healer”The Healer repairs an element locator during a run, instead of failing the step. Where the UI changed and the stored locator no longer matches, it identifies the element again and carries on. The run records what it changed, so you decide afterwards whether the new locator is the one the test should keep.
This needs Auto Healing turned on under Settings > Preferences, and the element itself left opted in. See Account preferences and Elements.
Find a healed step
Section titled “Find a healed step”Open the test case results for the run and select the healed step.
Approve or ignore the heal
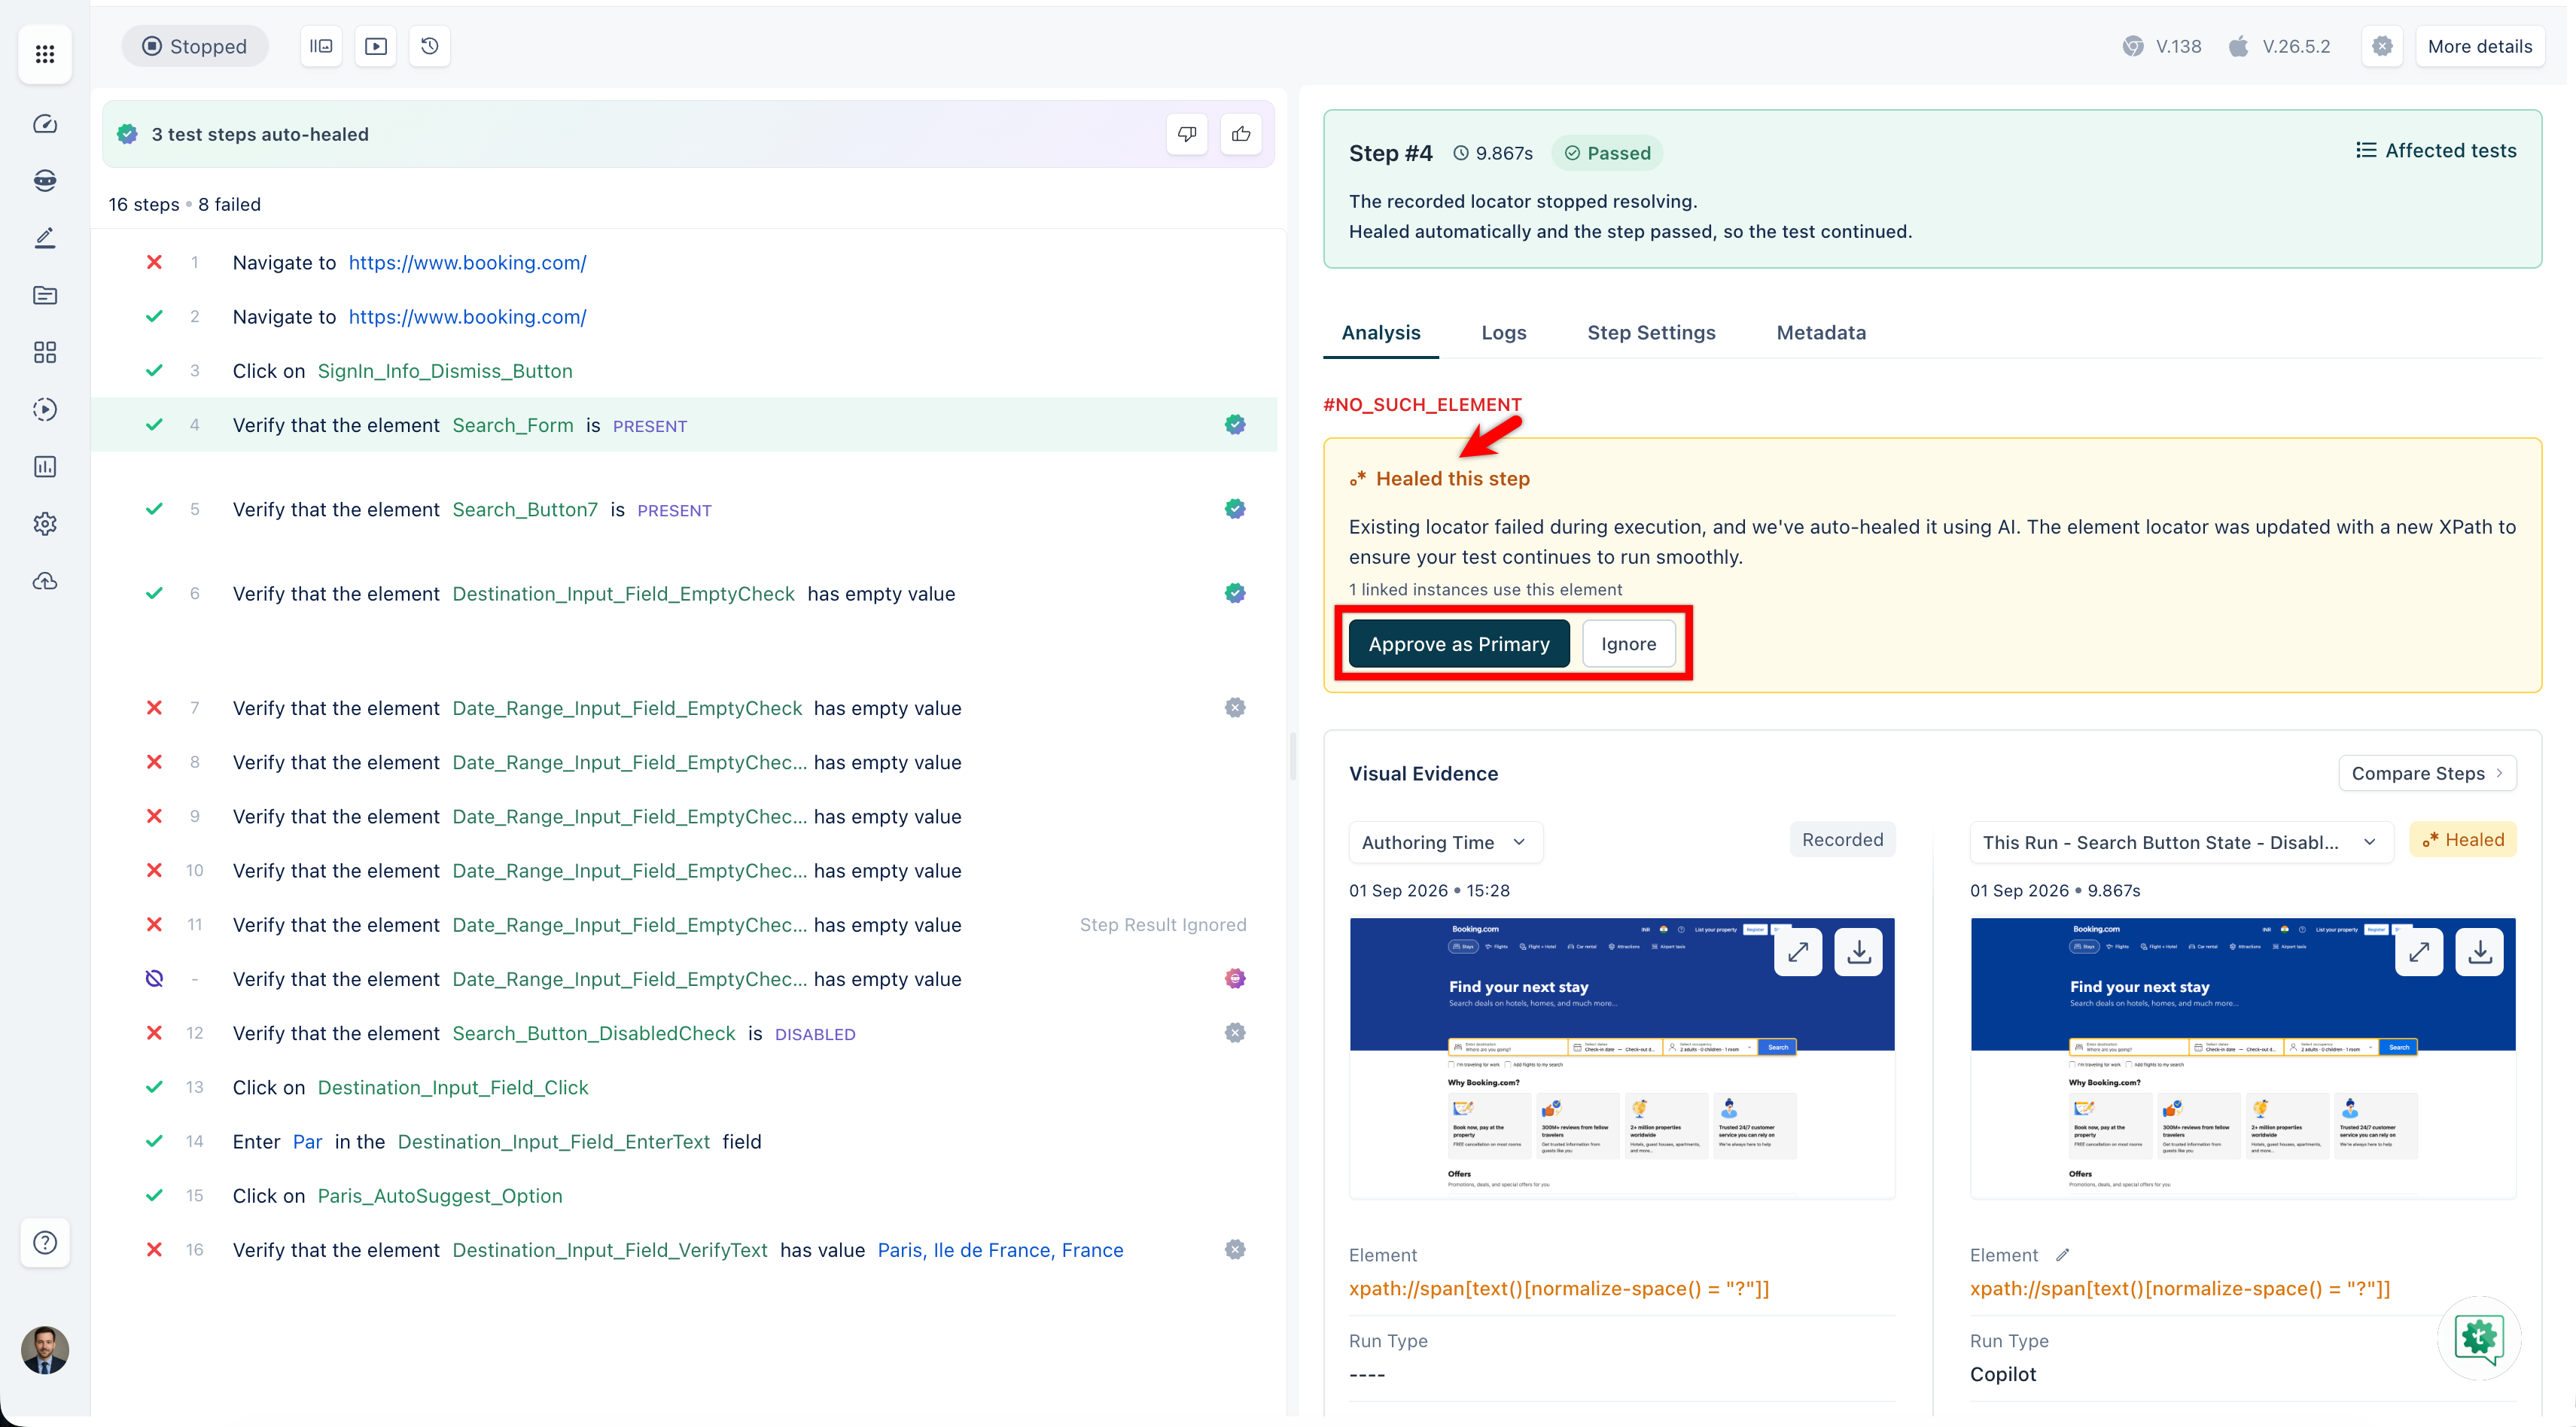
Section titled “Approve or ignore the heal”The Analysis tab shows a Healed this step card reporting that the existing locator failed during execution and was healed with a new one. Take either route:
- Approve as Primary makes the healed locator the one the test uses from now on
- Ignore leaves the original locator in place. The heal still applied to this run
See what changed
Section titled “See what changed”Open the Autoheal Details panel to read the heal itself. It names the element that was healed, the method and how long it took, such as Autohealed using CSS Selector in 32s 912ms, and shows the locator that failed struck through, followed by the one that replaced it.
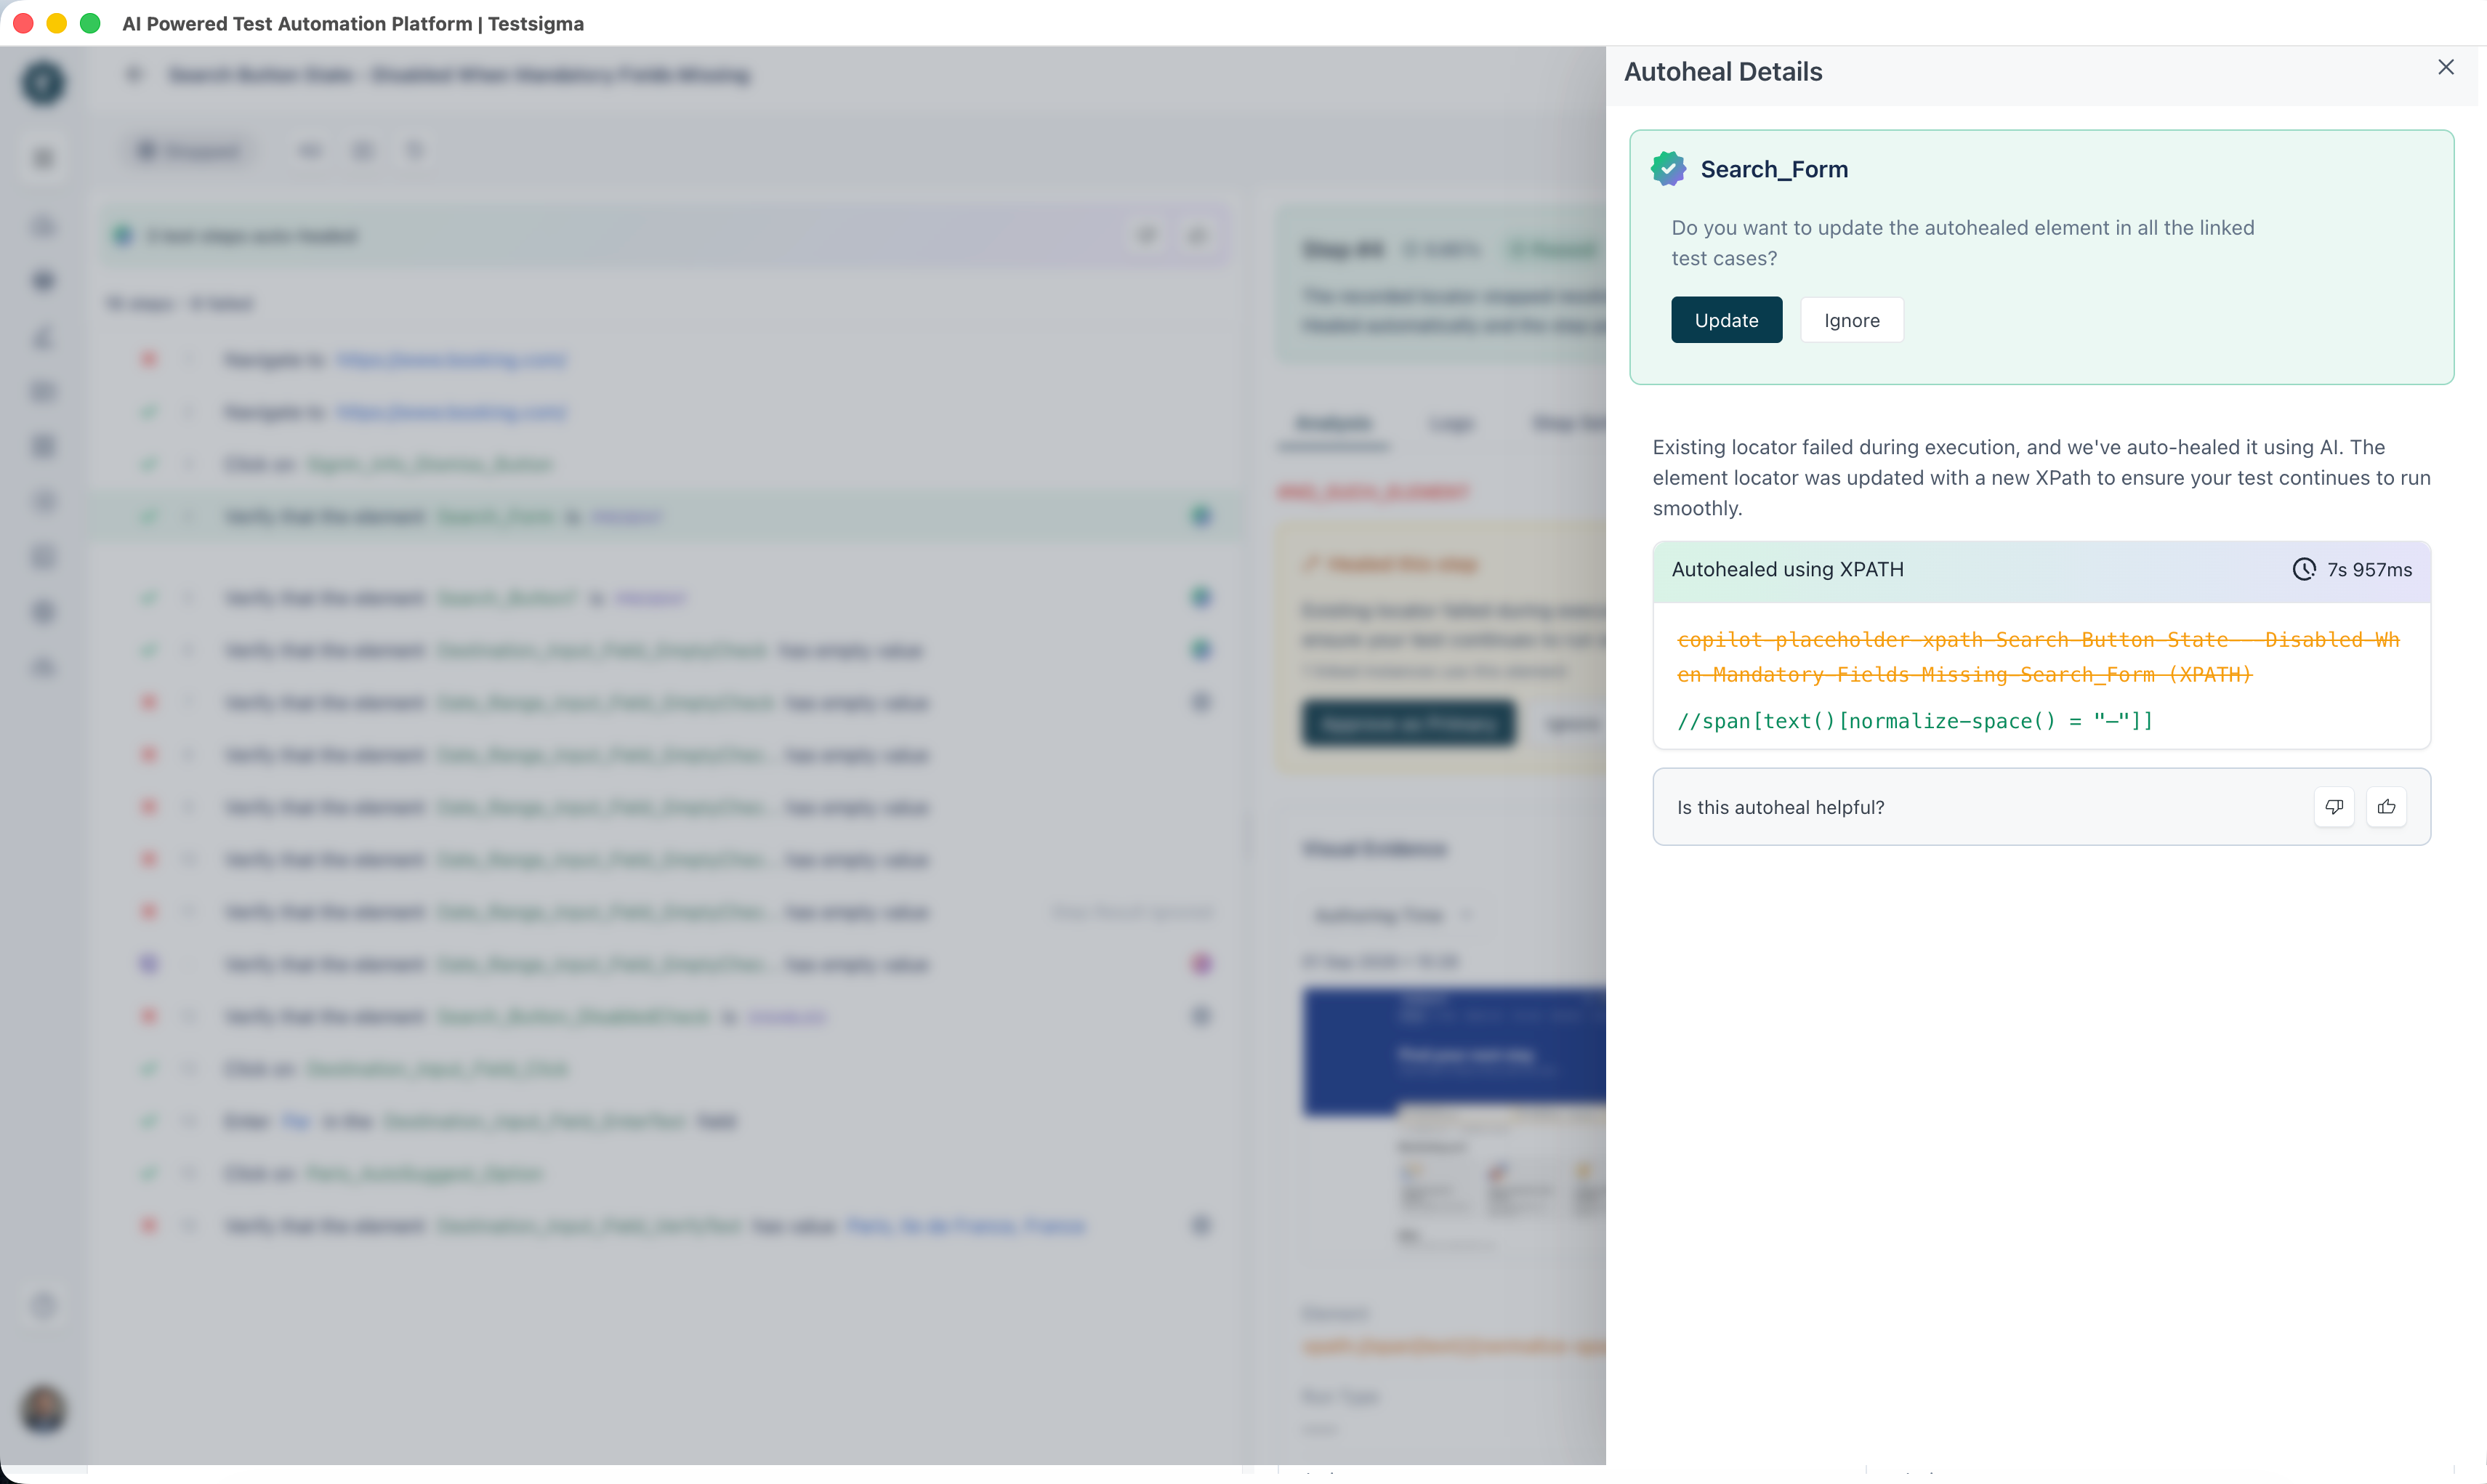
The panel asks whether to update the autohealed element in all the linked test cases. Update applies the healed locator across every test case linked to the element, and Ignore leaves those test cases unchanged.
Read the locator trace
Section titled “Read the locator trace”Every heal event records a locator trace: the full sequence the engine worked through to arrive at a heal, and whether that heal succeeded or failed. Read it to understand why a particular locator was chosen, or why no replacement could be found. The trace comes from the Auto Heal V2 architecture.
When a heal fails
Section titled “When a heal fails”A heal attempt that fails gets the same treatment as any failed step. Open the Root cause block on the Analysis tab and click Explain this failure to see why the engine could not resolve the element. See Debug.
Fix the locator yourself
Section titled “Fix the locator yourself”Two routes, where you would rather not accept the healed locator:
- Update element corrects the locator directly, through the edit icon on the Element field in Visual Evidence
- Relearn step re-captures the step, so a fresh locator is recorded
Frequently asked questions
Section titled “Frequently asked questions”Why do my Figma pages fail to load?
Section titled “Why do my Figma pages fail to load?”Figma’s API rate limits have been reached, so it stops returning file and page data to external tools, and Testsigma shows No pages. Lower-tier seats hit those limits sooner.
Check that the API key belongs to a Figma account with a Dev or Full seat, which carries higher limits. Generate a new key from such an account if the current one does not. If the limit was already exceeded, wait a few minutes before trying again.
Was this page helpful?
Thanks for the feedback.