

Tests overview
Tests is where you build your test case library. Open Test Cases in the left navigation to organize, find, and edit test cases, and Step Groups to manage the steps that several test cases share. Each test case holds its manual steps, its automated steps, and the history of its runs.
Tests pages
Section titled “Tests pages”- Test Cases: Create, find, edit, clone, delete, import, and export test cases, organize them in folders, send them through review, and compare or restore earlier versions.
- Step groups: Keep shared steps in one place, so a change reaches every test case that uses them.
- Deduplication: Find duplicate test cases and shared steps, then merge them or extract a step group.
- Automate a test case: Choose between Copilot learning, recording, and writing the steps yourself.
- Write automated steps: Add and edit steps in the editor.
- Blocks and conditions: Branch, repeat, group, and limit steps, and add conditions and checks to a step.
- Elements and locators: See and change how Arcus finds what a step acts on.
- Auto-heal: Keep steps running when a locator stops matching.
Open a test case
Section titled “Open a test case”Click a test case’s name in the Test Cases list. The quick view opens beside the list with the test case’s Steps, Automated, Run history, Properties, and Comments tabs. Press J and K to move to the next or previous test case.
The quick view’s header also has two buttons:
- Automate with Arcus: shown when the project has the Testsigma integration. See Integrations. It opens Select Testsigma Automation Project. Select the project, application, and version, then click Continue. Arcus sends the test case’s title, description, steps, and expected results to that project and opens Testsigma in a new tab, where an AI session starts automating it. Web, mobile web, Android, and iOS applications are supported.
- Run with Copilot: opens the Copilot configuration panel. The session starts only when you click Start Copilot. See Debug and run with Copilot.
To open the full test case page, click the edit icon in the quick view, or click the ellipsis icon (⋯) on the test case’s row and click Edit. A new test case opens on this page as soon as you create it.
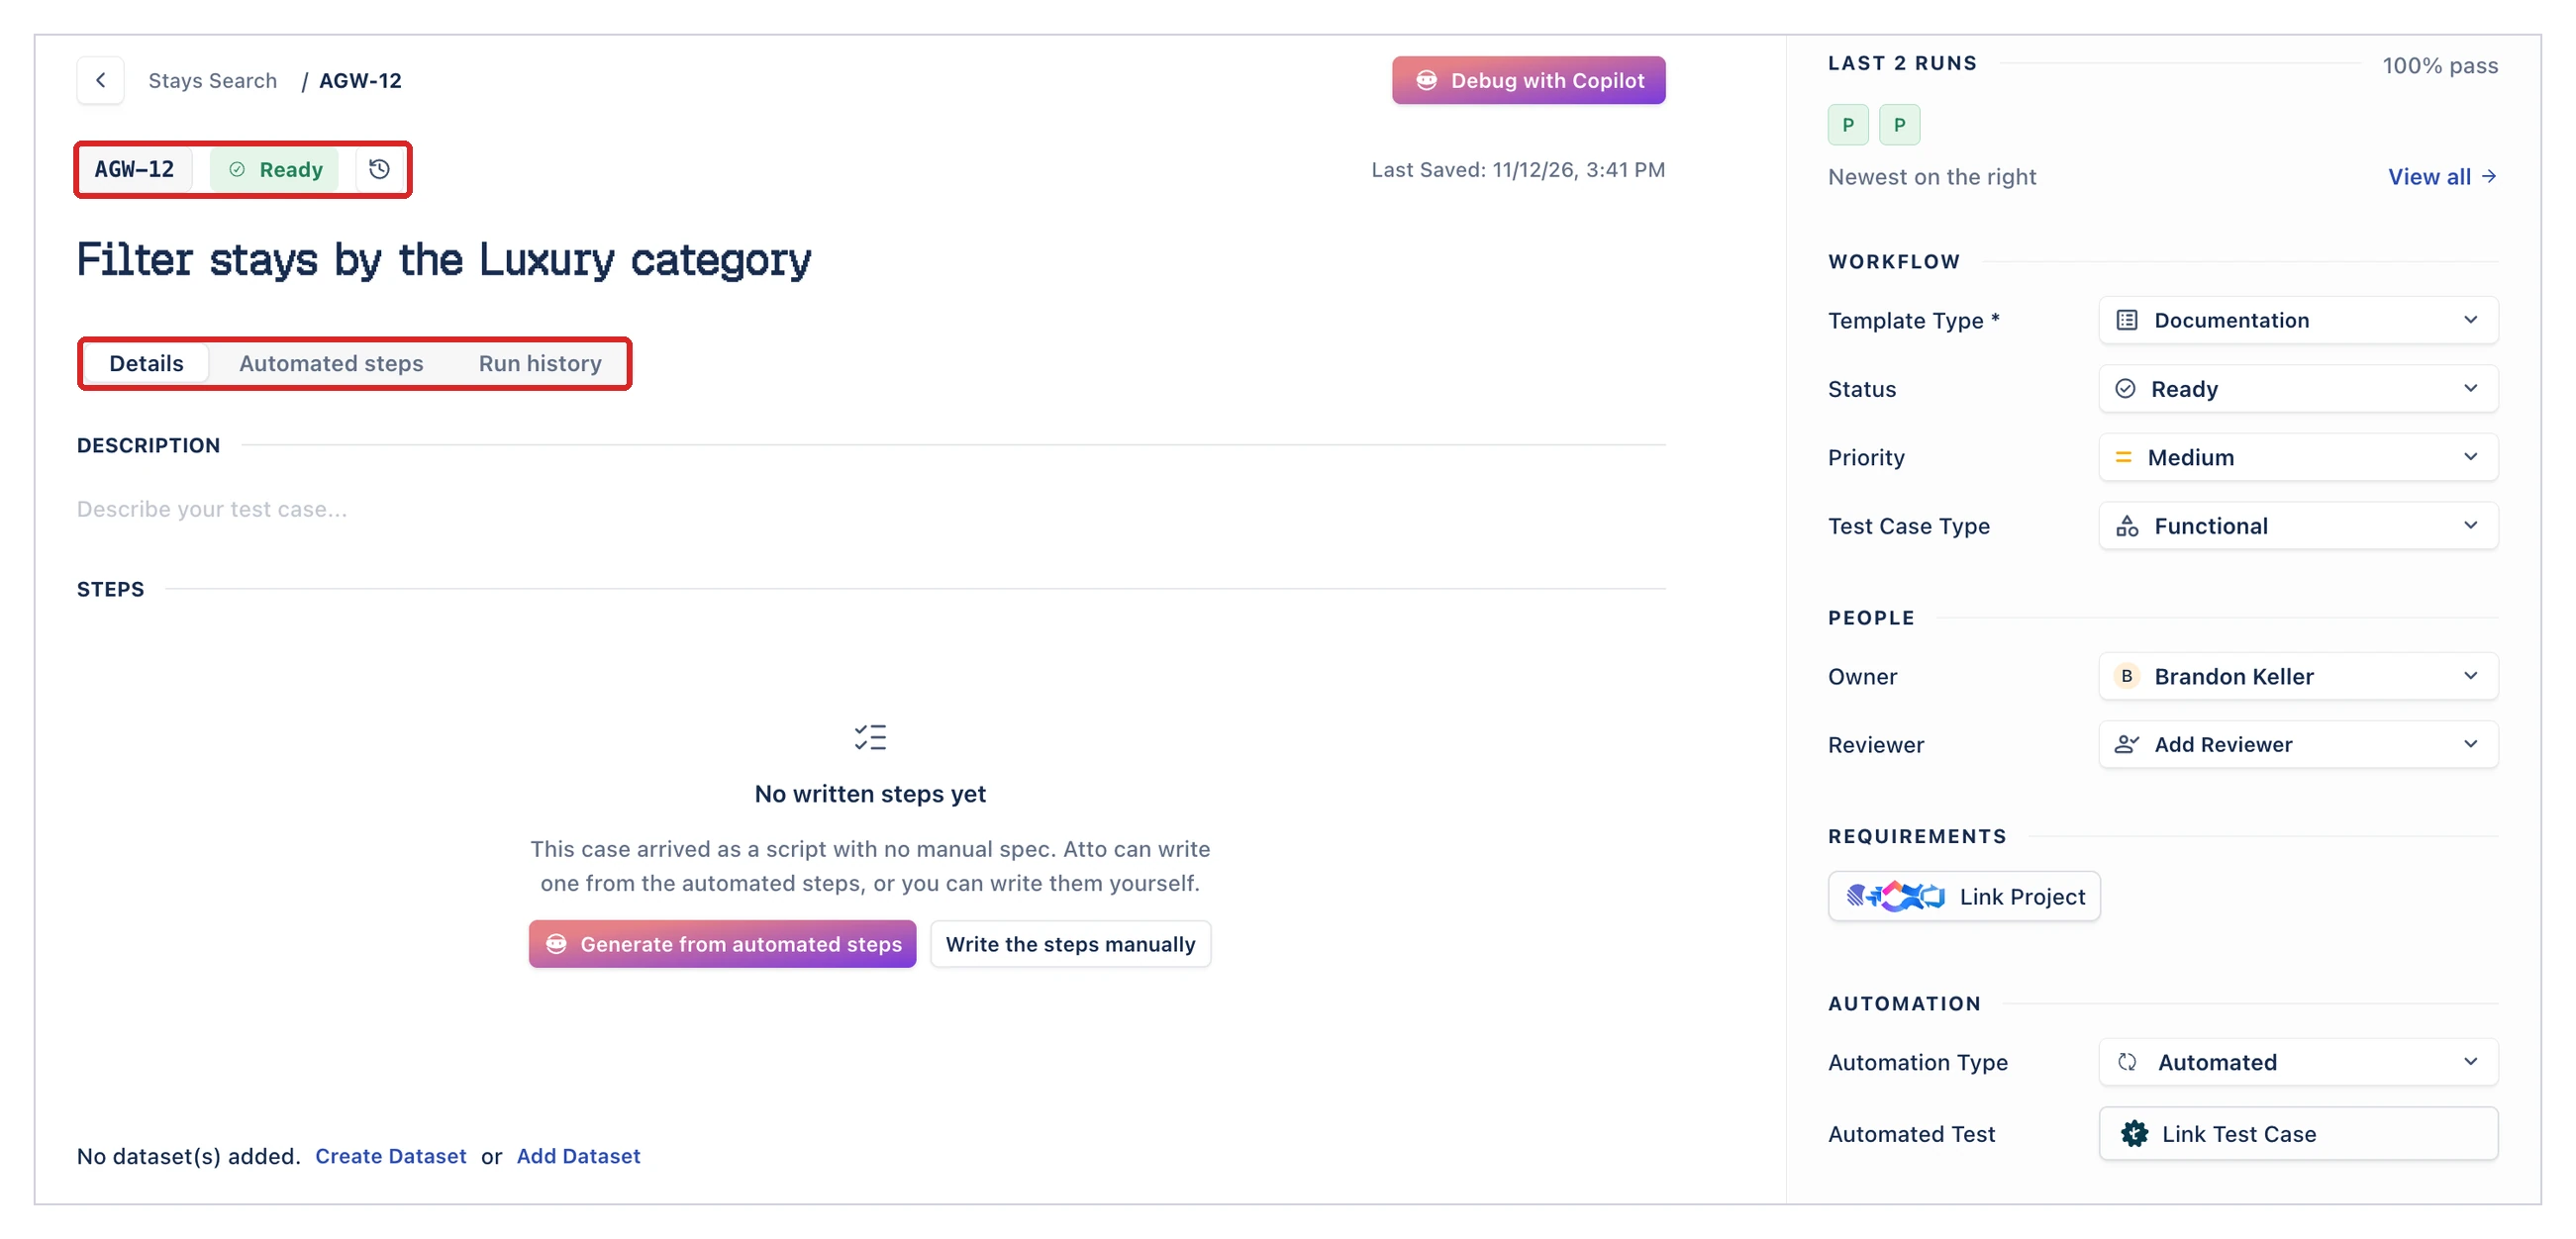
Header
Section titled “Header”| Part | What it shows |
|---|---|
| Back arrow and breadcrumb | The folder and the test case ID. Click the arrow to return to the Test Cases list. |
| ID and status chips | The test case ID and its status, such as Ready. |
| Version history icon | Opens the Version History panel. See Versions. |
| Review actions | Appear when Review Management is on: Submit for Review in Draft and Rework, and Mark as Rework and Mark as Ready in In Review. See Review test cases. |
| Last Saved | When Arcus last saved the test case. Arcus saves changes automatically, and the line reads Saving… while a save is in progress. |
| Debug with Copilot | Appears once the test case has automated steps. Opens a Copilot session that runs them. See Debug and run with Copilot. |
The test case title sits below the chips.
Details tab
Section titled “Details tab”The Details tab holds the manual test case. Its layout depends on the Template Type in the right panel:
- Documentation: free-text sections DESCRIPTION, PRECONDITIONS, STEPS, and EXPECTED RESULTS.
- Steps: DESCRIPTION and PRECONDITIONS, then a table with one row per step and the columns Steps and Expected results. Below the table, Add Step (
⌘+Enter) adds a row, Add Step Group inserts a step group, and Create Step Group starts a new one.
When a test case has automated steps but no manual steps, STEPS reads “No written steps yet”. Click Write the steps manually to add them. Generate from automated steps also appears, but writing the steps from the automated steps isn’t available yet.
Below the steps, a line lists the datasets attached to the test case, with Create Dataset and Add Dataset. See Datasets.
COMMENTS closes the tab. See Comments.
Automated steps tab
Section titled “Automated steps tab”The Automated steps tab holds the steps Arcus runs. Until the test case has any, the tab reads “This case is not automated yet” and offers the ways to start. See Automate a test case.
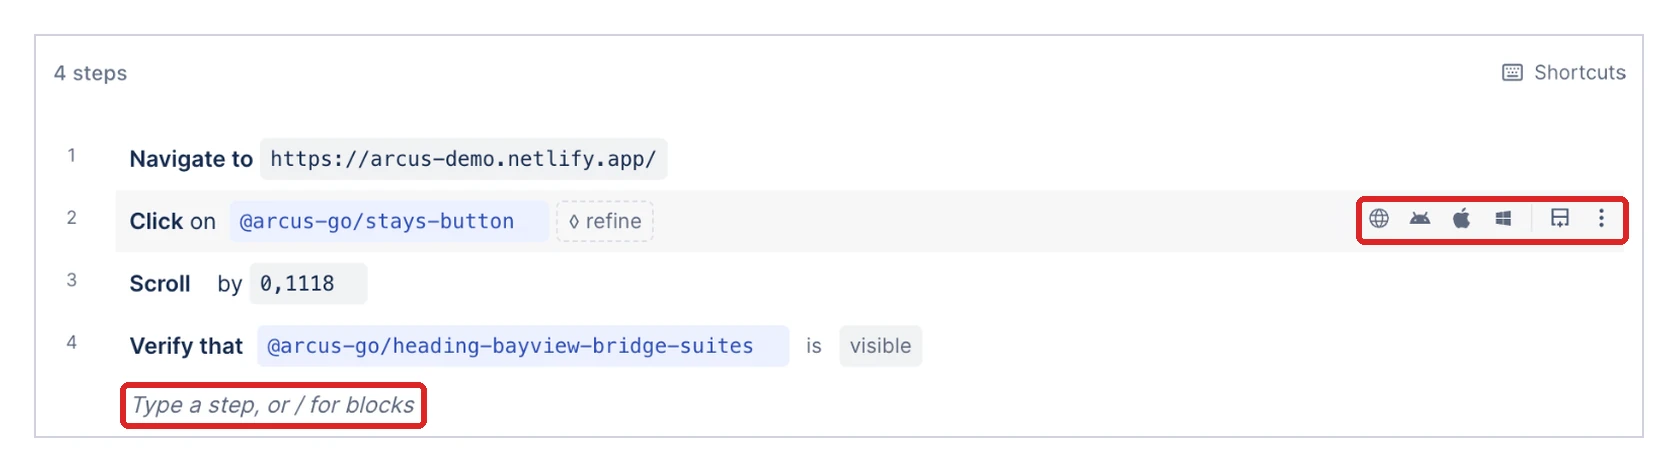
| Part | What it shows |
|---|---|
| Step count | The number of saved steps. When steps still need values, the count also shows how many, such as 1 to fill. |
| Shortcuts | Lists every keyboard shortcut in the editor. See Keyboard shortcuts. |
| Step rows | One numbered row per step. Values and elements show as chips. Drag a row by its handle to move it. The steps inside a block sit indented below it. |
| Platform icons | Show on hover: web, Android, iOS, and Windows. Hover an icon to see whether the step runs on that platform, such as “Web: supported”. |
| Add a step below icon | Adds an empty row under the step. |
| Ellipsis icon (⋮) | Opens Step settings, Move up, Move down, Duplicate, Skip this step, Insert a step above, Insert a step below, and Delete. On a block, the menu has no Skip this step. |
| Empty row | Reads “Type a step, or / for blocks”. Type to add a step, or type / to add a block. See Write automated steps and Blocks and conditions. |
When a row is incomplete, a banner above the steps reads “1 line is not saved: fix it to save it”, and the row says what’s wrong, such as Unexpected character "/". Edit the line, or pick a step for it. Complete the row or delete it. If you leave the page first, the browser asks you to confirm.
The datasets line and COMMENTS also appear on this tab.
Keyboard shortcuts
Section titled “Keyboard shortcuts”Click Shortcuts above the steps to see every editor shortcut, such as ⌘+D to duplicate a row and / to insert a block. For the full list, see Keyboard shortcuts.
Run history tab
Section titled “Run history tab”The Run history tab lists every run of the test case, newest first, including test runs and Copilot sessions. Each row shows the platform, the run’s name, its type and time, such as Copilot run · Automated, and its result. Until the test case has run, the tab reads “This test case has not been run yet.”
Right panel
Section titled “Right panel”The right panel holds the test case’s properties. Changes save as you make them.
| Section | Fields |
|---|---|
| LAST {n} RUNS | Appears once the test case has run. Shows the pass rate, one chip per run (P for passed, F for failed), and “Newest on the right”. View all opens the Run history tab. |
| WORKFLOW | Template Type (Documentation or Steps), Status, Priority, and Test Case Type. |
| PEOPLE | Owner and Reviewer. |
| REQUIREMENTS | Link Project links the test case to work items in your project management tool. If the project isn’t linked to one yet, it opens Project Settings, where you link it. |
| AUTOMATION | Automation Type. See Check the Automation Type. On Pro and Enterprise plans, Automated Test links the test case to a test case in the Testsigma automation platform. Click Link Test Case to pick one, and Automation Type changes to Automated. The link doesn’t add automated steps in Arcus. If Testsigma isn’t integrated yet, the field reads Integrate Testsigma Automation Platform and opens Integrations. |
| TAGS AND ATTACHMENTS | Add Label and Upload Attachments. |
| CUSTOM FIELDS | The fields your project defines under Settings > Custom Fields. |
The values in Status, Priority, Test Case Type, and Automation Type come from Settings > Manage Properties, so your project’s lists can differ. With Review Management on, the Status list reads “Review Management is turned on.” and you can’t select Ready or In Review from it.
Step settings
Section titled “Step settings”Selecting a step on the Automated steps tab replaces the right panel with Step settings. Click Step settings at the top of the panel to return to the properties.
| Section | What it holds |
|---|---|
| STEP {n} | The step as it reads in the editor. |
| ELEMENT | “Which element this step acts on.” The Web, Android, iOS, and Windows tabs list the locators Arcus tries on each platform, in order, and Element details on {platform} opens the element. A step without an element reads “This step names no element yet.” See Elements and locators. |
| ADD TO THIS STEP | The conditions, checks, and stored values the step can take, such as Only if, Verify, and Store. See Conditions, checks, and stored values on a step. |
| OPTIONS | “How this step behaves at run time: when to skip it, how long to wait for it, and what to capture.” Continue on failure, Skip this step, Screenshot, Wait before (s), Retry, and Timeout (s), plus Only if present on a step with an element. |
| PRINTS AS | The step as script text, such as click @checkout/submit. |
Blocks have their own Step settings. See Blocks and conditions.
Was this page helpful?
Thanks for the feedback.