

Install the Arcus Agent
The Arcus Agent is a desktop app that lets Arcus author, debug, and run tests against the browsers and devices on your own machine. You need it to use Copilot on your machine, to run tests against a local build or an application that isn’t publicly accessible, or to test on a phone or emulator connected to your computer. Cloud runs don’t need it.
When you need the Arcus Agent
Section titled “When you need the Arcus Agent”| Task | In the cloud | On your machine |
|---|---|---|
| Copilot on a web application | Nothing to install | Arcus Agent running |
| Copilot on an Android or iOS app | Nothing to install | Arcus Agent running, with a device or emulator connected |
| Copilot on a Windows desktop app | Not available | Arcus Agent running on a Windows computer |
| Test runs that use a Local Agent run configuration | Not applicable | Arcus Agent running, signed in, and on a profile used for execution |
The agent must be running, not only installed, for a session or run to use it.
When a newer version is available, the Copilot configuration shows Agent update available with Update Arcus Agent, and a test that needs the newer version shows “This test needs a newer Arcus Agent” until you update.
Install the Arcus Agent
Section titled “Install the Arcus Agent”The Arcus Agent runs on macOS, Windows, and Linux. My Local Device detects your operating system and offers the matching download. On a Mac, you choose between Apple Silicon and Intel.
Once installed, the agent runs in the background with an icon in the menu bar on a Mac, or in the system tray on Windows and Linux. You check and manage it from My Local Device and from the menu bar app.
Install on a Mac
Section titled “Install on a Mac”-
In the left navigation, click My Local Device. If no agent is running on your machine, the page shows Not running and the download options.
-
Click Download for Apple Silicon or Download for Intel. The installer is a
.pkgfile of about 500 MB. -
Open the downloaded file. The Install Arcus Agent installer opens.
-
Click Continue through Introduction and Destination Select.
-
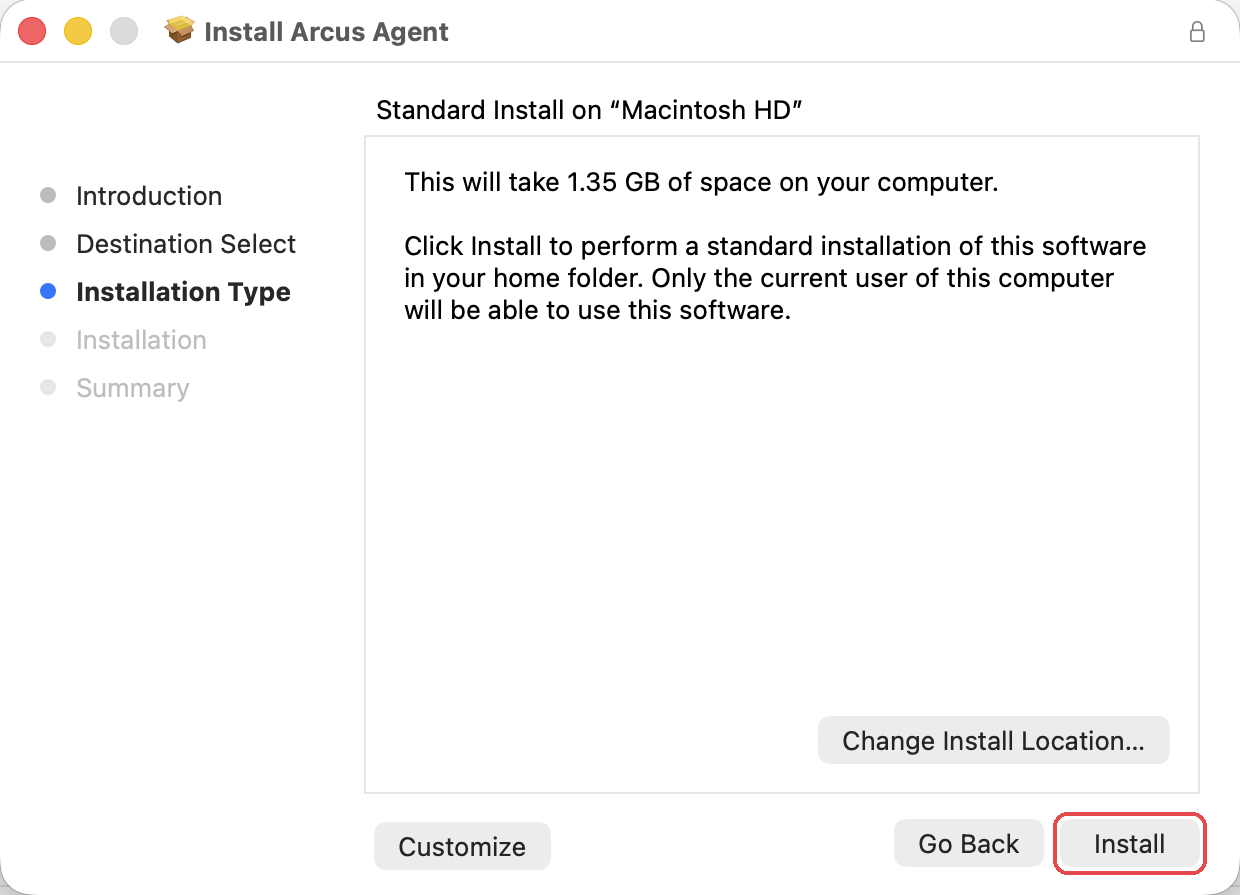
In Installation Type, click Install. A standard install takes about 1.35 GB and goes in your home folder, so only you can use the agent on this Mac. To install it somewhere else, click Change Install Location… first.
-
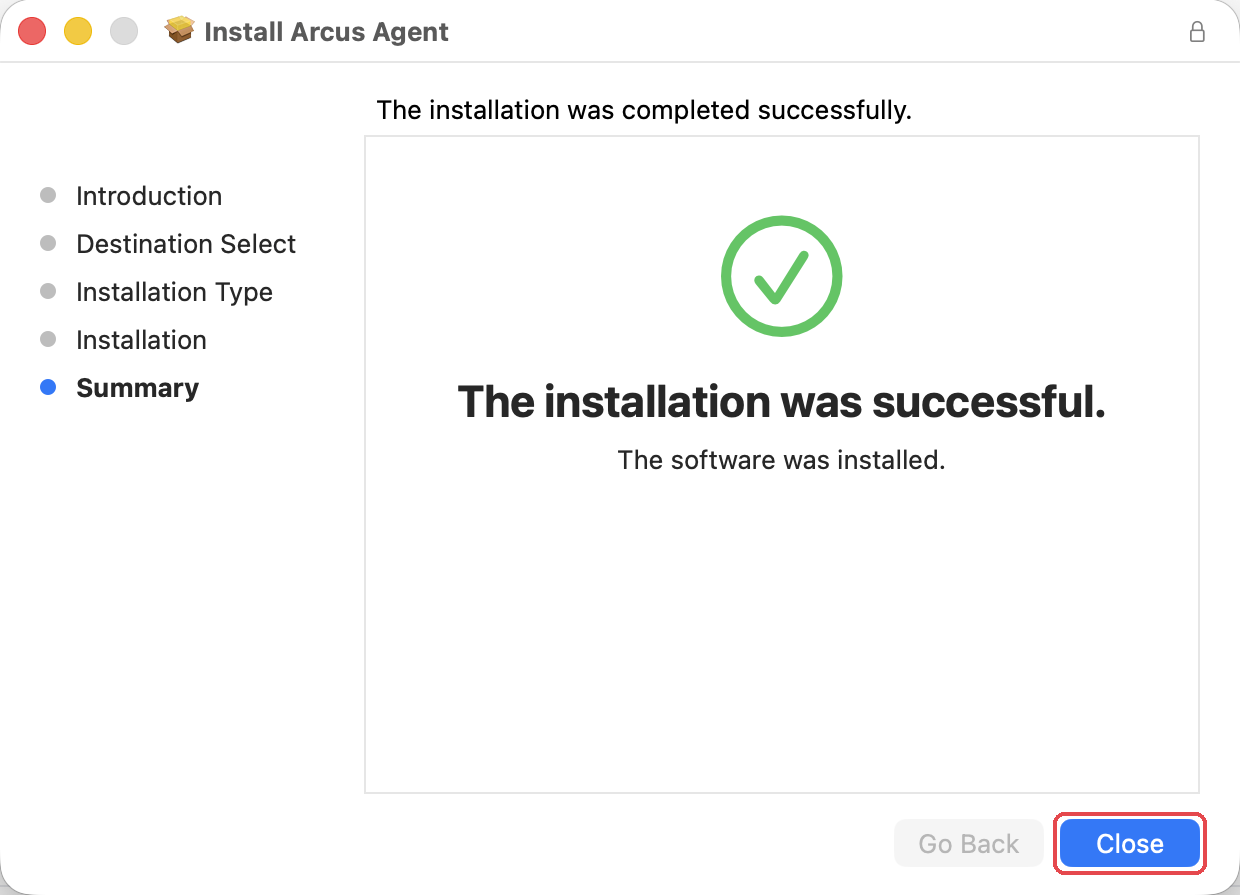
When the installer says The installation was successful, click Close. The Arcus Agent starts and its icon appears in the menu bar. If it doesn’t, open Arcus Agent from Spotlight or your Applications folder.
-
When macOS asks whether arcus.testsigma.com can access other apps and services on this device, allow it. Arcus uses this local network access to reach the agent.
-
Go back to My Local Device. The page fills in on its own once the agent responds. To check straight away, click Re-check.
Install on Windows
Section titled “Install on Windows”The Windows installer sets up the agent for your Windows user account, in your AppData\Local folder. It doesn’t ask for administrator rights.
-
In the left navigation, click My Local Device. If no agent is running, the page shows “The Agent isn’t running on this device” and the download options.
-
Under Download it, check that Windows is selected.
-
(Optional) In Profile, select the profile your admin set up for this machine. If you keep Default, you don’t need a profile file.
-
Click Download for Windows.
-
Open the downloaded installer. The Setup - Arcus Agent wizard opens.
-
In Agent profile, click Next. Setup uses the profile you downloaded from Arcus if it finds one in your Downloads folder. To choose a profile file yourself, click Browse… before you click Next. If Profile file is empty, the agent keeps this computer’s current profile or uses the defaults.
-
In Select Additional Tasks, select or clear Create a desktop shortcut and Start Arcus Agent at sign-in, then click Next.
-
If Setup lists applications that are using files it needs to update, select Automatically close the applications and click Next.
-
On the last screen, keep Start Arcus Agent selected and click Finish. The agent starts, and its icon appears in the system tray.
-
Go back to My Local Device. Once the agent responds, the page shows your computer’s name with Not signed in. To check now, click Re-check.
Copilot can use the agent now. To run test plans on this computer, sign in the agent.
Install on Linux
Section titled “Install on Linux”The Linux installer is a self-extracting ArcusAgent-Linux.run file. It installs the agent for your user in ~/.local/share/testsigma/agent/install and doesn’t need root.
-
In the left navigation, click My Local Device, and check that Linux is selected under Download it.
-
Click Download for Linux.
-
Open a terminal in the folder you downloaded it to, and run it as yourself, not as root:
Terminal window chmod +x ArcusAgent-Linux.run./ArcusAgent-Linux.run -
If the folder has an
.arcusprofilefile, the installer asks whether to connect the machine with it. Press Enter to connect it, or typento skip.
The installer adds Arcus Agent to your applications menu, sets it to start at sign-in, and starts it. Its icon appears in the system tray. On Linux, the icon opens a menu rather than the panel described in Use the menu bar app. On a machine with no desktop session, the installer sets the agent up as a systemd user service instead.
To pass options, add them after --, for example ./ArcusAgent-Linux.run -- --desktop-shortcut:
--desktop-shortcut: also adds an icon to the desktop.--headless: runs the agent as a background service, with no menu entry or tray icon.--profile=FILE: connects the machine with this profile file.--no-connect: connects no profile.--all-users: run as root to install the agent in/optfor every user on the machine.
Run the portable zip
Section titled “Run the portable zip”To run the agent without installing it, download the Portable zip from My Local Device. Unzip it and start the agent from the ArcusAgent folder:
- macOS and Linux: open a terminal in the folder and run
./ArcusAgent. - Windows: open
ArcusAgent.exe.
Keep it running while you use Arcus.
Use the menu bar app
Section titled “Use the menu bar app”Click the Arcus Agent icon in the menu bar on a Mac, or in the system tray on Windows. The top of the panel shows the agent’s version and a status card. The card shows the machine’s name, how many browsers and devices it found, and anything that needs your attention, such as Profile updated: restart to apply. Click Open Arcus to open Arcus in your browser.
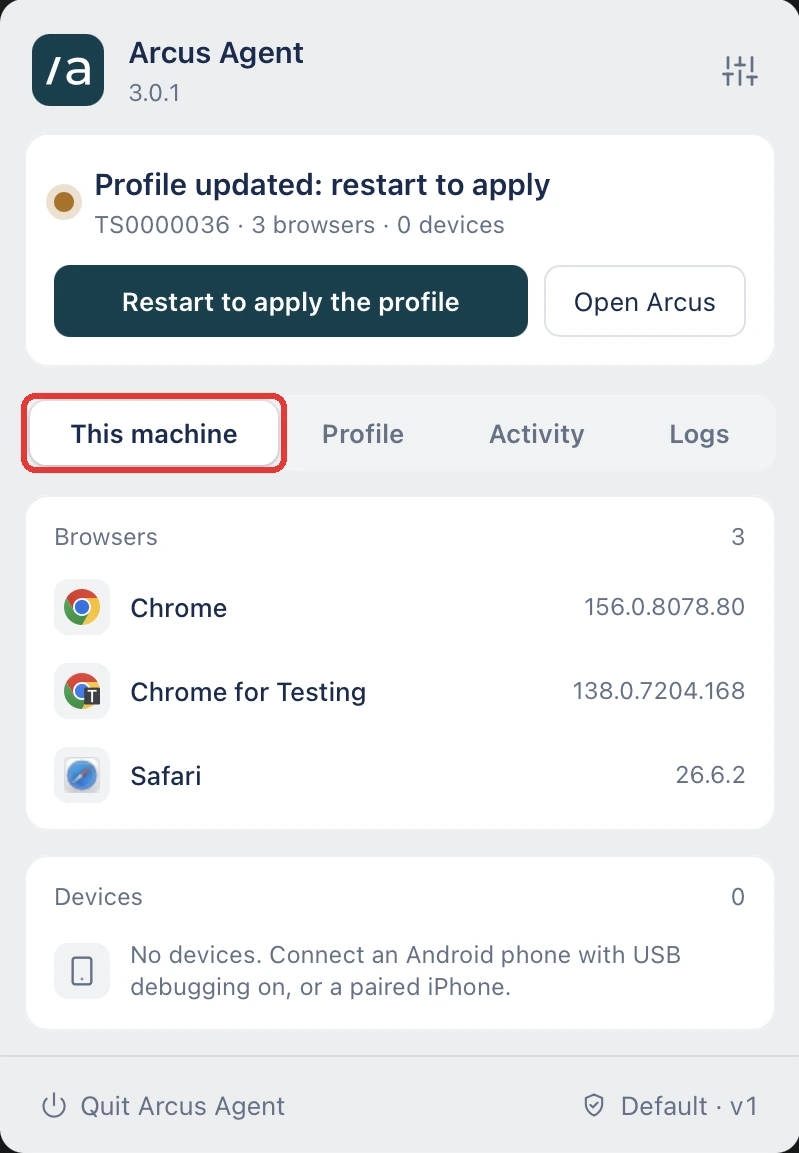
The panel has 4 tabs:
| Tab | Shows |
|---|---|
| This machine | The Browsers the agent found, with their versions, and connected Devices. With no device, it says to connect an Android phone with USB debugging on, or a paired iPhone. |
| Profile | The profile this machine is on, with its version and what it’s used for, such as Default · Authoring. Click Open to open the profile in Arcus, or What Default sets on this machine to see its settings. Other profiles lists the account’s other profiles. |
| Activity | The test runs and Copilot sessions running on this machine. When nothing is running, it says so. |
| Logs | Under Agent, the agent’s own logs: Agent, Tray, Appium, and Agent Pilot, with their sizes. Under Runs and sessions, a log for each recent run and Copilot session. A log that’s being written now shows Live. |
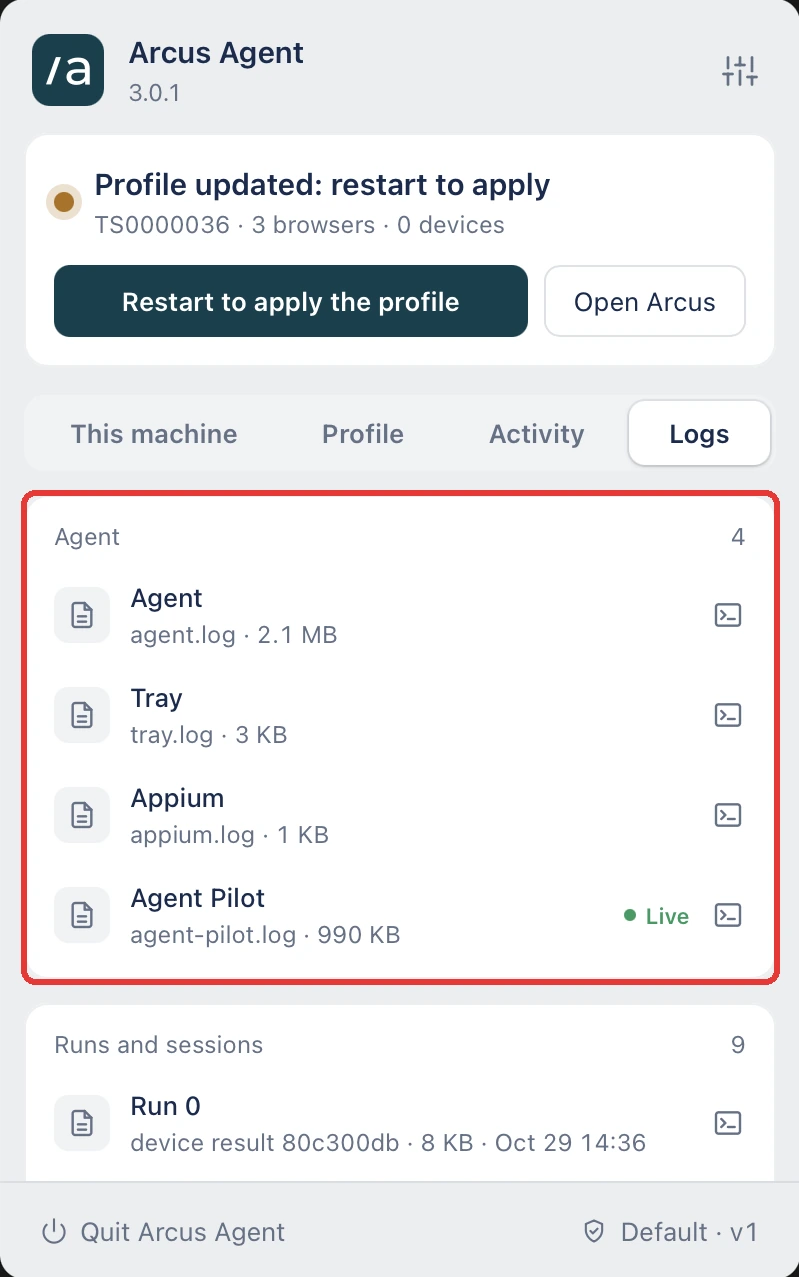
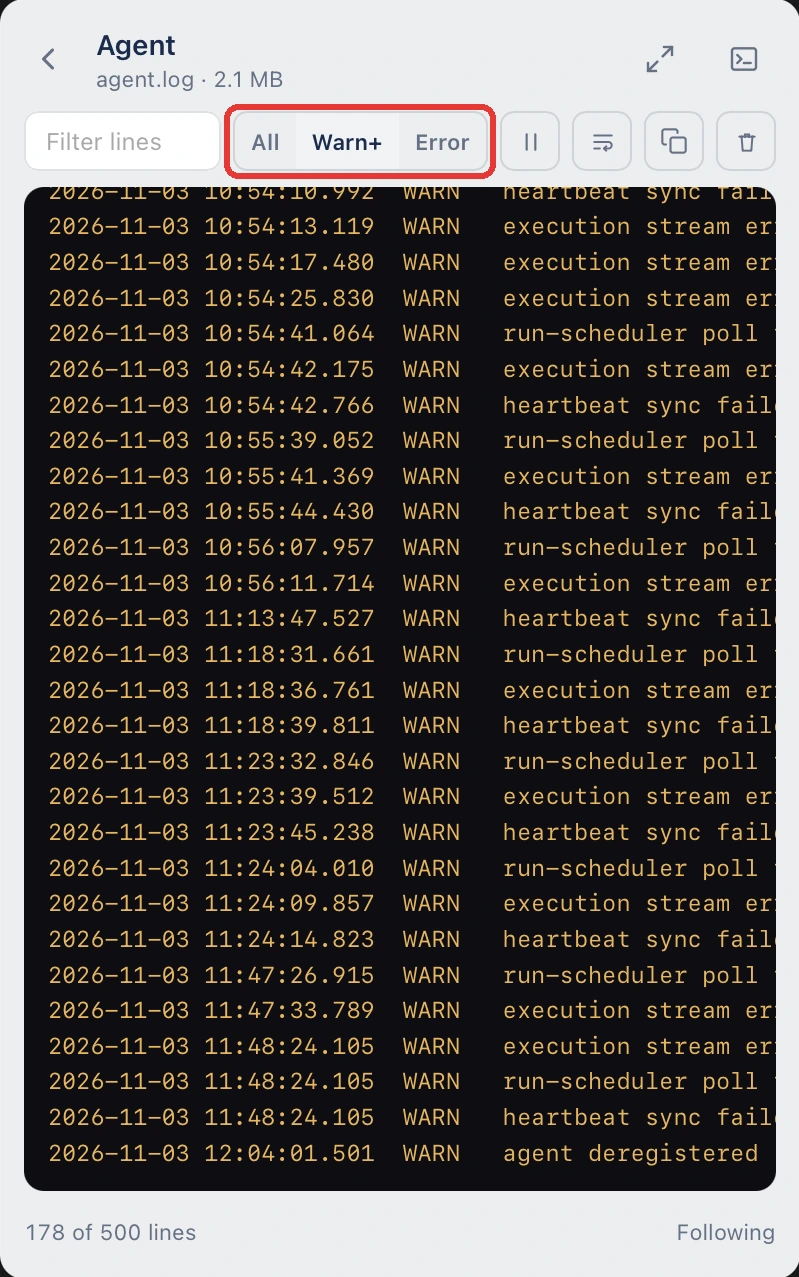
Click a log to read it. Type in Filter lines to search it, or show All lines, Warn+, or only Error. The viewer follows new lines as they arrive, and the footer reads Following. Use the pause control to stop following, and Jump to latest to go back to the newest lines. The other controls wrap long lines, copy the lines, and clear the view.
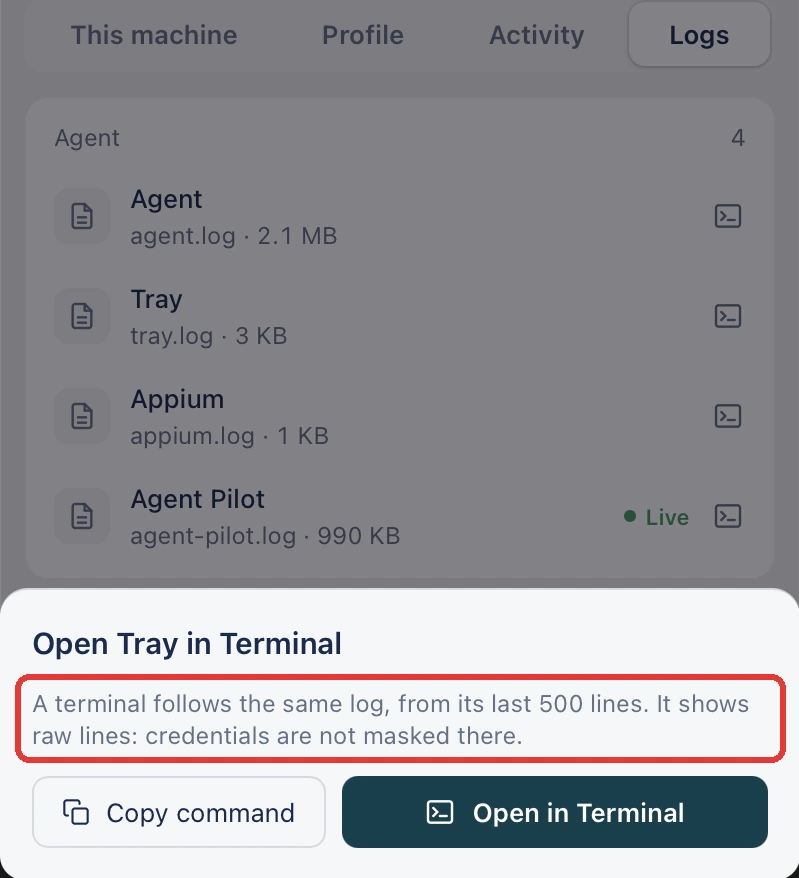
To follow a log in the Terminal app instead, click the terminal icon beside it, then click Open in Terminal. To run the command yourself, click Copy command. Terminal starts from the log’s last 500 lines.
At the bottom of the panel, Quit Arcus Agent stops the agent. Copilot sessions and runs on this machine can’t use it until you start it again. The profile name and version are shown beside it.
Agent settings in the menu bar app
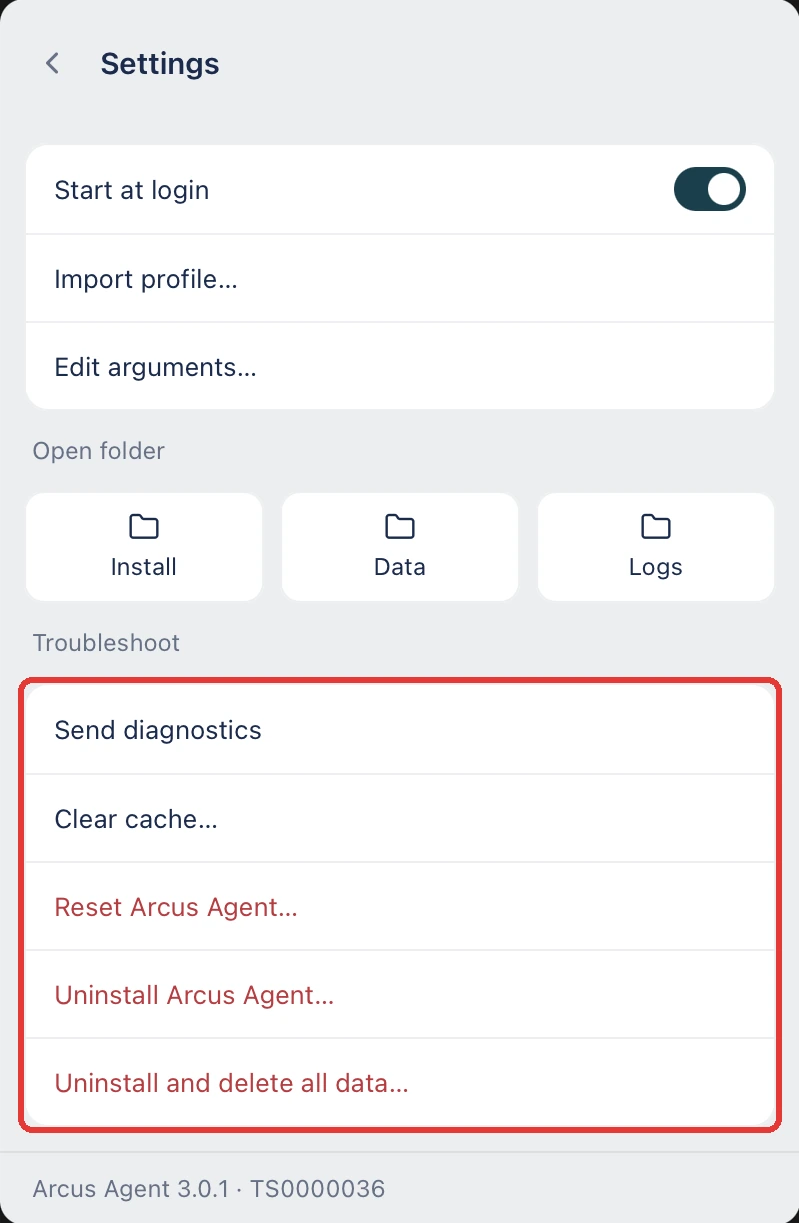
Section titled “Agent settings in the menu bar app”Click the settings icon at the top of the panel:
- Start at login: start the agent when you sign in to your computer.
- Import profile…: apply a profile file an admin gave you. See Change the machine’s profile.
- Edit arguments…: open the agent’s
args.ymlfile in a text editor to change the arguments the agent starts with. Save the file, then restart the agent. - Open folder: open the agent’s Install, Data, or Logs folder. Support may ask for files from the logs folder.
- Troubleshoot, for when restarting the agent doesn’t fix a problem. Each option asks you to confirm, and the agent restarts once its current runs finish.
- Clear cache…: removes temporary files, browser data, and run artifacts. The machine’s sign-in, settings, and logs are kept.
- Reset Arcus Agent…: removes everything the agent keeps on the computer, including its sign-in, settings, arguments, and paired iPhones. Only its logs are kept. Sign the machine in again afterwards.
- Uninstall Arcus Agent…: removes the agent from your Mac. Uninstall and delete all data… also removes the machine from Arcus and deletes the agent’s logs, run logs, profile, sign-in, and downloaded tools. This can’t be undone.
The bottom of the settings shows the agent’s version and the machine’s name.
Sign in the agent to your account
Section titled “Sign in the agent to your account”Copilot can use your machine as soon as the agent is running. Until the agent is signed in, My Local Device shows “This Agent isn’t signed in. Copilot works. Sign in to run tests and show it to your team.” To run tests on the machine or let your team see it, sign it in.
-
On My Local Device, click Sign in.
-
In Sign in this Agent, enter the code the agent shows in its window, in the form
XXXX-XXXX, then click Continue. To show the code in a terminal, runArcusAgent connect.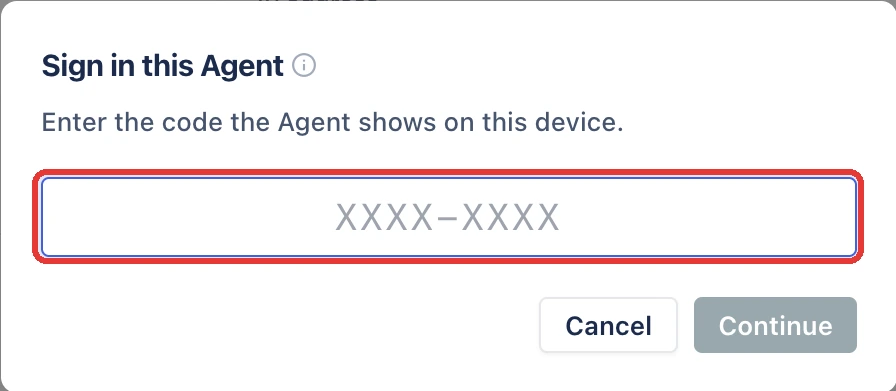
-
In Sign in this device to your account?, check the Machine, System, and Account, then click Sign in.
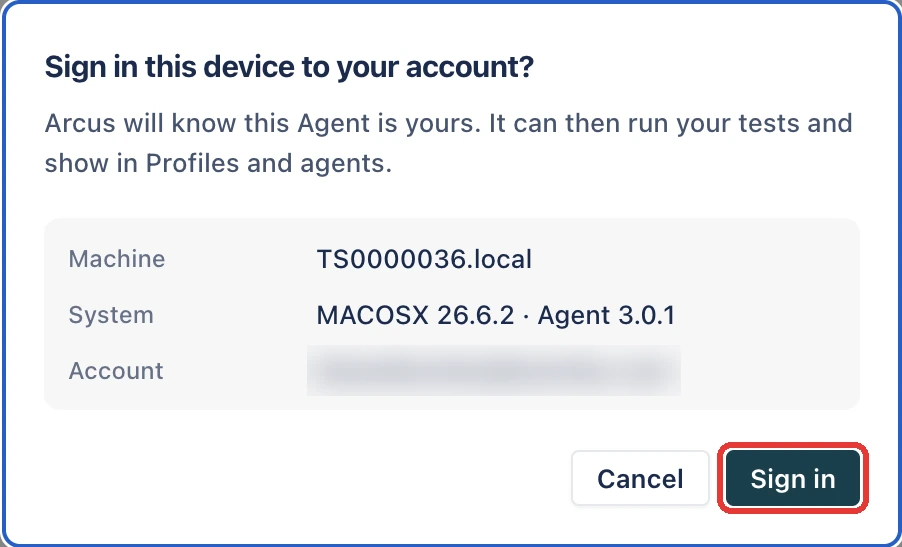
Arcus shows “Signed in”, and the header changes to Connected · Idle. The machine appears under Agents on this account, marked This device, and in Settings > Profiles and agents > Agents. You can then pick it as the Agent in a run configuration. See Run Configurations.
If the header shows Needs attention instead, see Needs attention.
If an admin gave you a profile file, importing it signs the machine in too. See Change the machine’s profile.
If the agent is signed in to another account
Section titled “If the agent is signed in to another account”If the agent on your machine is signed in to a different Arcus account, My Local Device shows Other account and “The Agent is on another account”. Click Reset and sign in, then sign in as above.
If the reset doesn’t work, run this in Terminal, then start the agent again:
ArcusAgent reset --hardThis removes the other account from the machine.
Check the agent on My Local Device
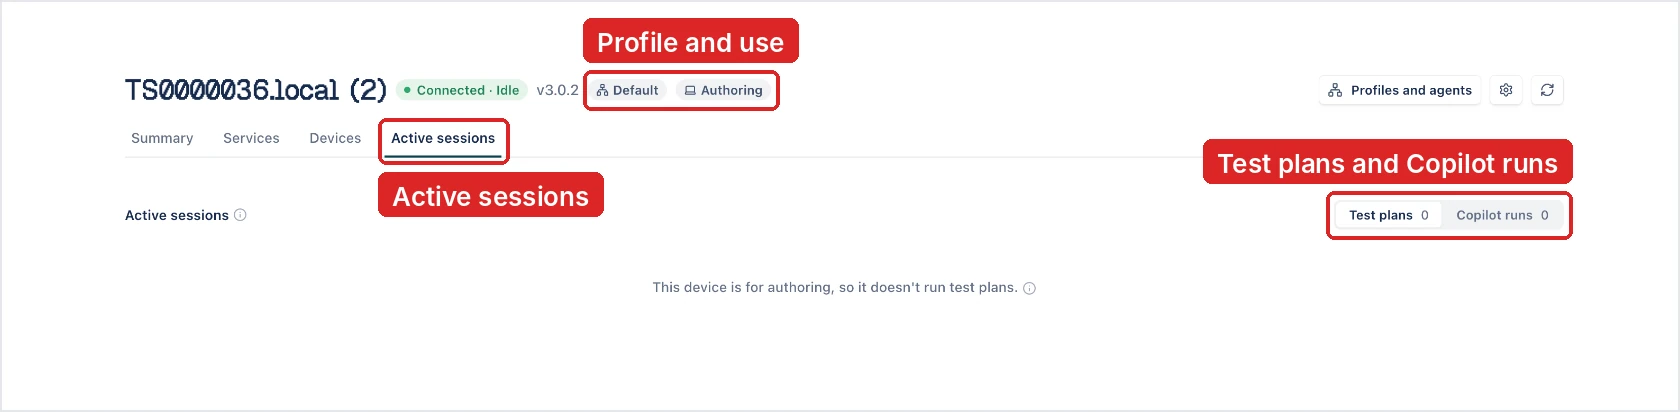
Section titled “Check the agent on My Local Device”My Local Device shows the agent on the computer your browser is running on. The header shows the machine’s name, its status, the agent’s version, and, once it’s signed in, its profile and what the profile is used for, such as Authoring:
- Connected · Idle: the agent is running, signed in, and ready.
- Not signed in: the agent is running, and Copilot can use it, but it can’t run tests yet. See Sign in the agent to your account.
- Other account: the agent is signed in to a different account. See If the agent is signed in to another account.
- Needs attention: something on the machine needs fixing. The Summary tab says what.
- Not running: no agent responded. See No Agent is running on this machine.
To check the agent again, click the refresh icon in the header.
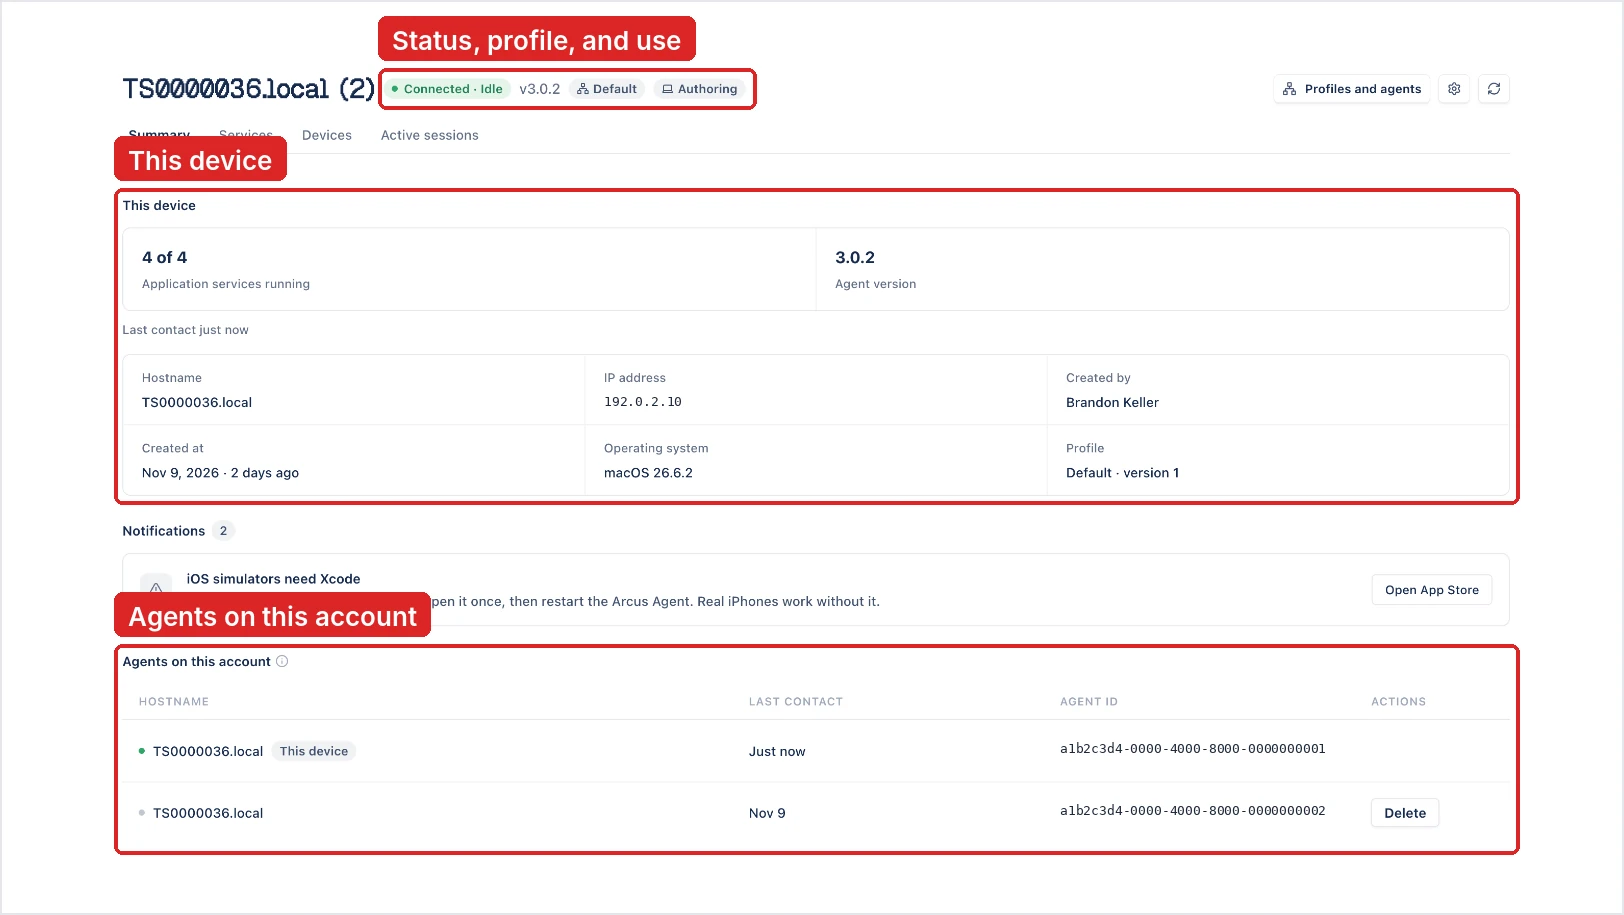
Summary
Section titled “Summary”- This device: how many of the agent’s 4 application services are running, the agent’s version, and when Arcus last heard from it. Below that are the machine’s hostname, IP address, operating system, who signed it in and when, and its Profile and version.
- Notifications: anything that needs your attention, such as a service that isn’t running, with what to do about it. After a profile changes, it shows “Profile updated: restart to apply” until the agent restarts. When all is well, it says “Nothing needs your attention on this machine.”
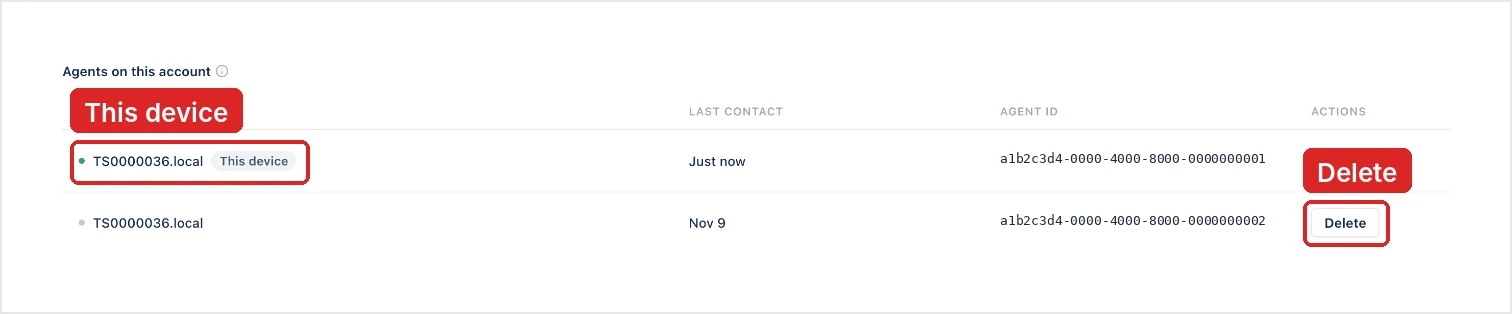
- Agents on this account: every machine with the agent on your account, with when each last made contact. A green dot means the machine’s agent is in contact now, and a grey dot means it isn’t. This list is for visibility only. Arcus always uses the agent on the machine you’re working on.
Arcus recognizes a machine by the sign-in its agent saved. If an update or reinstall loses that sign-in, the agent signs in as a new machine, for example MACHINE.local (2), and the old entry stays offline. Click Delete on the old entry to remove it.
Services
Section titled “Services”The Services tab lists the agent’s application services, with each one’s state and version:
| Service | Needed for |
|---|---|
| Web testing | Web authoring |
| Mobile testing: Android | Android authoring |
| Mobile testing: iOS | iOS authoring |
| Agentic AI capabilities | Every Copilot session |
A service that’s ready shows Idle. One that has stopped shows Not running.
Below them, System services lists the agent’s own services: Agent core, Debugger stream, and Log collector, with each one’s status and how long it has been running.
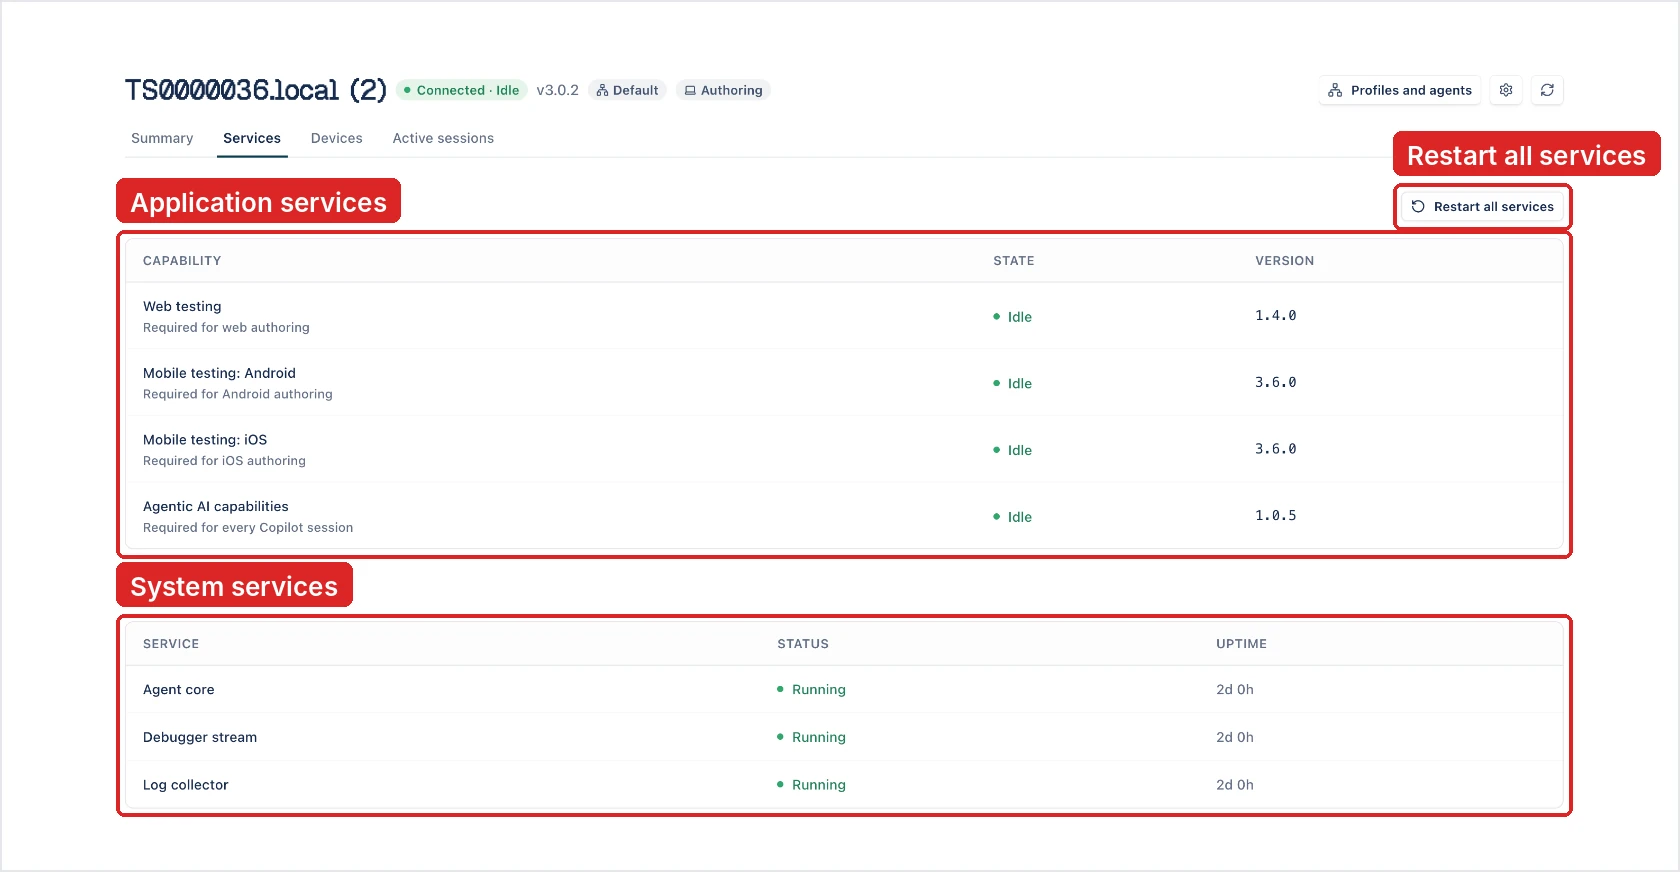
To restart them all, click Restart all services, then Restart. Arcus shows “All services restarted”. Each service can take a few minutes to come back, and the status shows Needs attention until they all have.
Devices
Section titled “Devices”- Mobile devices: the phones and emulators connected to this machine over USB or Wi-Fi. After you connect one, click Scan for devices.
- Browsers on this machine: each browser the agent found, with its version and whether it’s Ready or Not ready. A Local Agent run configuration offers these browsers.
On a Mac, Safari shows Not ready until the agent has downloaded WebKit, the engine Safari tests run on. The agent downloads it once the machine is signed in, and checks again every hour. iOS simulators also need Xcode: the Summary tab shows “iOS simulators need Xcode” with Open App Store. Install Xcode, open it once, then restart the agent. Real iPhones work without it.
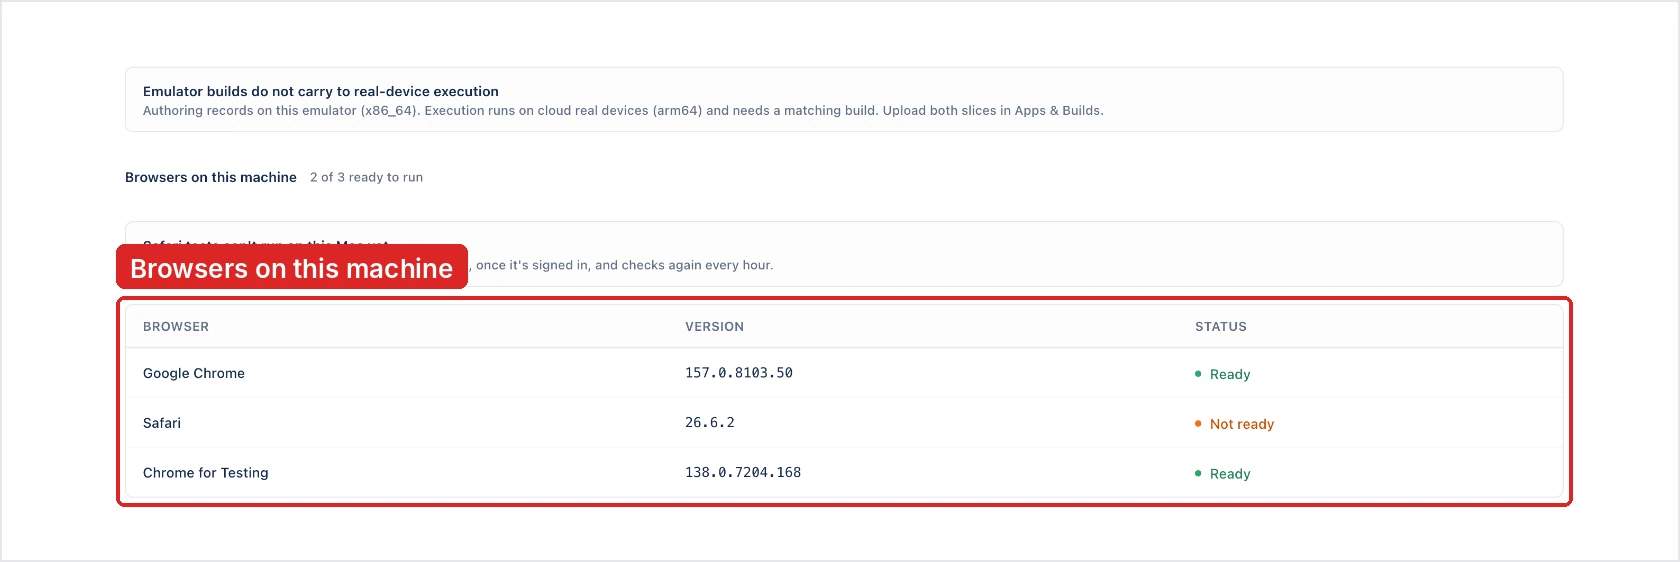
A build recorded on an emulator doesn’t run on a real device. An emulator records on x86_64, and cloud real devices run arm64, so upload a build for each. See Apps.
Active sessions
Section titled “Active sessions”The Active sessions tab counts the Test plans and Copilot runs using this machine now. If the machine’s profile is used for authoring only, the tab says “This device is for authoring, so it doesn’t run test plans.”
Connect a mobile device
Section titled “Connect a mobile device”Connect the phone or emulator to your machine, then click Scan for devices on the Devices tab. The agent looks for devices over USB and Wi-Fi.
To use a real iPhone, first create a provisioning profile in Settings > iOS Settings. Arcus uses it to re-sign your iOS builds so they run on your iPhone.
Change agent settings
Section titled “Change agent settings”A machine’s settings, such as who can pick it and how much its agent logs, come from its profile. Every machine starts on the Default profile, which is used for authoring. To see which profile a machine uses, check Profile on the Summary tab, or click the settings icon in the header.
To change them, go to Settings > Profiles and agents and edit the profile, or create one with New profile. A profile sets:
- Used for: Authoring, Authoring + Execution, or Execution only. A machine runs test plans only when its profile is used for execution.
- The agent’s log level in its CLI and local files: ERROR, WARN, INFO, DEBUG, TRACE, or ALL.
- How the machine reaches Arcus: Connection (Arcus cloud or self-hosted, and a proxy), Certificates, and Packages.
- Updates and logs, and Authentication for setup links and machine sign-in.
- Scope, for a profile used for execution: Global shares the machine with everyone in the account, and Local keeps it to the person who set it up.
See Agent profiles for every setting.
A changed profile applies when the agent restarts. The menu bar app then shows Profile updated: restart to apply. Click Restart to apply the profile.
Change the machine’s profile
Section titled “Change the machine’s profile”In the menu bar app, open the Profile tab. Other profiles lists the profiles this machine can switch to. Click Switch on a profile, check what changes, and click Switch again. The agent moves to that profile once its current runs finish. If the new profile can’t reach Arcus from the machine, the machine stays on its current profile. To undo a move before it happens, click Cancel.
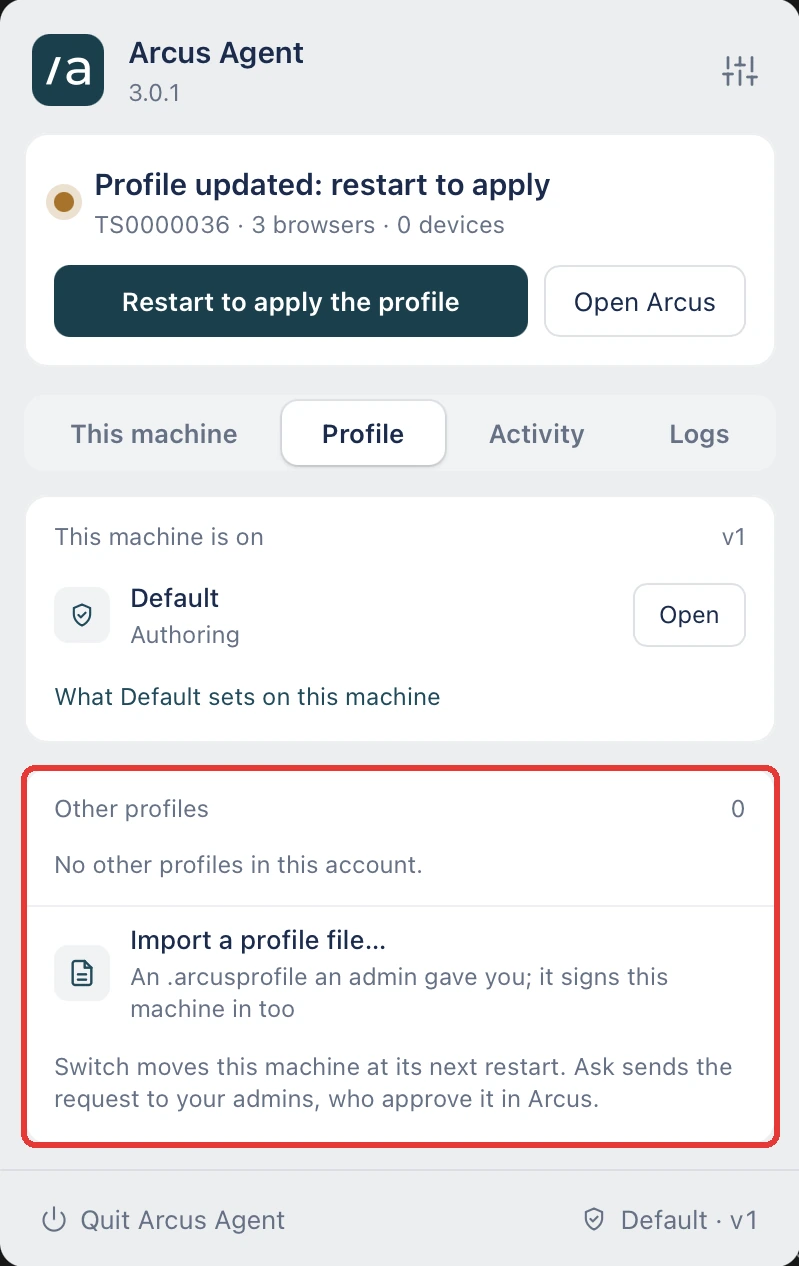
To use a profile an admin sent you as a file, click Import a profile file… and choose the .arcusprofile file. Importing a profile also signs the machine in.
Remove a machine from your account
Section titled “Remove a machine from your account”To remove another machine, find it under Agents on this account on the Summary tab, click Delete, and click Delete in the dialog.
Uninstall the Arcus Agent on Windows
Section titled “Uninstall the Arcus Agent on Windows”- In Windows, open Settings > Apps > Installed apps.
- Click the more options icon (⋯) beside Arcus Agent, then click Uninstall.
- Click Uninstall again to confirm.
- When the uninstaller asks “Are you sure you want to completely remove Arcus Agent and all of its components?”, click Yes.
- When it asks “Also remove Arcus Agent’s logs, settings and sign-in from this computer?”, click Yes to remove them, or No to keep them. If you keep them, you can reinstall without signing in again.
- Click OK to close the uninstaller.
Uninstalling also removes the machine from Agents on this account and from Settings > Profiles and agents > Agents.
Uninstall the Arcus Agent on Linux
Section titled “Uninstall the Arcus Agent on Linux”Click the Arcus Agent icon in the system tray, then click Uninstall Arcus Agent… and confirm. The agent’s logs and settings are kept. To delete them too, click Uninstall and delete all data… instead. These options need zenity or kdialog installed to ask you to confirm, and don’t appear for the portable zip.
You can also uninstall from a terminal:
~/.local/share/testsigma/agent/install/uninstall.shAdd --purge to also delete the logs and settings. For an install with --all-users, run sudo /opt/testsigma/agent/install/uninstall.sh.
As on Windows, uninstalling removes the machine from your account.
Troubleshooting
Section titled “Troubleshooting”No Agent is running on this machine
Section titled “No Agent is running on this machine”My Local Device shows this when the agent doesn’t respond.
- Check that the Arcus Agent icon is in the menu bar on a Mac, or in the system tray on Windows. If it isn’t, start the agent again from where you installed it, or from the portable zip. To restart it, click Quit Arcus Agent in the menu bar app, then open Arcus Agent again.
- If your browser blocks access to your local network, allow it for arcus.testsigma.com in the browser’s site settings, then refresh the page.
- Click Re-check.
Needs attention
Section titled “Needs attention”Open the Summary tab and read Notifications. If a service isn’t running, click Restart all services on the Services tab. Allow a few minutes for each service to come back. If that doesn’t help, quit the agent from the menu bar app and open it again. If the problem continues, open the menu bar app’s settings and use Troubleshoot > Clear cache…, or check the Logs tab for errors.
No devices are connected to this machine
Section titled “No devices are connected to this machine”Check that the phone or emulator is connected, then click Scan for devices on the Devices tab. For an iPhone, check that a provisioning profile exists, as in Connect a mobile device. To author on a mobile app without a device, use a cloud device instead.
Was this page helpful?
Thanks for the feedback.