

Projects and project settings
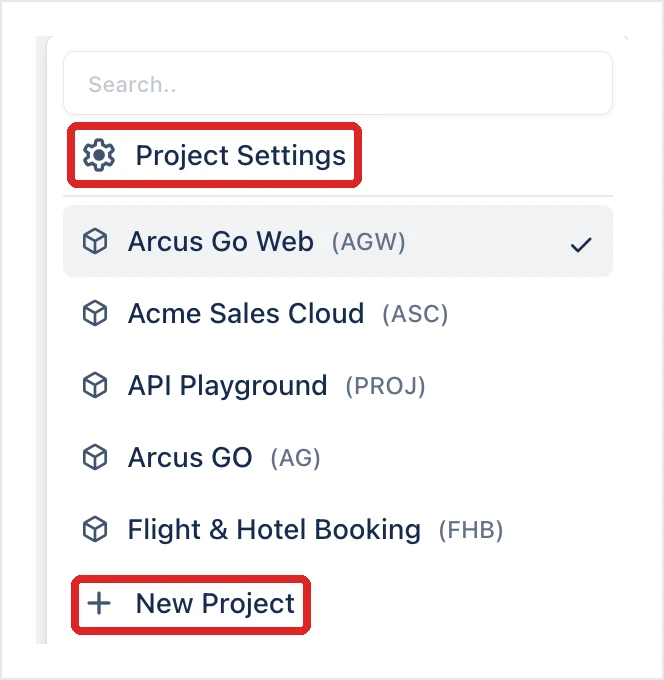
A project holds the test cases, step groups, test runs, plans, and test assets for one application or initiative. The pages in the left navigation, from QI Home to Reports, show the project selected in the project switcher at the top of the navigation. The same switcher opens Project Settings and creates new projects.
Create a project
Section titled “Create a project”-
Open the project switcher at the top of the left navigation and click New Project. The Create a New Project page opens.
-
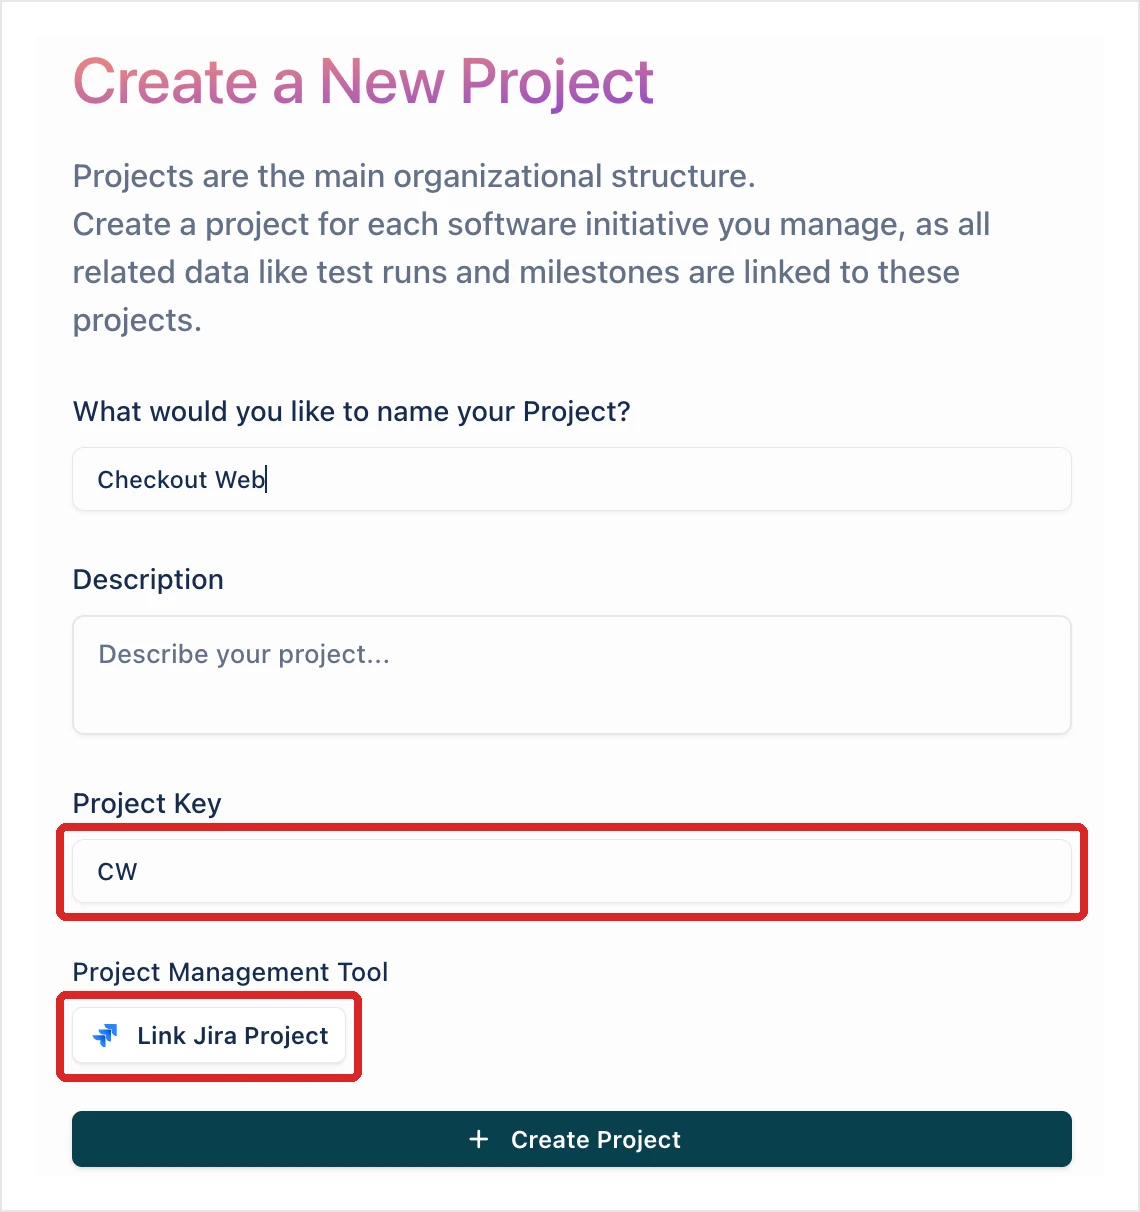
In What would you like to name your Project?, enter the project name.
-
(Optional) Enter a Description.
-
Check the Project Key. Arcus fills it in from the name. The key starts the ID of everything in the project, followed by a number. To use a different key, type over it. The key is turned into capitals, can be up to 10 characters, and must not match another project’s key.
-
(Optional) To read sprints from Jira from the start, click Link Jira Project. You can link it later from Project Settings.
-
Click Create Project.
Arcus switches to the new project and opens its Dashboard.
Change a project’s settings
Section titled “Change a project’s settings”Open the project switcher and click Project Settings. The page has 4 sections: Overview, Import, Export, and Salesforce. To work on another project, pick it from the project list at the top right of the page.
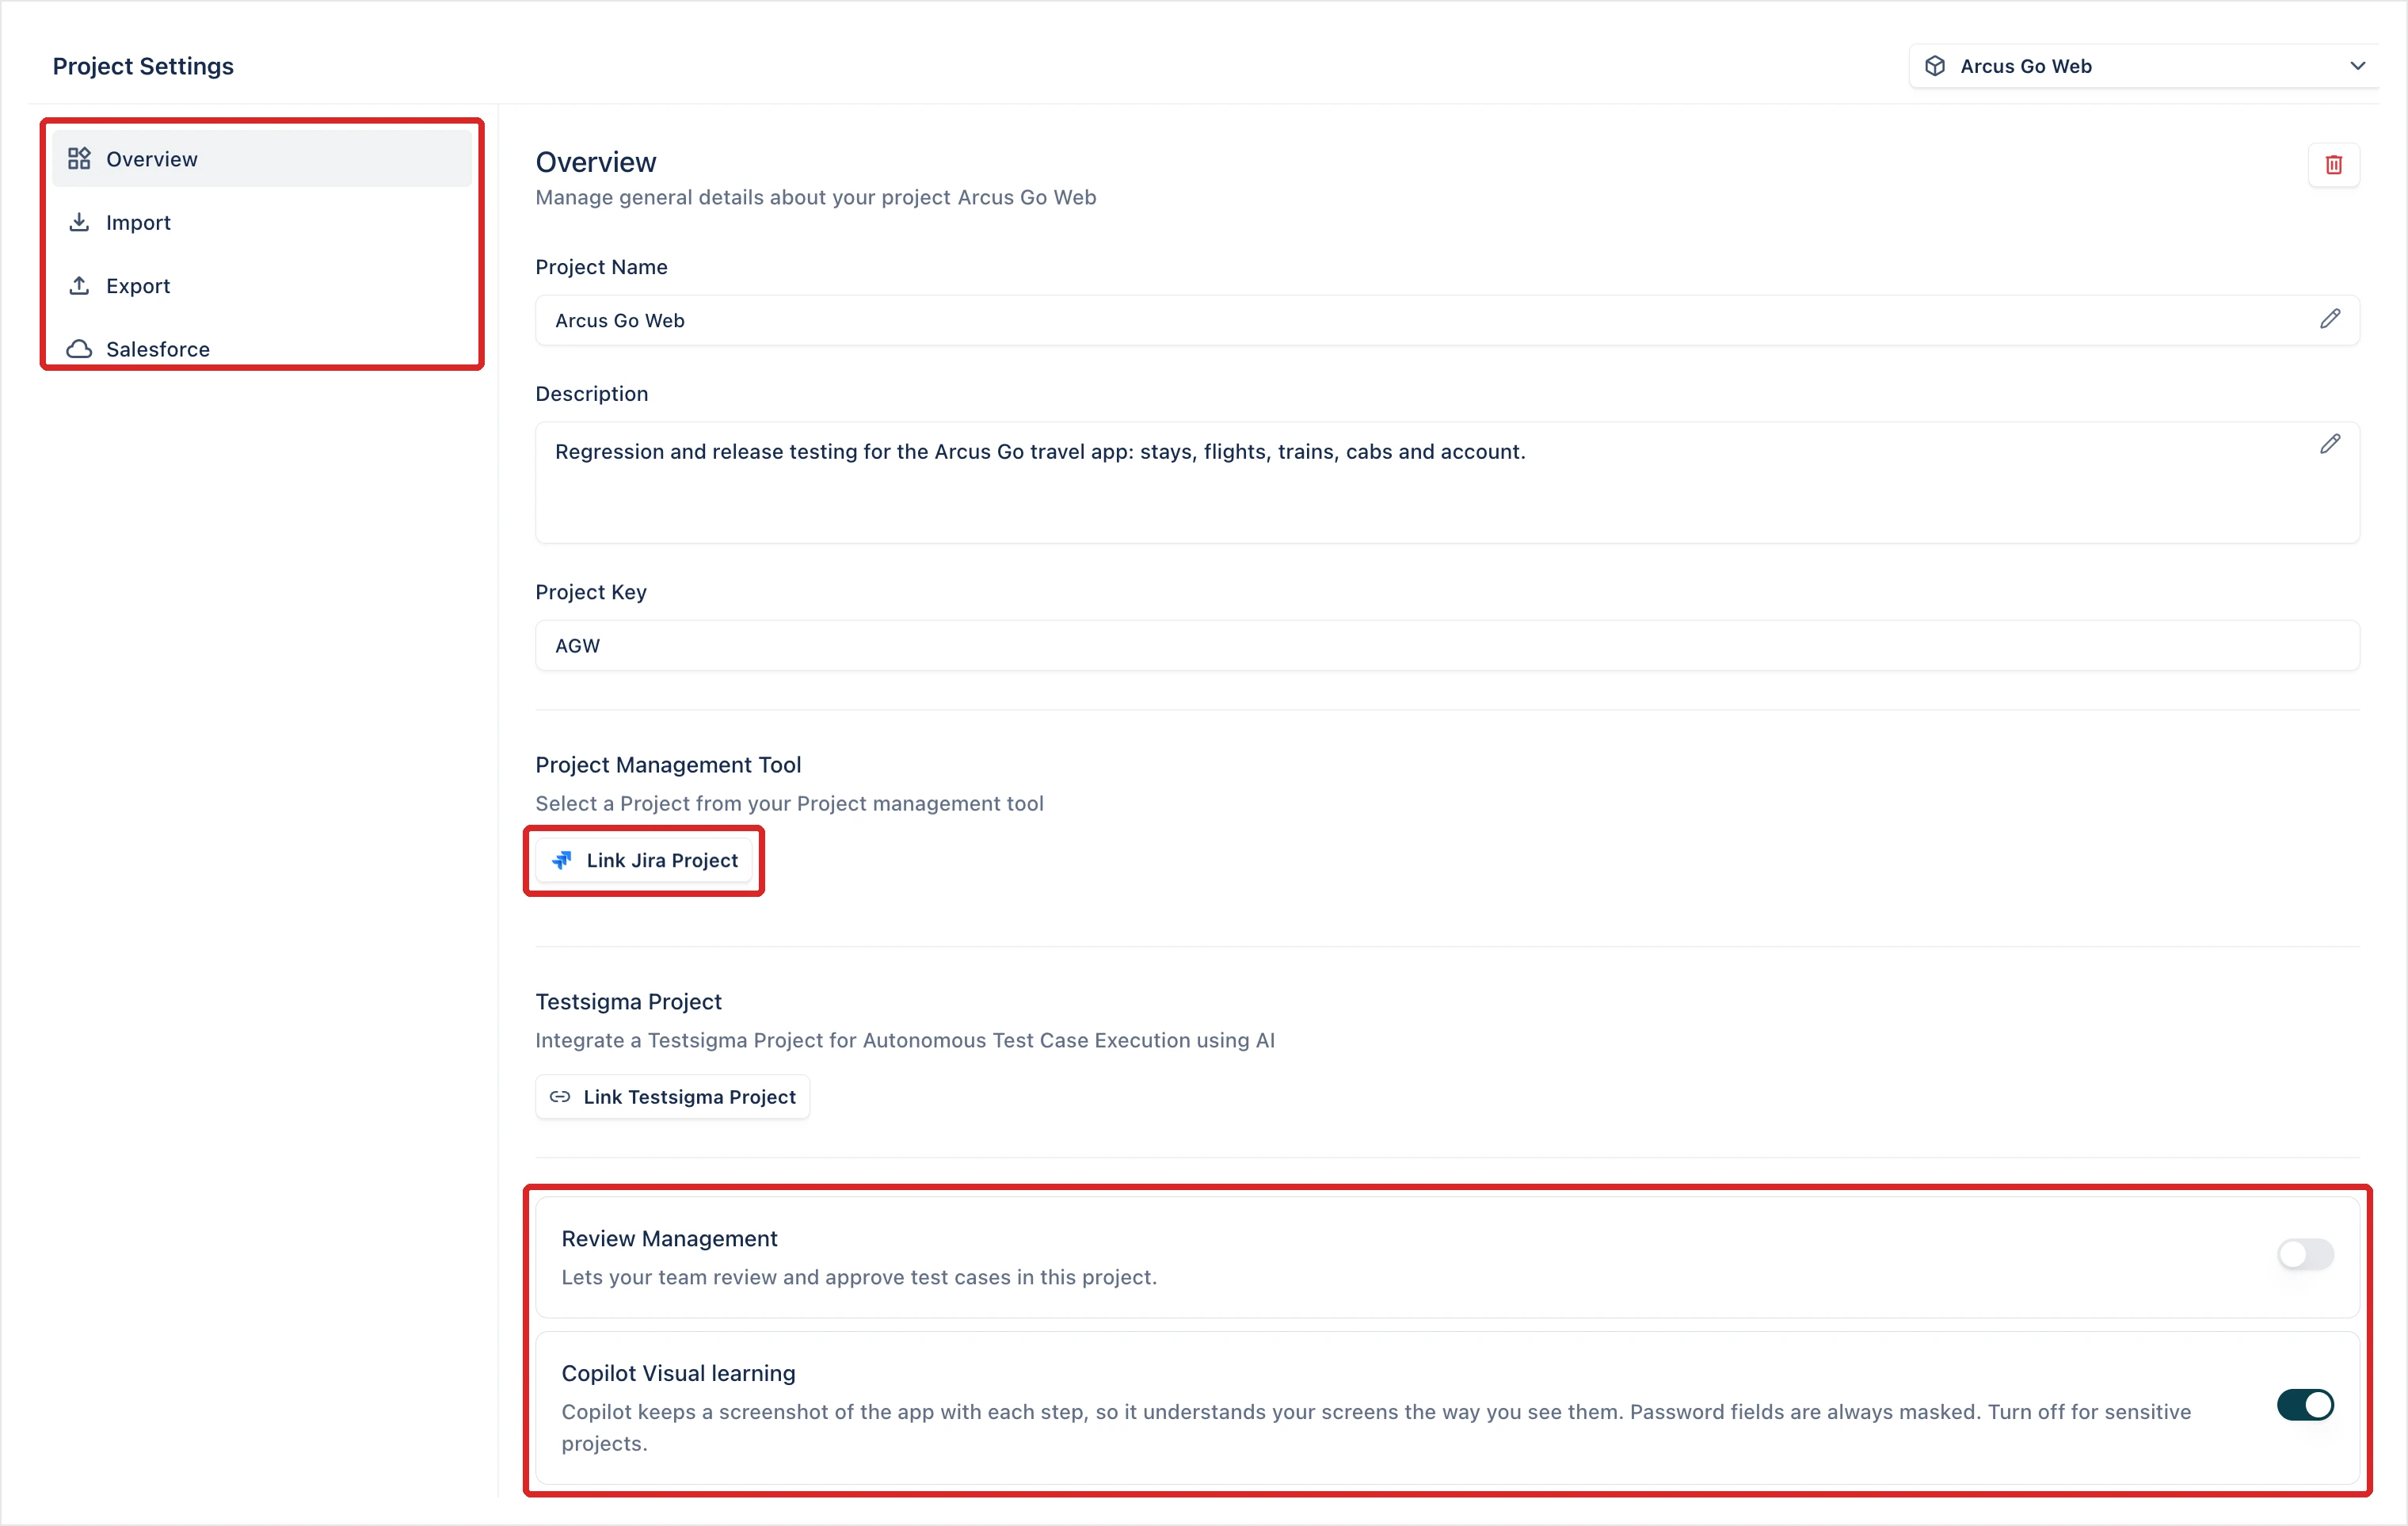
Overview holds the project’s details and settings:
- Project Name and Description: click the edit icon beside either one to change it.
- Project Key: read-only. You can’t change the key after the project is created.
- Project Management Tool: click Link Jira Project to choose the Jira project Arcus reads sprints and stories from. Other trackers link from QI Home. See Generate for a sprint.
- Testsigma Project: click Link Testsigma Project to connect a project in the Testsigma automation platform.
- Review Management: turn it on to have test cases reviewed and approved before they’re ready. See Review test cases.
- Copilot Visual learning: turn it off to stop Copilot keeping a screenshot of the app with each step. Use this for sensitive projects. Password fields are always masked.
Delete a project
Section titled “Delete a project”The delete icon at the top right of Overview deletes the project with all its test cases, runs, and plans. In the Delete Project dialog, select Confirm deletion; this action is permanent and cannot be undone., then click Delete Project. The demo project can’t be deleted.
Test properties
Section titled “Test properties”Test properties are the 4 classifications every test case carries. Each has a set of values, which you rename or extend here.
The properties
Section titled “The properties”- Test Case Priority: the urgency and execution order of a test case. It starts with Critical, Major, Medium, and Minor.
- Automation Type: the automation state of a test case. It starts with Automated, Manual, Not Automated, In Progress, Automation Not Required, and Obsolete.
- Test Case Status: the current state of a test case in the testing lifecycle. It starts with Draft, Ready, Reviewed, Archived, In Review, Obsolete, and Rework.
- Test Case Type: the category of a test case, based on its purpose and testing approach. It starts with Functional, Regression, Smoke, Performance, Integration, Manual, Unit Test, Non Functional, and User Experience.
Values your team adds, or that an import creates, are listed after these in Settings > Manage Properties, so your account may show more.
Rename a value
Section titled “Rename a value”-
In the left navigation, go to Settings > Manage Properties.
-
Click Edit. The Edit Properties panel opens.
-
Click the value you want to rename and edit it in place.
-
Click Update Details.
Add a value
Section titled “Add a value”-
In the left navigation, go to Settings > Manage Properties.
-
Click Edit.
-
Click the plus icon (+) beside the property you’re adding to. A row opens with the placeholder Enter property name.
-
Enter the name, then click the check icon to keep it. To drop the row instead, click the cross icon.
-
Click Update Details.
Custom fields
Section titled “Custom fields”A custom field adds project-specific information to a test case, beyond the default test properties. Once a field exists, you can set it on test cases and filter the list by its values.
Create a custom field
Section titled “Create a custom field”-
In the left navigation, go to Settings > Custom Fields.
-
Click + Add New. The Add new field in Test Case panel opens.
-
Enter a Field Name.
-
(Optional) Enter a Description.
-
Select the Field Type.
-
If the field type offers choices, enter its options.
-
Click Add. The field appears in the Custom Fields section.
A field takes 1 of 8 types:
- Text field: a single line of text.
- URL: a link.
- Text area: several lines of text.
- Date picker: a date.
- Dropdown select: one option from a list you define.
- Checkbox: a single on or off choice.
- Radio Button: one option from a set you define.
- Multi select: several options from a list you define.
Set a custom field on a test case
Section titled “Set a custom field on a test case”-
In the left navigation, open Test Cases, then create or open a test case.
-
In the Test Properties section, select the custom field values.
Set a custom field on several test cases
Section titled “Set a custom field on several test cases”-
In the left navigation, open Test Cases, then select the test cases to update.
-
Press
Command+Kand choose the custom field to edit. -
In the <Custom_Field_Name> dialog, select or enter the value to apply.
-
Click Update <number> Test Cases.
Filter by a custom field
Section titled “Filter by a custom field”-
In the left navigation, open Test Cases.
-
Click Filter by, or press
Command+Shift+F. -
In the Filter by dialog, select the custom field to filter on. The list narrows to test cases matching your selection.
Labels
Section titled “Labels”A label categorizes test cases and test runs so you can filter and track them. For example, label by functionality: Smoke Test, Regression, or API Testing.
Add a label
Section titled “Add a label”-
In the left navigation, go to Settings > Manage Labels.
-
Click Edit.
-
Click Add Labels.
-
Enter a Name.
-
Click the check icon to save.
Edit a label
Section titled “Edit a label”-
In the left navigation, go to Settings > Manage Labels.
-
Click Edit.
-
Select the label to update.
-
Update the Name.
-
Click Update Details.
Delete a label
Section titled “Delete a label”-
In the left navigation, go to Settings > Manage Labels.
-
Click Edit.
-
Click the delete icon next to the label.
-
Confirm in the Delete <Label_Name> dialog.
Import
Section titled “Import”Project Settings > Import brings test cases and step groups into the project. Its Test Cases and Step Groups tabs each list past imports with their results.
- Test Cases: click Import via CSV for a spreadsheet, or Quick import from to copy a project from another test management tool with its history. See Import from CSV and Quick import.
- Step Groups: click Import via CSV. See Import step groups.
Export
Section titled “Export”Project Settings > Export saves the project’s test cases as an Excel (.xlsx) file.
-
In Project Settings, open Export.
-
Click Export. The Export test cases dialog opens with the number of test cases to export.
-
Click Export (n).
To export only some test cases, filter the Test Cases list, then click the more options icon (⋯) and click Export. The same dialog opens with the list’s filters applied. See Import and export.
The file has three sheets: Test Cases, Test Steps, and Step Groups. Step Groups holds the step groups the exported test cases use. The dialog counts test cases only.
Arcus builds the file in the background. If you stay on the Export page, the file downloads when it’s ready. Every export is also listed on that page; click the download icon on an export to download it again. Arcus also emails you when the export is complete.
Salesforce
Section titled “Salesforce”Project Settings > Salesforce connects the Salesforce orgs this project tests. Click Connect Salesforce to start. See Connect and sync an org.
Was this page helpful?
Thanks for the feedback.