

Blocks and conditions
A block is a step that holds other steps, or brings in steps from elsewhere. Use blocks to call a step group, make an API call, run steps only when a condition holds, repeat steps, or keep steps to one platform. Add them from the Automated steps tab of a test case, in the same editor as single steps.
Add a block
Section titled “Add a block”-
Open the test case and open the Automated steps tab.
-
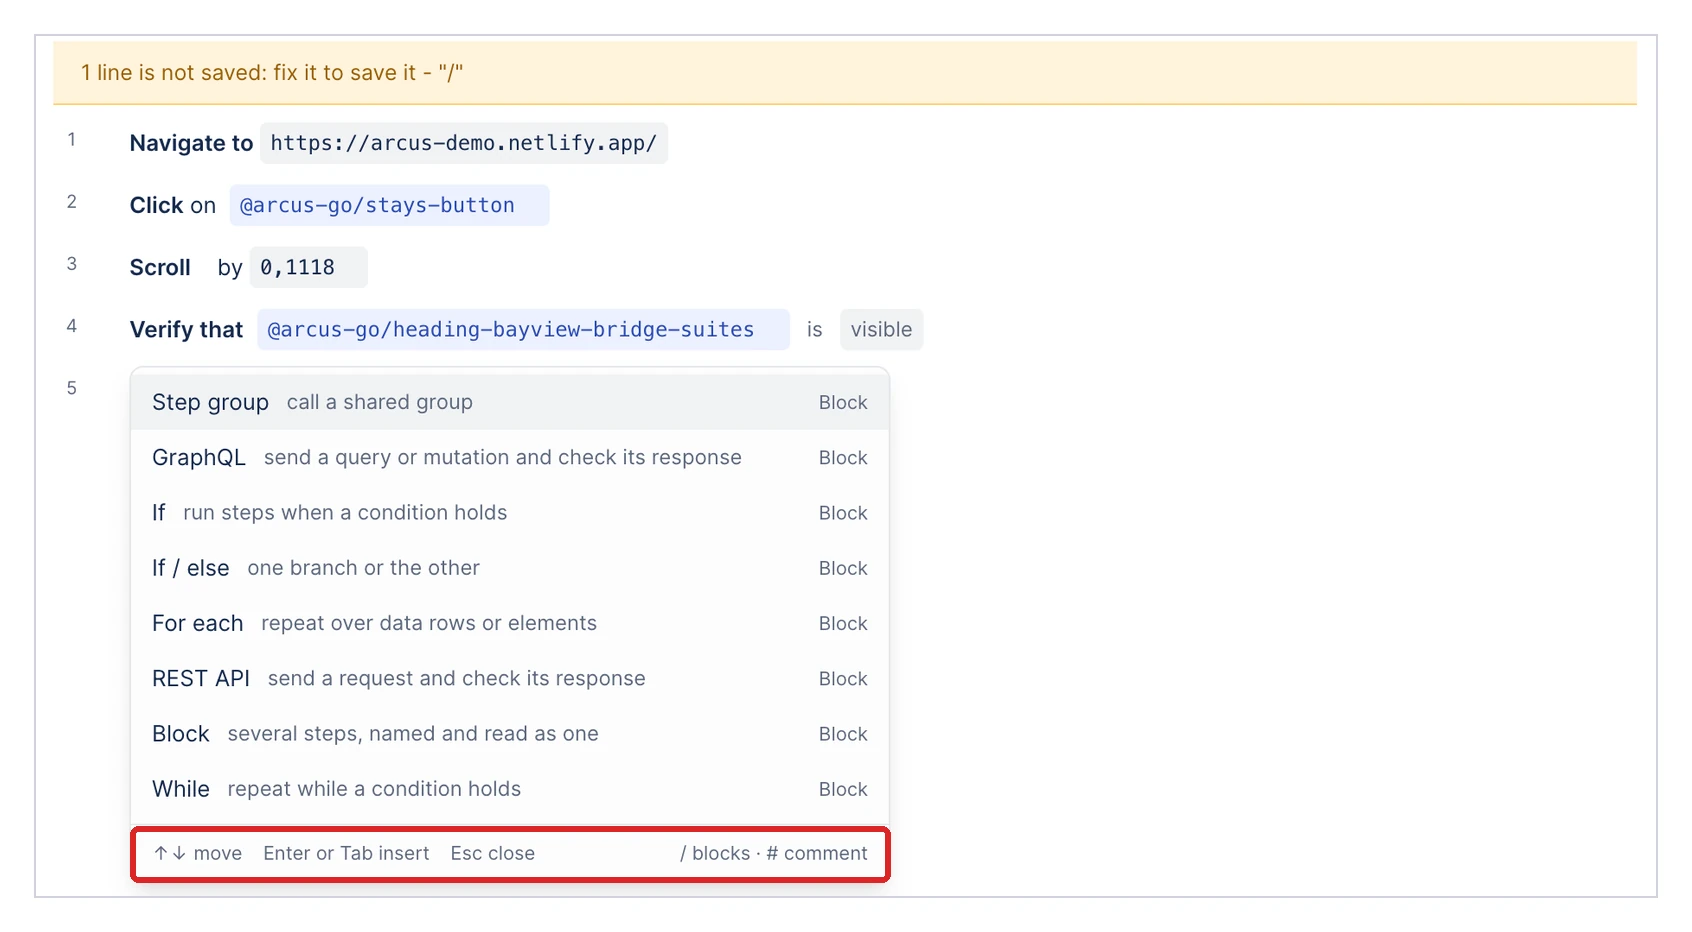
Click the empty row at the end of the steps that reads “Type a step, or / for blocks”.
-
Type
/. The list of blocks opens. To narrow it, keep typing, for example/while. -
Highlight a block with
↑and↓, and pressEnterorTabto insert it. You can also click it. -
Fill in the block’s row. The parts still to fill show as dashed chips, such as target.
-
Add the steps that belong inside the block in the indented row below it. To move an existing step in, select it and press
Tab.
An empty While, For each, Block, or Only on a platform block shows a warning, such as “empty while block”. Click a block’s row to open its Step settings.
Blocks
Section titled “Blocks”| Block | The row reads | Step settings |
|---|---|---|
| Step group | Step Group, the sentence set in the group’s READS AS, and a link icon (↗) | STEP GROUP (the group’s name), ARGUMENTS, and READS AS |
| REST API | The call as sentences, such as “Make GET call to …” | Opens the request editor. See API tests |
| If | If target is visible | CONDITION: “Edit it on the row - click the condition on the header.” |
| If / else | An If row followed by an Else branch | As If |
| For each | For each row in a dataset | LOOP: binding and over |
| Block | Block and the block’s name | NAME |
| While | While target is visible | SAFETY: max iterations |
| Only on a platform | Only on and a platform, such as android | PLATFORM: runs on web, android, ios, or windows |
Step group
Section titled “Step group”Selecting Step group lists the step groups in the project. Pick one, and the row shows the sentence the group was given under READS AS, followed by a link icon (↗) to the group. If the project has none yet, the list reads “No step groups in this project yet.” See Step groups.
REST API
Section titled “REST API”Selecting REST API opens the request editor beside the steps. Set up the request and click Create. Click Cancel to remove the row. See Add an API call.
If, If / else, and While
Section titled “If, If / else, and While”A condition reads as a sentence on the block’s row: what to check, then the check.
-
Click the target chip and choose what to check. The tabs are element, page, alert, and device, with more choices below them: two values, a new window, add-on check, the terminal screen, a desktop session, and the host.
-
Click the check, such as visible, and pick one from the list. Type in the “Find a check…” field to narrow the list.
-
(Optional) Click and to add another clause to the condition.
For an element, the checks include is visible, is present, is enabled, is checked, is editable, and is selected, each with a negative form such as is not visible. Checks marked windows only apply to desktop elements, and web only checks apply to web pages. Further down, text, value, label, placeholder, attribute, and how many match check a property of the element.
To add branches to an If block, click + else if or + else below its steps. If / else inserts an If block with an Else branch already in place.
A While block repeats its steps while the condition holds. Set max iterations in its Step settings to cap how many times it repeats.
For each
Section titled “For each”A For each block repeats its steps once per data row, per element, or per number.
-
Click the block’s row. Step settings opens on LOOP.
-
(Optional) Change binding, the name each pass reads through. It’s
rowby default. -
Under over, select a dataset, the elements at a locator, or a number range.
-
For a dataset, select it under the second over. If the list reads “No datasets on this test case yet. Add one under Dataset, then pick it here.”, attach a dataset to the test case first.
See Repeat steps for each row.
A Block groups steps under one name, so the test case reads as larger actions. Enter the name under NAME in Step settings.
Only on a platform
Section titled “Only on a platform”Steps inside an Only on a platform block run only on the platform the block names. Select the platform under runs on in Step settings: web, android, ios, or windows.
Move, collapse, and delete blocks
Section titled “Move, collapse, and delete blocks”- Press
Tabto move the selected step into the block above it, andShift+Tabto move it back out. - Press
⌥+↑or⌥+↓to move a step up or down, including in and out of blocks. - Click the arrow next to a block’s number to collapse or expand its steps.
- To delete a block, click its ellipsis icon (⋮) and click Delete. The steps inside it, and any Else if and Else branches, are deleted with it. Press
⌘+Zto undo.
The ellipsis menu on a block has Step settings, Move up, Move down, Duplicate, Insert a step above, Insert a step below, and Delete. It has no Skip this step.
Conditions, checks, and stored values on a step
Section titled “Conditions, checks, and stored values on a step”A single step can carry its own condition, check, and stored value, without a block. Open the step’s Step settings and use ADD TO THIS STEP. The buttons there depend on the step: a Verify that step offers only Store, while a Click on or Go back step offers all three.
- Only if adds a PRE-CONDITION section. Click + pre-condition to build a condition, or write it as text. The condition “runs before the action; the step is skipped or failed when it does not hold”.
- Verify adds a VERIFICATION section. Click + verification, or write it as text. The check “runs after the step action; fails the step when it does not hold”.
- Store adds a STORE section. Click + store binding to save a value from the target into a variable.
A pre-condition also shows under the step row as PRE-CONDITION. A store binding reads target text into variable, and the step stays a draft with “This step still needs a variable name.” until you name the variable. To remove a store binding, click its close icon (×).
Only if present, under OPTIONS, “Runs this step only when its element is on the page. If the element is missing the step is skipped and the run carries on.” It appears only on a step that acts on an element.
Use a stored value in a later step
Section titled “Use a stored value in a later step”Store takes a value off the page and keeps it under a name. A later step uses the value by writing the name in curly braces as a Runtime value, for example {user_id}.
A value stored inside a step group is also available to later steps in the test case that calls the group.
If no step above stores the name, the step shows “nothing above this row stores {user_id}”. Add a store binding to an earlier step, or check the spelling of the name.
An API call stores values the same way. See Use a stored value in a later call.
Add a note for readers
Section titled “Add a note for readers”To leave a note between steps, type # in an empty row and write the note. The footer of the block list shows this as ”# comment”.
Was this page helpful?
Thanks for the feedback.