

Apps
An app holds every build of one mobile application. Create it once, then upload builds to it from the browser or push them from your CI pipeline. A mobile run configuration picks the app and the build to test.
Open Apps
Section titled “Open Apps”In the left navigation, open Test Assets, then open the Apps tab. You can also click Apps on the Plans page, or Open Apps in a mobile run configuration when the project has no apps yet.
Each row shows the app’s ID, name, platform, and type: Builds for uploaded builds, or Manual for manual package details. It also shows the package or bundle ID, the number of builds, and the latest build and its state.

To narrow the list, click Platform and select Android or iOS. To reorder it, click Sort and sort by creation date, last update, or name. To find an app by name, click the search icon.
Create an app
Section titled “Create an app”-
On the Apps tab, click Create App.
-
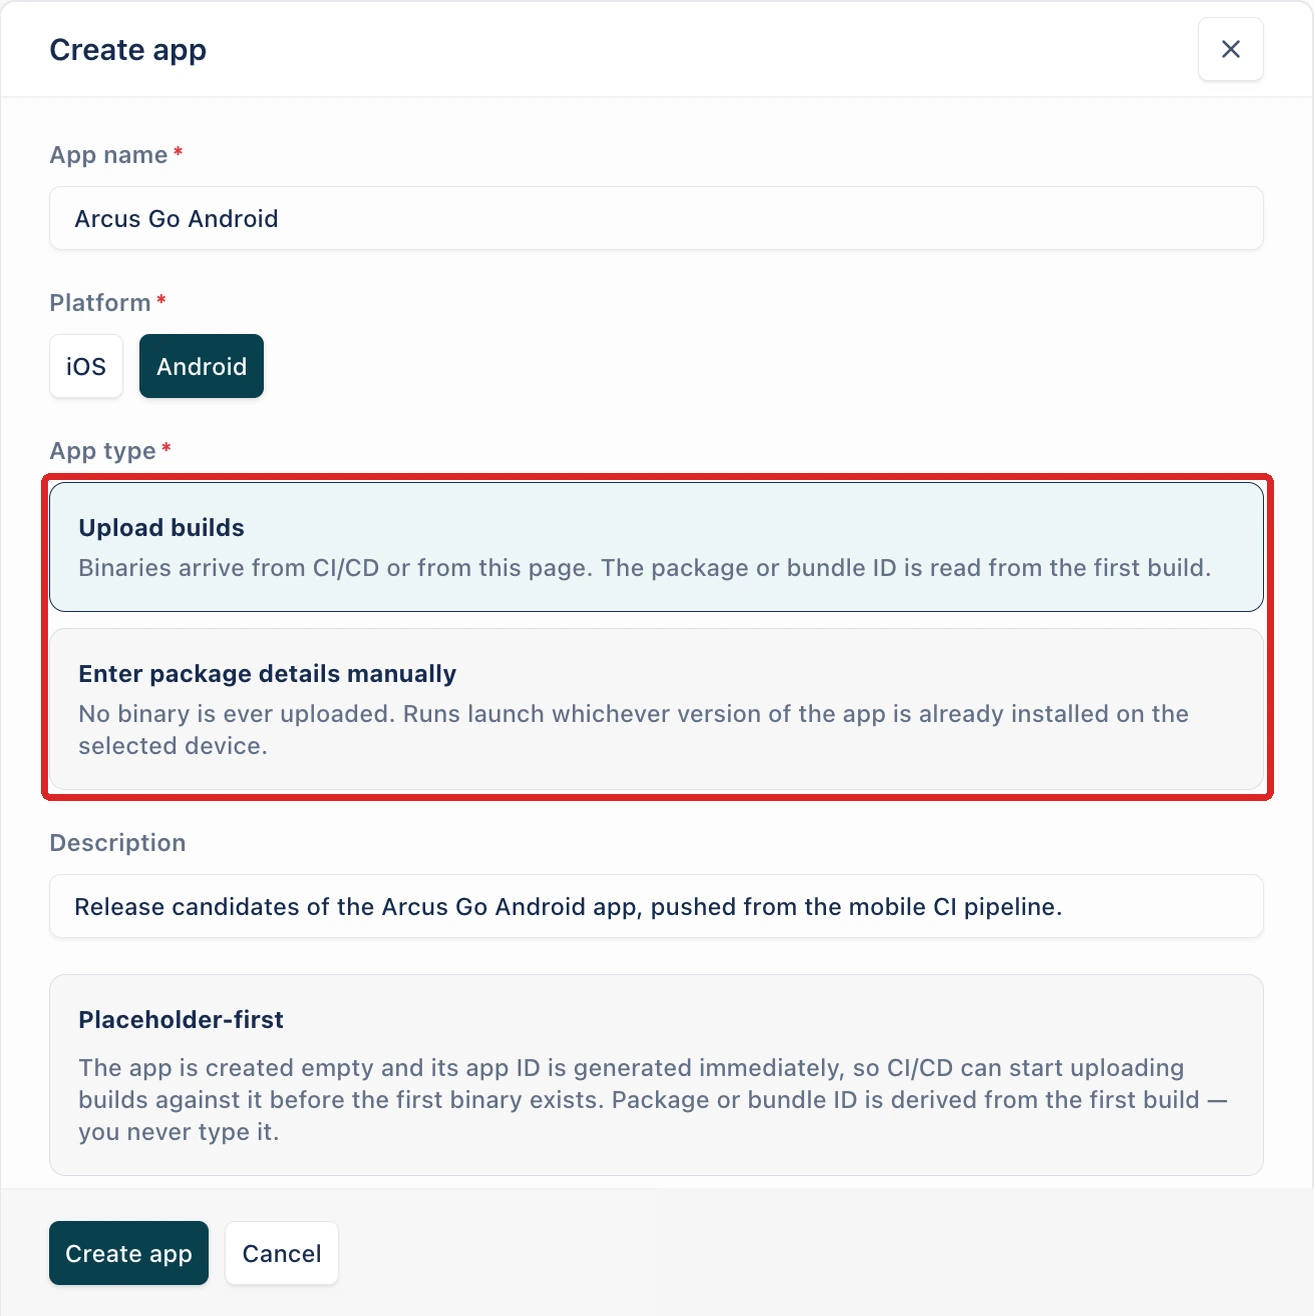
Enter the App name.
-
In Platform, select iOS or Android.
-
In App type, select how Arcus gets the app:
- Upload builds: you upload binaries from the app’s page or from CI/CD. Arcus reads the package or bundle ID from the first build.
- Enter package details manually: you never upload a binary. Enter the Package / Bundle ID, and for Android, optionally the Launch activity. Runs launch whichever version of the app is already installed on the device.
-
(Optional) Enter a Description.
-
Click Create app.
Arcus shows “App created” and opens the app’s page. An app with uploaded builds starts empty, with its app ID ready straight away, so a CI pipeline can start uploading builds before the first binary exists.
You can’t change an app’s type after creating it. To switch, create a new app.
The app page
Section titled “The app page”The app page shows four cards:
- App ID: the app’s permanent ID, which pipelines target.
- App Package, or Bundle ID for iOS: set by the first build, from the binary.
- Builds: how many builds the app has. Metadata is kept after a build expires.
- Resolution at trigger: the last uploaded build is always marked LATEST. If a run is triggered without a build number, it uses that latest build.
Below the cards are Upload API, Capabilities, and Builds.

An app with manual package details is marked MANUAL. Its page has only two cards, App ID and Resolution at trigger, which reads “Installed on device”. Below them, Package details holds the App package and Launch activity: change them and click Save. A manual app has no builds and no Upload Build.
Upload a build
Section titled “Upload a build”-
On the app page, click Upload Build.
-
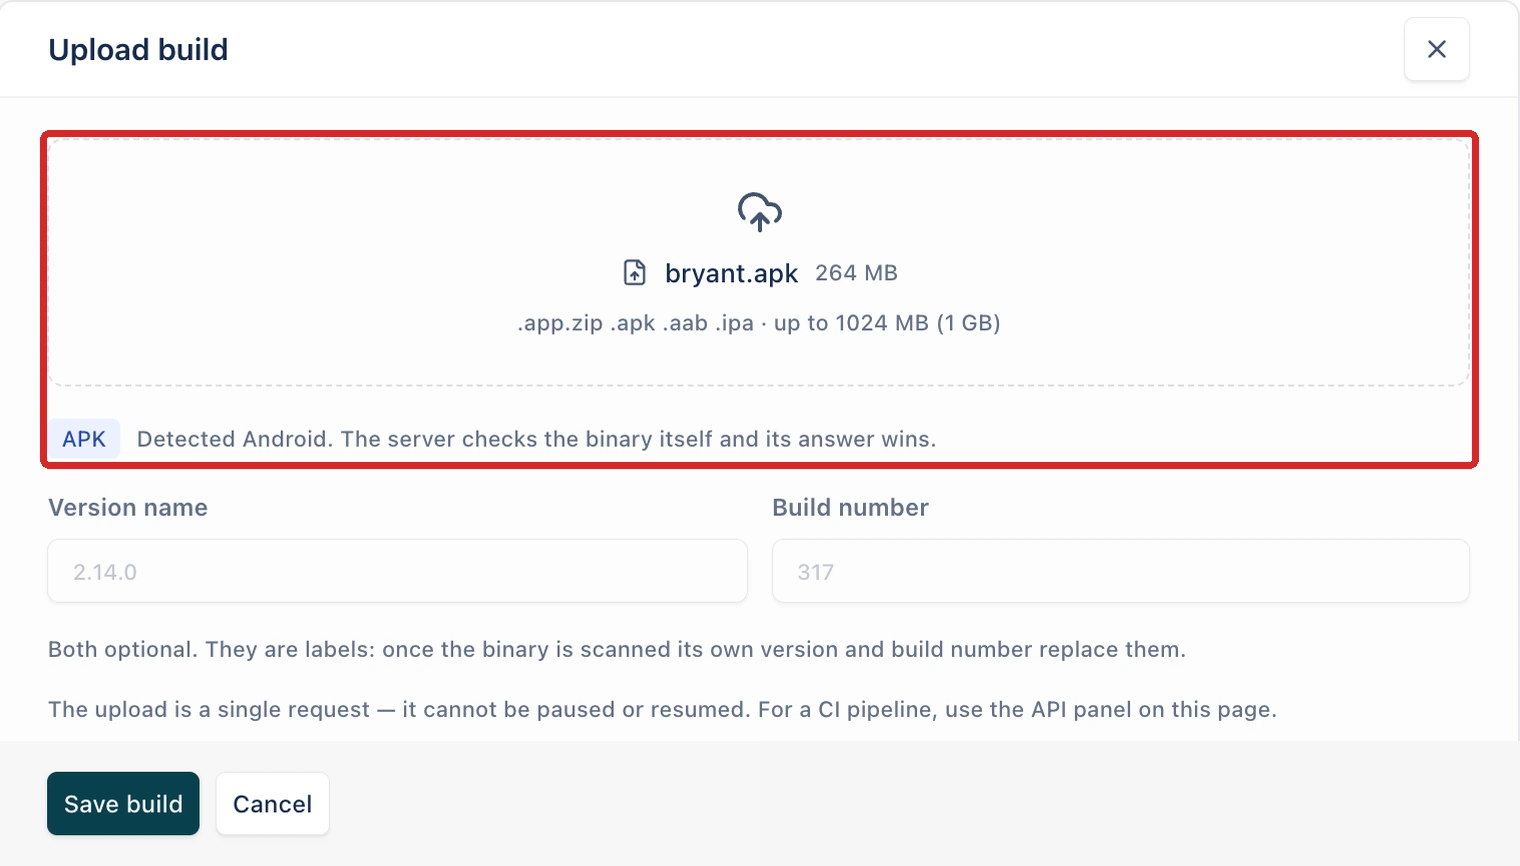
Drop the file in the panel, or click to choose it. Arcus accepts
.apk,.aab,.ipa, and.app.zipfiles, from 100 KB up to 1024 MB (1 GB). The panel shows the detected file type and platform. The server checks the binary itself when it’s uploaded, and its answer wins. -
(Optional) Enter a Version name and a Build number. These are labels only. Once Arcus scans the binary, the version and build number in it replace them.
-
For an iOS build, choose any iOS options. None is selected by default:
- Keychain support: re-signs the app with a keychain access group, so it can read its own keychain items on a lab device.
- Bypass secure screen: allows screenshots and video on screens the app marks as secure.
- Skip re-signing: uploads the binary as it is. Use this only for a build already signed for the target devices.
-
Click Save build.
The panel shows the upload’s progress as a percentage. To stop it, click Cancel upload. Stay on the page until the build appears under Builds, because leaving it stops the upload. The upload is a single request, so it can’t be paused or resumed. For a CI pipeline, use the Upload API instead.
Arcus refuses a file as soon as you pick it when it can’t be a build. A file over the limit shows “This file is larger than 1024 MB (1 GB), the maximum build size.”, one under 100 KB shows “The build is smaller than the minimum of 100 KB”, and any other type shows “Unsupported file type. Supported formats: .app.zip, .apk, .aab, .ipa.”
An .aab build lands in the Blocked state, because devices can’t install an Android App Bundle directly. Upload a universal .apk built from it instead.
Arcus re-signs iOS builds for real devices with the provisioning profiles in Settings > iOS Settings. A simulator build runs on a simulator as it was uploaded.
Upload from a CI pipeline
Section titled “Upload from a CI pipeline”Upload API on the app page has a ready-made snippet for cURL, GitHub Actions, Jenkins, GitLab, Bitrise, and CircleCI. The snippet uploads the build using an API key stored as ARCUS_API_KEY, then checks its state until it’s READY, or FAILED with a reason. To create a key, go to Settings > API Keys. To copy the snippet, click the copy icon. For the full API reference, click Docs.
Manage builds
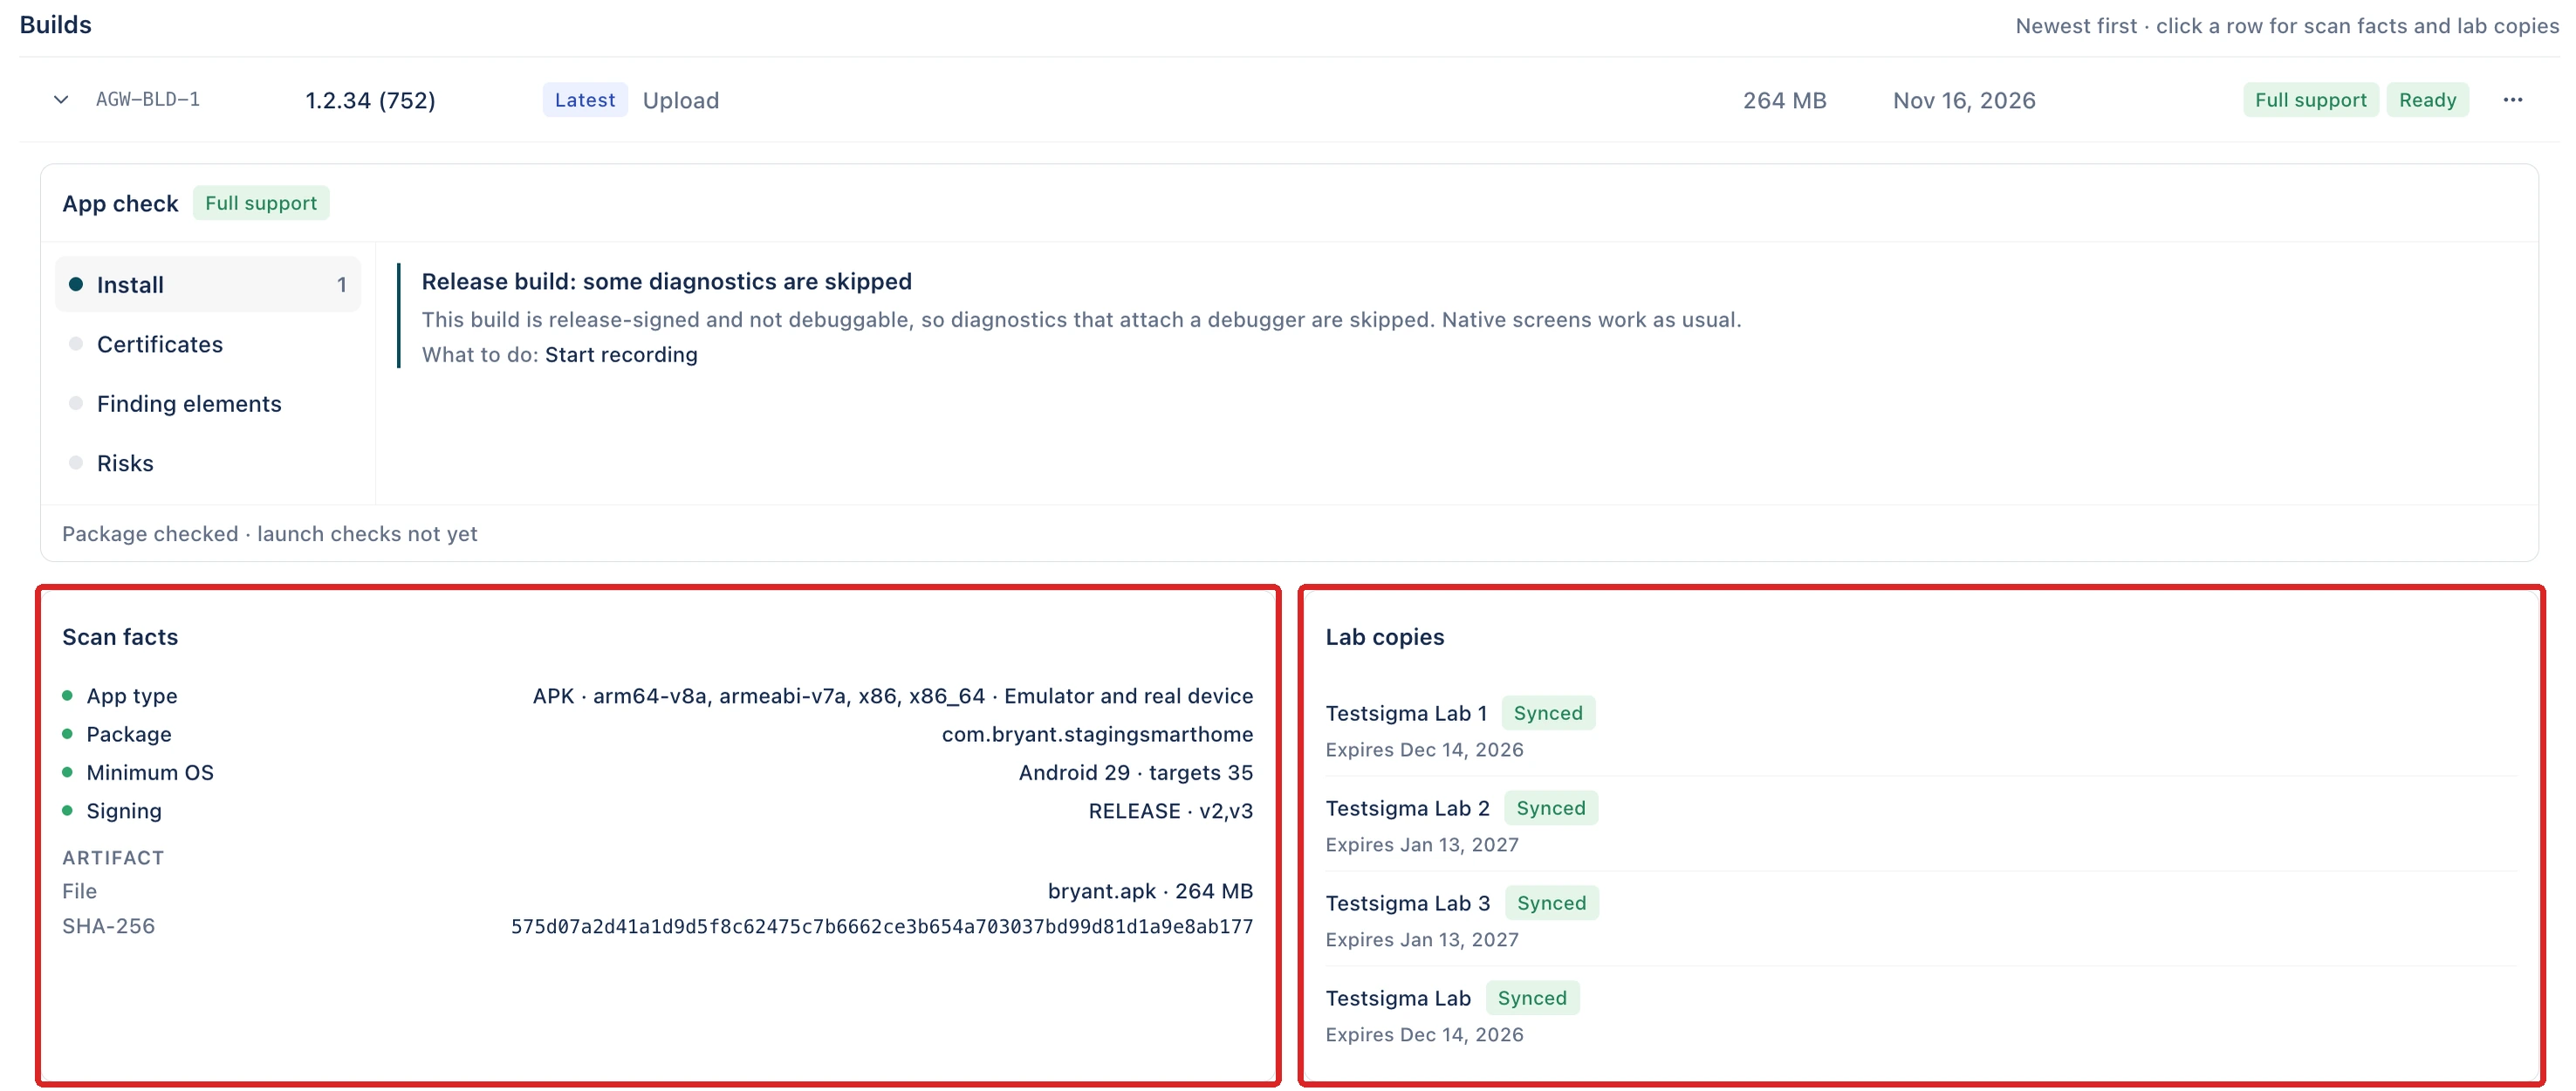
Section titled “Manage builds”Builds lists the app’s builds, newest first. Each row shows the build ID, its version with the build number in brackets, whether it’s Latest, where it came from, such as Upload, its size, its upload date, how well Arcus supports it, such as Full support, and its state. A new build shows Syncing while Arcus copies it to the device labs, then Ready.
Once the first build is scanned, the App Package card shows the package or bundle ID read from it, and the Apps tab shows the latest build and its state.
Click a row to open its details:
- App check: the support level and any findings, grouped under Install, Certificates, Finding elements, and Risks. Each finding says what it means and what to do. The footer shows which checks have run so far.
- Scan facts: the App type with its architectures and the devices it runs on, the Package, the Minimum OS and target version, and the Signing. Under ARTIFACT are the file name, its size, and its SHA-256.
- Lab copies: each device lab that holds a copy of the build, its state, such as Synced, and when the copy expires.
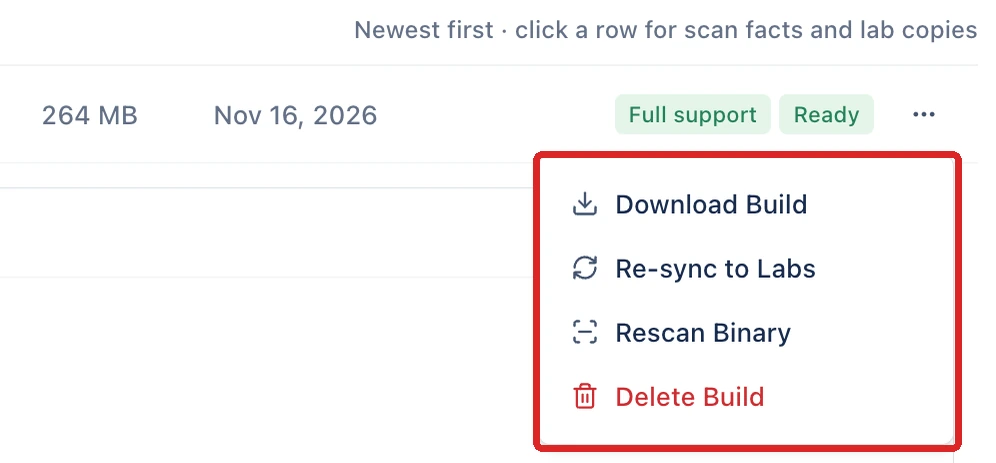
To act on a build, click the ellipsis icon (⋯) next to it:
- Download Build: download the binary.
- Re-sync to Labs: copy the build to the cloud devices again.
- Rescan Binary: scan the binary again. Arcus shows “Rescan started” and refreshes the scan facts when it finishes.
- Delete Build: delete the binary and every copy of it on the cloud devices. Runs that already used the build keep their results. This can’t be undone.
Set app capabilities
Section titled “Set app capabilities”Capabilities set on the app apply to every run of the app. A capability for one run or one device belongs in the run configuration instead. See Custom desired capabilities in Run configurations.
- On the app page, under Capabilities, click Add capability.
- Enter a KEY. App capability keys must start with
appium:orts:. - Select a DATA TYPE: String, Boolean, or Number, and enter a VALUE.
- Click Save.
Arcus shows “Capabilities saved”. For example, to grant an Android app’s permissions when it’s installed:
| KEY | DATA TYPE | VALUE |
|---|---|---|
appium:autoGrantPermissions | Boolean | true |
For more Android and iOS keys, see Desired capabilities.
In a run configuration, the app’s capabilities show as read-only. The run configuration’s own capabilities are merged over them.
Edit or delete an app
Section titled “Edit or delete an app”To edit an app, click the ellipsis icon (⋯) in the app page’s header, or next to the app on the Apps tab, and click Edit App. Edit the name and description, and for a manual app, its package details. You can’t change its platform or type. Click Save. Arcus shows “App updated”.
To delete an app, click the ellipsis icon (⋯) and click Delete App, then click Delete in the Delete this app? dialog.
Was this page helpful?
Thanks for the feedback.