

Elements and locators
An element is a named part of your app that steps act on, such as a button or a text field. Steps name an element by its path, such as @checkout/email, and every step that uses the same path shares one element. A locator is how Arcus finds that element on the page, such as a CSS selector or an XPath. Fix a locator once on the element, and every step that names it follows.
Copilot creates elements when it learns or records steps. Arcus has no separate page for elements: you open an element from a step that uses it.
How Arcus finds an element
Section titled “How Arcus finds an element”Each element has a primary locator and can have backup locators. When a step runs, Arcus tries the primary first. If the primary stops matching, a backup takes over and is confirmed against two other locators before the step’s action runs. With Auto-heal this element selected, Arcus can also look for the element on the live page. See Auto-heal.
Locators are kept per platform: Web, Android, iOS, and Windows. On web, Android, and iOS, a step that runs where its element has no locator goes through auto-heal, for example “No Android locator, so steps will go through auto-heal when you run on Android.”
Auto-heal doesn’t apply on Windows. Arcus finds a desktop element by resolving the application’s chain of controls from root to leaf, then matching the element’s identity properties in order. A property that stops matching fails the step, and a desktop step can’t find an element that has no Windows locator.
See which locators a step uses
Section titled “See which locators a step uses”-
Open the test case and open the Automated steps tab.
-
Click the step. Step settings opens beside the editor.
-
Under ELEMENT, open the tab for a platform. The tab lists the locators Arcus tries on that platform, in order, under Tried in this order on {platform}, with each locator’s type and value.
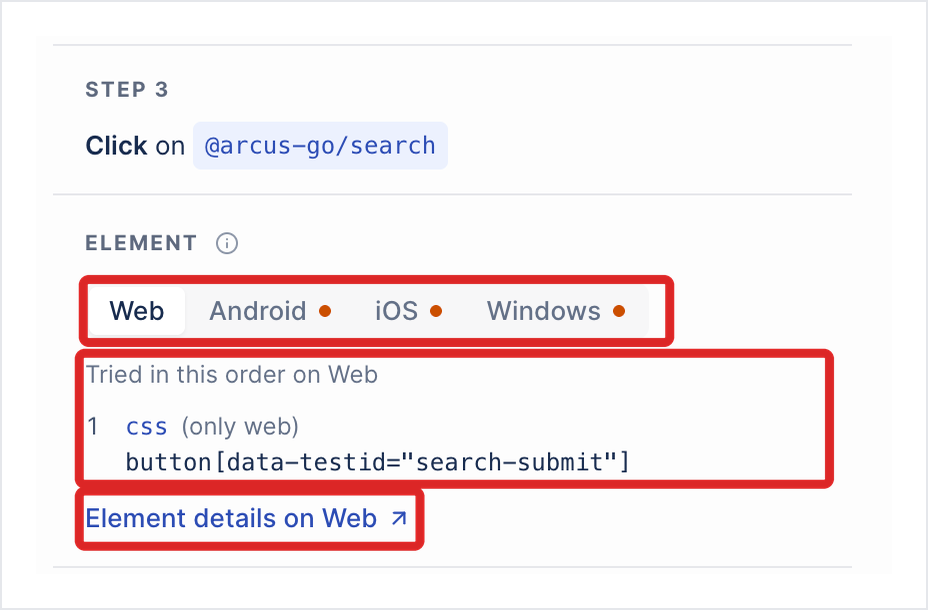
To point the step at a different element, click the element chip in the step and pick another one from element library, or describe it in find it on the page. The refine chip after an element narrows the target. See Pick an element.
Rename an element
Section titled “Rename an element”Change an element’s path from any step that uses it.
-
Hover the element chip in the step and click the pencil icon (Rename). The chip becomes editable, with the last part of the path selected.
-
Enter the new path. To cancel, press
Escor click away.

Renaming updates every step, in every test case and step group, that uses the element. You can’t rename an element to a path another element in the project already has, and you can’t rename the elements Arcus manages, such as Salesforce elements under @salesforce/.
The new path shows in the Path column of the Elements list. The list has no folders, so changing the prefix doesn’t move the element anywhere else.
Open Element details
Section titled “Open Element details”-
In Step settings, under ELEMENT, click Element details on {platform}. The Element details panel opens on the Locators tab.
-
(Optional) To see another platform’s locators, click the platform dropdown at the top right of the panel and select Web, Android, iOS, or Windows. The panel shows that platform’s locators and resolution.
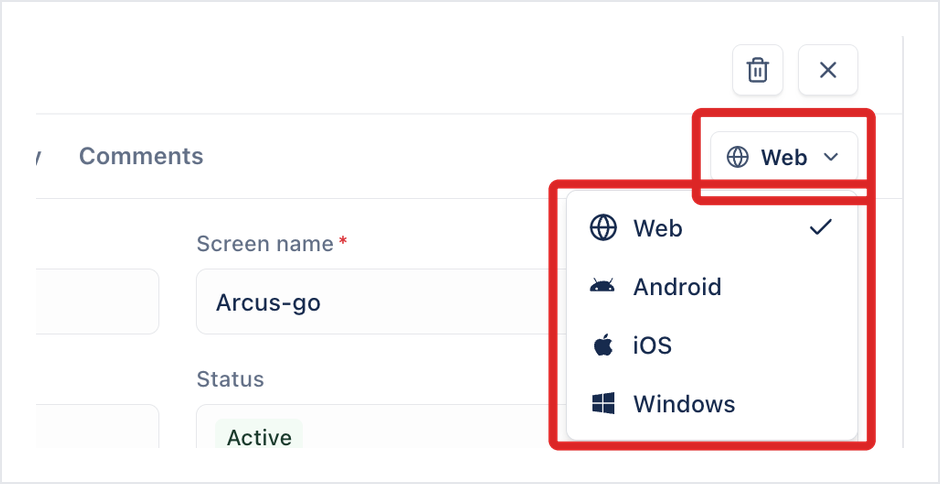
Element details has the tabs Locators, Backup Pool, Evidence, History, and Comments. History and Comments read “Coming soon”.
Element details opened from a run result or from a Copilot session is read-only. To change an element, open it from the test case.
Locators tab
Section titled “Locators tab”The Locators tab describes the element and the locators it uses.
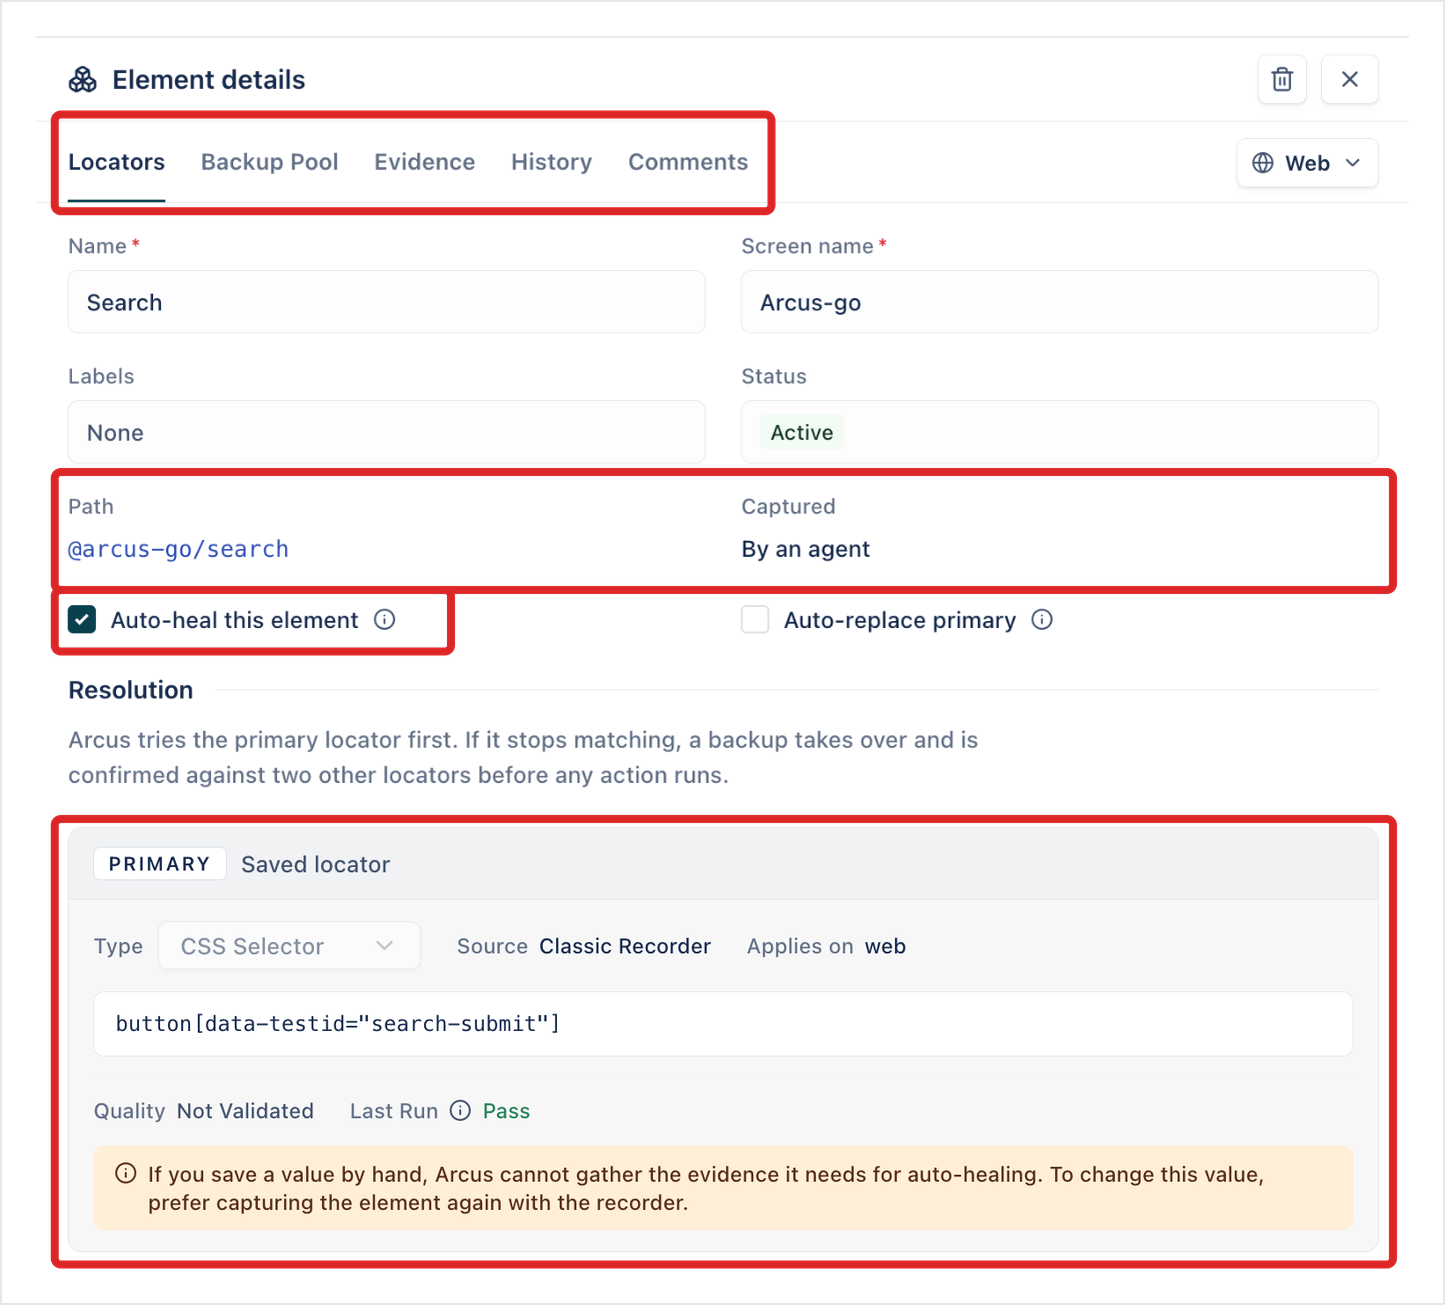
- Name and Screen name: the element’s name and the screen it belongs to. Both are required.
- Labels: the labels attached to the element.
- Status: the element’s state, such as Active.
- Path: the name steps use, such as
@checkout/email. - Captured: how the element was created, such as By the recorder or By an agent.
- Auto-heal this element and Auto-replace primary: see Auto-heal.
- Resolution: “Arcus tries the primary locator first. If it stops matching, a backup takes over and is confirmed against two other locators before any action runs.”
- PRIMARY card: the locator Arcus tries first, with its Type, Source, the platform it Applies on, its Quality, and its Consecutive failures and Total failures. The card’s corner shows whether it is Matching.
- ALL LOCATORS, IN ORDER: every locator for the platform, in the order Arcus tries them.
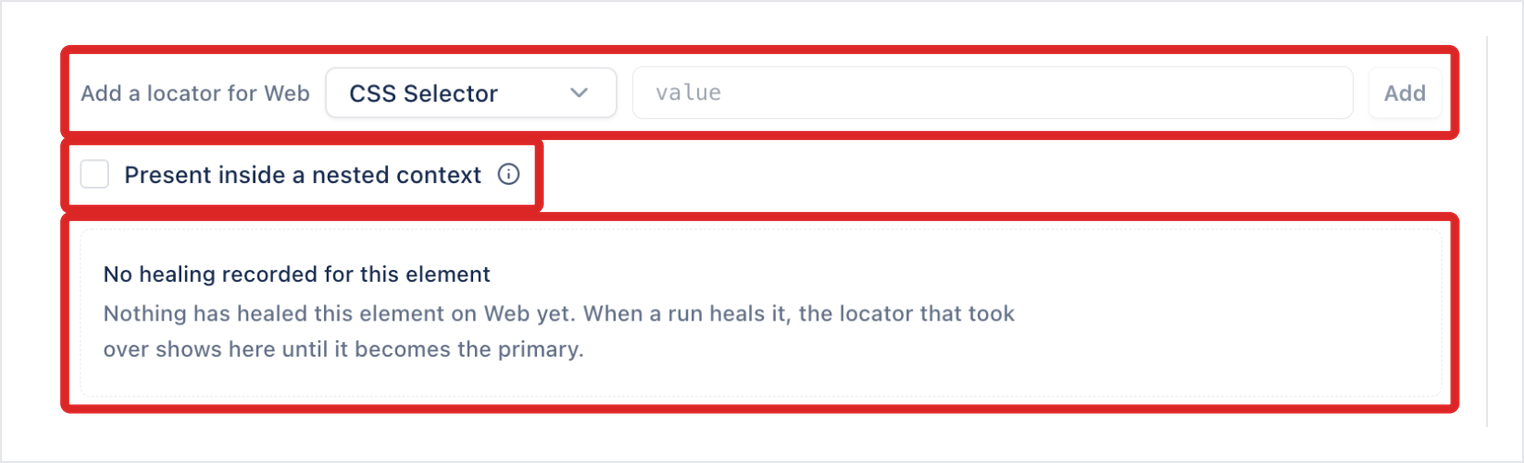
- The card below the locators says whether a heal has changed what runs. Until one has, it reads No healing recorded for this element: “Nothing has healed this element on Web yet. When a run heals it, the locator that took over shows here until it becomes the primary.”
A backup running in place of the primary
Section titled “A backup running in place of the primary”When a run heals the element, the locator that took over shows on the Locators tab as Backup running in place of the primary, until you accept it as the primary or the primary matches again. The card shows how it has performed since:
- Verified: how many resolve checks it has passed and failed, such as “3 passes / 0 fails”. Hidden until a check has run.
- Quality: the locator’s quality, as in the backup pool.
- Last Run: Pass, Failed, or Untested.
- Test Run: the date and time the locator last ran or was updated.
- Pass Streak: how many runs in a row it has passed, and how many in total.
Point at the info icon beside Last Run, Test Run, or Pass Streak for what it means. To make the backup the primary, see Accept a healed locator.
Add a locator
Section titled “Add a locator”A new locator changes the element for every test case that uses it, so Arcus asks you to confirm before it saves.
-
On the Locators tab, select the platform in the dropdown at the top right of the panel.
-
Under Add a locator for {platform}, select the locator type.
-
Enter the value and click Add. The locator appears in the panel, and a banner reads “Changing this element changes what {n} test cases run with.” above the names of those test cases.
-
Click Update Element to save the change, or Cancel to discard it.
| Platform | Locator types |
|---|---|
| Web | CSS Selector (default), XPath, ID, Name, Class, Tag, Link text, Partial link text |
| Android | Accessibility ID (default), Android Resource ID, XPath, Class, Android UIAutomator, Name |
| iOS | Accessibility ID (default), iOS Predicate, iOS Class Chain, XPath, Class, Name |
| Windows | Automation ID (default), Name, Class name, Control type ID, Framework ID, Ordinal |
Elements inside an iframe or shadow root
Section titled “Elements inside an iframe or shadow root”Select Present inside a nested context when the element sits inside “an iframe or a shadow root”. Name the element that hosts the iframe or shadow root, and the step resolves inside it.
Backup Pool tab
Section titled “Backup Pool tab”The Backup Pool tab lists the element’s backup locators, with the count and when the list was last updated. The recorder saves backups when it captures an element, and auto-heal adds more.
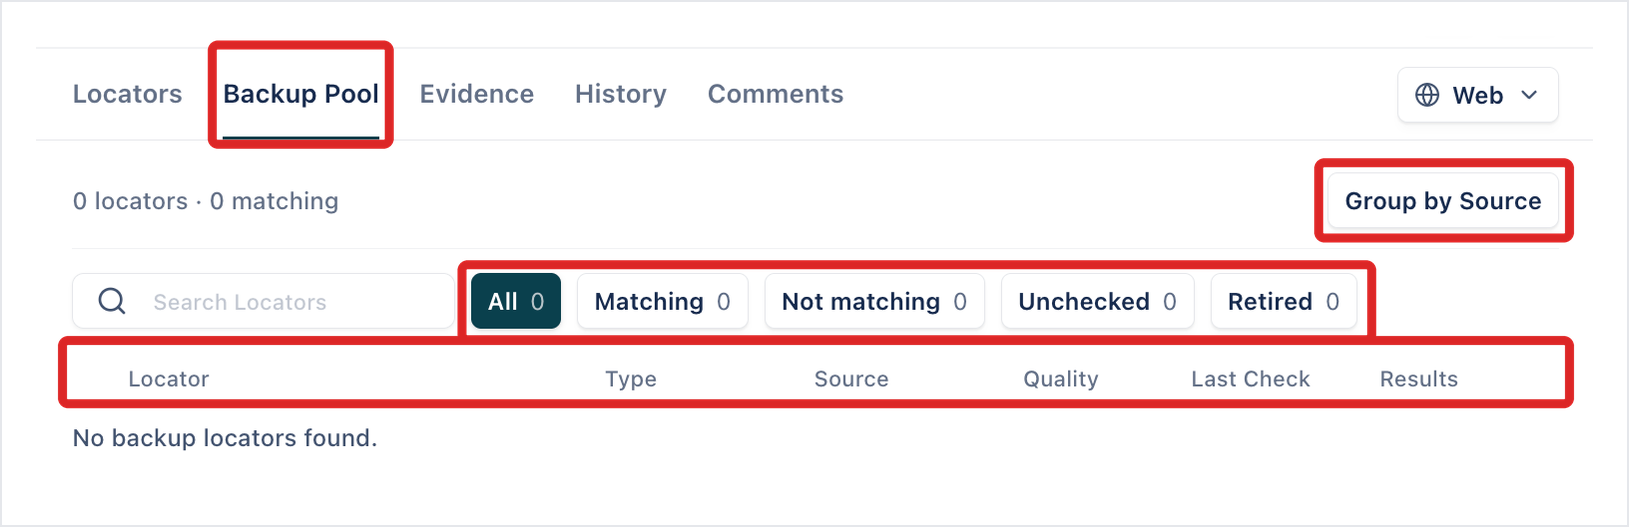
- Search Locators: searches the list.
- Filter chips: All, Matching, Not matching, Unchecked, and Retired, each with a count.
- Group by Source: groups the backups by where they came from, such as Smart Recorder, Classic Recorder, or Semantics.
- Columns: Locator, Type, Source, Quality (such as Good, Weak, or Fragile), Last Check (such as Not Checked), and Results.
Validate backups
Section titled “Validate backups”Click Validate backups to have the Validation Agent check every backup “against the captured DOM”. The panel lists the primary locator and each backup with its Quality, with a count of each quality at the top. Under Suggested stronger locators, click Add to backups to keep a suggestion, or Skip to drop it. To ask about a locator or request another one, type in “Ask about a locator, or request an alternative…”. Close the panel with its close icon (×).
For how backups take over when the primary stops matching, see Manage backup locators.
Evidence tab
Section titled “Evidence tab”The Evidence tab shows what the recorder saw when it captured the element.
- Screenshot at capture: “Taken by the smart recorder when this element was learned. Auto-heal compares each run against this snapshot before it changes a locator.” An element added from a verify step, without a capture, reads “No capture screenshot available.”
- Web Events: what happened on the page around the capture, one row per event, with the time since the previous one, its kind, such as appeared, removed, scroll, or navigated, and the element it happened to. Rows that are noise are muted. An element captured without interactions reads “No web events were recorded for this element.” or “This capture contains no interactions.” Arcus keeps the last 16 events; past that, the list ends with how many earlier events were not kept. If the list fails to load, it reads “The recorded web events could not be loaded. Try again.”
- {n} more target elements on this screen: the other elements captured on the same screen, by path.
- Downloads: the trees the recorder saved, each with Download. The button is unavailable when there is no file. Files are named
element-{id}-{kind}with the matching extension.
| Platform | Downloads |
|---|---|
| Web | Accessibility Tree, JS/DOM Tree, HTML Page Source |
| Android, iOS, Windows | Accessibility Tree, Element Tree, XML Page Source |
HTML Page Source is built from the saved locator tree when you download it, so it has no size in the list. When the tree wasn’t captured, the download reads “The element page source/HTML has not been captured yet.”
Web Events come from the web recorder. Elements captured before it sent them have none.
Record once for Android and iOS
Section titled “Record once for Android and iOS”For a Flutter or React Native app, Arcus writes locators for both platforms from one recording. When the build’s scan facts show the framework, and the app gives its widgets developer identifiers (testID in React Native, Semantics(identifier:) in Flutter), recording an element on Android also saves its iOS Accessibility ID, and recording on iOS also saves its Android Android Resource ID. See Apps for scan facts.
On the Locators tab, a locator written this way looks like any other, and Applies on shows the platform it was written for, such as ios. Recording the same element on that platform later replaces it with a captured locator.
The projection joins the two platforms by the developer identifier only. An element without one, and any element in a native app, gets no projected locator, and the tab reads, for example, “No iOS locator, so steps will go through auto-heal when you run on iOS.”
Recording for both platforms needs a current Arcus Agent. With an older one, the session ends with “This test needs a newer Arcus Agent”.
Was this page helpful?
Thanks for the feedback.