
Most of the applications being developed today have complex requirements. Hence, they must be tested thoroughly for each use case before being ready to deploy on the production server. Android Integration testing addresses such problems by focusing on integrating units of codes or software modules. They weed out all possible bugs introduced due to integrating related software components.

When you consider applications with complex functionalities, there can be tons of software modules developed by different programmers that interact and depend on each other. Even a slight defect in the interaction between any two modules can cause a chain of errors in the linked or dependent modules. That’s why we must perform Android integration testing for all the critical modules in our application.
Table Of Contents
- 1 Overview
- 2 What is Android Integration Testing?
- 3 Android Integration Test Example
- 4 Why Should We Perform Android Integration Testing?
- 5 Best Approaches For Android Integration Testing
- 6 Steps To Perform Android Integration Testing
- 7 Challenges in Android Integration Testing
- 8 Android app Integration testing with testsigma
- 9 Summary
- 10 Frequently Asked Questions
Overview
What is Android Integration Testing?
Android integration testing ensures that different modules and components of your app work together as intended. Unlike unit tests, which check individual functions, integration tests validate the interactions between activities, fragments, services, databases, and APIs, helping verify smooth communication and reliable app behavior.
Why is it Important?
- Detect issues early: Catch bugs that occur when components interact
- Ensure stability: Verify that features work correctly after updates or changes
- Maintain performance: Ensure your app runs smoothly without crashes or unexpected behavior
- Improve user experience: Integration testing helps deliver a seamless experience across the app
Common Areas for Android Integration Testing
- UI & Backend Interaction: Verify that user actions trigger the correct API calls and responses
- Database & Storage: Ensure data is saved, retrieved, and updated correctly across modules
- Third-party SDKs & Services: Confirm external libraries, analytics, and payment gateways integrate properly
- Activity & Fragment Communication: Test navigation flows and data passing between screens
Best Practices for Android Integration Testing
- Start testing early in the development life cycle
- Automate integration tests where possible for efficiency and consistency
- Focus on critical user workflows and real-world data scenarios
- Monitor results and keep tests maintainable for ongoing relevance
- Integrate tests into CI/CD pipelines for continuous quality assurance
What is Android Integration Testing?
Android integration testing is a method used to verify if different parts in an Android application. You must set up an emulator or physical device and execute tests to confirm that the application works as intended. In Integration testing, we aim to catch bugs/issues early in the development process and provide higher assurance that the application is functioning correctly.
Android Integration Test Example
Let’s look at an integrated testing example now. Let’s say you have a third-party ticket reservation android application. On the home page, there is a signup and login button. You also have a premium plan that users can subscribe to avail themselves of lucrative offers. Now, the signup/login page and the plan/subscription pages are two separate modules linked to each other. After the proper flow of data, such as login credentials, etc., you can move from the login page to the subscription page. In this case, you should ensure that the integration between the signup/login and the plan/subscription works as expected.
Why Should We Perform Android Integration Testing?
Integration testing should be done right after performing Unit testing on each software module. You might wonder that we have already tested each module, so why introduce a separate testing layer altogether? Here are the reasons why.
- Different programmers create different modules with different logic and understanding. Hence, verifying whether the entire software entity consisting of different modules works in unity is necessary.
- It’s quite common that the requirements might change during product development. Unit testing might not be performed on these new requirements, so integration testing becomes necessary.
- There are high chances of encountering errors in the software modules and database interface.
- Modules interacting with third-party APIs and tools are more prone to errors. A change in the third-party API might cause your entire application to fail. Hence, integration testing is very useful for locating such points of failure.
Hence, it’s always better to be safe than sorry, especially when dealing with android applications having complex functionalities. Because finding the right error-prone module is a mammoth task in such applications.
Best Approaches for Android Integration Testing
There are multiple strategies for performing Android integration testing. These are –
1. Big Bang Approach:
All the modules are integrated and then tested in this approach. You can’t use this strategy if you don’t have all your modules ready. It’s convenient for small applications. However, fault localization becomes a lot more difficult when testing a large number of integrated modules.
For example, in our previous application, we can first integrate all the high-level modules such as login, signup, subscription, train-info, user-profile, etc., and then test all these units together.
2. Incremental Testing:
In this approach, higher-level or lower-level modules (two or more) that are logically related are tested for their interaction first. Then, the number of dependent modules is increased incrementally one-by-one. It’s further divided into two categories –
i. Bottom-up Testing: Lower-level modules are tested first, and then we slowly move to higher-level modules. Locating faults becomes easier.
For example, in our railway reservation application, we can create low-level modules such as displaying train information, the number of seats in each train, train-route information, etc., and then integrate them to create a larger unit of related modules into each other. We can then perform testing on it. This will help us to find errors easier.
ii. Top-down Testing: Testing starts from higher-level modules and slowly moves to lower-level modules. If any higher-level modules are not yet ready, we use stubs as a replacement.
Our application can first integrate high-level modules such as user profile, login, signup, train-info, etc., and perform testing. If we find any bugs, we can dig deep into lower-level modules until we fix all the bugs.
Check here – Key Difference Between Top Down Testing and Bottom Up Testing
iii. Sandwich Testing: It combines both bottom-up and top-down approaches.
For example, we can start performing integration testing of higher-level modules such as login and signup along with lower modules such as user profile, purchase history, etc. These are the bunches of related modules, and performing testing on such integrations is easier and quicker.
Depending upon the type of Android application and the stage of your development process, you need to decide on the right Android integration testing approach that you can use to fulfill your testing requirements.
Also Read: Mobile Testing
Steps to Perform Android Integration Testing
Here’s a series of steps that you can follow to perform Android integration testing seamlessly.
1. Identify the Unit Interfaces
In this step, you need to decide what unit interfaces and the modules associated with those interfaces you want to perform testing on. In our example, the unit interface is “Login and Subscription Verification”. And the software modules that are associated with it are the Signup, Login, and Subscription modules.
2. Record the UI Identifiers and Examine the Interfaces
After you have identified the software modules and interfaces you want to test, you can record the identifiers that will help you perform your testing. In our example, the Login/SignUp button, Textboxes to enter email, password, etc., are such identifiers. After that, you need to gather information such as the indications suggesting the data transfer has been completed, etc.
3. Create Test Cases
After you have the list of UI identifiers, you can create test cases that will enable you to check the flow of information and whether the interface has been correctly integrated. In our example, some test cases include – clicking on the login/signup button, entering email and password in the respective text boxes, verifying the entered information, and the subscription plan, etc.
4. Create Test Plans
The next step is to create a test plan. Here, you need to select the test suites and the test devices. You need to decide on which Android devices you want to perform the tests on.
5. Execute the Tests
After creating the Test Plans, you can execute the tests. You can run the tests on a single device simultaneously or parallelly on multiple devices together.
6. Analyze the Reports and Re-Iterate
Please look closely at the test results, identify the modules that have the bugs, fix them, and re-iterate the test executions until all the bugs are fixed. Finally, document the test results and share them with the concerned authorities.
Challenges in Android Integration Testing
- Device & OS Fragmentation – Android runs on thousands of devices with different screen sizes, resolutions, OS versions, and hardware capabilities. Ensuring consistent behavior across all combinations is a major challenge.
- Complex Component Interactions – Android apps involve activities, fragments, services, content providers, and background tasks. Testing the interactions between these components can be complicated and error-prone.
- Third-Party Library Dependencies – Many apps rely on external SDKs, APIs, or libraries. Changes in these dependencies can break app functionality, making integration testing essential but difficult to maintain.
- Asynchronous Operations – Network calls, background services, and multithreading introduce timing and synchronization issues that can cause intermittent failures during integration testing.
- Test Data Management – Managing realistic test data for databases, APIs, and user inputs is crucial but often tedious. Incorrect or inconsistent data can lead to false positives or negatives in tests.
- Automation Complexity – Writing automated integration tests requires simulating user interactions and component behavior accurately. Without proper tools, this can be time-consuming and brittle.
- Maintaining Test Coverage – As apps evolve, keeping integration tests up-to-date with new features, screens, and workflows requires continuous effort.
Android App Integration Testing with Testsigma
Now that we have understood the Android integration testing flow, let’s perform ai powered integration testing on a sample application with Testsigma.
Before we start with the demonstration, you need to sign up with Testsigma and register yourself, if you have not done already, so that you can start accessing the application.
We will use the WordPress APK to perform the integration testing. We will use the bottom-up approach for testing the integration between the modules.
Step 1. Identify Unit Interfaces and Modules.
We will check the integration between the login module and the plan module. Here’s the flow that we will check to ensure that both these modules are integrated properly.
i. We will use a reusable step group to test the login process which will include tapping the login button, entering details such as email ID, password, click on the Next button, verifying the text displayed, and tapping on the continue button.
ii. We will then verify that the UI element called Plan displays the text called Free.
iii. We will then use a reusable step group to perform logout operations.
Step 2. Record the UI Identifiers.
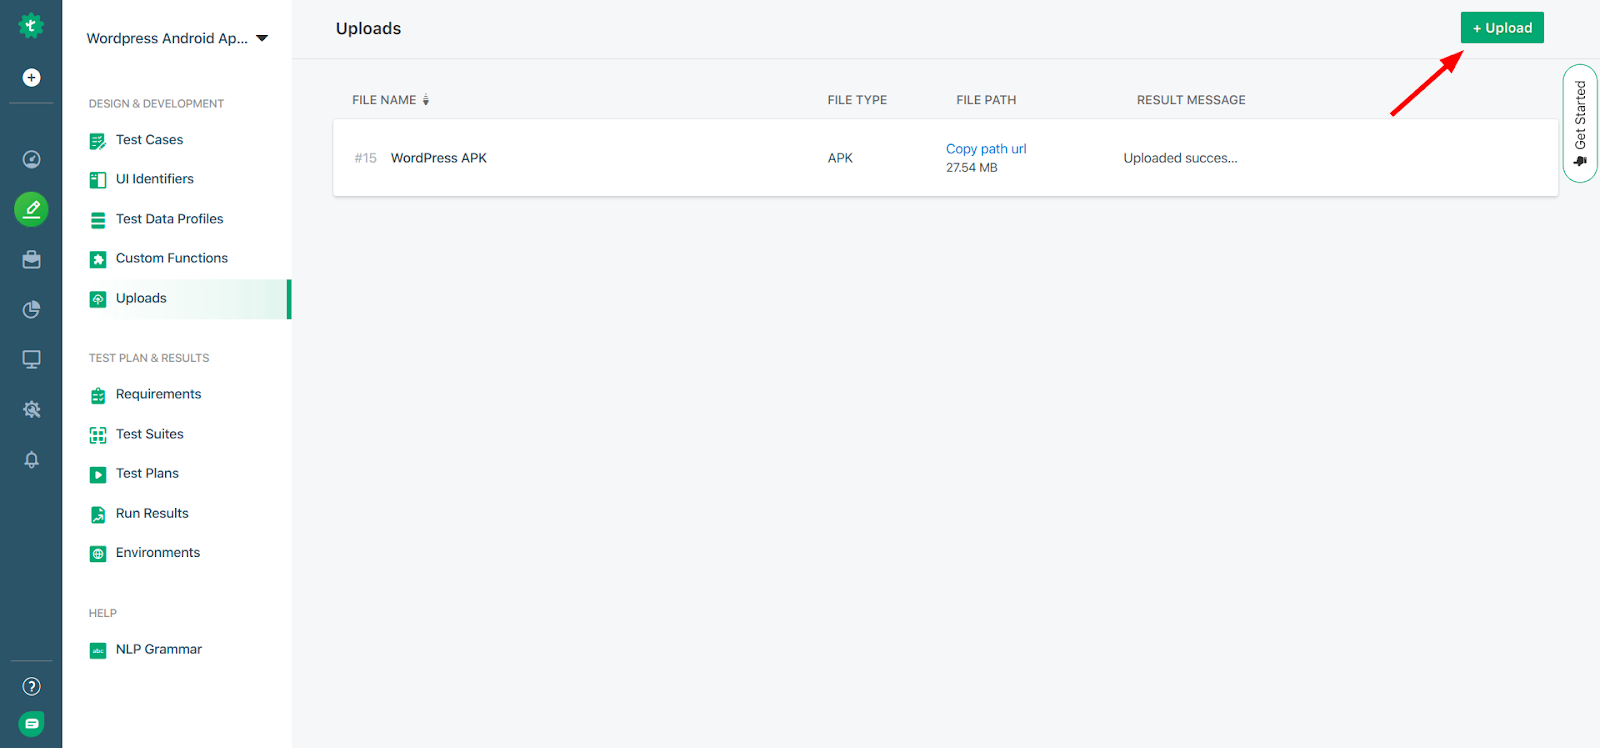
Please note that before you begin recording UI Identifiers, you need to upload the APK file of the Android application. To do so, you can navigate to Test Development > Uploads and click on the Upload button.
You would also need to register a test agent if you wish to perform a hybrid test execution. You can follow this guide to do so.
You can either add the UI Identifiers manually by specifying details such as XPath, ID, Classes, etc. or use the Chrome recorder to record all the UI Identifiers automatically.
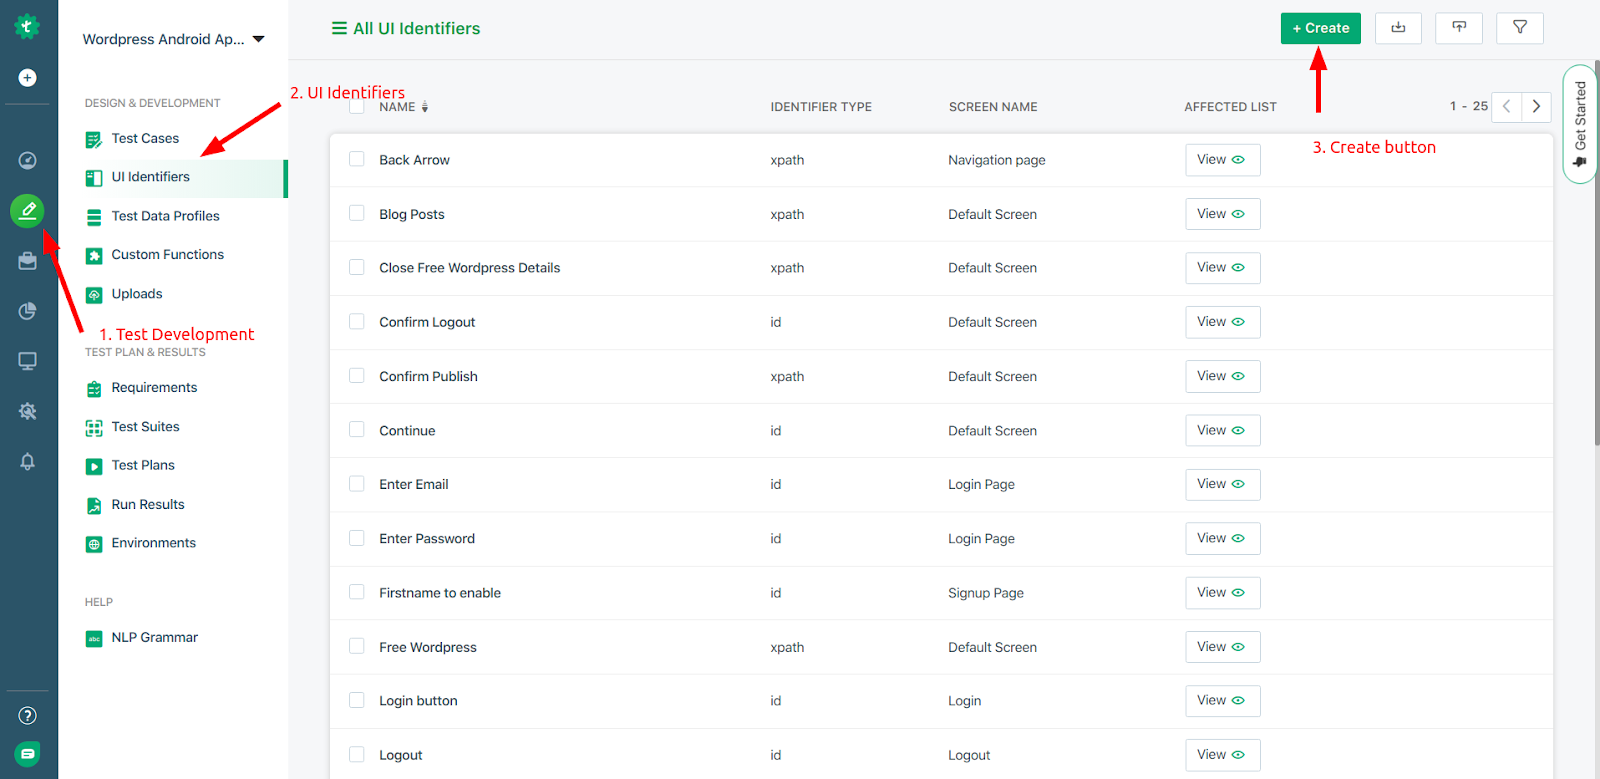
To capture UI Identifiers manually, you can navigate to Test Development > UI Identifiers and click on the add button. You can refer to the image below to do so.
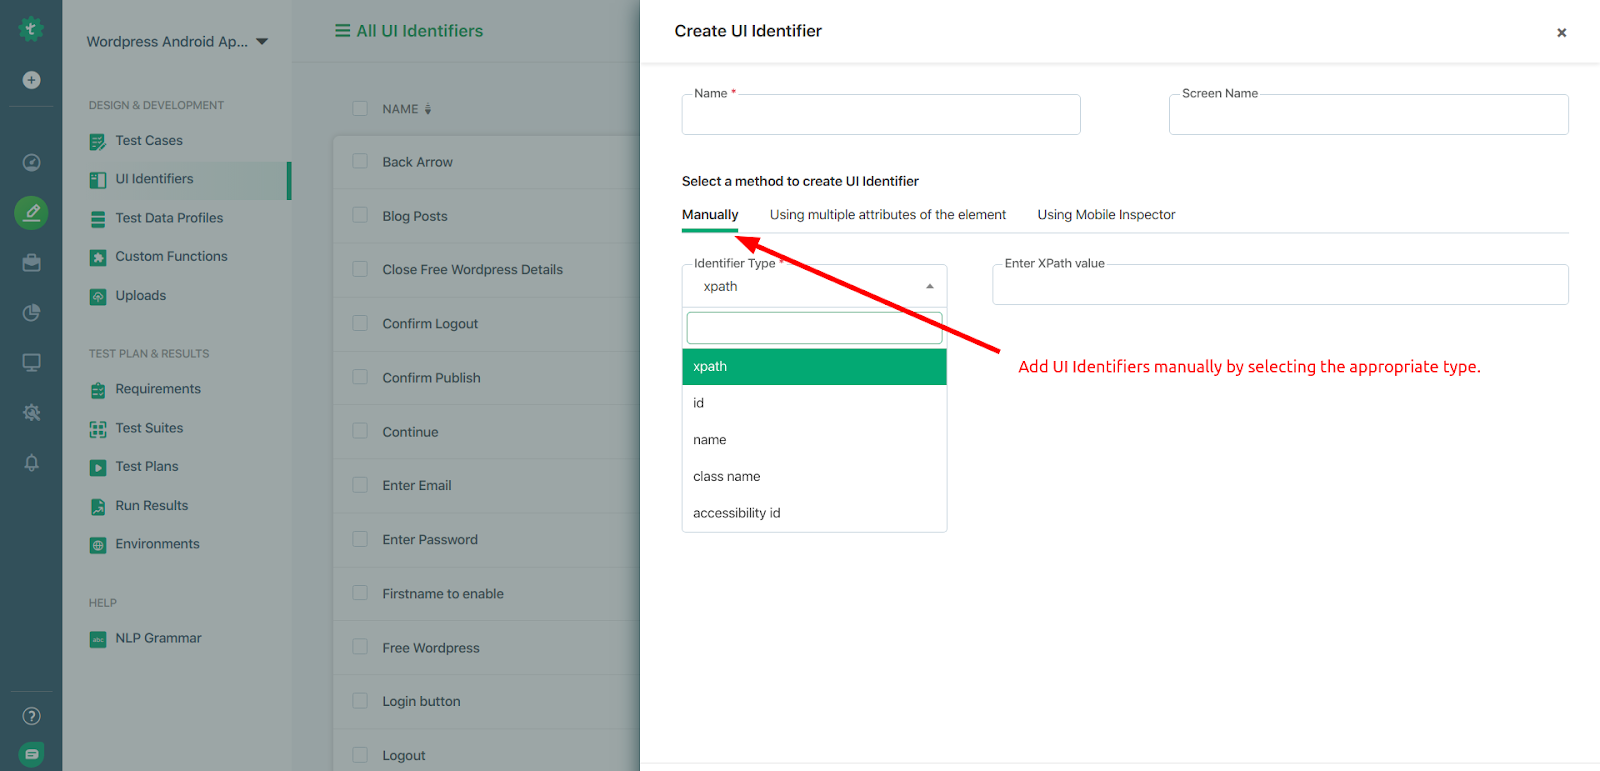
After clicking on the create button, you can select the appropriate type such as class, ID, XPath, etc.
Besides this, you can also use the recorder option to record the UI Identifiers automatically.
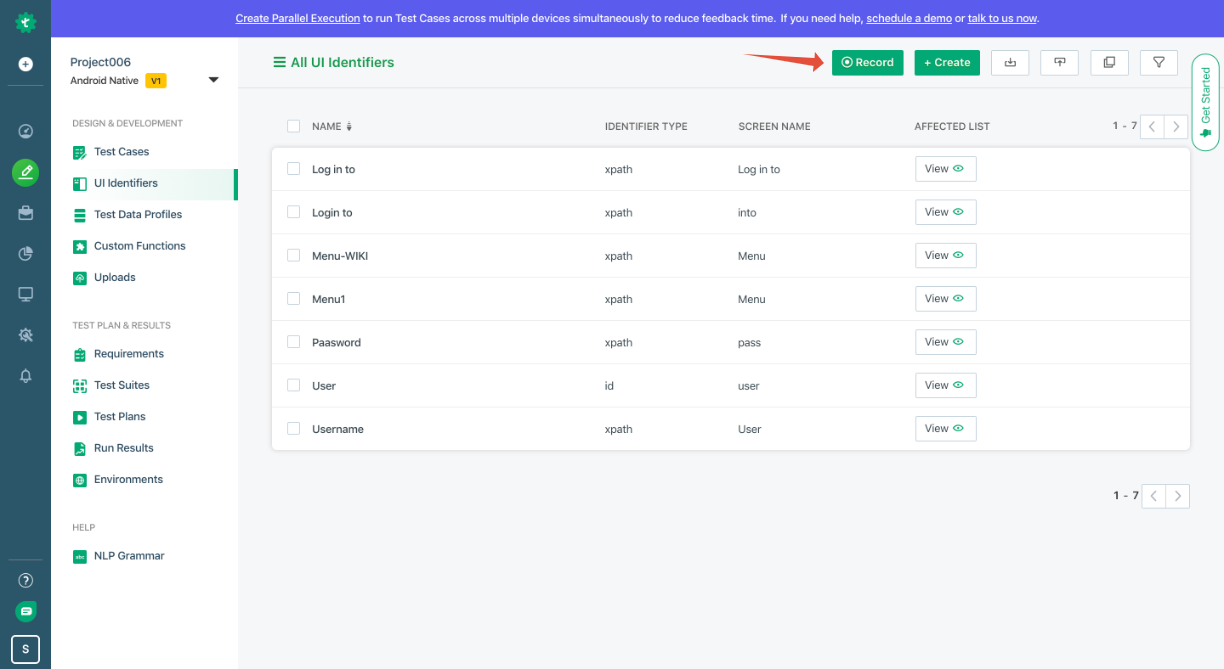
You can select a physical device by registering your agent or a device hosted on the cloud.
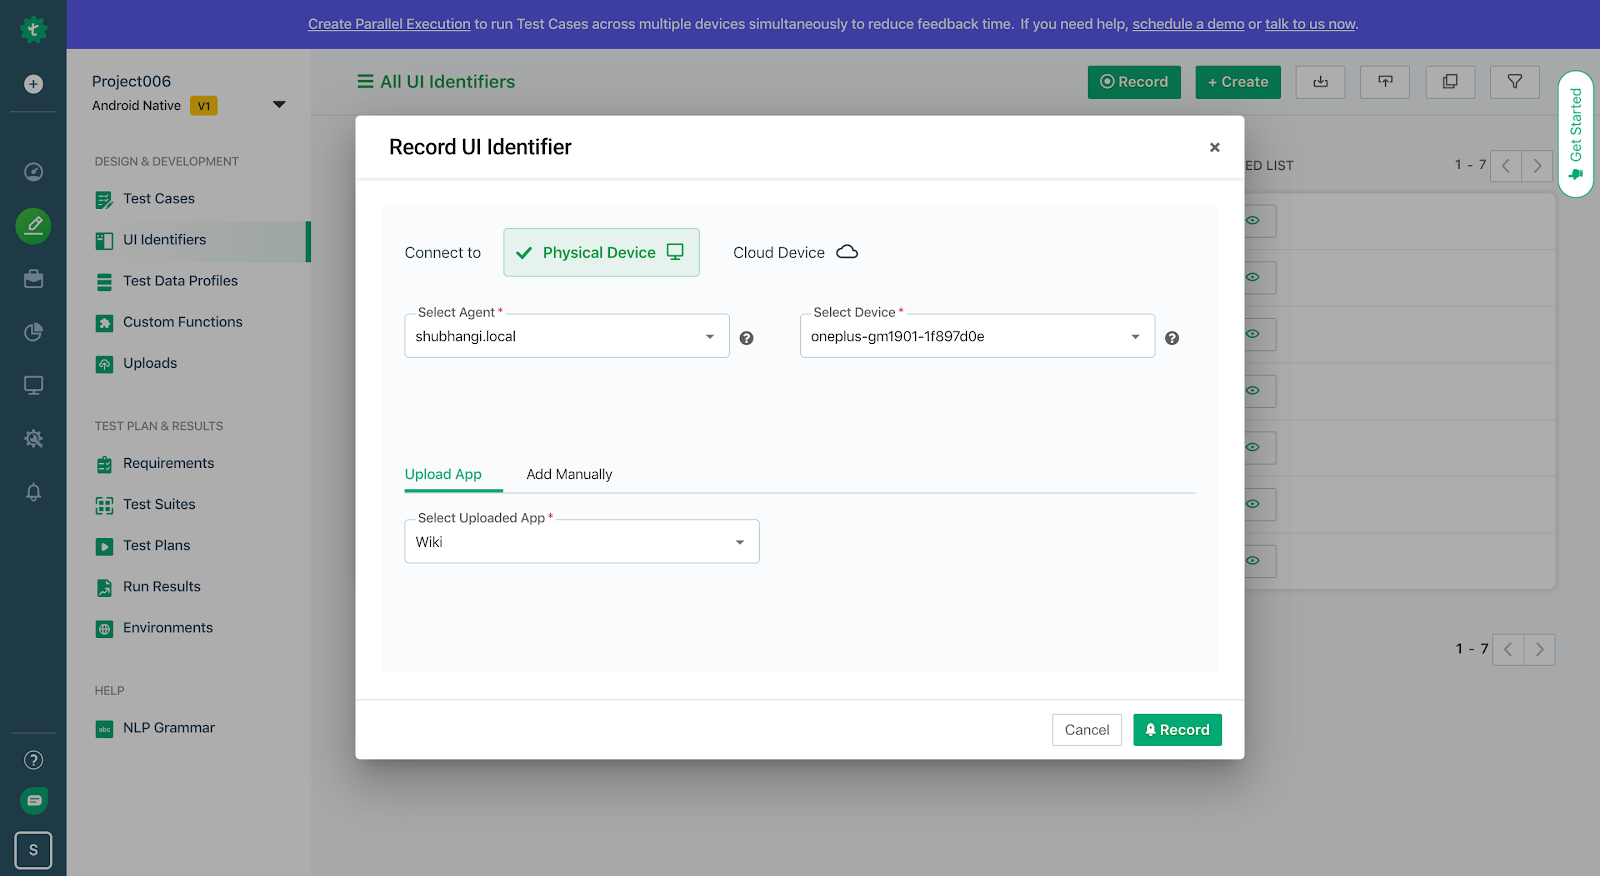
You can then click on the Record button to start the inspector and select elements that you want.
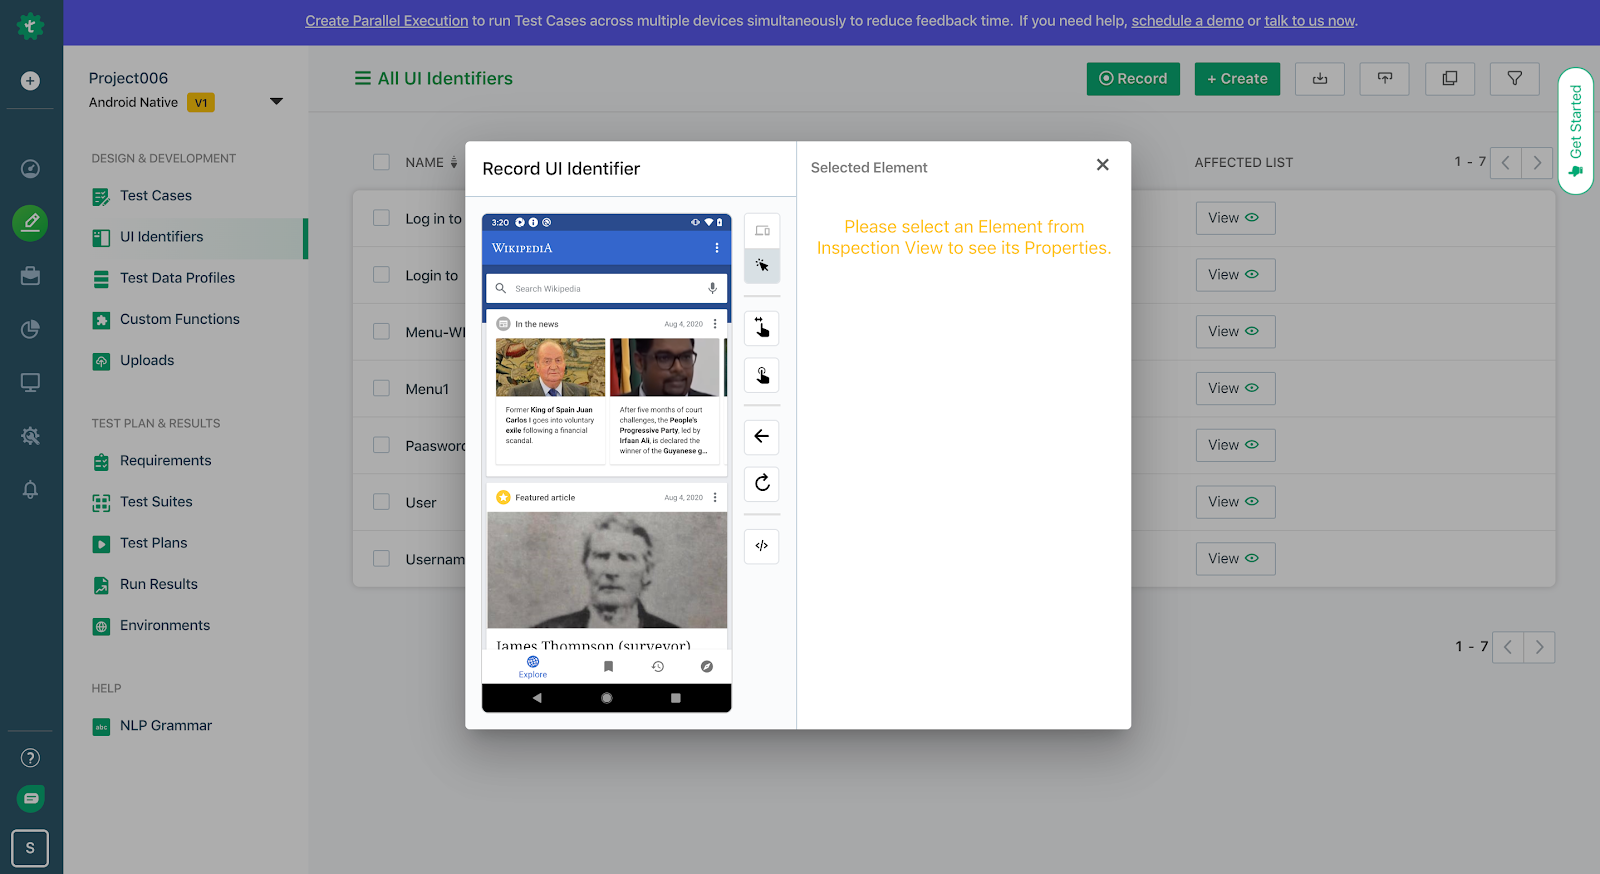
You can refer to this guide to see how to capture UI Identifiers using the Mobile Inspector.
Step 3. Creating Test Cases.
Once you have all your UI Identifiers listed, it’s time to create a test data profile, and using the UI Identifiers and the Test Data, we will then create the test cases.
Creating Test Data profiles are important to store certain data such as login credentials that will help us to insert data while creating test cases.
For our example, we have created the following test data profile for login credentials.
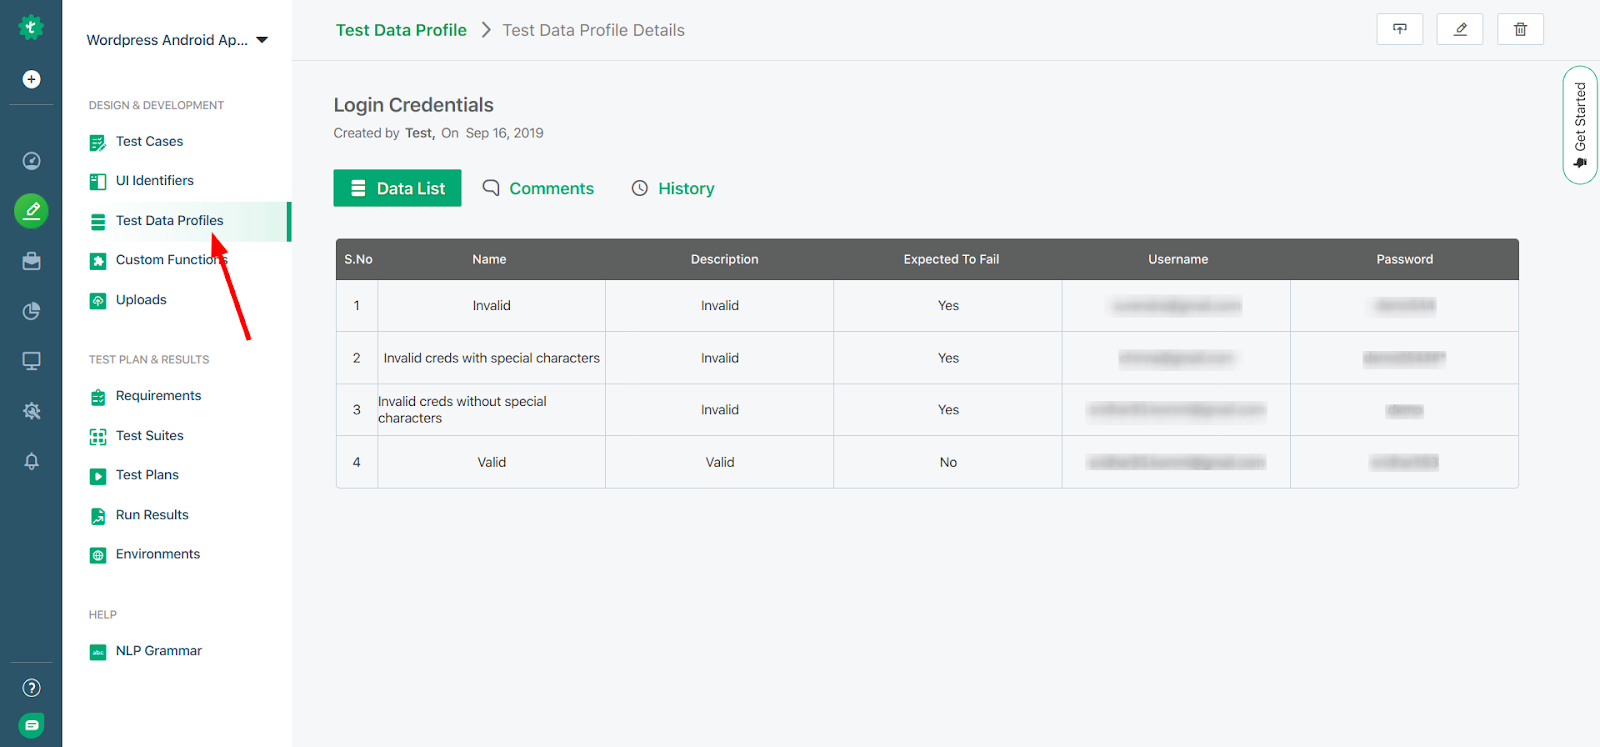
You can refer to this guide to create your own test data profile.
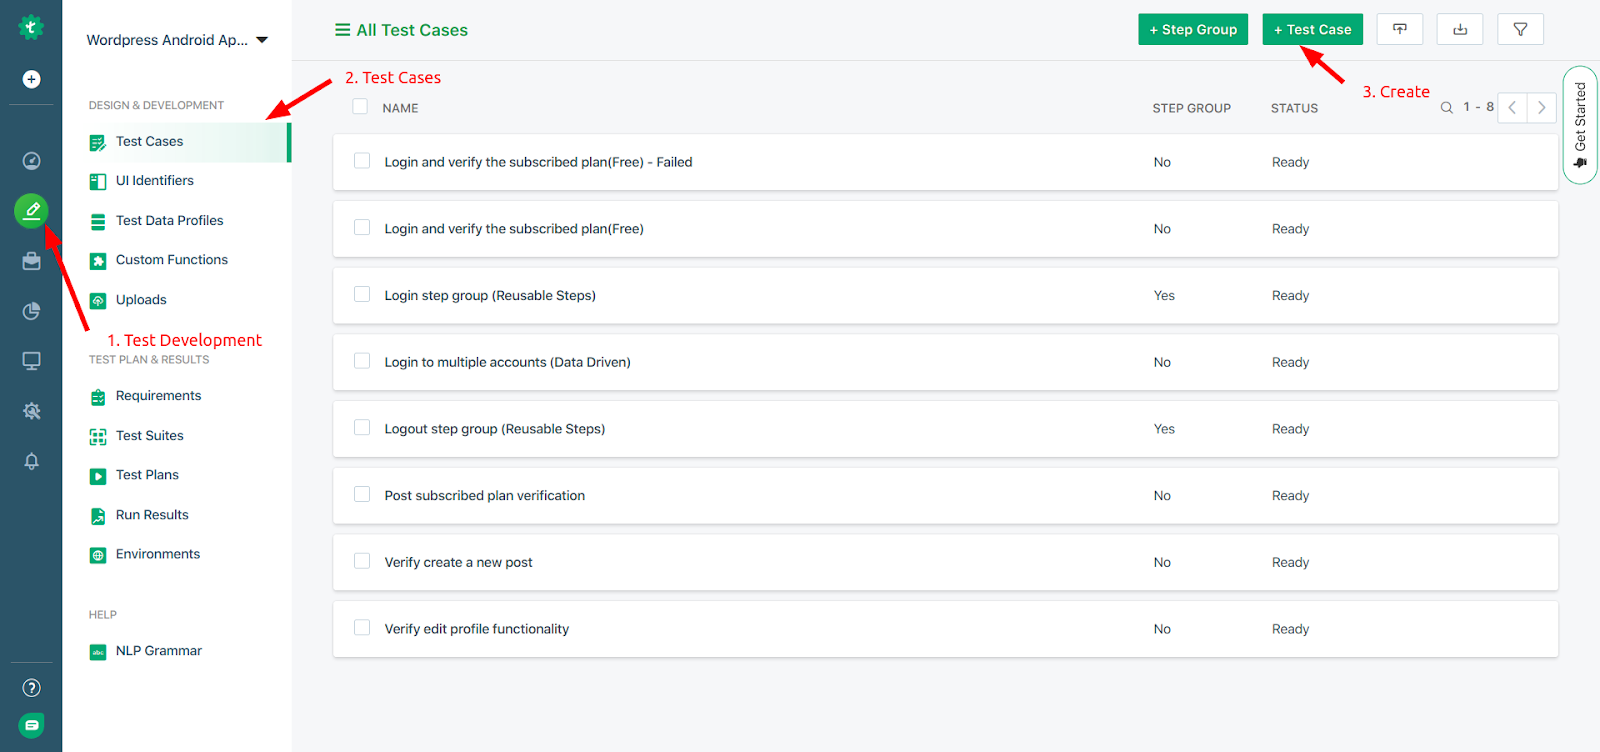
The next step is to create Test Cases. Navigate to the following path – Test Development > Test Cases and click on the + Test Case button.
After you create a new test case, you will be asked to create test steps. You can use simple natural language to create new test steps with the help of UI Identifiers that we recorded earlier and the test data that we created. Let’s see how to do so.
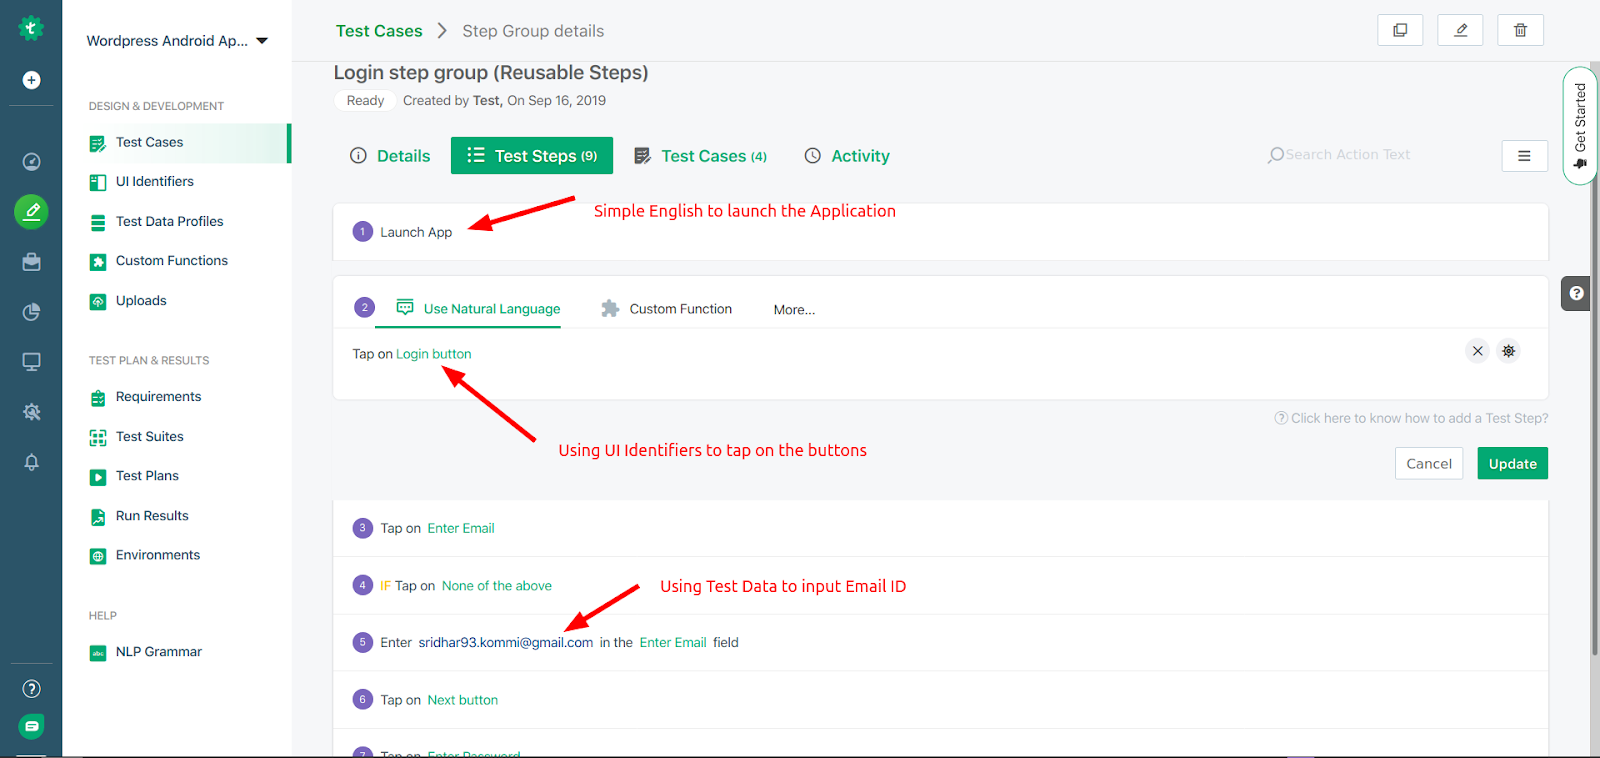
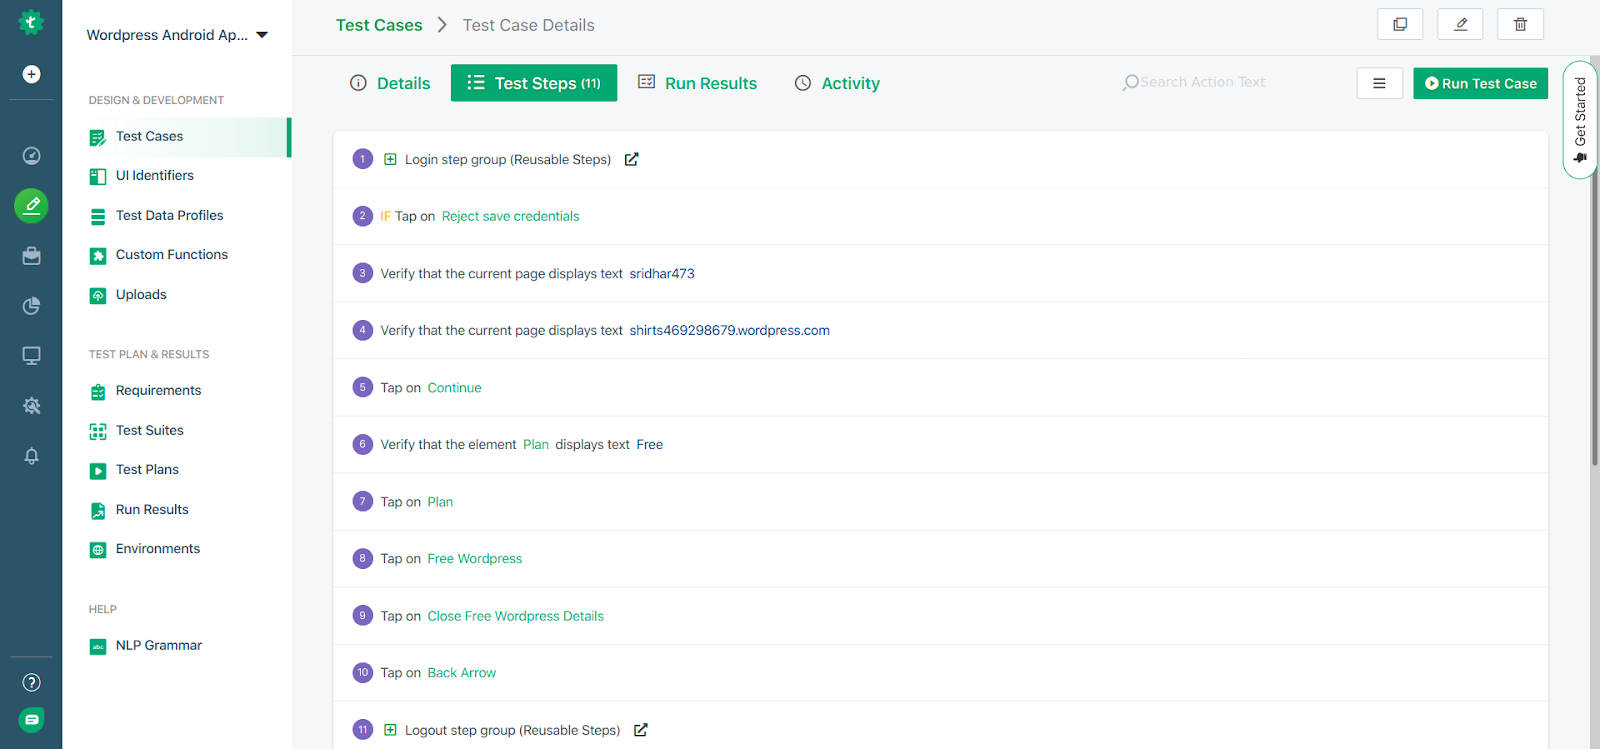
You can refer to this guide to get a detailed description of how to create test cases in TestSigma. In the image below, you can find the final list of test steps for our example.
Please note that after you have created the test cases, you can go ahead and combine certain test cases together to create a test suite that you can use later on. Follow this guide to create a test suite using the test cases.
Step 4. Create a Test Plan
Testsigma allows you to create test plans where you can enter important details regarding the type of test environment you want to use, the testing types such as cross-browser, parallel, or customized, etc. Here, you can also select the test suites on which you want to perform the testing. Test Management becomes a piece-of-cake as it gives you a birds-eye view of all the important information related to your testing environment.
Hence, the next and most important step is to create a test plan for Android integration testing. Creating test plans with Testsigma is quite simple.
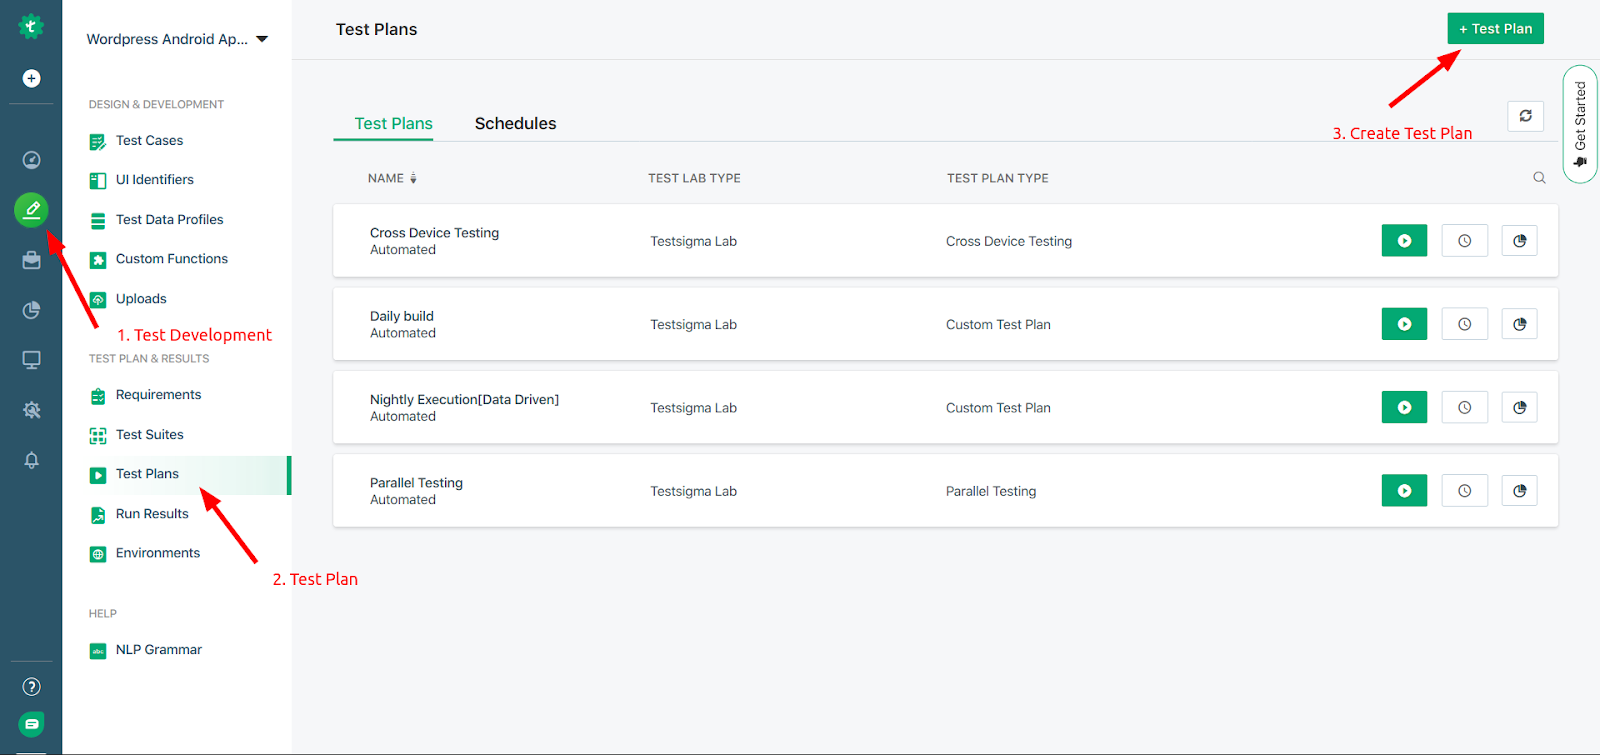
Navigate to Test Development > Test Plans and click on the + Test Plan button to create a new test plan.
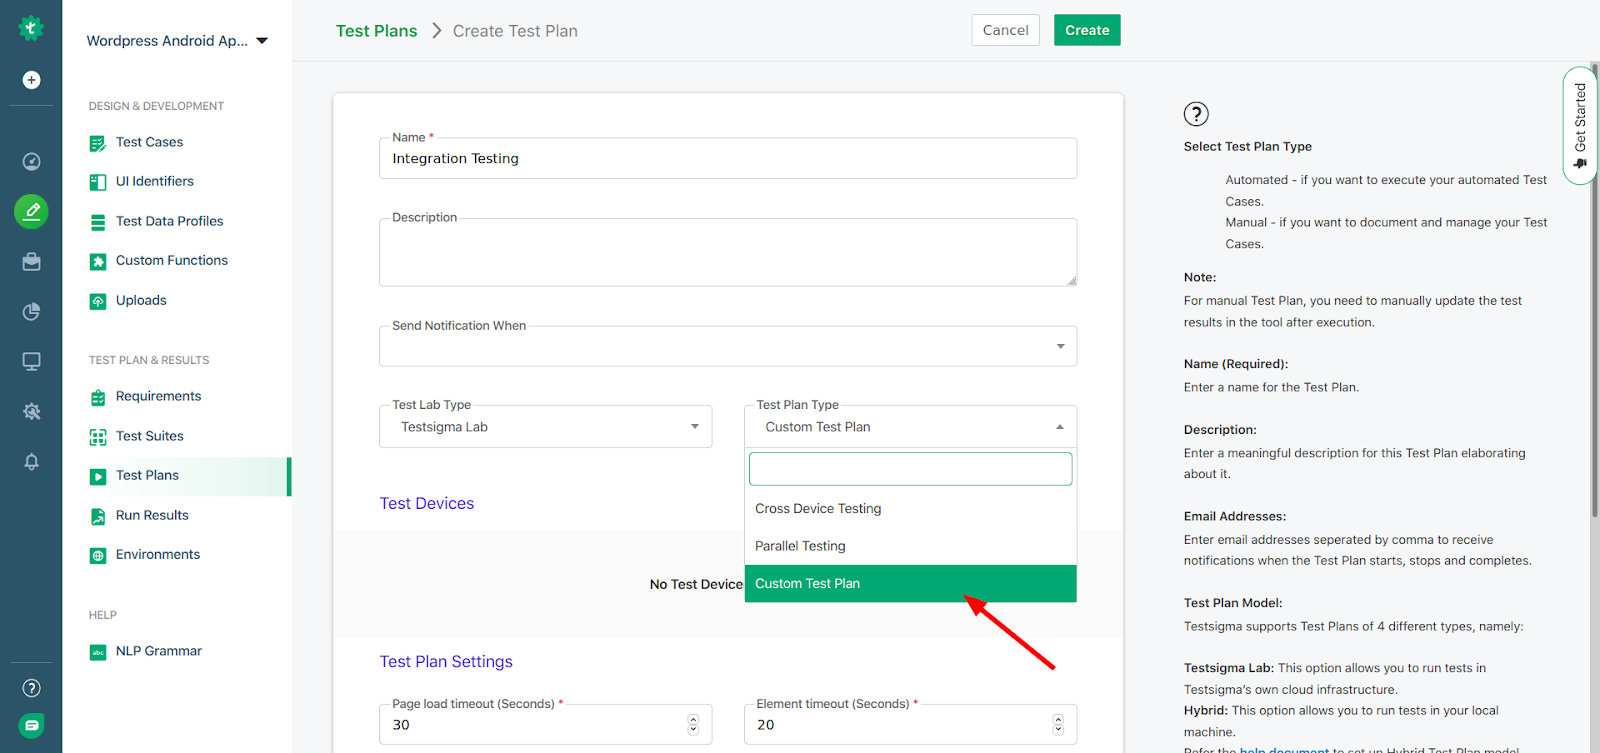
Enter details such as name, description, Test lab type, etc. After that, in the Test Plan type option, you will get three options. You can go for parallel testing as well. In this example, we will create a custom test plan.
After that, click on the Add Test Device button to add test devices. You can enter the following details here.
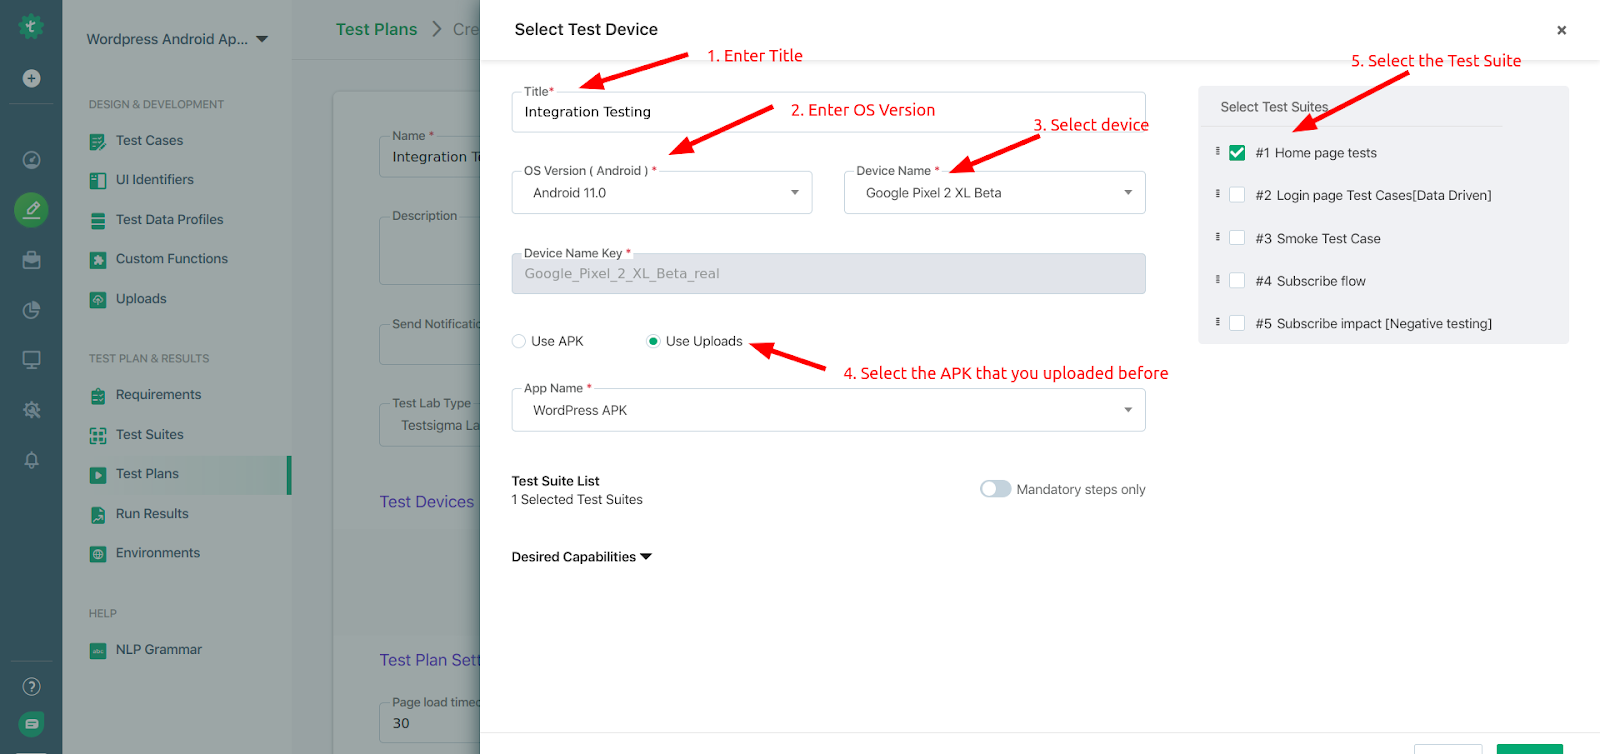
Click on the create button to create the Test Plan. To get more details on how to create a test plan, you can follow this guide.
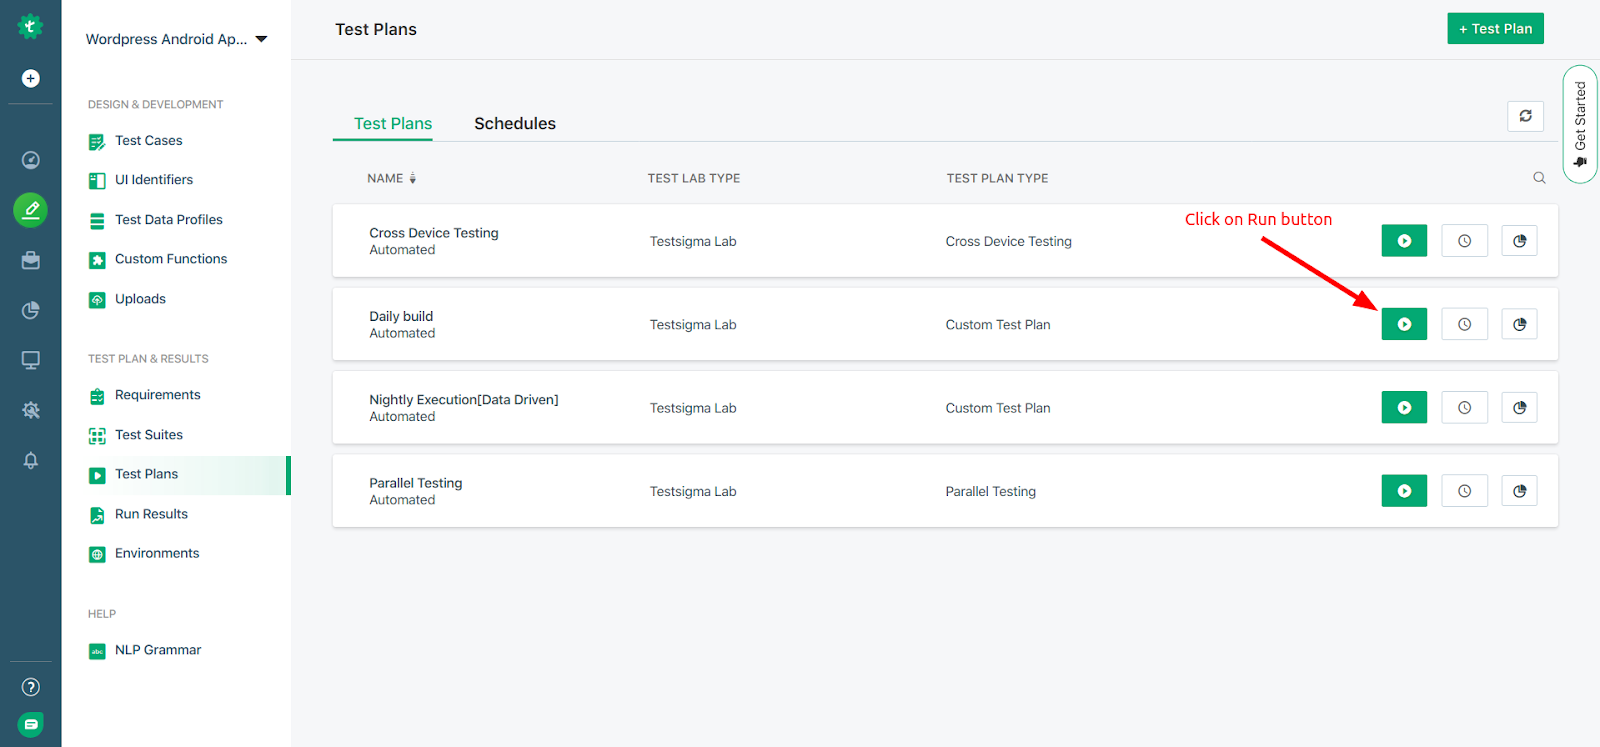
Step 5. Execute Test Plan and Analyse the results.
After you have created the Test Plan, you can click on the Run button to execute the test.
You can now check the results in the Run Results view.
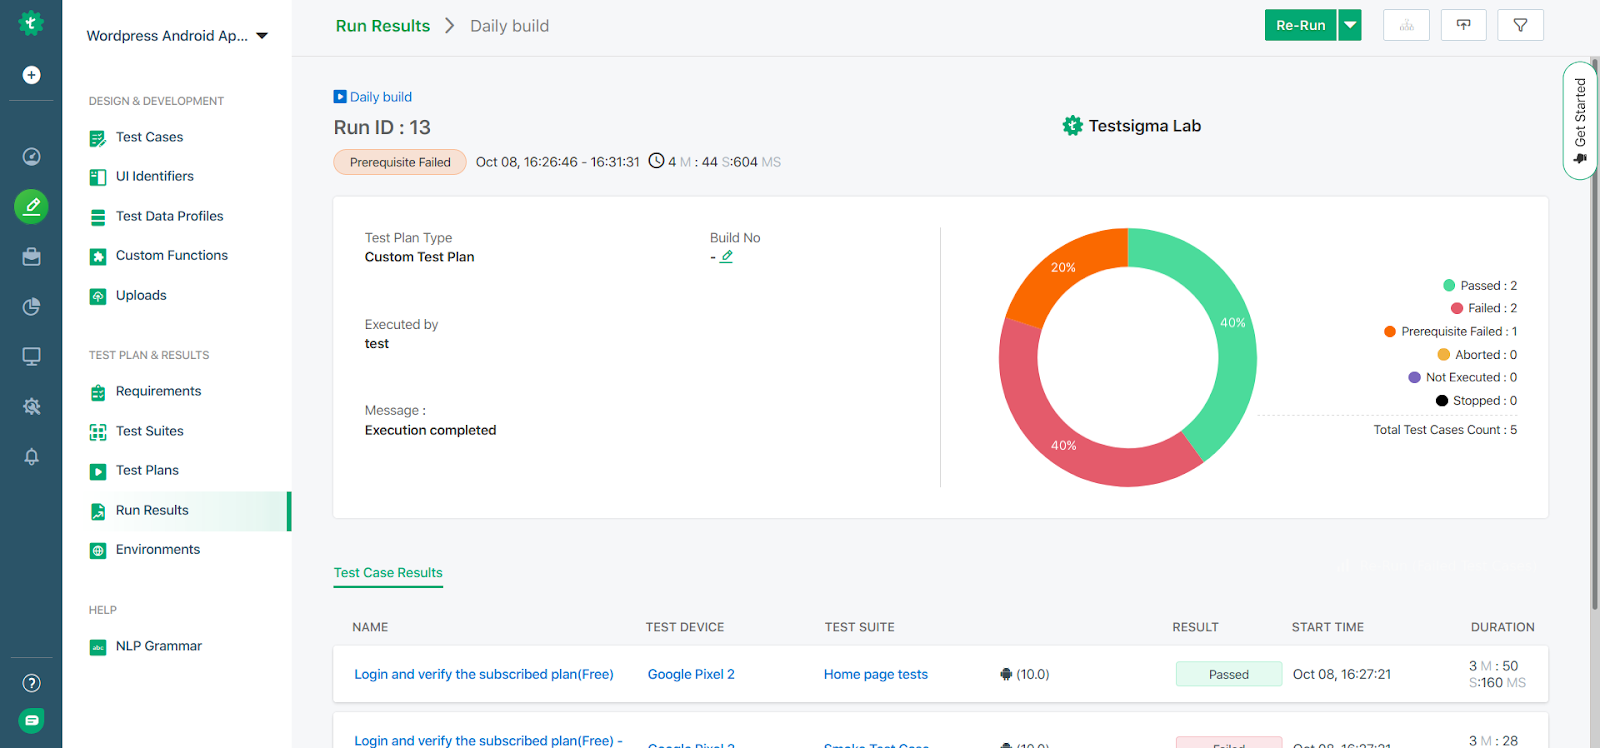
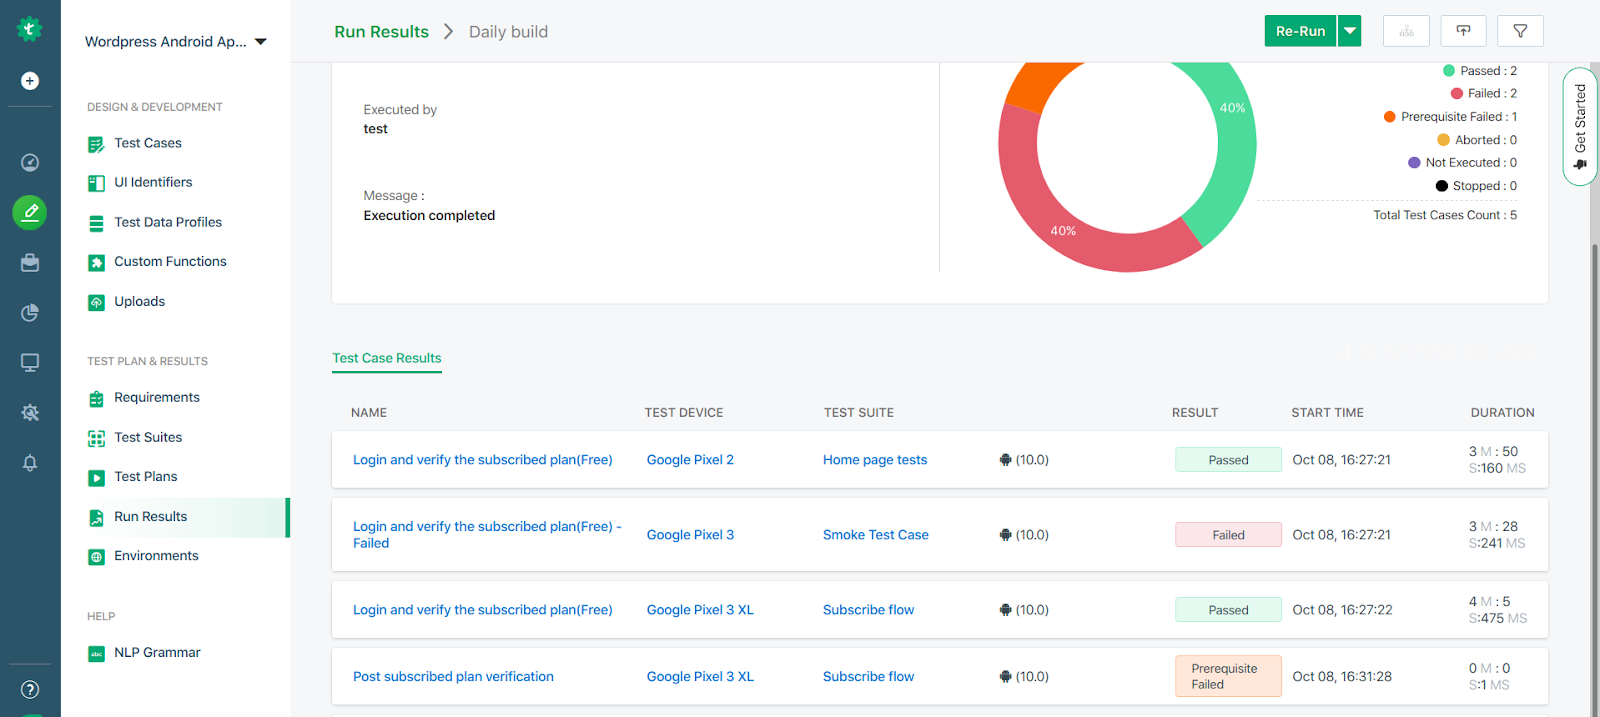
You will get a detailed comprehensive test result with environment-specific details as well. This will help you to adopt a drill-down approach, analyze the failed test cases, debug them, and re-run the test cases until all the modules are integrated without any errors.
Summary
In this article, we skimmed through the topic of Android integration testing and discussed what it is and how is it done. We then discussed how you can leverage an automated tool like Testsigma to perform Android integration testing on the module interfaces of your Android applications.
We discussed tons of features that the Testsigma tool provides to make your Android integration testing experience a seamless one. So without any further wait, you should immediately sign up for a free trial with Testsigma if you already haven’t.
Frequently Asked Questions
Integration tests will verify the application’s functionality when different parts interact. In contrast, UI tests will validate the application’s functionality when a user interacts with it. Both tests ensure that the application works accurately and meets specified requirements.
Integration testing for mobile refers to testing individual parts or modules of a mobile app to ensure functionality is proper when integrated with other parts or modules. Integration testing aims to recognize and fix issues arising when components interact.


