


The user interface of an application is the first thing a user sees when they hit enter on your web address. For people involved in developing and releasing the website, you just have 50ms to impress the users. Sometimes, it’s just 17ms. With so little time with us and considering that all that time goes into analyzing the UI of the app, it becomes our responsibility to release the website only after testing the UI and its components thoroughly. After all, focusing just on functionality would not be enough if the user cannot use them.
In this post, we will talk about UI testing and redefine areas where it is extremely important today. By chalking out its importance sporadically in the post, we will try to experiment with it practically by picking up the most popular tool used for UI testing – Selenium.
Table Of Contents
- 1 A brief introduction to UI testing
- 2 Why Selenium for UI testing?
- 3 Selenium UI Testing Architecture
- 4 Locators and their types
- 5 How to perform Selenium UI testing?
- 6 Finding locators and CSS selectors in Google Chrome
- 7 Performing UI testing with Testsigma
- 8 Best practices for Selenium UI testing
- 9 Wrapping up!
- 10 Frequently Asked Questions
A Brief Introduction to UI Testing
The user interface of an application is like the starter of an automotive vehicle. It gives your application the kickstart it wants, and it would be easier to say that many things depend on how the web application looks. To ensure that all our users will see exactly the same elements in the same arrangement as we are seeing, we need to perform UI testing.
A UI has a lot of elements that need to be evaluated before giving the green signal. For example, visual testing checks whether all the elements are visually in the right place or not. It should take care of things such as elements going out of the viewport or overlapping each other. Another section is to check the UI on various screen sizes. As the screen size reduce or expand, elements scale along with it. This can create a bit of an issue when a web page has a lot of elements. When we have checked all these elements, we conclude that UI testing is done and can move ahead to other testing techniques.
For reference, analyze this screenshot of a form:
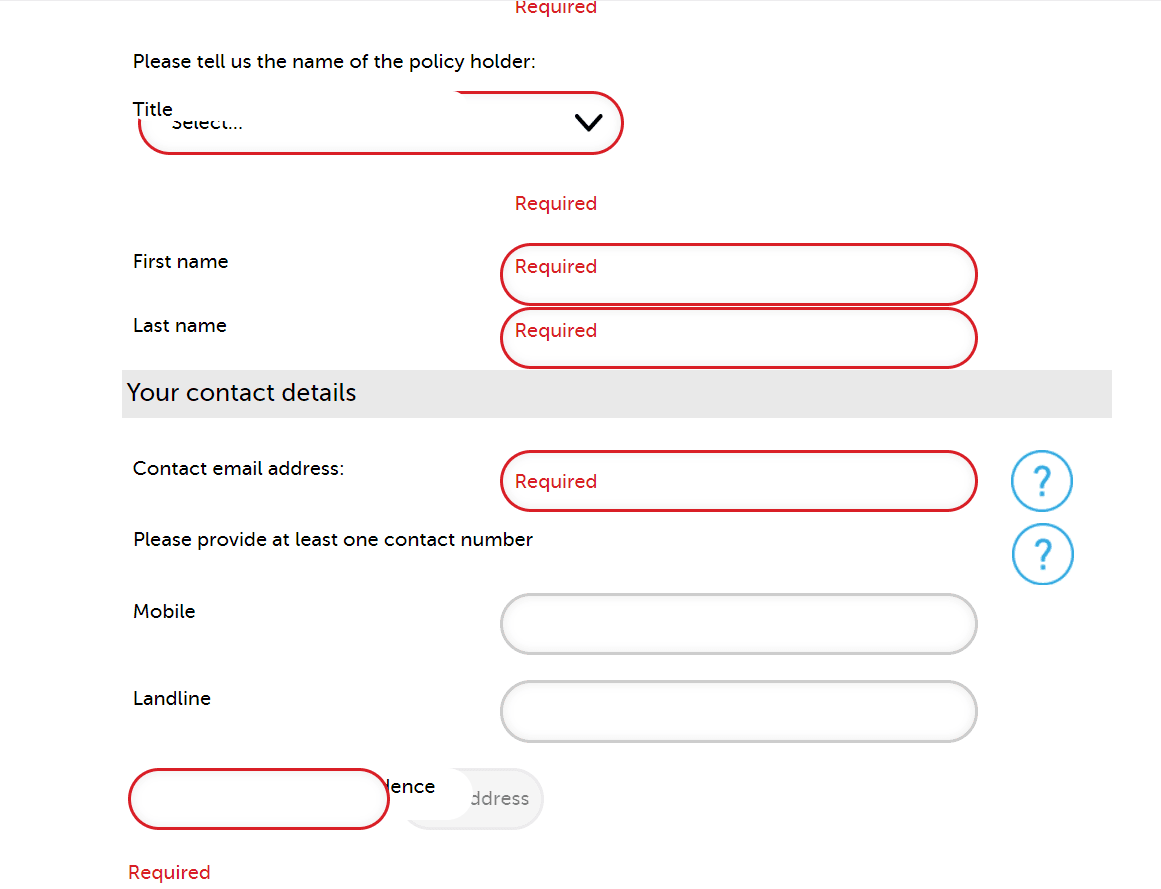
This is with respect to the alignment issues many users started facing with Google Chrome version 76 updates. This resulted in a lot of community channel discussions that could have been avoided with UI testing on the new version before release.
Why Selenium for UI Testing?
UI testing is not a new testing technique; neither is Selenium the only software in the market that can perform it. With the advancement in technologies, which includes incorporating artificial intelligence and machine learning to detect UI changes, we have got other options to verify the application’s UI. In the crowd of so many tools, what makes us select Selenium as the core choice for this post?
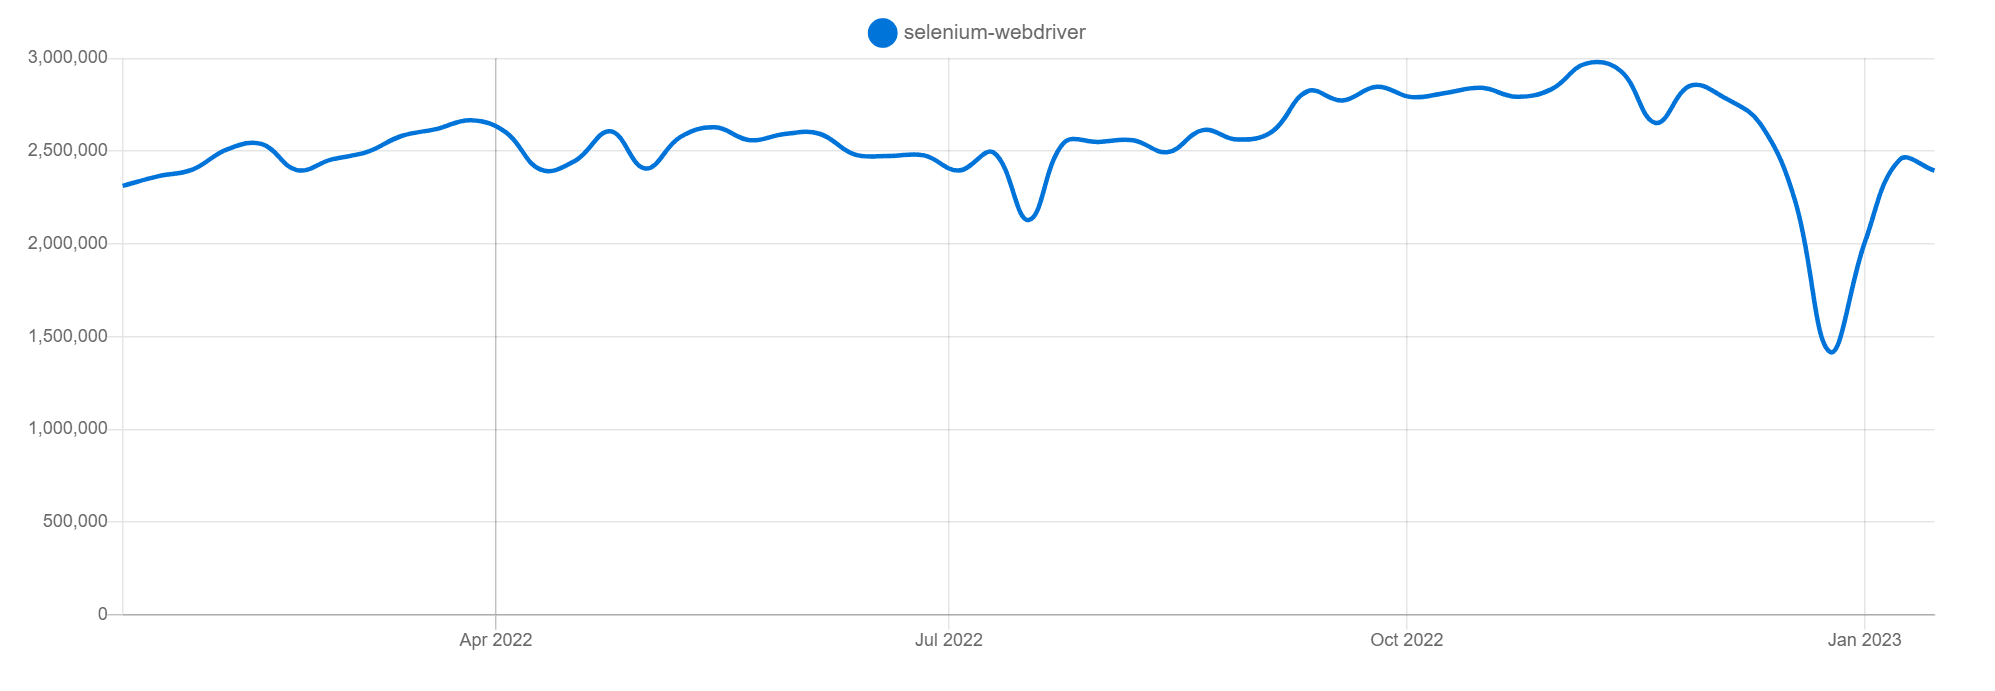
Selenium was released initially in 2004. With time, it has aged pretty well, considering that its popularity has not declined over 19 years. This is evident in the number of downloads Selenium witnessed in the last year:
When software ages that well, the community associated with it grows along too. While Selenium may have its own technical advantages, what a big community offers can never be underestimated. Another similar advantage is with being an open-source tool that helps great developers collaborate from across the world and keep improving the system with new demands and necessities.
If we glance at the technical abilities, Selenium benefits us in the following areas:
- Programming language support – Selenium offers support from a long list of programming languages. For a tester, a programming language never becomes a barrier to using Selenium for UI testing.
- Browser support – A good UI testing tool should support all browsers to cover all of their issues. With Selenium, we can run our automated UI tests in all the major browsers.
- Fast test execution – The execution of UI tests on Selenium is faster than most UI testing tools.
- Parallelization – The Selenium Grid helps parallelize tests and run them on multiple sources, which ultimately brings down testing time and associated costs.
Apart from it, Selenium also has a long list of feature supports like record-and-replay, etc. For this, you can go through our detailed post.
Selenium UI Testing Architecture
Selenium UI testing is performed using Selenium WebDriver, which executes tests on browsers installed on the system. Its architecture is as follows:

Selenium architecture contains four elements, as seen in the above image:
- Selenium language bindings – Selenium comes in different language bindings, also called client libraries. The testers need to download the same binding to write the test cases in Selenium.
- JSON Wire Protocol – This element helps communication between the language binding and browser drivers and is done using JSON over REST services.
- Browser drivers – The browser drivers help execute the automated test scripts on the actual browsers installed on the system. We need to download a browser driver specific to each browser installed on our system.
- Real browsers – These are the real browsers installed on the system available to download from their official websites like Chrome and Firefox.
The communication between browser drivers and real browsers is done through HTTP. The drivers send the instructions to the real browsers. The browser then executes the steps and returns back the report to the driver. This is then shown to the tester. All this is done with the help of an HTTP server which is also seen in the image.
Locators and Their Types
Locators are those attributes of the elements that give it a unique representation. Due to this, they are the preferred choice in UI testing. Selenium can grasp these elements using locators and take required action upon them. In Selenium UI testing, a tester may use one of the following locators:
ID
The ID attribute is attached to an HTML element as “id” which should be unique for an element in the same DOM. If the web page has more than one element with a similar id, JS code generally returns the first element, which can create confusion in testing. Therefore, it is a practice to keep this unique, and for testers wishing to find a unique element, “id” fits the purpose.
Selenium Code for Locating an Element with ID
driver.findElement(By.id(“”))
Class
The class attribute in HTML is similar to the ID attribute, but here, more than one element may have the same class name. The purpose of the class is to pool a certain set of elements with specific characteristics. For example, a class with the name “highlight” can be defined and used with all the elements that may need highlighting with different colors on the web page.
Selenium Code for Locating an Element with Classname
driver.findElement(By.className(“”))
Name
The name attribute is attached to the element to reference it in programming languages. The usage of “name” differs according to the element it is used in. It is popularly used in the input tag, but there is no such standard.
Selenium Code for Locating an Element with Name
driver.findElement(By.name(“name_attribute_value”));
Xpath
XPath stands for XML path language. It is used for navigating through the DOM tree with the help of expressions. For example, if there is an element “city” with multiple child elements named “Paris”, then to select the first “Paris” element we can write it as: /city/Paris[1].
Selenium Code for Locating an Element with Xpath
driver.findElements(By.xpath(“xpath_expression”));
CSS Selector
Another method to locate an element using Selenium is by using CSS Selectors. Their working method is somewhat similar to XPath and is very efficient. It is generally used when there is not any direct relation to the element with ID, class, and name.
Selenium code for locating an element with XPath
driver.findElement(By.cssSelector(“CSS_Selector”))
Link Text
A link text, as its name suggests, is the text attached to the link on a web page. So when we want to write some text clicking on which will redirect us to another link that may or may not be on the same page, we make use of an anchor tag. The anchor tag contains the link, while the text mentioned in it is what a user will see on the web page.
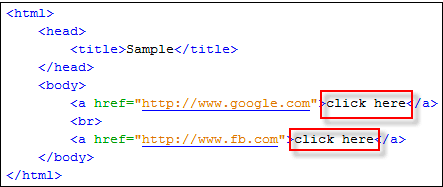
In the above code, the user will see “click here.” This is the link text. In Selenium, we can locate this part of the web page either by passing the complete text or only a part of it. Both of the scenarios use different methods.
Selenium Code for Locating an Element with Linktext
driver.findElement(By.linkText(“”))
Selenium Code for Locating an Element with Partiallinktext
Element(By.partialLinkText(“”))In the example above, we can input just “here” instead of “click here” and achieve a similar result.
Remember that if more than one link contains the same text, then only the first one is grasped.
How to Perform Selenium UI Testing?
With that much theory highlighting the relevance and existence of user interface tests, we can now get a bit practical and start UI testing using Selenium. For this, we move into two parts:
- Installing the required elements.
- Configuring the environment for tests.
- Running test cases with Selenium.
We will complete these steps one by one.
Installing Required Dependencies for Selenium UI Tests
To perform Selenium UI testing, we need to install the following elements:
- Selenium.
- An IDE.
- Browser driver.
To install Selenium, visit its official download page and select the appropriate language binding for you. For us, we can install Java binding.

If you are also interested in writing Selenium UI testing code in Java, make sure you have Java installed on the system with a compatible version. You can do that by visiting the Java home page.
Next, we need an IDE. This is also an independent choice for the tester, and they can download whichever IDE they are comfortable with. For personal projects, I use IntelliJ to run Selenium UI testing codes.
Finally, we need a browser driver to drive the real browsers with automated UI testing scripts. As mentioned in the previous section, a browser driver is specific to a browser. So, we need to download all the drivers if we are going to perform UI testing on all of them. For demonstration here, I will use ChromeDriver which can be downloaded from ChromeDriver’s official website.
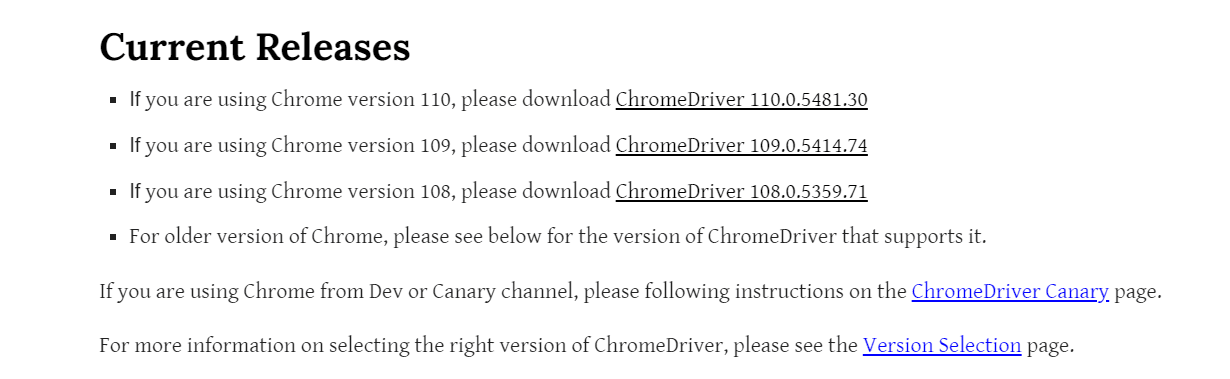
Select the latest version from the first link. Download the compatible binary according to your system on the next page.
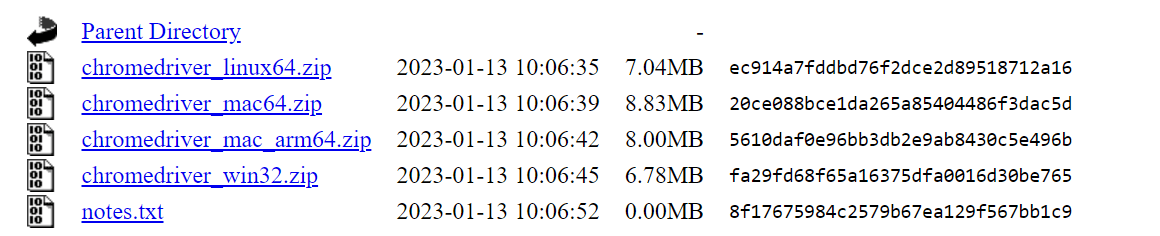
The zip will contain the .exe file which we will use in our tests. Remember here that the Chrome driver version, Selenium version, and actual installed Google Chrome version have to be in synchronization for a smooth test run. Otherwise, the tester may witness a lot of errors during the run.
Configuring the Environment to Run Selenium UI Tests
Now that we have everything downloaded, we need to set things up and create an environment for our tests. First, we need to incorporate Maven dependency for TestNG. For this, we will create a new project in IDE and visit the pom.xml file. Visit the official maven repository page for TestNG and select the latest version:

Here, select “Maven” and copy the code block written inside it:

Paste this in the pom.xml file in the editor. This will set up TestNG for our test case.
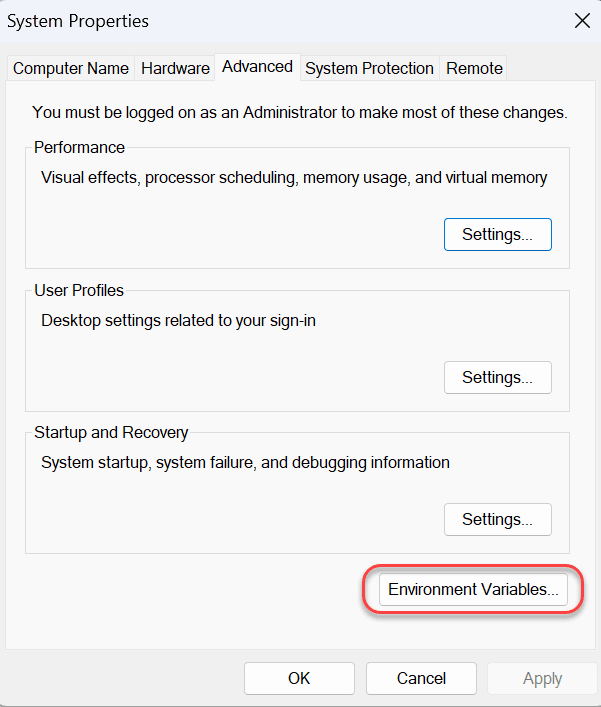
For testers who don’t want to put the location of webdriver repeatedly, they can put the location of “webdriver.exe” in the system variable path. This will be available in the “Environment Variables” section in System Properties.
With this small setup, we are ready to create tests in Selenium.
Running UI Test Cases with Selenium
To create a UI test in Selenium, we need the following snippets:
Initializing a driver:
WebDriver driver = new ChromeDriver();Remember that ChromeDriver needs to be replaced with another browser driver if you are not using Google Chrome driver for tests.
Then, we need our driver to open a web address. This can be done as:
driver.get(“https://www.testsigma.com/”);After executing this code, the browser can open with the URL address provided as an argument to it. This code is always present and is considered the initial part of the UI testing process. Now we just need to find a UI element and execute our test on it. This is called “locating the element” and is done through locators. Please refer to the above section to know about locator types.
val = driver.findElement(By.id(“”));You can know the locator values of web pages by right-click -> inspect.

Next, we make an assertion to know whether the value we fetched out by locating the element is actually what we expect.
Assert.assertEquals(val, “Selenium”);This assertion will provide pass-and-fail results by comparing the expected value and actual value. After this, we can just quit the browser driver instance. driver.quit();
Combining the whole code, we get the following Selenium UI testing code:
WebDriver driver = new ChromeDriver(); driver.get(“https://www.testsigma.com/”); val = driver.findElement(By.id(“”)); Assert.assertEquals(val, “Selenium”); driver.quit();The tester can use various locators and various types of assertions to accomplish their UI testing objectives.
The problem a tester might face here is that these locators cannot be remembered or documented for quick reference. The only method that remains is to identify them using inspect elements in Chrome or any other browser using different types of locators. This can be confusing with respect to the locator as well as the browser (as different browsers may have different methods).
Let’s quickly go through these methods in Google Chrome and see how we can speed things up faster.
Finding Locators and CSS Selectors in Google Chrome
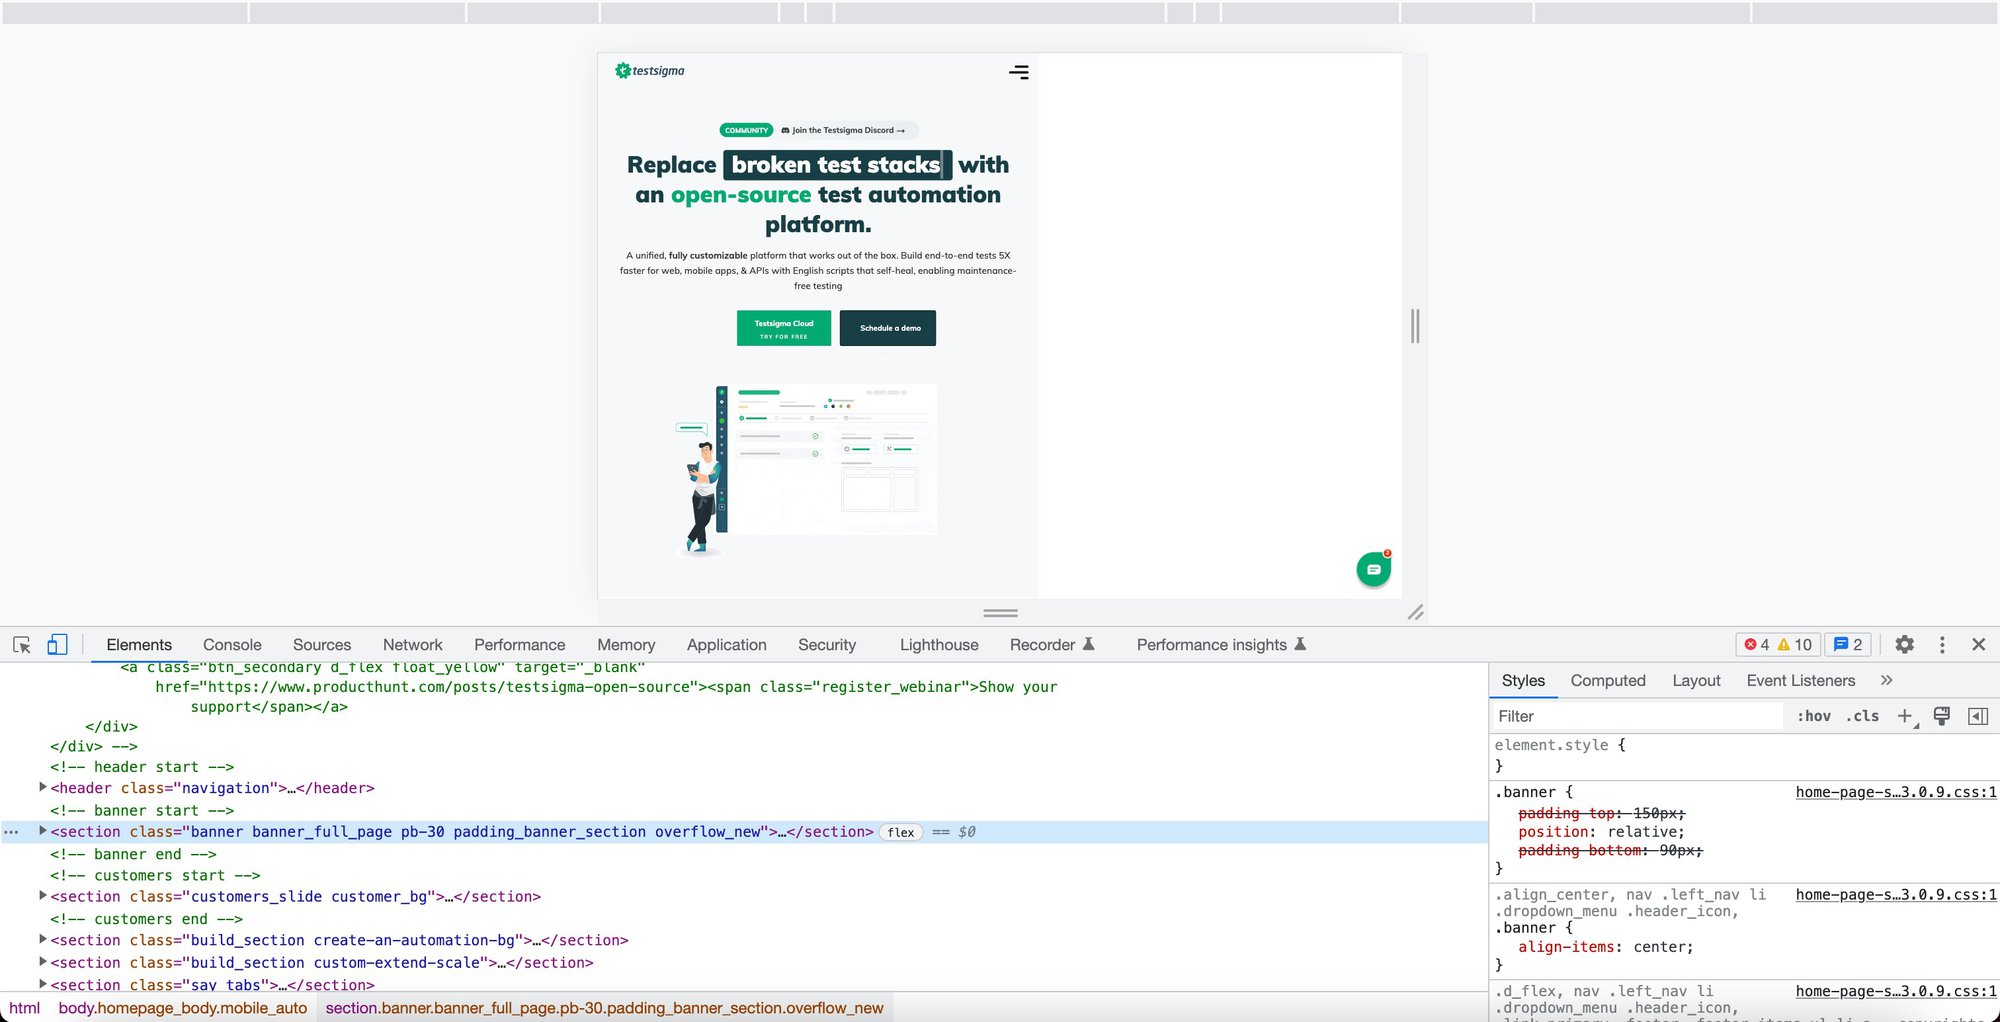
Finding and copying the locators or CSS selectors in Google Chrome is a simple process. For this demonstration, we have used macOS + Google Chrome v109 + Testsigma’s home page. 1. Right-Click and select “Inspect” anywhere on the web page or on a particular element to navigate to it directly. This will open up the page’s code docked on the right or bottom:
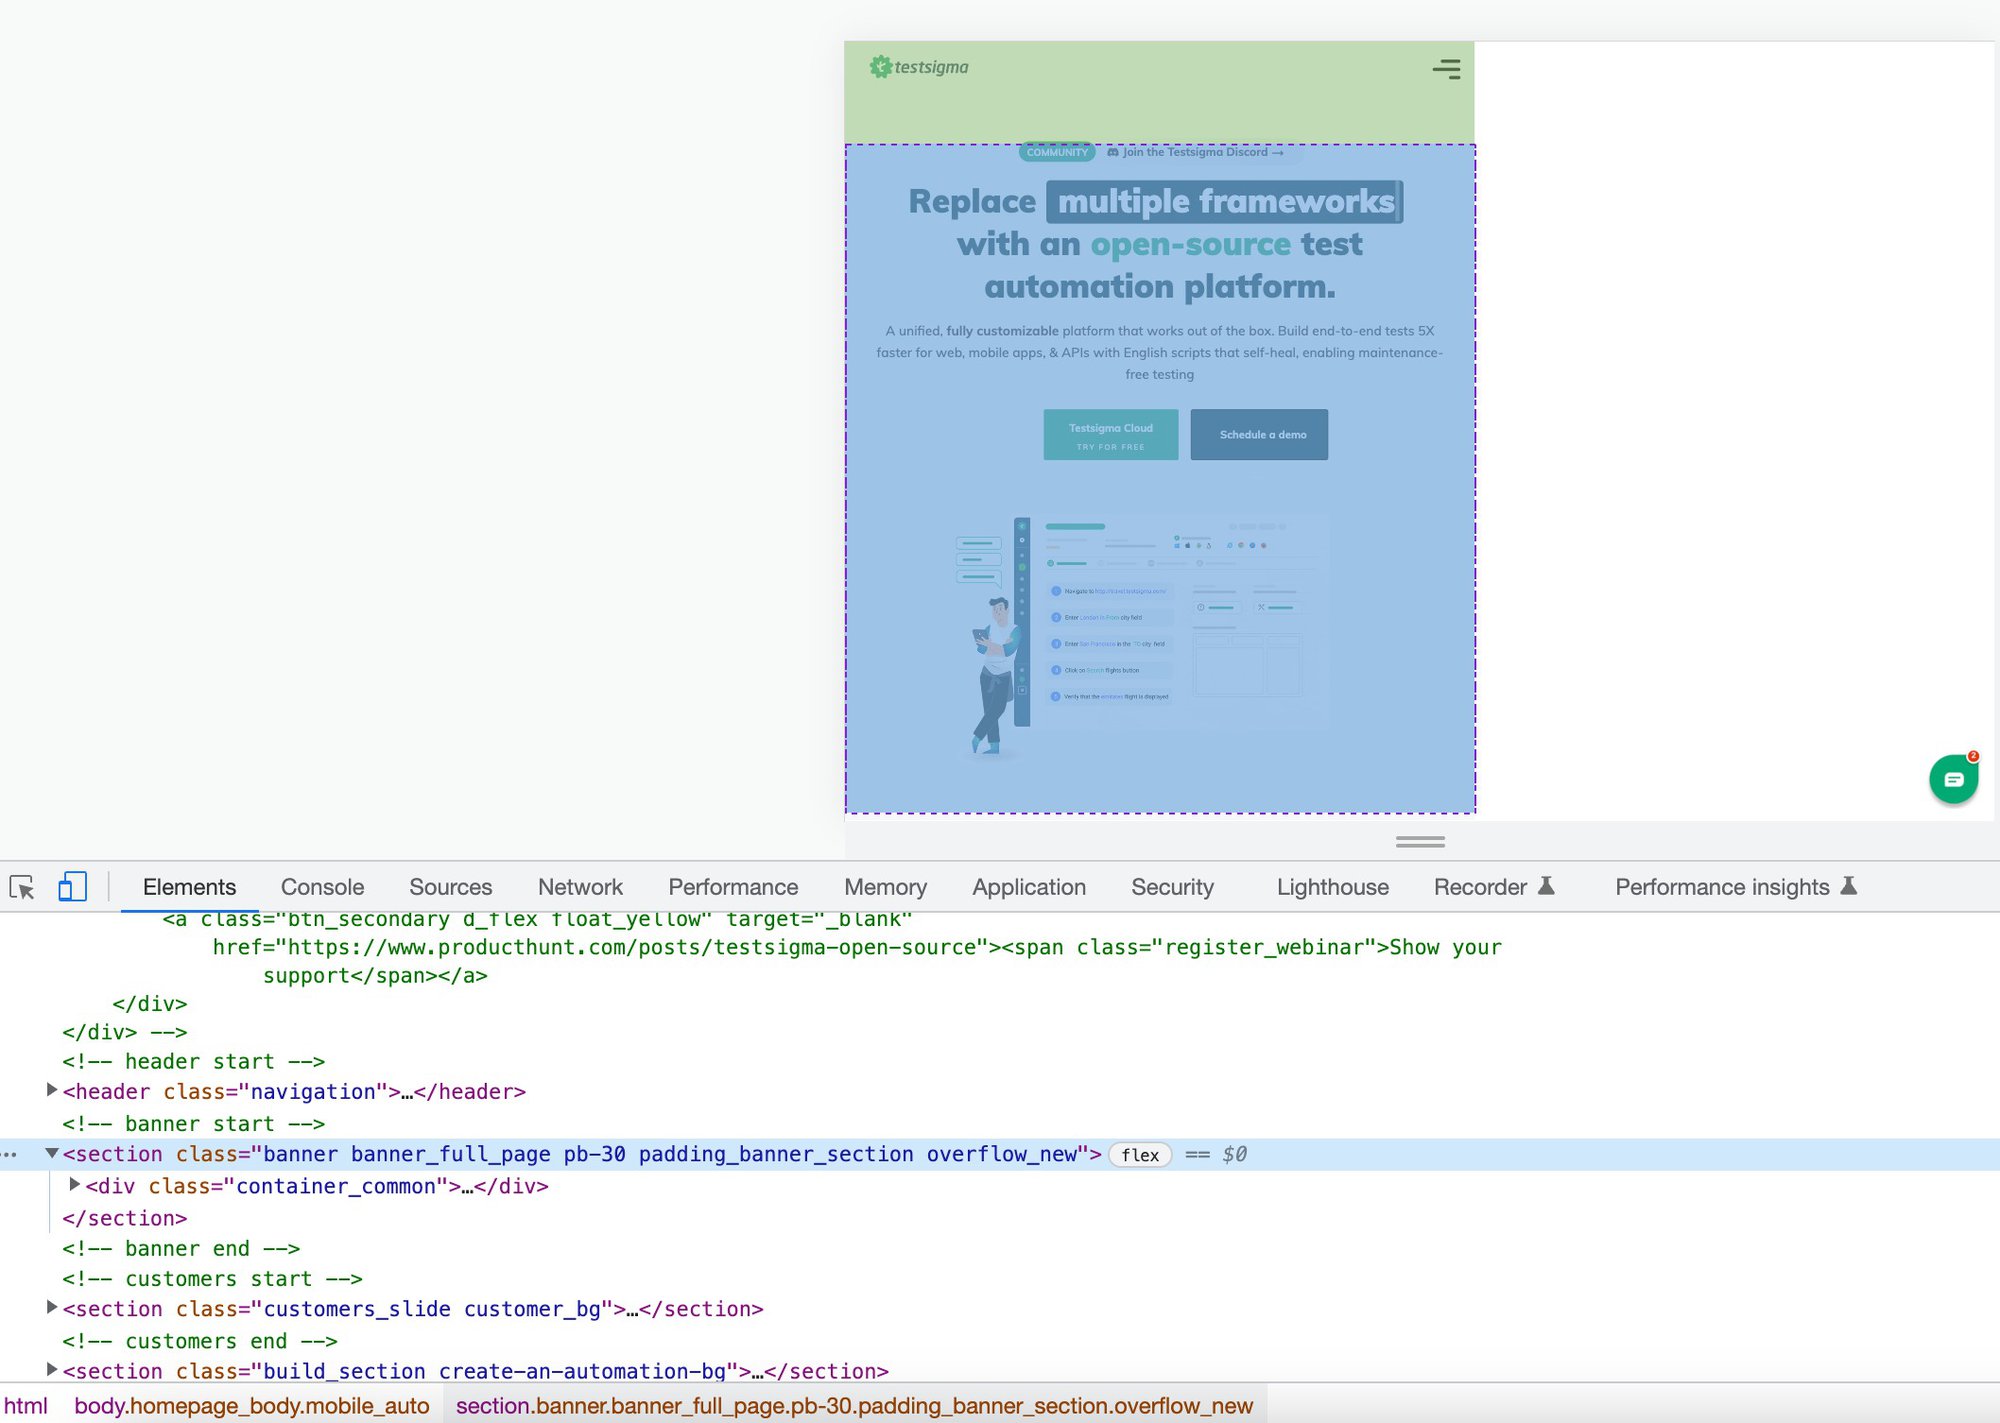
Here, you can select any line of code and its locators such as class name will be visible at the bottom. You can hover over each class to highlight the area it represents. For example, this is the output of hovering over the second class:
As an alternative (which is recommended), you can select any element. Right-click -> Copy-> and select any locator you want to copy from the element:
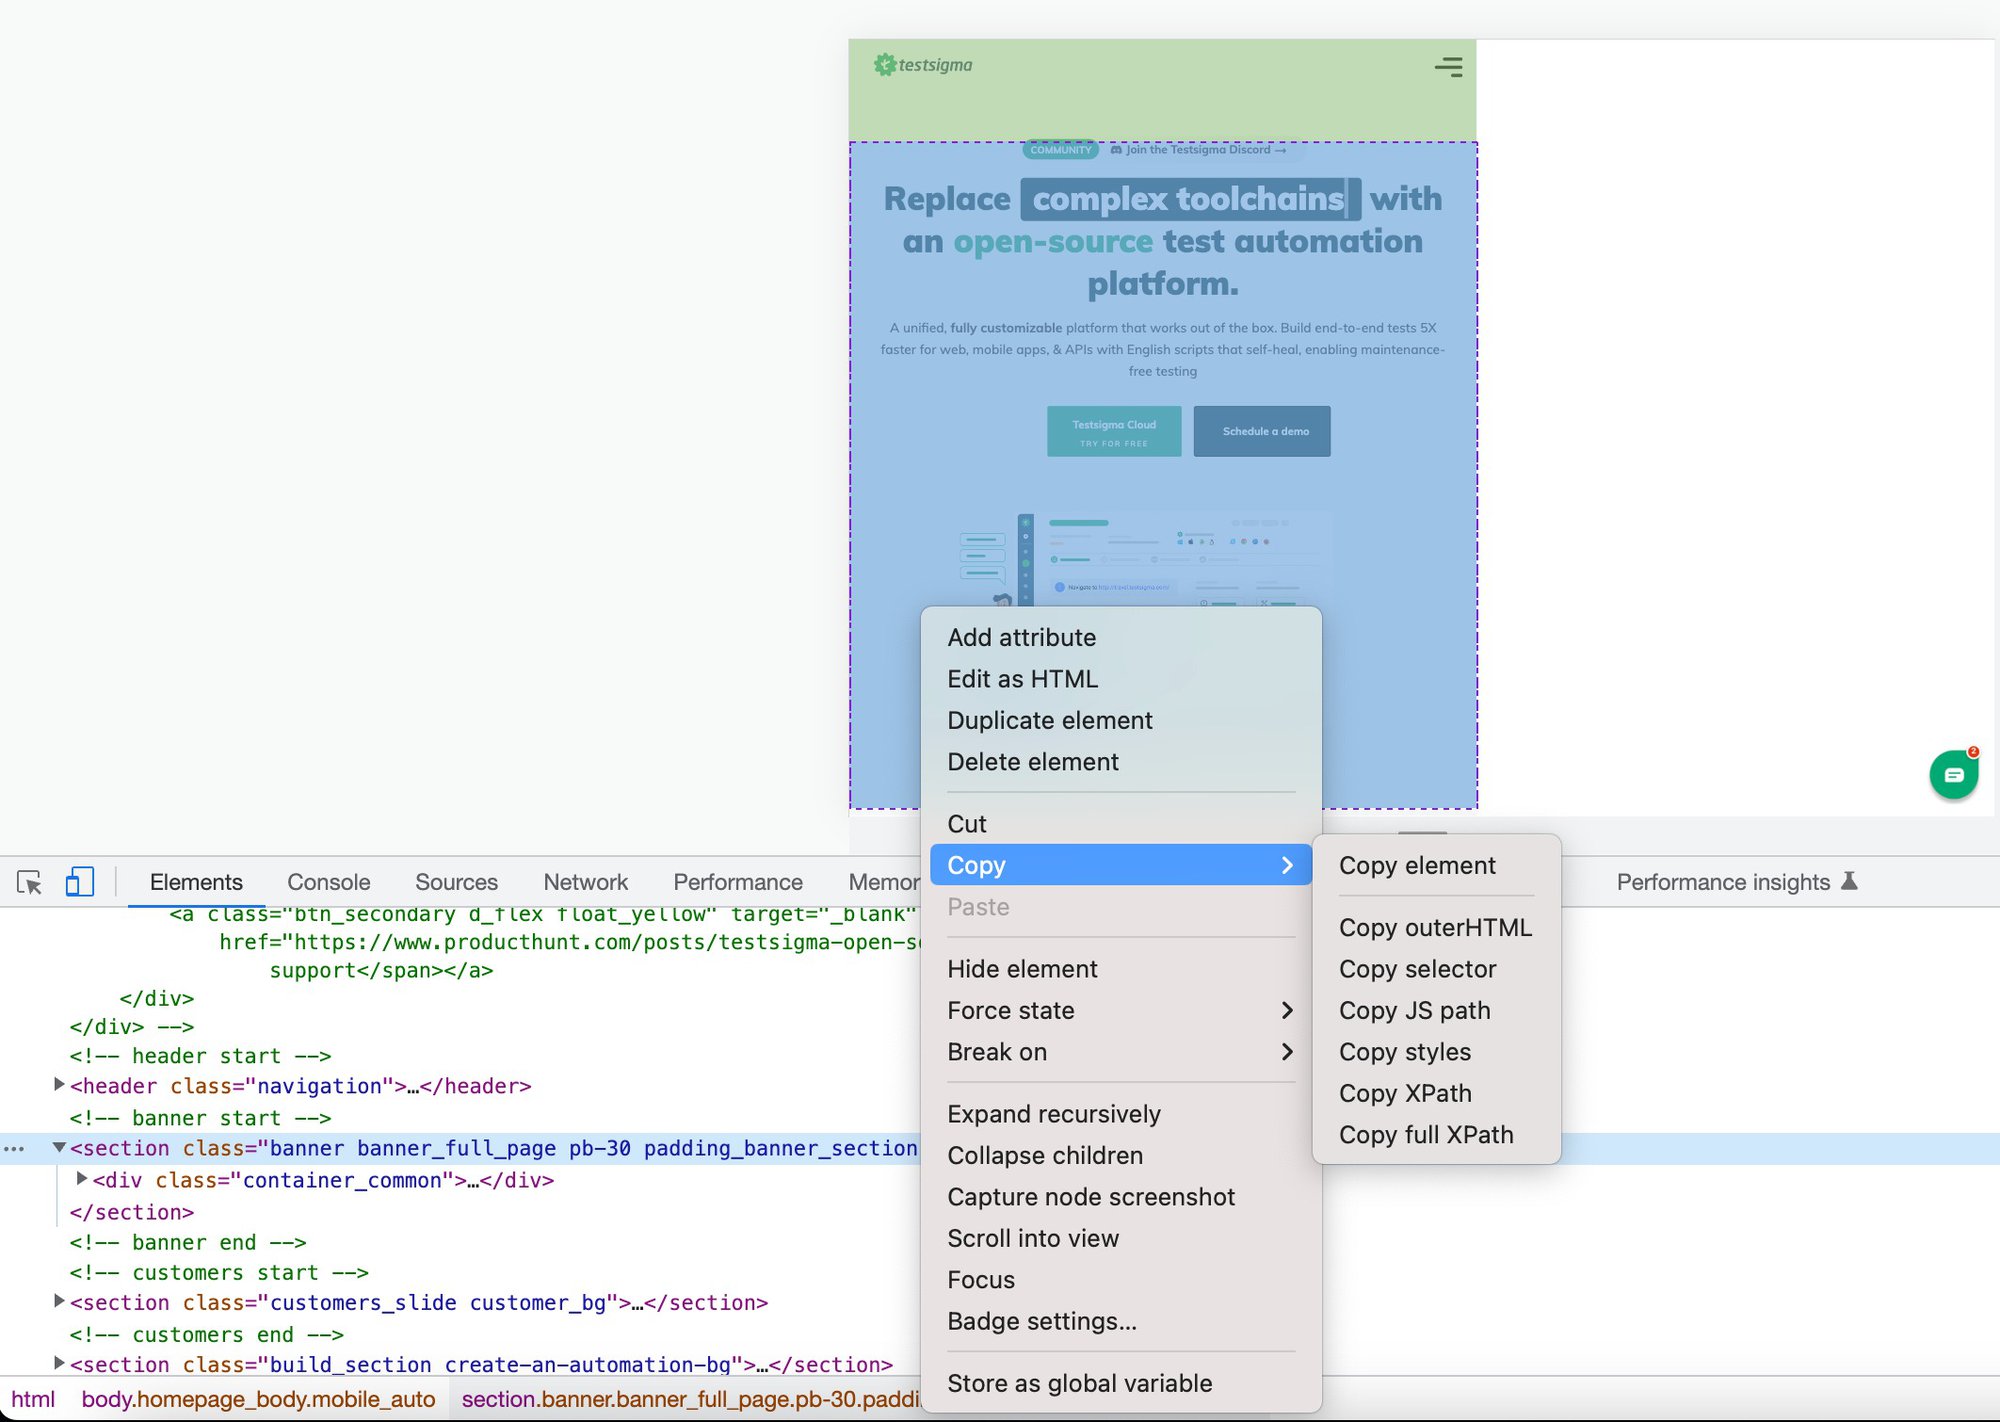
By this method, testers don’t need to derive the XPath and CSS selector explicitly. Just copy from this list, and you are good to go!
Performing UI Testing with Testsigma
Selenium is a great tool to have in our skillset that can help us perform UI testing. But, can a tester be confined to only UI testing? Or can they be confined to something that needs programming? This may create a couple of issues.
First, we might need people that know Selenium so that they can do Selenium-specific tasks. Then we will need additional people for other tools that we will use. Similarly, we will constraint ourselves to hiring only those testers who know how to program. This can eliminate a lot of good candidates that could be excellent testers but not as good in programming.
The solution to all these is Testsigma. Testsigma is a cloud-based automation testing platform that not only works in the website department but also brings you a complete package of testing features, ranging from data-driven testing to website testing to mobile application testing. On top of it, a tester need not know programming to use this platform.
Testsigma takes the test cases in the English language such as “Navigate to www.testsigma.com” which is equivalent to driver.get(“www.testsigma.com”) in Selenium.
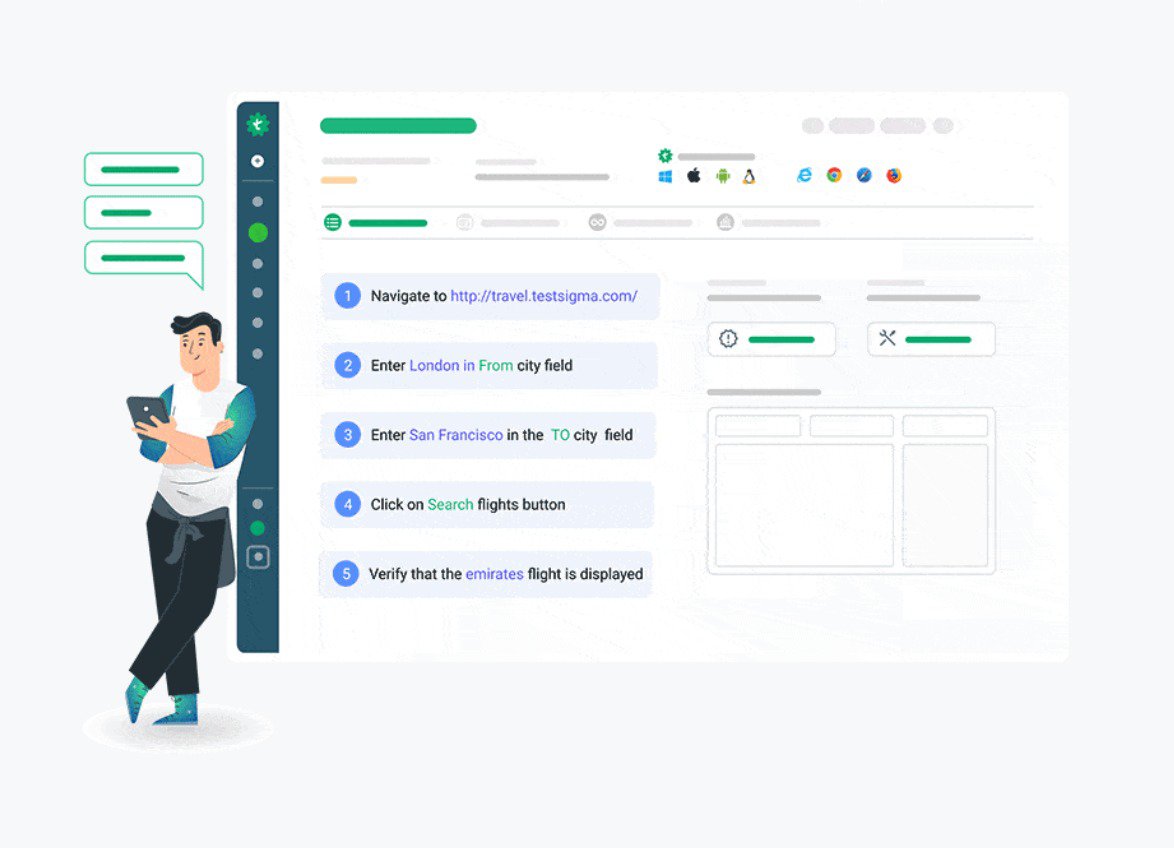
For UI testers, Testsigma has a great self-healing feature that can sense the UI changes and update the test accordingly. This is a blessing for testers as UI elements keep changing and maintaining them is an overhead in both time and cost. Features like these and a mobile recorder to convert actions into scripts are missing in Selenium. Testsigma can help boost the cycle with minimum costs, and all this comes with a single sign-up on the platform.
Best Practices for Selenium UI Testing
Finally, before concluding, we can look at some of the best practices that will help us perform UI testing in Selenium efficiently.
Keep Things Simple
The first rule of thumb in UI testing (or maybe in any type of testing) is to keep things simple. Don’t try to complicate the test cases, especially when you are a beginner. The simpler the test case, the easier it is to understand by others and fix it when it fails.
Cross-browser testing over the cloud
A lot of you might have heard about the importance of cross-browser testing and how relevant it is before pushing the code to the end users. However, as easy as it may sound, it might feel as difficult to download each browser, its versions and run them on each operating system. Therefore, it is always recommended to use a cross-browser testing platform available on the cloud like Testsigma. It can run all your test cases to multiple specifications automatically.
Don’t Sleep, Await!
A web page does not load synchronously and therefore neither do the UI elements present in it. This behavior demands waiting for the elements to load before executing test cases on it. A common mistake that testers do is to use the “sleep’ function to pause the test execution. However, using the “sleep” method is not recommended as it makes tests slower and brittle. This can change all your metrics in the final reports. Instead, use await – implicit wait and explicit wait in Selenium.
Read here about thread.sleep in selenium
Test As a User
As a generic best practice, UI tests should be written keeping the user in mind. Since the user interface is what the user will see and interact with, it is best to always write UI test cases in Selenium as a user. It will help you point out bugs in little things that could have been overlooked.
Choose the Perfect Locator
While performing Selenium UI testing, you will find that an element could have been located by using different locator strategies. The strategy that you need to use should be decided by you on the basis of the scenario and performance. Somewhere CSS selectors will give good results while somewhere XPath may be more beneficial. With experience, you will better judge such cases.
Always Record Videos and Capture Screenshots
While performing Selenium UI testing, always record videos of your testing sessions and capture screenshots wherever you may feel necessary. This will help you share these documents with different people in your team and debug test cases easily and speedily.
Use Relevant Test Case Names
Finally, always remember to use descriptive and relevant test case names in the Selenium UI testing process. If you use short names, abbreviations, or irrelevant names like foo, ABC, etc. you may not be able to identify what that test case meant. You will ultimately end up reading the code which will increase the maintenance time. Similarly, the members of your team will not get an idea about the tests and it will be even harder for them to decode as they did not write them. All this will be eliminated by using descriptive names.
Wrapping up!
The user interface of an application can make or break things for a business. If the user does not like the UI or having issues interacting with it, it might not take more than a couple of seconds to press that back button and begin a Google search again. This is intimidating for developers, testers, and business owners. But the good thing is, we can be prepared for such scenarios and this could easily be avoided.
UI testing is the process of testing the user interface, its perfectness, and its behavior in different devices in different situations. While manually verifying all this can be a start, it will not take us too far, and we will end up ignoring errors and warnings. A better method is to perform automated UI testing using robust and time-proven tools like Selenium.
Selenium is old software with an excellent track record in web app testing. It has a large community and is open-source which makes everything just better. To perform UI testing, Selenium takes help from browser drivers that run the actual browsers and execute tests on them. The driver locates elements on the web page and performs actions on them as specified by the tester. This is done through locators described in this post. All of this combined is what Selenium UI testing is and as we saw through this post, it is very easy and straightforward to perform even for beginners.
With the best practices to follow when working with UI testing, we conclude this post here by mentioning that even if Selenium is a great choice to work with, we recommend using a cloud-based tool to speed things up faster. There is a lot in the market but Testsigma could be the start you are looking for. I hope this post helps in your UI testing endeavours. For any comments and suggestions, let us know in the comment section. Thank you for giving this post your valuable time.
Frequently Asked Questions
How to Do UI Validation in Selenium?
UI validation in Selenium is done with assertions. The assertions let us compare the expected results and actual results of the element. This is generally done with the help of locators.
What is an Example of UI Testing Selenium?
While testing the font size and alignment of various sections is common in UI testing, one of the most useful use case is to test the contrast between two section’s colors. It helps create a good interface that gives the user a pleasant feel of the web application.
Are API and UI Testing the Same?
No. APIs are generally used as a medium to communicate between the frontend of the web application and the backend of it. They help in the business logic and directly affect the changes in the database attached to the web application. With API testing, we aim to test this functionality that our actions are indeed getting reflected in the database.UI testing, on the other hand, deals with the interface that the user sees. It does not concern any functionality or the database. It just concerns how a web app looks to the end user.

