


There are many automation tools in the market, such as Playwright, Cypress, Selenium, WebdriverIO, etc. Selenium is the most popular and most used tool in the market. Using these automation tools, one can integrate automation tests into CI/CD pipeline and run the tests without manual interruption. In this post, we’d talk in detail about its most popular component: Selenium IDE.
Table Of Contents
- 1 What is Selenium IDE?
- 2 Why Selenium IDE?
- 3 Features of Selenium IDE
- 4 Benefits of Using Selenium IDE
- 5 Limitations of Selenium IDE
- 6 Selenium IDE Working Principle
- 7 How to Install Selenium IDE?
- 8 How to Use Selenium IDE?
- 9 Convert Selenium IDE Command to Any Programming Language Automation Test
- 10 7 Selenium IDE Tips
- 11 Best Practices for Selenium IDE
- 12 Role of Cloud-Testing Platforms in Running Selenium IDE Test Cases
- 13 Conclusion
- 14 Frequently Asked Questions
What is Selenium IDE?
Selenium IDE (Integrated Development Environment) is a record and playback tool. It is available as a browser extension or plugin. Selenium IDE helps beginners and manual testers to learn more efficiently. It also helps to speed up the automation of test cases. The Selenium IDE was created long before for Firefox. However, it has gone into a maintenance state over a period of time. The latest Selenium 4 release re-introduced the Selenium IDE with revamped user interface, new design, and more features.
From the previous section, you understood what Selenium IDE is. Let’s explore Selenium IDE in detail. Selenium IDE is available as an extension/addon for Chrome and Firefox browsers.
Why Selenium IDE?
Selenium IDE is a highly regarded QA tool known for its intuitive and user-friendly interface. It allows for quick creation of test scripts through recording and provides a smooth playback functionality. This makes it an ideal choice for beginners in test automation looking for an easy-to-learn and efficient solution to their testing needs. Selenium IDE is a popular and reliable option for anyone seeking to improve their testing process.
Features of Selenium IDE
Here are the features of Selenium IDE, it offers a range of functionalities designed to enhance your testing efficiency, adaptability, and control over your test cases.
- Speed Control: Easily regulate the speed at which your test cases run, helping you analyze and debug at your preferred pace.
- Run All: Execute the entire Test Suite with a single click, saving time and effort during comprehensive testing.
- Run: Quickly launch the execution of the currently selected test, focusing on specific scenarios without running the entire suite.
- Pause/Resume: Gain control over your testing process by pausing and resuming individual test cases, allowing for closer inspection and adjustments.
- Step: Step into each specific command within your test script, facilitating detailed examination and fine-tuning of test steps.
- Rollup: Group multiple Selenese commands together into a single operation using the Rollup feature, simplifying complex actions and sequences.
- Dynamic Features: Note that features within Selenium IDE may evolve based on different extension versions, adapting to changing needs and enhancements.
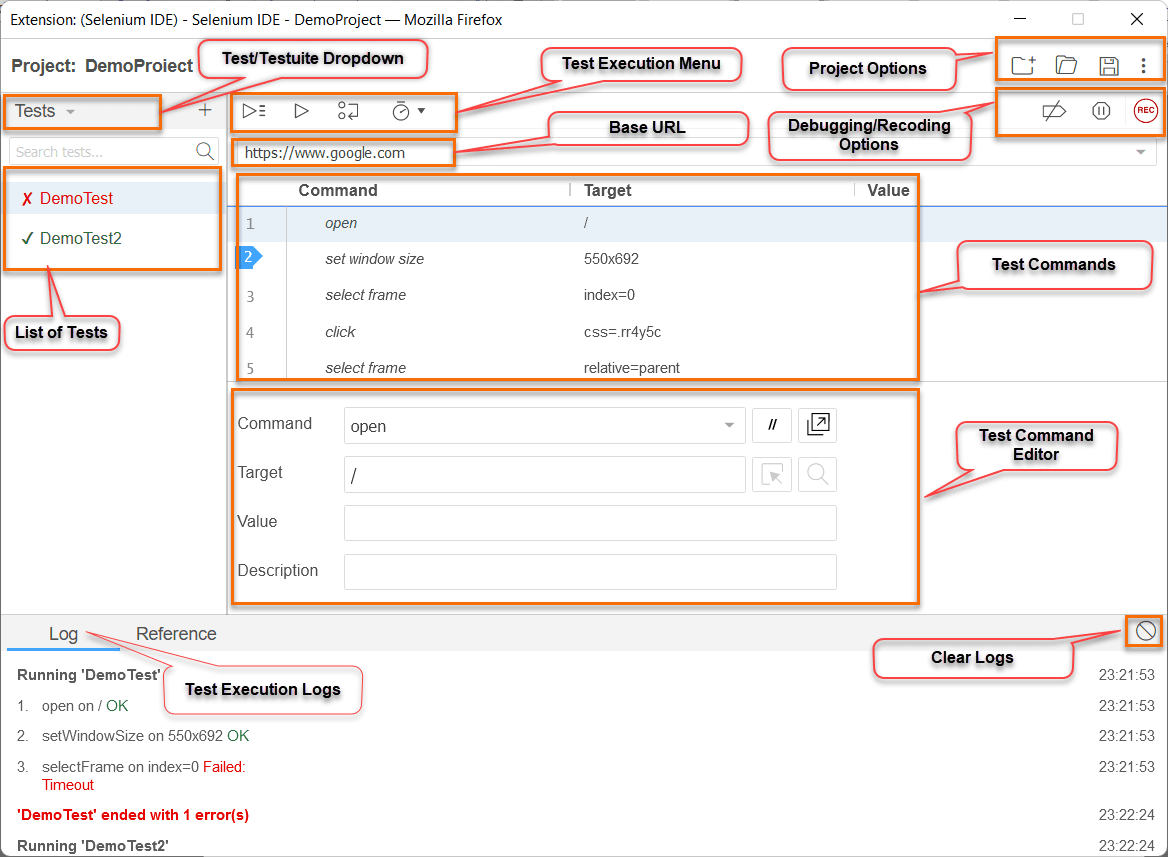
- Tests: New tests can be added using the + symbol available in the top right corner of the IDE window.
- Suites: Selenium tests can be grouped which is called Selenium Test Suite.
- Test Execution Menu: The Test execution menu provides options to Run Single Tests, Multiple Tests, Control the Execution Speed, Step over to the current command, etc.
- Project Options menu: The Project options menu provides Create new Test, Open existing Project, and Save the current project options.
- Base URL bar: This option is available below the Test Execution menu, which shows the recorded test case base URL.
- Recording /Debugging options provide disable breakpoints, pause the execution on exceptions, and Record new Test options.
- Command and Command Details: Once you record the test case, the commands table displays along with the target and value. The command details window helps you to modify any custom values.
- The Logs option provides run time execution logs, which help to analyze and understand why tests are failing or what is causing the issue.
Benefits of Using Selenium IDE
- No Coding knowledge required.
- Easy to install: just install as any other browser extension.
- Easy to debug: Selenium IDE provides many debugging features.
- Re-use of the test case is one of the advanced features in Selenium IDE. You can reuse the existing test cases.
- Add control flow statements such as if, while, times, etc., anywhere you want.
- Selenium IDE also provides customization. You can extend your IDE by building your commands, integrating third-party services, etc.
limitations of Selenium IDE
Here are the limitations of Selenium IDE:
- Limited Data Testing: Selenium IDE might not be ideal for testing scenarios involving extensive datasets, making it less suitable for comprehensive data-driven testing.
- Database Interaction: It lacks the capability to directly interact with databases, making it unable to validate database-related functionalities.
- Dynamic Web Applications: Selenium IDE struggles with handling dynamic components within web-based applications, potentially leading to inaccuracies in testing results.
- No Screenshot Capture on Failures: Unlike some other testing tools, Selenium IDE doesn’t offer built-in functionality to automatically capture screenshots when a test case fails, potentially hindering troubleshooting.
- No Result Report Generation: Selenium IDE lacks the feature to generate comprehensive result reports, making it challenging to review and share detailed testing outcomes.
While Selenium IDE offers a user-friendly and easy-to-use interface for quick test script creation, these limitations highlight situations where more robust testing tools might be necessary to address complex testing scenarios and generate detailed reports.
Selenium IDE Working Principle
Selenium IDE simplifies creating automated web tests by following a user-friendly workflow:
- Record Like a Pro: Interact with a web application as you normally would. Selenium IDE captures your actions in real time and translates them into a test script. No coding is required!
- Edit and Enhance: The recorded script is a starting point. You can refine it using the built-in editor, adding assertions to verify expected results, incorporating loops for repetitive tasks, or implementing conditional logic for complex scenarios.
- Run and Review: Once satisfied with your script, play it back to automate the test process. Selenium IDE interacts with your browser to mimic your recorded actions. During playback, you can review the execution steps in the command log to identify and address any issues.
- Save for Future Use: Share your test script with your team. Selenium IDE uses the “.side” extension to identify these test case files.
How to Install Selenium IDE?
Selenium IDE is available for both Chrome and Firefox as a browser extension.
Installing Selenium IDE in Firefox
- Navigate to https://addons.mozilla.org or type about: addons in URL bar.
- Search for Selenium IDE.
- Click on Add to Firefox.
Installing Selenium IDE in Chrome
- Navigate to https://chrome.google.com/webstore or type chrome://extensions in URL bar.
- Search for Selenium IDE.
- Click on Add to Chrome.
How to Use Selenium IDE?
Get started with automated web testing quickly using Selenium IDE.
- Install the free Selenium IDE for Chrome, Firefox, or Edge browser extension.
- Interact with a web application as usual. Selenium IDE captures your steps, automatically generating a test script.
- Fine-tune the script for clarity and efficiency. Add assertions to verify expected outcomes during testing.
- Play back the script to automate repetitive tasks and validate web application functionality.
Adding a New Test
When you launch the Selenium IDE, you get the below options.
- Record a new test in a new project
- Open an existing project
- Create a new project
- Close Selenium IDE
- Choose the 1st option, “Record a new test in a new project”
- Enter the Project Name (Example: Demo Project)
- Enter the Base URL (Example: https://google.com)
- Click on Start Recording
Let’s record the following scenario
- Open the Base URL
- Type the “TestSigma” as the search keyword
- Click on Search to View the Result
- Once Recording is complete, Switch back to Selenium IDE
- Click on the Stop Recording Icon
- The Selenium IDE prompts you to Enter the Test Name (Ex:DemoTest)
At this point, you can see the recorded tests in Selenium IDE.
Save Tests
Selenium doesn’t save any recorded tests. Unsaved Tests are marked with *(star) next to the Project menu. To save the recorded project, click on the Save option available on the Top Right of Selenium IDE.
- Click on the Save option
- Choose the directory/folder location
- Click on Save
Did you know?
- Selenium Projects are always saved with .side extension.
- Once you save the project, you can always open it next time. Furthermore, the project is not browser dependent which means you can save the Selenium IDE project(side) using the Chrome browser and open it on the Firefox browser.
Test Execution
Selenium IDE provides the option to execute the test through the IDE window. The Execution window provides following options:
Execute Test
This option will be helpful if you want to execute a single test in your project.
Execute Multiple Test
If your project contains multiple tests, you can execute them all at once, using the Execute all Test option.
Control Execution Speed
Using Selenium IDE, you can even control the execution Speed. Clicking on the Timer icon in the execution menu opens up the slider, and you can move from slow to fast and adjust the test execution accordingly.
Debugging Options
Selenium IDE provides an easy way to debug the tests:
Execution Logs
The logs section provides the execution logs that help to know which Selenium command is failing.
Adding Breakpoints
Once you know the command which is failing, you can add the breakpoint by navigating to the commands sections. Click on the number column to put the breakpoints; the execution stops at this point and helps to debug the tests.
Step over
Step over the current command helps to execute the commands one by one.
Pause on exception
On the right side, you can see the pause option. Instead of failing the test, this option pauses the tests if there is an exception, which helps to debug further from here.
Enable/Disable breakpoint
Finally, Selenium IDE provides the disable breakpoint option. Even though you have set some breakpoints earlier, this will ignore the breakpoints and continue execution in an uninterrupted way.
Command Details Section
The command details section allows you to enable/disable selected commands
If your command opens up a new window, you can do the new window configuration option available in the command details section.
Target Section has two options.
- Select the target on the page: The target is your selector, while recording if you have chosen the locator wrongly, you can correct it using the Select the target in page option. You can simply click on the arrow and choose the locator on a webpage.
- Find the Target in page option helps to find the web element of the current command. Clicking on the Search icon in the target option highlights the web element in the browser.
The command details window also provides the option to modify the command value. For example, if you are typing the search keyword Testsigma and you need to modify the value to Selenium, you can do so by using the value option
In the end, it provides the description option, more like writing the comment on the programming, that helps increase the readability of your tests.
Additional Options Available
- You can clear the logs using the Clear Logs option available in the bottom right, which will clear all the logs from the previous execution.
- The Reference section provides a short description of the command that is used. For example, if you are using the click command, clicking on reference provides the purpose of the click command and its syntax with argument details.
- The top left drop-down provides an option to choose between tests, test suites, and executing tests, which will filter out tests accordingly. In addition, clicking on plus (+) symbol creates new Tests or Test suites based on what you have selected from the dropdown.
Adding Assertions
Interestingly, the Selenium IDE also provides options to assert. Assertion is very important in marking the test as pass or fail.
While recording the test, you can simply right-click on the browser. In the end, you can see the Selenium IDE menu.
Select the Selenium IDE menu > Click on Assert > Choose from various available assertions.
Once you select the assertion from the UI, the assert will be added as a command in your Selenium IDE.
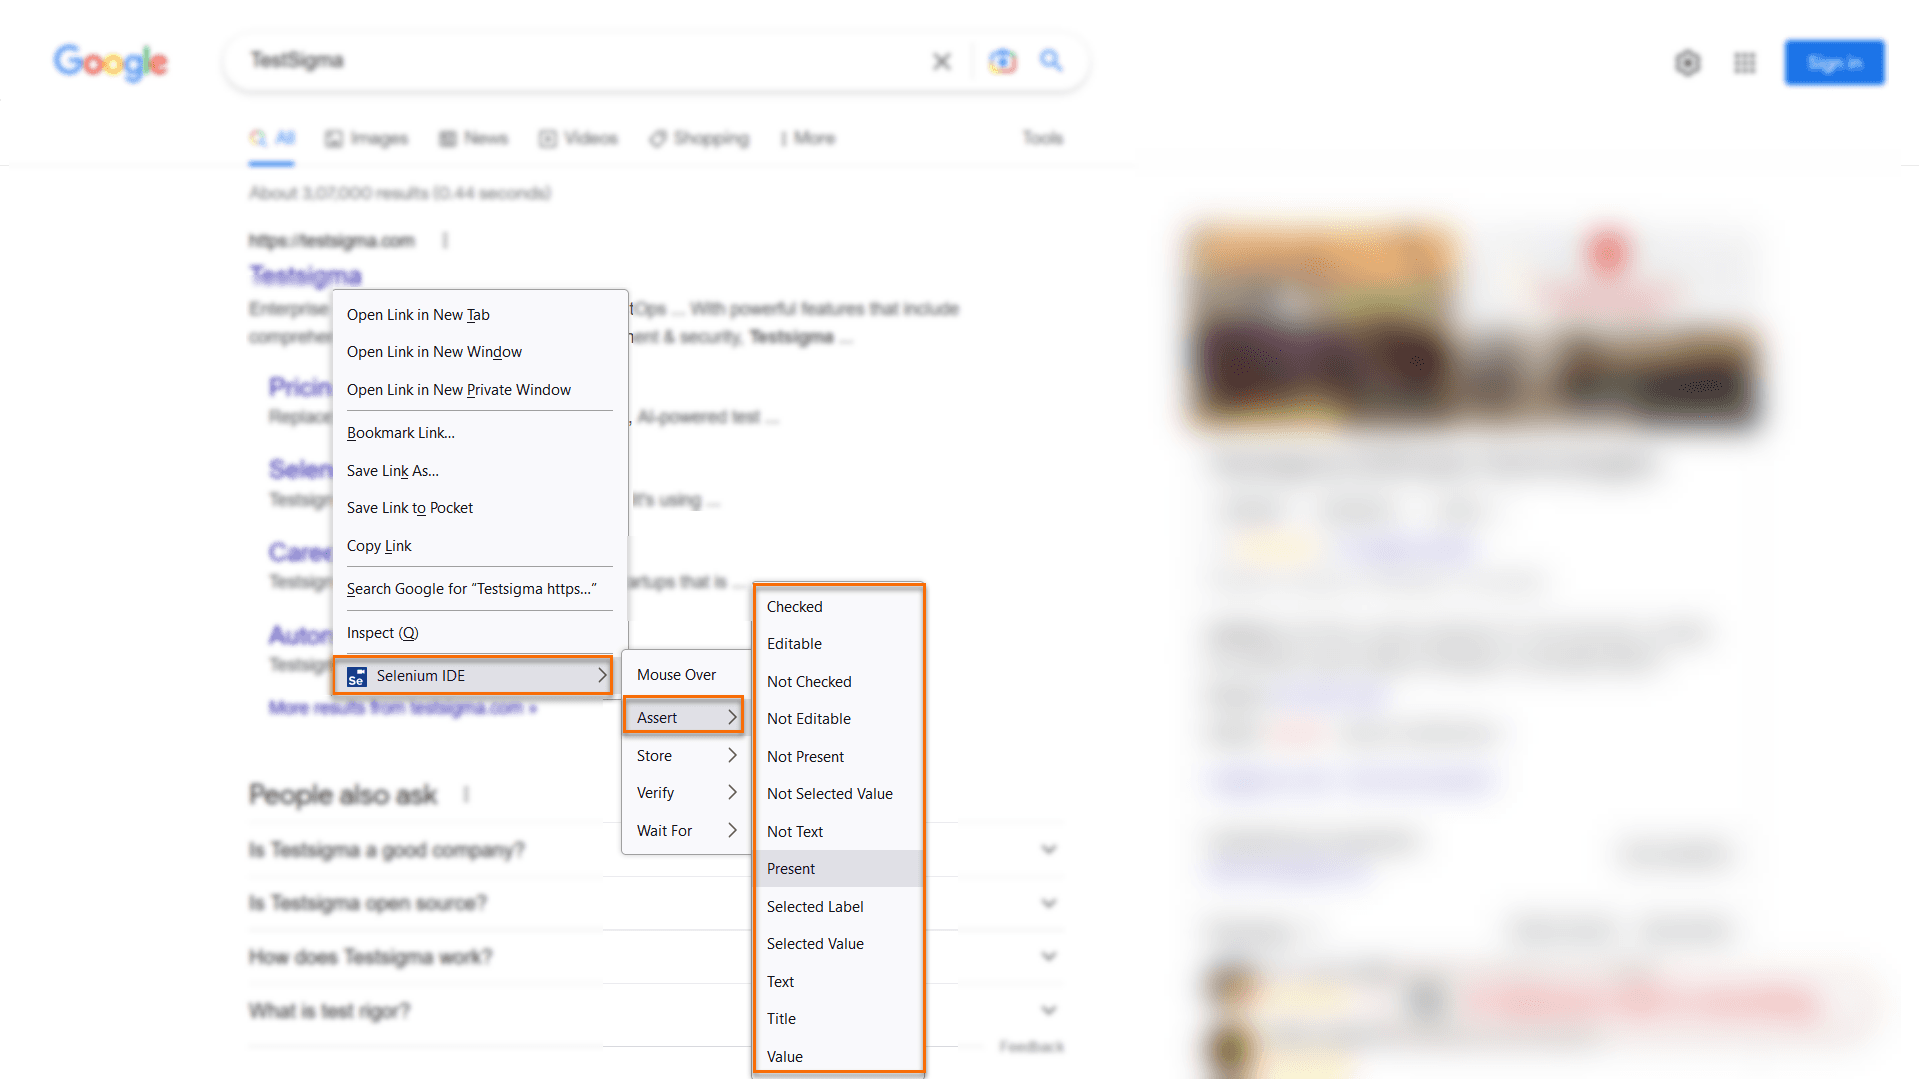
Similar way, you can use other options like Mouse over, Verify, WaitFor and Store.
- Mouse over: If your test case needs to mouse over a specific element, use this option.
- Verify: Verify helps to make the soft assert, where your test will verify the element. Even if verification fails, test continues to execute and fails the test after completion. Whereas the assertion terminates the test execution.
- WaitFor: The waitFor waits for Element visibility, presence or editable, etc, before performing the next actions.
- Store: The store option helps store the text, value, or title in a variable and use it in subsequent steps.
Convert Selenium IDE Command to Any Programming Language Automation Test
One of the advanced features of Selenium IDE is that you can convert the Recorded test into C#, Java, JavaScript, Python or Ruby test cases, just by clicking the export option.
- Click 3 vertical dots, next to the test name
- Click on Export
- Choose the Programming languages you wish
- Click on Export and save it in the specific directory
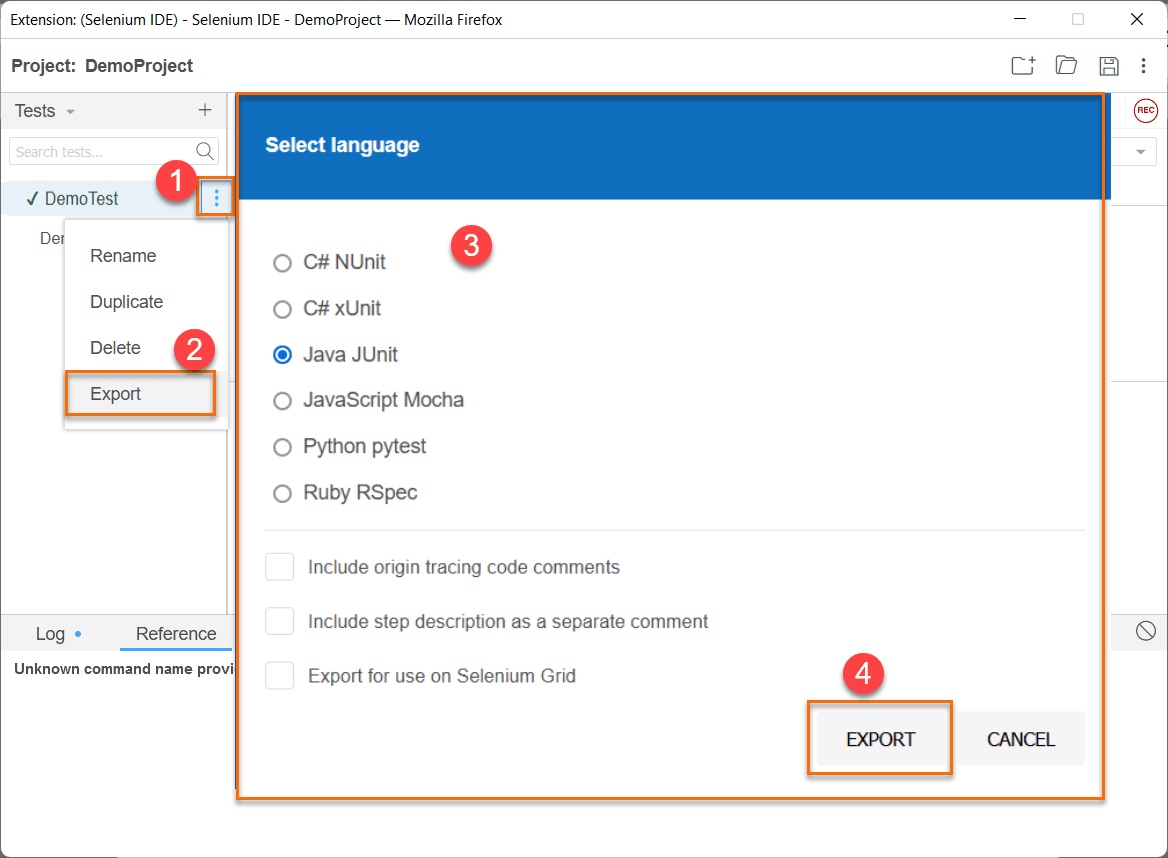
Your recorded test case is available in your favorite programming language/framework.
7 Selenium IDE Tips
Selenium IDE simplifies creating automated web tests. But how can you unlock its full potential? , Here are 7 tips to streamline your testing process and become a Selenium IDE pro:
- Essential Selenium Commands: While memorizing every command is unrealistic, familiarize yourself with the most frequently used ones. This saves time and reduces errors.
Explore the built-in command editor to manage recorded scripts, add assertions for verification, and incorporate loops and conditional statements for complex tests.
Common Commands:
- Action Commands: Open a website (open), enter text (type), click a button (click), wait for elements (pause, waitForText), switch windows (selectWindow).
- Accessor Commands: Generate random numbers and store them (store), view variable values for debugging (echo), retrieve text from elements (storeText).
- Assertion Commands: Verify element text matches a pattern (verifyText), count elements based on XPath (storeXpathCount).
- String Manipulation with JavaScript: Selenium IDE integrates with JavaScript, allowing you to leverage its string-handling functions for increased flexibility.
Explore functionalities like:
- Substring: Extract specific parts of strings (e.g., extracting a name from a full sentence).
- Replace: Modify text within strings (e.g., replacing a username).
- Split: Convert strings into arrays based on delimiters (e.g., separating email addresses).
- Concat: Combine multiple strings.
- Trim: Remove leading and trailing spaces.
- Xpath Mastery: XPath is a powerful tool for identifying web elements within HTML structures. Mastering XPath syntax unlocks the ability to target almost any element on a webpage. Here’s a breakdown of the basic syntax:
XPath=//tagname[@attribute=’value’]
- //: Selects the current node.
- tagname: The HTML tag of the element (e.g., div, input).
- @attribute: The attribute name of the element (e.g., id, class).
- value: The specific value of the attribute.
Examples:
- Xpath=//a[@href=’https://www.google.com/’] (Selects a link to Google).
- Xpath=//*[@id=’surname’] (Selects any element with an ID of “surname”).
- Xpath=//input[@type=’email’ and @name=’first_email’] (Selects an input of type “email” named “first_email”).
Leveraging XPath effectively requires practice. To hone your skills, consider using online resources like “https://www.w3schools.com/xml/xpath_intro.asp” (W3Schools XPath Tutorial) or “https://www. [invalid URL removed]” (XPath Examples).
- Unlock the Power of Parallel Testing: Parallel testing allows you to execute the same tests concurrently across different environments, saving significant time. This is particularly beneficial when testing across various browsers and operating systems. However, for effective parallel testing:
- Utilize Selenium Grid: Running parallel tests on a local machine can be cumbersome. Selenium Grid enables you to distribute tests across multiple machines for optimal performance.
- Avoid Hardcoded Values: Hardcoded data within tests makes them less reusable and harder to maintain. Use data from external sources or environment variables instead.
- Plan for Independent Test Cases: Dependent test cases can hinder parallelization. Strive for modularity and independence in your test design.
- Leverage CSV Data: Integrate external datasets in CSV format to avoid hardcoding data within your test scripts. This promotes test independence and simplifies test case management. Read CSV data using commands like csvReadArray and access data using ${importedCsv[row][column]}.
- Sharpen Your Skills with Practice Websites: Solidify your XPath and string manipulation skills by tackling diverse test scenarios.
http://www.freeformatter.com/xpath-tester.html
Also, browser extensions like XPath Helper (Firefox) or XPath Finder (Chrome) can help generate XPaths for elements.
- Expand Your Toolkit with Plugins: Selenium IDE is a browser extension for test automation. Its potential grows exponentially through supplementary extensions. It stands out for its interoperability, allowing seamless communication with other plugins via the WebExtension standard.
By exploring compatible plugins in browser marketplaces, users can unlock a realm of possibilities and augment Selenium IDE’s functionality dynamically.
Users can use the Selenium IDE API to orchestrate refined operations, propelling their testing endeavors to new heights.
Best Practices for Selenium IDE
- Keep Test Cases Simple: Divide your test scenarios into smaller, manageable test cases. Each test case should focus on testing one specific functionality or feature.
- Use Descriptive Names: Name your test cases and test suites descriptively and meaningfully. This makes it easier to understand each test’s purpose and identify it in the test suite.
- Use Assertions Wisely: Assertions are crucial for verifying expected outcomes. Use them to validate that the application behaves as expected. Yet, refrain from using too many assertions, as they can make your tests brittle and harder to maintain.
- Parameterize Test Data: If your test cases require different input data, parameterize them to make your tests more flexible and reusable. Use variables or data sources to input data into your test cases dynamically.
- Use Wait Commands: Incorporate explicit waits in your test cases to ensure that the page elements are fully loaded before interacting with them. This helps avoid flakiness in your tests due to timing issues.
- Modularize Test Cases: Break down complex test cases into smaller, reusable components called “test case modules.” This promotes code reusability and makes your test suite easier to maintain.
- Organize Test Suites: Group related test cases into test suites based on common functionalities or features. This helps you organize and manage your test suite better.
- Regularly Review and Refactor: Periodically review your test cases and suites to identify any redundancies or areas for improvement. Refactor your tests to keep them clean, concise, and maintainable.
- Use Version Control: Store your Selenium IDE test projects in a version control system (e.g., Git). This allows you to track changes, collaborate with team members, and revert to previous versions if needed.
- Document Your Tests: Provide clear and concise documentation for your test cases and test suites. Include information such as test purpose, preconditions, steps, expected outcomes, and other relevant details.
- Integrate with CI/CD Pipelines: Integrate Selenium IDE tests into your Continuous Integration/Continuous Deployment (CI/CD) pipelines to automate test execution and ensure that tests are run consistently as part of the development process.
Role of Cloud-Testing Platforms in Running Selenium IDE Test Cases
Cloud testing platforms are essential for running Selenium IDE test cases, especially when you need scalability, parallel execution, and testing across different environments and devices. Here’s how they help:
- Scalability: They give you access to a large pool of resources to scale your testing infrastructure based on your needs. This means you can simultaneously run your Selenium IDE tests on multiple browsers, operating systems, and devices without managing physical hardware.
- Parallel Execution: These platforms allow your test cases to run simultaneously across multiple virtual machines or containers. This reduces execution time because different tests can happen simultaneously on different setups.
- Cross-Browser and Cross-Platform Testing: You can execute your Selenium IDE tests across various browsers and platforms. This ensures your web applications work well regardless of where they’re accessed.
- Geographical Distribution: You can run tests from different locations around the world. This helps ensure your applications perform consistently under various network conditions and in different regions.
- On-Demand Infrastructure: You can access resources as needed without investing in hardware upfront. This makes it easy to set up testing environments quickly and only pay for what you use.
- Integration with CI/CD Pipelines: Many cloud testing platforms work seamlessly with CI/CD pipelines. This means you can automate test execution as part of your development process, ensuring consistency and efficiency with each code change.
- Collaboration and Reporting: These platforms often offer team collaboration and detailed reporting features. This makes it easy for team members to work together on tests, track results, and analyze metrics for improvement.
- Security and Compliance: Cloud testing platforms follow industry-standard security practices and compliance requirements. They ensure your test data is secure and private with features like encryption, access controls, and compliance certifications.
Conclusion
Selenium IDE is useful for beginners and manual testers but needs consistent results and reporting. Testsigma is a codeless alternative with more features and consistent results. It offers detailed test reports, integration with CI/CD, customization of recorded tests, and excellent support.
Happy Exploring!
Frequently Asked Questions
The IDE for Selenium is Selenium IDE, a browser extension for creating automated tests.
Selenium WebDriver is more powerful and flexible for test automation than Selenium IDE.
Selenium IDE is trending in the QA world due to its simplicity, ease of use, and quick test script generation capabilities, especially for beginners and small-scale projects.

