


The XCUI Test Framework is a powerful tool designed for mobile app testing on iOS devices. With a primary focus on automated test scripts, this framework provides a robust and efficient solution for developers to validate the functionality and performance of their iOS applications.
In today’s fast-paced world of mobile applications, timely delivery of high-quality software is paramount to success. As mobile apps are continuously evolving, so are the testing requirements. The XCUI Test Framework plays a critical role in the development process by ensuring the seamless execution of automated test scripts across various iOS devices and versions. It allows developers to identify and rectify bugs, glitches, and performance issues at an early stage of development, saving both time and resources.
Moreover, XCUI provides an extensive set of APIs and libraries, enabling testers to interact with app elements and simulate user interactions accurately. One of the significant advantages of the XCUI Test Framework is its seamless integration with Apple’s Xcode IDE.
Despite the undeniable benefits of the XCUI Test Framework, it’s essential to explore alternatives that may better suit specific testing requirements. Testsigma is one such platform that offers a compelling solution for mobile testing needs. One of the main advantages of using a comprehensive automated testing tool like Testsigma is that it is a complete solution to all your testing needs. Starting from creating requirements, test cases, and test suites to analyzing the reports and integrating with CI/CD, it offers end-to-end solutions.
In this article, let’s explore the XCUI test framework in detail and do a side-by-side comparison of the XCUI tool with a more wholesome tool like Testsigma. Let’s find out the advantages, features, and use cases of both types of tools so that it becomes easier for you to find the right choice for your needs.
Table Of Contents
- 1 What is XCUI Test Framework?
- 2 Testsigma: Cross-Platform Testing on Real Devices in the Cloud!
- 3 Why use XCUI Testing Framework for iOS?
- 4 Why Look for a Better Alternative?
- 5 Why use Testsigma – a Codeless AI-Powered Platform?
- 6 Key Concepts of XCUI Test
- 7 Key Concepts of Testsigma
- 8 An Overview of the XCUITest API
- 9 An Overview of the Testsigma REST API
- 10 Limitations of XCUITest
- 11 Limitations of Testsigma
- 12 Best Practices for XCUITest and Testsigma
- 13 Getting Started with XCUITest
- 14 Getting Started with Testsigma
- 15 Conclusion
- 16 Frequently Asked Questions
What is XCUI Test Framework?
The XCUI Test framework is a testing framework provided by Apple for iOS and macOS app developers. It is used for creating and executing UI (User Interface) tests to ensure the quality and functionality of iOS and macOS applications. XCUI Test is specifically designed to automate the testing of user interactions with the app’s user interface, making it an essential tool for iOS developers to perform end-to-end testing.
It’s worth noting that XCUI Test interacts directly with the app’s user interface, which means it can catch UI-related bugs and verify that the app functions correctly from the end-user perspective. However, since it interacts with the app as a user would, it can be relatively slower than unit tests or other types of testing. Therefore, it’s essential to use a combination of various testing approaches to achieve comprehensive test coverage for your iOS and macOS applications.
Testsigma: Cross-Platform Testing on Real Devices in the Cloud!
Testsigma is an advanced cloud-based test automation platform designed to simplify and streamline the testing process for web and mobile applications. Unlike traditional testing frameworks that require extensive coding, Testsigma employs a codeless approach, allowing testers to create, execute, and maintain tests using a simple and intuitive interface.
With its AI-driven capabilities, Testsigma takes test automation to a new level of efficiency. Testsigma also supports end-to-end testing, catering to cross-platform applications, including web, Android, and iOS, all within a single platform. The power of Testsigma lies in its ability to perform automated tests on a vast range of real devices and operating system combinations in the cloud.
With access to 2000+ real devices, including smartphones and tablets, testers can thoroughly evaluate application performance and compatibility across different hardware configurations without the need for physical devices.
Testsigma’s AI-driven approach further accelerates the test creation and execution process, making it suitable for both technical and non-technical team members. By reducing the complexities associated with traditional test automation, providing unparalleled device coverage, and leveraging AI for smart test maintenance, Testsigma empowers teams to achieve faster test cycles, improved test coverage, and ultimately deliver high-quality applications to end-users.
Also Read: Best Practices for Android UI Testing
Why Use XCUI Testing Framework for IOS?
The XCUI Test framework is a valuable choice for iOS and macOS app developers for several reasons. Here are a few key features of the XCUI Test framework.
- UI Element Interactions: XCUI Test allows you to interact with various UI elements in your app, such as buttons, text fields, tables, and more. You can simulate taps, swipes, scrolls, and other actions that a user might perform.
- Synchronization: The framework handles synchronization with the app being tested, ensuring that the tests wait for the UI elements to appear or change state before interacting with them. This is crucial for creating stable and reliable tests.
- Recording and Playback: XCUI Test supports recording user interactions within the app, which can be replayed later during test execution. This feature simplifies the test creation process, especially for those who are new to writing UI tests.
- Accessibility Testing: The framework encourages developers to write accessible apps. It provides built-in support for accessibility testing, ensuring that the app can be used by people with disabilities.
- Continuous Integration: XCUI Test seamlessly integrates with continuous integration (CI) systems, such as Jenkins or Xcode Server. This enables automated testing as part of the development workflow.
- Screenshots and Videos: XCUI Test allows capturing screenshots and recording videos during test execution. These assets can be helpful for debugging and reporting issues.
- Asynchronous Testing Support: The framework supports asynchronous testing, allowing developers to handle asynchronous tasks like network calls and animations in their tests effectively.
- Simulator and Device Support: XCUI Test works with both the iOS Simulator and physical iOS devices, giving developers the flexibility to choose their testing environment.
- Assertions and Validation: You can use assertions to validate the expected state of UI elements or verify specific interactions. This helps in confirming that the app behaves as intended during testing.
- Easy Test Organization: XCUI Test allows developers to organize their test cases into test suites and separate test classes, making it easier to manage and maintain a large suite of tests.
Why Look for a Better Alternative?
While XCUI Test is a powerful testing framework provided by Apple for iOS and macOS app testing, there are situations where exploring other tools might be beneficial.
- First and foremost, XCUI Test is specifically tailored to Apple’s ecosystem, limiting its usability to iOS and macOS applications.
- For teams working on cross-platform projects or needing to test web applications and Android apps, seeking alternative tools with broader platform support becomes essential.
- Additionally, XCUI Test requires developers to write test scripts in Swift or Objective-C, which might pose challenges for non-technical team members and increase the learning curve.
- For organizations seeking a more codeless and user-friendly approach to test automation, exploring other solutions that offer visual test creation and management can be advantageous.
- Furthermore, while XCUI Test allows testing on iOS Simulators and physical devices, it might lack the flexibility and scalability of cloud-based solutions that offer real device testing on a vast array of hardware configurations.
Considering these factors, exploring alternative tools that align better with specific project requirements and streamline the testing process could lead to more efficient and comprehensive test automation endeavors.
Why Use Testsigma – a Codeless AI-Powered Platform?
Testsigma is a cloud-based test automation platform that offers several advantages over the XCUI Test framework, especially when it comes to complete end-to-end testing needs, including mobile app testing.
Here are some features and aspects where Testsigma stands out:
- Cross-platform Testing: While XCUI Test is specifically designed for iOS and macOS app testing, Testsigma supports cross-platform testing for both web and mobile applications. It allows you to create and manage tests for web applications, Android apps, and iOS apps, making it a versatile choice for teams working on different platforms.
- Codeless Test Automation: Testsigma takes a codeless approach to test automation. This means that you don’t need to write complex code to create and maintain your tests. Instead, you can use a simple natural English and intuitive interface to build test cases using natural language statements. This significantly reduces the learning curve and empowers non-technical team members to participate in the testing process.
- AI-Driven Testing: Testsigma leverages AI and machine learning to speed up test creation and maintenance. It uses the power of AI to automatically detect and update elements in the application’s UI, even when there are changes to the UI structure. This reduces the effort required to keep test scripts up-to-date and ensures faster test execution.
- End-to-End Test Management: Testsigma provides a complete test management solution, allowing you to organize and manage your test cases effectively. It supports test suites, test data management, version control, and integration with CI/CD tools, making it a robust platform for end-to-end test automation.
- Real Device Testing on Cloud: One of the standout features of Testsigma is its cloud-based infrastructure that enables testing on 2000+ real devices and OS combinations. This means you can test your mobile applications on a wide range of real devices without the need to set up and maintain physical devices locally. This feature ensures comprehensive device coverage and helps identify device-specific issues that may not be apparent in emulators or simulators.
- Parallel Test Execution: It allows you to execute tests in parallel, reducing test execution time significantly. This is especially beneficial for large test suites and enables faster feedback on the application’s stability and functionality.
- Integration with Third-Party Tools: Testsigma integrates seamlessly with various third-party tools, including test management systems, CI/CD tools, bug tracking systems, and more. This enhances collaboration between different teams and streamlines the testing process as part of the development workflow.
- Reusable Components: Testsigma promotes reusability through its component-driven testing approach. You can create reusable components, such as test steps or modules, which can be used across multiple test cases. This simplifies test maintenance and improves test scalability.
- Automated Maintenance and Self-healing: With AI-powered capabilities, Testsigma automatically handles maintenance issues caused by UI changes, allowing tests to self-heal and adapt to evolving UIs without manual intervention.
In summary, Testsigma can be a better option for complete end-to-end testing needs, particularly for mobile app testing, due to its cross-platform support, codeless test automation, and AI-driven capabilities. The ability to test on a vast range of real devices and operating system combinations sets Testsigma apart, ensuring thorough coverage of mobile app testing scenarios.
Key Concepts of XCUI Test
XCUI Test is an essential part of Xcode, Apple’s integrated development environment (IDE). XCTest is designed to be user-friendly and intuitive, making it accessible to both beginners and experienced developers.
Here are a few concepts used in the context of the XCUI Test.
- Swift and Objective-C Support: XCUI Test allows developers to write test scripts in Swift or Objective-C, leveraging the same language used for app development. This can be advantageous for teams with experienced iOS/macOS developers as they can use their existing skills for testing.
- Built-in iOS Simulator: XCUI Test includes support for testing on the iOS Simulator, enabling developers to run tests on different iOS device configurations without needing physical devices. This is particularly useful for quick iterations during the development process.
- Test Case: In XCTest, a test case is the basic unit of testing. It is a subclass of XCTestCase and contains individual test methods that validate specific parts of the app’s functionality.
- Assertions: XCTest provides a set of built-in assertions, such as XCTAssertTrue, XCTAssertFalse, XCTAssertEqual, XCTAssertNil, XCTAssertNotNil, etc., to validate expected outcomes in the test cases. These assertions make it easy to check conditions and report test failures.
- Test Suites: Test suites are used to group related test cases together. XCTest allows developers to organize tests into suites, providing a structured way to manage and execute tests.
- Asynchronous Testing: XCTest supports asynchronous testing, which is essential for scenarios involving tasks like network calls or animations. Testers can use XCTestExpectation to manage asynchronous expectations and wait for completion.
- Performance Testing: XCTest includes performance testing capabilities, allowing developers to measure the performance of specific code segments or functions and identify potential bottlenecks.
- Code Coverage Analysis: Xcode integrates with XCTest to provide code coverage analysis, which helps developers understand how much of their codebase is covered by unit tests and identify areas that require more testing.
Key Concepts of Testsigma
Testsigma, as a cloud-based test automation platform, has its own set of key concepts that streamline the test creation, management, and execution process. Here are a few of them:
- Test Steps: Test steps are the building blocks of test cases in Testsigma. Each test case is composed of a sequence of test steps, representing individual actions or validations within the test. Test steps can include interactions with UI elements, API calls, database queries, or any other action required to validate the functionality of the application.
- Test Cases: Test cases in Testsigma represent a collection of test steps that together verify a specific feature or functionality of the application. Test cases are reusable components that can be included in multiple test suites, making it easy to maintain and manage test scenarios efficiently.
- Test Suites: Test suites are used to group related test cases together. They allow testers to organize tests based on different criteria, such as functionality, modules, or priority. Test suites help maintain a structured test organization and facilitate selective test execution.
- Test Plans: Test plans are a collection of test suites, forming a comprehensive test strategy for an application release or testing cycle. Testers can create multiple test plans to cover different aspects of testing, like regression testing, sanity testing, or feature-specific testing. Test plans help manage the test scope and ensure all necessary test scenarios are covered.
- Execution Configurations: Testsigma allows testers to define execution configurations that specify the target environment for test execution. An execution configuration includes details like the browser, device, operating system, and other settings necessary for running tests in specific conditions. This enables testers to execute the same test case across various environments easily.
- Extracting Elements: Testsigma’s “Element Extractor” is a Chrome browser extension that simplifies element extraction for web applications. Testers can use this extension to inspect and capture UI elements, generating unique locators like XPath or CSS selectors for precise element identification during test execution.
- Testsigma Agent: The Testsigma Agent acts as a bridge between the test execution environment and the application being tested. It ensures seamless test execution across various browsers, devices, and operating systems, enabling testers to validate their applications under diverse configurations.
- Test Step Recorder: Testsigma offers a “Test Step Recorder” that empowers testers to record user interactions directly from their browsers. This codeless approach captures actions like clicks, inputs, and selections, automatically creating test steps. It simplifies test creation and is particularly useful for non-technical users.
- Visual Testing: With “Visual Testing,” testers can verify the visual appearance of web applications. Screenshots of web pages are captured during test execution and compared against baseline images. This enables the identification of visual defects, ensuring consistent UI across different executions and devices.
- Addons: Testsigma provides “Addons,” pre-built libraries that extend test automation capabilities. These Addons can integrate with third-party tools, handle specific test scenarios, or enhance Testsigma’s functionalities, offering greater flexibility and extensibility.
- Testsigma SDK: The “Testsigma SDK” (Software Development Kit) allows testers to extend test automation beyond web applications. With the SDK, custom libraries can be created to interact with mobile applications, APIs, databases, and more, facilitating end-to-end testing across various platforms and technologies.
- App Uploads: For mobile app testing, “App Uploads” allows testers to upload and test Android and iOS apps directly on the cloud-based infrastructure. This feature enables efficient testing on a wide range of real devices and operating system combinations.
- REST APIs: Testsigma supports “REST APIs,” enabling seamless integration with other tools and systems. Testers can use REST APIs to trigger test execution, manage test data, and interact with Testsigma’s test management functionalities, enhancing automation workflows and integration possibilities.
These features collectively empower testers to create robust and efficient automated tests for web and mobile applications, enabling comprehensive testing and ensuring high-quality software releases.
An Overview of the XCUITest API
XCUITest API provides various functions, classes, and endpoints to interact with UI elements, perform actions, and validate the app’s behavior during testing. Below is an overview of some essential functions and endpoints available in XCUITest API with Swift code examples:
Xcuiapplication
The XCUIApplication class represents the entire iOS application and is the starting point for test automation.
<styled-code>
let app = XCUIApplication()
app.launch()
</styled-code>
Xcuielement
The XCUIElement class represents individual UI elements in the app, such as buttons, text fields, and labels.
<styled-code>
let button = app.buttons["LoginButton"]
button.tap()
</styled-code>
Xcuielementquery
XCUIElementQuery represents a collection of elements with specific attributes and hierarchies. It is used to find and interact with multiple UI elements that match certain criteria.
<styled-code>
let tables = app.tables
let cell = tables.cells.containing(.staticText, identifier: "Settings").element
cell.tap()
<styled-code>
Actions
XCUITest API provides various actions to interact with UI elements, such as taps, swipes, scrolls, and entering text into text fields.
<styled-code>
let textField = app.textFields["Username"]
textField.tap()
textField.typeText("user@example.com")
</styled-code>
Expectations
XCUITest supports asynchronous testing with XCTestExpectation, used to handle scenarios where actions may take time to complete.
<styled-code>
let saveButton = app.buttons["Save"]
saveButton.tap()
let saveExpectation = expectation(for: NSPredicate(format: "exists == true"), evaluatedWith: saveButton, handler: nil)
wait(for: [saveExpectation], timeout: 5)
</styled-code>
Assertions
XCTest provides various built-in assertions to validate expected states or conditions during test execution.
<styled-code>
let successLabel = app.staticTexts["SuccessLabel"]
XCTAssertTrue(successLabel.exists)
XCTAssertEqual(successLabel.label, "Login Successful")
</styled-code>
Screenshots and Attachments
XCUITest allows capturing screenshots and attaching files to test reports for better debugging and reporting.
<styled-code>
let screenshot = XCUIScreen.main.screenshot()
let attachment = XCTAttachment(screenshot: screenshot)
attachment.name = "Login_Screenshot"
XCTContext.runActivity(named: "Login Screen Screenshot") { activity in
    activity.add(attachment)
}
</styled-code>
Xcuiremote
XCUIRemote is a class that allows you to simulate remote control events during UI testing. With XCUIRemote, you can trigger actions like pressing physical buttons (e.g., volume up/down, home button) on the iOS device or simulator. This is helpful for testing app behavior in response to external events.
<styled-code>
let remote = XCUIRemote.shared()
remote.press(.volumeUp)
</styled-code>
Xcuidevice
XCUIDevice is a class that provides access to various device-related functionalities during UI testing. You can use XCUIDevice to simulate device orientation changes, adjust volume, and retrieve device information like battery level, current orientation, etc. This class is especially useful for testing scenarios that involve device-specific behaviors.
<styled-code>
let device = XCUIDevice.shared()
device.orientation = .landscapeLeft
</styled-code>
These are some of the key functions and endpoints in XCUITest API used for writing UI tests for iOS applications. Developers can use these functions in Swift or Objective-C to interact with UI elements, perform actions, and validate the app’s behavior during automated testing. The code examples provided demonstrate how to use XCUITest API to perform common testing tasks such as tapping buttons, interacting with text fields, and validating UI element states.
An Overview of the Testsigma REST API
The Testsigma REST API allows users to interact programmatically with the Testsigma platform, enabling seamless integration with other tools and systems. It provides various endpoints for managing projects, test suites, test cases, test executions, and more.
Here’s an overview of some essential endpoints, along with request-response examples in JSON format:
Authentication Endpoint
- Endpoint: https://api.testsigma.com/auth/token
- Description: Obtain an access token for authentication.
- Request:
<styled-code>
POST /auth/token
Content-Type: application/json

{
    "email": "your_email@example.com",
    "password": "your_password"
}
</styled-code>- Response:
<styled-code>
HTTP/1.1 200 OK
Content-Type: application/json

{
    "token": "your_access_token",
    "expires_in": 3600
}
</styled-code>
Projects Endpoint
- Endpoint: https://api.testsigma.com/v1/projects
- Description: Get the list of projects in the user’s account.
- Request:
<styled-code>
GET /v1/projects
Authorization: Bearer your_access_token
</styled-code>- Response:
<styled-code>
HTTP/1.1 200 OK
Content-Type: application/json

{
    "projects": [
        {
            "id": "project_id_1",
            "name": "Project 1",
            "description": "Description of Project 1"
        },
        {
            "id": "project_id_2",
            "name": "Project 2",
            "description": "Description of Project 2"
        }
    ]
}
</styled-code>
Test Suites Endpoint
- Endpoint: https://api.testsigma.com/v1/projects/{project_id}/testsuites
- Description: Get the list of test suites in a specific project.
- Request:
<styled-code>
GET /v1/projects/project_id_1/testsuites
Authorization: Bearer your_access_token
</styled-code>- Response:
<styled-code>
HTTP/1.1 200 OK
Content-Type: application/json

{
    "testsuites": [
        {
            "id": "testsuite_id_1",
            "name": "Test Suite 1",
            "description": "Description of Test Suite 1"
        },
        {
            "id": "testsuite_id_2",
            "name": "Test Suite 2",
            "description": "Description of Test Suite 2"
        }
    ]
}
</styled-code>
Test Cases Endpoint
- Endpoint: https://api.testsigma.com/v1/testsuites/{testsuite_id}/testcases
- Description: Get the list of test cases in a specific test suite.
- Request:
<styled-code>
GET /v1/testsuites/testsuite_id_1/testcases
Authorization: Bearer your_access_token
</styled-code>- Response:
<styled-code>
HTTP/1.1 200 OK
Content-Type: application/json

{
    "testcases": [
        {
            "id": "testcase_id_1",
            "name": "Test Case 1",
            "description": "Description of Test Case 1"
        },
        {
            "id": "testcase_id_2",
            "name": "Test Case 2",
            "description": "Description of Test Case 2"
        }
    ]
}
</styled-code>
Test Execution Endpoint
- Endpoint: https://api.testsigma.com/v1/testsuites/{testsuite_id}/execute
- Description: Trigger the execution of a test suite.
- Request:
<styled-code>
POST /v1/testsuites/testsuite_id_1/execute
Authorization: Bearer your_access_token
Content-Type: application/json

{
    "environment": "staging",
    "browsers": ["chrome", "firefox"],
    "platforms": ["Windows 10", "macOS Big Sur"]
}
</styled-code>- Response:
<styled-code>
HTTP/1.1 200 OK
Content-Type: application/json

{
    "execution_id": "execution_id_1",
    "status": "in_progress",
    "queued_at": "2023-08-06T12:00:00Z"
}
<styled-code>
These are just a few examples of the Testsigma REST API endpoints, and there are many more available for managing users, test data, test executions, and more. The API provides extensive capabilities for integrating Testsigma with your existing tools and workflows, allowing you to automate and streamline your testing processes. Check out the comprehensive Testsigma documentation for REST APIs.
Limitations of XCUITest
Here are a few limitations of XCUITest that you must know before adopting it for your needs.
- Platform Limitation: XCUITest is specific to iOS and macOS app testing. It cannot be used for testing Android or other platforms, limiting its scope for cross-platform testing.
- Simulator Performance: It relies on iOS simulators for testing, which might not accurately replicate real device behavior. Simulators may have performance differences and limitations, leading to potential discrepancies in test results.
- Test Execution Speed: XCUITest can be relatively slow when compared to other test automation frameworks like Testsigma. This can be a challenge for large test suites, leading to longer test execution times and slower feedback.
- Complexity in Setting Up: The setup can be complex, especially for beginners or developers new to iOS app testing. It requires a good understanding of the Xcode environment and XCTest framework, making it less accessible for non-developers.
- Limited Test Maintenance: XCUITest can become difficult to maintain as the app’s UI changes. Updates to UI elements might require manual adjustments in test scripts, leading to increased maintenance efforts.
Limitations of Testsigma
While Testsigma is a one-stop solution for all your testing needs, let’s check out a few points that can be a limitation based on your use cases.
- Cloud-Based Dependency: Testsigma is a cloud-based test automation platform, meaning it requires a stable internet connection for test execution. Lack of internet connectivity can hinder test execution and access to test assets.
- Learning Curve: While Testsigma provides codeless test automation, there might still be a learning curve for beginners to understand the platform’s features and functionalities, especially when compared to traditional test automation frameworks.
- Customization Limitations: Testsigma’s codeless approach makes it easier to create and maintain tests, but it might limit advanced customization for experienced developers who prefer more control over test scripts.
- Integration Dependencies: Integrating Testsigma with specific third-party tools might require additional efforts or support from the excellent Testsigma team. Limited integration support with specific tools could be a constraint for some testing environments.
It’s important to note that while both XCUITest and Testsigma have their limitations, they also offer unique strengths and advantages that cater to different testing requirements. Teams should consider their specific testing needs and project requirements when choosing the appropriate test automation tool.
Best Practices for XCUITest and Testsigma
Effective test automation is crucial for ensuring the quality and reliability of software applications. For iOS and Android app testing, XCUITest and Testsigma offer powerful solutions with their respective strengths. To make the most of these tools and achieve efficient test automation, it is essential to follow best practices tailored to each framework. Here are some best practices for XCUITest and Testsigma.
Key Tips and Practices for XCUITest
- Organized Test Structure: Maintain a well-organized test structure with clear naming conventions for test cases, test suites, and test methods. This ensures readability and makes it easier for team members to understand the test suite’s purpose.
- Use Accessibility Identifiers: Prefer using accessibility identifiers for UI element identification instead of relying solely on XPath or CSS selectors. Accessibility identifiers provide a stable and reliable way to locate elements, reducing test flakiness.
- Page Object Model (POM): Implement the Page Object Model design pattern to abstract UI elements and actions into separate classes. POM enhances the maintainability, readability, and reusability of test code.
- Asynchronous Handling: Use XCTestExpectation to handle asynchronous tasks in tests, such as waiting for network requests to complete or animations to finish. Properly handling asynchronous events ensures accurate test results.
- Test Data Management: Keep test data separate from test scripts. Use test data files or data providers to inject different test scenarios, enabling comprehensive test coverage without modifying the test code.
Best Practices for Testsigma
- Effective Element Extraction: Pay attention to element extraction in Testsigma. Use the Chrome Extension to capture UI elements accurately and provide meaningful names and descriptions to improve test readability.
- Modular Test Design: Break down complex test scenarios into smaller, modular test cases. This promotes reusability and simplifies test maintenance.
- Version Control: Utilize version control systems (e.g., Git) to manage test suites and test scripts. This ensures easy collaboration, tracks changes, and helps roll back to previous versions if necessary.
- Codeless Testing for Non-Technical Users: Encourage non-technical team members to participate in test automation using Testsigma’s codeless features. This fosters collaboration and allows domain experts to contribute to the testing process.
- Regular Maintenance: Regularly review and update test scripts as the application evolves. Leverage Testsigma’s AI-powered maintenance capabilities to automatically update test scripts in response to UI changes.
Getting Started with XCUITest
XCUITest is Apple’s official testing framework for iOS and macOS app UI testing. It allows developers to automate interactions with the app’s user interface, ensuring the app functions correctly from a user’s perspective. While due to lots of technicalities involved with XCUITest, the learning curve might be a bit difficult for beginners and non-technical members. However, here’s a step-by-step guide to getting started with XCUITest:
- Set up Xcode: XCUITest is integrated into Xcode, so the first step is to have Xcode installed on your macOS system. You can download Xcode from the Mac App Store or the Apple Developer website.
- Create a New Xcode Project: Open Xcode and create a new project or open an existing project you want to test with XCUITest.
- Add a Test Target: Once you have your project open, add a new test target for UI testing. To do this, go to “File” > “New” > “Target,” and select “iOS UI Testing Bundle” under the “Test” section.
- Write Your First Test: XCUITest test cases are written using Swift or Objective-C. Create a new Swift file in the test target and start writing your test cases. You can access UI elements using accessibility identifiers, and XCTest provides various assertions for validating expected outcomes.
- Set Up Test Configurations: Xcode allows you to run tests on iOS simulators or physical devices. You can choose the target device, iOS version, and other configurations for your test runs.
- Run Tests: Once you have written your test cases, you can run them using Xcode’s test runner. Simply select the test target and click the play button, or use the keyboard shortcut Command + U.
- Analyze Test Results: After running the tests, Xcode will display the test results, indicating whether the tests passed or failed. You can view detailed logs and screenshots to understand test failures and debug issues.
- Continuously Improve: As you write more tests and expand your test suite, regularly review and refactor your test code. Follow best practices like the Page Object Model to improve maintainability and reusability.
By following these steps and exploring XCUITest’s capabilities, you can start building a robust test suite to ensure the quality and reliability of your iOS and macOS applications. Remember to leverage Xcode’s debugging tools and XCTest’s rich features to create effective UI tests.
Getting Started with Testsigma
Testsigma is a cloud-based test automation platform that empowers teams to create and execute automated tests for web and mobile applications without writing code. Here’s a step-by-step guide to getting started with Testsigma:
- Sign Up for Testsigma: Visit the Testsigma website and sign up for a new account. You can choose the free trial or a suitable subscription plan based on your testing needs.
- Create a New Project: Once you have signed up and logged in, create a new project in Testsigma. A project serves as a container for organizing your test assets.
- Install Element Extractor: Testsigma provides a Chrome browser extension called the “Element Extractor.” Install this extension in your Chrome browser to inspect and capture UI elements from your web application.
- Record Test Steps: If you prefer a codeless approach, use the “Test Step Recorder” within Testsigma. This feature allows you to interact with your web application directly from the browser and record test steps without writing any code.
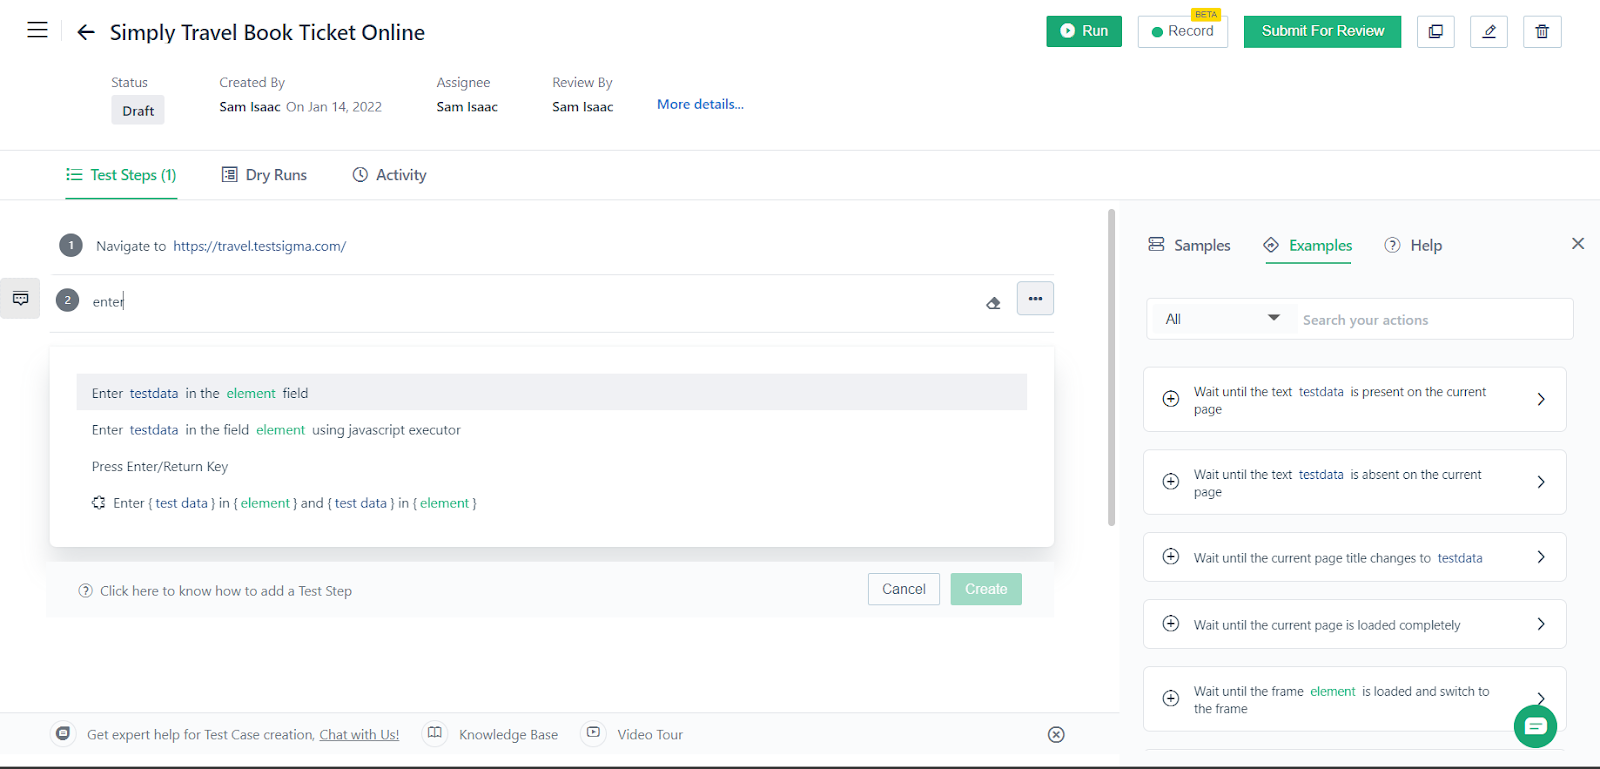
- Create Test Cases: Start creating your test cases using the captured elements or recorded steps. Organize your test cases into logical test suites to ensure a structured and well-maintained test suite.
Let’s take an example where we need to automate the login scenario for Simply Travel Web Application. Here’s the login page that we would be testing – https://travel.testsigma.com/login. The steps would be:
- Navigate to Simply Travel login page(https://travel.testsigma.com/login)
- Enter username as ‘admin’ in the User Name field
- Enter the password as ‘12345’ in the Password field
- Click on the login button
- Set Up Execution Configurations: Define execution configurations specifying the target browsers, devices, operating systems, and other settings for test execution.
- Upload Mobile Apps: For mobile app testing, upload your Android or iOS app to Testsigma. This enables you to test your mobile applications on real devices available in the cloud.
- Run Test Executions: Once your test cases are ready, you can run test executions manually or schedule them for automated execution based on your requirements.
- Analyze Test Results: After test execution, view detailed reports, logs, and screenshots to understand the test results and any potential issues that need attention.
- Integrate with CI/CD: If you use continuous integration or continuous delivery pipelines, integrate Testsigma with your existing CI/CD systems to incorporate test automation seamlessly into your development workflow.
- Collaborate and Iterate: Collaborate with your team members to refine and enhance your test suite continually. Implement best practices and iterate on your tests to maximize coverage and maintainability.
Getting started with Testsigma is straightforward, and its codeless approach enables non-technical team members to actively participate in test automation. By leveraging Testsigma’s features and capabilities, teams can achieve faster and more reliable automated testing for their web and mobile applications.
Conclusion
In this comprehensive article, we explored two powerful test automation solutions: XCUITest and Testsigma. XCUITest, Apple’s official testing framework, allows developers to write UI tests for iOS and macOS applications. With its integration into Xcode and extensive support for iOS simulators and devices, XCUITest empowers developers to validate app functionality from a user’s perspective.
On the other hand, Testsigma provides a cloud-based test automation platform with a codeless approach, enabling both technical and non-technical team members to create and execute automated tests for web and mobile applications. The platform’s Chrome Extension for element extraction, Test Step Recorder, and AI-driven maintenance capabilities simplify test creation and maintenance, ensuring efficiency and scalability in test automation.
Whether it’s native iOS/macOS app testing using XCUITest or web and mobile app testing with Testsigma’s codeless approach, adopting the right test automation strategy and best practices can significantly improve the development workflow, accelerate release cycles, and deliver high-quality software products. By understanding the unique strengths of each tool, teams can make informed decisions and select the ideal solution that aligns with their testing needs and project requirements.
Frequently Asked Questions
Xcode is Apple’s integrated development environment (IDE) used for iOS and macOS app development. It provides tools for coding, debugging, testing, and app distribution. XCUITest is Apple’s official testing framework integrated into Xcode, specifically designed for UI testing of iOS and macOS applications. XCUITest allows developers to write automated tests that interact with the app’s user interface, validating app behavior and functionality from an end-user perspective.
performance tests, and UI tests for iOS and macOS applications. It is the underlying framework that powers XCUITest for UI testing. XCTest provides various APIs and assertions to define test cases, validate test outcomes, and manage test execution. It supports asynchronous testing, allowing developers to handle asynchronous tasks effectively. XCTest is an essential part of Xcode and is used extensively for test-driven development (TDD) and automated testing of Apple’s software products.

