


An application is focused on the perspective of the end-user. We develop, observe and re-iterate as the end-user wants because they are the ones who keep our product, the application, alive in the market. And that is why Android UI testing is critical for every application making its way into smartphones. Before jumping on to the tips and practices of android UI testing, let’s quickly brief ourselves on android UI testing and its types.
Table Of Contents
- 1 What is Android UI Testing?
- 2 Why is Android UI Testing Important?
- 3 Android UI Testing Approaches
- 4 Android UI Testing Automation
- 5 Ways to Perform Android UI Testing
- 6 Role of Real Devices in Android UI Testing
- 7 Technical Tips for UI Testing in Android
- 8 Non-Technical Tips for UI Testing in Android
- 9 Best Practices for Android UI Testing
- 10 Automated Android UI Test Example
- 11 What’s Your Forte?
- 12 Frequently Asked Questions
What is Android UI Testing?
Android UI Testing is the process of testing an Android application for UI issues. Android’s official application store, the Google play store, hosts 2.87 million Android applications on its platform. This number excludes the third-party hostings, which are large in number and are not on the Google play store. Such a staggering number of applications gives our end-user a variety of options on a single type of application.
As a developer, we cannot risk skipping the Android UI testing with such high competition. The main motive of Android UI testing is to check how our application performs when the user interacts with it. Secondly, how our application looks visually to the end-user. Both of these cases are equally important for our application to sustain in the market.
Why is Android UI Testing Important?
Android UI testing plays a critical role in making your application a success among all Android users. It is important for below reasons:
- UI testing ensures that the Android application’s user interface functions as intended and provides a smooth and intuitive user experience.
- It helps identify bugs and issues related to the visual presentation and behavior of the app.
- UI testing ensures that the app’s UI remains consistent across different devices and screen densities by helping uncover layout issues, text truncation, or UI elements.
- It validates the app’s accessibility standards and guidelines by verifying features such as proper labeling, adequate color contrast, screen reader compatibility, and support for assistive technologies.
- Automated UI testing enables organizations to perform consistent tests throughout the development process and facilitates continuous integration and delivery.
Android UI Testing Approaches
1. Through Manual efforts.
2. Through Automated design.
Both of the techniques are used and are important in android UI testing. To compare them, you can have a look at the section ‘Manual and Automated testing, which is better?’ in the mobile testing guide. There are a lot of scenarios that cannot be checked through automation scripts and therefore are better analyzed with manual techniques.
While on the other side, there are some scenarios that want repeated analysis and hence can be very well managed through the automation scripts. This will further be discussed later in the post. In this post, we shall see some of the best practices and tips on android UI testing to help you gain confidence and approach testing an application in the correct way.
Android UI Testing Automation
Automated Android UI testing refers to the process of using specialized testing tools or frameworks to automate user interface testing in Android applications. These tools simulate user interactions with the app’s UI elements and verify that the app behaves as expected.
Some of the top automated UI testing tools that support Android UI automation are as follows,
- Testsigma
- Selenium
- Appium
- XCUITest
- Espresso
Using code-based testing tools like Selenium, Appium, Espresso, and XCUITest requires writing test code to run UI tests. In contrast, you can use a test automation tool like Testsigma to test your app’s UI – without writing code.
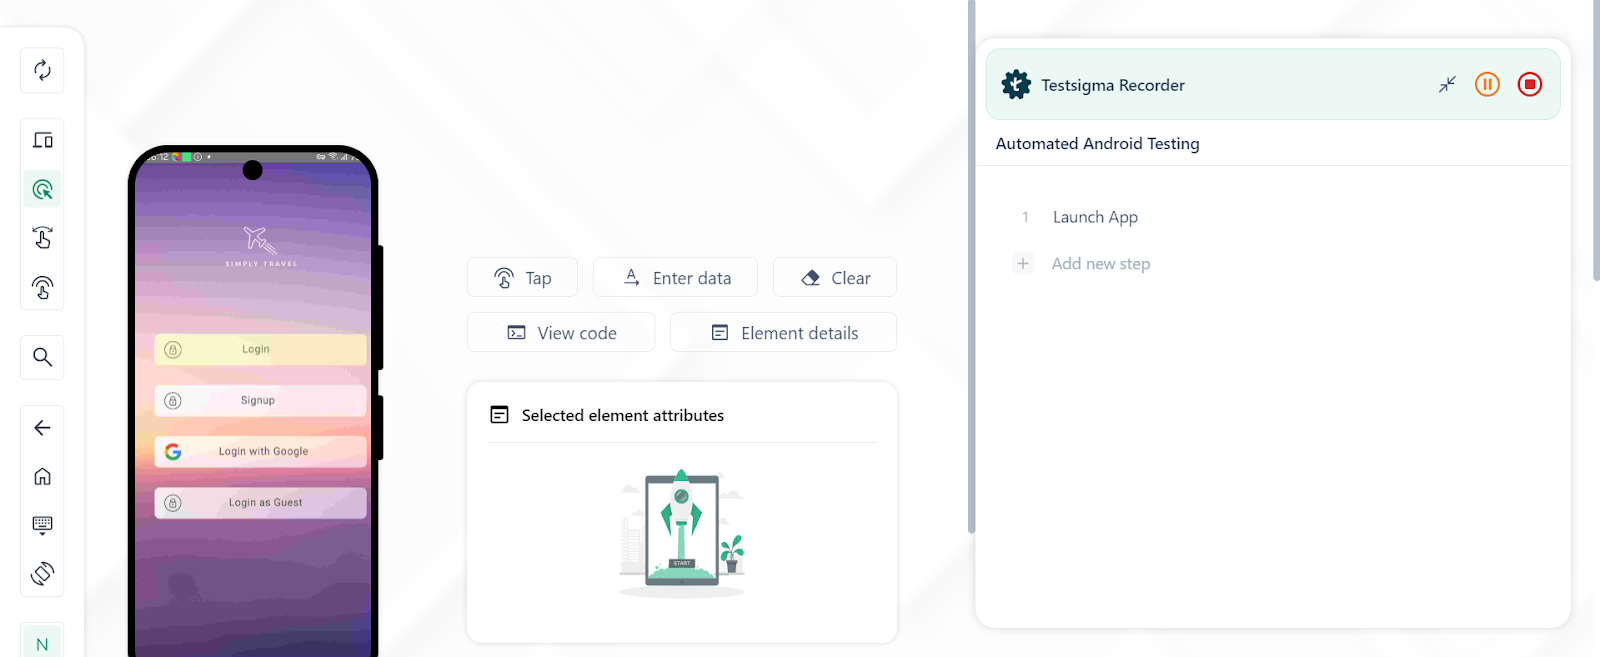
As a low-code testing tool, Testsigma does not require you to write any test code. You can test your UI using NLPs or Recorder, which makes your testing accessible for both technical and non-technical members. It is a cloud-based testing tool, so you don’t have to spend time installing and setting up the tool.
Ways to Perform Android UI Testing
As mentioned above, there are two ways you can perform Android UI testing: manual and automated. Manual testing is time-consuming, error-prone, and requires a high number of resources. You can choose automation testing, which you can perform using the below options:
- Android emulator: It is a software application that allows developers to create and simulate Android devices on their systems. The tool provides an environment that mimics the behavior and functionality of a physical Android device, which developers use to test and debug their applications without requiring a physical device.
- Physical device: This is pretty straightforward. You use a physical device with Android OS to test the application. It is helpful when you want to validate the app in different environments and access real-life user experience.
- Real device cloud: It is similar to the physical device with only one difference that it allows testers to widen their test coverage. It is a cloud-based platform that provides a collection of physical devices for testing and debugging software applications.
Role of Real Devices in Android UI Testing
Real devices play a crucial role in Android UI testing as they provide accurate test results. How? That is because real devices accurately represent the variety of hardware and software configurations that end-users may have. This helps ensure the app behaves as expected across different devices, screen sizes, resolutions, browsers, and platforms.
Testsigma is a test automation platform that provides a real device cloud for running Android and iOS tests. It supports a wide variety of devices from Samsung to Apple for UI testing. It also integrates with popular CI/CD tools, bug tracking, product management, and collaboration tools to ensure efficient and accurate testing at scale.
Technical Tips for UI Testing in Android
This section focuses on the technical methods of Android UI testing. The technical tips are more focussed on the testers and the professionals who are involved in Android app development and testing.
For a more detailed study on mobile testing, check the guide here:
1. Test on Real Devices
The first thing to understand in UI testing is that the device has a lot to do with the visual appearance of the application. You may use an emulator for testing but when an android application is opened on a real device, there are a few hidden challenges. It is always advisable to use the real device for android UI testing and explore all the challenges before an end-user does.
But this does not mean you need to purchase or rent physical android devices for testing. There are online services available that can provide a cloud platform to the tester and on the other end uses actual android devices for testing. This is the best and most feasible option considering the variations in android mobile devices today.
One such tool is Testsigma. Testsigma offers actual android devices for the testers to run their tests and analyze any UI failures, visual problems or problems in execution. With a lot of integrations built into the system, the tester can perform a variety of functions in a single place, starting at no cost to the new users.
2. Never Ignore Manual Testing
The manual testing method is sometimes perceived as a method requiring lower capabilities, demanding higher time and too much effort. Automation seems to be a winner a lot of the times when asked between manual and itself. In my personal experience, there is no replacement for manual testing but just for repeated tasks done through manual work.
For example, I can perform some tests today but then again after fifteen days a newer version will come. Then again the same process repeats. When repeated tasks are assigned to humans, they are certainly prone to errors but there are a lot of things in manual testing that is hard to replace. For example, no automation script can mimic an end-user’s behaviour.
Actually, no machine can. Therefore, for android UI testing, do not consider going straight ahead to the automation. Create certain test cases, for both the techniques and divide them among the team members with specific goals. Analyze the reports and always pay attention to the manual test ones.
3. Consider Frameworks in Android UI Testing
Frameworks are extremely useful while performing android UI testing. Frameworks provide a structure in themselves that satisfy a majority of the needs of a developer and a tester. These frameworks are required to apply some logic to the program before passing it to the back-end system for processing. A skilled android app development company would typically integrate the right framework early in the development cycle to streamline testing later.
Frameworks such as Rails for Ruby or Django for Python provide in-built functionalities that can be easily used for the automation of applications. These functionalities are also editable and the only requirement left is to write the logic and leave the communication part to the framework.
On my first project in Django, I did not touch the framework code and the full web application was running smoothly. They were provided with the basic code which is what a framework is for.
In android UI testing too, we should follow the same approach. Frameworks in android UI testing will provide you with a structure that has pre-defined functionalities and the logic part is left for us. One such framework for android UI testing is Espresso.

This 8-year-old framework is a popular choice among the testers and can automatically synchronize test actions with the user interface. Espresso ensures that the UI tests are run after the activity has started. There are a lot of such functionalities and a lot of other frameworks for automated android UI testing. As for espresso, you can check out the
Although espresso has been there and is quite efficient, it does require you to know coding. While there are now solutions that don’t require you to know code. One such solution is Testsigma that lets you automate your Android UI testing in simple English and with the same efficiency.
If you are wondering, if you should implement automated testing to your project or not, then this is an article that you should check out: 8 signs you need to implement mobile test automation
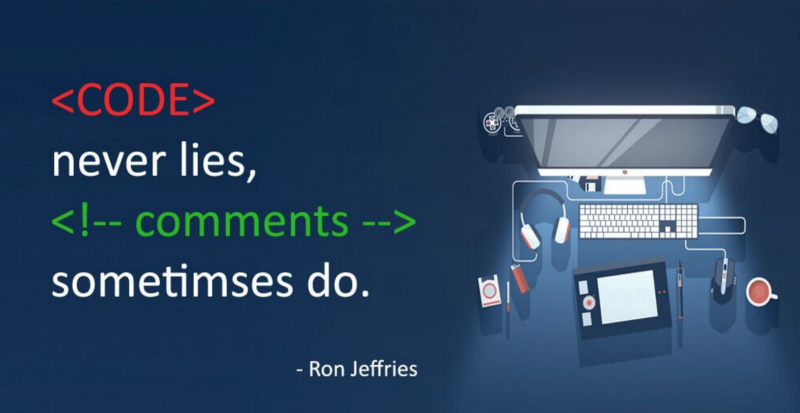
4. Avoid Comments
Recently while reading the book “Clean Code” by Robert Martin, I encountered a chapter called “Comments” which focuses on why comments should be limited to a minimum. Being a great programmer himself, Robert argues that if a programmer needs to write the comments on functions and other code, it indicates his code is not clear enough.
This has been a standard strategy in development and testing. The need for comment should not arise if the function speaks for itself. For example, in a library management system, a function date(int book) is more explicit or dateOfBookIssue(int issuedBookISBN)?
Such practice not only improves your android UI tests for other teammates but also improves you professionally as a tester. Avoiding comments also means you will be forced to write simpler tests or converting complex test to simpler ones.
This ability always proves helpful professionally. Although you do not need to go towards a zero comment policy. Sometimes, a comment is a necessity. But always remember that it should only be used when it is extremely necessary for the test code you are writing.
5. Tests Should Not Be Dependent
Dependency on tests has been an issue for the argument for some time now. Some of the testers say that they need to test complex dependencies among the modules which results in complex test cases. While others neglect this fact. In my honest opinion, dependency hardly brings anything beneficial to the table.
There are many discrepancies while dealing with the dependent tests in android UI testing. Your test cases may fail as a result of the failure of another test case which will abruptly stop everything. Moreover, dependent tests are hard to read. You will find a dependency and then move to the test to understand it.
Then you might find another dependency and then again shift your focus to a third test. This is a bad practice in testing as well as development.
Therefore, the important thing to understand is, independent tests (UI or unit) are easy to maintain and are readable in general. As a part of the Android UI testing team, your test coverage and efficiency will get a boost through the independent tests. If a need arises for dependency, prefer annotations such as @Before to initiate the before method logic.
6. Perform Usability Testing
Usability testing is the process of testing your application with real end-users. The best part of usability testing is that since the product is for the end-user, you will get an honest opinion out of it.
The problem with a tester is that we are inclined to thinking technically about a problem and the challenges. An end-user is different. A lot of the times I show my project to my non-technical friends and they say things like, “It would be better if a modal popped up rather than another page.”
The end-user can point out some snafus that a technical person cannot. Moreover, the android application is for their usage so their opinion is of the top priority. Usability testing is becoming a lot popular with people being paid to test the application.
Some companies record user’s movements while some record the video with the user always speaking. There are a lot of ways to implement usability testing. But whatever you choose, remember never to skip usability testing from your android UI testing process.
7. Include Data-Driven Tests
Data-driven tests feed a large list of data into the test script and perform the tests, again and again, with different data. What started as a tiresome manual process, has now leveraged the power of automation today. Data-driven tests can point out various bugs through automation faster and without any manual efforts.
Just by passing different types of data to the same script, the same script can be used to execute multiple scenarios. Thus, data-driven tests help achieve better test coverage with a minimum number of scripts. Also, because these are automated, these tests can be while having lunch and results can be reviewed later on!
Data-driven tests also enhance the reusability factor when we are testing for the user interface in our android application. Since we have the volume of data at our disposal in an Excel or CSV or any other file, we can run the same tests with the same data again after the next release.
If any type of functional changes is done by the development team, we can run the same tests again with just a few clicks (given that the constraints are the same). Data-driven tests prove helpful in upgrading the quality of the user interface. Covering all the points in this post will deviate us from the theme. If you are interested to learn more, you can visit the post about the “benefits of data-driven testing”.
8. Avoid 100% OS coverage
Before we start the android UI testing on our application, we declare some target devices. With target devices, we convey that our application is built for these devices and is consistent on all of them.
Once we are done with that, we need to be assured that our application’s user interface is consistent and works as intended on all the target devices. But do we need to check this on every operating system?
Sure, testing for cross-browser compatibility issues requires extensive testing on a number of browser-OS combinations. While the usability and functionality would remain the same, a tester still needs to test the application in search of some elements that may not be appearing properly in a few devices.
Moreover, resolution plays a greater role when the application is rendered on different devices. Sometimes, elements get disorganised and sometimes they’re just out of the ratio. These parameters require us to take devices and test our application.
If a colour is important on the website, consistency in colour will also have to be checked across various manufacturers. So, a device with a 6.1-inch screen, manufactured by Samsung and running Android 10 will be equal to another such device manufactured by Samsung no matter what their names are. Taking care of these points reduces our device list to considerably low and increases the efficiency of android UI testing.
9. Group Test Scenarios Logically
While performing android UI testing on an android mobile application, you will assemble a lot of the test cases to test the quality and point out bugs in the software. The problem is that if those tests are spread sporadically, it is not only hard to recognize the severity, it will affect all the further tests and overall coverage. Grouping the test helps a lot in such scenarios.
When we group the tests logically, we have an idea about the progress we are making and can move ahead step by step. These organised tests also help in increasing the efficiency of Android UI testing.
A common example of grouping can be to group the smoke tests in a single place. Now smoke tests are of high relevance and even though you pass some minor tests, smoke tests still need to be considered. So, rather than finding out each test manually and checking if all the smoke tests passed, you can group them and run them all together.
Similarly, you can have regression tests at a single place and whenever there is a revision, you just need to run that group on the android application.
Non-Technical Tips for UI Testing in Android
This section is focussed on the non-technical tips for Android UI testing. The non-technical tips include tips that are not related to “testing” as people think but more towards improving the software by practising a few habits. From this point, we shall see how we can enhance our efficiency by practising some additional non-technical and professional skills.
10. Log Test Information
The first thing to consider here is the logging. Logging saves a lot of time in every domain. What went wrong that failed my CI/CD pipeline? Why is my local testing tunnel not working?
Such questions can easily be found through logs. Logs are like notes of everything that is happening during the testing. For example, which of my status codes were not 200, if they weren’t then what were they? It is easier to then find out the reason for failure and helps in quick refix.
Logs also provide good information to us for the reports and future. For example, to know the time of response from some server for my page in the android application. I can report the time and when another version is released; these metrics can be compared to new metrics to judge the performance.
11. Do Not Forget Multitasking (Multiple applications appearing in the UI at once)
Multi-tasking has become an important feature of mobile applications especially since big-screen phones have entered the market. Multi-tasking lets the user operate two applications simultaneously on the same screen; either through the horizontal division or through vertical division.
But multitasking plays an important role in the user interface testing of android applications. With such a fragile arrangement, the static/fixed elements tend to displace from their position.
If you are making an application with the feature of appearing somewhere on the screen while another application is open; then you need to ensure that there is no impact on the UI of your application and any other application.
A typical scenario is when a user is supposed to type, but the keyboard does not appear. Or, the keyboard occurs but it goes over and beyond the element where the text was supposed to be typed. Such bugs eventually render the application useless and lead to users feeling frustrated.
12. Check For File Upload/Download
File uploading and downloading is a very frequent action that happens through a user on an application. While the fetching happens at the backend server, it is important to confirm at the user level. The file should not only get uploaded/downloaded properly, but the user interface should also be able to redirect the user about the actions.
For example, let say you are uploading an image through an android application, having an update button might initiate the uploading process but if there is no indication of the progress – the user might start pressing the button again and again thinking that the upload has not started. Some of them might also abandon the website.
The user interface testing is an important step in determining whether the downloading and uploading is happening as it should and our user has something to be engaged on. A progress bar is a good choice for bigger files or a loader works fine too.
Once the upload/download is complete, ensure that the user is redirected correctly to an engaging page which can help you increase the session time. Redirection to a normal “Download Complete” page can make the user abandon the application.
13. Always maintain a report
A report is a summarization of your findings in a clear, elegant and concise manner. When you are done performing the android UI testing and it’s time to analyze the verification of tests, going test by test takes a lot of time and effort.
In some tools like Testsigma, we can construct a report from the software and can email our teammates and colleagues for a quick look. Reports are also easy to carry around rather than writing the results manually.
Before writing the reports, keep in mind that not all things are necessary and there are certain practices that should be followed to generate a better report. To know more on this topic, visit How to write a good report?
14. Always maintain screenshots
The last tip I have for you is a rather predictable one and sooner or later, like me, you will also realize how important screenshots are in UI testing. When we perform android UI testing, we are more inclined towards the visual aspect of the application.
If my element is aligned right out of the screen, I can never explain this to my teammates without visual evidence. Even if I do, they would want to see how bad it is or what went wrong etc. Running the UI tests again and again just to show something repeatedly is a waste of time and resources. A better way is to take screenshots.
Screenshots provide visual evidence of the problem we are facing in the android application. So anytime or any number of times I want to see the bug, I just need to open an image and it is easy to share with the team. Screenshots are also very helpful for the future as we can recall the bug through the image very quickly.
The best way is to maintain folders of the project and put screenshots in the folder so that not only you, anyone else can also understand and view logs, reports and screenshots within seconds. Apart from this, a smart way is to choose a tool for testing the android application that can capture screenshots and save them to your account for you.
Tools like Testsigma can take off your load of the screenshot and video recording management and provide configurable options to capture the screenshots and share them with your team from within the software.
Best Practices for Android UI Testing
Like any other testing process, Android UI testing as well can be challenging. Following the below listed best practices are sure to help you perform the testing tasks better with great results:
- Create a comprehensive test plan with all the necessary test cases, scenarios, test data, tools, and the testing approach.
- Within the same test plan, mention the test coverage and code coverage goals.
- Make sure to adopt automation for tests and the right tools to simulate real-life user conditions.
- Take and save screenshots or videos for better understanding and debugging of the issues.
- Integrate with CI/CD tools to run your tests automatically.
Automated Android UI Test Example
A quick demo of how to create and run automated UI tests using Testsigma,
Step 1 – Sign in to Testsigma and create a new project using Create New – Project.

Step 2 – Then click Create test case and start creating test cases using NLPs or Recorder.
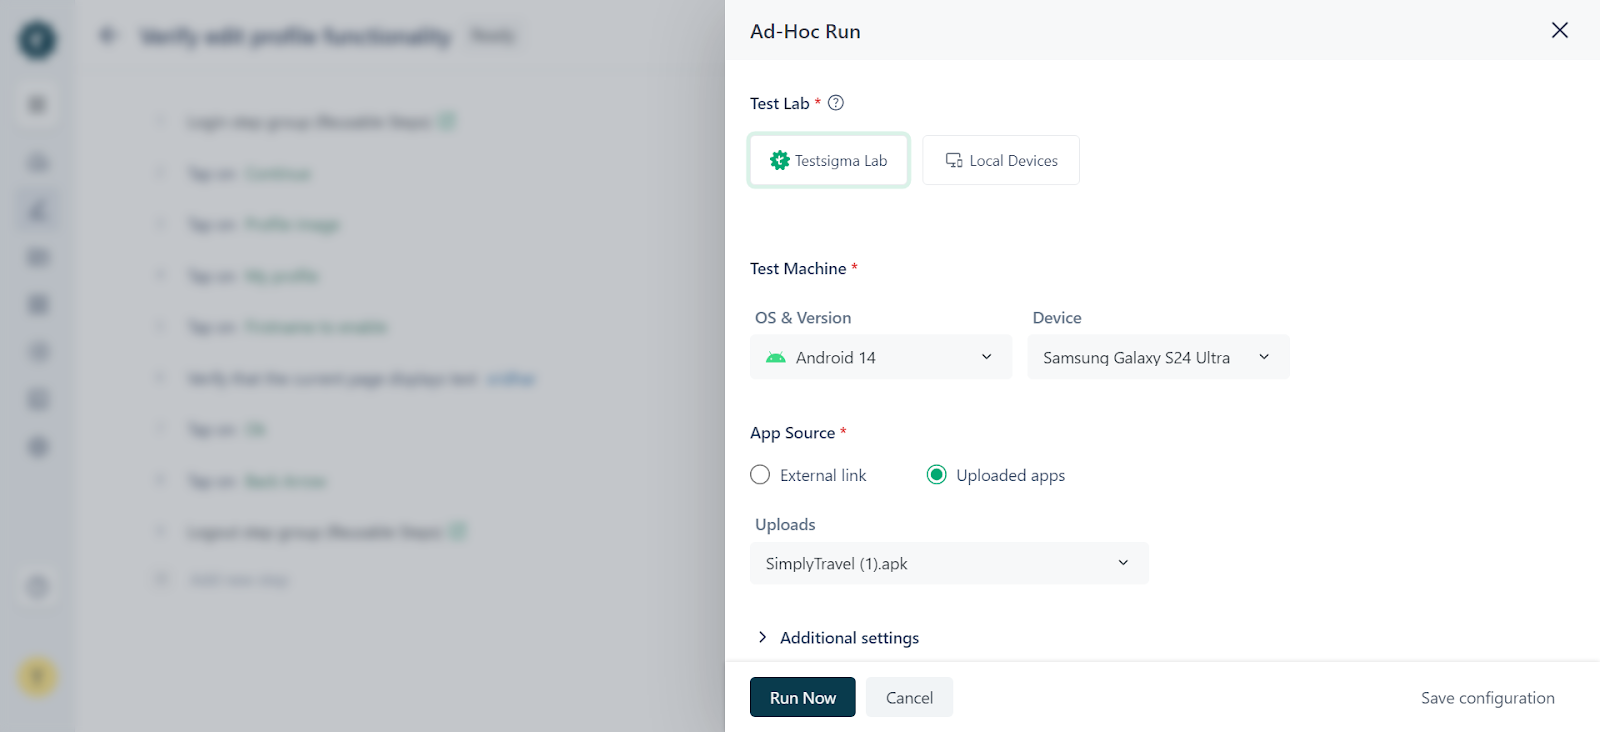
Step 3 – After creating test cases, click on Run to execute the tests.
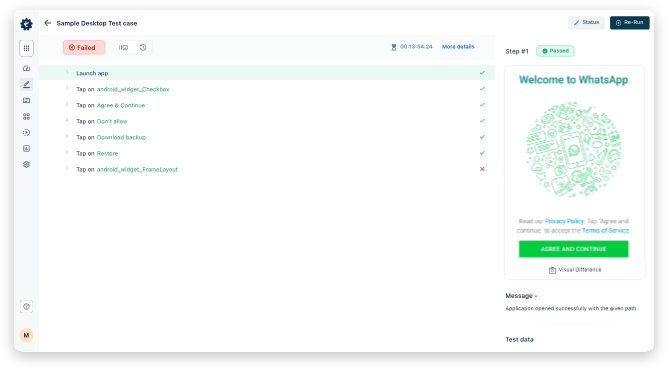
Step 4 – Analyze and share the test results with the dev team so they can start working on bug fixing.
Using a low-code testing tool like Testsigma helps you create and run tests 10x faster for Android and iOS. With Testsigma, you can run your mobile tests across 3000+ real devices/tablets and 1000+ platforms/browsers for comprehensive cross-browser and cross-platform testing.
What’s Your Forte?
User interface testing in today’s world has become extremely important. Thanks to the millions of applications available in stores and a lot more being developed as we speak. The user interface is probably the first thing that a user wants and believe me, if someone is not from a technical background, he will not be impressed with a messed up user interface.
Not only visual appearance, but the user interface also covers the consistency of the android application. It should look similar and work consistently on all the target android devices. Complex as it may sound, we can follow certain practices to achieve excellence in android UI testing and make them our habit.
In this post, I tried to highlight these best practices and tips that an android UI tester should be aware of. But I am sure you must have learned something new and made it your practice with your experience in Android UI testing.
Such personal experiences always give rise to smaller tips that prove very fruitful in the overall process. We welcome these practices and tips and would love to listen from you in the comment section below. Happy UI testing!!
Frequently Asked Questions
How to Do Testing for UI?
Testing for UI means checking the visual elements on the page. Usually, UI testing is done using a reference image as the baseline image and comparing all the other images on the page against it. For instance, before running UI tests, enable the UI testing option in Testsigma that will run the tests for UI and take a screenshot of the page as the baseline image. After that, all the results of other test cases are compared against the reference picture. Any deviation from the first image is considered an issue, which is highlighted by the tool.
What is Unit Test Vs UI Test Android?
Unit test is the first testing phase any code or program goes through. Developers conduct unit tests to check if the code is working correctly. UI Android test, on the other hand, focuses on the visual aspects of an application run on Android OS and is performed by testers. It is basically for smartphones with Android OS.

