


Table Of Contents
- 1 Commonly Used Push Notification Testing Tools
- 2 Automating Push Notification Testing in CI CD
- 3 Where End-to-End Automation Fits in Push Notification Testing
- 4 Conclusion
- 5 Frequently Asked Questions
- 6 Frequently Asked Questions
- 7 Commonly Used Push Notification Testing Tools
- 8 Automating Push Notification Testing in CI CD
- 9 Where End-to-End Automation Fits in Push Notification Testing
- 10 Conclusion
- 11 Frequently Asked Questions
- 12 What is Push Notification Testing?
- 13 Why Push Notification Testing is Critical
- 14 Types of Push Notification Testing
- 15 How to Test Push Notifications Step by Step
- 16 Push Notification Test Cases
- 17 Frequently Asked Questions
- 18 Frequently Asked Questions
- 19 Commonly Used Push Notification Testing Tools
- 20 Automating Push Notification Testing in CI CD
- 21 Where End-to-End Automation Fits in Push Notification Testing
- 22 Conclusion
- 23 Frequently Asked Questions
- 24 Frequently Asked Questions
- 25 Commonly Used Push Notification Testing Tools
- 26 Automating Push Notification Testing in CI CD
- 27 Where End-to-End Automation Fits in Push Notification Testing
- 28 Conclusion
- 29 Frequently Asked Questions
- 30 What is Push Notification Testing?
- 31 Why Push Notification Testing is Critical
- 32 Types of Push Notification Testing
- 33 How to Test Push Notifications Step by Step
- 34 Push Notification Test Cases
- 35 Frequently Asked Questions
- 36 Frequently Asked Questions
- 37 Commonly Used Push Notification Testing Tools
- 38 Automating Push Notification Testing in CI CD
- 39 Where End-to-End Automation Fits in Push Notification Testing
- 40 Conclusion
- 41 Frequently Asked Questions
Commonly Used Push Notification Testing Tools
-
Firebase Cloud Messaging (Fcm)
|
Platform Focus |
Best For |
Key Capability |
|
Android, Web |
Sending and validating test push notifications |
Create and send test payloads, monitor delivery, and manage device tokens |
-
Apple Push Notification Service (Apns)
|
Platform Focus |
Best For |
Key Capability |
|
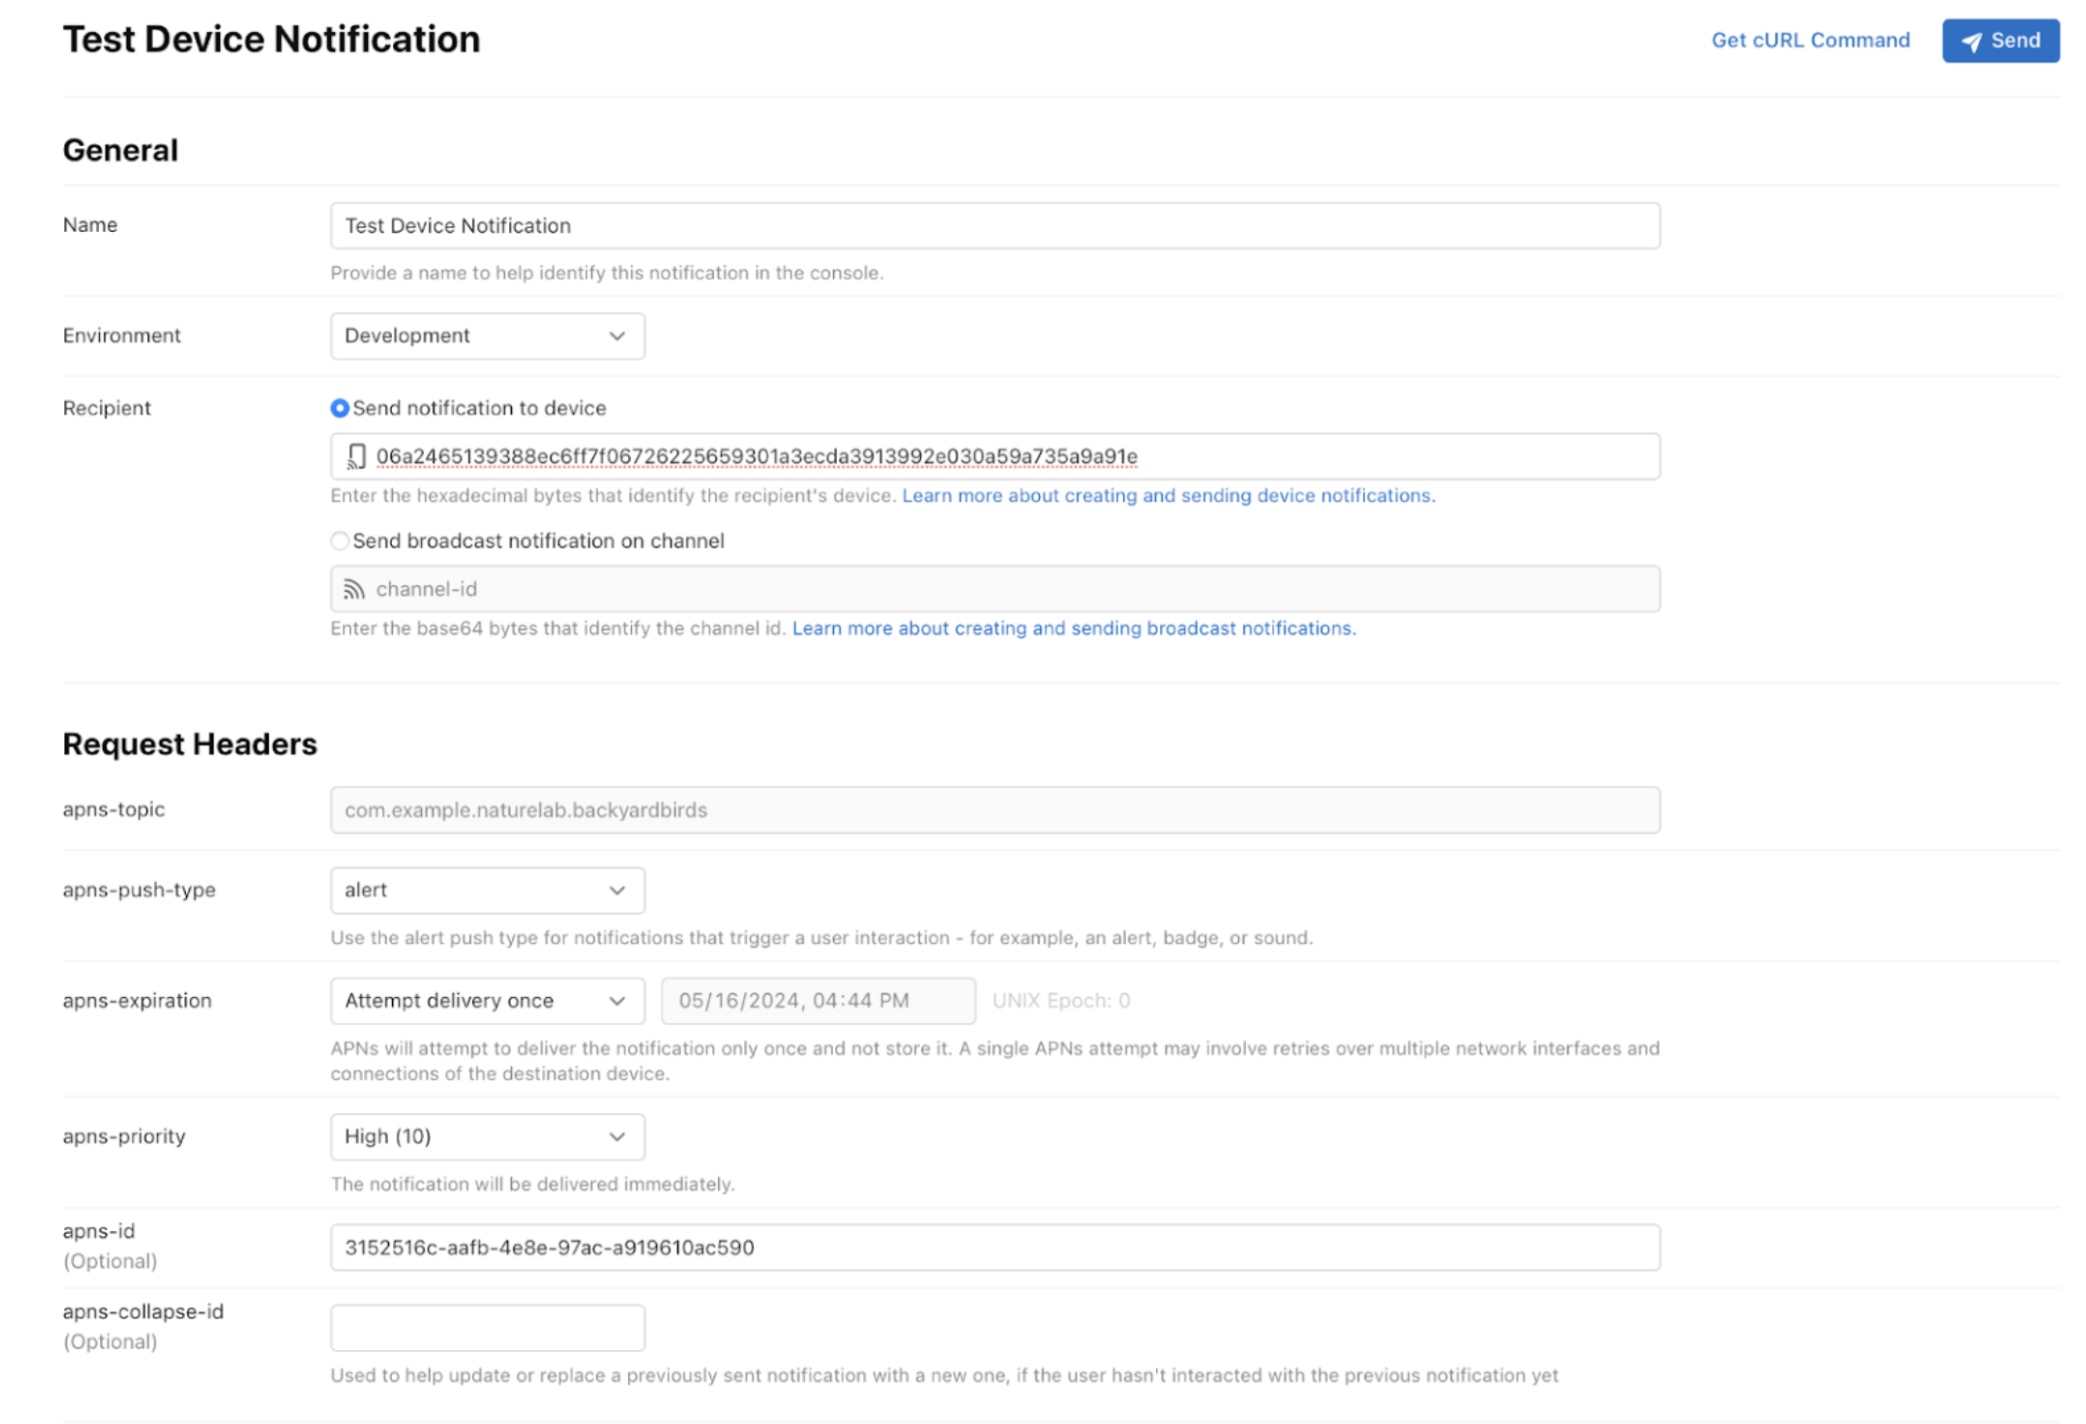
iOS |
Testing iOS push notification delivery |
Validate APNs certificates, send test pushes, and monitor delivery responses |
-
Postman
|
Platform Focus |
Best For |
Key Capability |
|
API-based testing |
Sending custom push payloads via API |
Manually trigger push notifications using REST APIs and validate responses |
-
Onesignal
|
Platform Focus |
Best For |
Key Capability |
|
Android, iOS, Web |
Cross-platform push testing and campaign validation |
Dashboard-based push testing, segmentation, and delivery tracking |
-
Amazon Sns (simple Notification Service)
|
Platform Focus |
Best For |
Key Capability |
|
Android, iOS |
Backend-driven push workflows |
Send push notifications via cloud backend and monitor delivery status |
Automating Push Notification Testing in CI CD
Modern teams integrate push notification testing into CI CD pipelines.
Best Practices Include:
- Using staging Firebase projects
- Triggering notifications via API calls in test environments
- Mocking notification services for controlled scenarios
- Validating backend responses
- Automating post-click user flows
- Monitoring delivery metrics automatically
Automation ensures that every release validates push-triggered workflows without manual effort.
Where End-to-end Automation Fits in Push Notification Testing
Push notification testing is not only about whether FCM or APNs delivered the message. It is also about what the user experiences after it arrives. When someone taps a notification, the app should open reliably, land on the right screen through deep linking, load the correct UI, and trigger the expected backend calls. That post-tap journey is where end-to-end automation on real devices becomes essential.
Testsigma supports testing across more than 3,000 real and virtual Android and iOS devices, along with web, desktop, and API testing capabilities. This makes it possible to:
- Validate app behavior when a push notification is received
- Test deep linking triggered by notifications
- Verify UI rendering across different devices and OS versions
- Confirm that backend APIs respond correctly after user interaction
- Automate complete mobile workflows connected to notification events
Teams often trigger notifications through FCM or APNs in a staging setup, then automate the post-tap flow on real devices. This keeps delivery handled by push services while ensuring the in-app experience is consistently validated in CI pipelines.
Conclusion
Push notification testing is more than sending a test message and checking if it appears. It requires validating delivery, payload structure, rendering across devices, behavior in different app states, and the full user journey after interaction.
By combining platform-level validation with real device testing and end-to-end automation, teams can ensure notifications are reliable, accurate, and aligned with business goals. When done right, push notification testing protects user trust and ensures every message delivers the experience it promises.
Frequently Asked Questions
Push notification testing involves sending test payloads through FCM or APNs, validating delivery across devices, verifying UI display, and confirming correct deep link behavior and backend integration. It should include functional, visual, and performance validation.
Yes. You can automate push notification testing by triggering backend events via APIs and validating the user journey using end-to-end automation frameworks. This ensures that post-click workflows function correctly across devices.
To test FCM notifications, configure Firebase, create a valid payload, send it to test devices, validate delivery logs, and confirm the app behaves correctly when users interact with the notification.
Common issues include delayed delivery, broken deep links, missing personalization fields, duplicate notifications, and incorrect behavior in killed app states.
iOS push notification testing requires validating APNs configuration, testing on real devices, checking background behavior, verifying deep linking, and ensuring compliance with iOS notification permission rules.
Commonly Used Push Notification Testing Tools
-
Firebase Cloud Messaging (Fcm)
|
Platform Focus |
Best For |
Key Capability |
|
Android, Web |
Sending and validating test push notifications |
Create and send test payloads, monitor delivery, and manage device tokens |
-
Apple Push Notification Service (Apns)
|
Platform Focus |
Best For |
Key Capability |
|
iOS |
Testing iOS push notification delivery |
Validate APNs certificates, send test pushes, and monitor delivery responses |
-
Postman
|
Platform Focus |
Best For |
Key Capability |
|
API-based testing |
Sending custom push payloads via API |
Manually trigger push notifications using REST APIs and validate responses |
-
Onesignal
|
Platform Focus |
Best For |
Key Capability |
|
Android, iOS, Web |
Cross-platform push testing and campaign validation |
Dashboard-based push testing, segmentation, and delivery tracking |
-
Amazon Sns (simple Notification Service)
|
Platform Focus |
Best For |
Key Capability |
|
Android, iOS |
Backend-driven push workflows |
Send push notifications via cloud backend and monitor delivery status |
Automating Push Notification Testing in CI CD
Modern teams integrate push notification testing into CI CD pipelines.
Best Practices Include:
- Using staging Firebase projects
- Triggering notifications via API calls in test environments
- Mocking notification services for controlled scenarios
- Validating backend responses
- Automating post-click user flows
- Monitoring delivery metrics automatically
Automation ensures that every release validates push-triggered workflows without manual effort.
Where End-to-end Automation Fits in Push Notification Testing
Push notification testing is not only about whether FCM or APNs delivered the message. It is also about what the user experiences after it arrives. When someone taps a notification, the app should open reliably, land on the right screen through deep linking, load the correct UI, and trigger the expected backend calls. That post-tap journey is where end-to-end automation on real devices becomes essential.
Testsigma supports testing across more than 3,000 real and virtual Android and iOS devices, along with web, desktop, and API testing capabilities. This makes it possible to:
- Validate app behavior when a push notification is received
- Test deep linking triggered by notifications
- Verify UI rendering across different devices and OS versions
- Confirm that backend APIs respond correctly after user interaction
- Automate complete mobile workflows connected to notification events
Teams often trigger notifications through FCM or APNs in a staging setup, then automate the post-tap flow on real devices. This keeps delivery handled by push services while ensuring the in-app experience is consistently validated in CI pipelines.
Conclusion
Push notification testing is more than sending a test message and checking if it appears. It requires validating delivery, payload structure, rendering across devices, behavior in different app states, and the full user journey after interaction.
By combining platform-level validation with real device testing and end-to-end automation, teams can ensure notifications are reliable, accurate, and aligned with business goals. When done right, push notification testing protects user trust and ensures every message delivers the experience it promises.
Frequently Asked Questions
Push notification testing involves sending test payloads through FCM or APNs, validating delivery across devices, verifying UI display, and confirming correct deep link behavior and backend integration. It should include functional, visual, and performance validation.
Yes. You can automate push notification testing by triggering backend events via APIs and validating the user journey using end-to-end automation frameworks. This ensures that post-click workflows function correctly across devices.
To test FCM notifications, configure Firebase, create a valid payload, send it to test devices, validate delivery logs, and confirm the app behaves correctly when users interact with the notification.
Common issues include delayed delivery, broken deep links, missing personalization fields, duplicate notifications, and incorrect behavior in killed app states.
iOS push notification testing requires validating APNs configuration, testing on real devices, checking background behavior, verifying deep linking, and ensuring compliance with iOS notification permission rules.
Push notification testing ensures that notifications are delivered accurately, displayed correctly, and trigger the expected behavior across devices, operating systems, and network conditions. This article explains how to test push notifications effectively across web and mobile apps, the tools involved, real test cases, and how to automate validation within your CI CD workflow.
What is Push Notification Testing?
Push notification testing is the process of validating that notifications sent from a backend system via services such as Firebase Cloud Messaging or Apple Push Notification Service are delivered correctly and function as expected on user devices.
Why Push Notification Testing is Critical
Push notifications are often tied to revenue-driving events such as order confirmations, promotions, cart reminders, or security alerts. A failure in any of these flows directly impacts business metrics.
Common risks when push notifications are not tested properly include:
- Notifications not delivered in certain app states
- Incorrect personalization fields
- Broken deep links
- Delayed delivery
- Notifications not appearing on specific OS versions
- Time zone scheduling errors
If a cart reminder opens the home screen instead of the cart page, conversion drops immediately. This is why mobile push notification testing must go beyond simply sending a test message.
Types of Push Notification Testing
|
Type |
What this test ensures |
What to test |
Example |
|
Functional |
The notification triggers the correct in-app behavior and business logic |
Payload structure, title, and body content, deep link navigation, badge updates, action buttons |
Tapping a promotional notification opens the correct campaign page with the right offer details |
|
UI and visual |
The notification displays correctly across devices, OS versions, themes, and browsers |
Lock screen view, notification tray layout, text truncation, emoji and Unicode rendering, dark mode, browser display for web push |
The same notification appears properly formatted on iOS, Android, and Chrome without text cutoff |
|
Delivery |
The notification is reliably delivered in all app states and network conditions |
Foreground state, background state, killed app state, airplane mode recovery, slow or unstable network |
A security alert is delivered even when the app is terminated and opens the correct screen on tap |
|
Localization |
The notification content is accurate and properly formatted for different regions and languages |
Multi-language content, special characters, right-to-left languages, regional date and number formats |
An Arabic notification displays right-to-left text with correct regional formatting |
|
Performance and load |
The system handles high-volume notification sends without failure or duplication |
Delivery latency under load, backend throttling, FCM or APNs rate limits, duplicate notifications |
A flash sale campaign sends thousands of notifications with an acceptable delay and no duplicates |
How to Test Push Notifications Step by Step
If you are wondering how to test push notifications effectively, follow this structured process.
Step 1: Configure Push Services
Set up Firebase Cloud Messaging for Android and APNs for iOS. Use separate staging environments for testing.
Step 2: Create a Test Payload
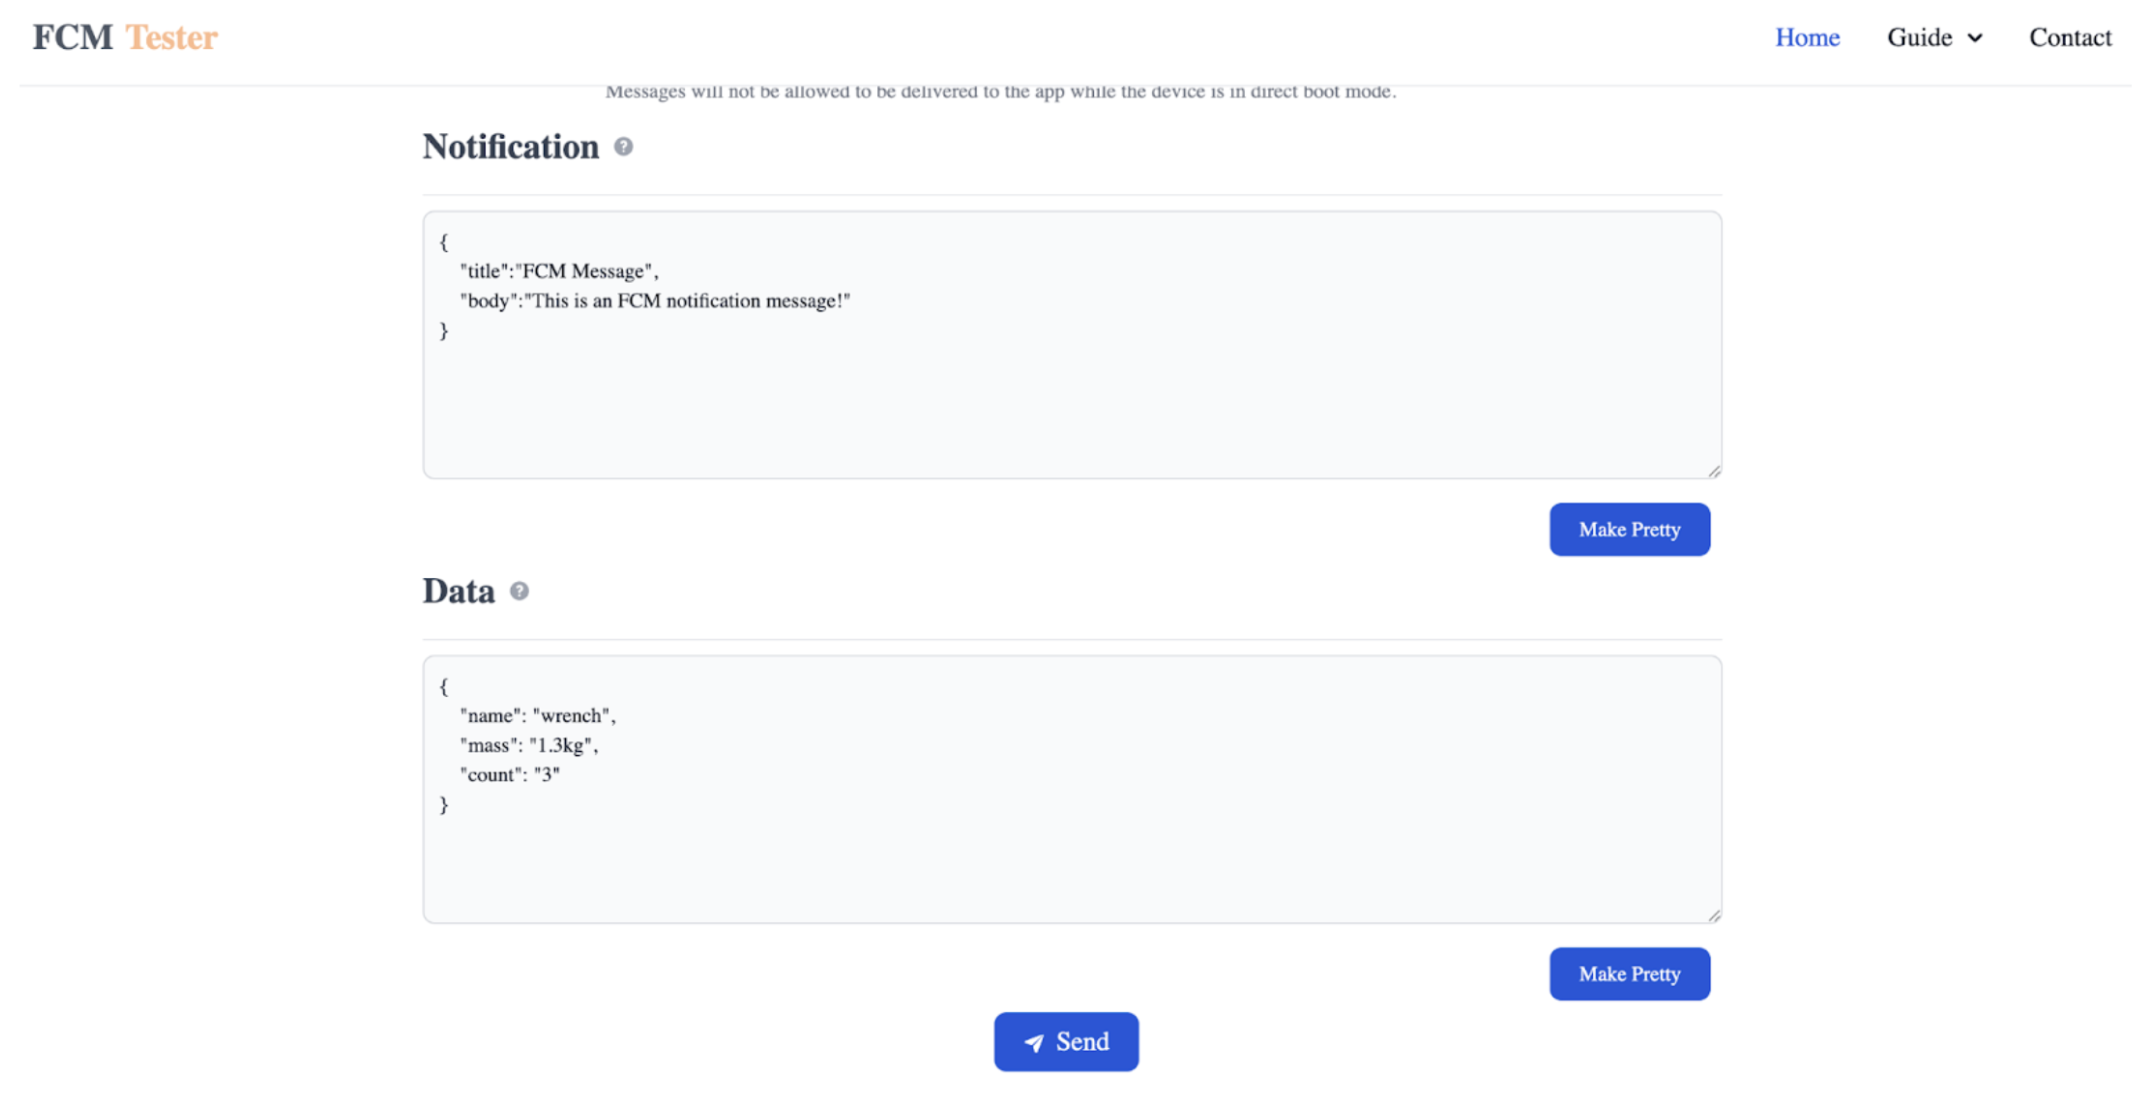
A simple FCM payload might look like:
{
  "to": "device_token",
  "notification": {
    "title": "Test Notification",
    "body": "This is a push notification test."
  },
  "data": {
    "screen": "offers"
  }
}
Validate that the payload structure matches platform requirements.
Step 3: Send the Test Notification
Use Firebase Console, Postman, or API calls to send notifications to test devices.
Step 4: Validate on Real Devices
This is critical. Emulators often behave differently from physical devices. Test across:
- Multiple OS versions
- Different screen sizes
- Various manufacturers
Step 5: Verify Backend Logs
Check the delivery status in FCM or APNs logs. Confirm there are no rejected payloads or invalid tokens.
Step 6: Validate User Journey after Click
Push notification testing does not stop at delivery. You must verify:
- Correct screen opens
- API calls are triggered
- UI loads properly
- Analytics events fire
This is where end-to-end automation becomes essential.
End-to-end automation allows teams to consistently validate notification-driven user journeys across devices, operating systems, and releases, ensuring reliability without depending on manual verification.
Push Notification Test Cases
Below are sample push notification test cases you can adapt.
|
Test Case ID |
Scenario |
Expected Result |
|
PN-01 |
Notification received in foreground |
Banner appears without crashing the app |
|
PN-02 |
App in the background |
Notification visible in the tray |
|
PN-03 |
App killed state |
Notification delivered successfully |
|
PN-04 |
Tap notification |
Correct deep link screen opens |
|
PN-05 |
Invalid payload |
Error logged, no crash |
|
PN-06 |
Poor network |
Notification delivered after reconnect |
|
PN-07 |
Multiple notifications |
No duplication |
|
PN-08 |
Permission denied |
No notification delivered |
|
PN-09 |
Localization enabled |
Correct translated message displayed |
|
PN-10 |
Dark mode enabled |
Text readable and UI consistent |
Including structured push notification test cases improves clarity and ensures coverage.
Frequently Asked Questions
Push notification testing involves sending test payloads through FCM or APNs, validating delivery across devices, verifying UI display, and confirming correct deep link behavior and backend integration. It should include functional, visual, and performance validation.
Yes. You can automate push notification testing by triggering backend events via APIs and validating the user journey using end-to-end automation frameworks. This ensures that post-click workflows function correctly across devices.
To test FCM notifications, configure Firebase, create a valid payload, send it to test devices, validate delivery logs, and confirm the app behaves correctly when users interact with the notification.
Common issues include delayed delivery, broken deep links, missing personalization fields, duplicate notifications, and incorrect behavior in killed app states.
iOS push notification testing requires validating APNs configuration, testing on real devices, checking background behavior, verifying deep linking, and ensuring compliance with iOS notification permission rules.
Commonly Used Push Notification Testing Tools
-
Firebase Cloud Messaging (Fcm)
|
Platform Focus |
Best For |
Key Capability |
|
Android, Web |
Sending and validating test push notifications |
Create and send test payloads, monitor delivery, and manage device tokens |
-
Apple Push Notification Service (Apns)
|
Platform Focus |
Best For |
Key Capability |
|
iOS |
Testing iOS push notification delivery |
Validate APNs certificates, send test pushes, and monitor delivery responses |
-
Postman
|
Platform Focus |
Best For |
Key Capability |
|
API-based testing |
Sending custom push payloads via API |
Manually trigger push notifications using REST APIs and validate responses |
-
Onesignal
|
Platform Focus |
Best For |
Key Capability |
|
Android, iOS, Web |
Cross-platform push testing and campaign validation |
Dashboard-based push testing, segmentation, and delivery tracking |
-
Amazon Sns (simple Notification Service)
|
Platform Focus |
Best For |
Key Capability |
|
Android, iOS |
Backend-driven push workflows |
Send push notifications via cloud backend and monitor delivery status |
Automating Push Notification Testing in CI CD
Modern teams integrate push notification testing into CI CD pipelines.
Best Practices Include:
- Using staging Firebase projects
- Triggering notifications via API calls in test environments
- Mocking notification services for controlled scenarios
- Validating backend responses
- Automating post-click user flows
- Monitoring delivery metrics automatically
Automation ensures that every release validates push-triggered workflows without manual effort.
Where End-to-end Automation Fits in Push Notification Testing
Push notification testing is not only about whether FCM or APNs delivered the message. It is also about what the user experiences after it arrives. When someone taps a notification, the app should open reliably, land on the right screen through deep linking, load the correct UI, and trigger the expected backend calls. That post-tap journey is where end-to-end automation on real devices becomes essential.
Testsigma supports testing across more than 3,000 real and virtual Android and iOS devices, along with web, desktop, and API testing capabilities. This makes it possible to:
- Validate app behavior when a push notification is received
- Test deep linking triggered by notifications
- Verify UI rendering across different devices and OS versions
- Confirm that backend APIs respond correctly after user interaction
- Automate complete mobile workflows connected to notification events
Teams often trigger notifications through FCM or APNs in a staging setup, then automate the post-tap flow on real devices. This keeps delivery handled by push services while ensuring the in-app experience is consistently validated in CI pipelines.
Conclusion
Push notification testing is more than sending a test message and checking if it appears. It requires validating delivery, payload structure, rendering across devices, behavior in different app states, and the full user journey after interaction.
By combining platform-level validation with real device testing and end-to-end automation, teams can ensure notifications are reliable, accurate, and aligned with business goals. When done right, push notification testing protects user trust and ensures every message delivers the experience it promises.
Frequently Asked Questions
Push notification testing involves sending test payloads through FCM or APNs, validating delivery across devices, verifying UI display, and confirming correct deep link behavior and backend integration. It should include functional, visual, and performance validation.
Yes. You can automate push notification testing by triggering backend events via APIs and validating the user journey using end-to-end automation frameworks. This ensures that post-click workflows function correctly across devices.
To test FCM notifications, configure Firebase, create a valid payload, send it to test devices, validate delivery logs, and confirm the app behaves correctly when users interact with the notification.
Common issues include delayed delivery, broken deep links, missing personalization fields, duplicate notifications, and incorrect behavior in killed app states.
iOS push notification testing requires validating APNs configuration, testing on real devices, checking background behavior, verifying deep linking, and ensuring compliance with iOS notification permission rules.
Commonly Used Push Notification Testing Tools
-
Firebase Cloud Messaging (Fcm)
|
Platform Focus |
Best For |
Key Capability |
|
Android, Web |
Sending and validating test push notifications |
Create and send test payloads, monitor delivery, and manage device tokens |
-
Apple Push Notification Service (Apns)
|
Platform Focus |
Best For |
Key Capability |
|
iOS |
Testing iOS push notification delivery |
Validate APNs certificates, send test pushes, and monitor delivery responses |
-
Postman
|
Platform Focus |
Best For |
Key Capability |
|
API-based testing |
Sending custom push payloads via API |
Manually trigger push notifications using REST APIs and validate responses |
-
Onesignal
|
Platform Focus |
Best For |
Key Capability |
|
Android, iOS, Web |
Cross-platform push testing and campaign validation |
Dashboard-based push testing, segmentation, and delivery tracking |
-
Amazon Sns (simple Notification Service)
|
Platform Focus |
Best For |
Key Capability |
|
Android, iOS |
Backend-driven push workflows |
Send push notifications via cloud backend and monitor delivery status |
Automating Push Notification Testing in CI CD
Modern teams integrate push notification testing into CI CD pipelines.
Best Practices Include:
- Using staging Firebase projects
- Triggering notifications via API calls in test environments
- Mocking notification services for controlled scenarios
- Validating backend responses
- Automating post-click user flows
- Monitoring delivery metrics automatically
Automation ensures that every release validates push-triggered workflows without manual effort.
Where End-to-end Automation Fits in Push Notification Testing
Push notification testing is not only about whether FCM or APNs delivered the message. It is also about what the user experiences after it arrives. When someone taps a notification, the app should open reliably, land on the right screen through deep linking, load the correct UI, and trigger the expected backend calls. That post-tap journey is where end-to-end automation on real devices becomes essential.
Testsigma supports testing across more than 3,000 real and virtual Android and iOS devices, along with web, desktop, and API testing capabilities. This makes it possible to:
- Validate app behavior when a push notification is received
- Test deep linking triggered by notifications
- Verify UI rendering across different devices and OS versions
- Confirm that backend APIs respond correctly after user interaction
- Automate complete mobile workflows connected to notification events
Teams often trigger notifications through FCM or APNs in a staging setup, then automate the post-tap flow on real devices. This keeps delivery handled by push services while ensuring the in-app experience is consistently validated in CI pipelines.
Conclusion
Push notification testing is more than sending a test message and checking if it appears. It requires validating delivery, payload structure, rendering across devices, behavior in different app states, and the full user journey after interaction.
By combining platform-level validation with real device testing and end-to-end automation, teams can ensure notifications are reliable, accurate, and aligned with business goals. When done right, push notification testing protects user trust and ensures every message delivers the experience it promises.
Frequently Asked Questions
Push notification testing involves sending test payloads through FCM or APNs, validating delivery across devices, verifying UI display, and confirming correct deep link behavior and backend integration. It should include functional, visual, and performance validation.
Yes. You can automate push notification testing by triggering backend events via APIs and validating the user journey using end-to-end automation frameworks. This ensures that post-click workflows function correctly across devices.
To test FCM notifications, configure Firebase, create a valid payload, send it to test devices, validate delivery logs, and confirm the app behaves correctly when users interact with the notification.
Common issues include delayed delivery, broken deep links, missing personalization fields, duplicate notifications, and incorrect behavior in killed app states.
iOS push notification testing requires validating APNs configuration, testing on real devices, checking background behavior, verifying deep linking, and ensuring compliance with iOS notification permission rules.
Push notification testing ensures that notifications are delivered accurately, displayed correctly, and trigger the expected behavior across devices, operating systems, and network conditions. This article explains how to test push notifications effectively across web and mobile apps, the tools involved, real test cases, and how to automate validation within your CI CD workflow.
What is Push Notification Testing?
Push notification testing is the process of validating that notifications sent from a backend system via services such as Firebase Cloud Messaging or Apple Push Notification Service are delivered correctly and function as expected on user devices.
Why Push Notification Testing is Critical
Push notifications are often tied to revenue-driving events such as order confirmations, promotions, cart reminders, or security alerts. A failure in any of these flows directly impacts business metrics.
Common risks when push notifications are not tested properly include:
- Notifications not delivered in certain app states
- Incorrect personalization fields
- Broken deep links
- Delayed delivery
- Notifications not appearing on specific OS versions
- Time zone scheduling errors
If a cart reminder opens the home screen instead of the cart page, conversion drops immediately. This is why mobile push notification testing must go beyond simply sending a test message.
Types of Push Notification Testing
|
Type |
What this test ensures |
What to test |
Example |
|
Functional |
The notification triggers the correct in-app behavior and business logic |
Payload structure, title, and body content, deep link navigation, badge updates, action buttons |
Tapping a promotional notification opens the correct campaign page with the right offer details |
|
UI and visual |
The notification displays correctly across devices, OS versions, themes, and browsers |
Lock screen view, notification tray layout, text truncation, emoji and Unicode rendering, dark mode, browser display for web push |
The same notification appears properly formatted on iOS, Android, and Chrome without text cutoff |
|
Delivery |
The notification is reliably delivered in all app states and network conditions |
Foreground state, background state, killed app state, airplane mode recovery, slow or unstable network |
A security alert is delivered even when the app is terminated and opens the correct screen on tap |
|
Localization |
The notification content is accurate and properly formatted for different regions and languages |
Multi-language content, special characters, right-to-left languages, regional date and number formats |
An Arabic notification displays right-to-left text with correct regional formatting |
|
Performance and load |
The system handles high-volume notification sends without failure or duplication |
Delivery latency under load, backend throttling, FCM or APNs rate limits, duplicate notifications |
A flash sale campaign sends thousands of notifications with an acceptable delay and no duplicates |
How to Test Push Notifications Step by Step
If you are wondering how to test push notifications effectively, follow this structured process.
Step 1: Configure Push Services
Set up Firebase Cloud Messaging for Android and APNs for iOS. Use separate staging environments for testing.
Step 2: Create a Test Payload
A simple FCM payload might look like:
{
  "to": "device_token",
  "notification": {
    "title": "Test Notification",
    "body": "This is a push notification test."
  },
  "data": {
    "screen": "offers"
  }
}
Validate that the payload structure matches platform requirements.
Step 3: Send the Test Notification
Use Firebase Console, Postman, or API calls to send notifications to test devices.
Step 4: Validate on Real Devices
This is critical. Emulators often behave differently from physical devices. Test across:
- Multiple OS versions
- Different screen sizes
- Various manufacturers
Step 5: Verify Backend Logs
Check the delivery status in FCM or APNs logs. Confirm there are no rejected payloads or invalid tokens.
Step 6: Validate User Journey after Click
Push notification testing does not stop at delivery. You must verify:
- Correct screen opens
- API calls are triggered
- UI loads properly
- Analytics events fire
This is where end-to-end automation becomes essential.
End-to-end automation allows teams to consistently validate notification-driven user journeys across devices, operating systems, and releases, ensuring reliability without depending on manual verification.
Push Notification Test Cases
Below are sample push notification test cases you can adapt.
|
Test Case ID |
Scenario |
Expected Result |
|
PN-01 |
Notification received in foreground |
Banner appears without crashing the app |
|
PN-02 |
App in the background |
Notification visible in the tray |
|
PN-03 |
App killed state |
Notification delivered successfully |
|
PN-04 |
Tap notification |
Correct deep link screen opens |
|
PN-05 |
Invalid payload |
Error logged, no crash |
|
PN-06 |
Poor network |
Notification delivered after reconnect |
|
PN-07 |
Multiple notifications |
No duplication |
|
PN-08 |
Permission denied |
No notification delivered |
|
PN-09 |
Localization enabled |
Correct translated message displayed |
|
PN-10 |
Dark mode enabled |
Text readable and UI consistent |
Including structured push notification test cases improves clarity and ensures coverage.
Frequently Asked Questions
Push notification testing involves sending test payloads through FCM or APNs, validating delivery across devices, verifying UI display, and confirming correct deep link behavior and backend integration. It should include functional, visual, and performance validation.
Yes. You can automate push notification testing by triggering backend events via APIs and validating the user journey using end-to-end automation frameworks. This ensures that post-click workflows function correctly across devices.
To test FCM notifications, configure Firebase, create a valid payload, send it to test devices, validate delivery logs, and confirm the app behaves correctly when users interact with the notification.
Common issues include delayed delivery, broken deep links, missing personalization fields, duplicate notifications, and incorrect behavior in killed app states.
iOS push notification testing requires validating APNs configuration, testing on real devices, checking background behavior, verifying deep linking, and ensuring compliance with iOS notification permission rules.
Frequently Asked Questions
Push notification testing involves sending test payloads through FCM or APNs, validating delivery across devices, verifying UI display, and confirming correct deep link behavior and backend integration. It should include functional, visual, and performance validation.
Yes. You can automate push notification testing by triggering backend events via APIs and validating the user journey using end-to-end automation frameworks. This ensures that post-click workflows function correctly across devices.
To test FCM notifications, configure Firebase, create a valid payload, send it to test devices, validate delivery logs, and confirm the app behaves correctly when users interact with the notification.
Common issues include delayed delivery, broken deep links, missing personalization fields, duplicate notifications, and incorrect behavior in killed app states.
iOS push notification testing requires validating APNs configuration, testing on real devices, checking background behavior, verifying deep linking, and ensuring compliance with iOS notification permission rules.
Commonly Used Push Notification Testing Tools
-
Firebase Cloud Messaging (Fcm)
|
Platform Focus |
Best For |
Key Capability |
|
Android, Web |
Sending and validating test push notifications |
Create and send test payloads, monitor delivery, and manage device tokens |
-
Apple Push Notification Service (Apns)
|
Platform Focus |
Best For |
Key Capability |
|
iOS |
Testing iOS push notification delivery |
Validate APNs certificates, send test pushes, and monitor delivery responses |
-
Postman
|
Platform Focus |
Best For |
Key Capability |
|
API-based testing |
Sending custom push payloads via API |
Manually trigger push notifications using REST APIs and validate responses |
-
Onesignal
|
Platform Focus |
Best For |
Key Capability |
|
Android, iOS, Web |
Cross-platform push testing and campaign validation |
Dashboard-based push testing, segmentation, and delivery tracking |
-
Amazon Sns (simple Notification Service)
|
Platform Focus |
Best For |
Key Capability |
|
Android, iOS |
Backend-driven push workflows |
Send push notifications via cloud backend and monitor delivery status |
Automating Push Notification Testing in CI CD
Modern teams integrate push notification testing into CI CD pipelines.
Best Practices Include:
- Using staging Firebase projects
- Triggering notifications via API calls in test environments
- Mocking notification services for controlled scenarios
- Validating backend responses
- Automating post-click user flows
- Monitoring delivery metrics automatically
Automation ensures that every release validates push-triggered workflows without manual effort.
Where End-to-end Automation Fits in Push Notification Testing
Push notification testing is not only about whether FCM or APNs delivered the message. It is also about what the user experiences after it arrives. When someone taps a notification, the app should open reliably, land on the right screen through deep linking, load the correct UI, and trigger the expected backend calls. That post-tap journey is where end-to-end automation on real devices becomes essential.
Testsigma supports testing across more than 3,000 real and virtual Android and iOS devices, along with web, desktop, and API testing capabilities. This makes it possible to:
- Validate app behavior when a push notification is received
- Test deep linking triggered by notifications
- Verify UI rendering across different devices and OS versions
- Confirm that backend APIs respond correctly after user interaction
- Automate complete mobile workflows connected to notification events
Teams often trigger notifications through FCM or APNs in a staging setup, then automate the post-tap flow on real devices. This keeps delivery handled by push services while ensuring the in-app experience is consistently validated in CI pipelines.
Conclusion
Push notification testing is more than sending a test message and checking if it appears. It requires validating delivery, payload structure, rendering across devices, behavior in different app states, and the full user journey after interaction.
By combining platform-level validation with real device testing and end-to-end automation, teams can ensure notifications are reliable, accurate, and aligned with business goals. When done right, push notification testing protects user trust and ensures every message delivers the experience it promises.
Frequently Asked Questions
Push notification testing involves sending test payloads through FCM or APNs, validating delivery across devices, verifying UI display, and confirming correct deep link behavior and backend integration. It should include functional, visual, and performance validation.
Yes. You can automate push notification testing by triggering backend events via APIs and validating the user journey using end-to-end automation frameworks. This ensures that post-click workflows function correctly across devices.
To test FCM notifications, configure Firebase, create a valid payload, send it to test devices, validate delivery logs, and confirm the app behaves correctly when users interact with the notification.
Common issues include delayed delivery, broken deep links, missing personalization fields, duplicate notifications, and incorrect behavior in killed app states.
iOS push notification testing requires validating APNs configuration, testing on real devices, checking background behavior, verifying deep linking, and ensuring compliance with iOS notification permission rules.

