


An application has different Web Elements like buttons, text boxes, checkboxes, menus, sliders, and more. While testing using Selenium, you can simulate certain scenarios by automating low-level interactions with the WebElement(s) in the DOM, such as keypresses and mouse button operations (such as click, double click, and right-click). One such action is Mouse hover over a web element.
Moving the cursor over an element in a graphical user interface (GUI) without clicking is called hovering. In web design, hovering is frequently used to show more details or options related to an element. For instance, a submenu displaying more options may emerge when you hover over a menu item.
In this blog, we’d see how to perform mouse hover actions in Selenium WebDriver.
Let’s get started!
Table Of Contents
Overview
What is a Mouse Hover Action in Selenium?
In Selenium, a mouse hover action occurs when the cursor is moved over a web element without clicking, often revealing additional options or menus, like drop-downs or tooltips.
How to Perform Mouse Actions in Selenium?
- Import the Actions class from org.openqa.selenium.interactions.Actions.
- Create an Actions instance and pass the WebDriver instance to it.
- Locate the element you want to interact with.
- Use the appropriate Actions method for the desired action:
- moveToElement() for hover,
- click() for clicking,
- contextClick() for right-click,
- doubleClick() for double-click.
- Call the build() method to prepare the action and then use perform() to execute it.
What is a Mouse Hover Action in Selenium?
In Selenium, a mouse hover action is described as the movement of the cursor over a particular web element without clicking on it. Users can see additional options and menus that appear when they place their cursors over an item. Examples include drop-down menus or tooltips.
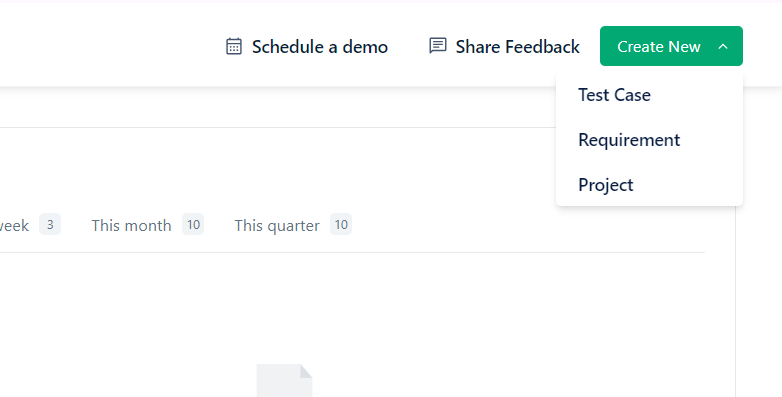
Dropdowns/sub-lists are common for e-commerce websites (such as Amazon, Flipkart, Walmart, eBay, etc.). They are one of the basic, very common ui element for most websites and hence has to be developed and tested so that it works across all browsers and customers at all times.
Take this image as an example showing, “Create New”, the parent element – once the mouse hovers over it, a sub-menu with child elements appears containing “Test Case”, ”Requirement”, and “Project”.
Visibility during test automation from the end user’s perspective is better served when one follows the parent-child hierarchy.
In Selenium, the first step for hovering over an element is to locate it. Then, the tester can perform the hover operation using the Actions class.
Understanding the Actions Class in Selenium
Overview of the Actions Class
The Actions class in Selenium is a class used to simulate user interactions with a web page. It provides a way to perform advanced mouse and keyboard interactions, such as moving the mouse over an element, clicking and holding an element, and dragging and dropping elements. The Actions class is part of the org.openqa.selenium.interactions package in Selenium and can be used with the WebDriver API.
The Actions class has several methods and properties that allow you to simulate a wide range of user interactions. For example, the click method can be used to simulate a mouse click, the moveToElement method can be used to move the mouse over an element, and the keyDown method can be used to simulate a key press.
To use the Actions class, you must first create a new Actions object and then chain together the desired actions using the methods provided by the class. Once you have defined the actions you want to perform, you can use the perform method to execute the actions.
In summary, the Actions class in Selenium provides a powerful and flexible way to simulate advanced user interactions with a web page. It is an essential tool for performing mouse hover actions and other types of interactions in Selenium testing.
Methods and Properties of the Actions Class
The Actions class in Selenium has several methods and properties that can be used to simulate user interactions with a web page. Some of the most commonly used methods and properties are listed below:
Methods:
- click: Simulates a mouse click on an element.
- clickAndHold: Clicks and holds down the mouse button on an element.
- doubleClick: Performs a double-click on an element.
- keyDown: Simulates pressing a key on the keyboard.
- keyUp: Simulates releasing a key on the keyboard.
- moveToElement: Moves the mouse cursor over an element.
- release: Releases the mouse button.
- sendKeys: Simulates typing text on the keyboard.
- perform: Executes the defined actions.
How to Implement Mouse Hover in Selenium Using the Actions Class?
In Selenium, the Actions class can be used to perform mouse hover actions. Here’s how you can perform a mouse hover using the Actions class in Selenium:
Syntax:
moveToElement(WebElement element) – Move the mouse to the middle of the element (i.e. element) which is passed to the method
Step by Step explanation
1. Set the chrome driver path
System.setProperty(“webdriver.chrome.driver”, “/path/to/chromedriver”);2. Instantiate the browser driver
WebDriver driver = new ChromeDriver();3. Launch the browser and website
driver.get(“https://www.example.com”); WebElement element = driver.findElement(By.id(“locatorvalue”));4. Create an instance of an Actions class
Actions actions = new Actions(driver);5. Perform the Mouse hover action
actions.moveToElement(element).build().perform();Code Snippet:
1
2package demo;
3
4import org.openqa.selenium.By;
5import org.openqa.selenium.WebDriver;
6import org.openqa.selenium.WebElement;
7import org.openqa.selenium.chrome.ChromeDriver;
8import org.openqa.selenium.interactions.Actions;
9
10public class MouseHover {
11    public static void main(String[] args) throws Exception {
12        // Set the path of the ChromeDriver
13        System.setProperty(“webdriver.chrome.driver”, “.chromedriver.exe”);
14
15        // Instantiate the Chrome driver
16        WebDriver driver = new ChromeDriver();
17
18        // Launch a website
19        driver.get(“https://testsigma.com/”);
20        driver.manage().window().maximize();
21        // Identify the element to be hovered
22        WebElement element = driver.findElement(By.xpath(“//a[text()=’Resources’]”));
23
24        // Instantiate the Actions class
25        Actions actions = new Actions(driver);
26
27        // Perform the mouse hover action
28        actions.moveToElement(element).build().perform();
29
30        // close the browser
31        driver.close();
32    }
33}
34
How Can I Position the Mouse Cursor at an Offset Element?
In Selenium, the Actions class can be used to move the mouse cursor to a specific offset relative to an element. Here’s how you can perform this action using the Actions class in Selenium:
Syntax:
moveToElement(WebElement, X, Y) – Move to an offset (x_Offset and y_Offset) from the WebElement’s in canter viewpoint.
Code Snippet:
1
2package demo;
3import org.openqa.selenium.By;
4import org.openqa.selenium.WebDriver;
5import org.openqa.selenium.WebElement;
6import org.openqa.selenium.chrome.ChromeDriver;
7import org.openqa.selenium.interactions.Actions;
8
9public class MouseHoverByOffset {
10    public static void main(String[] args) throws Exception {
11        //Set the path of the Chromedriver path
12        System.setProperty(“webdriver.chrome.driver”, “C:UserssgokhruDownloadschromedriver_win32chromedriver.exe”);
13
14        //Instantiate the Chrome driver
15        WebDriver driver = new ChromeDriver();
16
17        //Launch the website
18        driver.get(“https://testsigma.com/”);
19        driver.manage().window().maximize();
20
21        //Identify the element to be hovered
22        WebElement element = driver.findElement(By.xpath(“//a[text()=’Resources’]”));
23
24        //Instantiate of the Actions class
25        Actions actions = new Actions(driver);
26
27        // Perform the mouse hover action
28        actions.moveToElement(element, 10, 20).build().perform();
29        Thread.sleep(3000);
30        //close the browser
31        driver.close();
32    }
33}
34
In this example, the Chrome driver is being used, so the path to the chromedriver executable must be set. The element_id is the id of the element on the page to which you want to move the mouse cursor. The Actions class is used to simulate mouse events, and the moveToElement method is used to move the mouse to a specific offset relative to the specified element.
The first argument to the moveToElement method is the element, and the second and third arguments are the x and y offsets, respectively. The build method is used to compile the actions into a single step, and the perform method is used to execute the actions.
Conclusion
In conclusion, mouse hover is a commonly used interaction in web applications and can be easily simulated using the Actions class in Selenium. The Actions class provides a way to simulate mouse and keyboard events in the browser, and the moveToElement method can be used to perform mouse hover actions. You can also move the mouse cursor to a specific offset relative to an element by using the moveToElement method with x and y offset arguments.
It’s important to note that mouse hover actions can be used to uncover hidden elements or drop-down menus and can be useful in navigating and automated web app testing
Frequently Asked Questions
how to Mouse Hover and Click in Selenium?
You can perform a mouse hover and click action in Selenium using the following steps in Java:
- Locate the element: First, you need to locate the element you want to perform the mouse hover and click action on. You can locate the element using its id, class name, xpath, or any other method supported by Selenium.
- Import the Actions class: In order to perform mouse actions, you need to import the Actions class from the org.openqa.selenium.interactions.Actions package.
- Create an instance of Actions: After importing the Actions class, create an instance of Actions and pass the web driver instance as the parameter.
- Mouse hover: Use the moveToElement method of the Actions class to move the mouse cursor over the element you want to hover.
- Click: To perform the click action, use the click method of the Actions class.
Syntax :
WebElement element = driver.findElement(By.id(“element-id”)); Actions actions = new Actions(driver); actions.moveToElement(element).perform(); actions.click(element).perform();How to Get Hover Text in Selenium?
In Selenium, you can get the text displayed on an element when you hover over element by using the following steps in Java:
- Locate the element: First, you need to locate the element you want to get the hover text from. You can locate the element using its id, class name, xpath, or any other method supported by Selenium.
- Import the Actions class: In order to perform mouse actions, you need to import the Actions class from the org.openqa.selenium.interactions.Actions package.
- Create an instance of Actions: After importing the Actions class, create an instance of Actions and pass the web driver instance as the parameter.
- Mouse hover: Use the moveToElement method of the Actions class to move the mouse cursor over the element you want to hover.
- Get the hover text: To get the hover text, you can use the getAttribute method of the WebElement class and pass the title as the argument. The title attribute contains the text displayed when you hover over the element.
Syntax:
WebElement element = driver.findElement(By.id(“element-id”)); Actions actions = new Actions(driver); actions.moveToElement(element).perform(); String hoverText = element.getAttribute(“title”); System.out.println(“Hover text: ” + hoverText);How to Perform Mouse Actions in Selenium?
In Selenium, you can perform mouse actions (such as hover, click, right-click, double-click, etc.) in Java by using the Actions class. Here’s how you can do it:
- Import the Actions class: Import the Actions class from the org.openqa.selenium.interactions.Actions package.
- Create an instance of Actions: Create an instance of Actions and pass the web driver instance as the parameter.
- Locate the element: Locate the element you want to perform the mouse action on.
- Perform the mouse action: Use the appropriate method of the Actions class to perform the mouse action. For example, to perform a mouse hover, use the moveToElement method. To click an element, use the click method. To right-click an element, use the contextClick method. To double-click, an element, use the doubleClick method.
- Build and perform the action: After performing the mouse action, you need to call the build method of the Actions class and then call the perform method to execute the action.
Here’s an example that demonstrates how to perform a double click in Selenium:
Syntax:
WebElement element = driver.findElement(By.id(“element-id”)); Actions actions = new Actions(driver); actions.doubleClick(element ).perform();
