


Before we get started, let’s understand what a Element Locator/UI identifier is.
Table Of Contents
- 1 What are Web Elements?
- 2 What is Element Locator?
- 3 Web Element Locator Strategies
- 4 Types of Element Locators
- 5 How to Find Web Elements?
- 6 How to Find Element Locators using Chrome Extension in Testsigma?
- 7 Advanced Keyboard Controls in Testsigma for Capturing UI Identifiers:
- 8 Conclusion
- 9 Frequently Asked Questions
What Are Web Elements?
Web elements are the parts of a website you can see and interact with. Things like buttons, text boxes, dropdowns, and links are all web elements. They make up what you see when you visit a website and are essential for automated testing – which means scripts use them to act like real people do on the site.
What is Element Locator?
An element locator is what we use to identify or “locate” an element(a button, a text field, link or anything displayed) on a web page.
Automated testing tools use element locators to interact with specific elements on a web page. They must work correctly to run the scripts and appropriately interact with the right element. The most famous element locators are ID, class name, XPath and CSS selector. Element Locators are the HTML properties of these elements which tells the Testing tool(Selenium,Testsigma etc) about the web element it needs to interact with.
Locators can be a considerable cost factor of test maintenance if the UI keeps changing. Hence, maintaining locators is critical.
A UI Identifier(or Element locator) can be:
- A single Attribute of the Element such as id, name, class name, placeholder, visible text etc
- Multiple Attributes of the Element if a single attribute doesn’t locate the element uniquely.
- It may also be Xpaths or a CSS Selector
Element locator are essential for automated web testing, as they uniquely identify and manipulate web page elements such as buttons, text fields and dropdowns. Without element locators, automated test cases could not interact with the necessary elements on the page accurately. As such, their use is critical in ensuring the reliability and accuracy of automated tests.
Web Element Locator Strategies
Web element locator strategies are methods used to identify and interact with elements on a web page during automated testing. In the below sections, we will discuss the types of element locators.
Types of Element Locators
Element locators are used in automated UI testing to identify and interact with elements on a web or mobile app. Below are the types of element locators,
1. Element ID
Element IDs are unique and created by the developers while coding. IDs are best used when there’s only one instance of the element on the page.
2. Field Name
Each input field in a form has a name, which is mostly unique but not always. For example, the field names for username and password on a login page are usually unique and work well for locating them. However, radio buttons in a group share the same name but have different values, so you must use a different locator to select a specific button. In this case, you can use its ID or field name.
3. Text
The text locator searches for elements that contain the specified text. It is useful for finding links and buttons with visible text but not images with text.
4. Link Text
The Link Text locator finds an element with the text that exactly matches the provided text.
5. CSS Class
The CSS Class locator looks for the first element with a specific CSS class attribute, which is helpful in finding items with a unique style.
6. Xpath
XPath is a language used to navigate a web page’s DOM structure. They can locate any element on a page using one or more XPaths. XPath locators are powerful and flexible. A well-crafted XPath can be robust, but a poorly written one may be fragile and break when the application undergoes changes.
7. CSS Selector
CSS Selectors and XPaths are quite similar in terms of power and flexibility. However, CSS Selectors don’t rely on DOM structures like XPath. CSS Selectors can perform certain tasks more efficiently than XPaths. If your application heavily uses CSS, your developers can quickly use CSS Selectors to locate any element on the page.
How to Find Web Elements?
Here are the steps to find web elements for automated testing:
- Inspect the web page: Check out the browser developer tools (like Chrome DevTools or Testsigma Recorder) to look at the web page and find the element you want to work with.
- Identify the element type: Figure out which element you want to interact with, like a button, input box, or link.
- Locate the element: Employ an appropriate element locator strategy, including ID, class name, XPath or CSS selector, to identify the element.
- Test the locator: Verify it in the browser console to ensure it produces the desired element.
- Use the locator in the test script: Utilize the locator to interact with the element within your automated test script.
There are different types of element locators available in Testsigma, each with its unique set of advantages, and before that, lets understand the basics.
How to Find Element Locators Using Chrome Extension in Testsigma?
Testsigma provides a Chrome extension which facilitates the identification and selection of web element locators while recording automated test scripts. This integration with Testsigma’s recorder offers a user-friendly interface that lets users quickly pinpoint web elements and generate dependable locators. Utilizing this Chrome extension, users can expedite the process of constructing automated test scripts and guarantee that their tests are reliable and precise.
To use the extension:
- Navigate to the web page you want to test.
- Open the Testsigma Recorder.
- Click on the elements you want to locate.
- The extension will then generate the appropriate element locators for the selected elements, which can be used in your automated test scripts.
Getting started with Automation testing, the most challenging part is finding automatically inspect and record the element details. Let us see how UI Identifiers can be created in Testsigma.
For those getting started with Automation testing, finding unbreakable reliable Element locators of an Application is the most challenging part. Testsigma provides a Chrome Extension that automatically inspects and records the element details.
You could also manually inspect an element if familiar with HTML basics.
Get UI Identifier Details Easily with Testsigma’s Chrome Extension
You may store the UI identifiers while creating Test Steps or skip this part, create empty UI identifiers, and fill the details later.
Let’s try the latter. The create UI Identifier page has a link to add the extension to the Chrome browser as shown in the image.
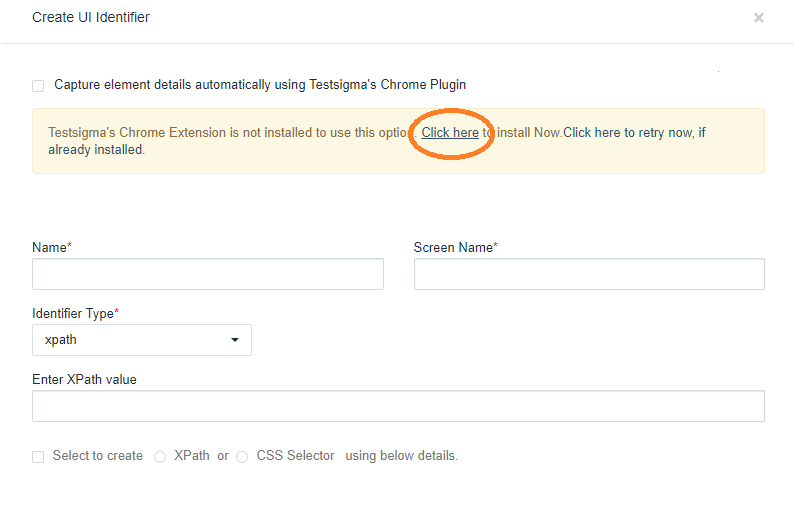
The link, “Click here” takes you to Testsigma’s Extension page in Chrome web store.
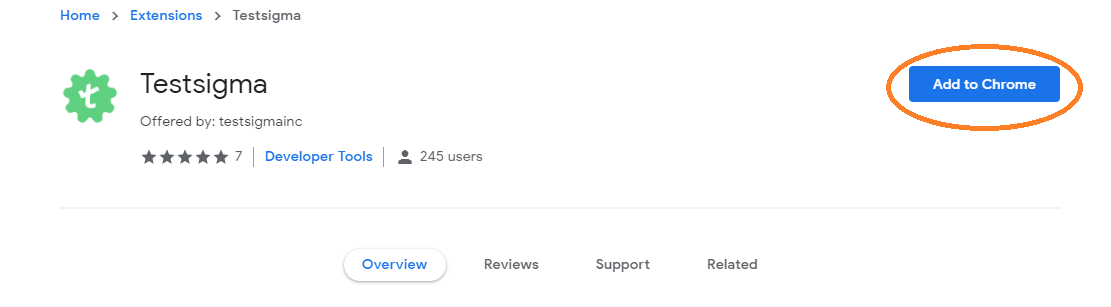
Click on the “Add to chrome” button and Testsigma’s UI identifier Extension will be added to the Chrome browser. After adding the chrome extension, simply refresh Testsigma’s Create UI Identifier page.
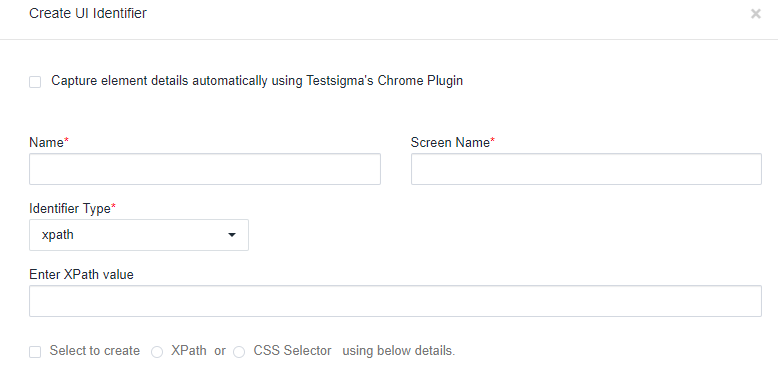
The Create UI Identifier page will look like this:
Now that we have added the extension to automatically store Element locators, let us see how we can start using it.
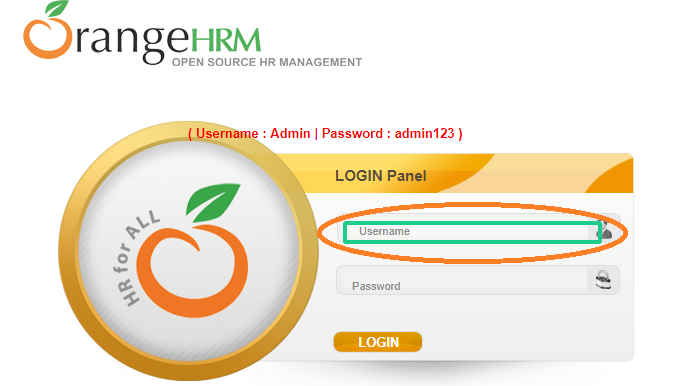
Click the checkbox “Capture element details automatically using Testsigma’s Chrome Plugin”. Open a new tab of the browser and go to the webpage in which you want to capture the UI Identifier information(I’m using the OrangeHRM login page).
Now, if you move the cursor around the page, you will see a green highlighter around the elements as shown in the image below.
Now click on the element that we want to inspect. Then go back to Testsigma’s Create UI Identifier page, where u can see the details of the captured element.
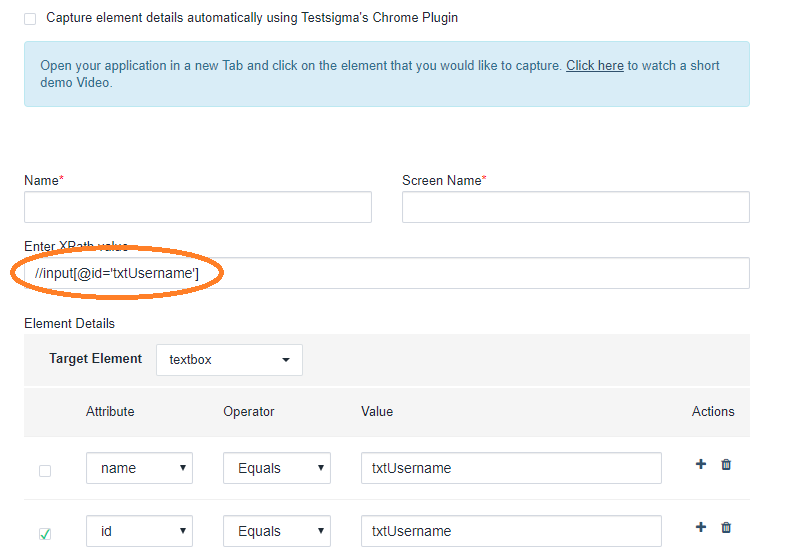
The element details have been captured using Testsigma’s extension. Enter the name and screen name. Screen Name help keep Element locators organized for a particular page(particularly helpful in emulating the Page Object Model). Click on Save.
You may refer to this video that explains this process – Watch video
Now that we have recorded the UI identifiers automatically using the Chrome plugin, let us now see a few actions that can be recorded in addition to capturing the element details.
Advanced Keyboard Controls in Testsigma for Capturing UI Identifiers:
Here’s a list of Advanced Keyboard Controls and gestures available in Testsigma while capturing UI identifiers.
1. Mouse Over/Hover over
Press and hold Control key while moving from cursor from one element to the required element to capture the mouse over action for the required element.
2. Pause Recording temporarily
Press and hold Alt key while performing the actions to skip/pause recording the user actions temporarily. Once you are ready to resume the recording, depress the Alt key to resume.
3. Scroll page
No Actions necessary. While recording, scroll to the desired Element and perform the required action on the desired Element to record the scroll action and the Element interaction.
4. Key Press
No Actions necessary. While recording, you can press on common Keys such as Tab, Enter etc, to record the key press actions.
5. Choose option from Select Dropdowns
While recording, if you want to select an option from a select(dropdown) field, you need to press and hold the Control key while clicking on the select field and then depress the Control key before clicking on your required option/item in the list.
6. Record click for Input boxes
Suppose you click on input fields such as username or password boxes and enter the required value. In that case, the click action is ignored by default, and only the type action is captured (since capturing both the click and type action is unnecessary in case of most input fields). However, if you still want to record the click for input box, you can do so by pressing and holding the Control key while clicking on the input field.
Note: From the above given controls, option1, option 5, and option 6 will work while recording UI Identifiers as well.
Conclusion
Element locators are a vital aspect of automated web testing. They enable the identification and interaction with specific elements on a web page, thus ensuring that automated test scripts accurately simulate user actions. Testsigma offers an easy-to-use Chrome extension to facilitate the process of finding element locators, allowing testers to quickly generate automated test scripts without manually identifying and locating web elements. When implemented correctly, element locator strategies can create powerful and effective automated test scripts that detect defects early in development, ultimately saving time and resources.
Frequently Asked Questions
In Selenium, an element locator is a way of finding certain elements on a webpage so that you can interact with them during automated testing. It’s really important for making sure your automated test scripts are working properly and interacting with the right elements on the page.
This question doesn’t have a straightforward answer – it all depends on the website and the elements you’re trying to test. Different strategies can be used to locate elements, such as ID, class name, XPath and CSS selector. It’s up to you to decide which one works best for your situation.
There are few types of locators which you can use to find the element you’re looking for in a few ways. You can use the ID to locate elements with their unique ID attribute, class name to find elements based on their class attribute, name to find elements based on their name attribute, tag name for HTML tags, link text for hyperlinks, partial link text for part of a hyperlink’s text and XPath and CSS selector to locate elements by their location in the HTML document.
A Complete Guide to WebElements in Selenium CommandsXpath in Selenium
Smart Ways to Use XPath in SeleniumFind Element by Xpath
Find Element by XPath: A Complete Guide

