


We are here with a basic guide to help you understand how to configure Azure CI CD pipelines and integrate them into Testsigma, a fully customizable test automation platform that covers all your testing needs!
Table Of Contents
- 1 Why Azure CI CD Pipelines?
- 2 Key Components of an Azure CI/CD Pipeline
- 3 Azure CI CD Pipeline Prerequisites
- 4 Advantages of Azure Pipelines
- 5 How to Build Azure CI/CD Pipeline?
- 6 Best Practices for Implementing CI/CD pipelines in Azure DevOps
- 7 Integrating Azure DevOps with Testsigma
- 8 Summary
- 9 Frequently Asked Questions (FAQs):
What Are Azure CI CD Pipelines?
Azure pipeline handles and simplifies the CI/CD process for developers. You can begin Azure CI CD pipeline implementation from the source stage by using the code available on GitHub or the on-premises containers. Thereafter, you can move forward with the rest of the steps discussed above.
Azure Repose stands for Azure repository and maintains a central repository for your code. Azure Pipelines maintain the build and releases pipelines for the given project. Besides handling CI/CD with Azure DevOps, Azure Pipelines also emerge useful in creating build-deploy-test workflows to perform continuous testing (CT).
Why Azure CI CD Pipelines?
Azure CI/CD Pipelines is an excellent solution for testing teams looking to set up and execute high-productivity, seamless CI/CD workflows. This is because the tool offers a slew of advantages designed to streamline development and test cycles. These include:
- Ability to build, test, and deploy Node.js, Python, Java, PHP, Ruby, C#, C++, Go, XCode, .NET, Android, and iOS applications.
- Easy integration with version control systems such as GitHub and Azure DevOps so that pipelines can be triggered automatically when code changes occur.
- Enables automation of build, testing, and deployment processes to integrate and validate code changes as quickly as possible.
- Enables users to define pipelines in YAML to make easier version control for CI/CD configurations.
- Supports building and deploying software on multiple platforms — Windows, Linux, macOS.
- Operates on multiple programming languages.
- Supports a large number of test frameworks, and can integrate with existing test suites.
- Offers in-built reporting and dashboards that provide in-depth visibility into test results with varied detail.
- Enables users to build multi-stage pipelines that let the test engine run different steps across different environments (development, testing, production).
- Enables parallel testing to speed up the QA process.
- Supports role-based access control.
- Enables testers to include manual intervention and approvals for deployment to production.
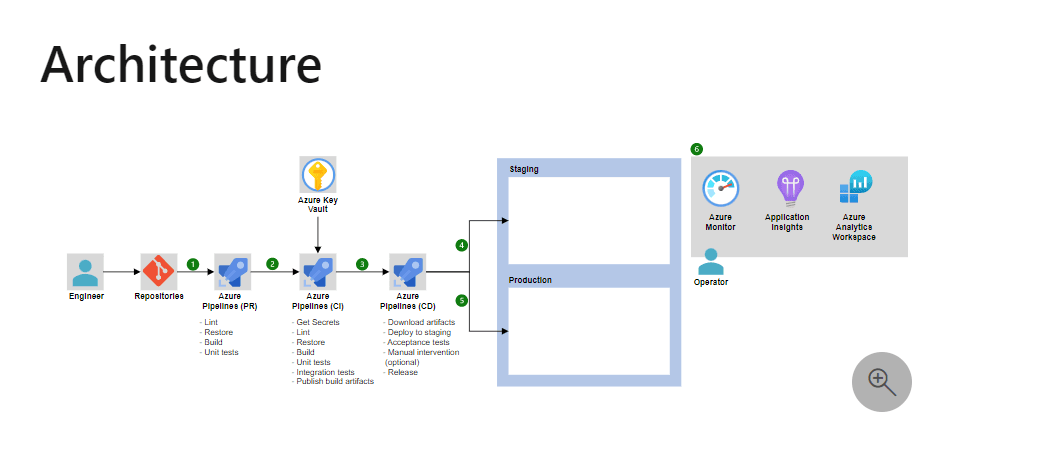
Key Components of an Azure CI/CD Pipeline
When building a CI/CD pipeline with Azure, the following components must be in place for effective configuration and management:
- Repositories: The version control system in which your source code is hosted. This can be Azure Repos, GitHub, or any other tool capable of storing and versioning application code and related files.
- Build Pipeline: The build pipeline is what actually automates the tasks of compiling code, executing tests, and generating build artifacts — all triggered by new code pushes. Artifacts of the build process like binaries and packages are also stored for reuse.
- Release Pipeline: This pipeline deploys build artifacts to different environments. It is possible to set up manual approvals before deploying to the production environment to align with expected compliance and quality standards.
- Stages and Jobs: Users must create logical stages within the workflow for better management. These stages are usually Build, Test, and Deploy.
They must also design jobs — sets of steps that run in sequence (or even parallelly) within a single stage. Common steps include running tests, generating containers, and deploying code to specific environments.
- Tasks: These are individual steps to accomplish necessary operations — running scripts, calling for the right build tools and artifacts, deploying the right resources, etc. Apart from the built-in tasks offered by Azure, users can also configure custom tasks.
- Triggers: Triggers are set up to start a test pipeline as specific events are initiated. For instance, the automated pipeline is triggered when new code is pushed, at scheduled times, or when pull requests come in.
- Testing: Automated tests (unit, integration, end-to-end) are integrated to verify all code changes before being deployed. All completed tests are accompanied by detailed reports with granular insights for better analysis.
- Variables and Secrets: Variables store values (like config settings and connection strings) that are changeable between multiple stages and environments. Secrets store sensitive information like passwords and API keys in protected formats.
- Environments: The target environments — Development, Staging, and Production — must be defined with specific configurations and approvals.
- Feedback: All pipeline activity can be monitored from the Azure DevOps dashboards with performance and success analytics for evaluation.
Azure CI CD Pipeline Prerequisites
In order to run Azure Pipelines, your tech stack must meet the following conditions:
- Get an Azure account. A free trial is available.
- Create an organization.
- Have your source code already stored in a version control system — to be integrated with Azure Pipelines.
Advantages of Azure Pipelines
Azure Pipelines offers a quick and easy way of automating the software development process, which provides consistent deployment and quality code for the users. Some of the well-known advantages of Azure Pipelines are:
- It is compatible with any language and platform, including cloud
- The service easily integrates with Azure deployments and GitHub
- You can use it to execute builds on Windows, Linux, and macOS
- It works well with open-source applications
- Azure Pipeline allows you to deploy code on multiple targets, such as container registries and virtual machines
Azure Devops Features
Azure DevOps is a collection of services that are useful to developers to execute CI/CD practices. Here we provide an explanation of the different features of Azure DevOps:
Azure Repos
It is a version control tool that allows you to manage the code and track the changes made in the same. Azure Repos provides two types of version control—Git repositories and Team Foundation Version Control (TFVC)—for source control of your code.
Azure Pipelines
It provides build and release services to support CI/CD processes to automatically build, test, and deliver your code to any environment. Azure Pipelines is compatible with all the major languages and project types.
Azure Boards
It is a software management service consisting of Agile tools to track and manage application development and testing progress. Azure Boards provides a rich set of capabilities, including native support for Scrum and Kanban processes, calendar views, configurable dashboards, and integrated reporting to monitor the overall CI/CD workflow.
Azure Test Plans
It is a set of tools that enable team members to collaborate and drive quality through complete application development. Azure Test Plans is an easy-to-use, browser-based test management solution that supports planned manual testing, user acceptance testing, exploratory testing, and collecting feedback from stakeholders.
Azure Artifacts
It allows teams to share packages such as Maven, npm, NuGet, and more from public and private sources. Artifacts feeds bring together different types of packages into your pipelines.
You can further use Azure Artifacts with Azure Pipelines to deploy packages, publish build artifacts, and integrate files between pipeline stages.
How to Build Azure CI/CD Pipeline?
Azure DevOps is a reliable platform for creating CI/CD pipelines using its Azure Pipeline service. The package supports different languages and programs through which you can build the pipeline to perform CI/CD for your application development.
This article will briefly provide a brief on how to create CI/CD pipeline for .Net and GitHub repo using Azure DevOps. Both of these methods have some similar pre-requisites, but they differ in configuration at the later stage.
Create a CI/CD Pipeline for the GitHub Repo Using Azure Devops Starter
Azure DevOps simplifies the CI/CD pipeline creation process, and under this section, we will discuss how to do this for the GitHub repo.
To start with the process, you will require a couple of setups before creating the pipeline. The pre-requisites are:
- An Azure subscription
- Access to GitHub or external Git repo to access the existing code or write a new one in any language preferable
Here are the steps to follow:
Sign In:
- Sign in to Azure Portal and search for DevOps Starter. Then click on Add to create a new resource.
- Select Bring Your Own Code and then Next.
Configuration and Framework Selection:
- Select GitHub or external Git repo. Here, we will move ahead with the GitHub option. You will also need to authenticate GitHub to allow Azure access to the repository.
- After selecting the repository and the Branch, click on Next.
- For Docker containers, make sure to select Yes for Is app Dockerized. We are moving ahead with the No option for this tutorial. Click on Next.
- Next, you will need to select a runtime application and framework.
- Finally, select an Azure service to deploy your application and move forward.
Your next steps are as follows, which are explained in detail here for better understanding.
- Configure Azure DevOps with Azure Subscription under a Project (you have to create a new project). You can access this project through the dashboard that shows your code repo, the CI/CD pipeline, and the app in Azure.
- You are ready to commit changes to your GitHub code and deploy it on Azure. Follow the institutions given in the above link.
- The next step is to examine your CI/CD pipeline in Azure Pipelines, which gives you access to the build history, code change triggers, and build edit rights.
Create CI/CD Pipelines for ASP.Net Using Azure Devops Starter
The next option is to create an Azure CI/CD pipeline for ASP.Net. And similar to the above process, you require some initial setups before creating the pipeline. The pre-requisites are:
- An Azure subscription, which you can avail of for free through Visual Studio Dev Essentials
- Knowledge of ASP.Net
Here are the steps to follow:
- Sign in to Azure Portal and search for DevOps Starter. Then click on Add to create a new resource.
- Select a .Net sample application, which will include a choice of either the open-source ASP.NET framework or the cross-platform ASP.NET Core framework. Here we will continue with the .NET Core application framework.
- Select the platform to deploy your application and click Next. We will go with Windows Web App as a deployment target.
Your next steps are similar to how they were for CI/CD pipeline using GitHub, which are described in this document by Microsoft in detail:
- Configure Azure DevOps with Azure Subscription under a Project (you have to create a new project).
- You are ready to commit code changes and deploy them on Azure. Follow the institutions given in the above link.
- The next step is to examine your CI/CD pipeline to explore and personalize the pipeline as per your need.
Best Practices for Implementing CI/CD Pipelines in Azure Devops
To get the optimal results from implementing CI/CD workflows, consider the following practices in your team’s daily operations:
- Define clear goals: Be very clear on the objectives of the CI/CD pipeline. Is your team looking for faster delivery? Improved software quality? Better collaboration? Their objectives should be closely related to the features of Azure DevOps.
- Leverage Infrastructure as Code (IaC): IaC is essential to maintain consistency across environments and interpret documents. Tools like Azure Resource Manager can help implement these protocols.
- Break pipelines into modules: Modularize your pipeline into smaller, reusable stages and jobs. This formation is easier to maintain and promotes effective resource management by reusing modules across different projects and environments.
- YAML for version control: By using YAML to define pipelines, you can version control your pipeline and code. This simplifies change tracking and roll-back.
- Automate builds and tests: Configure builds and tests to trigger automatically when code changes occur. This sets up appropriate filters to identify bugs early and deliver quick feedback to devs.
- Set up approval gates: Establish a juncture for manual approval, especially for deployments to production or critical environments. These checks ensure that code is deployed with the necessary insight and compliance.
- Utilize Variables and Secrets: Instead of hardcoding sensitive information (such as API keys and passwords), use Azure Key Vault and manage configuration settings through pipeline variables and secrets.
- Real-world testing environments: All (or all feasible) tests should ideally be conducted in environments that closely simulate the actual conditions in which end-users operate the app. This refers to testing on real browsers, devices, and OSes.
- Track pipelines and keep them organized: Use the dashboard to track performance, build/test success rates, and deployment metrics. However, you get the most of these insights if you’re working with a clean, organized pipeline with regularly documented configurations and comments to clarify logic.
Integrating Azure Devops with Testsigma
By now, you know how to create CI/CD pipelines in Azure DevOps. But this knowledge is useful when you know how to use it correctly. In this section, we will continue our discussion about Azure DevOps integration with Testsigma for performing real-time browser testing. It proves to be extremely helpful in bug tracking from Testsigma and listing it on the Azure DevOps CI/CD Dashboard of the Project.
For the uninitiated, Testsigma is an Gen AI-powered cloud-based codeless test automation tool. It supports end-to-end testing for web, mobile apps, & APIs with scripts that are self-healing.
Steps to Integrate Azure Devops with Testsigma:
Pre-requisites:
Azure DevOps Organization URL: You would need the Azure DevOps URL which is the domain name. You can find the URL by logging into your Azure DevOps account under your organization.
Personal Access Token (PAT): You would also need PAT. You will find that under the Azure Application, you can find the Personal Access Token under Security > Personal Access Tokens.
Once these prerequisites are taken care of, you can go ahead with Azure DevOps integration with Testsigma. Follow these steps:
1. The process starts after you acquire the URL and PAT. And because Azure DevOps comes as a third-party plug-in. All you need to do is add that plug-in.
Navigate to the Plugins page through Dashboard > Settings > Plugins and select Azure DevOps which is present under the Product Management tab.
2. Then, click on the Disabled Icon on Azure DevOps Boards. After, you will see the below prompt:
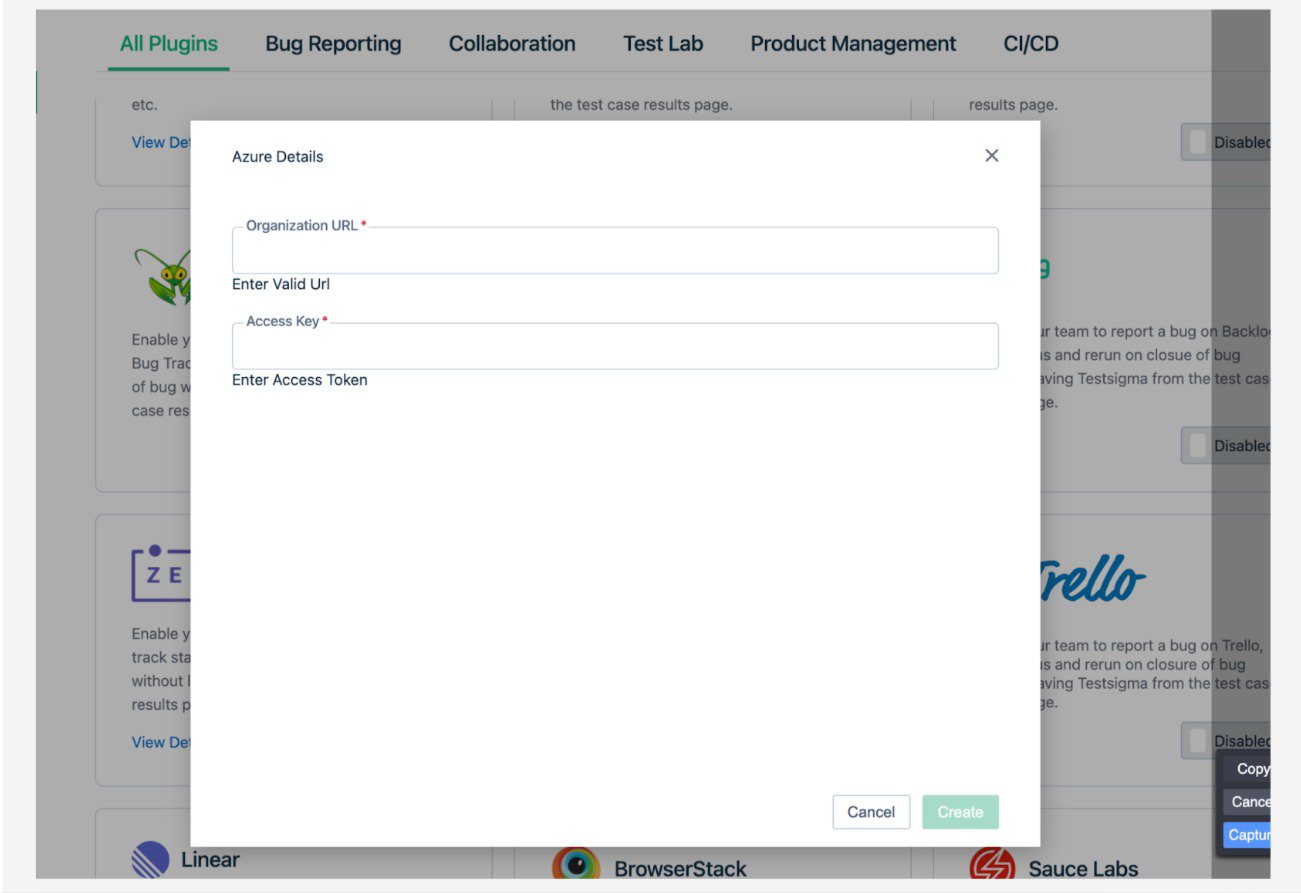
3. Enter the details that you got in the prerequisites section and click on Create to complete the integration process.
Report Bug Using Azure Devops Board While Testing on Testsigma
Now that you know how to integrate Azure DevOps with Testsigma, let’s talk about the simple step you need to report the bug while testing on Testsigma.
Go to the Test Run results page and click on the Report Bug icon.
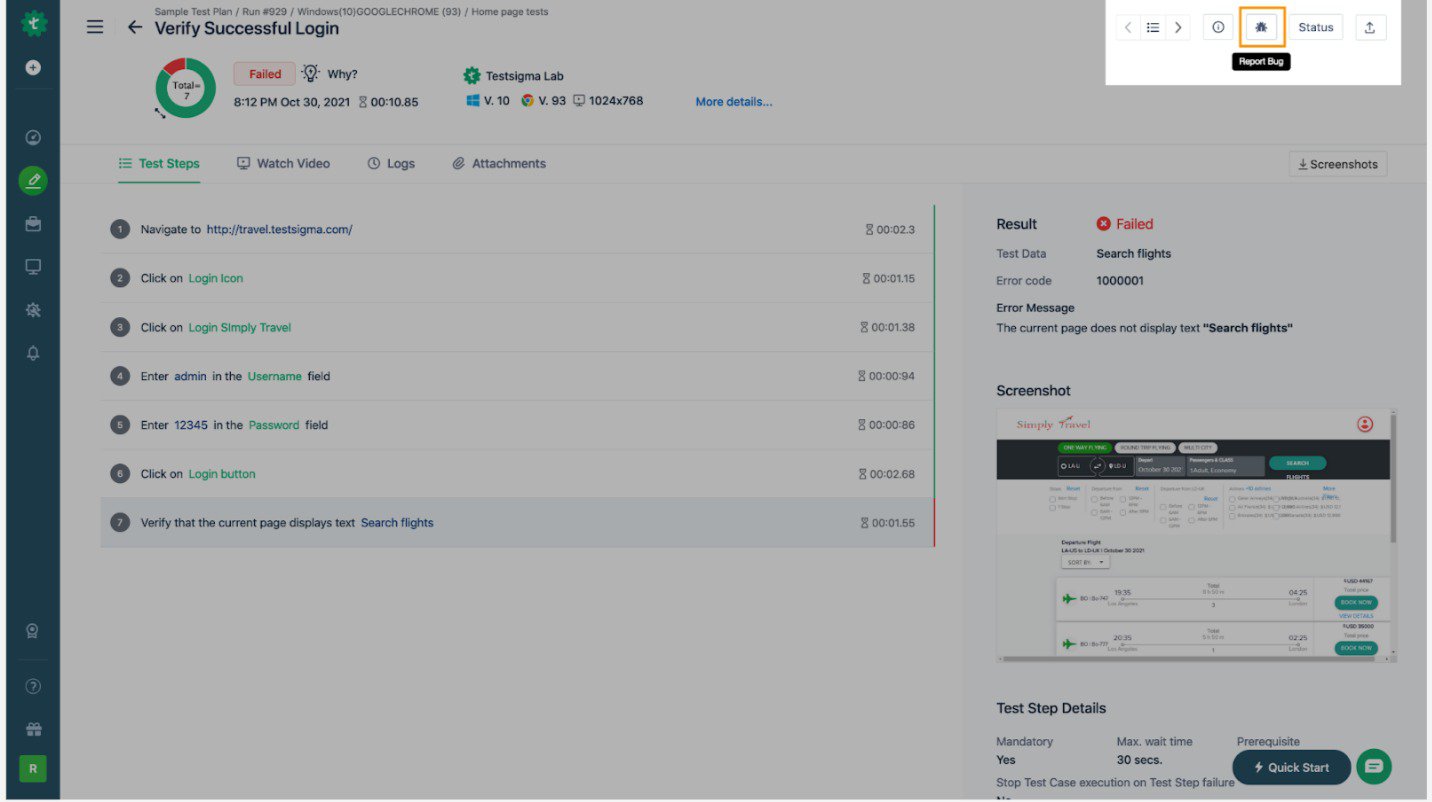
It will open the below overlay:
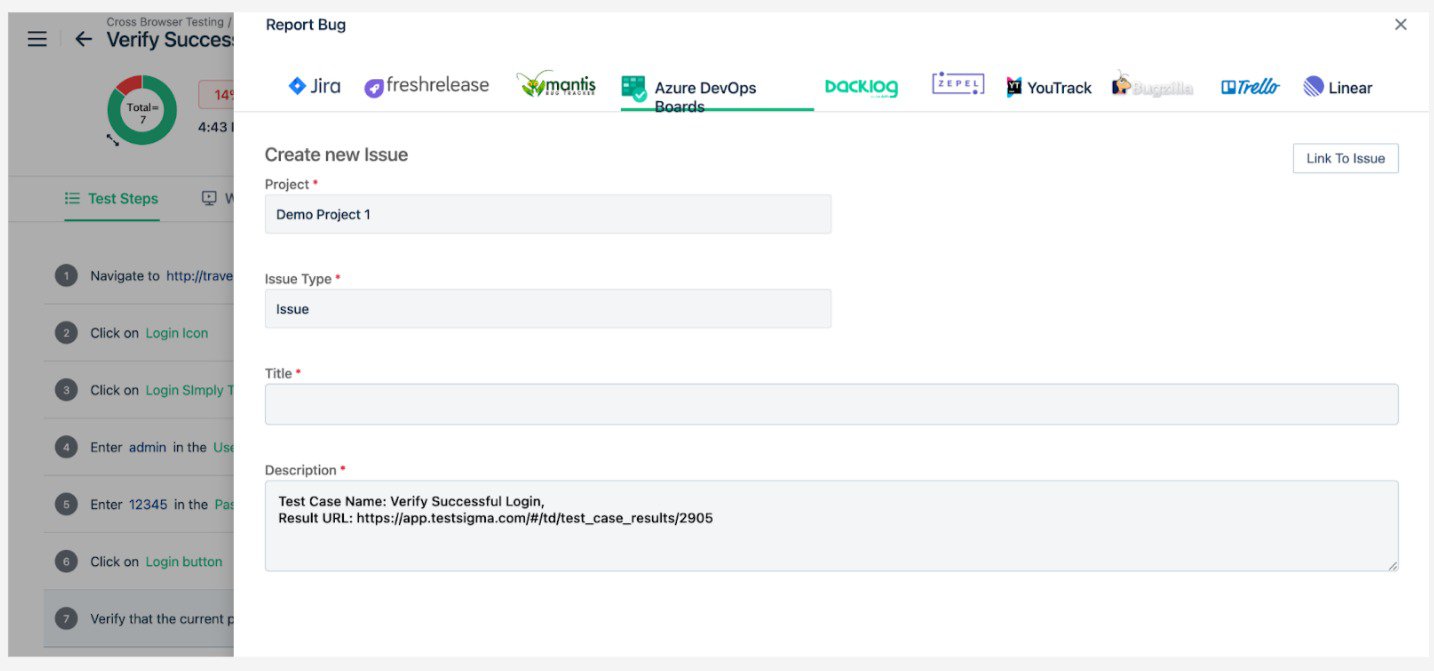
Enter the details as per your requirement and give the description that mentions your bugs:
- Project: Name of your Azure Project.
- Issue Type: Type of the Issue – Bug, Task, etc.
- Title: Title of the Item to be created in Azure DevOps Board.
- Description: Add a meaningful description for the item with as much detail as you can provide.
Summary
There is a clear indication of CI/CD popularity among DevOps engineers. They are always on the lookout for tools that offer improved CI/CD pipeline creation and easy integration options. Azure DevOps is the one tool that packages every necessary to build, test, and deploy an application for faster delivery. It also supports integration with Testsigma, which is extremely useful in bug tracking.
We have discussed the complete process of integrating Azure DevOps with Testsigma. You can go through this blog or follow our docs section to better understand the integration process.
Frequently Asked Questions (Faqs):
What is the AWS CI/CD Pipeline?
AWS CI/CD pipeline builds, tests, and deploys a product or application in an AWS environment. AWS offers a complete set of CI/CD developer tools to accelerate software development and release cycles. One is AWS CodePipeline, which automates the build, test, and deploy phases for every change in the code.
Is Azure DevOps a CI/CD tool?
No, Azure DevOps is not a CI/CD tool. It is a set of several development services for a team to plan, build, collaborate, deliver, deploy, and support the software. One of the services within Azure DevOps supports creating CI/CD pipelines, which is discussed in detail in this blog.
Does Azure Devops Need Jenkins?
Azure DevOps does not need Jenkins, but you can use both of them together. You can trigger Jenkins build when the Azure DevOps Services build is complete to use both systems to build the app.
Is Coding Required for Azure Devops?
Yes, you do require a certain level of coding and scripting language knowledge for configuring and using Azure DevOps.

