


A bug life cycle (or defect life cycle) is the sequence of stages a software defect goes through, from detection to closure. The bug life cycle in software testing can vary based on the organization, project, and testing tools used.
Table Of Contents
- 1 What is Bug/Defect?
- 2 What is a Bug Life Cycle (Defect Life Cycle)?
- 3 Who Performs a Bug Life Cycle?
- 4 Benefits of the Bug Life Cycle in Modern Software Testing
- 5 Guidelines for Implementing a Defect Life Cycle
- 6 Stages of Bug Life Cycle in Testing
- 7 Best Practices for Bug/Defect Life Cycle
- 8 Why use Testsigma for Bug Tracking?
- 9 Conclusion
- 10 Frequently Asked Questions
What is Bug/defect?
A bug or defect is an error that stops users from using an application as intended. Bugs typically arise when a developer makes a mistake while building or designing software. These flaws are often discovered by software testers during application testing. Testers are responsible for finding, reporting, and ensuring the timely resolution of bugs, helping deliver high-quality products to clients. Eliminating bugs and defects is essential for software reliability.
What is a Bug Life Cycle (defect Life Cycle)?
The bug life cycle (defect life cycle) describes the path a bug follows from initial reporting until it is resolved or closed. When a tester or team member finds a defect, the life cycle helps track the status and progress of the resolution. Different people, testers, developers, project managers, are involved at various stages, depending on the workflow. Developers classify and communicate bug statuses throughout the software development process. Typically, the tester discovers and reports the bug, the developer investigates and fixes it, and the tester verifies the solution.
Example of a Bug Life Cycle
Suppose you are testing the flight reservation feature for a travel company. You notice the meal option does not get booked when added to a ticket and report the bug with status “NEW”. The bug is assigned to a developer (“ASSIGNED”), who fixes it (“FIXED”) and sends it back for retesting. If you find a related issue, such as incorrect invoice pricing, you reopen the bug (“REOPENED”). After further fixes and successful testing, you mark the bug as “VERIFIED” and finally “CLOSED” once everything works as expected.
Who Performs a Bug Life Cycle?
In the bug life cycle in software testing, several roles contribute at different stages, each bringing unique expertise and responsibilities.
| Role | Responsibilities in Defect Life Cycle in Software Testing |
| Tester | Reports defects with detailed, reproducible steps, attaches logs or screenshots, verifies fixes, and retests after changes. |
| Developer | Analyzes bug reports, implements fixes, updates status, and communicates any technical constraints or root causes. |
| Project Manager | Prioritizes bug fixes based on release goals, manages timelines, and coordinates resources to keep the process on track. |
| QA Lead | Oversees bug triage, ensures correct classification and prioritization of defects, and monitors resolution progress. |
| Business Analyst | Evaluates the impact of defects on requirements and business outcomes, advising on prioritization to align with user needs. |
| End User | May report issues through feedback or support channels, providing real-world insights into defects not caught in testing. |
While these roles handle the human aspects of the defect life cycle in software testing, automation pipelines support the process by detecting and logging defects during test runs, triggering regression tests after fixes, integrating seamlessly with issue trackers, and providing real-time visibility on bug status. This reduces manual effort, speeds up the cycle, and ensures issues are identified and resolved quickly in modern development environments.
Benefits of the Bug Life Cycle in Modern Software Testing
Understanding and applying the bug life cycle in software testing transforms how teams build quality products, launch on time, and uphold user trust. Here’s a deeper look at its advantages across critical dimensions:
1. Impact on Product Quality
When bugs are detected, documented, and resolved through a structured series of stages, it fosters thorough verification and minimizes the chance of lingering issues. This process ensures that every bug, whether minor or critical, is addressed systematically. The transparency provided by lifecycle tracking means testers and developers know exactly what’s unresolved and who’s responsible, drastically reducing duplication and missed defects. As teams use automation and analytics for bug tracking, underlying trends become visible, allowing for shifts in development to proactively address root causes.
2. Business Repercussions
Undetected defects can halt services, spark negative publicity, and cause costly outages. The Standish Group’s CHAOS reports have found that late-stage bug discovery often leads to 30% longer project timelines and increased budget overruns. A visible, well-communicated defect life cycle allows teams to prioritize critical fixes, ensuring vital business functions aren’t compromised. Stakeholders are kept informed, and the responsiveness to customer-reported bugs improves. A company’s ability to manage the bug life cycle well becomes a competitive advantage, reinforcing user trust and supporting smoother releases.
3. Agile, Devops, and Shift-Left Integration
The defect life cycle creates a shared language and workflow for tracking and fixing bugs that fits naturally into these iterative environments. By integrating bug tracking with CI/CD pipelines and automated testing, teams can detect issues earlier, often while code changes are being committed. This “shift-left” approach ensures defects are not only found but also triaged, assigned, and resolved rapidly before they snowball and disrupt entire sprints or releases. The process bridges silos: ops, QA, and devs collaborate with access to real-time bug statuses and histories. This synergy allows frequent deployments without sacrificing quality.
4. Team Collaboration
Instead of confusion over status or responsibility, each bug carries a clear “state” and owner. Transparent communication prevents misunderstandings and helps align priorities. Teams can share updates using modern defect tracking tools, ensuring no critical issue slips through. Over time, this system promotes a culture where knowledge is routinely shared, leading to smarter handovers, fewer missed details, and stronger accountability.
A clear and detailed bug report is essential for swift defect resolution and effective communication between testers and developers. For comprehensive guidance on creating precise and actionable reports, refer to our detailed guide on how to write a good bug report.
Guidelines for Implementing a Defect Life Cycle
Before you begin working on the bug life cycle, you must follow the guidelines below to explore the maximum advantages of the process:
- The involved teams (the testing and development teams) must be well-versed in the different states covered in a defect.
- All individuals working in this process must thoroughly understand their responsibilities to ensure quality results.
- There must be proper documentation of the defect life cycle in testing to prevent any kind of confusion in the future. You should use a bug report that comprehensively includes all necessary details regarding the bug.
- It is recommended to use a tool for defect tracking. The purpose is to maintain consistency among the bugs as well as in the workflow of the bug life cycle. You can use tools like Bugzilla, Jenkins, and Jira.
If you also have test automation pipeline, then you should integrate that with bug reporting tools so that any bugs found via your automated tests, is reported automatically.
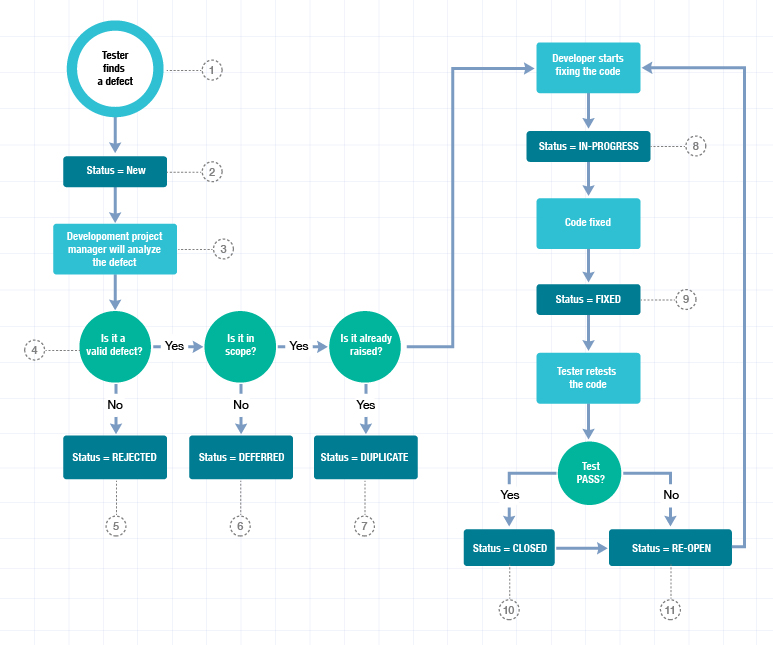
Stages of Bug Life Cycle in Testing
No matter how your team is structured, every issue moves through well-defined bug life cycle stages in software testing. Thanks to advances in automation and integrations, tracking and managing bugs is smoother than ever, especially when paired with codeless test automation platforms and popular issue trackers. Let’s dig into each stage and highlight where automation and integration amp up your efficiency.
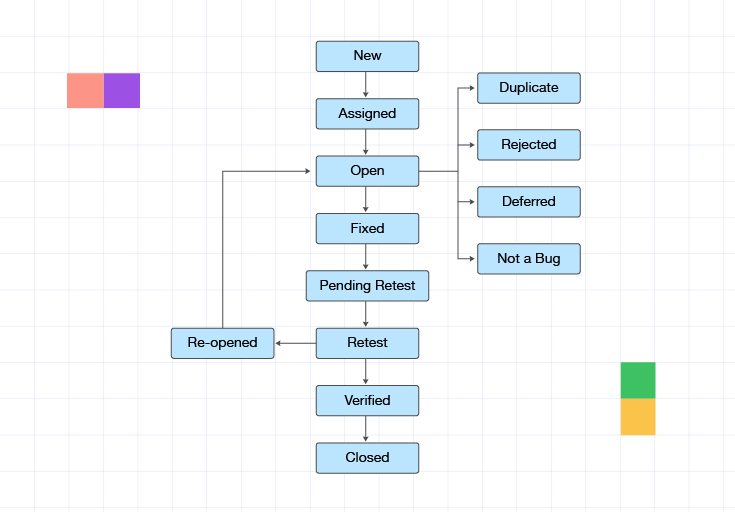
- New
A defect is first captured and marked as “NEW.” Modern automated testing tools can spot bugs during test runs and instantly log entries into integrated tracking platforms. With these integrations, testers don’t waste time manually logging issues. Detailed reports, screenshots, and system data flow in automatically, giving developers everything they need upfront. - Assigned
Once logged, the bug is assigned to a developer or dev lead for review. Smart integration lets teams set up auto-routing, bugs can be assigned based on severity, area, or even developer workload, reducing bottlenecks and ending manual ticket shuffling. - Open
Here, the developer digs into the issue, analyzing logs and test results thanks to automation. Integrated systems make it easy to pull together data from different environments, so the root cause stands out. If a bug isn’t valid, it’ll shift to “Deferred” or “Rejected,” sometimes flagged automatically using duplicate or non-reproducible detection algorithms. - Fixed
Once the developer has patched the code, they update the bug as “Fixed.” In many modern setups, continuous integration pipelines trigger regression tests automatically, verifying fixes in seconds and notifying the right people. - Test
With the bug marked “Test,” automated tests are rerun to ensure the defect no longer appears. This stage highlights the power of codeless automation: tests scale, repetitive scenarios run at any hour, and each result is logged back to the defect tracking tool. - Verified
If the automated and manual testing show the patch works and no related issues emerge, the tester marks it as “Verified.” Integrated dashboards keep everyone aware of the bug’s journey, offering historical insights for similar future errors. - Closed
The bug, now fixed and verified, gets “Closed.” Automated workflows close tickets across systems, update release notes, and help teams measure response time, crucial metrics for process improvement. - Reopen
Sometimes, a bug pops up again. If tests reveal the issue is unresolved, automation flags and re-opens the bug for review, kicking it back through the cycle with full traceability and context for developers to act fast. - Duplicate
Bugs reported twice are marked “Duplicate.” Reliable defect life cycle management in software testing often relies on automated duplicate detection that scans for similarities and links related tickets. - Deferred
A bug that’s lower priority or targeted for a future release becomes “Deferred.” Automation helps by tagging these based on business rules, and keeping them visible for planned sprints, ensuring nothing critical slips through if priorities change. - Rejected
If the issue is invalid, due to a misunderstanding or isn’t a real defect, it’s marked “Rejected.” Automated triage helps catch frequent causes like duplicates or non-reproducibles early, reducing time wasted. - Cannot be fixed
For technical or practical reasons, some bugs are marked “Cannot be fixed.” Integration here helps link the decision to relevant documentation, so reasoning and constraints stay part of the project’s record. - Not a defect
Some reported issues don’t actually impact the software, so they’re tagged “Not a defect” and later rejected. Automation helps confirm this by cross-referencing expected outcomes and specs. - Not Reproducible
When an issue can’t be recreated, it’s tagged “Not Reproducible.” Automated testing across multiple platforms or with varied datasets improves reproducibility. If all runs pass, integration tools feed this info back to testers so the defect can be closed or re-evaluated. - Need More Information
Sometimes, developers need extra detail. The bug moves to “Need more information,” triggering automated prompts for testers to provide additional steps, logs, or data. With integrations, communication is seamless and time-to-resolution shrinks.
Best Practices for Bug/defect Life Cycle
Delving deeper into best practices for managing the defect life cycle in software testing reveals actionable strategies that elevate product quality and team efficiency:
- Clear Bug Reporting: A comprehensive bug report should detail steps to replicate the issue, include relevant screenshots, and specify the environment and impact. Precision at this stage prevents wasted time, as developers quickly grasp the problem’s scope and urgency. High-quality reports also streamline prioritization when multiple bugs are logged, ensuring the most critical ones get addressed first.
- Consistent Status Updates: As bugs move through “New,” “Assigned,” “In Progress,” “Fixed,” “Verified,” and “Closed,” their status must be updated in tracking tools. This real-time visibility gives stakeholders an accurate view of progress and prevents duplicate efforts, bottlenecks, and missed deadlines. Consistency in status management is especially vital for distributed teams.
- Regular Communication: Frequent, transparent updates between testers, developers, managers, and even end users foster a culture of trust and rapid resolution. Regular bug review sessions help teams reassess priorities, clarify details, and unblock issues before they affect releases.
- Root Cause Analysis: Beyond merely fixing bugs, teams should analyze each defect to uncover systemic issues, whether they stem from coding errors, unclear requirements, or gaps in testing. Tracking recurring bugs and documenting solutions helps prevent future problems and makes the entire cycle more proactive.
- Automation Tools Adoption: Modern bug tracking platforms integrated with code repositories, testing frameworks, and CI/CD pipelines automate much of the repetitive work. Automated test scripts and real-time reporting enable bugs to be logged and even triaged with minimal manual intervention, saving time and increasing accuracy.
- Timely Verification and Closure: After fixing, each bug should be retested in relevant scenarios to confirm the solution. Only when the issue is reliably resolved, without introducing regressions, should the bug be closed. Delayed verification can lead to deployment of unstable code; timely closure ensures confidence at release.
- Documentation: Every decision, workaround, or fix related to a bug should be documented in its lifecycle history. This record is invaluable for audits, training, reference in future projects, and continuous improvement initiatives. Well-documented bugs serve as learning resources and enable process optimization down the line.
Why Use Testsigma for Bug Tracking?
Testsigma is an codeless Agentic AI-driven test automation platform designed to simplify and accelerate software testing for teams of all sizes. It offers an intuitive interface that makes writing, executing, and managing tests accessible, even for those without programming skills, while providing powerful features to support end-to-end quality assurance processes.
Automating bug tracking is crucial because it reduces manual effort, speeds up defect identification, and improves communication between testers and developers. The Bug Reporter Agent in Testsigma simplifies this by automatically capturing detailed bug reports during test execution, including screenshots, logs, and environment details, making it easier to reproduce and resolve bugs quickly.
Key Features of Bug Tracking in Testsigma
- Agentic AI-Based Bug Reporting: Captures comprehensive bug details automatically when tests fail, saving time and eliminating manual errors in documentation. Combines screenshots, logs, and test steps in a single report for clear defect communication.
- Seamless Tool Integration: Connects effortlessly with popular issue trackers and project management tools for smooth workflow continuity.
- Real-Time Updates: Provides instant notifications and real-time bug status tracking to keep teams aligned.
- Codeless Test Automation: Enables testers to create and run automated tests without writing code, making bug detection faster and more frequent.
- Collaboration Support: Facilitates easy sharing of bug reports with developers and stakeholders to speed up triage and resolution.
- Customizable Workflows: Supports adaptable bug life cycle stages to fit varying team processes and project needs.
- Regression Testing: Automatically reruns tests on bug fixes within CI/CD pipelines to ensure issues are resolved without introducing new errors.
Conclusion
A well‑defined bug life cycle in software testing ensures that defects are detected early, tracked effectively, and resolved with clarity, leading to higher software quality and better user satisfaction. By combining structured processes with automation, teams can reduce manual overhead, speed up resolution, and maintain complete transparency across all roles involved. Modern platforms like Testsigma make this even easier by integrating testing, bug reporting, and collaboration into a single streamlined flow. Adopting these practices not only improves release quality but also strengthens team efficiency, enabling faster delivery of dependable, user‑ready software.
Frequently Asked Questions
A bug life cycle (also known as a defect life cycle) refers to the journey of a defect in which a defect passes throughout its lifetime. It entails all states ranging from the detection of a new defect to the closing of the particular defect by a tester.
Software Testing Life Cycle (STLC) refers to a sequence of specific activities undertaken during the testing process to fulfill the software quality goals. It entails both validation and verification activities. A bug life cycle involves all states of defects or bugs, ranging from detecting a new bug to closing that bug by the tester.
Any problem in code produces errors. They are resultant of the developer’s misunderstanding of the defined requirements.
If an application is not functioning as per the stated requirements, it is called a defect. It indicates the deviance from the actual and anticipated result of the software/application.
Failure refers to an event in which a system or component doesn’t perform a required function within specific limits.

