


When it comes to ensuring the quality of software, testing is essential. The testing process can vary depending on the application type being developed and its purpose. One form of testing used in software development is known as screenshot Testing, also sometimes known as Visual Testing. This guide discusses screenshot testing, how it works, and how to perform the process on different platforms.
Table Of Contents
- 1 What is Screenshot Testing?
- 2 Why Screenshot Testing is Important?
- 3 When to Use Screenshot Testing?
- 4 Why Keep Screenshot Tests to a Minimum?
- 5 How Does Screenshot Testing Work?
- 6 Screenshot Testing with Testsigma
- 7 Advantages of Screenshot Testing
- 8 Disadvantages of Screenshot Testing
- 9 Best Practices for Screenshot Testing
- 10 Tools for Performing Screenshot Testing
- 11 Conclusion
What is Screenshot Testing?
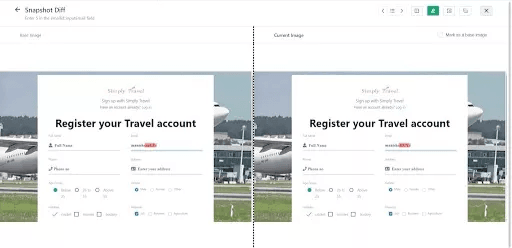
In Screenshot testing, testers take screenshots of the application or website under test and compare them to the expected results. They can then identify discrepancies between the two and report them to developers for resolution. This process helps ensure the application or website meets design specifications and provides a positive user experience.
This testing is particularly useful when the UI of the application gets changed often and can point out the smallest of differences from the expected results very quickly.
Why Screenshot Testing is Important?
Screenshot testing is important to evaluate the end-user experience. It is done to ensure all the visual elements work fine on different devices. It helps analyze and compare different versions. The objective is to make sure that everything looks correct and is visually consistent.
When to Use Screenshot Testing?
Screenshot testing is essential for cross-platform testing. To test if the UI is responsive across all platforms. When dealing with dark modes or different themes, it is better to verify the aspect ratios, color schemes, fonts, etc.
Why Keep Screenshot Tests to a Minimum?
While screenshot testing is important for a better user experience, doing too much of it can lead to excessive non-critical bugs. This can increase the time taken to market. UI changes frequently, and maintaining large sets of screenshot tests requires constant updates to avoid outdated baselines. It is recommended to test all necessary and high-priority tasks with this testing.
How Does Screenshot Testing Work?
You take screenshots of the website or app in different environments like browsers, resolutions, and operating systems. Following these steps ensures that your website or application functions optimally and provides a positive user experience.
Here are the steps:
Step 1: Choose a Screenshot Testing Tool
The first step is to choose a Screenshot testing tool that suits your needs. Many options are available in the market, such as Testsigma, Applitools, Percy, and Cypress. Each tool has its unique features and benefits.
Step 2: Define Test Scenarios
Once you have selected a tool, the next step is to define test scenarios. This involves identifying your application’s different pages or screens that need to be tested. You can also define specific actions that users might take on these pages.
Step 3: Capture Screenshots
After defining test scenarios, you must capture screenshots of each page or screen using the screenshot testing tool. This can be done manually or automatically, depending on your tool. These screenshots become the baseline for your tests.
Step 4: Compare Screenshots
Once you have captured the screenshots, the next step is to compare them. By comparing the screenshots, you can ensure that the UI is consistent with the expectation. This will help you identify any visual bugs or inconsistencies that may have been introduced during development or changes made to the page.
Step 5: Resolving the Issue
After identifying any visual bugs or inconsistencies, addressing them promptly is important. This may involve making changes to the code or design of the page. Once the necessary adjustments have been made, repeating the comparison process is recommended to ensure the issues have been resolved. Tools like Testsigma, Applitools, Percy, and BrowserStack can automate this process and make it way faster to compare multiple screenshots simultaneously.
Screenshot Testing with Testsigma
With Testsigma, you can perform this Testing for your web and mobile applications.
This Testing is default switched off for all test steps. Users have the freedom to turn it on only for the steps where they need visual validation.
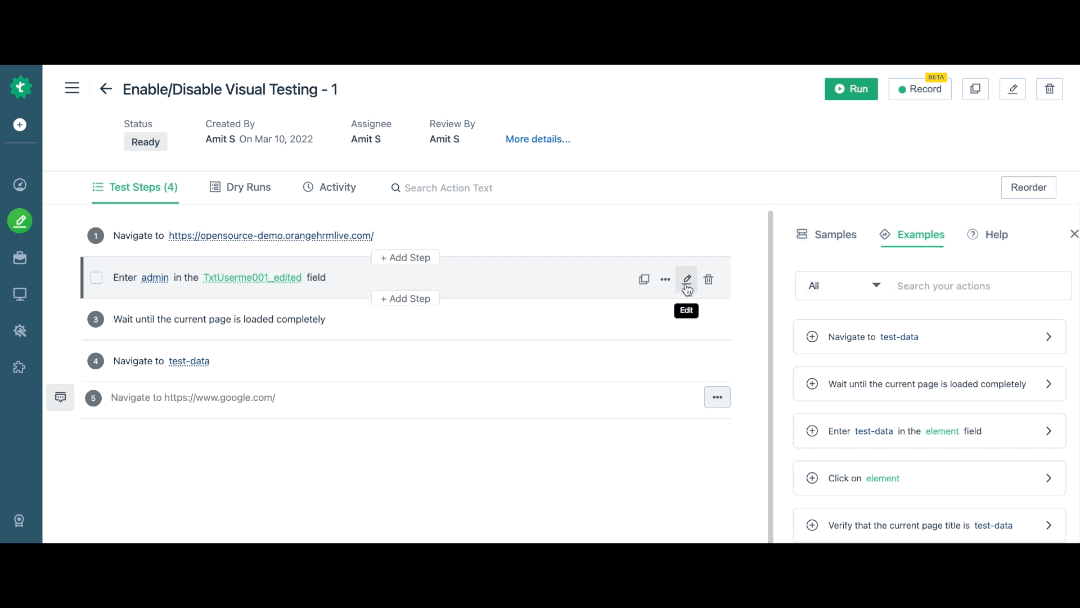
1. How to Enable Testing for a Test Step
This testing can be configured for a test step on a test case details page or on a test step recorder. Below are the steps for doing the same:
- Go to the step and click on step details.
- Turn on the the Testing for the step using the setting “Visual Testing”(Screenshot Testing)
- Testing validation is now on for this test step.
Alternatively, below is a gif demonstrating the above steps:
After you enable “visual testing” for a test step – Screenshot Testing becomes available only after the next successful run. This is because, to execute Screenshot testing, Testsigma needs a baseline image corresponding to the test step.
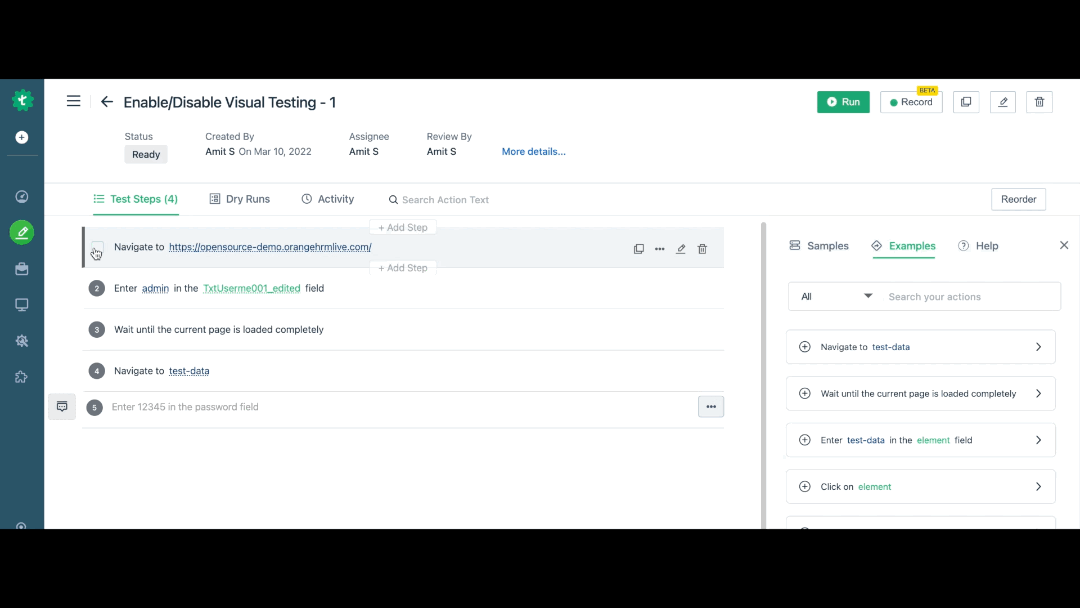
2. Bulk Update Steps
Testsigma supports bulk steps updates to turn on/off Screenshot testing to save time and reduce redundant efforts.
You can select all the steps in the test case you want and turn on/the screenshot testing settings on/off in one go.
Below is a gif demonstrating bulk updates for enabling screenshot testing for multiple steps at once:
Advantages of Screenshot Testing
This testing plays a vital role in ensuring the quality and accuracy of software applications. Here are some major advantages and disadvantages of this testing.
The advantages are:
- Its primary benefit is to detect even the slightest differences in the graphical user interface between the expected and actual results.
- Allows for fast testing to identify if there are major differences between expected and actual results.
- It visually represents how the user will see the application and can detect UI-related errors.
- Easy to use and set up compared to other automated testing methods.
Disadvantages of Screenshot Testing
The disadvantages are:
- Not suitable for more complex applications with multiple user interactions, functionalities, and data sets.
- It cannot detect logical defects in the application as it only captures what it is displaying.
- It is a labor-intensive process as manual effort compares expected and actual results.
Best Practices for Screenshot Testing
- Maintain a balance of tests: Too much testing doesn’t assure you of a great visual experience. There are other tests to consider to improve the user experience. Focus on the most important aspects instead of testing everything.
- Avoid false positives: Small visual imperfections can cause unnecessary test failures. Ignoring such minor anomalies can save a lot of time in testing.
- Use baseline screenshots correctly: To get better results, use the correct baseline screenshot. This baseline screenshot will be a reference image that is compared with all the screenshots taken on different devices.
- Automate screenshot testing in CI/CD pipelines: Integrate testing into your CI/CD workflows. Run tests automatically on new code commits and pull requests to catch visual regressions early.
- Implement parallel testing for faster execution: Perform different tests on different platforms, browsers, and devices. Run screenshot tests in parallel to save time.
Tools for Performing Screenshot Testing
The must-to-know tools are here. Bookmark them:
1. Testsigma: Testsigma is a web-based test automation platform for automated screenshot testing. It enables developers and QA teams to create, run and manage automated tests for web, iOS, and Android applications. It also supports visual regression tests for UI components.
2. Applitools Eyes: Applitools Eyes provides AI-driven visualization testing to compare web and mobile application interface images, detect visual UI differences, and report them as bugs. It is a cloud-based automated testing solution.
3. Kobiton: The cloud-based test automation platform, Kobiton, supports automated testing for Android and iOS applications. Kobiton offers access to real devices and browsers for testing, screenshot testing, and bug tracking.
4. Screenster: Developers can use Screenster, a cloud-based automated testing solution, to verify the accuracy of their web and mobile apps across browsers and devices. It records screenshots of each test run and allows developers to check for visual regression errors.
5. Percy: Percy is a visual testing platform designed to help QA teams identify visible changes in web and mobile applications. It uses screenshot data to compare images of the same page or element across different browsers, devices, and environments and provides feedback on any broken images or layout discrepancies.
Conclusion
Here comes the finale! Screenshot testing is a simple and effective way to help ensure integrity, reliability, and accuracy. By using this method, teams can save time and resources and provide an improved user experience. This makes it an invaluable tool for testing and development.
Frequently Asked Questions
Screenshot testing focuses only on visual components like image rendering. It is mainly used for detecting visual anomalies and layout issues to ensure the UI is consistent across different platforms. For example, screenshot testing can check if the user interface looks the same on different devices or browsers.
Snapshot testing, on the other hand, focuses on the structural representation of the visual components, such as the underlying code. It helps in identifying unexpected changes in UI components by testing the structure of the codebase used in the UI, rather than its appearance.
For example, snapshot testing could be used to ensure the structure of the code that creates a UI component hasn’t changed unintentionally.
Screenshot testing is usually done via automated tests and helps to verify the look, feel, and consistency of the UI across different versions of the same application. It is typically faster and requires less time, cost, and effort to conduct compared to other testing methods.
UI testing, in contrast, can be performed either manually or with automation. It tests the functioning of UI components, including buttons, checkboxes, and other interactive elements. UI testing generally takes more time to complete and is higher in cost and effort because it assesses both the visual aspects and the actual interactions within the application.
Android screenshot testing is a way to test the UI of an Android app. With this testing, users can check that everything looks how it should on all device sizes and configurations, ensuring the user experience is consistent across different devices. It’s helpful for developers because they can quickly find and fix any visual bugs in their app.
Android screenshot testing involves capturing screenshots of an app on different devices and comparing the visuals against a baseline to spot any differences. It helps ensure UI consistency across various Android platforms.

