- getting started
Get Started with Automating Web Applications
Get Started with Automating Mobile Web Applications
Get Started with Automating Android Apps
Get Started with Automating iOS Apps
Get Started with REST API Testing
- test cases
- web apps
How to create web application tests using Test Recorder
How to create Test Steps for uploading files
- mobile apps
How to create Android & iOS app tests using Test Recorder
How to automate Android app tests using local devices
How to automate iOS app tests using local devices
How to automate data driven testing
- REST API
What is JSONPath and How to query JSON using JSONPath
Contract Testing with Testsigma
Consumer Driven Contract Testing with Testsigma
- test plans
How to create test plans to run on your local devices
How to do cross-platform end-to-end testing with Testsigma
Web: How to build Test Cases using Recorder
Recording user actions is an effective way to simplify test creation and enable everyone in your team to contribute to building tests. In this tutorial we are going to show you how to use the step recorder to create a readable and editable test case for an end-to-end scenario.
We cover
- Prerequisites for getting started
- Creating a step group
- Recording a test case
- Running the test
- Analyzing results
Pre-requisites
- You have a Testsigma account : If you haven't already, sign up for a free trial The trial includes all product features and free support (always!) via the in-app chat or email to support@testsigma.com
- You have added the Test recorder : The extension will automatically render steps(in readable natural language) based on how you interact with the application under test. You can add Testsigma’s extension from the Chrome webstore by visiting this link. For a detailed overview, check here.
Setting the stage to Record your first test
Workflow: Create a Project > Add a Test Case > Create a step Group -> Record Test Steps
Let’s understand these in detail.
- Project - Can be your web application for instance
- Test Case - specific scenario that has to be tested, say, login functionality
- Test Steps - the actual set of instructions/steps required to test the functionality
- Step Group - A group of test steps that can be used across other test cases
By default, 4 Projects will be readily available on your account. These projects (here, Web application) will also have a few sample Test Cases and Test Steps ready for your reference.
- Start by creating a Project first. For a detailed overview, check here.
- Create a Test Case For a detailed overview, check here.
- Record Test Steps Once you create a Test Case, you will be redirected to the page where you can record all your Test Steps.
Test scenario
We’ll be using our ‘Simply Travel’ web Application to demonstrate the step recorder functionality. The test scenario in this case will be “Booking a flight using multiple filters”
Before you start make sure you’ve referred to the ‘Setting the stage to write your first test’ ‘section in this tutorial and your are currently in the ‘Test Case Details’ Page
Creating a step group
To create a step group from the test case details navigate to the step groups tab that's present right next to the test cases page. Here we’ll be performing the following steps:
Step 1. The first step is to navigate to the login screen of the application which in this case is the travel testsigma website. Since this is always the first step, a default “Navigate to test data” action will be added by default.
Test data is a terminology in Testsigma which refers to the input values you wish to provide.
So, you only need to paste the website address (URL) you are testing. In this case, the Simply Travel web application URL which is https://travel.testsigma.com/login
Paste this link in place of test data.
Step 2: Add the following action statements to complete the login portion of the test scenario. To learn more about writing test cases manually refer to this document:
- Enter admin in the User Name field
- Enter 12345 in the Password field
- Click on Login
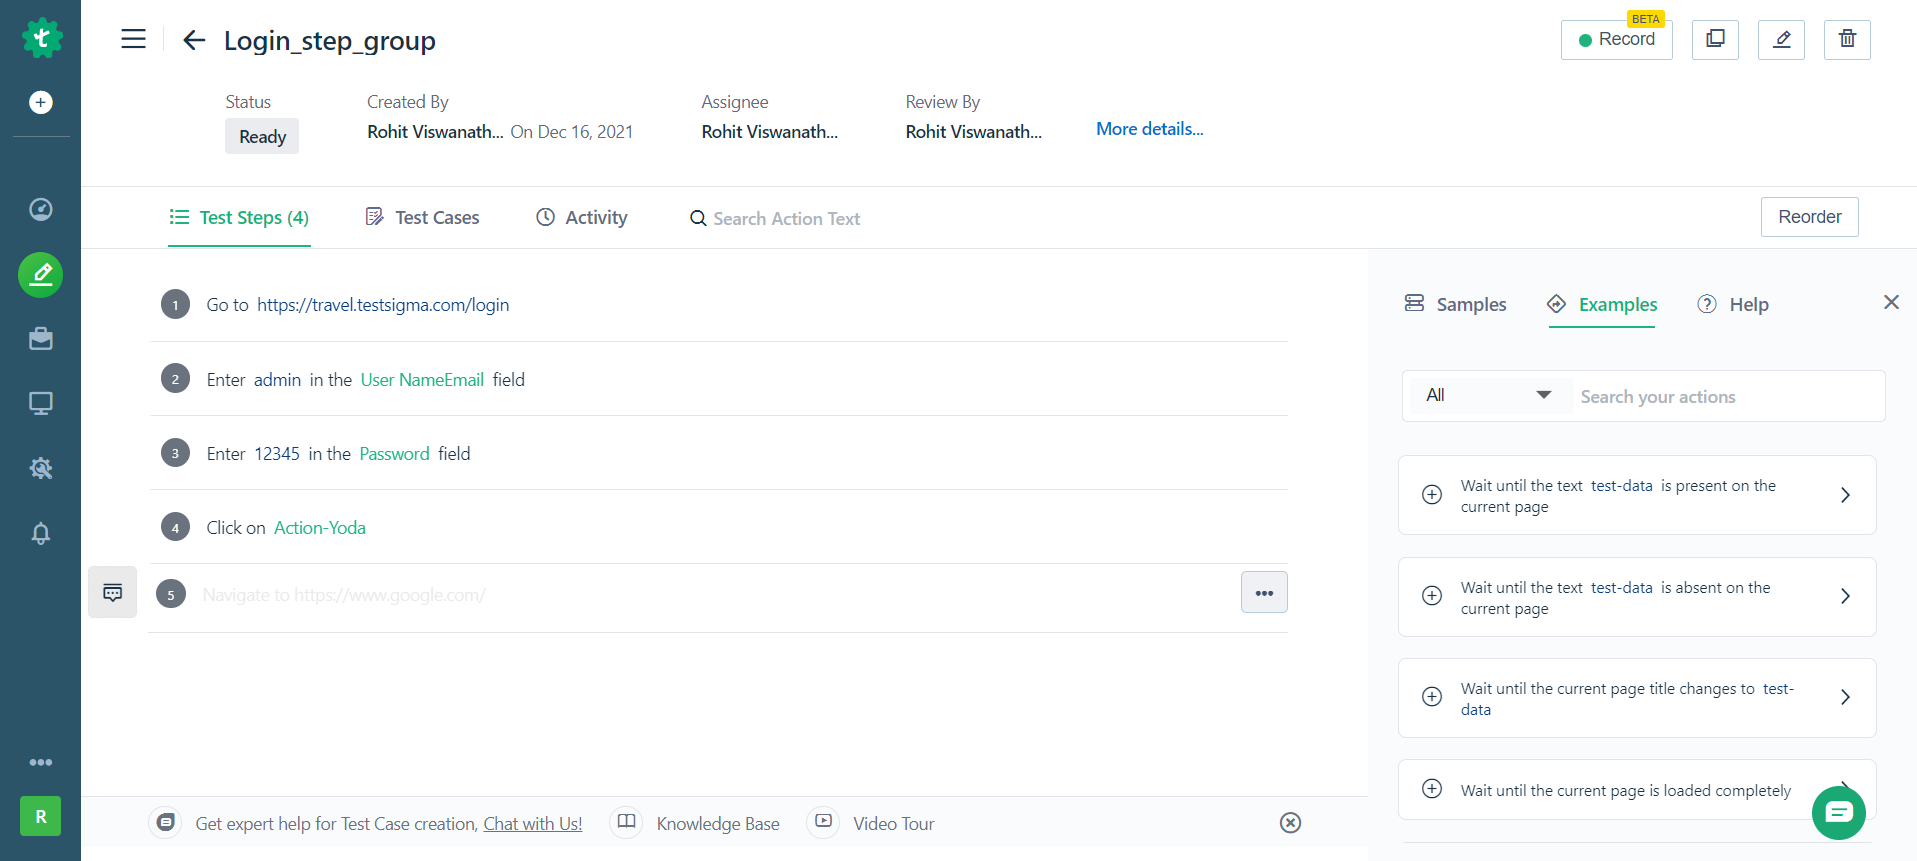
Once you’re done adding the test steps you’ve completed the required login scenario for the step group. Go back to the test cases page.
Recording the test case
Step 1: Navigate to the test case details page. Now we need to add the Step group you just created as the first step in this test scenario. Click on the NLP symbol on the left of your test step. From the drop down select the Step Group option.
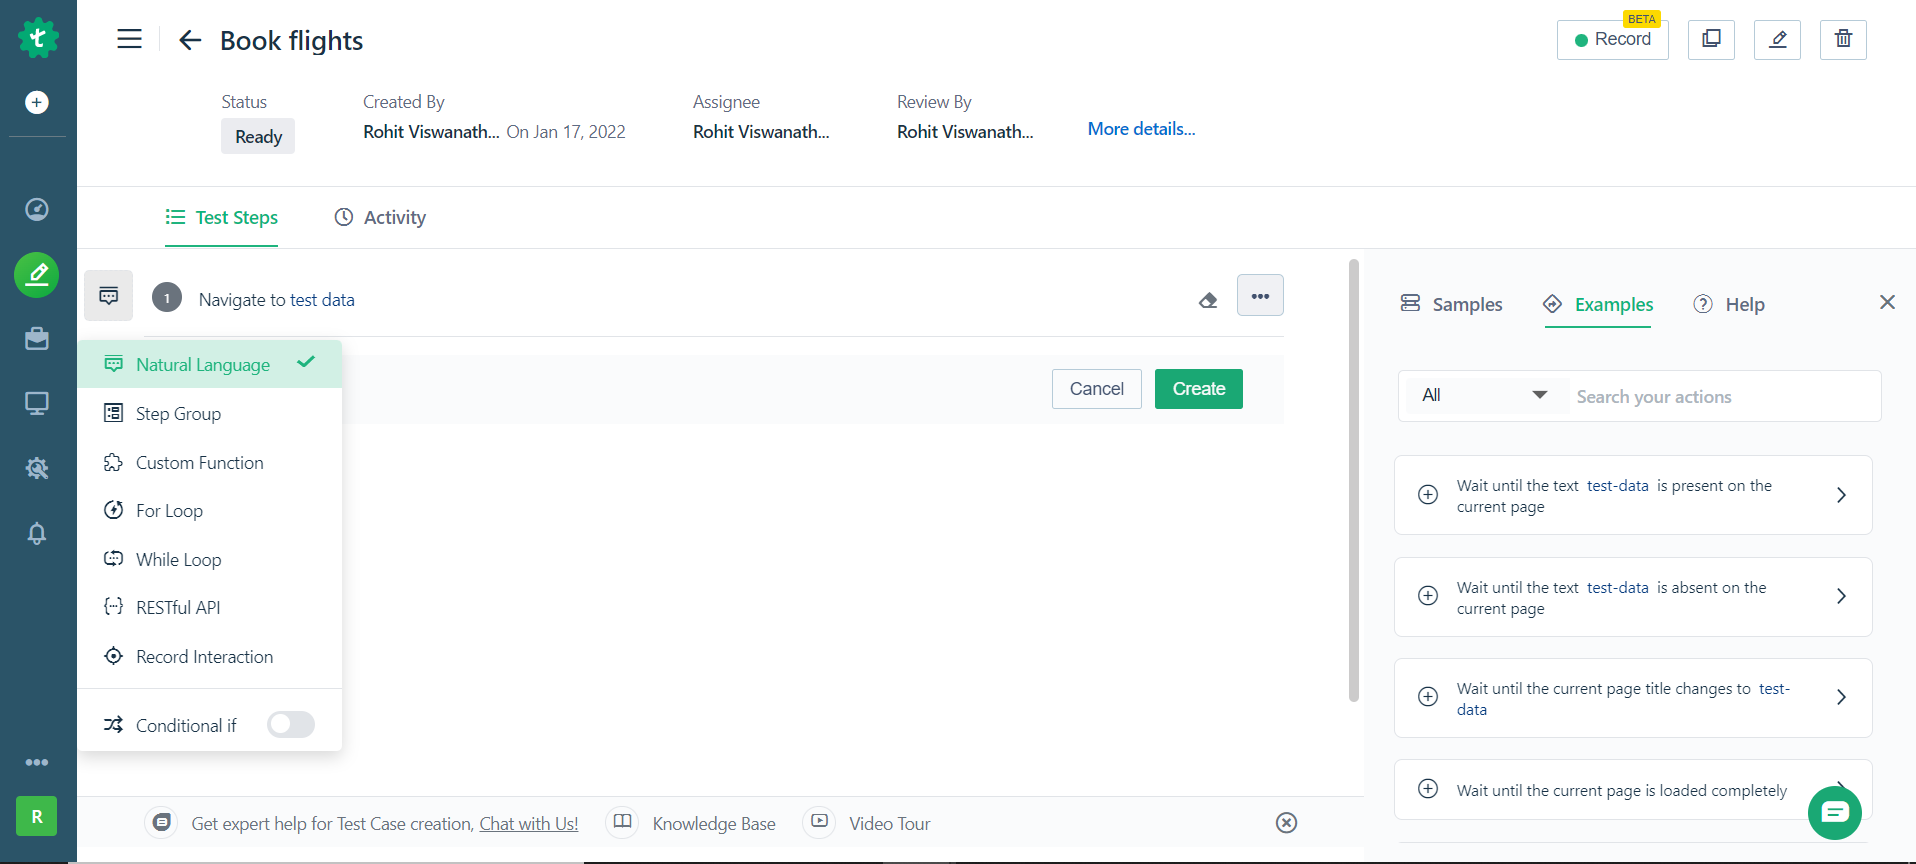
Step 2: Click on the Record button at the top right to start recording your interactions.
You will see that a new window appears that will navigate you to the URL you just entered.
Here, you can start performing your desired actions on your web application. Note that each click, keystroke will be recorded as steps. The corresponding simple English tests will be automatically created and added below the first step you just created (Step 1).
To enter some value, click on any text field in the form, enter a name (say, John Doe). The input you entered and its address will all be automatically captured by the smart recorder.
Perform the following user actions on screen while the recorder is running. You can click on the little red button at the bottom at any time to pause your recording.
- Select the checkbox Non Stop
- Check the checkbox Before 6AM
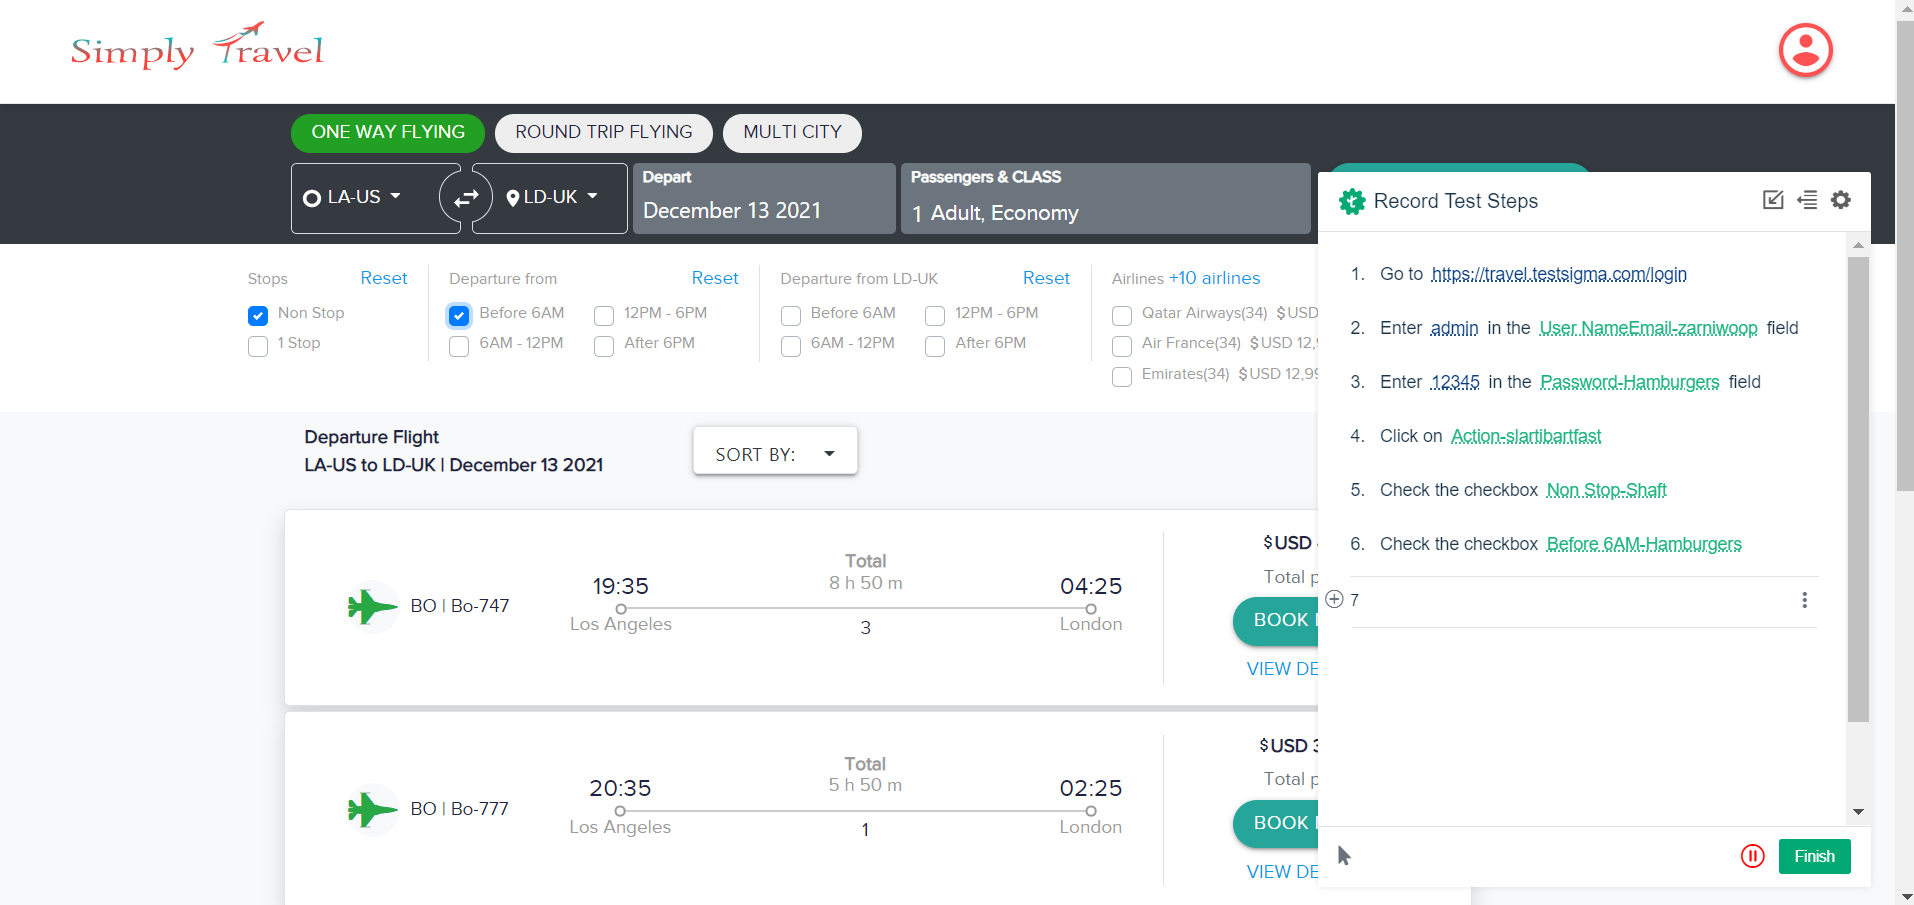
- Click on More Filters
- Click on Apply
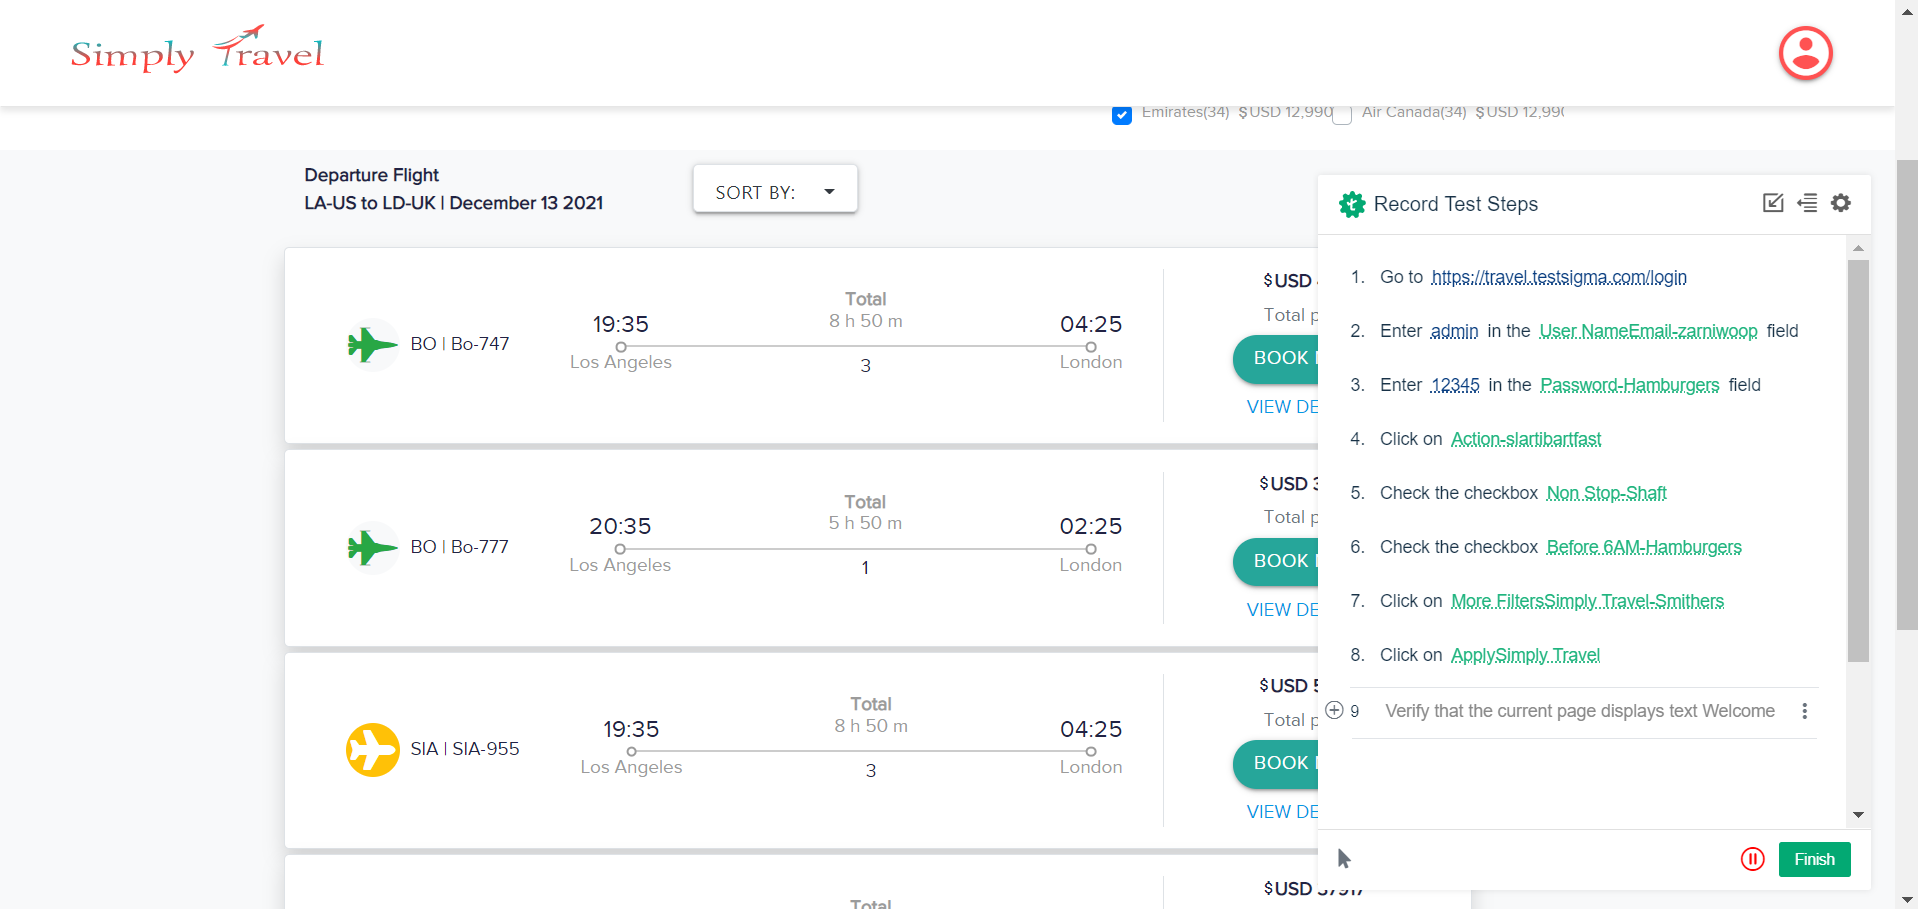
- Click on Sort By
- Click on Book Now for any of the flight options
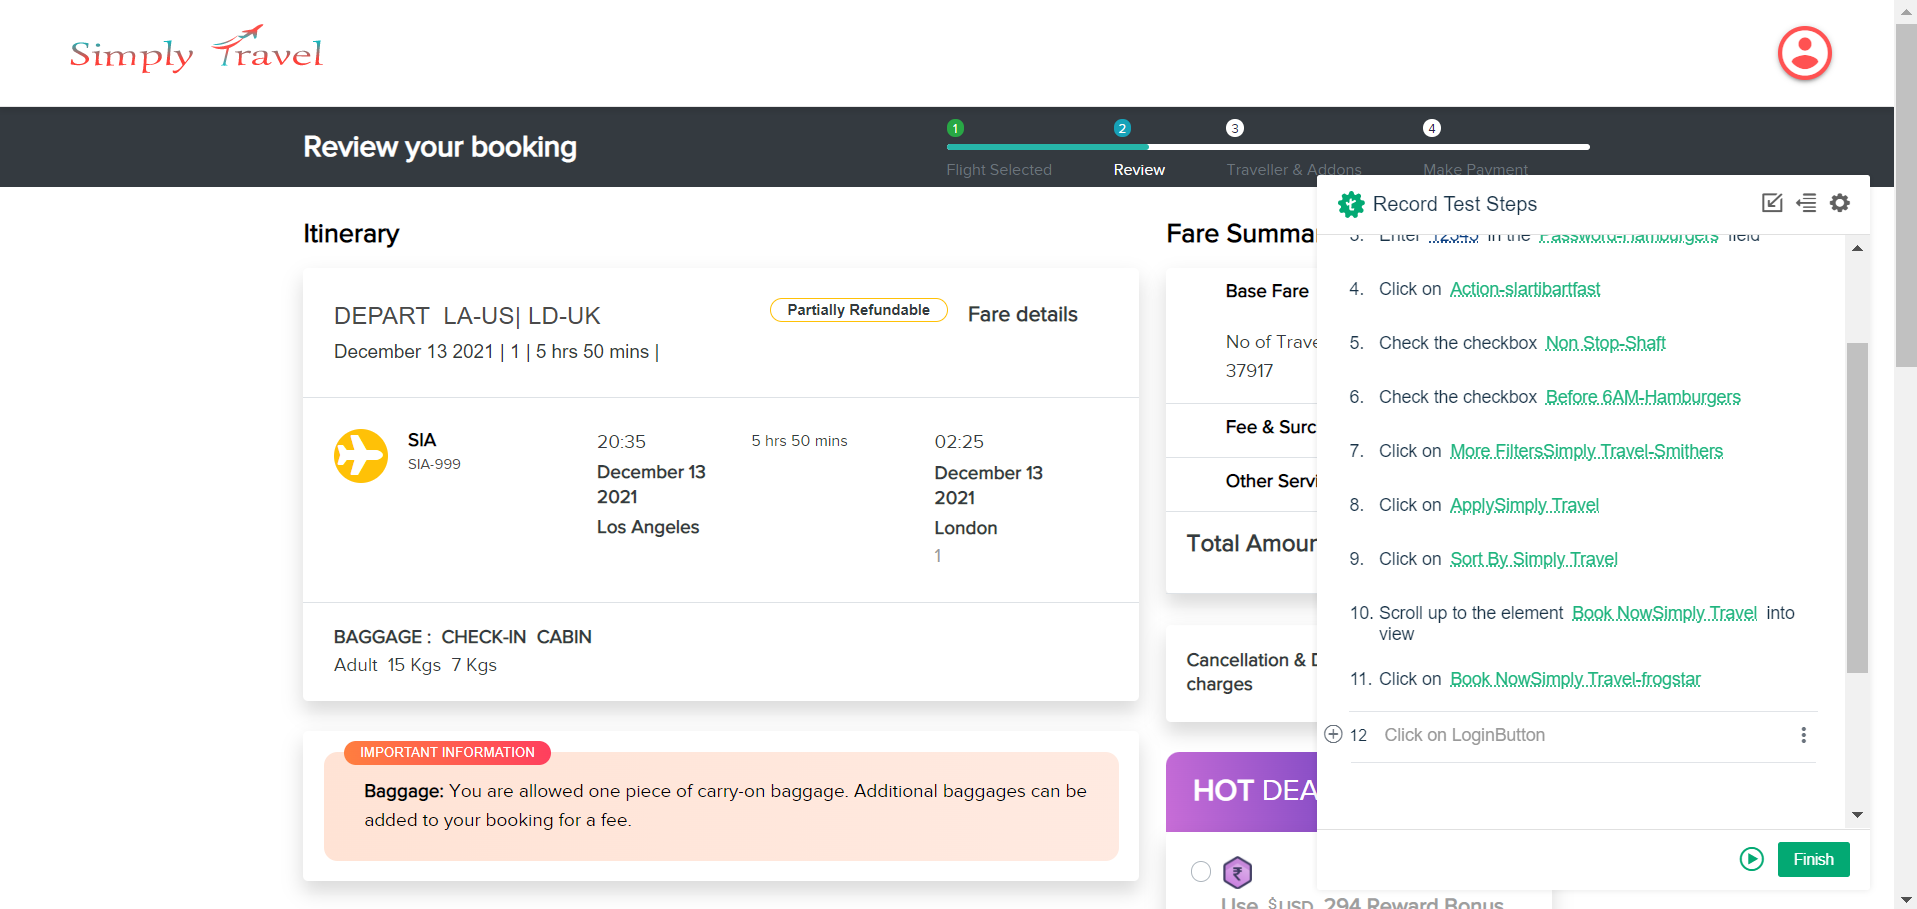
- Click on Continue
- Select the Mobile No field
- Enter 8884587765 or any other valid phone number in the Mobile No field
- Enter admin@gmail.com in the Email field
- Click on Continue
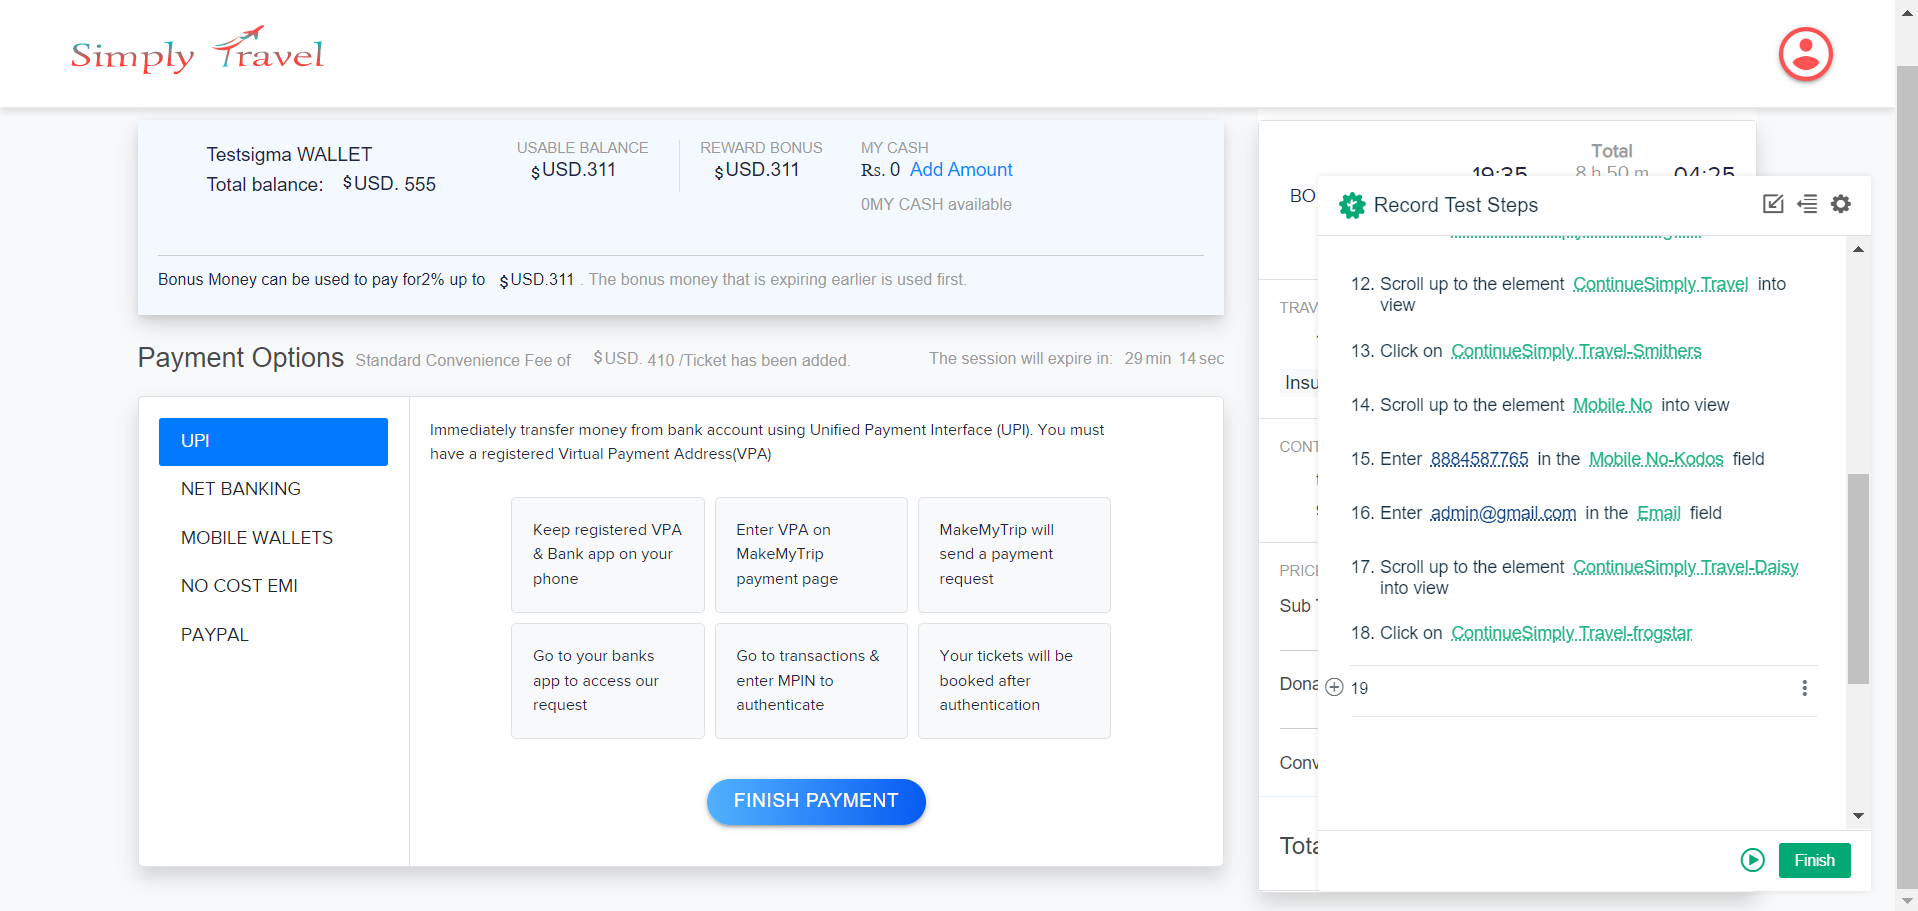
- Click on Net Banking or any other option you prefer
- Select Axis Bank or any bank you prefer
- Click on Finish Payment once you’re done
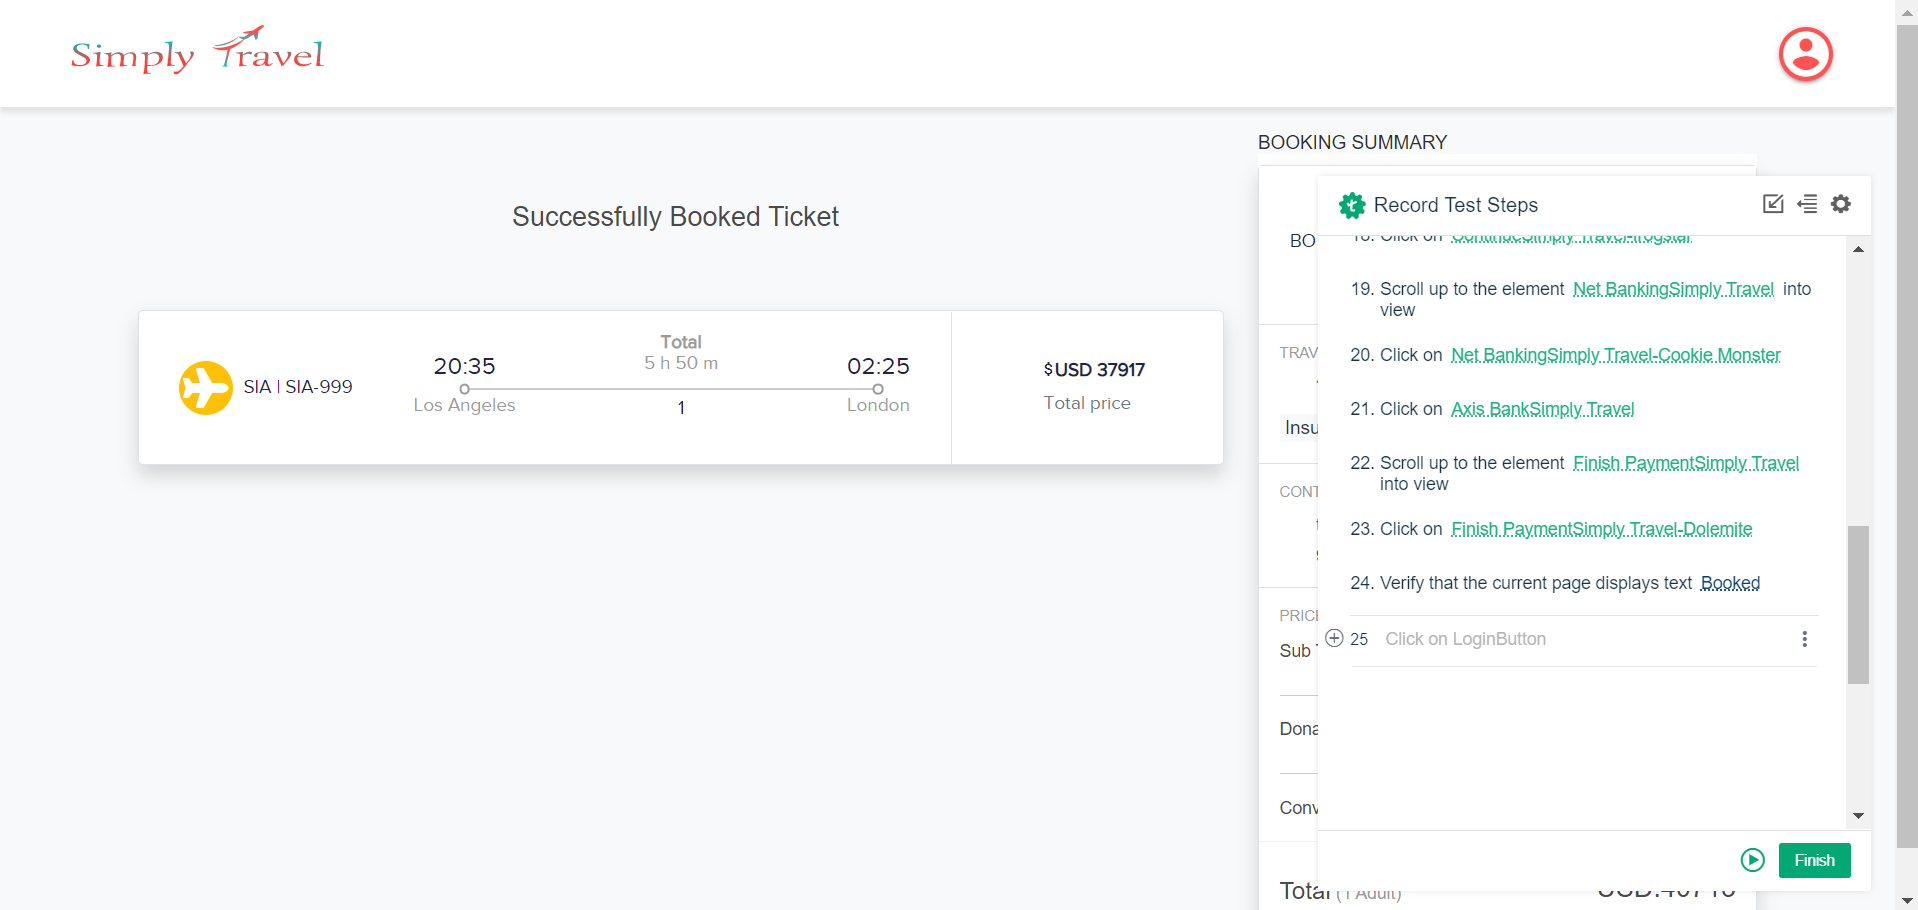
Step 3: Once you are done recording all your user actions we will add an assertion step manually within the recorder itself. We use the Verify action to add assertions in Testsigma. Here the test step is:
‘Verify that the current page displays text Booked’
This statement ensures that we’ve executed all the steps successfully and the ‘Booking a flight’ scenario reached the final page.
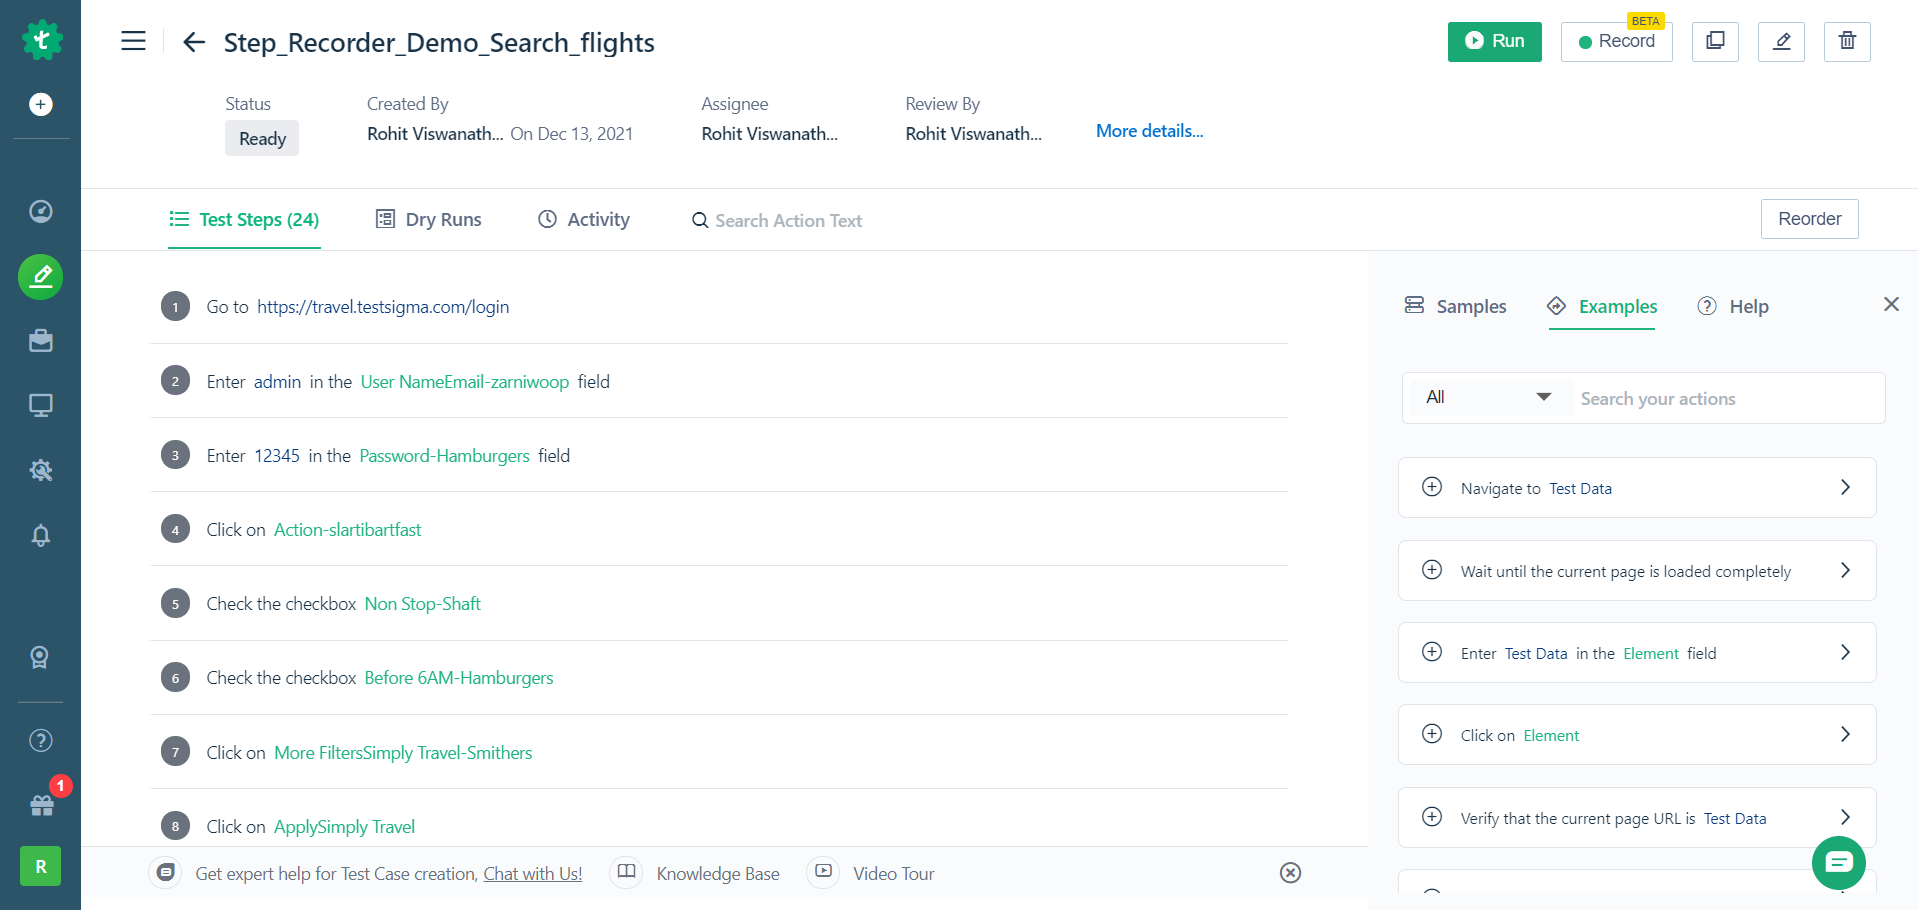
Step 4: After recording all the actions and adding the required step, click on the finish button in the recorder and you’ll be redirected to the test case screen. In the test case screen you’ll find all your test steps recorded with the elements you’ve interacted with.
Running your test
Once you’ve completed writing all your test steps, click on the Run button on the top right hand side of your screen.
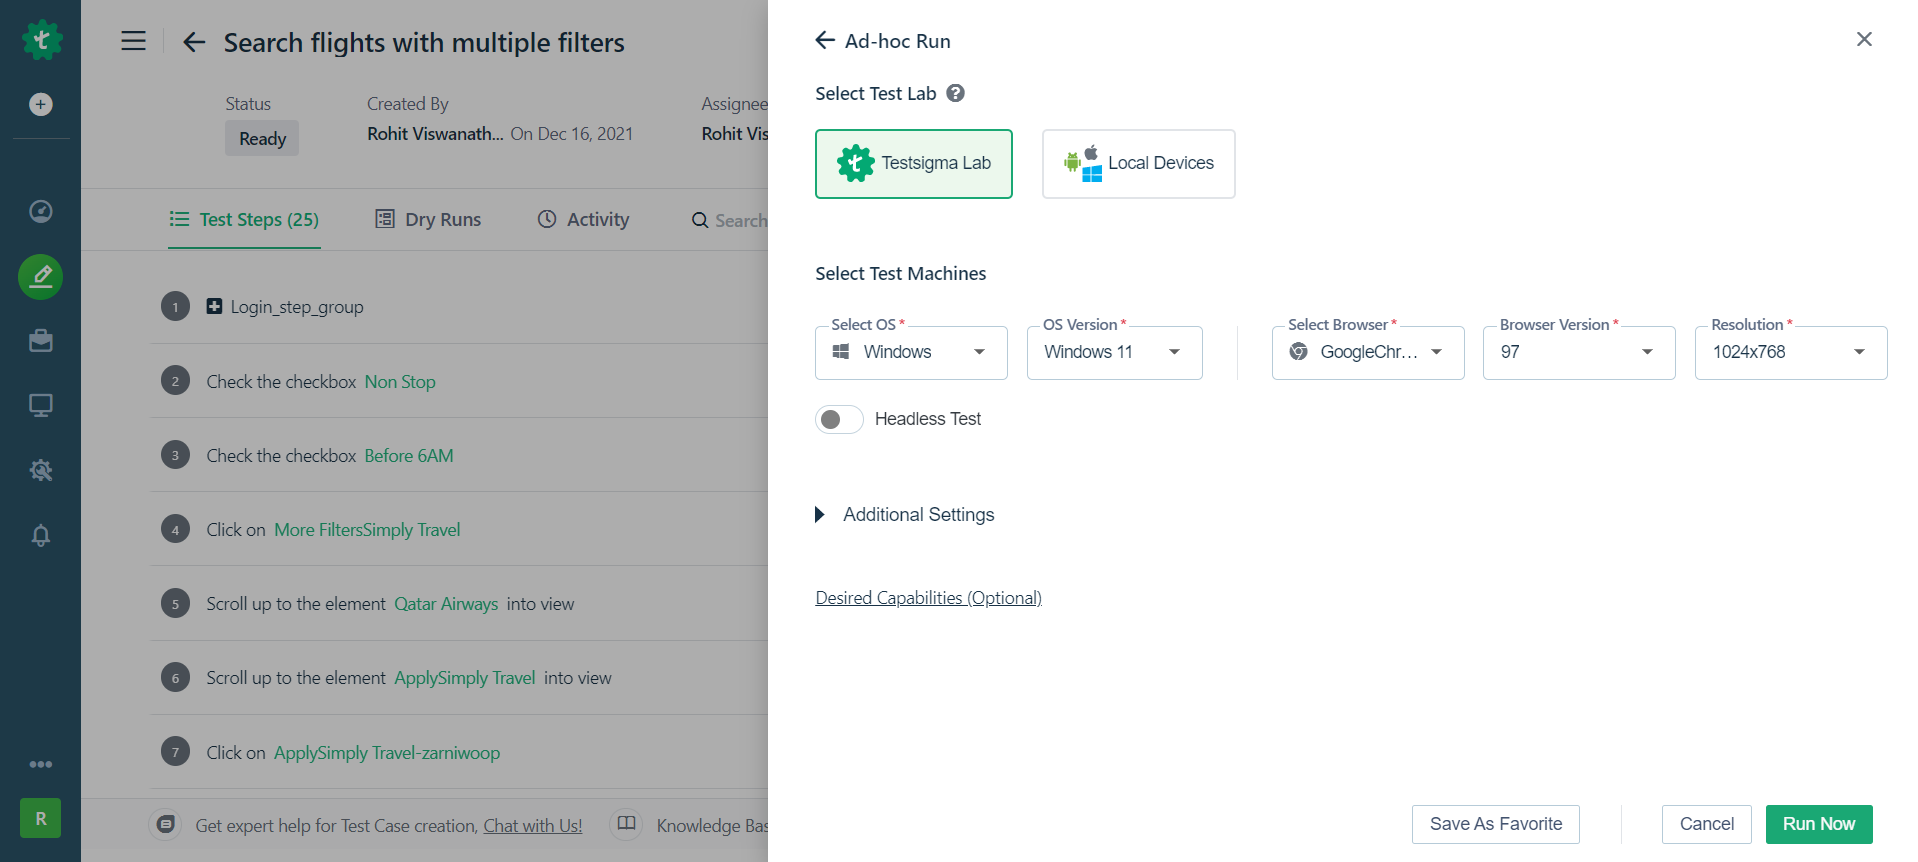
You can run your tests locally on your own machine or on the devices on the cloud (that you may not necessarily own!)
Analyzing results
After running the test case you’ll be able to view the results of your test run for each step by clicking on each of them.
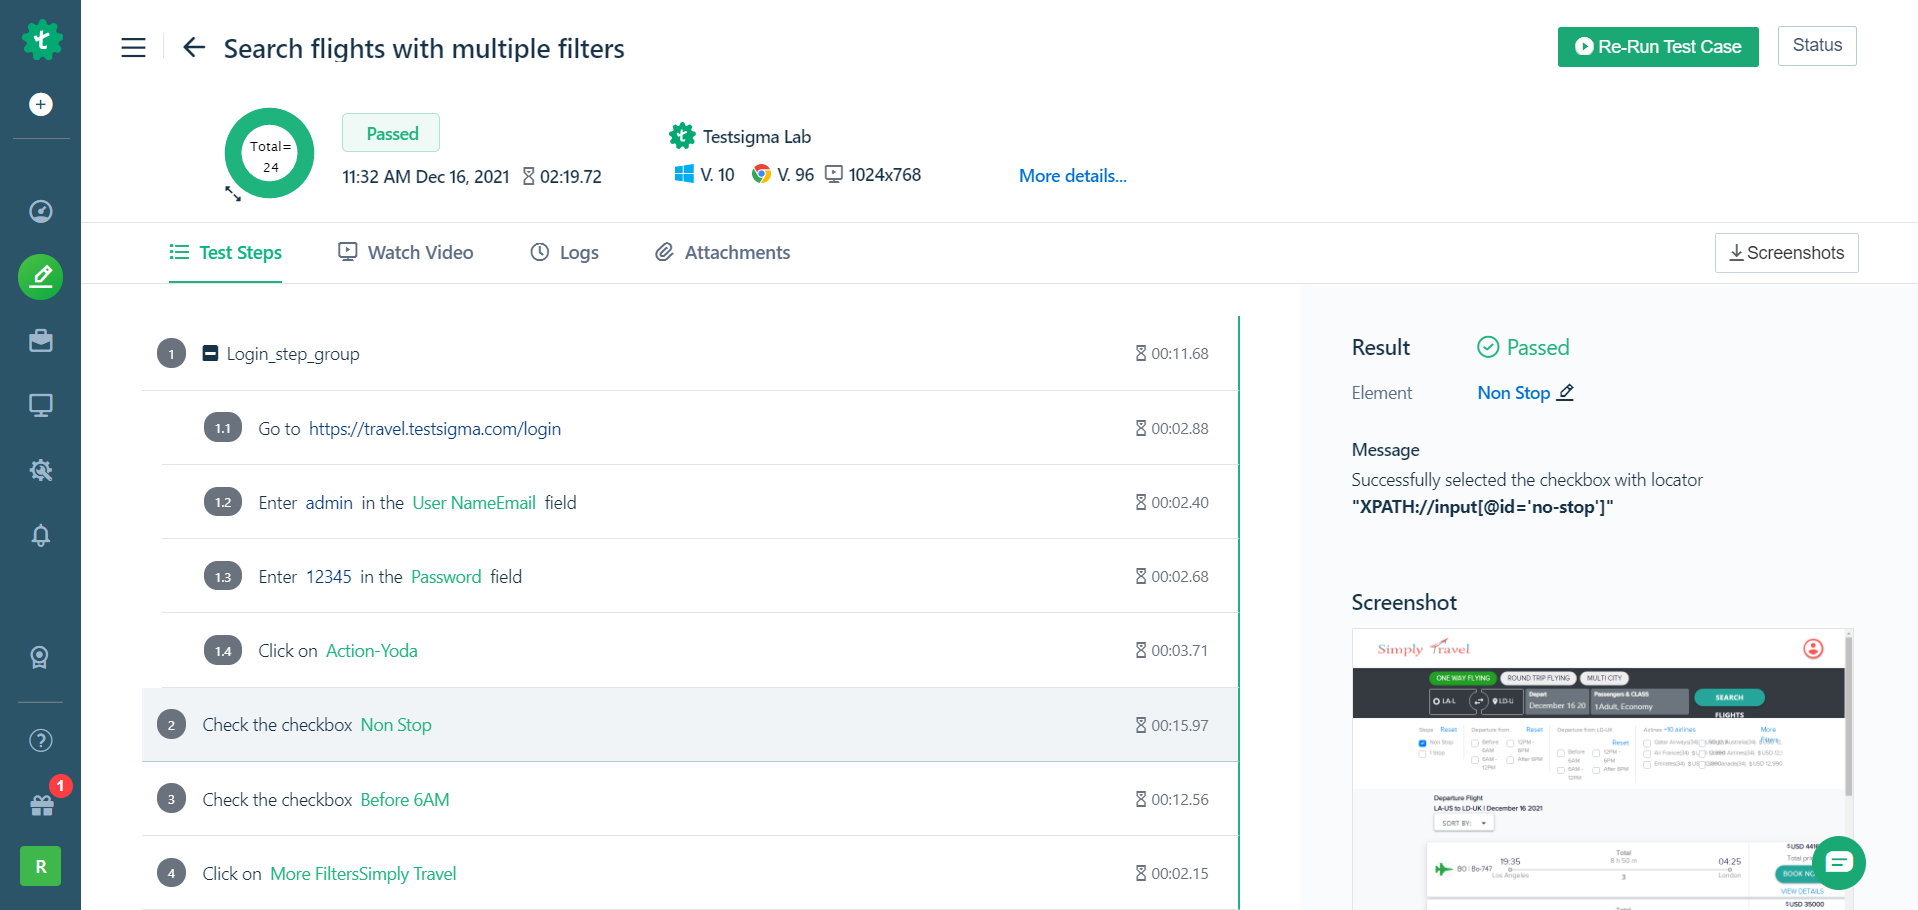
You can also view screenshots of each test step execution as well as watch a video of the entire test run.
To view detailed results of all your test cases you can navigate to: Test development -> Run Results where can use several filters to fetch detailed reports
Next Steps
- Practice in your account. If you don't have an account Try out!.
- Try all options in Test Recorder. Try it out!
- Create Test Plans and Schedule. Head over to this link!
- Try out more advanced capabilities. Check out our detailed documentation.
Reach out to us through in app chat for a walkthrough or if you have any questions!
JoinTestsigma’s Discord Server for support
