Get Started with Automating Android Apps
This Tutorial is made to help you learn the basics of creating tests with Testsigma and help you create and execute your first test case for a sample android application - Wordpress.
In this tutorial we will demonstrate how Testsigma’s revolutionary mobile test recorder makes android app testing stable and seamless.
We cover
- Prerequisites for getting started
- Creating a project for android app testing
- Capturing app elements using mobile inspector
- Writing and running a simple test for a calculator app
Pre-requisites
- You have a Testsigma account : If you haven't already, sign up for a free trial The trial includes all product features and free support (always!) via the in-app chat or email to support@testsigma.com
- Testsigma agent for local execution(Optional): If you’d like to run your test using a local android device follow this guide to install the Testsigma agent
Setting the stage to write your first test
Workflow: Create a Project > Add a Test Case > Add Test Steps
Let’s understand these in detail.
- Project - Can be your iOS application name for instance
- Test Case - specific scenario that has to be tested, say, login functionality
- Test Steps - the actual set of instructions/steps required to test the functionality
_By default, 4 Projects will be readily available on your account.
These projects (here, Android application) will also have a few sample Test Cases and Test Steps ready for your reference._
- Start by creating a Project first. For a detailed overview, check here
- Create a Test Case. For a detailed overview, check here
- Add Test Steps. Once you create a Test Case, you will be redirected to the page where you can add all your Test Steps.
Here’s a video that explains all the steps discussed so far.
The next section explains how you can add steps to test a sample scenario. Sample Test Scenario: We will be using a sample login test scenario using the wordpress app where the user taps on login, enters an email ID and is sent a magic login link.
There are two ways you can add Test Steps to your Test Case:
- Add/Record Test Steps using the Test Recorder.
- Writing your tests step by step in simple English language.
Before you start make sure you’ve referred to the ‘Setting the stage to write your first test’ ‘section in this tutorial and your are currently in the ‘Test Case Details’ Page
Method 1 : Add/Record Test Steps using the Test Recorder
The Testsigma test recorder (web and mobile) is in-built and sits directly on your app, acting as both test recorder and object spy/element inspector, letting you create the most stable tests in a matter of time. No extra setup is required for the same.
Launch Test Recorder
Step1: To do this, simply click the Record option at the top of the test case details page.
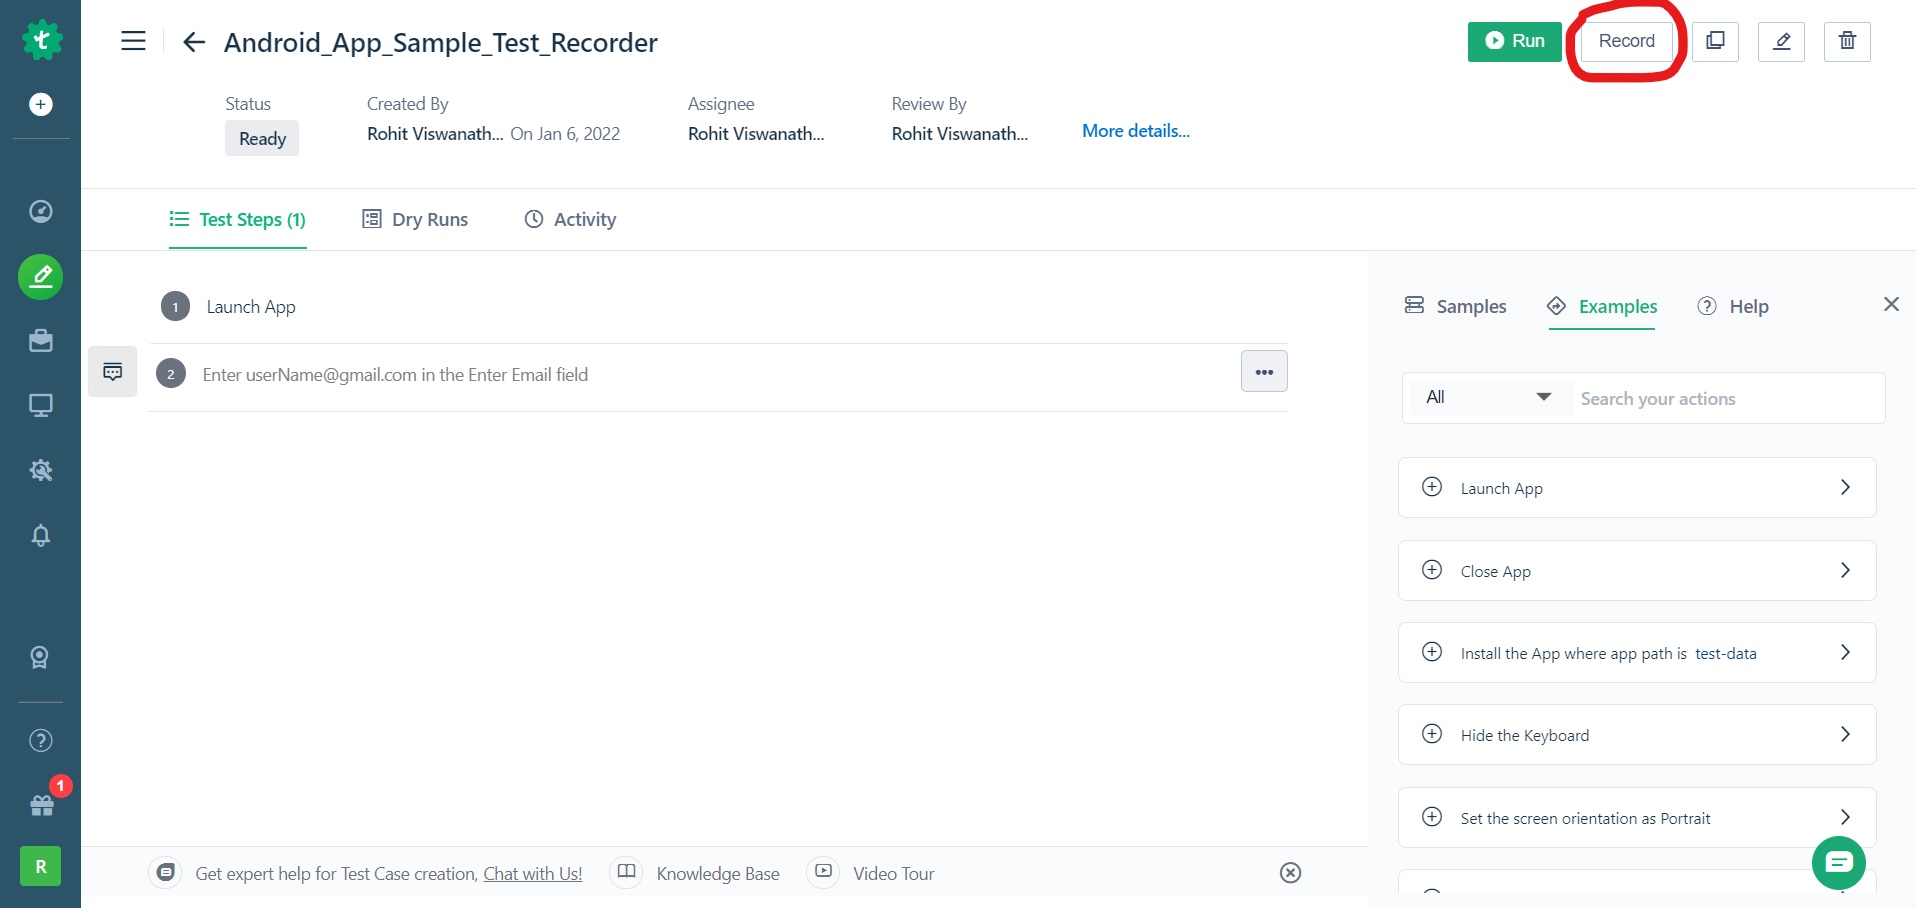
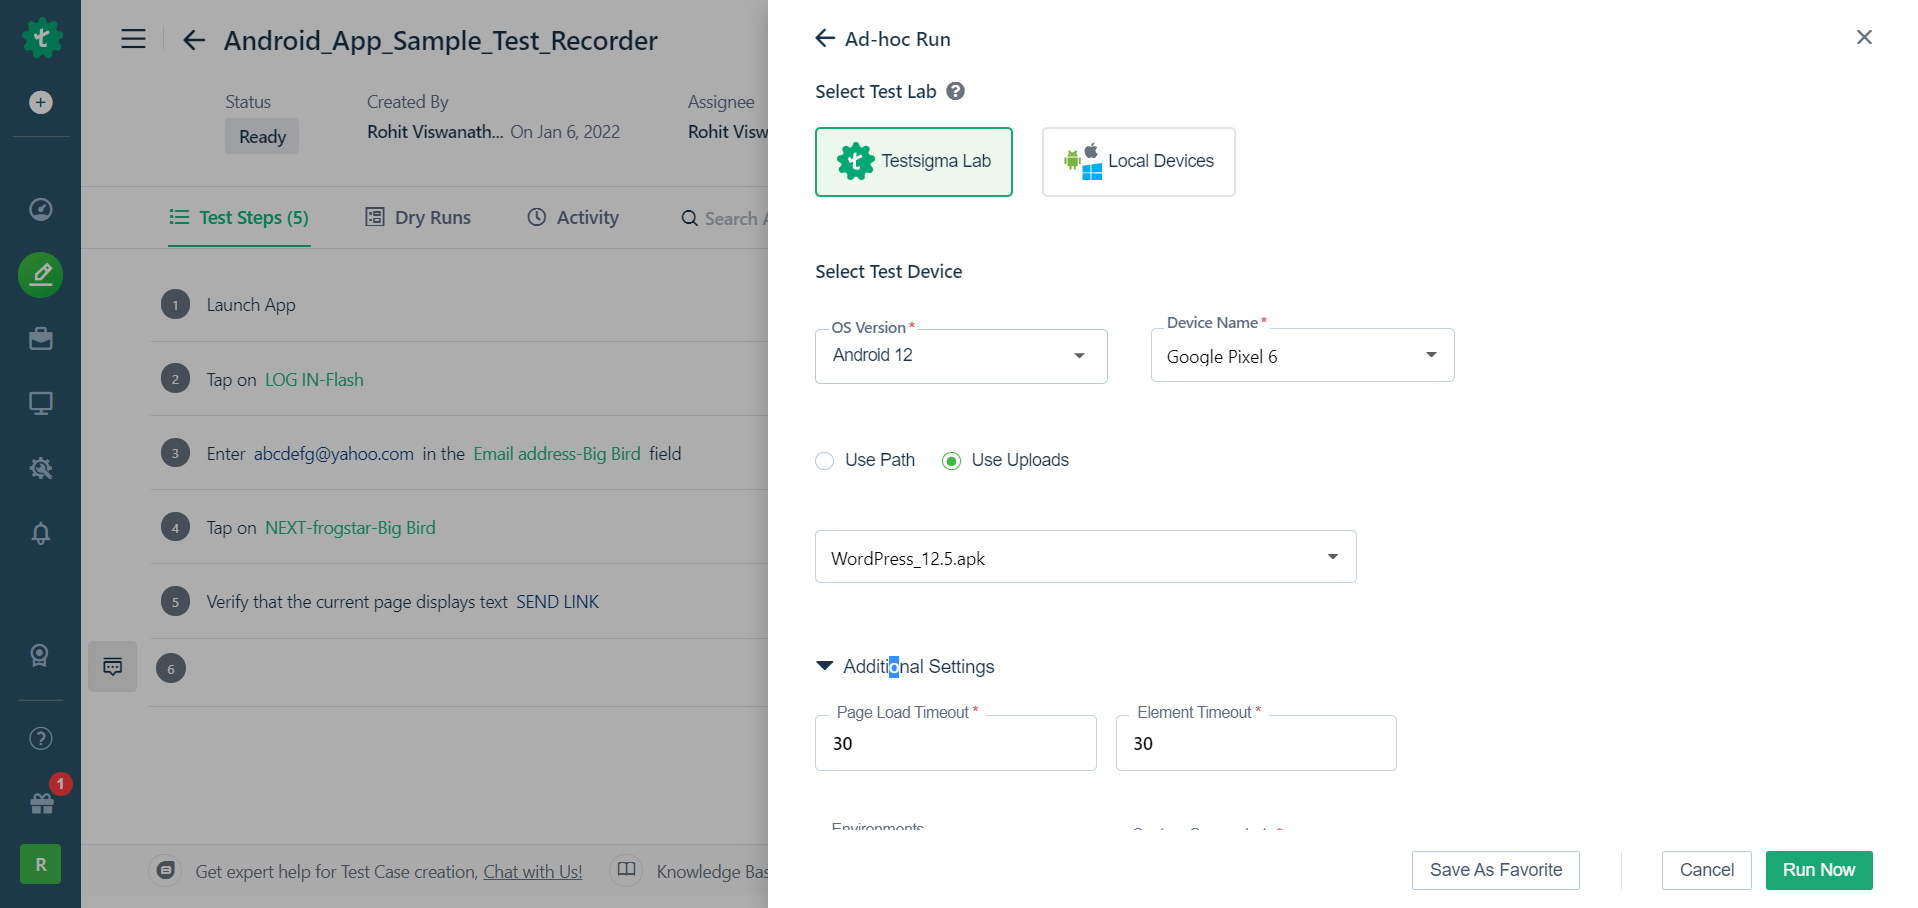
Step 2: A new window will appear that has a few options in rows.
Let’s break down each row.
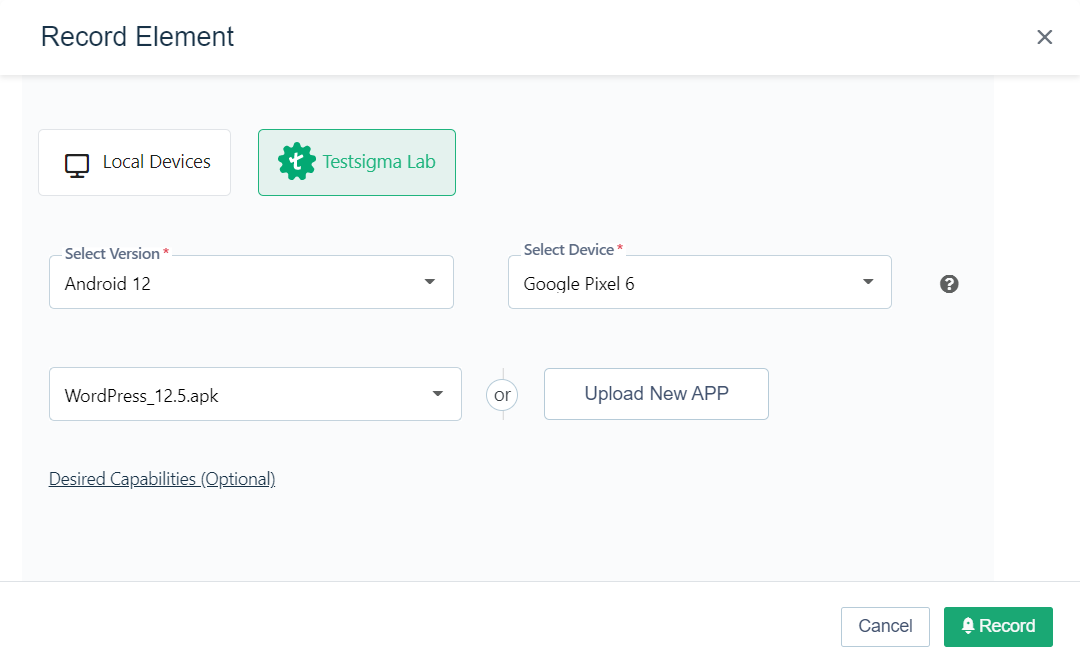
Test Lab Type: The first row displays the list of test labs supported to select the mobile devices to use from.
Testsigma Lab lets you run your tests on a wide range of real devices on the cloud(that you may not necessarily own). You need not worry about the maintenance of these devices as they are managed by Testsigma.
In addition to Testsigma Lab, Testsigma offers integrations with Sauce Labs, BrowserStack and more. The complete list can be found under the Plugins option on your account.
Local devices as the name indicates means you can run the tests you are about to create on your own current/local device. In this case, you need to install Testsigma Agent on your device. Learn how to install Testsigma Agent here.
Select Version and Select Device that you wish to run your tests on (in case you choose cloud option i.e. Testsigma Lab)
Select Android Version : Select the version of the application of the Android device you wish to run your tests on. Select Device : Opt and run your tests on any Android device. Choose/Upload App : Upload the Android application you wish to test. You can upload a new application by uploading its apk file.
To familiarize with Testsigma, you may choose any application that is already available on your Testsigma account via the dropdown menu. In this tutorial, a sample app is uploaded to demo how the steps can be recorded.
Uploading a sample app (Wordpress): In this tutorial, the app under test is Wordpress. For this, the Wordpress app’s apk file needs to be uploaded as discussed earlier. Click on Upload. Wait for the app to be uploaded.
Once done, click Record. Upon clicking Record, the Testsigma Mobile Recorder will be launched.
New to Testsigma Mobile Recorder? Here is a detailed walkthrough.
Let’s record!
By default, the recorder will be in inspection mode (highlighted in yellow when you hover over any element).

Let’s try interacting with the Wordpress app we just uploaded.
Test Step 1. Perform Tap action on. To record the Tap action we have two options, clicking on the ‘Log in’ button or the ‘Sign up’ button. For now in Inspector mode, click on the Login button with your mouse.
You’d see a new pane appear in the centre.
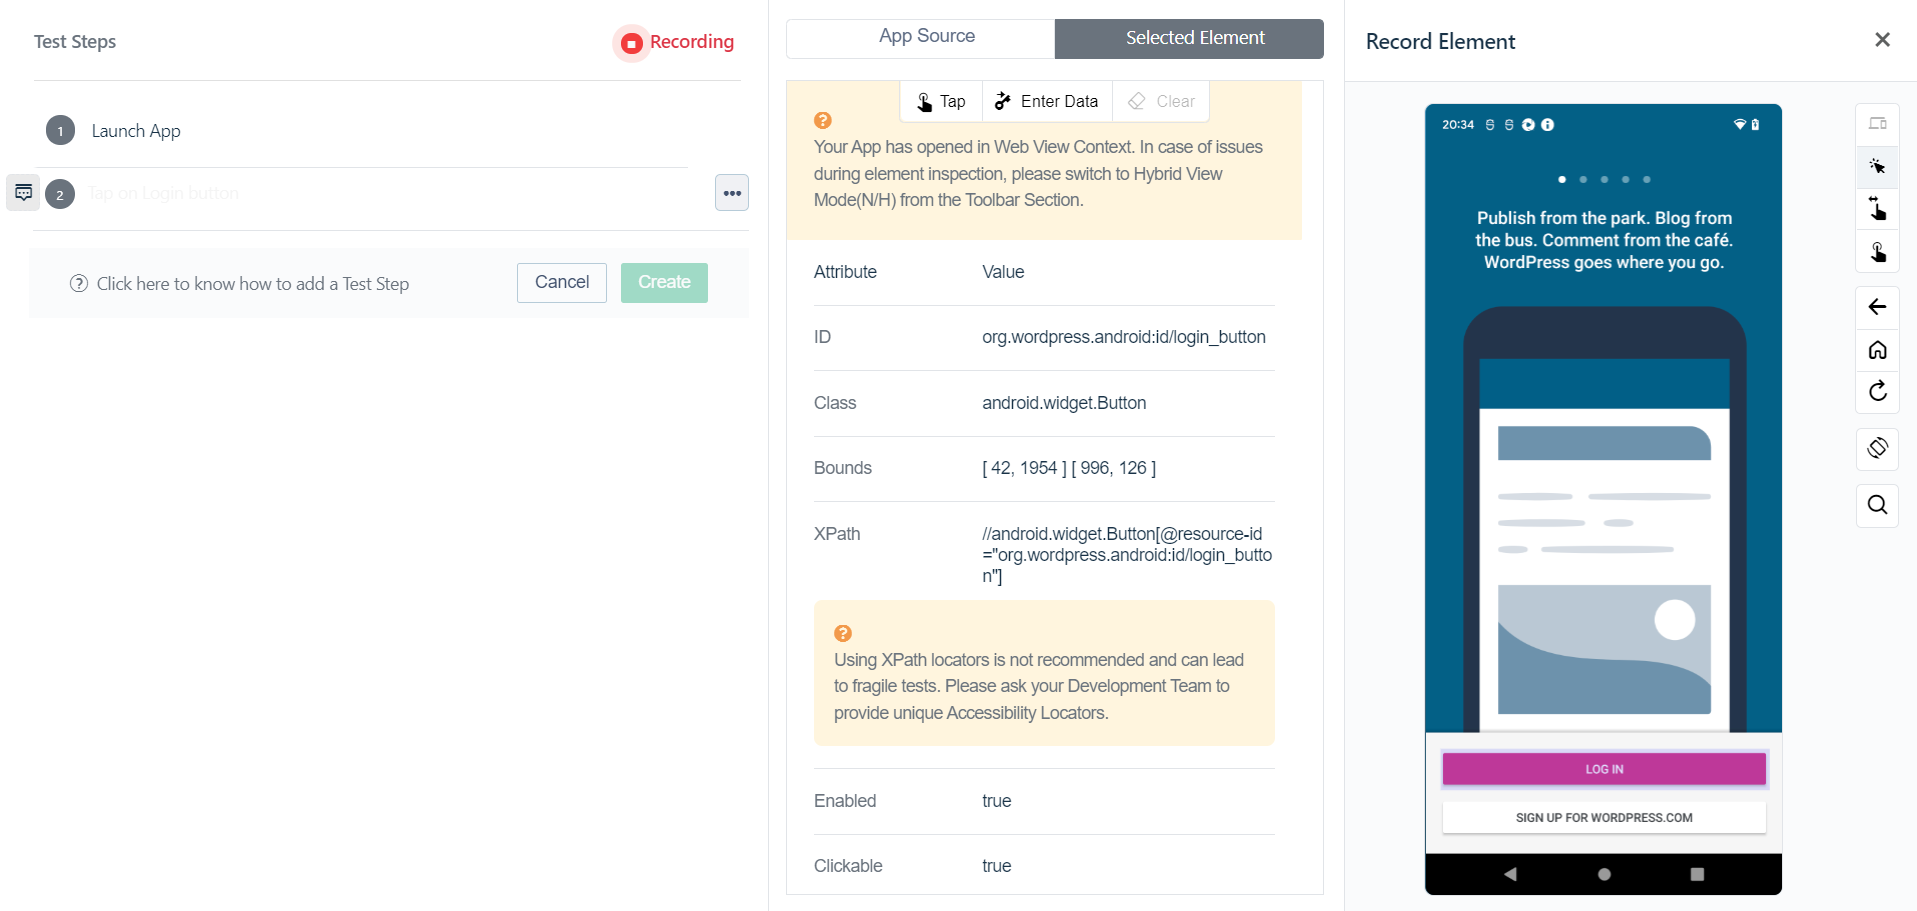
You’ll notice 3 options appear on top in the same pane:
- Tap
- Enter Data
- Clear So in this case click on tap and the recorder will perform a tap action in the app. Simultaneously this will generate an NLP statement in your test steps on the left hand side.

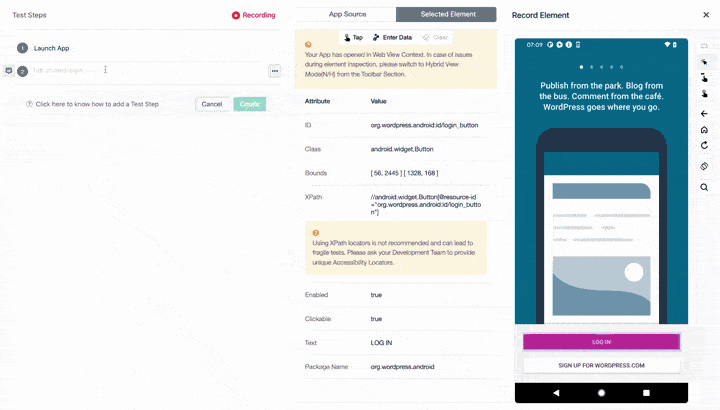
Test step 2: Enter data into a field.
After the tap action you will be navigated into the next screen in the app where you have to enter the email ID in the field provided.

To do this in inspector mode, first click on the email field. Then from the actions choose the enter data option. A box will pop up where you’ll be able to enter the email you want to.
Like the previous step the same actions will be recorded as an NLP step.
If you want to clear the value entered, clicking on the clear option after selecting that element in inspector mode will do that for you. And once again since we’re recording the test it will be converted into a test step in NLP.

Test step 3 Click on next.
Once you’ve entered the desired email address click on the next button and the once again select the tap option in the middle pane.
Test step 4: Click on Send Link.
This is once again similar to the previous click actions. Since in this specific scenario we do not have a valid login user ID we’ll need to use an assertion step at the end to verify the previous test steps were executed successfully
Test Step 5. Add a verify statement (assertion) manually.
After performing these basic actions we need to verify that they were successful. We do this by using a verify statement which is otherwise called an Assertion in Test Automation.
So first click on the empty test step below the most recently created one in the recorder. From the drop down list select ‘Verify that the current page displays OPEN MAIL’

Here’s a summary of the steps we discussed so far.
Method 2 : Write automated test steps in plain English
Not all steps can be recorded automatically. For advanced cases, you may need to incorporate Testsigma’s manual simple english based test authoring approach to reuse elements and perform verify actions.
In this section you will learn:
-
How to add steps and create a new element on the go, Learn more about how to add steps manually from the test case details page here.
- How to add steps using existing elements, You can reuse them at any time by choosing the element you want to use/reuse in the Test Case. Simply pick the name of the Element.
-
How to add a simple verification steps, Use the Verify action as used in Test Step 5 in the previous section.

- How to create multiple elements at once, Read this to learn more. You can use any of these elements by picking the name and reuse them anywhere in your Test Steps.
Here’s an end-to-end video on how to create elements and add NLP steps manually for android apps
Run your test case
You can run your tests locally on your own machine or on the devices on the cloud (that you may not necessarily own!)
At the top right of your Test Steps page, click on Run.
Choose the device you wish to run your tests on, the device configurations, or how you’d like the screenshots captured, etc. You can choose these options based on your preference.
Click Run Now.
Analyzing results
After running the test case you’ll be able to view the results of your test run for each step by clicking on each of them.
You can also view screenshots of each test step execution as well as watch a video of the entire test run.
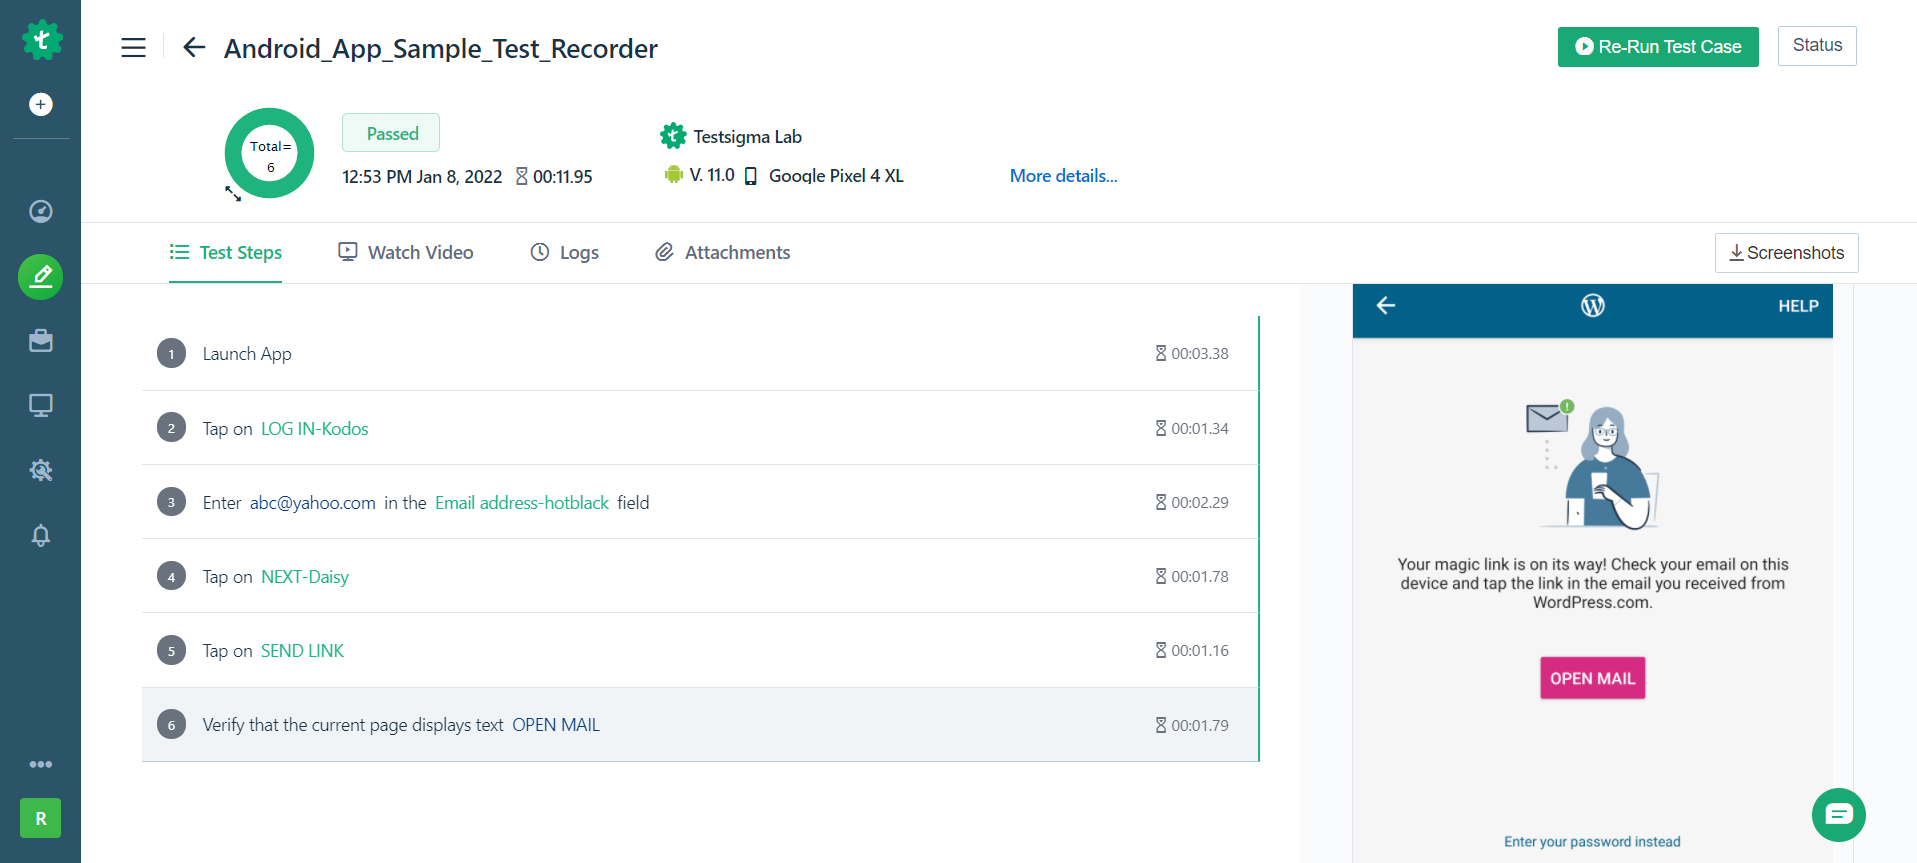
Here all the test steps have passed successfully. In case if a test step fails you’ll be able to see the error message provided by clicking on the test step along with the screenshot. You can also check the video recording to see what went wrong in detail.
Here’s an example of a failed test step:
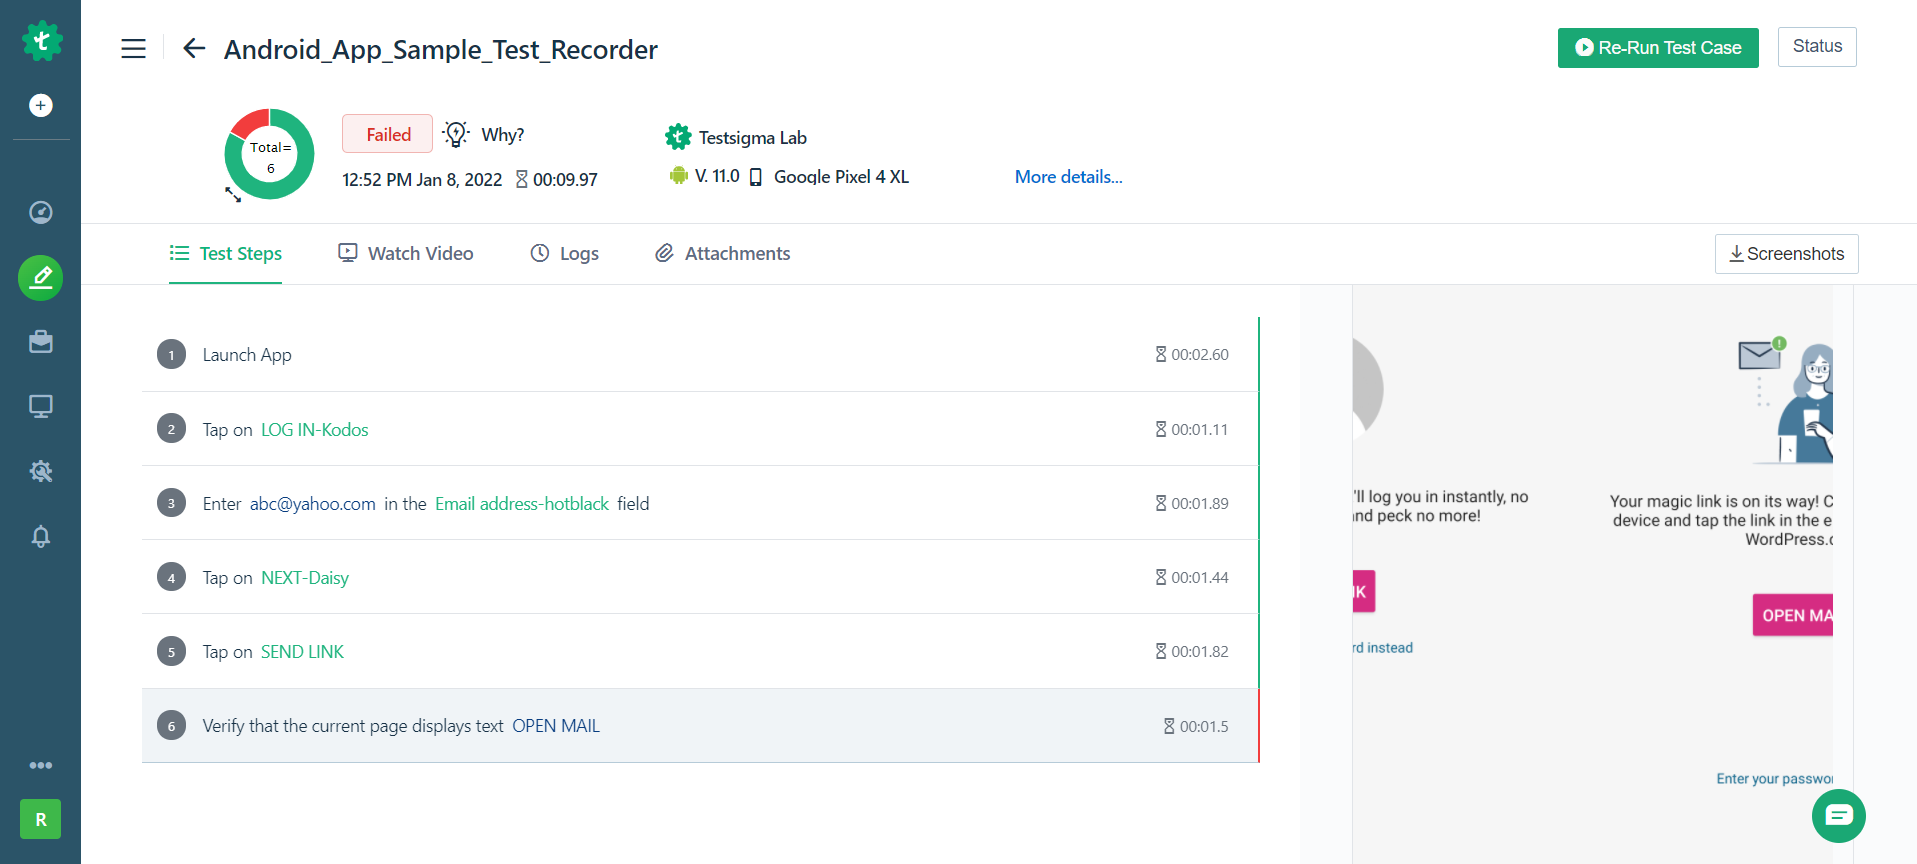
In this particular case we fixed the error by increasing the wait time of the assertion to ensure the app screen loaded completely before checking for the presence of the text.
If you need any help with errors you can reach out to support@testsigma.com, or chat with us on Discord.
Next Steps
- Practice in your account. Try it out!
- Start creating tests. Explore Recorder.
- Automate Android Apps using your local devices. Learn more!
- Create Test Plans and Schedule. Head over to this link!
- Try out more advanced capabilities. Check out our detailed documentation.
Reach out to us through in app chat for a walkthrough or if you have any questions!
Join Discord Server to learn more about Testsigma.