Testsigma Quick-Start Guide For mobile web Application Testing
This Tutorial is made to help you learn the basics of creating tests with Testsigma and help you create and execute your first test case for a sample mobile- web application - Simply Travel
A majority of users today prefer to access websites on their mobile browsers when they’re on the move or due to convenience. This is why doubling down on testing your mobile-based web application version becomes even more necessary.
In this guide we’ll help you write and execute a simple test case for a mobile-web application
We Cover
- Prerequisites for getting started
- Creating a project in Testsigma
- Capturing elements using our Chrome Recorder
- Writing and running a test for a sample Mobile-web application
Pre-requisites
- You have a Testsigma account : If you haven't already, sign up for a free trial The trial includes all product features and free support (always!) via the in-app chat or email to support@testsigma.com
- You have added the Chrome extension : The extension will automatically render steps(in readable natural language) based on how you interact with the application under test.
You can add Testsigma’s extension from the Chrome webstore by visiting this link. For a detailed overview, check here.
Setting the stage to write your first test
Workflow: Create a project -> Add a test case -> Add Test steps
Let’s understand these in detail.
- Project - Can be your mobile-web application for instance
- Test Case - specific scenario that has to be tested, say, login functionality
-
Test Steps - the actual set of instructions/steps required to test the functionality
Here’s how you can create a Project in Testsigma
Sample test Scenario
For this tutorial we’ll be simulating a login scenario for the ‘Simply travel” application. Here are the steps we’ll be performing using Testsigma
- Navigate to https://travel.testsigma.com
- Tap on Login SImply Travel
- Enter admin in the Username field
- Enter 12345 in the Password field
- Tap on Login button
There are two ways you can add Test Steps to your Test Case:
- Add/Record Test Steps using the Test Recorder
- Write your test step by step in simple English language
Before you start make sure you’ve referred to the ‘Setting the stage to write your first test’ ‘section in this tutorial and your are currently in the ‘Test Case Details’ Page
Method 1: Add/Record Test Steps using the Test Recorder
The first approach to creating a test case for mobile-web applications is via a seamless record and playback tool using our Recorder.
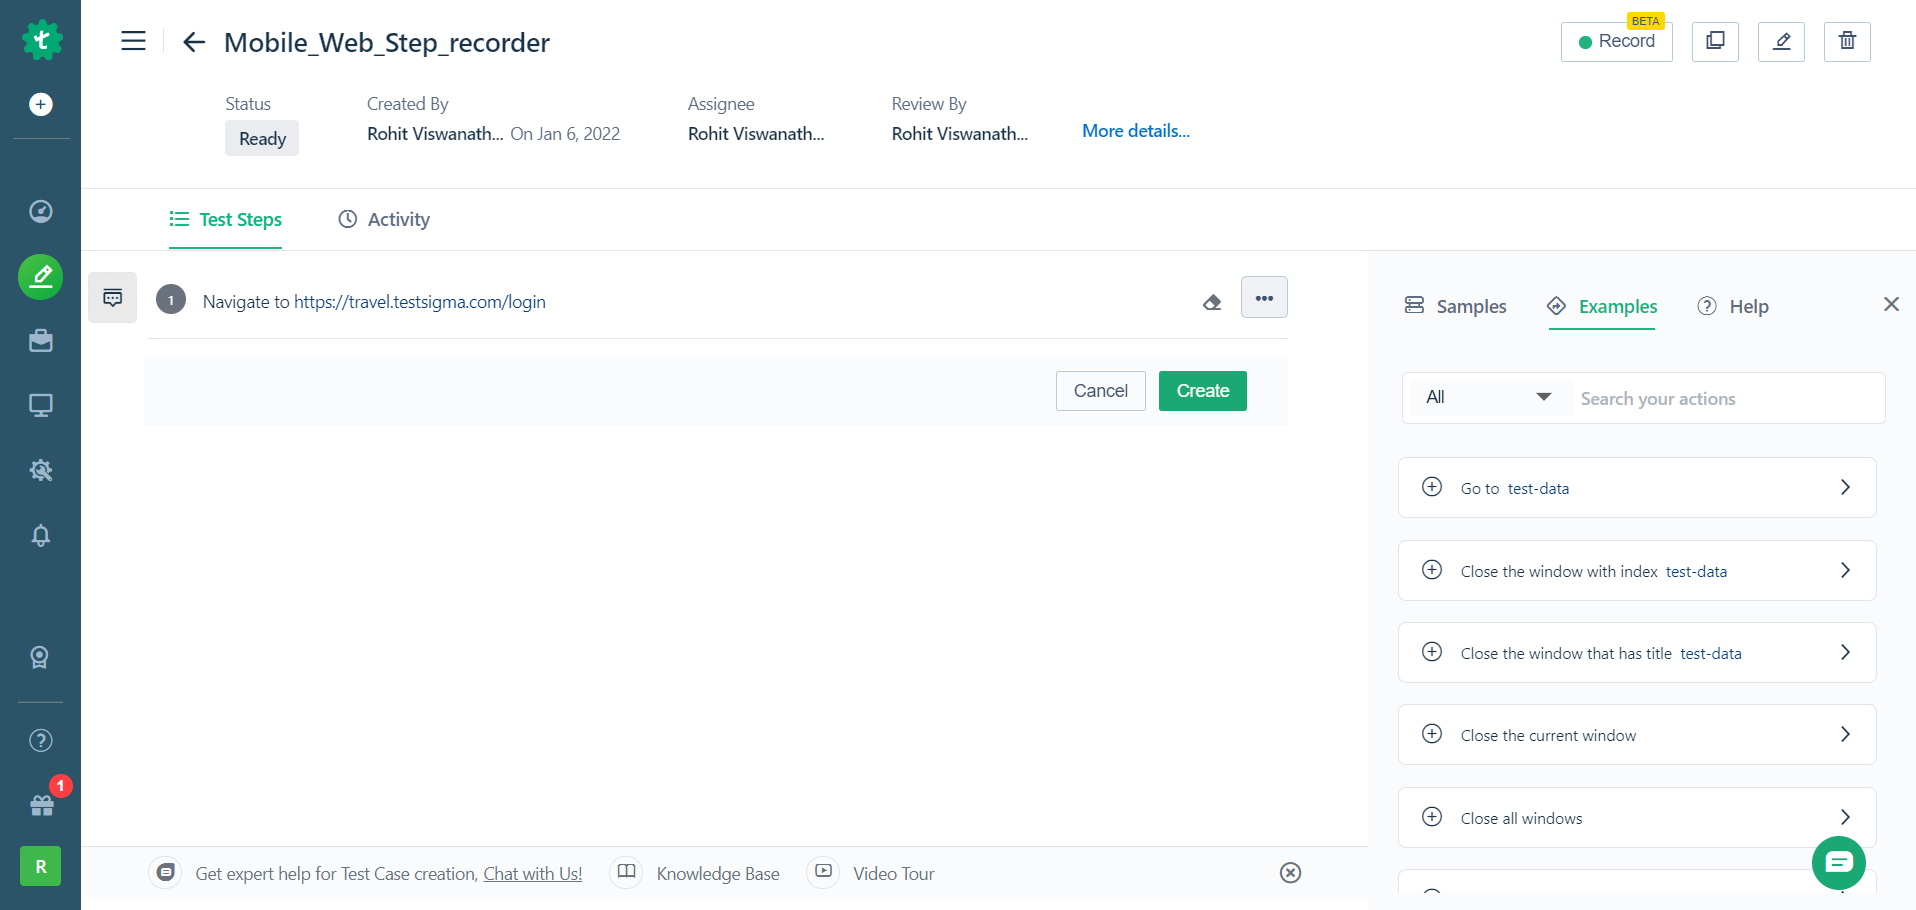
Step 1: Navigate to the application URL
First we’ll manually add the Navigate to the specific application URL step. The NLP for this step which is ‘Navigate to test data’ will already be added by default.
Here ‘Test Data’ will be replaced with https://travel.testsigma.com/login
Test data is a terminology in Testsigma which simply means the input value you wish to provide.
Step 2: Record your user actions
Now that the application URL has been specified we’ll be recording user actions in the application using the recorder
- Start by clicking on the record option on the top right of your screen.
- You will see that a new window appears that will navigate you to the URL you just entered.
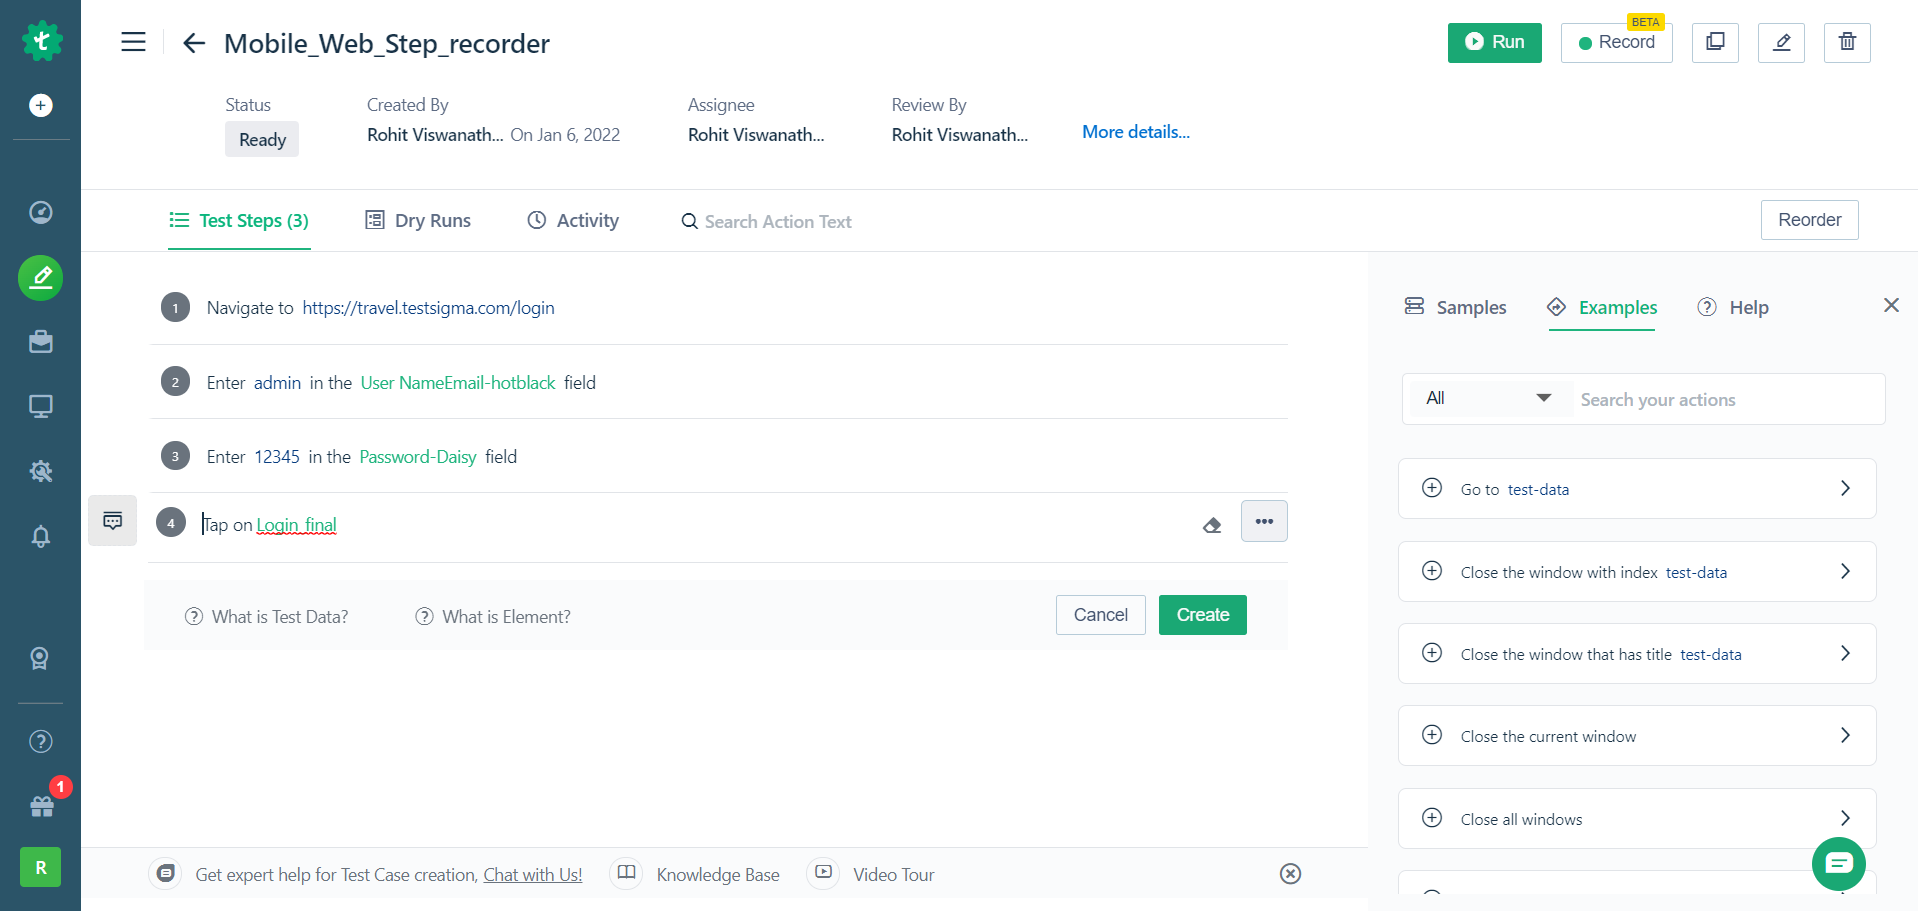
- Here, you can start performing your desired actions on your mobile_web application. Note that each click, keystroke will be recorded as steps. The corresponding simple English tests will be automatically created and added below the first step you just created (Step 1).
- You can also edit any of these steps by clicking on the pencil icon in any test step and also add steps manually in between
Step 3. Add a verify statement (assertion) manually
After performing these basic actions we need to verify that they were successful. We do this by using a verify statement which is otherwise called an Assertion in Test Automation.
So first click on the empty test step below the most recently created one in the recorder. From the drop down list select ‘Verify that the current page displays test data’
To add more steps additionally to the already recorded tests (like we discussed in Method 1) manually. Refer to this guide.
Step 4: Once you’re done recording, click on ‘Finish’ and you’ll be navigated back to the test case details screen where you’ll see all your test steps.
Explore the recorder and ways you can use it to its full potential and record all complex scenarios here.
This is a basic test that can be recorded by interacting with your app. We will dive into more advanced capabilities in other tutorials or you can also ping us for awesome support!
Here’s a video that shows all the steps we’ve performed so far.
Method 2: Write automated test steps in plain English (manually)
The second way to create a test case is using simple English. For a detailed guide into authoring your test case you can refer to this documentation. Here’s list of actions that we support by default.
Now let’s look at how to create the same set of steps as in the recorder using simple English.
Step 1: Navigate to the application URL
First we’ll add the Navigate to the specific application URL step. The action for this step is ‘Navigate to test data’.
Replace ‘Test Data’ with https://travel.testsigma.com/login as shown below:
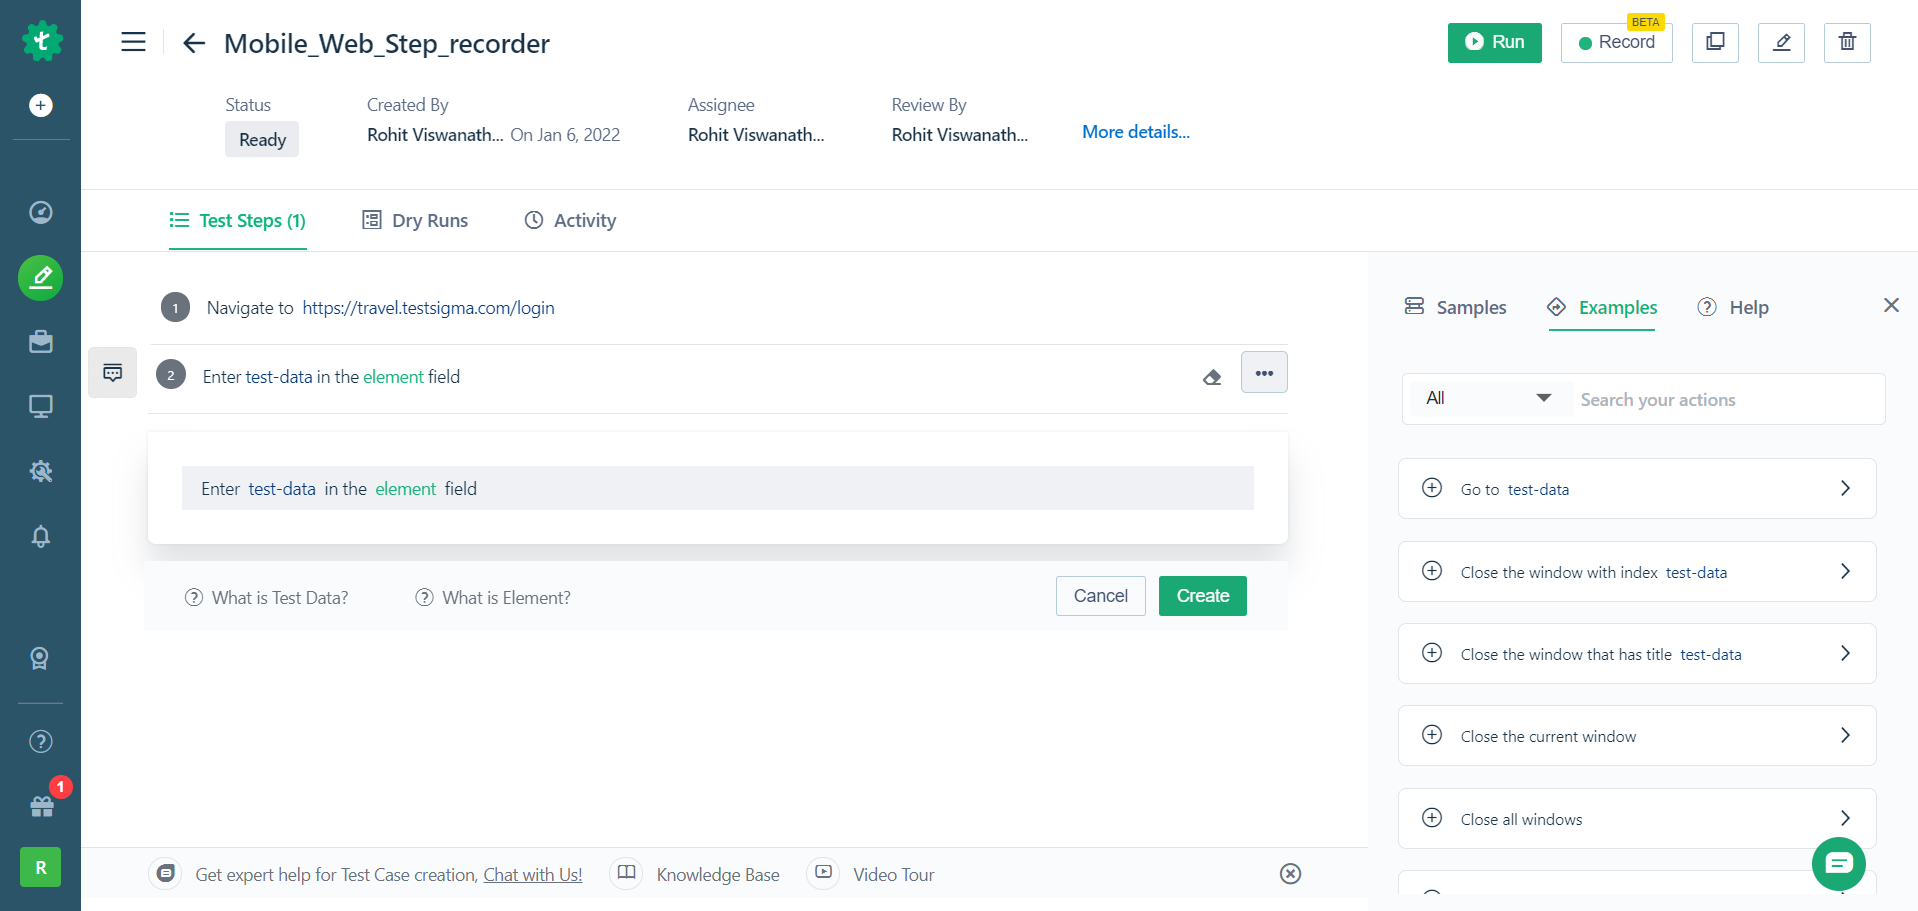
Step 2: Enter test data in a given field
In the next step in our Simply Travel example we will be entering a username into the username field. The action for this is:
Enter test data in the element field
Here:
- Test Data is the value you want to enter. In place of test data give a username like John Doe.
- Elements are the page objects you can capture using our recorder in Testsigma.
_In Testsigma, Elements represent the unique address/locators of the actual elements (such as a button, a text field, a link etc) on your web page. These (can be xpath, id, link text etc.) help us locate where they reside and interact with them to perform actions on them.
Refer to this guide to learn more about Elements._
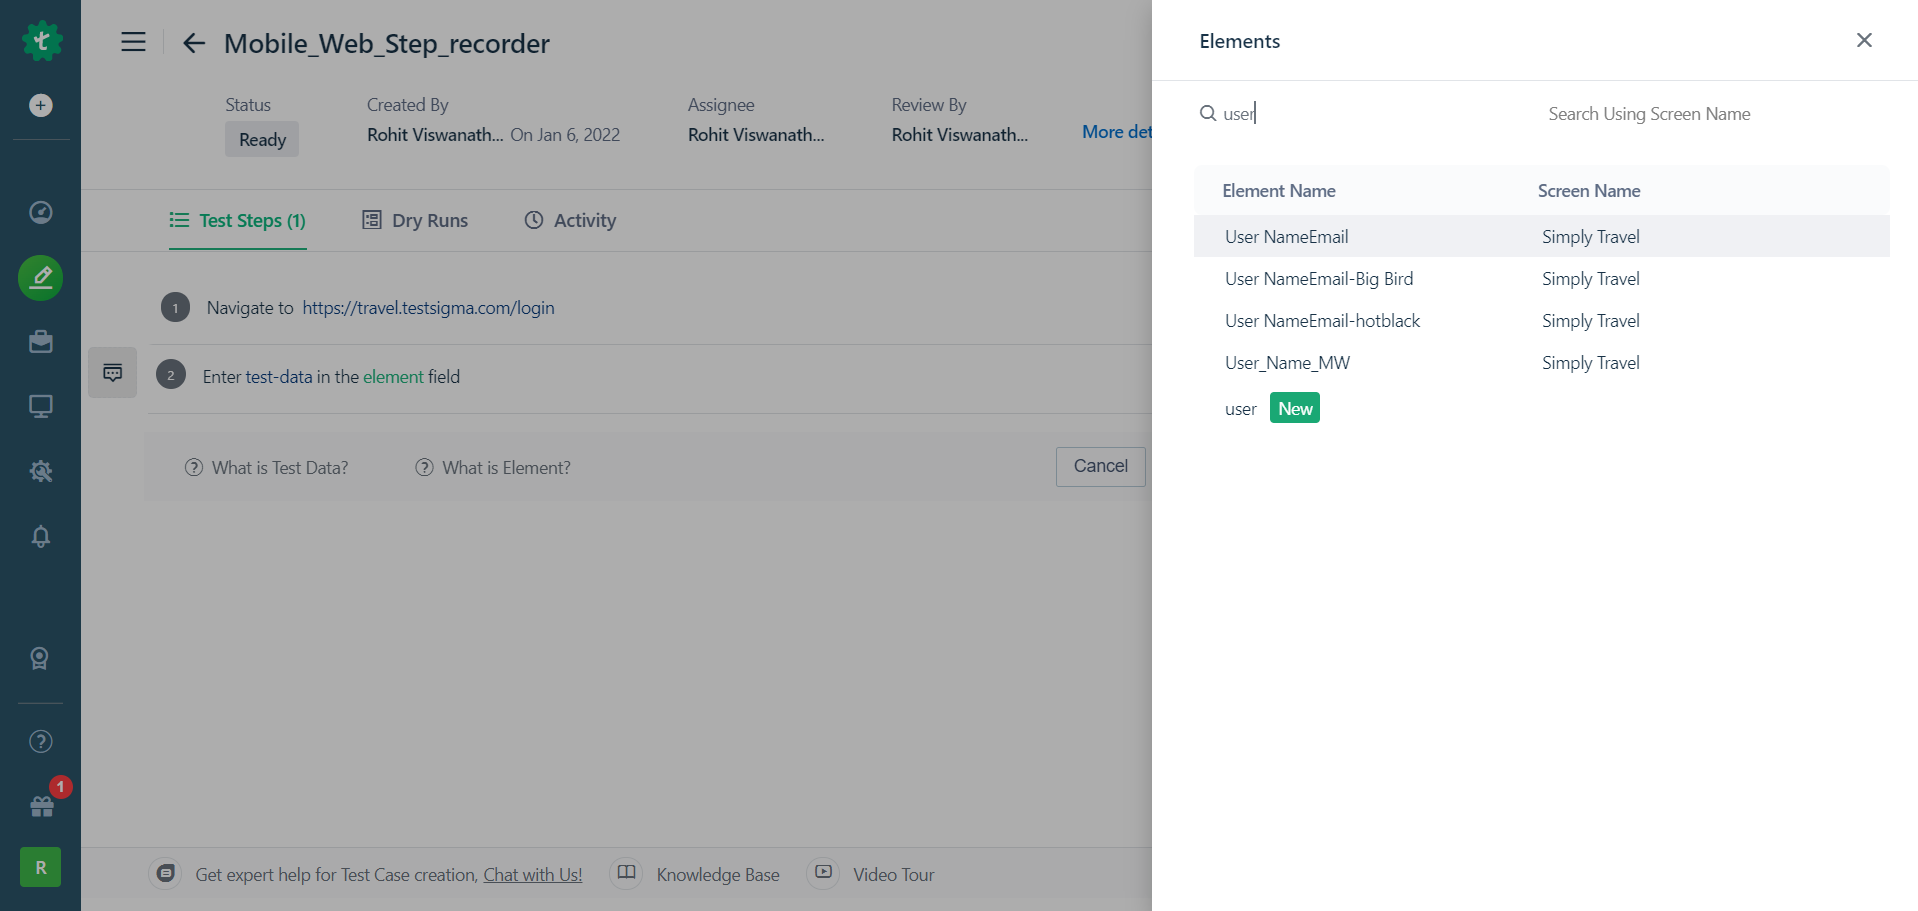
There are two ways you can capture you application elements:
-
Pre-capture them using our recorder. Here’s a video that will help guide you through capturing all your elements and saving them to your repository.
-
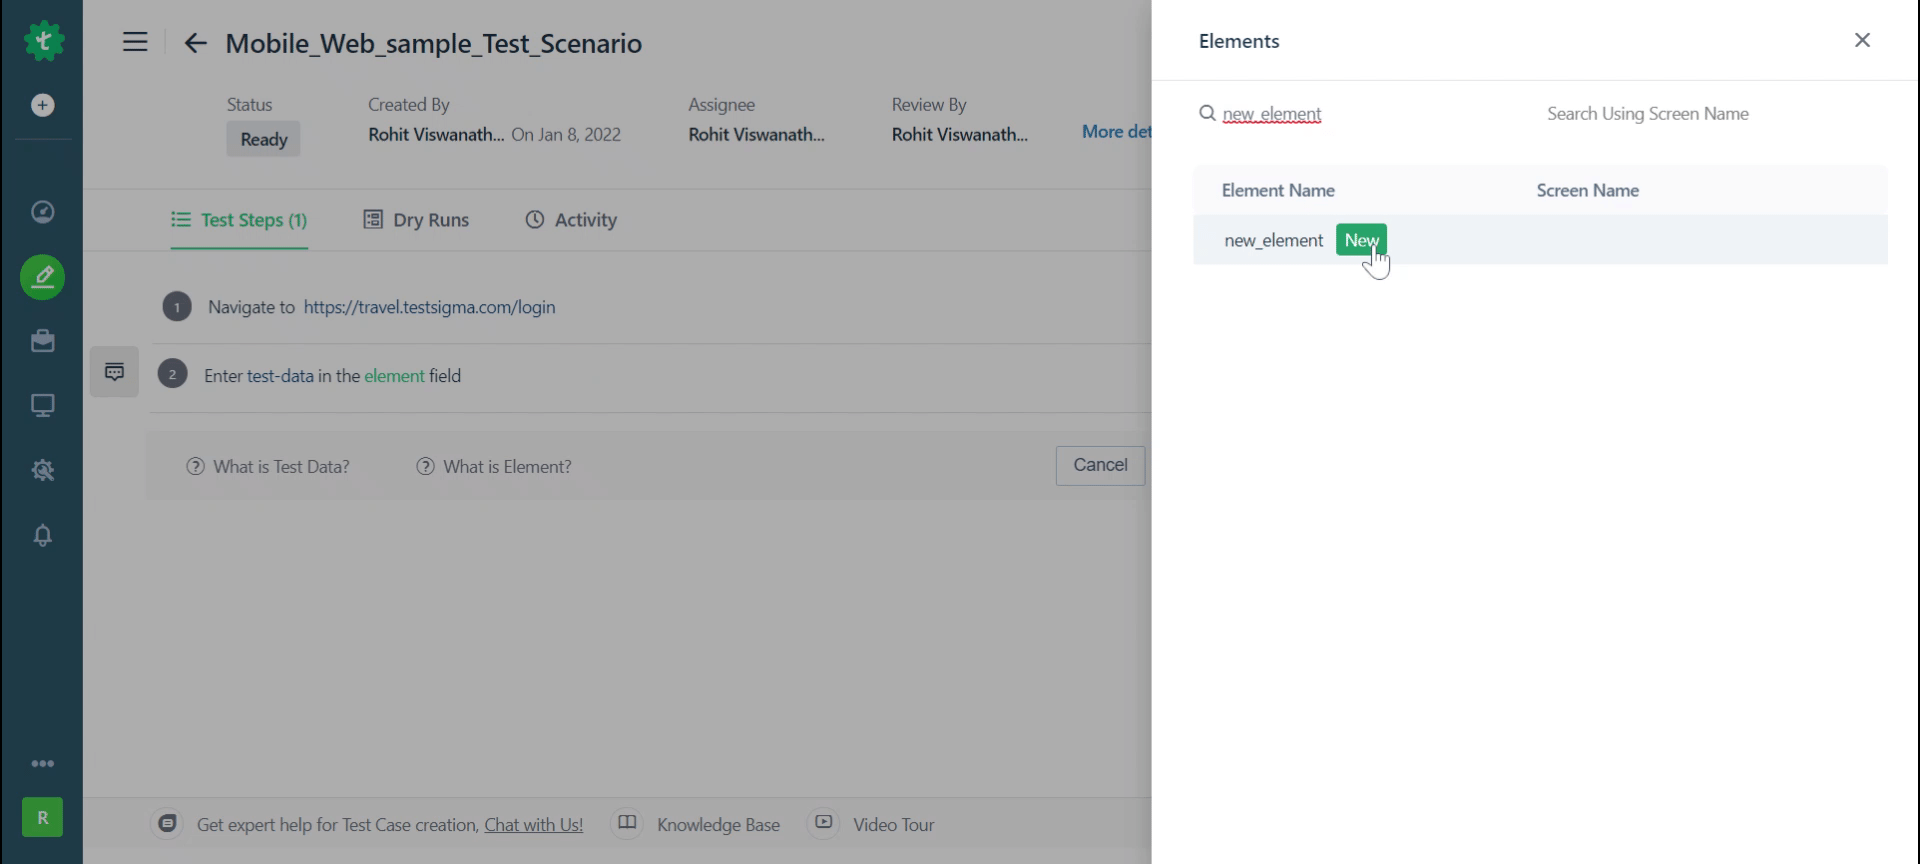
The second method is creating an element in real time while creating your test step. For this:
- Click on Element and then in the search bar type in the name you want to give your element.
-
Click on ‘New’ highlighted in green.
- Enter details like name, screen name, & select the attribute type
-
You can either manually enter the selector value OR Use our recorder to capture the required attribute value by opening the application in a new window.
- Once you’ve updated the details click on save.
Finally click on create.
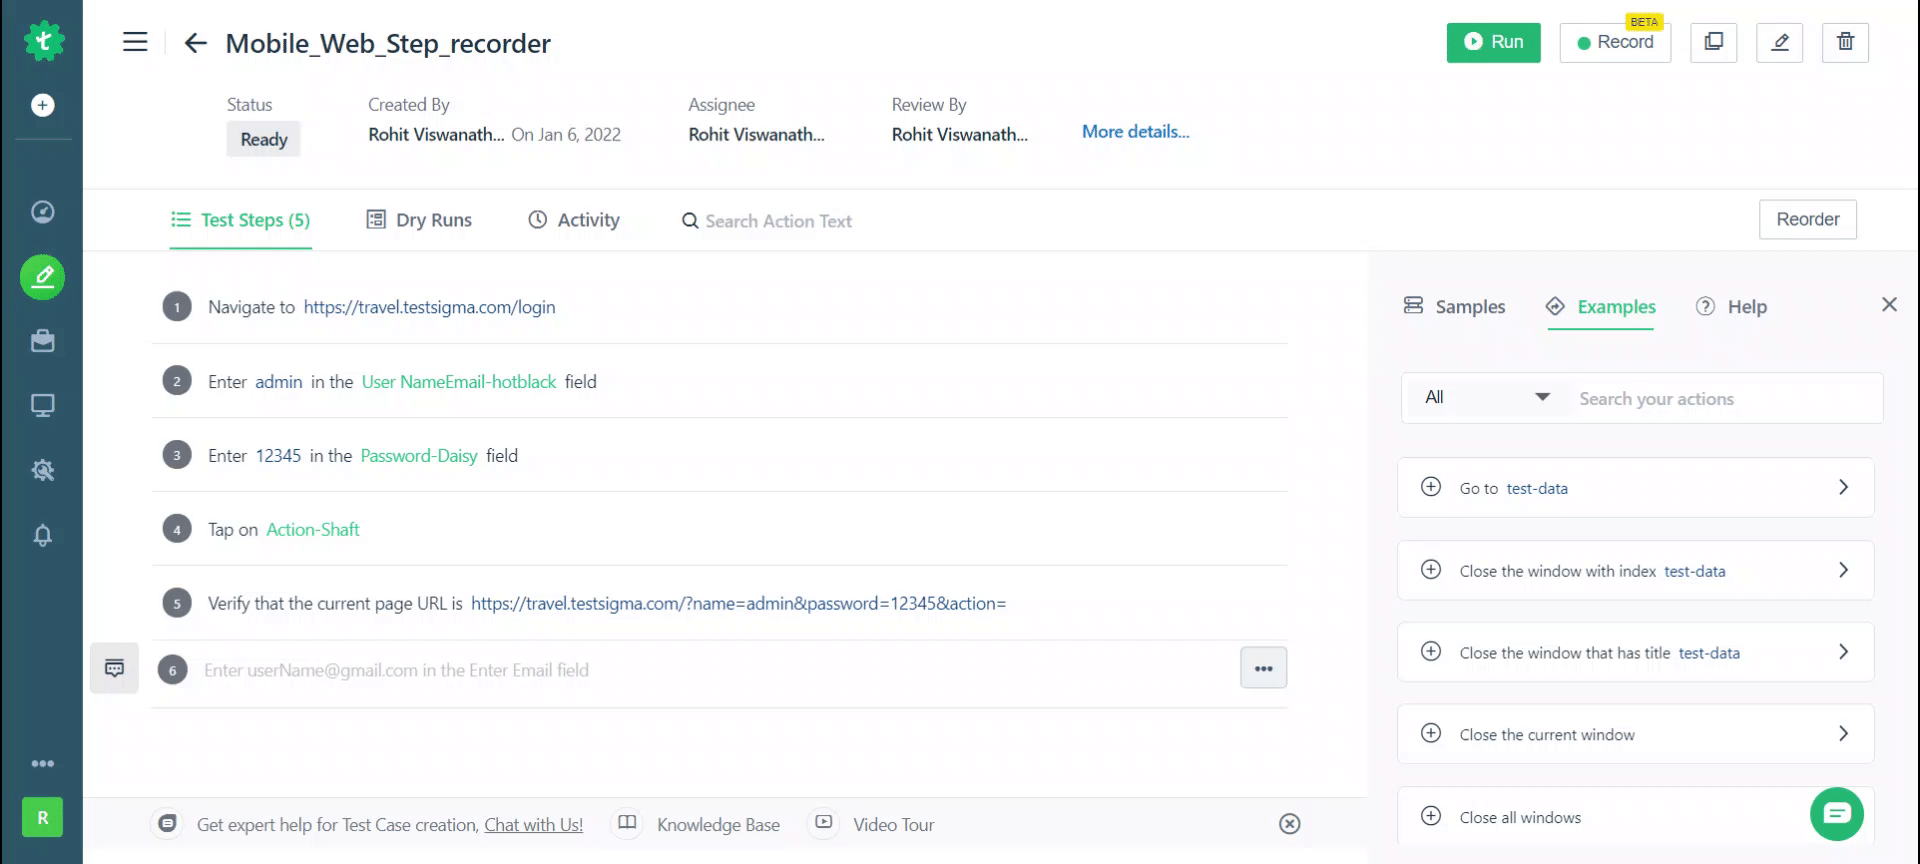
Repeat the above set of steps with the same action to enter a value into the password field of the login screen
Step 3: Tap on element
Finally we use the 'Tap on element’ statement to perform a tap action on login button in the application
Simply replace the element with the login button element tcaptured using the recorder or by creating it manually.

Step 4: Add a verify statement (assertion)
Add an assertion statement as your final steo as a way to check that the login action worked on the Simply Travel mobile_web application
This can be done by using the ‘Verify that current URL is test data’, where test data is replaced with URL https://travel.testsigma.com/?name=admin&password=12345&action=
Here’s a video that summarizes how to create test steps using simple English for a mobile-web application.
Running your test case
Once you’ve completed writing all your test steps, click on the Run button on the top right hand side of your screen.
From the window that opens up, select which device and version you’d like to run your test on and when you’re ready click on run.
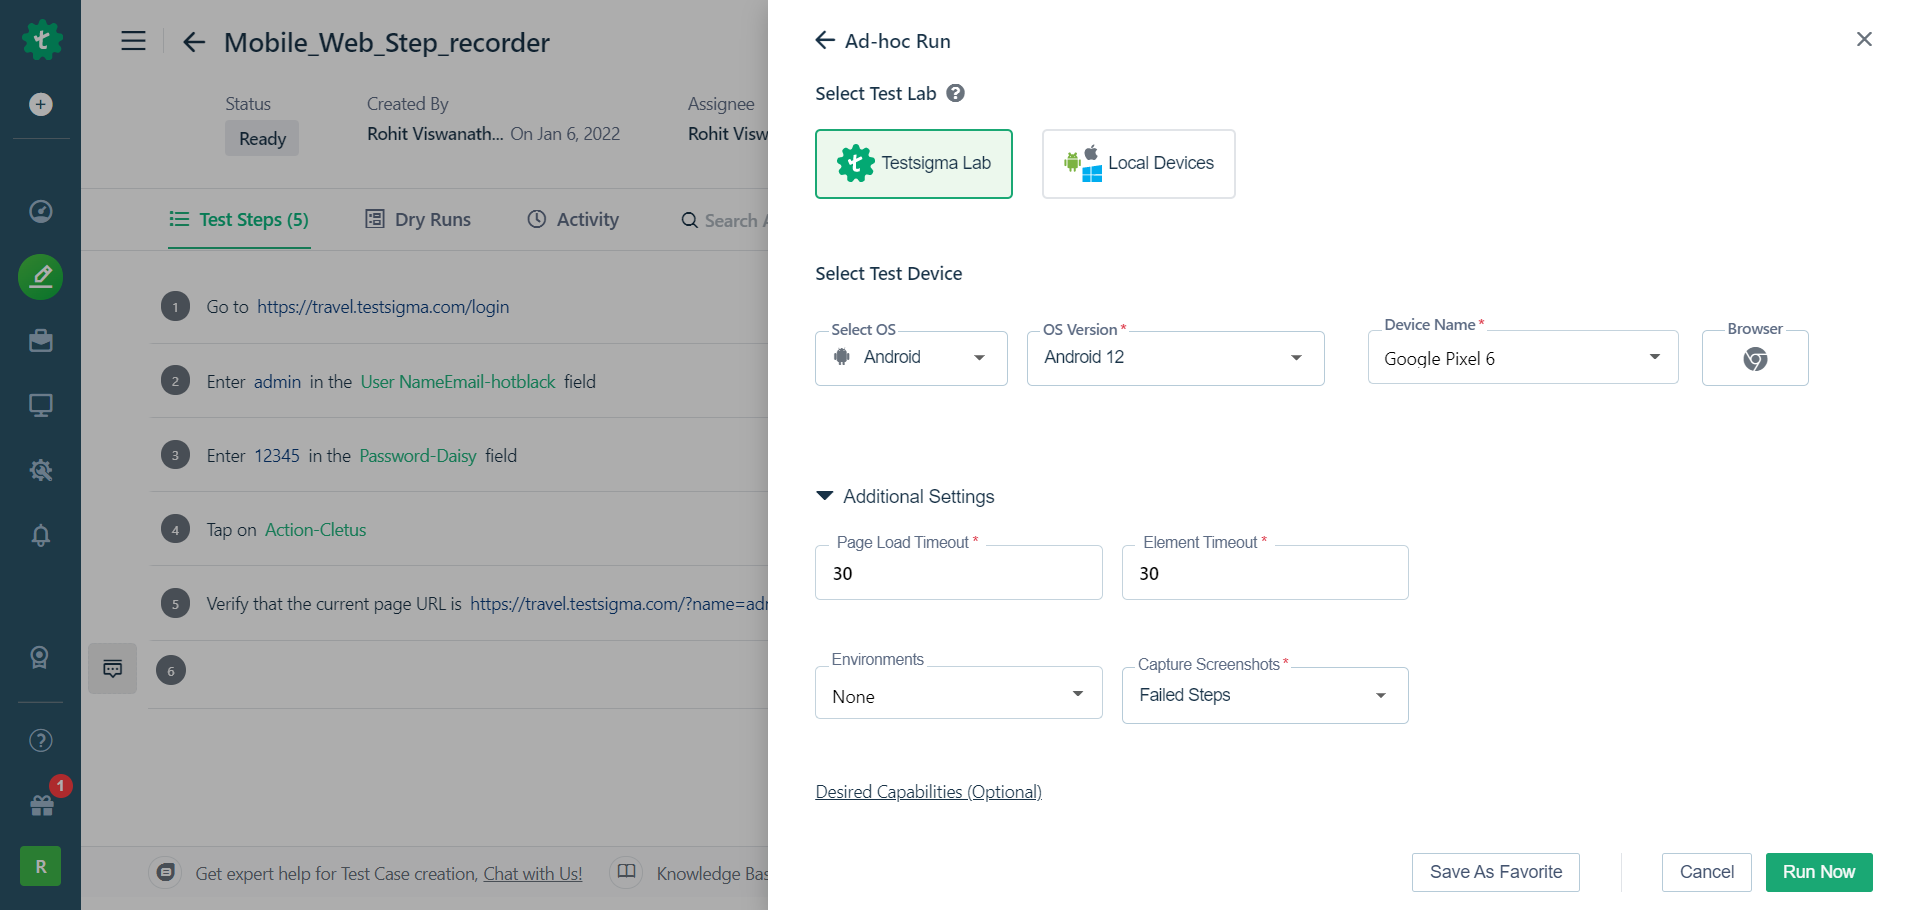
Here’s how you can execute your tests. Learn more about Ad-hoc run here.
Analyzing the results
After running the test case you’ll be able to view the results of your test run for each step by clicking on each of them.

You can also view screenshots of each test step execution as well as watch a video of the entire test run.
To check all your recent executions of the test select the dry runs tab.
To view detailed results of all your test cases you can navigate to: Test development -> Run Results where can use several filters to fetch detailed reports
Next Steps
- Practice in your account. If you don't have an account Try out!.
- Try all options in Test Recorder. Try it out!
- Create Test Plans and Schedule. Head over to this link!
- Try out more advanced capabilities. Check out our detailed documentation.
Reach out to us through in app chat for a walkthrough or if you have any questions!
JoinTestsigma’s Discord Server